1
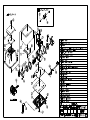
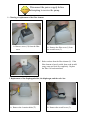
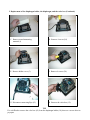
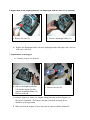
Service Manual
Type EL
Table of Contents
Cleaning or replacement of the filter element ………………………...Section 1
Replacement of the diaphragm holder and the valve box…………..…Section 2
Replacement of the Magnet……………..…………………………….Section 3
Reset of the Auto Stopper…………..…………………………………Section 4
Disconnect the power supply before
attempting to service the pump.
1. Cleaning or replacement of the filter element
A. Remove screw (31) from the filter
cover.
B. Remove the filter cover (1) from
the overall cover (3).
C. Shake out dust from the filter element (2). If the
filter element is heavily soiled, then wash in mild
soapy water and let it dry completely. Replace
the filter if it has deteriorated.
2. Replacement of the diaphragm holder, the diaphragm, and the valve box
A. Remove the 4 exterior bolts (27)
B. Remove the overall cover (3).
2. Replacement of the diaphragm holder, the diaphragm, and the valve box (Continued)
C. Remove sound attenuating
material (4).
D. Remove 4 screws (24)
E. Remove holder cover (5).
F. Remove 4 screws (28).
G. Disconnect connecting Pipe (13)
H. Remove the valve box (12).
TIP
If it is difficult to remove the valve box (12) from the diaphragm holder (10), then use a screw driver to
pry apart.
2. Replacement of the diaphragm holder, the diaphragm, and the valve box (Continued)
I. Remove hex nut (23).
J. Remove diaphragm holder (11).
K. Replace the diaphragm holder with new diaphragm holder and replace the valve box
with a new valve box.
3. Replacement of the magnet
A. Complete steps A-J in section 2
B. Remove the diaphragm holder
(10) and the magnet (9) after
opposite diaphragm holder (10)
has been removed.
C. Remove hex nut (29).
D. Replace magnet (9) with a new magnet making sure that the new magnet is in
the correct orientation. The bumper tabs that contain the autostop device
should be in the up position.
E. Make sure that the magnet (9) does not come in contact with the solenoid (7).
4. Resetting the Auto-stopper
A. Reassemble steps J-H in section 2
L1
B. Center the slider in the middle
position with a screwdriver.
L2
C. The autostop should be oriented
so L1=L2.
D. Reassemble pump by reversing steps J-A in section 2.
Warning!
Never touch live parts as electric shock will occur!