1
Standard Performance Evaluation Corporation (SPEC)
Chauffeur™ Worklet
Development Kit (WDK)
User Guide
1.1.0
7001 Heritage Village Plaza, Suite 225
Gainesville, VA 20155,
USA
SPECpower Committee
Chauffeur WDK - User Guide
Table of Contents
1.
Overview ..................................................................................................................... 3
1.1.
Summary ..............................................................................................................................3
1.2.
Using This Document ............................................................................................................3
1.3.
Configuration Requirements .................................................................................................4
1.4.
Chauffeur WDK Media Content .............................................................................................5
2.
Chauffeur Command Line Usage ................................................................................... 7
2.1.
Chauffeur Configuration and Start Procedure ........................................................................7
2.2.
Generate report files with the reporter scripts .................................................................... 10
3.
Power Analyzer Range Settings .................................................................................. 11
3.1.
4.
Automating Range Settings ................................................................................................. 11
Developing with the Chauffeur WDK .......................................................................... 12
4.1.
Developing with Eclipse ...................................................................................................... 12
4.2.
Debugging Chauffeur Worklets in Eclipse ............................................................................ 13
5.
Known Issues ............................................................................................................. 15
6.
Trademark ................................................................................................................. 16
7.
Copyright Notice ........................................................................................................ 16
SVN Revision:
995
SVN Date:
2015/05/05 18:21:47
20 Apr 2015
2 of 16
Copyright © 1988-2015 SPEC
Chauffeur WDK - User Guide
1. Overview
1.1. Summary
When SPEC developed SPECpower_ssj2008, the first industry-standard benchmark for measuring energy efficiency
of servers, they also created the SPEC Power and Performance Benchmark Methodology to describe best practices
for future benchmarks and tools developed to measure power and performance of computer systems. As SPEC set
out to create the Server Efficiency Rating Tool (SERT), they recognized that many of these best practices were
independent of the actual workload being measured.
The Chauffeur framework was designed to simplify the development of workloads for measuring both
performance and energy efficiency. Chauffeur contains functionality that is common to most workloads, enabling
developers to focus on the actual business logic of the application, and take advantage of Chauffeur’s capabilities
for configuration, execution, data collection, validation, and reporting.
Chauffeur was initially designed to meet the requirements of the SERT. SPEC recognized that the framework
would also be useful for research and development purposes and is now being made available as the Chauffeur
Worklet Development Kit (WDK). This kit can be used to develop new workloads, or “worklets” in Chauffeur
terminology. Researchers can also use the WDK to configure worklets to run in different ways in order to mimic
the behavior of different types of applications. These features can be used in the development and assessment of
new technologies such as power management capabilities.
1.2. Using This Document
This User Guide is intended for both novice and experienced Chauffeur users. It provides instructions for installing
the Chauffeur WDK and running initial tests with the sample worklets included in the kit. It also describes more
advanced configuration, along with basic information for creating new worklets.
For the most basic Chauffeur hardware measurement setup, one of each of the following is required:
System under Test (SUT): the actual system for which the measurements are being taken
Controller (e.g. a server, desktop PC, or laptop): the system to which the power analyzer, temperature
sensor, and SUT are connected
o
The Controller and SUT are connected to each other via an Ethernet connection.
o
The analyzer and temperature sensor are connected to the Controller via device specific means.
Power analyzer and temperature sensor [optional]:
o
A power analyzer is necessary for measuring energy usage during the test, and a temperature
sensor is needed for measuring the ambient temperature. These devices are not required for
running performance-only tests. It is also possible to use simulated “dummy” devices for testing
purposes.
o
The power analyzer is connected to the Controller and used to measure the power consumption
of the SUT, whilst the temperature sensor is also connected to the controller and used to
measure the ambient temperature in front of the SUT’s main airflow inlet.
o
Note: Before connecting the power analyzer and the temperature sensor to the Controller and
the SUT, please read the “Power and Temperature Measurement Setup Guide” in the Chauffeur
doc directory carefully! The latest version of this document can be found on the SPEC web site:
http://www.spec.org/power/docs/SPEC-Power_Measurement_Setup_Guide.pdf.
This practical guide explains how to set up and run various power analyzers and temperature
sensors with the SPEC PTDaemon. Additionally, it describes the configuration recommendations
for obtaining accurate data.
20 Apr 2015
3 of 16
Copyright © 1988-2015 SPEC
Chauffeur WDK - User Guide
o
Note: This release of the Chauffeur WDK is only able to measure the energy usage of servers
running on AC power. The Chauffeur WDK can run on DC powered servers, but DC power
measurement is not supported.
The Chauffeur WDK is composed of several elements including:
The test harness (called Chauffeur): handles the logistical side of measuring and recording power data
along with controlling the software installed on the SUT and controller system itself
The Director: instructs the SUT to execute the workload
The workload (a set of worklets, which are small, self-contained work items that may be run individually
or collectively): exercises the SUT while the test harness collects the power and temperature data. The
Chauffeur WDK includes a set of sample worklets, and allows for the development of new worklets.
The SPEC Power & Temperature Daemon (PTDaemon): connects to the power analyzer and temperature
sensor and gathers their readings while the workload executes
The Reporter: gathers the environmental, power, and performance data after a run is complete and
compiles it into an easy-to-read format.
All of these components are included in the Chauffeur WDK distribution.
The sample worklets included in the Chauffeur WDK are provided for demonstration purposes only, and are not
suitable for measuring the energy efficiency of systems.
1.3. Configuration Requirements
The hardware and software requirements for running the Chauffeur WDK depend on the worklets and
configuration. The following are recommended minimum requirements; it may be possible to run in smaller
environments for some configurations.
System Under Test (SUT) – one or more host systems, each with the following:
o Hardware requirements
One or more CPUs. The Chauffeur WDK has been tested on recent x86_64, POWER,
ARM, and SPARC processors. Other processors are likely to work as long as a
compatible Java Virtual Machine is available.
At least 4 GB of RAM
A minimum of 1 GB free storage space
At least one Network Interface Controller (NIC)
o Software requirements
A single operating system per host system. Most testing of the Chauffeur WDK has been
on Microsoft Windows Server 2008 R2 SP1, Windows Server 2012 R2, Red Hat
Enterprise Linux 6.5 (or higher), SLES 11 SP2 (or higher), AIX 7.1, and Solaris 11.
Limited testing has been performed using multiple guest operating systems under
control of a hypervisor; these configurations are likely to be functional, but interactions
among the guests may cause unexpected results.
A Java SE 6 (or higher) runtime environment. The Chauffeur WDK has been tested
primarily with Java SE 7 runtime environments from Oracle and IBM. Other
implementations are likely to work as long as they are fully compatible with the Java
specifications.
o In multi node test setups, it is recommended that all nodes have exactly the same hardware and
software components. Configurations with heterogeneous nodes may work, but have not been
extensively tested.
Controller
o Hardware requirements
A hardware configuration capable of running a supported OS and JVM combination.
20 Apr 2015
4 of 16
Copyright © 1988-2015 SPEC
Chauffeur WDK - User Guide
At least one Network Interface Controller (NIC)
If a power analyzer and temperature sensor is to be used, the controller system must
have external ports (such as RS232, USB, or GPIB) that are supported by PTDaemon for
these devices. See the PTDaemon Accepted Devices List for details:
http://www.spec.org/power/docs/SPECpower-Device_List.html
o Software requirements
Any operating system that supports the required Java runtime. If a power analyzer or
temperature sensor is to be used, PTDaemon requires x86 hardware running either
Microsoft Windows or Linux.
A Java SE 6 (or higher) runtime environment.
Vendor specific drivers supporting special power analyzer and/or temperature sensor
connectors, if required.
Power analyzer requirements (only required for measuring power consumption)
o At least one power analyzer from the list of accepted measurement devices
http://www.spec.org/power/docs/SPECpower-Device_List.html
o In order to ensure data is accurate, the power analyzer should have been calibrated within the
past year.
Temperature sensor requirements (only required for measuring temperature)
o At least one temperature sensor from the list of accepted measurement devices
http://www.spec.org/power/docs/SPECpower-Device_List.html
The SPEC PTDaemon includes support for additional devices that are not on the list of accepted devices. Use of
these devices is not recommended, as they have received limited testing and generally do not meet the accuracy
requirements set out by SPEC.
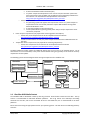
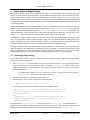
The following system overview diagram shows the logical components of a Chauffeur test:
Controller
Director
SPEC PTDaemon
Reporter
System Under Test
Network
SPEC PTDaemon
Memory
Workload
Workload
Worklet A
Storage
Worklet B
Temperature Sensor
Power Analyzer
Worklet C
PSU
PSU
CPU
CPU
1.4. Chauffeur WDK Media Content
The Chauffeur WDK is distributed in both zip and tar.gz formats. Both formats contain the same files. The zip
archive is recommended for Microsoft Windows platforms. The tar.gz archive uses UNIX-style line-ending
characters for text files, and has the executable bit set for executable files; this is recommended for all other
platforms.
Extract the archive using the appropriate tools for your operating system. This will result in the following directory
structure:
20 Apr 2015
5 of 16
Copyright © 1988-2015 SPEC
Chauffeur WDK - User Guide
└───ChauffeurWDK-1.x.y
│─── discovery
│─── doc
│
└─── apidoc
│─── lib
│─── PTDaemon
│─── redistributable_sources
└─── src
This document can be found in the “doc” directory, while the various script and batch files discussed in the
following section are present in the top-level ChauffeurWDK directory or the PTDaemon sub-directory.
The ChauffeurWDK files need to be extracted on the Controller system and each SUT.
20 Apr 2015
6 of 16
Copyright © 1988-2015 SPEC
Chauffeur WDK - User Guide
2. Chauffeur Command Line Usage
2.1. Chauffeur Configuration and Start Procedure
This section provides details to enable a successful test with a simple server configuration. Further sections provide
additional details of the configuration settings required to perform a successful test. Please note that in the
following instructions there are typically two script file options: *.bat for the Windows OS and *.sh for UNIX and
Linux OSes.
If power and/or temperature will be measured, configure the power analyzer and/or temperature sensor. By
default, the PTDaemon scripts are configured to use a “dummy” power analyzer and temperature sensor.
These dummy devices support the PTDaemon command interface but produce simulated data. These dummy
devices may be used if real devices are not available. To configure PTDaemon for actual devices, edit the
power analyzer PTDaemon (PTDaemon\runpower.bat or PTDaemon/runpower.sh) and temperature
sensor PTDaemon (PTDaemon\runtemp.bat or PTDaemon/runtemp.sh) script files on the controller
system (the system that the devices are physically connected to). Ensure the proper communication ports and
network ports are used.
o
For each additional power analyzer: Create a copy of runpower.bat or runpower.sh and
ensure that the proper communication ports and network ports are set as described in the respective
files.
If power and/or temperature will be measured, start an instance of PTDaemon for each power analyzer
(runpower.bat/runpower.sh) and temperature sensor (runtemp.bat/runtemp.sh). The scripts
should be started on the controller system.
If power or temperature will not be measured (with either real or dummy devices), edit the
listeners.xml file (in the ChauffeurWDK-1.x.y directory on the controller system). For each
PowerAnalyzerListener or TemperatureSensorListener in the file, set <listener enabled="false">.
Optional: Edit the config.xml file (in the ChauffeurWDK-1.x.y directory on the controller system). The
default file can be used without modification for a simple test run on most systems. The configuration can be
customized by adjusting interval lengths, the number of intervals, the set of worklets to be run, etc.
To change the configuration of the client JVMs, find the <client-configuration> / <clients>
section in config.xml. The number of clients (JVM instances) can be set using the <count> element. This
can be set to an absolute number (e.g. <count>4</count>) or the count can be a JavaScript expression
which will determine the client count at runtime based on the characteristics of the system. This expression
can make use of the variables:
logicalCores
physicalCores
numaNodes
physicalMemoryBytes
paramMap
(worklet parameters)
For example: <count>logicalCores / 2</count>
20 Apr 2015
7 of 16
Copyright © 1988-2015 SPEC
Chauffeur WDK - User Guide
The <option-set> section can be used to specify Java command-line parameters to be used when
launching the clients. For example, with HotSpot the following configuration would use the HotSpot Server
JVM:
<option-set>
<parameter>-server</parameter>
</option-set>
Note: heap parameters (-Xms and –Xmx) will be set automatically by Chauffeur, and should not be included
here. On Solaris, it may be necessary to use <parameter>-d64</parameter> to force the use of a 64bit JVM.
Optional: Edit the test-environment.xml file (in the ChauffeurWDK-1.x.y directory on the
controller system), describing the hardware and software details of the test setup. The default values in this
file need to be changed to match the real test environment.
o
For each additional power analyzer, add the following section to the test-environment.xml in
the <MeasurementDevices> section and change the default values to match the real test
environment.
<PowerAnalyzer>
<PTDaemonHostname>localhost</PTDaemonHostname>
<PTDaemonPort>8888</PTDaemonPort>
<HardwareVendor>_Energy Minder, Inc.</HardwareVendor>
<Model>_EM1000+ USB</Model>
<SerialNumber>_ser001122</SerialNumber>
<Connectivity>_USB2</Connectivity>
<InputConnection>_Default</InputConnection>
<CalibrationInstitute>_NIST</CalibrationInstitute>
<AccreditedBy>_IQ2 Calibration Laboratory</AccreditedBy>
<CalibrationLabel>_N-32768</CalibrationLabel>
<DateOfCalibration>2010-01-01</DateOfCalibration>
<SetupDescription>_Unknown</SetupDescription>
</PowerAnalyzer>
o
For multi-node environments: the node quantity needs to be set. An example for a 3
node environment:
<Node>
<Quantity>3</Quantity>
If the default port numbers in the PTDaemon script files have been changed, the listeners.xml file (in
the ChauffeurWDK-1.x.y directory on the controller system) must be changed accordingly. Also any
range settings for the power analyzer can be specified in the same section of the file.
o
For each additional power analyzer, add the following section to the listeners.xml and change
the default values to match the real test environment (Note: Do not forget to change the port #).
<listener enabled="true">
<type>PowerAnalyzerListener</type>
<classpath>
<path>lib/ptdaemonClientApi.jar</path>
</classpath>
<parameters>
<parameter name="hostname">localhost</parameter>
<parameter name="port">8888</parameter>
<parameter name="voltage-range">
<range-set>
<default-range>none</default-range>
</range-set>
20 Apr 2015
8 of 16
Copyright © 1988-2015 SPEC
Chauffeur WDK - User Guide
</parameter>
<parameter name="current-range">
<range-set>
<default-range>none</default-range>
<range level="87.5%">none</range>
<range level="75%">none</range>
<range level="62.5%">none</range>
<range level="50%">none</range>
<range level="37.5%">none</range>
<range level="25%">none</range>
<range level="12.5%">none</range>
</range-set>
</parameter>
</parameters>
</listener>
On the system under test, edit the Chauffeur host script file (host.bat/host.sh) for the appropriate
system configuration. For single runs, the KEEPALIVE variable can be cleared; for multiple consecutive runs,
it should remain at the default setting: -keepalive.
Check the following specifications for proper values matching the test system configuration:
JAVA = <for a non-default Java Virtual Machine (JVM), change the java command to
the pathname of the java command you want to run>
The host.sh/.bat script files both include the default definition:
JAVA=java
On the system under test, call the host.bat/.sh script file.
On the controller system, edit the director.bat/.sh script files. First, specify the host IP address of the
SUT by editing the following line:
HOSTS=_hostname_or_IP_of_Host_systems_
For multi-SUT environments, add each SUT hostname or IP address (separated by a comma) to the HOST
argument. Note: Do not use a space behind the comma(s). An example for 3 SUTS:
HOSTS=10.10.10.1,10.10.10.2,10.10.10.3
Also set JAVA as you did on the SUT in host.bat/.sh
On the controller system, call the director.bat/.sh script file to start the run.
The duration of the whole test sequence depends on the number of test cases defined above. The result files
for each Chauffeur WDK test run (results.html and results.xml) are stored in a separate
subdirectory within results, with a name beginning with chauffeur-nnnn e.g. chauffeur-0000.
20 Apr 2015
9 of 16
Copyright © 1988-2015 SPEC
Chauffeur WDK - User Guide
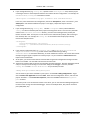
Controller
System under Test
runpower.bat/.sh
host.bat/.sh
SPEC PTDaemon
Host JVM
runtemp.bat/.sh
SPEC PTDaemon
director.bat/.sh config.xml
Client JVM 1
Director
JVM
Client JVM 2
:
Reporter
:
Reports
----------------------Reports
--------------------------------------------Reports
-----------------------
Client JVM N
---------------------------------------------------------------------------------------------------------------------------------------------------------------------------------------------------------------------------------------------------------------------------------------------------------------------
Figure 2: Chauffeur Startup Procedure
2.2. Generate report files with the reporter scripts
In some cases the user might want to create a new .html, .csv, or .txt report from a Chauffeur xml output file, for
example after editing user-modifiable fields (configuration information in the TestEnvironment section of
results.xml).
The reporter can be run on the controller system, or any other system where the Chauffeur WDK has been
installed. You may need to edit the reporter.bat/.sh script to set the JAVA environment variable, as you
did in the host and director scripts. The syntax of the reporter command is:
reporter.bat [options] {for Windows-based system}
reporter.sh [options] {for Linux/UNIX-based system}
Required option:
-r <filename>
A results.xml file from a Chauffeur run
Additional options:
-a
Generate all report formats (HTML, CSV, and Text)
default: generate only HTML output
-c
Generate CSV report files
-o <outfile>
Output file for generated report
default: match the filename of the raw file, with a .txt,
.csv, or .html extension (to match the report type). May
not be used with the -a option
-p
Direct XSL transform (must be used with -x)
default: generate a report from the transformed output
-s
Skip validation. Reports will automatically be marked invalid
-t
Plain ASCII text output
default: generate HTML output
-x <xslfile>
Use a non-default XSL file to generate the report
Example: reporter.bat –a –r results/chauffeur-0002/results.xml
20 Apr 2015
10 of 16
Copyright © 1988-2015 SPEC
Chauffeur WDK - User Guide
3. Power Analyzer Range Settings
Most power analyzers can be set to multiple current ranges. In order to achieve accurate results, the range
settings on the device must be set appropriately for the load being measured. Most devices also support an autoranging mode which will adjust the device automatically as the load changes; use of this mode is not
recommended for measurement because it takes time for the range to adjust (during which the measured data
may not be accurate), and because SPEC PTDaemon cannot determine the accuracy of the data while the device is
in auto-ranging mode.
The Chauffeur WDK allows you to configure separate ranges for each power analyzer and can adjust the ranges as
needed for each measurement interval. These settings appear in the listeners.xml file on the controller
system. Each PowerAnalyzerListener includes “voltage-range” and “current-range” parameters. The
default configuration includes multiple current range settings for different load levels, but all are set to the same
value: “none”. This indicates that no change should be made to the settings on the device.
To configure the ranges manually, replace each of these entries with a value appropriate for your system under
test. The range setting should generally be slightly higher than the maximum expected reading during that
interval. Each model of power analyzer will support a specific set of ranges; however, the configuration can use
any value, and SPEC PTDaemon will round the range settings up to the next supported range.
The range settings may need to be adjusted when making changes to the system under test, the worklets being
tested, or changes to the configuration of the operating system or Chauffeur. The validation performed at the end
of the run will determine if power measurement accuracy thresholds are not being met. If your result includes
warnings regarding the power analyzer uncertainty, adjusting the current ranges may resolve the issue.
3.1. Automating Range Settings
The Chauffeur WDK includes a process for automatically determining appropriate ranges for your configuration.
To perform range setting automation:
1.
Edit listeners.xml on the controller system and ensure that the analyzer is set to auto-ranging mode, or
make an approximation at the appropriate ranges. The default listeners.xml specifies "none" as the
range for each worklet. This tells Chauffeur not to change settings at runtime, so it will use the range the
device is already set to.
o
2.
3.
If multiple power analyzers are in use, make sure to create a listener section for each device in
listeners.xml. This process is described in section 2.1.
Perform a run using the same steps described in section 2.1.
At the end of the run, the name of the results file will be printed:
e.g. results/chauffeur-0000/results.xml
4.
Use this filename and run the following command on the controller system:
reporter.bat –s –p -r results/chauffeur-0000/results.xml -x
org/spec/chauffeur/reporter/resources/rangeSettings.xsl -o
rangeSettings.txt
-or./reporter.sh –s –p -r results/chauffeur-0000/results.xml -x
org/spec/chauffeur/reporter/resources/rangeSettings.xsl -o
rangeSettings.txt
This will generate a rangeSettings.txt in the same directory as results.xml. This file will contain an
XML listener specification for each power analyzer used in the range setting run. Open the file in a text editor and
follow the included instructions, which will be to copy some text from that file to the listeners.xml.
20 Apr 2015
11 of 16
Copyright © 1988-2015 SPEC
Chauffeur WDK - User Guide
4. Developing with the Chauffeur WDK
Source code for the Chauffeur WDK is provided mainly as an aid for understanding how to implement new
worklets or extend Chauffeur functionality. It may be helpful to import the Chauffeur source code into your
development environment while developing code based on Chauffeur. For certain types of extensions,
modifications to Chauffeur itself may be necessary. The Chauffeur code can be recompiled within your IDE. Ant
scripts are also provided.
4.1. Developing with Eclipse
The Chauffeur code should be straightforward to import into any Java development environment. As an example,
this section describes the steps for importing the code into Eclipse, using Eclipse 4.4.2 (Luna SR2). Some familiarity
with Eclipse is assumed.
1.
2.
3.
4.
5.
6.
Create a new Eclipse workspace. An existing workspace can also be used.
From the Java Perspective, select File > New > Project… and choose General > Project. Name the project
ChauffeurLibraries. Press Finish.
Right-click on the new ChauffeurLibraries project and choose Import… Select General > File System.
Browse for the directory ChauffeurWDK-1.x.y/src/Chauffeur/ChauffeurLibraries and
press OK. Check the box next to ChauffeurLibraries and press Finish.
Select File > New > Java Project. Name the new project PTDaemonClientApi. Select “Create
separate folders for source and class files”. Click “Configure default…”, change the Source folder name to
src/java, and press OK. Press Next. Click on “Create new source folder” and add the folder
src/test. Press Finish (to accept the new source folder), and then press Finish again (to finish creating
the new project).
Right-click on the newly-created project and choose Import… Select General > File System. Browse for
the directory ChauffeurWDK-1.x.y/src/pwrd/PTDaemonClientApi and press OK. Check the
box next to PTDaemonClientApi and press Finish.
Repeat the two previous steps to create and import additional Java projects as listed below. Note that it
is not necessary to re-configure the default source folder, but the src/test folder will have to be added
for each project:
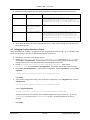
Project Name
Import Location
ChauffeurCommon
ChauffeurWDK-1.x.y/src/Chauffeur/ChauffeurCommon
Reporter
ChauffeurWDK-1.x.y/src/Chauffeur/Reporter
Chauffeur
ChauffeurWDK-1.x.y/src/Chauffeur/Chauffeur
ChauffeurTest
ChauffeurWDK-1.x.y/src/Chauffeur/ChauffeurTest
7.
Right-click on the Chauffeur project and select Properties. Choose Java Build Path. In the Projects
tab, press Add… and select the projects ChauffeurCommon, PTDaemonClientApi, and
Reporter, and press OK. In the Libraries tab, press Add JARs… and add
ChauffeurLibraries/junit/junit-x.y.jar and ChauffeurLibraries/xmlsecurity-x_y_z/xmlsec-x.y.z. Press OK to add the jars, then press OK again to exit the Java
Build Path dialog.
20 Apr 2015
12 of 16
Copyright © 1988-2015 SPEC
Chauffeur WDK - User Guide
8.
Repeat the previous step for the other projects listed below, adding the Projects and Libraries shown:
Project Name
Build Projects
Build Libraries
ChauffeurCommon
<none>
ChauffeurLibraries/junit/junit-x.y.jar
ChauffeurLibraries/saxonHE-w-x-y-zJ/saxon9he.jar
ChauffeurLibraries/slf4j-x.y.z/slf4j-api-x.y.z.jar
ChauffeurLibraries/slf4j-x.y.z/slf4j-jdk14-x.y.z.jar
ChauffeurTest
Chauffeur
ChauffeurCommon
Reporter
<none>
Reporter
ChauffeurCommon
ChauffeurLibraries/jfreechart/jcommon-x.y.z.jar
ChauffeurLibraries/jfreechart/jfreechart-x.y.z.jar
ChauffeurLibraries/saxonHE-w-x-y-zJ/saxon9he.jar
ChauffeurLibraries/slf4j-x.y.z/slf4j-api-x.y.z.jar
ChauffeurLibraries/slf4j-x.y.z/slf4j-jdk14-x.y.z.jar
9.
At this point, all of the code should compile without errors. There may be warnings for some classes, but
these can be ignored.
4.2. Debugging Chauffeur Worklets in Eclipse
When developing new worklets, it is helpful to be able to debug them within the IDE. To run Chauffeur inside
Eclipse you will need to create Run Configurations for Director and the host.
1.
2.
3.
4.
Start Eclipse, and switch to the Java perspective.
Expand Chauffeur/src/java/org.spec.chauffeur.host. Right-click on Host.java and
select Run As > Java Application. On some platforms, a warning message may be generated regarding
missing helper libraries. Press the stop button (red square in the Console view).
Expand Chauffeur/src/java/org.spec.chauffeur.director. Right-click on
Director.java and select Run As > Java Application. The Director will fail with a usage message.
Choose Run > Run Configurations… Select the Host configuration. On the Arguments tab, enter the VM
arguments:
-Djava.library.path=${resource_loc:/Chauffeur/lib}
5.
Press Apply.
Still in the Run Configurations dialog, select the Director configuration. On the Arguments tab, enter the
VM arguments:
-Djava.library.path=${resource_loc:/Chauffeur/lib}
and the Program arguments:
-hosts localhost ${resource_loc:/ChauffeurTest/config.xml}
The second parameter is the location of the Chauffeur configuration file you want to run – in this case,
config.xml is a resource in the ChauffeurTest project. An absolute pathname can also be
selected.
Press Apply.
20 Apr 2015
13 of 16
Copyright © 1988-2015 SPEC
Chauffeur WDK - User Guide
6.
If your configuration file (e.g. config.xml) specifies a suite <description> class, add the project
containing that class to the classpath for both the Host and the Director configurations. For example, the
ChauffeurTest/config.xml listed above includes:
<description className="org.spec.chauffeur.test.ChauffeurTest"/>
In this case, select the Director Run Configuration, choose the Classpath tab, select “User Entries”, press
Add Projects… and add the ChauffeurTest project. Press Apply. Repeat this step for the Host
configuration.
7.
If your configuration file (e.g. config.xml) includes <classpath> entries, add an additional
<entry> to reference the build path of the project containing these classes. This new entry should be
relative to the Chauffeur/Chauffeur directory, since this is the working directory used by the
Director and Host JVMs. This way the run can use the current classes built by Eclipse, without having to
first rebuild jar files. For example, the config.xml in the ChauffeurTest sample project already
includes the classpath entries:
<classpath>
<entry>chauffeurTest.jar</entry>
<entry>../../Chauffeur/ChauffeurTest/build/classes</entry>
</classpath>
If your listener configuration file (e.g. listeners.xml) uses a PowerAnalyzerListener or
TemperatureSensorListener, you will need to either disable them (by adding
enabled=”false” to the listener definition), or launch PTDaemon instances. This can be done outside
of Eclipse using the regular runpower and runtemp scripts. Or you can define an External Tool within
Eclipse to launch PTDaemon.
9. At this point, you can launch the Director and Host JVMs using the Run Configurations dialog or the Run
button in the toolbar. The two JVMs can be started in either order.
10. The Director and Host JVMs can also be launched with the Eclipse debugger. But when debugging worklet
code, it is usually more interesting to run the Client JVM(s) in the debugger. To do this, edit the
config.xml. Find the <launch-definition> for your worklet, and add:
8.
<debug-base-port>8000</debug-base-port>
You can select any port that is available on your system. Choose Run > Debug Configurations… Rightclick on Remote Java Application and choose New. Name the new configuration “Client”, and enter the
project “Chauffeur”. In the Connection Properties, ensure that the Port matches the debug-baseport set above.
Now when you do a run and the Host launches a new client, you can start the Client Debug Configuration
to attach to the running client with the debugger. If there are multiple clients, they will use successive
ports (8001, 8002, etc).
20 Apr 2015
14 of 16
Copyright © 1988-2015 SPEC
Chauffeur WDK - User Guide
5. Known Issues
None at this time. See the SERT Chauffeur WDK web page for information about any issues identified after
release.
20 Apr 2015
15 of 16
Copyright © 1988-2015 SPEC
Chauffeur WDK - User Guide
6. Trademark
SPEC, the SPEC logo, and the name SPECpower_ssj are registered trademarks of the Standard Performance
Evaluation Corporation (SPEC). Chauffeur WDK, SPEC PTDaemon, and SERT are trademarks of SPEC. Additional
product and service names mentioned herein may be the trademarks of their respective owners.
7. Copyright Notice
Copyright © 1988-2015 Standard Performance Evaluation Corporation (SPEC). All rights reserved.
20 Apr 2015
16 of 16
Copyright © 1988-2015 SPEC