1
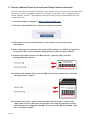
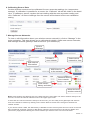
Monnit Wireless Sensors
and USB Gateway
User’s Guide
For Use With iMonnit Online Software
Before You Plug In Your MonnitLink™
USB Gateway
• Unpackthecontentsofyourkit(s)andbecome
familiarwiththetypesofsensorsthatwere
includedanddoublecheckthatallcomponents
areincluded.
• BeforeinsertingtheUSBdongle,youwillneed
tocreateaMonnitaccount,assigngateways
andwirelesssensorstoyouraccount,then
installtheUSBdriverandgatewaysoftware.
.
System Requirements
•AnAvailableUSBPort
•WindowsVistaorNewerWith
512MBMemory(1024MBRec.)
•20MBFreeDiskSpace.
•ASP.NET3.5
1. Create a Monnit User Account and Setup Sensor Network
IfthisisyourfirsttimeusingtheiMonnitonlinesystemsite,youwillneedtocreateanew
account.Ifyouhavealreadycreatedanaccountyoucanskiptothe“Loggingintothe
OnlineSystem”section.Thefollowinginstructionswillguideyouthroughtheaccount
creationprocess.
1. In a web browser, navigate to https://www.imonnit.com.
2. Click the “Get Started Here” button to create an account.
3. Follow the on-screen instructions to enter your account and contact
information.
4. After entering your account and contact information, you will be prompted to
create your first sensor network. Simply enter a name for this network.
5. Add the information from your MonnitLink™ gateway then click the
“Assign Gateway” button.
ID: ZTL-RFUSB1
IC: 9794A-RFUSB1
ID: #### Code: XXXXXX
Pe
Back of
+
_
el
6a. Add the information from your first Monnit wireless sensor then click the
“Assign Sensor” button.
Sensor
Contains: FCC ID: ZTL-RFSC1
IC: 9794A-RFSC1
Sensor ID: ######
Sensor Code: XXXXXX
6b. On the next screen, enter a name for the wireless sensor and use the
drop down to tell us how you are going to be using the wireless sensor.
(This allows us to suggest settings for your sensor.) When finished, click
the “Continue” button.
PAGE2
7. Setup sensor notification(s).
Thenextscreenwillallowyoutosetupnotificationsforthesensorthatwasjust
addedtothenetwork.Youhavetheoptionofusingpre-configurednotificationsbased
onsuggestionsfromoursystem,oryoucancreateyourowncustomnotification.
Ifyouchoosetocreateyourownnotification,itwillbeavailableforanysimilarsensors
thatareaddedtoyouraccountinthefuture.
Or,createyour
owncustom
notificationhere.
Selectany
pre-configured
notificationsyou
wanttousewith
yoursensor.
Custom notifications
Tocreateacustomnotification,clickonthe“Createyourown”button.Setyour
customnotificationsettingsandclick“Save”.
Setnotification
settings.
Thenclick“save”.
PAGE3
8. Assign any additional sensors.
Whenyouhavefinishedsettingupthesensor,youwillseeaconfirmationscreen.At
thispointyoucanassignadditionalsensorstoyournetworkorbeginusingthesystem
byclicking“Done”.
2. Install the Monnit USB Gateway Software
1. MonnitLink™ USB Driver Installation
Whenyouareloggedintoyouraccount,youcandownloadthelatestUSBdriversby
clickingon“Support”fromthemainnavigationbar(https://www.imonnit.com/support).
Fromthedownloadspage,clickontheMonnitUSB Gateway Driver forthecorrectversionofWindowsthatyouarerunning(32or64bit).Thedriverfileshouldautomatically
startdownloading.Ifpromptedtosavethefile,selectalocationthatiseasilyaccessible
andclick“Save”.
Whenthefilehascompleteddownloading,browsetothefolderwherethefilewas
saved.Doubleclickthesetupfileandselect“Run”.Select“Next”thenfollowthe
on-screenguidetoinstallthedrivers.
Whenthesetuphasfinished,theprogramwillautomaticallydeterminewhichdriversto
installforyoursystemandanotherguidewilllaunchtowalkyouthroughtheinstallation
ofthedrivers.Click“Next”toinstallthedrivers.Whenthedriversaredoneinstallingyou
willseeasuccessscreen.Click“Finish”toexittheinstallationprogram.
2. Monnit Gateway Application Installation
TheMonnitGatewayApplicationusesyourcomputersinternetconnectiontopass
wirelesssensordatatotheiMonnitonlinesensormonitoringandnotificationsystem.
(Theonlinesystemallowsyoutoviewallyoursensordata,sensorstatus’andconfigure
allsensorparametersaswellassetupnotificationsoralertsviaSMStextandemail.)
Toinstallthesoftware,click“Support”onthemainnavigationbarorgoto
https://www.imonnit.com/support.Fromthedownloadspage,clickon“USBGateway
Installer”tolaunchthewebinstallerdownload.Ifpromptedtosavethefile,selecta
locationthatiseasilyaccessibleandclick“Save”.
Whenthefilehascompleteddownloading,browsetothefolderwherethefilewas
saved.Doubleclickthe“MonnitGatewaySetup.msi”file,select“Run”whenprompted
thenfollowtheon-screeninstructionstocompletetheinstallation.
Wheninstallationiscompletetheprogramwillautomaticallylaunch.Youcannowbegin
usingyourwirelesssensorsonline.
Note: Thegatewayapplicationneedstoberunningonyourcomputerinorderforthesensordata
tobetransmittedtotheonlinesystem.Ifthegatewayisnotrunningyoursensordataisnotbeing
recordedonlineandnotificationsbasedonsensordatacannotbesentfromthesystem.
PAGE4
3. Using Your Monnit Wireless Sensors
1. Start the Gateway Software:
DoubleclickontheiMonnitGatewayprogramicononyourdesktoporselectthe
programfromtheWindows“StartMenu”underAllPrograms>Monnit.
Note:SensordatawillonlybetransmittedtotheOnlineSensorMonitoringSystemwhenthe
gatewaysoftwareisrunning.
2. Insert Your USB Wireless Gateway
WiththeiMonnitGatewayapplicationrunning,insert
theUSBGatewayintoyourcomputer.Thenetwork
statusinthesoftwareshouldchangeto“NetworkActive”
whentheUSBgatewayispluggedin.
Note:Ifthestatusdoesnotchange,tryunpluggingandre-insertingtheUSBgateway.
3. Insert Batteries Into Wireless Sensors
Important: Make sure your sensors are at least 3ft. away from USB Gateway.
Peelbacktheblackstickercoverofthebatteryslotandslidethecoincellbatteryinto
thesensorasshowninfig.1.Itwillpoweronwithin10-20seconds.Onceonline,your
sensorisreadytobedeployed.Ifyouwishtochangeasensorconfiguration,change
theparameterinthesoftware.Thenewparameterswillbetransmittedtothesensor
onthenextheartbeat.Ifyouneedamoreimmediateresponsefromthesensor,power
cyclethesensorbyremoving,thenre-insertingthebattery.
Notes:
- If the sensor status indicator does not change, reset
the sensor by removing the battery.
- Wait 60 seconds then re-insert the battery.
- When inserting the battery, make sure to push the
battery all the way back using a paper clip.
- Note the proper orientation of battery in fig.1
Battery
Insertion
fig.1
+
_
Warning: Your sensors ship with a 10 minute heartbeat.
It is recommended that unless you are using the AA battery
solution, you should set the heartbeat to no faster than one hour to preserve battery life. When
changing a sensor’s heartbeat, the new configuration information will be sent to the sensor on it’s
next heartbeat. If you want to update the sensors immediately you can reset them manually.
Manual Sensor Reset Process:
1 - Using the end of a paper clip, push the batteries out of the sensors through the small hole
in the top of the sensor
2 - Change the sensor heartbeat through the online system
3 - Re-insert the batteries into the sensors
PAGE5
4. Using The iMonnit™ Online Wireless Sensor System
1. Understanding The Online Interface
Whenyoulogintotheonlinesystem,thedefaultviewshowsallofyoursensorslast
recordeddata.
MenuSystem
View/SortFeatures
DateRangeSelector
SensorsOverview
SensorDetailsView
Menu System
Overview
Notifications
Manage
Reports Sensor Maps Support -Showsallsensorsintheaccountandtheirlastreadings.
-Managesensornotificationsandshowallsentnotifications.
-Managenetworks,sensorsandgateways.
-Printableaccountandsensornetworkreports.
-Visualmapstohelpyoutracksensorplacement.
-Supportinformationforusingsensorsandsoftware.
View / Sort Features
Thissectionallowsyoutosortthesensorsbeingviewedandsearchforsensorson
youraccount.
Sensor Overview
Displayssensorsonyouraccountwiththeirlastreadingandstatusinformation.
Clickingonasensorrowexpandsthe“SensorDetailView”allowingyoutoview
detailedinformationfortheselectedsensor.
PAGE6
Totheleftsideofeachsensorrowisanindicatortohelpyouunderstandthecurrent
statusofthesensor.
Sensorischeckinginandwithinuserdefinedsafeparameters.
Sensorhasmetorexceededauserdefinedthresholdortriggeredevent.
Sensorhasnotcheckedin(inactivityalertsent).
Nosensorreadingssinceshipping
Nosensorreadingswillberecorded(Inactive)
Edityoursensor
Edityoursensor,howeversomefieldsareunavailableuntilpending
transactionshavebeendownloadedtothesensor
Sensor Details View
Clickingonasensorrowonthe“Overview”pageexpandstherowtoincludeadetailed
sensorviewfortheselectedsensor.
Selectatabtochangebetween:
Chart
Notifications
History Export
Edit
Calibrate
-Displaysagraphicalviewoftheselectedsensor’sdata.
-Allowsyoutomanagenotificationsforthesensor.
-Displaysahistoryoftheselectedsensor’sdata.
-Allowsyoutoarchivedatabyexportingasa.csvfile.
-Allowsyoutomanagesensorsettings.
-Availableoncertainsensortypestoprovidemoreaccuratedata.
Note:Thedatashownonthechart,notification,historyandexporttabsisbasedonthedate
rangeindicatedontheupperrightsideofthesensordetailinformation.Tochangethedate
range,clickinsidethedatebox.
2. Chart and History Views.
Clickingonthe“Chart”or“History”tabswithinthesensordetailpanelallowsyoutoview
thesensor’sdatahistoryinagraphicalchartformatorastext.
PAGE7
Note:Tochangethedaterangeoftheviewableinformation,clickonthedaterangeboxatthetop
rightofthesensordetailpanel.
3. Configuring Sensor Settings
Toeditasensorsoperationsettings,clickonthesensoroverviewrowtodisplaythe
detailsview.Clickonthe“Edit”tabtoaccessthesensorconfigurationpanel.
Thesensoreditpanelallowsyoutosettheprimaryconfigurationsforthesensor.
Mousingoverthequestionmarkiconbyeachsettingwillprovideanexplanationofthat
setting.Whenyouhavefinishedmakingchanges,pressthe“Save”buttonatthe
bottomofthissection.
Note:Besuretoclickthe“Save”buttonanytimeyoumakeachangetoanyofthesensorparameters.
All changes made to the sensor settings will be downloaded to the sensor on the next sensor
heartbeat (check-in). Once a change has been made and “Saved,” you will not be able to edit that
sensor’s configurations again until the sensor has downloaded the new setting.
PAGE8
4. Editing and Adding Notifications
Notificationsforasinglesensorcanbecreated,deletedoreditedbyclickingthe
“Notifications”tabinasensor’sdetailview.
Notificationscanbecreated,deletedoreditedforanysensororgroupofsensorsby
clickingon“Notifications”inthemainmenu.
The Notification List Window
CreateaNew
Notification
ClicktoEnable/
Disablea
Notification
EditNotification
View/Edit/Delete
Notification
Tocreateanewnotification,clickon“Createnewnotification”,thennamethe
notificationandselectthetypeofnotificationyouwouldliketocreate.
Class of Notification
Therearefournotificationoptionsavailablewhencreatinganewnotification.
• Application - Applicationnotificationsaresensorspecific(i.e.watersensor=trigger
alertwhenwaterpresent,tempsensor=triggeralertwhentempisabove70°F,etc.).
Ifcreatinganapplicationspecificnotification,youwillneedtochoosewhatsensor
typeyouarecreatingthealertfor.Thesystemwillautomaticallypopulatealistof
sensortypesthatarecurrentlybeingusedwithinthenetwork.Thenotificatiionyou
createwillbebasedontheselectedsensortype.
• Inactivity - Set-up“Inactivity”notificationstoalertyouwhenyoursensorshave
stoppedcommunicatingwiththeservers.Failuretosetupan“Inactivity”notification
willresultinnoemail/SMStxtbeingsentshouldyoursensorsstopcommunicating
withtheservers.
• Low battery -Allowsuserstodefineabatterypowerpercentagelevelthatwilltrigger
analertfromthesystem,warningthemtoreplacebatteries.
• Advanced Notifications - Allowstheusertosetnotificationsbasedonmoreadvancedrules,suchascomparingpastdatapointswiththecurrentonetodetermineif
thenotificationshouldbesent.
PAGE9
Setting and Editing Notification Settings
People to Notify
Starttypinganameintotheboxandthesystemwillautomaticallypopulatethe
nameofauserwithinyoursensornetwork.Iftherearealreadymultipleuserson
thenetwork,adropdownlistofnameswillappear.Selectthenameoftheuser
forthenotification.Ifthepersontobenotifieddoesnothaveanaccountonthe
network,youmayquickaddthembyselectingthe“AddRecipient”linkandentering
intheircontactinformation.
Notification Parameters
Thisareaallowstheusertosetnotificationparameterssuchasnamingthe
notification,customizingthenotificationmessageandsettingsensorconditionsthat
willtriggerthenotification.
Assigned Devices
Allowsyoutotellthesystemwhichsensor(s)willtriggerthenotificationbeing
created.Whenanotificationsissentfromthesystem,itwillautomaticallyinclude
thesensornameanddatathatcausedthenotificationtobesent.
Anotificationcanbeassignedtomultiplesensors.Applicationspecificnotifications
(ex.Temperature)canonlybeassignedtosensorsofthatapplicationtype.General
notificationssuchas“batterystatus”,canbeassignedtoanyorallsensors.
5. Exporting Sensor Data
Clicking onthe“Export”tabwithinthesensordatawindowallowsyoutoexportsensordata
toacommaseparatedvalue(.csv)fileorsendthesensordatatoanexternalwebsource.
Toexportsensordatayoumustfirstselectthedaterangeforthedatayouwanttoexport.
Oncethedaterangeisselected,determinewhetheryouwantsensordatafromthe
selectedsensoronly,fromallsensorsinthenetworkorallsensorsassignedtotheaccount.
Whenyouarefinished,clickon“ExportData”atthebottomofthiswindow.Thedatawillbe
exportedtoacommaseparatedvalue(.csv)fileformat.
Note:Onlythefirst2,500recordswithintheselecteddaterangewillbeexported.
Youcanalternatelysendyoursensors’incomingdatatoa3rdpartybyclickingonthe
“Configuredatapush”buttonatthebottomofthewindow.Fromthisareayoucanpass
datafromyourwirelesssensornetworkdevicestoanotherserviceinrealtime.Thisisdone
bycodingthedataintoaurlquerythensendingthedataviahttpgetrequestatthetime
dataisreceived.Thereisanextensivelistofparametersthatcanbepassed,aslistedin
theviewedwindow,thatallowyoutosenddetailedinformationaboutboththedataandthe
sensor.
PAGE10
6. Calibrating Sensor Data
Certainwirelesssensorscanbecalibratedformoreaccuratereadings(ex.temperature
sensors).Ifcalibrationispossibleforasensor,the“Calibrate”tabwillbevisibleinthedetail
view.Tocalibrateasensor,replacethelastreadingwiththemoreaccuratereadingand
click“Calibrate”.Allfuturereadingsfromthesensorwillbebasedoffthenewcalibration
setting.
7. Manage Sensor Networks
Tovieworeditinformationaboutyourwirelesssensornetwork(s),clickon“Manage”inthe
mainnavigation.Thisareaallowsyoutoeditnetworkdetails,createnewsensornetworks,
andmanagewirelessgatewaysandsensorsforyournetwork(s).
Clickto
Manage
Createa
newnetwork
Selectwhich
networktoview
Editnetwork
information
Addadevice
tothenetwork
Removedevice
fromnetwork
Clearsensor
historyanddata
Movedeviceto
PAGE11
anothernetwork
Note:Somebuttonsandfeaturesareonlyvisibleifthereismorethanonesensornetworksetuponthe
account,suchasthenetworkselectionboxintheupperrightcorner.
Ifmorethanonesensornetworkissetupontheaccount,youcaneasilymovegatewaysandsensors
fromonenetworktoanotherbyclickingonthe“MoveDevice”buttonatthefarrightofthedevice’s
“Status”section.
Ifyouclearasensor’sdata,thedatahistoryisdeletedfromtheentiresystemandcannotberecovered.
Werecommendexportingasensor’sdatahistoryusingtheexportfunctioninthesensordetailsview
(“Overview”page)beforeclearingthesensor’sdataifyouwanttohavearecordofthedata.
PAGE11
Error Reporting,Troubleshooting and Support
Fortechnicalsupportandtroubleshootingtipspleasevisitoursupport
libraryonlineathttp://www.monnit.com/support/.Ifyouareunableto
solveyourissueusingouronlinesupport,emailMonnitsupportat
[email protected]
oftheproblem,andasupportrepresentativewillcallyouwithinone
businessday.
Forerrorreporting,pleaseemailafulldescriptionoftheerrorto
[email protected].
Warranty Information
(a)MonnitwarrantsthatMonnit-brandedproductswillbefreefromdefectsinmaterialsand
workmanshipforaperiodofone(1)yearfromthedateofdeliverywithrespecttohardware
andwillmateriallyconformtotheirpublishedspecificationsforaperiodofone(1)year
withrespecttosoftware.Monnitmayresellsensorsmanufacturedbyotherentitiesandare
subjecttotheirindividualwarranties;Monnitwillnotenhanceorextendthosewarranties.
Monnitdoesnotwarrantthatthesoftwareoranyportionthereofiserrorfree.Monnitwill
havenowarrantyobligationwithrespecttoProductssubjectedtoabuse,misuse,negligenceoraccident.IfanysoftwareorfirmwareincorporatedinanyProductfailstoconform
tothewarrantysetforthinthisSection,Monnitshallprovideabugfixorsoftwarepatch
correctingsuchnon-conformancewithinareasonableperiodafterMonnitreceivesfrom
Customer(i)noticeofsuchnon-conformance,and(ii)sufficientinformationregardingsuch
non-conformancesoastopermitMonnittocreatesuchbugfixorsoftwarepatch.Ifany
hardwarecomponentofanyProductfailstoconformtothewarrantyinthisSection,Monnit
shall,atitsoption,refundthepurchasepricelessanydiscounts,orrepairorreplacenonconformingProductswithconformingProductsorProductshavingsubstantiallyidentical
form,fit,andfunctionanddelivertherepairedorreplacementProducttoacarrierforland
shipmenttocustomerwithinareasonableperiodafterMonnitreceivesfromCustomer(i)
noticeofsuchnon-conformance,and(ii)thenon-conformingProductprovided;however,
if,initsopinion,Monnitcannotrepairorreplaceoncommerciallyreasonabletermsitmay
choosetorefundthepurchaseprice.Repairpartsandreplacementproductsmaybe
reconditionedornew.AllreplacementproductsandpartsbecomethepropertyofMonnit.
Repairedorreplacementproductsshallbesubjecttothewarranty,ifanyremains,originally
applicabletotheproductrepairedorreplaced.CustomermustobtainfromMonnitaReturn
MaterialAuthorizationNumber(RMA)priortoreturninganyProductstoMonnit.Products
returnedunderthisWarrantymustbeunmodified.
CustomermayreturnallProductsforrepairorreplacementduetodefectsinoriginalmaterialsandworkmanshipifMonnitisnotifiedwithinninety(90)daysofcustomer’sreceiptof
theproduct.Monnitreservestherighttorepairorreplaceproductsatitsownandcomplete
discretion.CustomermustobtainfromMonnitaReturnMaterialAuthorizationNumber
(RMA)priortoreturninganyproductstoMonnit.ProductsreturnedunderthisWarranty
mustbeunmodifiedandinoriginalpackaging.Monnitreservestherighttorefusewarranty
repairsorreplacementsforanyproductsthataredamagedornotinoriginalform.For
productsoutsidetheninety-daywarrantyperiodrepairservicesareavailableatMonnitat
standardlaborratesforaperiodofoneyearfromtheCustomer’soriginaldateofreceipt.
PAGE12
(b)AsaconditiontoMonnit’sobligationsundertheimmediatelyprecedingparagraphs,
CustomershallreturnProductstobeexaminedandreplacedtoMonnit’sfacilities,in
shippingcartonswhichclearlydisplayavalidRMAnumberprovidedbyMonnit.Customer
acknowledgesthatreplacementproductsmayberepaired,refurbishedortestedandfound
tobecomplying.Customershallbeartheriskoflossforsuchreturnshipmentandshall
bearallshippingcosts.MonnitshalldeliverreplacementsforProductsdeterminedbyMonnittobeproperlyreturned,shallbeartheriskoflossandsuchcostsofshipmentofrepaired
productsorreplacements,andshallcreditCustomer’sreasonablecostsofshippingsuch
returnedProductsagainstfuturepurchases.
(c)Monnit’ssoleobligationunderthewarrantydescribedorsetforthhereshallbetorepair
orreplacenon-conformingproductsassetforthintheimmediatelyprecedingparagraph,or
torefundthedocumentedpurchasepricefornon-conformingProductstoCustomer.Monnit’swarrantyobligationsshallrunsolelytoCustomer,andMonnitshallhavenoobligation
tocustomersofCustomerorotherusersoftheProducts.
LimitationofWarrantyandRemedies.
THE WARRANTYSETFORTHHEREINISTHEONLYWARRANTYAPPLICABLETO
PRODUCTSPURCHASEDBYCUSTOMER.ALLOTHERWARRANTIES,EXPRESS
OR IMPLIED,INCLUDINGBUTNOTLIMITEDTOTHEIMPLIEDWARRANTIESOF
MERCHANTABILITYANDFITNESSFORAPARTICULARPURPOSEAREEXPRESSLY
DISCLAIMED.MONNIT’SLIABIITYWHETHERINCONTRACT,INTORT,UNDERANY
WARRANTY,INNEGLIGENCEOROTHERWISESHALLNOTEXCEEDTHEPURCHASE
PRICEPAIDBYCUSTOMERFORTHEPRODUCT.UNDERNOCIRCUMSTANCES
SHALLMONNITBELIABLEFORSPECIAL,INDIRECTORCONSEQUENTIALDAMAGES.THEPRICESTATEDFORTHEPRODUCTSISACONSIDERATIONINLIMITING
MONNIT’SLIABILITY.NOACTION,REGARDLESSOFFORM,ARISINGOUTOFTHIS
AGREEMENTMAYBEBROUGHTBYCUSTOMERMORETHANONEYEARAFTER
THE CAUSEOFACTIONHASACCRUED.
IN ADDITIONTOTHEWARRANTIESDISCLAIMEDABOVE,MONNITSPECIFICALLY
DISCLAIMSANYANDALLLIABILITYANDWARRANTIES,IMPLIEDOREXPRESSED,
FORUSESREQUIRINGFAIL-SAFEPERFORMANCEINWHICHFAILUREOFAPRODUCTCOULDLEADTODEATH,SERIOUSPERSONALINJURY,ORSEVEREPHYSICAL
OR ENVIRONMENTALDAMAGESUCHAS,BUTNOTLIMITEDTO,LIFESUPPORTOR
MEDICALDEVICESORNUCLEARAPPLICATIONS.PRODUCTSARENOTDESIGNED
FORANDSHOULDNOTBEUSEDINANYOFTHESEAPPLICATIONS.
PAGE13
Certifications
United States FCC
This equipment has been tested and found to comply with the limits for a Class B digital
devices, pursuant to Part 15 of the FCC Rules. These limits are designed to provide
reasonable protection against harmful interference in a residential installation. This
equipment generates, uses, and can radiate radio frequency energy and, if not installed
and used in accordance with the instruction manual, may cause harmful interference to
radio communications. However, there is no guarantee that interference will not occur in
a particular installation. If this equipment does cause harmful interference to radio or
television reception, which can be determined by turning the equipment off and on, the
user is encouraged to try to correct the interference by one of more of the following
measures:
• Reorient or relocate the receiving antenna
• Increase the separation between the equipment and receiver
• Connect the equipment into an outlet on a circuit different from that to which
the receiver is connected.
• Consult the dealer or an experienced radio/TV technician for help.
Warning: Changes or modifications not expressly approved by Monnit could void
the user’s authority to operate the equipment.
RF Exposure
WARNING:TosatisfyFCCRFexposurerequirementsformobile
transmittingdevices,theantennausedforthistransmittermustnotbe
co-locatedinconjunctionwithanyotherantennaortransmitter.
Monnit Wireless Sensor Contains: FCC ID: ZTL-RFSC1
This device has been designed to operate with an approved antenna listed below, and
having a maximum gain of 5.1 dBi. Antennas not included in this list or having a gain
greater than 5.1 dBi are strictly prohibited for use with this device. The required antenna
impedance is 50 ohms.
To reduce potential radio interference to other users, the antenna type and its gain should
be so chosen that the equivalent isotropically radiated power (EIRP) is not more than that
required for successful communication.
Approved Antennas
ThefollowingantennasareapprovedforusewithMonnitdevices.
• Hyperlink HG905RD-RSP (5.1 dBi Rubber Duck)
• Pulse W1063 (3.0 dBi Rubber Duck)
• ChangHong GSM-09 (2.0 dBi Rubber Duck)
• Specialized Manufacturing MC-ANT-20/4.0C (4” whip)
Monnit Wireless USB Gateway Contains: FCC ID: ZTL-RFUSB1
This device has been designed to operate with the attached non-removable antenna.
PAGE14
Canada (IC)
English
Under Industry Canada regulations, this radio transmitter may only operate using an
antenna of a type and maximum (or lesser) gain approved for the transmitter by Industry
Canada. To reduce potential radio interference to other users, the antenna type and its gain
should be so chosen that the equivalent isotropically radiated power (e.i.r.p.) is not more
than that necessary for successful communication.
The radio transmitter (IC: 9794A-RFSC1 and IC: 9794A-RFUSB1) has been approved by
Industry Canada to operate with the antenna types listed below with the maximum permissible gain and required antenna impedance for each antenna type indicated. Antenna types
not included in this list, having a gain greater than the maximum gain indicated for that type,
are strictly prohibited for use with this device.
This device complies with Industry Canada licence-exempt RSS standard(s). Operation is
subject to the following two conditions: (1) this device may not cause interference, and (2)
this device must accept any interference, including interference that may cause undesired
operation of the device.
French
Conformément à la réglementation d’Industrie Canada, le présent émetteur radio peut
fonctionner avec une antenne d’un type et d’un gain maximal (ou inférieur) approuvé pour
l’émetteur par Industrie Canada. Dans le but de réduire les risques de brouillage radioélectrique à l’intention des autres utilisateurs, il faut choisir le type d’antenne et son gain de
sorte que la puissance isotrope rayonnée équivalente (p.i.r.e.) ne dépasse pas l’intensité
nécessaire à l’établissement d’une communication satisfaisante.
Le présent émetteur radio (IC: 9794A-RFSC1 et IC: 9794A-RFUSB1) a été approuvé par
Industrie Canada pour fonctionner avec les types d’antenne énumérés ci-dessous et ayant
un gain admissible maximal et l’impédance requise pour chaque type d’antenne. Les types
d’antenne non inclus dans cette liste, ou dont le gain est supérieur au gain maximal indiqué, sont strictement interdits pour l’exploitation de l’émetteur.
Le présent appareil est conforme aux CNR d’Industrie Canada applicables aux appareils
radio exempts de licence. L’exploitation est autorisée aux deux conditions suivantes : (1)
l’appareil ne doit pas produire de brouillage, et (2) l’utilisateur de l’appareil doit accepter
tout brouillage radioélectrique subi, méme si le brouillage est susceptible d’en compromettre le fonctionnement.
Industry
Canada
PAGE15
Additional Information and Support
Foradditionalinformationormoredetailedinstructionsonhowtouseyour
MonnitWirelessSensorsortheiMonnitOnlineSystem,pleasevisitusonthe
webathttp://www.monnit.com/support/.
MonnitCorporation
7304SouthCottonwood
Suite#204
Midvale,Utah84047
801-561-5555
www.monnit.com
AlltrademarksarepropertyofMonnit.©2009-2014MonnitCorp.AllRightsReserved.
MUG-21-1B(04/14)