1
BCS
GUI
User Guide
Ver 5.0.1
June 2015
Contents
Summary
1.0
2.0
3.0
4.0
5.0
Introduction
6
1.1
1.2
About BCS
Work environment
6
7
1.3
1.4
How to get started
Disaster Recovery Invocation
7
9
1.5
1.6
Clearing calendar
Login
9
11
1.7
Change Password
12
Application layout
13
2.1
2.2
Main Menu
Windows layout
13
18
2.3
Saving and closing windows
22
Archives
23
3.1
3.2
Markets
Classes
23
24
3.3
3.4
Tradable Series
Participants
26
27
3.5
3.6
Non-Clearing Members
SubAccounts
28
29
3.7
Automatic Give-up
36
Positions
43
4.1
Position list
43
4.2
4.3
Rectifications
Transfers
50
51
4.4
Sub Account Changes
56
Trades
58
User Guide
June 2015
6.0
7.0
8.0
9.0
5.1
5.2
Trade list
Transfers
59
69
5.3
5.4
Splits
Open Close Changes
73
74
5.5
Client Code Changes
75
Exercise / Assignments
77
6.1
Early Exercise (By Positions)
77
6.2
Early Exercise (By Series)
80
6.3
Expiry Exercise (Exercise by Exception) (By Positions)
81
6.4
Expiry Exercise (Exercise by Exception) (By Series)
84
6.5
6.6
Exercise Request History
Assignments
87
90
Risk Management
7.1
Trade Limit
93
7.2
7.3
Position Limit
Margin Limit
95
97
7.4
What If
99
Guarantees
Collateral Guarantees
101
8.2
Deposited guarantees
102
Report
Report
Tools
10.1 Monitor
10.2 Intraday Margin Call
11.0
101
8.1
9.1
10.0
92
Appendix A – Regular Expressions
104
104
107
107
108
110
User Guide
June 2015
User Guide
June 2015
1.0 Introduction
This section introduces the BCS GUI application main features and provides with basic
information aimed at its correct use.
1.1 About BCS
BCS for IDEM is a GUI application allowing a clearing member to execute clearing operations
on IDEM Derivatives markets traded financial products.
The application allows to:
• Receive trades executed by members in real time and their own non-clearing members in
the current trade date and in the last trading days
• Perform transfer, split, open/close and client code change operations
• View the history of a specified trade
• Receive positions in real time and perform rectify, transfers, subaccount change and
exercise operations
• Manage exercise and assignments operations
• Manage expiry operations
• Access a set of Post Trade Risk Management functionalities on Positions, Trades and
Margins
• Manage subaccounts
• Download clearing reference data
• Receive intraday margin calls and messages from the clearing system
• View deposited guarantees
• Receive and save settlement reports provided by the clearing system
6
User Guide
June 2015
1.2 Work environment
BCS is based on a client-server architecture: the server layer is located at one of the IDEM
server farms and connected to the Clearing system and markets through their network access
points. On the other hand, the client layer should be installed on the clearing members’ work
environment.
BCS GUI is the comprehensive solution for all IDEM clearing functionalities. The electronic
platform supporting the client application is structured to make its access independent from the
technical frame features of central systems.
1.3 How to get started
In order to access to the clearing services through BCS, the user needs a login name, a
password and a Member Code. These data have to be requested to Borsa Italiana.
BCS GUI can be downloaded from the Borsa Italiana website (www.borsaitaliana.it) and
installed on one or more members’ PCs. The BCS GUI needs Java Virtual Machine V.1.6 or
higher. A compatible version of the JVM will be installed during the setup process of the BCS
GUI.
The client can be used to reach production (PDC/SDC) or test environment (CDS). By default
the Client will point to the production environment. The user can select the desired environment
at the startup in the login window.
Before starting the application, is warmly suggested to the user to uninstall any previous version
of the BCS GUI and to test the connectivity from the local desk to the BCS application servers.
This involves the following steps:
• close the BCS GUI if running;
• verify with the customer network department if a natted IP address is used to reach the
BCS application servers instead of the real addresses
If the real IP address is used:
• go into the BCS GUI installation directory (usually C:\Program Files\Borsa Italiana\BCS
Client XXX\) and locate the GKApi_J_Version.xml” file in the “etc\Server” directory.
• verify that the file contains the real IP addresses of the BCS application servers; the IP
address should be specified in the “TCP_IP” tag of each application server
7
User Guide
June 2015
<SERVER name="BCSPRODUCTIONSERVER">
<TCP_IP>Insert here</TCP_IP>
<TCP_PORT>34900</TCP_PORT>
<KEEPALIVE_TIMEOUT>20</KEEPALIVE_TIMEOUT>
<TRANSPORT_BUFFER>1024</TRANSPORT_BUFFER>
<APPLICATION_WINDOW_SIZE>20000</APPLICATION_WINDOW_SIZE>
<TRACE_LEVEL>ERR</TRACE_LEVEL>
<TRANSACTION_BUFFER_SIZE>2000</TRANSACTION_BUFFER_SIZE>
<SUBSCRIPTION_BUFFER_SIZE>2000</SUBSCRIPTION_BUFFER_SIZE>
<INQUIRE_BUFFER_SIZE>2000</INQUIRE_BUFFER_SIZE>
<TCP_BUFFER_SIZE>10240</TCP_BUFFER_SIZE>
</SERVER>
• telnet the BCS application server IP addresses and ports from the user local PC;
• if the telnet does not work, please verify with the customer network department if the telnet
attempt is filtered by any internal firewall;
If a natted IP address is used:
• go into the BCS GUI installation directory (usually C:\Program Files\Borsa Italiana\BCS
Client XXX\) and locate the GKApi_J_Version.xml” file in the “etc\Server” directory;
• change the file replacing the real IP addresses with the natted ones; the ip address should
be specified in the “TCP_IP” tag of each application server
<SERVER name="BCSPRODUCTIONSERVER">
8
User Guide
June 2015
<TCP_IP>Insert here</TCP_IP>
<TCP_PORT>34900</TCP_PORT>
<KEEPALIVE_TIMEOUT>20</KEEPALIVE_TIMEOUT>
<TRANSPORT_BUFFER>1024</TRANSPORT_BUFFER>
<APPLICATION_WINDOW_SIZE>20000</APPLICATION_WINDOW_SIZE>
<TRACE_LEVEL>ERR</TRACE_LEVEL>
<TRANSACTION_BUFFER_SIZE>2000</TRANSACTION_BUFFER_SIZE>
<SUBSCRIPTION_BUFFER_SIZE>2000</SUBSCRIPTION_BUFFER_SIZE>
<INQUIRE_BUFFER_SIZE>2000</INQUIRE_BUFFER_SIZE>
<TCP_BUFFER_SIZE>10240</TCP_BUFFER_SIZE>
</SERVER>
• save the file
• telnet the natted IP addresses and ports from the user local PC;
• if the telnet does not work, please verify with the customer network department if the telnet
attempt is filtered by any internal firewall;
Please notice: the user is not allowed to put chars ';' and '=’ in free fields; otherwise an error
message will be shown on the GUI.
1.4 Disaster Recovery Invocation
In case of Disaster Recovery invocation, in order to correctly reach the SDC application servers,
the user should restart the BCS GUI and select “SDC” in the environment field of the login
window.
1.5 Clearing calendar
The CommonApplication.config configuration file, in the \etc\client directory, allows the user to
define bank holidays rules for the current year.
9
User Guide
June 2015
An example of the holiday configuration file is shown hereafter:
HOLIDAYS=*SUNDAY;*SATURDAY;01/01;$EASTER;$EASTER+1;$EASTER-1;$EASTER2;01/05;15/08;$CHRISTMAS;$CHRISTMAS+1;$CHRISTMAS-1;31/12
Where:
• “ ; “ = Field separator character
• *SUNDAY = every Sunday of the year
• *SATURDAY = every Saturday of the year
• $EASTER = Easter date
• $CHRISTMAS = Christmas date
• $EASTER +/- n° = Easter + or – specific number of days
• $CHRISTMAS +/- n° = Christmas + or – specific number of days
• dd/mm = specific date of the year
10
User Guide
June 2015
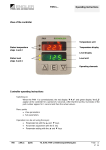
1.6 Login
In order to access the BCS clearing system, the login procedure should be correctly
completed by the user. Username, Password and Member Code should be specified in the
corresponding fields of the login window. The user should specify the environment he
would like to login before clicking the Login button.
PDC: Production environment
CDS: Test environment
At the first login the password change is required.
11
User Guide
June 2015
1.7 Change Password
It’s possible to change the password clicking on Change Password in the File menu. The
following window will be shown.
The following steps should be performed:
1.
2.
3.
Insert the current password in the Password field;
Insert the new password in the New Password and in the Retype new
password fields;
Press the OK button to confirm.
A confirmation message will be shown informing that the transaction has been correctly
sent.
12
User Guide
June 2015
2.0 Application layout
This section will go thorough the BCS GUI layout, including the description of the work
environment and the basic functions for the data management.
2.1 Main Menu
After the user has been authenticated, the BCS Main Menu will be shown on the screen. The
Windows bar on the upper side of the Main Menu shows the username and the environment the
user is connected to. The Main Menu is made up of two sections: Menu Bar and Active
Windows Bar.
Menu Bar
The Menu Bar contains the following menus and commands:
File
Menu
Description
Login
Shows the login prompt
Settings
Allows to access the main settings of the BCS application
Save Environment
Saves the windows configuration
Change Password
Changes the current password
Exit
Performs the logout
13
User Guide
June 2015
Archives
Menu
Description
Markets
List of the available markets
Classes
List of the classes
Tradable Series
List of the tradable series
Participants
Clearing members list
Non-Clearing members
List of own non-clearing members (for GCM only)
Sub Accounts
Configuration/management of secondary accounts for every
clearing member
Automatic Give-up
Configuration/management of client codes for automatic give-up
functionality
Positions
Menu
Description
Positions
Allows to manage positions registered in the clearing system. It
is possible to see the list of open positions and access the
functions of Rectification, Transfer, Subaccount Change and
Early Exercise. It’s also possible to add positions to Custom
Portfolios for Risk Management activities
Trades
Menu
Description
Trades
Allows to manage executed trades registered in the clearing
system. It is possible to see the list of trades, the history of a
single trade and access the functions of International Give-Up,
Trade Transfer, Split, Open/Close Change and Client Code
Change.
14
User Guide
June 2015
Exercise/Assignments
Menu
Description
Early Exercise
Allows to access the function of Early Exercise Request.
Expiry Exercise (Exercise By
Exception)
Allows to access the function of Exercise By Exception (Ex By
Ex) and see the list of exercises at expiry proposed by the
clearing system.
Exercise Request History
List of Early Exercise Requests and Expiry Exercises (Exercise By
Exception) Requests sent to the clearing system by the clearing
member (and its NCM’s).
Assignments
List of Assignments received by the clearing system for the clearing
member (and its NCM’s).
Risk Management
Menu
Description
Trades Limit
Allows to manage the list of trade limits of the clearing member
(and its NCM’s) and it shows the alarms list.
Positions Limit
Allows to manage the list of position limits of the clearing member
(and its NCM’s) and shows the limit values of the current business
day.
Margin Limits
This function will be soon available. Allows to manage the list of
portfolios of the clearing member (and its NCM’s) and shows the
margin limit values for the current business day.
What If
This function will be soon available. Allows to calculate in advance
the margin amount that the clearing system will ask to the member
in case of a change on a the current open positions.
Guarantees
Menu
Description
Collateral guarantees
List of Collateral guarantees
Deposited guarantees
List of Deposited guarantees
15
User Guide
June 2015
Report
Menu
Description
Report
List of available clearing reports
Tools
Menu
Description
Monitor
Shows the main activities of the clearing member (and its NCM’s)
in real time
Intraday Margin Calls
Intraday margins requested by CC&G
The menu bar also contains two status lights:
1. BCS Server Connection Status
It shows the connection status of the BCS GUI to the BCS application servers
(green/red);
16
User Guide
June 2015
2. BCS Server Components Status
It shows the status of the BCS server components (green/red).
•
If the Reports component is not available (red), clearing reports file could not be
downloaded; any update about the reports availability will not be sent to the
user. Any other clearing function will be available;
•
If the CC&G component is partially unavailable (yellow), it will not be possible to
submit transactions to the clearing system; historical data could not be
downloaded; the trade history function will not be available;
If the CC&G component is totally unavailable (red), it will not be possible to
submit transactions to the clearing system; real time updates will not be
available; historical data could not be downloaded; the trade history function will
not be available; clearing reports will be available;
•
If the Risk Management component is not available (red), it will not be possible
to receive alarms and margin values updates and it will not be possible to
change the limit and portfolios definition. Any other clearing function will be
available;
•
If the Real Time component is not available, it will be possible to send submit
transactions to the clearing system, anyway data shown in the GUI may not be
updated;
Active Windows Bar
This bar shows a button for every active window of the GUI. Clicking on a button will open the
corresponding window.
17
User Guide
June 2015
2.2 Windows layout
This section describes the layout of the BCS windows and the basic functions which can
be executed in order to manage, sort, filter and export data.
Toolbar
The main windows of the BCS GUI have a toolbar on the top which contains a basic set of
functions.
The Filter button allows to enable a set of background filters on the displayed data. Where
allowed, regular expressions can be used (See Appendix A: Regular Expressions).
The Select All button allows to select all the rows of the table.
18
User Guide
June 2015
The Save button allows to export the content of the table into a Microsoft Excel file or to an
ASCII/PDF file.
The Customize button allows to select which columns to show in the table and in which
order. It’s possible to select which columns have to be shown in the fixed part of the table
moving them over the red slider.
The Autofit button allows to automatically resize the columns width in order to fully show the
data contained in the cells of the table.
19
User Guide
June 2015
The Foreground button allows to select the foreground color of the rows of the table
The Background button allows to select the foreground color of the rows of the table
The Font button allows to select the font of the data displayed in the table
The Print button allows to print the data of the table. Only data shown on the screen is
printed: hidden columns, if any, or filtered data will not be printed.
The Print Preview button allows to have a preview of the data before it will be printed
Business Date Bar
A Business Date Bar is present in the windows of the BCS GUI where previous days data are
available. By default, the current business day is selected. In order to download data from a
specific business date, the user should click on the “+” button next to the current business day
tab and select the date of interest (up to T+5). A new tab will be shown in the bar, allowing to
download data of the selected business date and to access the other clearing functionalities. It’s
possible to switch between any active tab of the Business Date Bar in any time. Any tab will be
automatically updated in case of a change on the displayed data, even if the tab is active in
background.
20
User Guide
June 2015
Table functions
It’s possible to access a basic set of functions for the data management right clicking on the
table header of every BCS window.
The Sort By Ascending button allows to sort the data of the column in ascending order.
The Sort By Descending button allows to sort the data of the column in descending order.
The Remove All Sorts button allows to remove any sort previously defined on any column of
the table.
The Quick Filter button allows to filter the rows of the table basing on a value of the selected
column.
21
User Guide
June 2015
The Remove All Quick Filters button allows to remove any filter previously defined on any
column of the table.
The Remove Current Quick Filter button allows to remove a filter previously defined on the
selected column of the table.
The Columns button allows to access a submenu with the following functions: Hide Column,
Customize, Autofit Column and Autofit All.
The Colors button allows to access a submenu with the following functions: Background and
Foreground
The Font button allows to select the font of the data displayed in the table
The Select button allows to select all the rows of the table basing on a value of the selected
column
The Export to Excel button allows to export the content of the table into a Microsoft Excel
file.
The Print button allows to print the data of the table. Only data shown on the screen is
printed: hidden columns, if any, or filtered data will not be printed.
The Print Preview button allows to have a preview of the data before it will be printed
2.3 Saving and closing windows
The Save Environment function, in the File menu of the Main Menu, allows to save the windows
current configuration (i.e. filters, characters, colors, sort criteria, etc…).
The configuration is saved before closing and exiting the BCS client.
22
User Guide
June 2015
3.0 Archives
This menu allows users to access clearing reference data like available markets, product
classes, tradable series and clearing members. It allows also to manage sub accounts and
automatic give-up codes.
3.1 Markets
The Markets window shows the information concerning the markets to which the member
belongs to.
23
User Guide
June 2015
Table columns description:
Id
Market identification code
Acronym
Market identification name
Alpha code
Market alphanumeric code
Description
Market description
3.2 Classes
The Classes window shows the list of the classes of the markets to which the member
belongs to. A class is a group of derivatives instruments, options or futures, with the same
underlying.
Table columns description:
Symbol
Class Name
Product
Type
Product type (B = bond, C = equity and fund quotes, F=future, O= option, R =
repo, V= convertible, W = warrant)
24
User Guide
June 2015
Product
Group
Underlying Symbol
Description
Class Description
Market
Trading market
ISIN Code
ISIN code of the underlying
Underlying
Underlying
Margin
interval
Maximum upward/downward expected deviation of the underlying price
Settlement
Type
Settlement type of a financial contract (ST = settled, CSH = cash settled, FUT =
future style)
Contract
size
Number of shares underlying a standard contract
Option
Underlying
type
Financial instrument type (Bond, Equity, Index)
Option
Style
Option style (American, European)
SubType
Instrument type (N=Normal, W=Weekly, M=Monthly, Q=Quarterly, Y=Yearly)
Settlement
days
Number of days between trade and settlement date
25
User Guide
June 2015
3.3 Tradable Series
The Tradable Series window shows the list of the standard tradable instruments for the current
date. Only the tradable series of the markets to which the member belongs to are shown.
Table columns description:
Symbol
Class Symbol
Product
type
Product type (B = bond, C = equity and fund quotes, F= future, O = option, R =
repo, V = convertible, W = warrant)
Strike price
Strike Price
Put/Call
Option type (Put/Call)
Market
Trading market
ISIN Code
Instrument ISIN code
Series
Name of the series
26
User Guide
June 2015
name
Expiry Day
Expiry date
Last
Trading
Day
Last Trading Date
Closing
Price
Daily settlement price (closing price)
Last Day
Price
Last day settlement price
Closing
Price Date
Closing price reference date
Underlying
Price
Underlying product reference price
Open
interest
Open Long/short positions amount
Volatility
Volatility calculated by the clearing system
3.4 Participants
The Participants window shows the members’ list for each market. Only members of the
markets to which the member belongs to are shown.
27
User Guide
June 2015
Table columns description:
ABI Code
Clearing Member Identification Code for the Clearing system
CED Code
Market assigned numeric code
Description
Member name
Mnemonic
Alphanumeric code
Participant
Code
Member clearing code
Market
Trading Market
Type
Member type (Individual Clearing member, Non-Clearing member, General Clearing
member)
3.5 Non-Clearing Members
The Non-Clearing Members window shows, for each available market, the list of the NonClearing Members and segregated accounts (ISA and AOA) of the Clearing Member.
Table columns description:
ABI Code
Clearing Member Identification Code for the Clearing
system
CED Code
Market assigned numeric code
Description
Participant name
Mnemonic
Alphanumeric code
Participant Code
Participant clearing code
Market
Trading Market
28
User Guide
June 2015
Type
Member type (Non-Clearing member, General Clearing member)
3.6 SubAccounts
The Subaccounts window allows to show and manage the list of subaccounts of the member
and its NCMs.
SubAccount List
This window lists all the subaccounts of the Clearing Member. For General Clearing
Members, also Non-Clearing Members subaccounts are shown. New subaccounts are
automatically shown as soon as they are managed by the clearing system, without having
to manually refresh the window. At the same way, any update on a subaccount is
automatically shown.
29
User Guide
June 2015
Table columns description:
Market
Trading Market
ABI Code
Member ABI Code
Account Type
Account type (House/Client)
SubAccount
SubAccount name
Activation date
Sub account activation date
Disabling date
Sub account deactivation date
Creation date
Sub account creation date
Modify date
Sub account modification date
Market maker flag
Flag Market maker
Liquidity provider flag
Flag Liquidity provider
Keep net position flag
Flag Keep net position
Net Margin Flag
Net Margin flag
Sub account status
Sub account status
Each subaccount can be modified or disabled.
30
User Guide
June 2015
Add New Subaccount. This function allows to create a new subaccount.
The user is required to specify the new sub account details in the dialog window.
The following fields have to be selected: Market, Member Code, Account Type (House/Client),
Sub Account name (only upper-case characters and numbers are allowed), Activation Date,
Keep Net Position and Net Margin.
Modify: In order to modify an existing subaccount, the user has to right click on a specified
subaccount in the SubAccount List window and select Modify. Only some parameters can be
changed: Keep net position, Net margin, Activation date and Inactivation date.
31
User Guide
June 2015
Client Code Links
This window lists all the subaccounts / client code links of the member. For General
Clearing Members, also Non-Clearing Members data are shown. New subaccount / client
code links are automatically shown as soon as they are managed by the clearing system,
without having to manually refresh the window. At the same way, any update on a
subaccount / client code link is automatically shown
A subaccount / client code link is an association between a subaccount and a specific client
code. The member can specify a client code previously associated to a subaccount in a client
code change operation on a trade, in order to transfer the trade to the related subaccount.
32
User Guide
June 2015
Table columns description:
Market
Trading Market
ABI Code
Member ABI Code
Client code
Client Code
Account type
Account type (House/Client)
Sub account
Sub account
Creation date
Sub account / client code link
creation date
Modify date
Sub account / client code link
modification date
Client Code link status
Sub account / client code link status
Add Client Code Link: This function allows to create a new subaccount-client code link. The
user should select the SubAccount value from the Sub Account field, the Account Type field will
be populated accordingly. If both House and Client Account types have been set-up for that
subaccount, the user should specify which one (House or Client) he wants to associate to the
client code.
33
User Guide
June 2015
Modify: The user can right click a specific subaccount/client code link and choose the Modify
option. A pop-up window will be shown. Here the user can choose a new subaccount that will
be assigned to the client code.
Inactivate: The user can right click a specific subaccount/client code link choose the Inactivate
option. Clicking Ok, the existing subaccount / client code link will be inactivated.
34
User Guide
June 2015
Client Code Link Changes
This window shows all the changes made during the current business day on subaccount /
client code links for a specific Member. For General Clearing Members, also Non-Clearing
Members data are shown. New changes are automatically shown as soon as they are
managed by the clearing system, without having to manually refresh the window. Displayed
changes will be active from next business day.
Table columns description:
Market
Trading Market
Member
Member ABI Code
Client code
Client code
Account type
Account type (House/Client)
Sub account
Sub Account
Modify Type
Description of requested operation type
Modify Time
Modify Time
Delete: It is possible to delete a change made on a subaccount-client code link right clicking on
the corresponding row and selecting Delete; a dialog window will pop up; the user should select
Ok to delete the change.
35
User Guide
June 2015
3.7 Automatic Give-up
The Automatic Give-Up menu allows to manage International Give-Up and Trade Transfer
operations automatically, using client codes associated to specific participants; Automatic Giveup codes can be set on both sender (Give-out) and receiver (Take-Up) sides.
Members can set Give-Out and Take-Up client codes in order to automatically transfer trades
among different participants.
Give-Out
This window lists all the Give-Out client codes of the member. For General Clearing
Members, also Non-Clearing Members Give-Out codes are shown. New Give-Out codes
are automatically shown as soon as they are managed by the clearing system, without
having to manually refresh the window. At the same way, any update on a Give-Out codes
is automatically shown.
Table columns description :
Market
Trading market
Deliver member
Deliver member code
Client code
Client code
Account type
Account type (client only)
Receiver member
Receiver member code
Rectify Position
Rectify Position
Description code
Description code (receiver member has to specify the
same value into Description code field of the
corresponding Take-Up)
36
User Guide
June 2015
Activation date
Activation date
Inactivation date
Inactivation date
Creation date
Creation date
Modify date
Modify date
Status
Give-out status
Add New Give-Out function allows to create a new Give-Out client code. All fields are
mandatory.
Modify: In the Give-Out list, the user can right click on the row corresponding to the Give-Out
that has to be modified and select Modify. Only enabled fields can be modified.
37
User Guide
June 2015
38
User Guide
June 2015
Take-Up
This window lists all the Take-Up client codes of the member. For General Clearing
Members, also Non-Clearing Members Take-Up codes are shown. New Take-Up codes
are automatically shown as soon as they are managed by the clearing system, without
having to manually refresh the window. At the same way, any update on a Take-Up codes
is automatically shown.
Table columns description:
Market
Trading market
Deliver member
Trading member code
Client code
Client code
Account type
House/Client account type
Receiver member
Clearing member code
Open/Close
Open/Close/Assigned by Trader
Description code
Description (the deliver member has to specify the
same code into description code field of the
corresponding Give-Out)
Additional info
Free text additional information
Activation date
Activation date
Inactivation date
Inactivation date
Creation date
Creation date
Modify date
Modification date
Status
Take-Up status
39
User Guide
June 2015
40
User Guide
June 2015
Add new Take-Up: This function allows to create a new Take-Up client code.
All fields are mandatory except for Additional Info. The value “Assigned by Trader” in the
“Open\Close” field will assign to the incoming trade the same value specified for it by the trader.
Modify: In the Take-Up list, the user can right click the row corresponding to the Take-Up that
has to be modified and select Modify. Only enabled fields can be modified.
41
User Guide
June 2015
The value “Assigned by Trader” in the “Open\Close” field will assign to the incoming trade the
same value specified for it by the trader.
42
User Guide
June 2015
4.0 Positions
This menu allows members to manage positions registered in the clearing system. It is
possible to see the list of open positions and access the functions of Rectification,
Transfer, Subaccount Change and Early Exercise. It’s also possible to add positions to
Custom Portfolios for Risk Management activities.
The Positions menu is made by the following tabs:
•
Positions List: it shows the list of open positions of the clearing member (and its NCM’s)
and allows to access the functions of Rectification, Transfer, SubAccount Change,
Early Exercise Request and Add to Portfolio;
•
Rectify: it shows the rectified positions of the clearing member (and its NCM’s);
•
Transfers: it shows the position transfers (delivered and received) of the clearing
member (and its NCM’s); it allows to access the functions of Accept, Reject and Cancel
Position Transfer;
•
SubAccount Change: it shows the list of SubAccount Changes of the clearing member
(and its NCM’s).
4.1 Position list
This window lists all the positions owned by the member. For General Clearing Members,
also Non-Clearing Members positions are shown. New positions are automatically shown
as soon as they are managed by the clearing system, without having to manually inquire
the clearing system. At the same way, any update on a position (i.e. Position Transfer,
SubAccount Transfer, Rectifications, …) is automatically shown.
43
User Guide
June 2015
Table columns description:
Market
Trading Market
ABI code
Clearing Member Identification Code for the Clearing system
Account Type
Account Type (House/Client)
Sub Account
Sub Account
Series Name
Name of the Tradable Series
ISIN Code
ISIN Code
Long
Long current positions
Short
Short current positions
Symbol
Alphanumeric symbol of underlying instrument
Expiration Month
Expiration Month
Product Type
Product type (B = bond, C = equity and fund quotes, F = future,
O = option, R = repo, V = convertible, W = warrant)
Expiration Date
Expiration Date
Strike Price
Strike Price
Put/Call
Option type (Put/Call)
Opening Date
Position opening date
44
User Guide
June 2015
Last Operation
Last operation date
Long at opening
Long positions at market opening
Short at opening
Short positions at market opening
Transfer Price
Transfer price
Intraday exercises
Early intraday exercises
Intraday assignments
Intraday assignments
Exercises
Early exercises
Assignments
Assignments
ITM amount
In the money amount
Rectify
Rectify allows to increase / decrease positions in options on share or index.
It’s possible to rectify only IDEM market positions on Client account.
In order to execute a Rectify, the user should select a position from the Positions List, right
click on it and select Rectify.
45
User Guide
June 2015
A pop-up will be opened.
The following steps should be performed:
1.
2.
3.
Insert a value into the Volume field;
Select the Increase or Decrease option;
Press OK button to confirm
A confirmation message informs the user that the transaction has been successfully committed.
Transfer
The Position Transfer allows to transfer an open position to another clearing member. The
clearing system processes the transfer request only after the counterpart has accepted the
received position. It is possible to transfer positions only to counterparts other than the member
itself.
The user can access the position Transfer function right clicking on a specified position in the
positions list (also multiple selection is allowed).
46
User Guide
June 2015
In order to send a Position Transfer, the user should select one or more positions from the
Positions List, right click on them and select Transfer.
The following steps should be performed:
1.
2.
3.
4.
5.
6.
Insert a value into the Volume field;
Select Long or Short in the Long/Short option;
Select Yes or No in the Rectify Position option. Selecting Yes the clearing
system will automatically increase the positions in case they are no more
available when the receiver clearing member accepts the transfer (i.e. in case
of trade executions on the transferred series);
Insert a value into the Additional Info field (optional);
Select the Receiver Member specifying the ABI code or the clearing member
description;
Press the OK button to confirm.
A confirmation message will be shown informing that the transaction has been correctly sent.
47
User Guide
June 2015
Sub Account Change
The Sub Account Change allows to change the subaccount of a specific position. At the same
time it’s possible to rectify the position and assign a part of it to the new sub account.
In order to perform a Sub Account Change, the user should select a position from the
Positions List, right click on it and select Sub Account Change.
The following steps should be performed:
1.
2.
3.
4.
5.
6.
Insert the number of positions to be transferred into the Volume field;
Select Long or Short in the Long/Short option;
Select Yes or No in the Rectify Position option. Selecting Yes the clearing
system will automatically increase the positions in case they are no more
available when the receiver clearing member accepts the transfer (i.e. in case
of trade executions on the transferred series);
Select the new Sub Account of the position in the Sub Account option;
Insert a value into the Additional Info field (optional);
Press the OK button to confirm.
A confirmation message will be shown informing that the transaction has been correctly sent.
48
User Guide
June 2015
Early Exercise Request
The Early Exercise Request allows to send early exercise requests to the clearing system.
In order to send an Early Exercise Request, the user should select a position from the
Positions List, right click on it and select Early Exercise Request.
The following steps should be performed:
1.
2.
3.
Insert the number of positions to be early exercised into the Quantity field; the
quantity field is limited to four digits. In order to early exercise a quantity with more
than four digits, the user should send more than one request, to cover the whole
amount of positions to exercise;
Insert a value into the Additional Info field (optional);
Press the Insert button to confirm.
49
User Guide
June 2015
The list of early exercise requests sent can be verified in the Exercise/Assignments main menu,
in the Exercise Request History sub-menu.
Please notice
An early exercise can be executed also in the Early Exercise (By Positions) and Early
Exercise (By Series) windows, which can be reached through the Exercise/Assignments
main menu.
4.2 Rectifications
This window lists all the position rectifications of the member. For General Clearing
Members, also Non-Clearing Members rectifications are shown. The window lists the
rectifications executed on the current business date. New rectifications are automatically
shown as soon as they are managed by the clearing system, without having to manually
refresh the window.
In order to have access to previous days rectifications, it’s possible to click on the “+” button
on the Business Date Bar and select the date of interest.
A new tab will appear in the Business Date Bar. The user should select the Market field and
click on the Download button. Rectifications that match the specified criteria will be
displayed.
Table columns description:
Market
Trading Market
Member
Member ABI Code
Symbol
Alphanumeric symbol of underlying instrument
Expiration Month
Expiration month
50
User Guide
June 2015
Strike Price
Strike Price
Put/Call
Option type (Put/Call)
ISIN Code
ISIN Code
Series name
Name of the series
Account Type
Account Type (House/Client)
Volume
Volume
Sign
Operation sign (+ = increase, - = decrease)
Execution Date
Position adjustment date
Execution Time
Position adjustment time
Status
Operation status (Y=executed, N=not executed)
Sub Account
Sub Account
4.3 Transfers
This window lists all the Position Transfers of the member. For General Clearing Members,
also Non-Clearing Members transfers are shown. The window lists the transfers executed
on the current business date. New transfers are automatically shown as soon as they are
managed by the clearing system, without having to manually refresh the window. At the
same way, any update on a transfer (i.e. transfer status changed) is automatically shown.
The window is composed by two tables: the Transferred Positions and the Received
Positions. The Transferred Positions table shows all the transfers sent by the member to
other clearing members. The Received Positions table shows all the transfers received by
the member. The color of the row identifies if the request has been accepted by the
receiver clearing member (green row), has been refused (red row), is still pending (yellow
row), or has been cancelled by the member (white row).
In order to have access to previous days transfers, it’s possible to click on the “+” button on
the Business Date Bar and select the date of interest.
51
User Guide
June 2015
A new tab will appear in the Business Date Bar. The user should select the Market field and
click on the Download button. Transfers that match the specified criteria will be displayed.
The color of the row shows the transfer status, according to the following table:
Color
Status
Description
Green
Processed
The receiver accepted the transfer. The position is now owned by the
receiver.
Red
Rejected
The receiver rejected the transfer. The position is still owned by the sender.
Yellow
Holding
The receiver didn’t accept (or reject) the transfer yet. The position is still
owned by the sender.
White
Cancelled
The sender cancelled the transfer request before the receiver accepted or
rejected it. The position is still owned by the sender.
52
User Guide
June 2015
Table columns description:
Deliver Member
Deliver ABI Code
Receiver Member
Receiver ABI Code
Deliver Name
Deliver Name
Receiver Name
Receiver Name
Status
Status of the Transfer
(H=Holding, P=Processed, R=Rejected, C=Cancelled)
Additional Info
Free text additional information
Market
Trading Market
ISIN Code
ISIN code of the Tradable Series
Sub Account
Sub Account
Volume
Transfer Quantity
Long/Short
Position type (Long/Short)
Series Name
Name of the Tradable Series
Transfer Date
Business Date of the Transfer
Entry Time
Entry Time of the Transfer (when the Deliver Clearing Member sent the
Transfer Request)
Execution Time
Execution Time of the Transfer (when the Receiver Clearing Member
accepted/rejected the Transfer Request)
Symbol
Alphanumeric Symbol of Underlying
Expiry Month
Expiration Month of the Tradable Series
Strike Price
Strike Price of the Tradable Series
Put/Call
Option type (Put / Call) of the Tradable Series
Transfer Price
Transfer Price
Deliver Account Type
Deliver Account Type (House / Client)
Receiver
Type
Receiver Account Type (House / Client)
Account
53
User Guide
June 2015
Deliver Client Info
Deliver Client Info
Deliver Client Code
Deliver Client Code
Receiver Client Info
Receiver Client Info
Receiver Client Code
Receiver Client Code
Transferred/Received
Transfer Type (Transferred / Received)
Product Type
Product type of the Tradable Series (B = bond, C = equity and fund quotes,
F=future, O= option, R = repo, V= convertible, W = warrant)
Position Value
Counter value
Cancel Transfer Request
Pending position transfers with status H (Holding) can be cancelled by the deliver member.
The user should right click on the pending transfers in the Transferred Positions table and
select Cancel Transfer Request.
The following steps should be performed:
1.
Press OK button to confirm
A confirmation message will be shown informing that the transaction has been correctly sent.
Confirm Transfer Request
Pending position transfers with status H (Holding) can be accepted (confirmed) by the
receiver member. The user should right click on the pending transfers in the Received
Positions table and select Confirm.
The transfer will be executed by the clearing system only after the user accepts the
received position. Received positions can be allocated on house or client account. If the
transfer is accepted, the color of the row gets green as soon as the transfer is executed by
the clearing system; the red row confirms instead that the transfer request has been
rejected by the user.
The following steps should be performed:
54
User Guide
June 2015
1.
2.
3.
4.
5.
6.
Select Open or Close in the Open/Close option;
Select Client or House in the Receiver Account Type option;
Select the Sub Account in the Sub Account option;
Insert a value into the Receiver Client Code field (optional);
Insert a value into the Receiver Client Info field (optional);
Press OK button to confirm
A confirmation message will be shown informing that the transaction has been correctly sent.
Reject Transfer Request
Pending position transfers with status H (Holding) can be rejected by the receiver
member. The user should right click on the pending transfers in the Received Positions
table and select Reject.
The following steps should be performed:
1.
Press OK button to confirm
A confirmation message will be shown informing that the transaction has been correctly sent.
55
User Guide
June 2015
4.4 Sub Account Changes
This window lists all the sub account changes of the member. For General Clearing
Members, also Non-Clearing Members changes are shown. The window lists the sub
account changes executed on the current business date. New changes are automatically
shown as soon as they are managed by the clearing system, without having to manually
refresh the window.
In order to have access to previous days sub account changes, it’s possible to click on the
“+” button on the Business Date Bar and select the date of interest.
A new tab will appear in the Business Date Bar. The user should select the Market field and
click on the Download button. Sub Account Changes that match the specified criteria will be
displayed.
Table columns description:
Market
Trading Market
ABI Code
Clearing Member Identification Code for the Clearing system
Request Date
Date of the modification request
Request Time
Time of the modification request
Long/Short
Position type (Long/Short)
Account Type
Account Type (House/Client)
Original Sub Account
Original sub account identifier
Sub Account
sub account identifier
56
User Guide
June 2015
Rectify Position
Gross position rectification flag
Symbol
Alphanumeric symbol of underlying financial instrument
Expiration Date
Expiration Date
Strike Price
Strike Price
Put/Call
Option type (Put/Call)
Product Type
Product type (B = bond, C = equity and fund quotes, F = future, O = option,
R = repo, V = convertible, W = warrant)
ISIN Code
ISIN Code
Series Name
Name of the series
Quantity
Quantity
Transfer Price
Transfer price
Request State
Request state
Return Code
Operation result
Counter value
Countervalue
57
User Guide
June 2015
5.0 Trades
This menu allows to manage executed trades registered in the clearing system. It is
possible to see the list of trades, the history of a single trade and access the functions of
International Give-Up, Trade Transfer, Split, Open/Close Change and Client Code Change.
The Trades menu is made by the following tabs:
•
Trades List: it shows the trades of the clearing member (and its NCM’s) and allows to
access the functions of International Give-Up, Trade Transfer, Split, Open/Close
Change and Client Code Change;
•
Transfers: it shows the trade transfers (delivered and received) of the clearing member
(and its NCM’s); it allows to access the functions of Accept, Reject and Cancel Trade
Transfer;
•
Splits: it shows the splits of the clearing member (and its NCM’s);
•
Open/Close Changes: it shows the Open / Close Changes of the clearing member (and
its NCM’s);
•
Client Code Changes: it shows the Client Code Changes of the clearing member (and
its NCM’s);
•
Trade History: it shows all the clearing operations performed on the selected trade.
58
User Guide
June 2015
5.1 Trade list
This window lists all the trades owned by the member. For General Clearing Members, also
Non-Clearing Members trades are shown. The window lists the trades of the current business
date. New trades are automatically shown as soon as they are managed by the clearing
system, without having to manually refresh the window. At the same way, any update on a
trade (i.e. Client Code Change, Open / Close Change, Split, International Give Up, Trade
Transfer, …) is automatically shown. A trade is automatically removed from the Trades List
after a transfer to another clearing member or after a split.
59
User Guide
June 2015
In order to have access to previous days trades, it’s possible to click on the “+” button on the
Business Date Bar and select the date of interest.
A new tab will appear in the Business Date Bar. The user should select the Market, the
Account Type and the Side fields and click on the Download button. Trades that match the
specified criteria will be displayed.
Table columns description:
ABI Code
Clearing Member Identification Code for the Clearing system
Market
Trading Market
Trade Date
Business Date of the Trade
Contract Number
Trade Identification Number assigned by the Clearing system
Unique Key for a Trade is made by:
Market + Contract Number + Side + Trade Date
Side
Side of the Trade (Buy / Sell)
Trade Price
Price of the Trade
Quantity
Quantity of the Trade
Contract State
State of the Trade (T = Active / C = Cancelled)
Account Type
Account Type (House / Client)
Sub Account
Sub Account
Series Name
Name of the Tradable Series
ISIN Code
ISIN code of the Tradable Series
Order Number
Unique identifier of the order in the Trading System
Original Contract Number
Trade Identification Number for the Clearing system before a split.
In case of multiple splits, the Contract Number of the original trade
is shown
Market Contract Number
Trade Identification Number assigned by the Trading System.
Trade Time
Execution Time of the Trade
Symbol
Alphanumeric Symbol of Underlying
Expiration Month
Expiration Month of the Tradable Series
60
User Guide
June 2015
Strike Price
Strike Price of the Tradable Series
Put/Call
Option type (Put / Call) of the Tradable Series
Open/Close
Open / Close
Trader Id
Trader Identifier assigned by the Trading System
Requested for Transfer Quantity
Transferred Quantity
Client Code
Client Alphanumeric Code
Client Info
Optional free text notes
Trade Source
Source of the Trade (M = Market, G = Give-Up, S = Split, D = Data
Entry)
Market Trade Source
Market Source of the trade
International Give up
The International Give Up allows to send one or more trades to another clearing member.
The transfer is performed at the execution price. The settlement of the variation margins (or
the premium as well) is performed accordingly. Only the clearer has to deposit initial margins.
The clearing system processes the transfer request only after the counterpart has accepted
the received trade. This function is available only on T trades. It is possible to transfer trades
only to counterparts other than the member itself. Only the overall amount of trade can be
transferred.
61
User Guide
June 2015
In order to send an International Give up, the user should select one or more trades from the
Trades List, right click on them and select International Give-Up.
The following steps should be performed:
1.
3.
4.
5.
Select Yes or No in the Rectify Position option. Selecting Yes the clearing
system will automatically increase the positions in case they are no more
available when the receiver clearing member accepts the transfer (i.e. in case
of trade executions on the transferred series);
Insert a value into the Additional Info field (optional);
Select the Receiver Member specifying the ABI code or the clearing member
description;
Press the OK button to confirm.
A confirmation message will be shown informing that the transaction has been correctly sent.
Trade Transfer
The Trade Transfer allows to send one or more trades to another clearing member. The
transfer is performed at the execution price. The settlement of the variation margins (or the
premium as well) is performed accordingly. Only the clearer has to deposit initial margins.
The clearing system processes the transfer request only after the counterpart has
accepted the received trade. This function is available only on T+1 and T+2 trades. It is
possible to transfer trades only to counterparts other than the member itself. Only the
overall amount of trade can be transferred.
In order to send a Trade Transfer, the user should click on the “+” button on the Business
Date Bar and select the T+1 (or T+2) date. A new tab will appear in the Business Date Bar.
The user should select the Market, the Account Type and the Side fields and click on the
Download button. Trades that match the specified criteria will be displayed. The user should
select one or more trades from the Trades List, right click on them and select Trade Transfer.
The following steps should be performed:
1.
3.
4.
5.
Select Yes or No in the Rectify Position option. Selecting Yes the clearing
system will automatically increase the positions in case they are no more
available when the receiver clearing member accepts the transfer (i.e. in case
of trade executions on the transferred series);
Insert a value into the Additional Info field (optional);
Select the Receiver Member specifying the ABI code or the clearing member
description;
Press the OK button to confirm.
62
User Guide
June 2015
A confirmation message will be shown informing that the transaction has been correctly sent.
Split
The Split allows to separate any trade into a set trades (up to 8), each one having a different
volume amount. The total amount of the separated trades should be equal to the volume of the
original trade.
This function is allowed on T and T+1 trades.
In order to execute a Split, the user should select a trade from the Trades List, right click on it
and select Split.
63
User Guide
June 2015
A pop-up will be opened, showing in the higher part the current trade and in the lower part
the trades that will be created after the split.
The following steps should be performed:
1.
2.
3.
4.
5.
Insert a value into the Quantity field in both the rows of the New Trades table.
In case more than two trades should be generated from the split, the total
amount should be lower than the quantity of the original trade; in this case, an
additional row will be shown in the New Trades table, allowing to specify the
Quantity field for another trade. The Remaining Quantity indicator, in the
lower part of the window, shows the quantity of the original trade that still
needs to be allocated;
Repeat the insertion of the quantity for each trade that should be generated
from the split (up to 8 trades);
Insert a value into the Client Code field in any row of the New Trades table
(optional);
Insert a value into the Client Info field in any row of the New Trades table
(optional);
Press the OK button to confirm.
A confirmation message will be shown informing that the transaction has been correctly sent.
64
User Guide
June 2015
Open / Close Change
This function is allowed only on T trades.
In order to execute an Open / Close Change, the user should select one or more trades from
the Trades List, right click on them and select Open/Close Change.
The following steps should be performed:
1.
2.
3.
Select Open or Close in the Open/Close option;
Select Yes or No in the Rectify Position option;
Press OK button to confirm
A confirmation message will be shown informing that the transaction has been correctly sent.
65
User Guide
June 2015
Client Code Change
The Client Code Change allows to change the Client Code and the Client Info values of
one ore more trades. This operation could trigger a Sub Account Change or an Automatic
Give-Up in case the specified Client Code has been previously created and associated to
any of this functionalities (see sections 3.6 and 3.7).
In order to execute a Client Code Change, the user should select one or more trades from
the Trades List, right click on them and select Client Code Change.
The following steps should be performed:
1.
2.
3.
Insert a value into the Client Code field;
Insert a value into the Client Info field (optional);
Press the OK button to confirm.
In case multiple trades have been selected, it’s possible to insert the same Client Code and
the same Client Info values in all of them at the same time using the copy and paste
functionality (CTRL+C; CTRL+V) in the Client Code Change window.
66
User Guide
June 2015
Trade History
The Trade History allows to download all the clearing operations done on a selected trade.
In order to access the Trade History, the user should select a trade from the Trades List,
right click on it and select Trade History.
A pop-up will be shown, listing each clearing operation performed on the trade:
Table columns description:
ABI Code
Clearing Member Identification Code for the Clearing system
Market
Trading Market
Trade Date
Business Date of the Trade
Contract Number
Trade Identification Number assigned by the Clearing system
Unique Key for a Trade is made by:
Contract Number + Side + Trade Date
Side
Side of the Trade (Buy / Sell)
Trade Price
Price of the Trade
Quantity
Quantity of the Trade
Contract State
State of the Trade (T = Active / C = Cancelled)
Account Type
Account Type (House / Client)
Sub Account
Sub Account
Series Name
Name of the Tradable Series
ISIN Code
ISIN code of the Tradable Series
Order Number
Unique identifier of the order in the Trading System
Original Contract Number
Trade Identification Number for the Clearing system before a split.
In case of multiple splits, the Contract Number of the original trade
is shown
Market Contract Number
Trade Identification Number assigned by the Trading System.
Trade Time
Execution Time of the Trade
Symbol
Alphanumeric Symbol of Underlying
Expiration Month
Expiration Month of the Tradable Series
Strike Price
Strike Price of the Tradable Series
67
User Guide
June 2015
Put/Call
Option type (Put / Call) of the Tradable Series
Open/Close
Open / Close
Trader Id
Trader Identifier assigned by the Trading System
Requested for Transfer Quantity
Transferred Quantity
Client Code
Client Alphanumeric Code
Client Info
Optional free text notes
Trade Source
Source of the Trade (M = Market, G = Give-Up, S = Split, D = Data
Entry)
Market Trade Source
Market Source of the trade
Operation
Clearing Operation performed on the Trade
68
User Guide
June 2015
5.2 Transfers
This window lists all the International Give-Ups and Trade Transfers of the member. For
General Clearing Members, also Non-Clearing Members transfers are shown. The window
lists the transfers executed on the current business date. New transfers are automatically
shown as soon as they are managed by the clearing system, without having to manually
refresh the window. At the same way, any update on a transfer (i.e. transfer status
changed) is automatically shown.
The window is composed by two tables: the Transferred Trades and the Received Trades.
The Transferred Trades table shows all the transfers sent by the member to other clearing
members. The Received Trades table shows all the transfers received by the member. The
color of the row identifies if the request has been accepted by the receiver clearing
member (green row), has been refused (red row), is still pending (yellow row), or has been
cancelled by the member (white row).
In order to have access to previous days transfers, it’s possible to click on the “+” button on
the Business Date Bar and select the date of interest.
A new tab will appear in the Business Date Bar. The user should select the Market field and
click on the Download button. Transfers that match the specified criteria will be displayed.
The color of the row shows the transfer status, according to the following table:
Color
Status
Description
Green
Processed
The receiver accepted the transfer. The trade is now owned by the
receiver.
Red
Rejected
The receiver rejected the transfer. The trade is still owned by the sender.
Yellow
Holding
The receiver didn’t accept (or reject) the transfer yet. The trade is still
owned by the sender.
White
Cancelled
The sender cancelled the transfer request before the receiver accepted or
rejected it. The trade is still owned by the sender.
Table columns description:
Deliver Member
Deliver ABI Code
Receiver Member
Receiver ABI Code
Deliver Name
Deliver Name
Receiver Name
Receiver Name
69
User Guide
June 2015
Status
Status of the Transfer
(H=Holding, P=Processed, R=Rejected, C=Cancelled)
Additional Info
Free text additional information
Market
Trading Market
Trade Date
Business Date of the Trade
Contract Number
Trade Identification Number assigned by the Clearing system
Unique Key for a Trade is made by:
Contract Number + Side + Trade Date
Side
Side of the Trade (Buy / Sell)
Series Name
Name of the Tradable Series
ISIN Code
ISIN code of the Tradable Series
Original Contract
Number
Trade Identification Number for the Clearing system before a split. In case
of multiple splits, the Contract Number of the original trade is shown
Market Contract
Number
Trade Identification Number assigned by the Trading System.
Transfer Date
Business Date of the Transfer
Entry Time
Entry Time of the Transfer (when the Deliver Clearing Member sent the
Transfer Request)
Execution Time
Execution Time of the Transfer (when the Receiver Clearing Member
accepted/rejected the Transfer Request)
Price
Transfer Price
Symbol
Alphanumeric Symbol of Underlying
Expiration Month
Expiration Month of the Tradable Series
Strike Price
Strike Price of the Tradable Series
Put/Call
Option type (Put / Call) of the Tradable Series
Deliver Account Type
Deliver Account Type (House / Client)
Receiver
Type
Receiver Account Type (House / Client)
Account
Deliver Client Info
Deliver Client Info
Deliver Client Code
Deliver Client Code
Receiver Client Info
Receiver Client Info
70
User Guide
June 2015
Receiver Client Code
Receiver Client Code
Sub Account
Sub Account
Quantity
Transfer Quantity
Transferred/Received
Transfer Type (Transferred / Received)
Product Type
Product type of the Tradable Series (B = bond, C = equity and fund quotes,
F=future, O= option, R = repo, V= convertible, W = warrant)
Transfer Mode
Transfer Mode (Automatic / Manual)
Cancel Transfer Request
Pending trade transfers with status H (Holding) can be cancelled by the deliver member. The
user should right click on the pending transfers in the Transferred Trades table and select
Cancel Transfer Request.
The following steps should be performed:
2.
Press OK button to confirm
A confirmation message will be shown informing that the transaction has been correctly sent.
Confirm Transfer Request
Pending trade transfers with status H (Holding) can be accepted (confirmed) by the
receiver member. The user should right click on the pending transfers in the Received
Trades table and select Confirm.
The transfer will be executed by the clearing system only after the user accepts the
received trade. Received trades can be allocated on house or client account. If the transfer
is accepted, the color of the row gets green as soon as the transfer is executed by the
clearing system; the red row confirms instead that the transfer request has been rejected
by the user.
Please notice: Trades transferred via Automatic Give-Up don’t need to be accepted by the
receiver member.
71
User Guide
June 2015
International Give-ups not accepted by the end of the day, will expire.
The following steps should be performed:
7.
8.
9.
10.
11.
Select Open or Close in the Open/Close option;
Select Client or House in the Account Type option;
Insert a value into the Client Code field (optional);
Insert a value into the Client Info field (optional);
Press OK button to confirm
A confirmation message will be shown informing that the transaction has been correctly sent.
Reject Transfer Request
Pending trade transfers with status H (Holding) can be rejected by the receiver member.
The user should right click on the pending transfers in the Received Trades table and
select Reject.
The following steps should be performed:
2.
Press OK button to confirm
A confirmation message will be shown informing that the transaction has been correctly sent.
72
User Guide
June 2015
5.3 Splits
This window lists all the trade splits executed by the member. For General Clearing
Members, also Non-Clearing Members splits are shown. The window lists the splits executed
on the current business date. New splits are automatically shown as soon as they are
managed by the clearing system, without having to manually refresh the window.
In order to have access to previous days splits, it’s possible to click on the “+” button on the
Business Date Bar and select the date of interest.
A new tab will appear in the Business Date Bar. The user should select the Market field and
click on the Download button. Splits that match the specified criteria will be displayed.
Table columns description:
ABI Code
Clearing Member Identification Code for the Clearing system
Market
Trading Market
Contract number
Trade Identification Number assigned by the Clearing system
Unique Key for a Trade is made by:
Contract Number + Side + Trade Date
Original Contract
Number
Trade Identification Number for the Clearing system before a split. In case of
multiple splits, the Contract Number of the original trade is shown
Series name
Name of the Tradable Series
Trade date
Business Date of the Trade
Buy/Sell
Side of the Trade (Buy / Sell)
Account type
Account Type (House/Client)
Quantity
Quantity of the Trade
Client info
Optional free text notes
Client code
Client Alphanumeric Code
Market Contract
Number
Trade Identification Number assigned by the Trading System
73
User Guide
June 2015
5.4 Open Close Changes
This window lists all the Open / Close Changes executed by the member. For General
Clearing Members, also Non-Clearing Members Open / Close Changes are shown. The
window lists the changes executed on the current business date. New Open / Close Changes
are automatically shown as soon as they are managed by the clearing system, without having
to manually refresh the window.
In order to have access to previous days Open / Close Changes, it’s possible to click on the
“+” button on the Business Date Bar and select the date of interest.
A new tab will appear in the Business Date Bar. The user should select the Market field and
click on the Download button. Open / Close Changes that match the specified criteria will be
displayed.
Table columns description:
Open Close
Open / Close (O = Open, C = Close)
Sub Account
Sub Account
Market
Trading Market
ABI Code
Clearing Member Identification Code for the Clearing system
Trade Date
Business Date of the Trade
Contract number
Trade Identification Number assigned by the Clearing system
Unique Key for a Trade is made by:
Contract Number + Side + Trade Date
Account type
Account Type (House / Client)
Symbol
Alphanumeric Symbol of Underlying
Client Info
Optional free text notes
Client Code
Client Alphanumeric Code
Expiration date
Expiration Date of the Tradable Series
Strike Price
Strike Price of the Tradable Series
Put / Call
Option type (P = Put, C = Call)
ISIN code
ISIN code of the Tradable Series
Series Name
Name of the Tradable Series
Quantity
Quantity of the Trade
Side
Side of the Trade (Buy / Sell)
Market Contract
Trade Identification Number assigned by the Trading System.
74
User Guide
June 2015
Number
Request Time
Execution Time of the Open / Close Change Request
Request Date
Execution Date of the Open / Close Change Request
Request State
State of the Open / Close Change Request
Return Code
Return Code of the Open / Close Change Request
5.5 Client Code Changes
This window lists all the Client Code Changes executed by the member. For General Clearing
Members, also Non-Clearing Members Open / Close Changes are shown. The window lists
the changes executed on the current business date. New Client Code Changes are
automatically shown as soon as they are managed by the clearing system, without having to
manually refresh the window.
In order to have access to previous days Client Code Changes, it’s possible to click on the
“+” button on the Business Date Bar and select the date of interest.
A new tab will appear in the Business Date Bar. The user should select the Market field and
click on the Download button. Client Code Changes that match the specified criteria will be
displayed.
Table columns description:
Client Code
Client Alphanumeric Code
Original Client
Code
Client Code before the Client Code Change
Client Info
Optional free text notes
Sub Account
Sub Account
Original Sub
Account
Sub Account before the Client Code Change
Market
Trading Market
ABI Code
Clearing Member Identification Code for the Clearing system
Trade Date
Business Date of the Trade
Contract
Number
Trade Identification Number assigned by the Clearing system
Unique Key for a Trade is made by:
75
User Guide
June 2015
Contract Number + Side + Trade Date
Side
Side of the Trade (Buy / Sell)
Account type
Account Type (House / Client)
Symbol
Alphanumeric Symbol of Underlying
Open / Close
Open / Close (O = Open, C = Close)
Rectify Position
Rectify Position (Y = Yes, N = No)
Expiration date
Expiration Date of the Tradable Series
Strike Price
Strike Price of the Tradable Series
Put / Call
Option type (P = Put, C = Call)
ISIN code
ISIN code of the Tradable Series
Series Name
Name of the Tradable Series
Quantity
Quantity of the Trade
Request Time
Execution Time of the Client Code Change Request
Request Date
Execution Date of the Client Code Change Request
Request State
State of the Client Code Change Request
Return Code
Return Code of the Client Code Change Request
76
User Guide
June 2015
6.0 Exercise / Assignments
This menu allows to exercise the long option positions and verify the assignments received
for the short option positions.
The Exercise/Assignments menu is made by the following sub-menus:
•
Early Exercise: it allows to access the function of Early Exercise “By Position”, i.e.
by seeking the option position to exercise within the list of the open positions, or
“By Series”, i.e. by seeking the option series to exercise within the list of all the
option series;
•
Expiry Exercise (Exercise By Exception): it allows to access the function of Expiry
Exercise (Exercise By Exception) By Positions, i.e. by seeking the expiring option
position within the list of the expiring option positions (where are also indicated the
automatic exercises proposed by the clearing system), or “By Series”, i.e. by
seeking the expiring option series within the list of all the expiring option series;
•
Exercise Request History: it shows the early exercise requests and the expiry exercises
(Exercise By Exception) requests sent by the member to the clearing system;
•
Assignments: it shows all the assignments received by the member for its short option
positions.
The information for the use of the above mentioned functions are provided below.
6.1 Early Exercise (By Positions)
This window lists all the options positions of the member for which is possible to send an
Early Exercise Request (long positions). For General Clearing Members, also NonClearing Members data are shown. New data are automatically shown as soon as they are
processed by the clearing system, without the need for manual refresh of the window. At
the same way, any update on a position is automatically shown.
77
User Guide
June 2015
Table columns description:
Market
Trading Market
ABI code
Clearing Member Identification Code for the Clearing system
Account Type
Account Type (House/Client)
Sub Account
SubAccount
Series Name
Name of the Tradable Series
ISIN Code
ISIN Code
Long
Long current positions
Short
Short current positions
Symbol
Alphanumeric symbol of underlying instrument
Expiration Month
Expiration Month
Product Type
Product type (B = bond, C = equity and fund quotes, F = future,
O = option, R = repo, V = convertible, W = warrant)
Expiration Date
Expiration Date
Strike Price
Strike Price
Put/Call
Option type (Put/Call)
Opening Date
Position opening date
Last Operation
Last operation date
Long at opening
Long positions at market opening
Short at opening
Short positions at market opening
Transfer Price
Transfer price
Intraday exercises
Early intraday exercises
Intraday assignments
Intraday assignments
Exercises
Early exercises
Assignments
Assignments
ITM amount
In the money amount
78
User Guide
June 2015
Early Exercise Request
The Early Exercise Request allows to send an early exercise request on the specified position
to the clearing system.
In order to send an Early Exercise Request, the user should select a position from the Early
Exercise (By Positions) window, right click on it and select Early Exercise Request.
The following steps should be performed:
1.
2.
3.
Insert the number of positions to be early exercised into the Quantity field; the
quantity field is limited to four digits. In order to early exercise a quantity with more
than four digits, the user should send more than one request, to cover the whole
amount of positions to exercise;
Insert a value into the Additional Info field (optional);
Press the Insert button to confirm.
79
User Guide
June 2015
The list of early exercise requests sent can be downloaded through the Exercise/Assignments
main menu, in the Exercise Request History sub-menu.
Please notice
An early exercise can be executed also in the Positions List window, which can be reached
through the Positions main menu or in the Early Exercise (By Series) window, reachable
from the Exercise / Assignments menu.
6.2 Early Exercise (By Series)
The Early Exercise (By Series) window allows to send early exercise requests to the clearing
system by seeking the option series to exercise within the list of all the option series.
80
User Guide
June 2015
The following steps should be performed:
1.
2.
3.
4.
5.
6.
Select the tradable series of the position to early exercise in the ISIN Code or
in the Series Name field;
Select H or C in the Account Type option;
Select the Sub Account of the position to early exercise in the Sub Account
field;
Insert the number of positions to be early exercised into the Quantity field; the
quantity field is limited to four digits. In order to early exercise a quantity with more
than four digits, the user should send more than one request, to cover the whole
amount of positions to exercise;
Insert a value into the Additional Info field (optional);
Press the Insert button to confirm.
A confirmation message informs the user that the transaction has been successfully
committed
Please notice
An early exercise can be executed also in the Position List window, reachable from the
Positions item of the main menu or in the Early Exercise (By Position) window, reachable
from the Exercise / Assignments menu.
6.3 Expiry Exercise (Exercise by Exception) (By Positions)
This window lists all the automatic and non-automatic exercise proposals which could be
confirmed or exercised by exception by the member. If the member intends to accept all
exercise and non-exercise proposals, it does not need to perform any operations. For General
Clearing Members, also Non-Clearing Members data are shown. Any update of the window
is automatically shown without the need for manual refresh. Any exercise proposal will be
automatically updated in case of Exercise By Exception sent by the member.
81
User Guide
June 2015
Table column description:
Market
Trading market
ABI code
Clearing Member Identification Code for the Clearing system
Account Type
Account Type (House / Client)
Sub Account
Sub Account
Symbol
Alphanumeric Symbol of Underlying
Expiration month
Expiration Month of the Tradable Series
Strike Price
Strike Price of the Tradable Series
Put/Call
Option type (Put / Call) of the Tradable Series
Product Type
Product type (B = bond, C = equity and fund quotes, F = future, O = option, R =
repo, V = convertible, W = warrant)
ISIN Code
ISIN code of the Tradable Series
Proposed Quantity
Proposed quantity
Requested
Quantity
Requested Quantity
Abandoned
Quantity
Abandoned Quantity
Available Quantity
Available Quantity
Exercise type
Exercise type (P=Proposed, E=Exception)
ITM/OTM
In the Money / Out of the Money
ITM/OTM amount
In the Money / Out of the Money amount
Underlying Price
Underlying price
Series name
Name of the Tradable Series
82
User Guide
June 2015
Exercise By Exception Request
The Exercise By Exception allows the user to send:
1. a request to partially or entirely exercise an Out of the Money option, which would be
otherwise, abandoned by the clearing system;
2. a request to entirely abandon an In the Money option, which would be otherwise
exercised by the clearing system.
In order to send an Exercise By Exception request, the user should select an expiry exercise
proposal from the Expiry Exercise (Exercise By Exception) (By Positions) window, right click
on it and select Exercise by Exception.
83
User Guide
June 2015
The following steps should be performed:
1.
2.
3.
Insert the number of positions to be exercised by exception into the Quantity
field; the quantity field is limited to six digits. Every Exercise by Exception
sent replaces a previous request already sent on the same ISIN Code / Abi
Code / Account Type / Sub Account;
Insert a value into the Additional Info field (optional);
Press the Insert button to confirm.
The list of exercise by exception requests sent can be downloaded through the
Exercise/Assignments main menu, in the Exercise Request History sub-menu.
Please notice
An exercise by exception can be executed also in the Expiry Exercise (Exercise By Exception)
(By Series) window, reachable from the Exercise / Assignments menu.
6.4 Expiry Exercise (Exercise by Exception) (By Series)
The Expiry Exercise (Exercise By Exception) (By Series) window allows to send to the an
exercise by exception request to the clearing system.
84
User Guide
June 2015
The following steps should be performed:
1.
2.
3.
4.
5.
6.
Select the tradable series of the position to exercise by exception in the ISIN
Code or in the Series Name field;
Select H or C in the Account Type option;
Select the Sub Account of the position to exercise by exception in the Sub
Account field;
Insert the number of positions to be exercised by exception into the Quantity
field; the quantity field is limited to six digits. Every Exercise by Exception
sent replaces a previous request already sent on the same ISIN Code / Abi
Code / Account Type / Sub Account;
Insert a value into the Additional Info field (optional);
Press the Insert button to confirm.
85
User Guide
June 2015
A confirmation message informs the user that the transaction has been successfully
committed
Please notice
An exercise by exception can be executed also in the Expiry Exercise (Exercise By Exception)
(By Positions) window, reachable from the Exercise / Assignments menu.
86
User Guide
June 2015
6.5 Exercise Request History
The Exercise Request History window is made by the following tabs:
•
Early Exercises Sent: it shows the list of early exercise requests sent to the clearing
system by the clearing member (and its NCM’s) and allows to access the function of
Cancel Early Exercise Request;
•
Expiry Exercises: it shows the list of exercises by exception sent to the clearing system
by the clearing member (and its NCM’s).
Early Exercises Sent
This window lists all the early exercise requests sent by the member. For General Clearing
Members, also Non-Clearing Members exercises are shown. The window lists the early
exercise requests of the current business date. New exercises are automatically shown as
soon as they are managed by the clearing system, without having to manually refresh the
window. At the same way, any update on an exercise (i.e. cancellation) is automatically
shown.
In order to have access to previous days exercises, it’s possible to click on the “+” button on
the Business Date Bar and select the date of interest.
A new tab will appear in the Business Date Bar. The user should select the Market and the
ABI Code fields and click on the Download button. Exercises that match the specified criteria
will be displayed.
87
User Guide
June 2015
Table columns description:
Market
Trading Market
ABI code
Clearing Member Identification Code for the Clearing system
ISIN Code
ISIN Code of the Tradable Series
Series Name
Name of the Tradable Series
Sub Account
Sub Account of the position
Account Type
Account Type (House/Client)
Quantity
Exercised Quantity
Exercise time
Time of the Exercise Request
Exercise date
Date of the Exercise Request
Status
Status of the Early Exercise Request (P=Processed, C=Cancelled)
Request Date
Request Date
Total exercises
quantity
Total exercises quantity
ITM/OTM
In the Money / Out of the Money
ITM/OTM amount
In the Money / Out of the Money Amount
Symbol
Alphanumeric symbol of underlying instrument
Expiration Month
Expiration Month
Strike Price
Strike Price
Put/Call
Option Type (Put / Call)
Request key
Request Key of the Early Exercise Request assigned by the clearing system
Cancel Exercise Request: The Cancel Early Exercise Request allows to cancel an early
exercise request previously sent to the clearing system.
In order to send a Cancel Early Exercise Request, the user should select an early exercise
position from the Early Exercises Sent tab of the Exercise Request History window, right click
on it and select Cancel Early Exercise Request.
The following steps should be performed:
1.
Press the Ok button to confirm.
88
User Guide
June 2015
Expiry Exercises
This window lists on the expiration day all the exercise by exception requests sent by the
member. For General Clearing Members, also Non-Clearing Members exercises are
shown. New exercises are automatically shown as soon as they are managed by the
clearing system, without having to manually refresh the window.
Table column description:
Market
Trading market
ABI Code
Clearing Member Identification Code for the Clearing system
Sub Account
Sub account of the position
ISIN Code
ISIN Code of the Tradable Series
Account Type
Account type: (House/Client)
Requested Quantity
Requested Quantity
Proposed Quantity
Proposed Quantity
ITM/OTM
In the Money / Out of the Money
ITM/OTM amount
In the Money / Out of the Money Amount
Exercise time
Time of the Exercise Request
89
User Guide
June 2015
Symbol
Alphanumeric symbol of underlying instrument
Series Name
Name of the Tradable Series
Strike Price
Strike price
Put/Call
Put/Call
Expiration month
Expiration Month
Additional info
Free text additional info
Product Type
Product type (B = bond, C = equity and fund quotes, F = future, O = option, R =
repo, V = convertible, W = warrant)
Underlying Price
Underlying price
Status
Status of the Early Exercise Request (P=Processed, R=Refused)
Please notice
A cancel functionality for ex by ex requests is not available. Since the last ex by ex request
always overwrites the former (on the same ISIN Code / Abi Code / Account Type / Sub
Account), the user can just send another request with quantity 0 to delete a request
previously sent.
6.6 Assignments
This window lists all the assignments received for the short option positions of the member. For
General Clearing Members, also Non-Clearing Members assignments are shown. The
window lists the assignments of the current business date. New assignments are
automatically shown as soon as they are managed by the clearing system, without having to
manually refresh the window.
In order to have access to previous days assignments, it’s possible to click on the “+” button
on the Business Date Bar and select the date of interest.
A new tab will appear in the Business Date Bar. The user should select the Market and the
ABI Code fields and click on the Download button. Assignments that match the specified
criteria will be displayed.
90
User Guide
June 2015
Table columns description :
Market
Trading market
ABI Code
Clearing Member Identification Code for the Clearing system
ISIN Code
ISIN Code
Series Name
Name of the Tradable Series
Symbol
Alphanumeric symbol of underlying instrument
Account Type
Account type (House/Client)
Expiration Month
Expiration Month
Assignment Date
Assignment Date
Sub account
Sub Account
Strike Price
Strike price
Put/Call
Put/Call
Assigned Quantity
Assigned Quantity
91
User Guide
June 2015
7.0 Risk Management
This menu allows to access to all the Risk Management functionalities: Trade Limit,
Position Limit, Margin Limit and What If.
The Risk Management menu is made by the following windows:
•
Trades Limit: it shows the list of trade limits of the clearing member (and its NCM’s) and
allows to create a new limit or change and delete an existing limit; for each trade
limit, an alarm will be shown as soon as a new executed trade fall under the imposed
trade limit threshold; this check will be carried out evaluating, for each new executed
trades, the notional value for derivatives products or the counter value for stock
contracts;
o for derivatives instruments, the notional value is calculated multiplying the price
by the quantity by the Index Point Value or Contract Size (if the instrument is on
Index or on Stock); for a future instruments the price variable might refer to the
trade price, settlement price or a VWAP price, while for an option instrument
the price variable might refer to the premium or the strike price.
o for stock instruments, the counter value is calculated multiplying the price by
the quantity.
•
Position Limit: it shows the list of position limits of the clearing member (and its NCM’s)
and allows to create a new limit or change and delete an existing limit; it shows, for
each position limit, the limit values of the current business day; as for trade limit, this
check is carried out evaluating, for all the trades in place that composes the positions
included in the Position Limit, the notional value for derivatives products or the counter
value for stock contracts;
•
Margin Limit: it shows the list of the existing portfolios of the clearing member (and its
NCM’s) and, for each portfolio, the margin limit values of the current business day and
the portfolio definition; it allows to create a new portfolio (and related margin limit) or
change and delete an existing portfolio (and related margin limit);
•
What If: it allows to calculate in advance the margin amount that the clearing system will
ask to the member in case of a change on a the current open positions.
92
User Guide
June 2015
7.1 Trade Limit
This window is composed by three tables:
•
Trades Limit: lists all the existing trade limits; right clicking on the limit, it is possible to
change or delete the trade limit; clicking on the icon next to the Limit name, the details
of the limit are shown. In case the risk engine doesn't work properly and the limit
computation is not possible, the corresponding trade limit name will be highlighted with
a yellow background.
Clicking on the “Add” button, it is possible to add a new trade limit through the following
window.
93
User Guide
June 2015
The following steps should be performed:
1.
2.
3.
4.
5.
Select the market from the Market List;
Insert the Trade Limit Name in the related text box;
Select the ABI code from the combobox;
Select the ProductGroup from the combobox
Define a value for the Limit1
In order to narrow the subset of trades to be included in the limit, it is possible to select
values for ProductType, Put/Call, ExpiryDay, StrikePrice; if the LimitIndicator field is
blank, the “StrikePrice” value is considered as default value.
Clicking on the icon next to the Limit name the details of the limit are shown.
•
•
Trade Limit Definition: it shows all the series included in the selected Trade Limit.
Trade Limit Alarm: it shows an alarm as soon as an executed trade fall under the
imposed trade limit threshold.
94
User Guide
June 2015
7.2 Position Limit
This window is composed by three tables:
•
Positions Limit: lists all the existing position limits; right clicking on the limit, it is possible
to change or delete the position limit; clicking on the icon next to the Limit name, the
details of the limit are shown. In case the risk engine doesn't work properly and the limit
computation is not possible, the corresponding position limit name will be highlighted
with a yellow background.
Clicking on the “Add” button on the bottom, it is possible to add a new position limit
through the following window.
95
User Guide
June 2015
The following steps should be performed:
1.
2.
3.
4.
5.
Select the market from the Market List;
Insert the Position Limit Name in the related text box;
Select the ABI code from the combobox;
Select the ProductGroup from the combobox
Define a value for the Limit1
In order to narrow the subset of positions to be included in the limit, it is possible to
select values for ProductType, Put/Call, ExpiryDay, StrikePrice; if the LimitIndicator field
is blank, the “StrikePrice” value is considered as default value.
•
Position Limit Definition: it shows all the positions included in the selected Positions
Limit.
•
Position Limit Values: it shows the timetable of the limit values, and the threshold of the
Limit1 and, if specified in the PositionLimit definition, the threshold of Limit 2 and Limit
3. Every five minutes, a notification with the Position Limit value is received, and the
96
User Guide
June 2015
chart in the Position Limit Values table updates accordingly; as soon as a clearing
operation that impacts the Position Limit value is executed, a notification with the new
value of the Position Limit is received, and the chart in the Position Limit Values table
updates accordingly.
7.3 Margin Limit
This window is composed by three tables:
•
Portfolios: lists all the existing portfolios of the clearing member (and its NCM’s) with an
associated margin limit. By right clicking on the portfolio, it is possible to change the
portfolio and the related margin limit or to delete them. By clicking on the icon next to
the Portfolio name, the details of the portfolio and of the related margin limit are shown.
In case the risk engine doesn't work properly and the margin limit computation is not
possible, the corresponding Portfolio name will be highlighted with a yellow background.
By clicking on the “Add” button on the bottom, it is possible to add a new portfolio with a
new associated margin limit through the following window.
97
User Guide
June 2015
The following steps should be performed:
1.
2.
3.
4.
5.
6.
Select the Portfolio Type between Standard and Custom;
Insert the Portfolio Name in the related text box;
Select the ABI code from the combobox;
Select the Account Type from the combobox;
Select the Market from the related combobox;
Select the list of Members to be added in the new portfolio from the list of the
available ones;
7. Define the Margin Limit by filling in the related text boxes: Margin Limit Name,
Initial Margin value, Limit 1, Limit 2, and Limit 3 values.
•
Portfolio Definition: it shows the composition of the selected portfolio.
98
User Guide
June 2015
•
Margin Limits: it shows, for each portfolio, the timetable of the margin limit values of the
current business day and the threshold of the Limit1, Limit2, and Limit3. Every five
minutes, a notification with the Margin Limit value is received, and the chart in the
Margin Limits table updates accordingly; as soon as a clearing operation that impacts
the Margin Limits value is executed, a notification with the new value of the Margin
Limits is received, and the chart in the Margin Limits table updates accordingly.
7.4 What If
This window is composed by three tables:
•
Starting Portfolio: lists the available portfolios with an associated margin limit that can
be used as a starting point for the What If computation. The starting portfolio is to be
chosen between an empty one or among the listed ones.
•
Portfolio Definition: it shows the composition of the selected portfolio.
•
Positions Delta List: it lists the positions to be considered as part of the starting portfolio
for the What If computation of the new Margin value.
By clicking on the “Modify” button on the bottom, it is possible to modify the Positions
Delta List through the following window.
99
User Guide
June 2015
The following steps should be performed:
1.
2.
3.
4.
5.
Select the Market from the related combobox;
Select the Symbol from the related combobox;
Select the Product Group from the related combobox;
Select the Product Type from the related combobox;
Select the positions to be added in the Positions Delta List by double clicking on
them;
6. In the Position Delta List table, for each position, select Account Type, Sub
Account, Volume, and Long/Short from the related combobox;
7. Click the Add button at the bottom of the window;
8. Click the Calculate Margin Limit button at the bottom of the previous window to
calculate the new margin value.
100
User Guide
June 2015
8.0 Guarantees
This window shows collateral securities deposited in the Clearing System.
8.1 Collateral Guarantees
This window shows the list of securities eligible to be deposited in the clearing system.
Table columns description:
ISIN Code
Security ISIN Code
101
User Guide
June 2015
Description
Security description
Currency
Security currency
Price
Market price is calculated, for Government bonds different from BOT, as the
compounded average market price on MTS. If not available, a price meaningful of
market conditions is referred to. BOTs are evaluated at their nominal value.
Headcut
HeadCut
8.2 Deposited guarantees
This window shows the list of collateral guarantees deposited in the clearing system.
Table columns description:
Allocation type
Allocation Type on cash guarantees (O=Option, F=Futures)
Deposit ID
Deposit ID
Repayment date
Repayment Date
ABI Code
Member’s ABI Code
Account Type
Account Type: House/Client
Type
Deposit Type (GD=Government Bonds Deposit, BD=Equities Deposit, CC=cash)
Deposit Date
Deposit Date
Expiration Date
Expiration date
Quantity
Quantity (0 if cash)
Value
Margins hedge value (0 on not cash guarantees)
ISIN Code
ISIN Code (not valued if cash)
Description
Description
Currency
Currency
Sub Account
Subaccount
Bulk Deposit Modify: The user can change the allocation and the subaccount associated to
one or more shares deposits. In order to access this function, the user has to right click on
the a specified guarantee and select Bulk Deposit Modify.
102
User Guide
June 2015
In order to modify a subaccount the user has to select a new value in the SubAccount field;
to modify the allocation just select O (option) or F(future); is possible to perform both these
changes simultaneously. Click the OK button to send the modifications to the system. The
results will be shown into the columns Allocation type change result and Sub account change
result.
103
User Guide
June 2015
9.0 Report
This window shows the list of clearing reports provided by the clearing system, together with
the Order and Trades files provided by the trading system.
9.1 Report
This window shows the list of the clearing reports available on a specified date. Some reports
are available in a multiple format, so the user can select to download them in TXT, PDF or XML.
A General Clearing Member can manage and download also its NCM’s reports selecting the
corresponding tab.
104
User Guide
June 2015
Table columns description:
Report Type
Report type identification code
Description
Report description
PDF
PDF Report availability status and zipped file size
XML
XML Report availability status and zipped file size
TXT
TXT Report availability status and zipped file size
ZIP
ZIP Report availability status and zipped file size
(Only for RISK file)
GCM
GCM Participant Code the report refers to
Operational steps description:
1.
2.
3.
Select the Date and press Download button to view available reports for that date.
For General Clearing Members, more than one tab will appear, allowing to
choose the NCM for which you want to download the report.
Select the row of the desired report and right click on the row. Depending on
the availability of the formats, you will be able to open them (“Show Report
as”) or save them in the local PC (“Save Report as”).
Please notice
For Risk file only the “Save report as” functionality is available.
105
User Guide
June 2015
The report window always shows the most recent version of a report, in case more than one
update is sent during the same day.
After the selection, the download of the report will start, showing a progress bar that will alert
about the remaining and the elapsed time for this action.
The user can abort the download clicking on the Break button and then on Close.
106
User Guide
June 2015
10.0
Tools
This menu allows to access the Monito and the Intraday Margin Calls windows.
10.1 Monitor
The Monitor windows shows in real time the list of clearing events previously subscribed by the
user. This window is automatically opened by the GUI after the login and show any event
generated from that moment on related to the member. For General Clearing Members, also
Non-Clearing Members events are shown. New events are automatically shown as soon as
they are managed by the clearing system, without having to manually refresh the window.
By default, only a subset of clearing events are subscribed for the notification. The user
could customize the list of events to be shown in this window by clicking the Settings
button in the toolbar.
The Settings button allows the user to select which clearing events to be shown in the
Monitor window. It’s also possible to select the Always Show on Top and the Open at
Startup options. To enable any change, the user should click the Ok button.
The Clear Messages button allows to clear the Monitor window deleting all the listed events.
Clicking on any event in the Monitor window will open the corresponding window of the GUI
where the information of that event is displayed.
107
User Guide
June 2015
It’s possible to change the colors of the events by clicking on the Background button in the
toolbar. It’s possible to define a color for every type of clearing event.
Table columns description:
Time
Timestamp of the reception of the clearing event
message
Event
Description of the clearing event
10.2 Intraday Margin Call
This window shows the requests of additional intraday margins issued by the clearing system to
the participant.
This window will be automatically shown when a new intraday margin call will be required by the
clearing system to the clearing member or to one of its NCMs. In this case one tab for each
NCM will be shown.
Table columns description:
Sequence Number
Identifier of the request
Date
Date of the request
Account Type
Account Type
Initial Margin
Initial Margin
Variation Margin
Variation Margin
Premium Margin
Premium Margin
Net Margin
Net Margin
Asset
Guarantees Amount
108
User Guide
June 2015
Requested amount
Requested Amount
Percent Variation
Percent Variation
Margin Call Type
Margin Call Type
109
User Guide
June 2015
11.0
Appendix A – Regular Expressions
A regular expression is a string (sequence of characters) built with a proper syntax,
which express characteristics shared by a set of strings.
Assume you intend to use a notation to indicate all the strings which begin by ‘a’ and end by ‘o’:
we will write ‘a*o’ to indicate all these strings which share the characteristic to start by ‘a’ and
end by ’o’ The following strings belong to the set mentioned above ‘ao’, ’ago’, ’also’ but not
‘aristotelis’ or ‘psycho’. The character ‘*’ used into the regular expression indicate whatever
sequence of characters.
Let’s see the syntax to be used for regular expressions and the meaning of each abbreviation:
x
“x” character
[]
Finds a single character into the brackets. For instance,[abc] looks for an ‘a’, a ‘b’ or a ‘c’.[az] is an interval and finds every small character of the alphabet. Mixed cases can occur:
[abcq-z] looks for b, c, q, r, s, t, u, v, w, x, y, z, just as [a-cq-z].
[^]
Finds every small character not included into the brackets. For instance, [^abc] finds all the
characters different than “a”, “b”, o “c”. [^az] looks for every character different than small
letter
^
Indicates the beginning of the string
$
Indicates the end of the string
()
Define a sub expression
X?
X which recurs 0 or one time
X*
X which recurs 0 or several times
X+
X Which recurs at least once
X{n}
X which recurs twice exactly
X{n,}
X which recurs at least n times
X{n,m}
X which recurs at least n times and no more than m times
XY
X followed by Y
X|Y
X or Y
110
User Guide
June 2015
X and Y are regular expressions
Some examples follows:
[ab]* = all the strings which start by a or b
[^a-c]*a$ = all the strings which start by “a”, “b” e “c” but which end by “a”
*s{2}* = all the strings which have two “s” at any point of the sequence
*cu(t|p) =strings which end by ”cut” and “cup”
111
Each and all information contained in this document are confidential, legally privileged and protected by applicable law. Any
disclosure, distribution, copying or other diffusion of this communication is strictly prohibited. If you have received this
document or part of it in error, are not the intended recipient, nor an employee or agent responsible for delivering this message
to the intended recipient, please immediately notify Borsa Italiana S.p.A., at [email protected]. Your co-operation is
appreciated.
Contacts
Service Desk Italy, Borsa Italiana
Client Technology Services Italy, LSEG
Email [email protected]
www.borsaitaliana.it