1
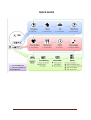
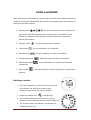
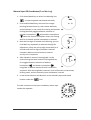
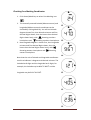
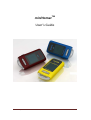
miniHomerTM
User’s Guide
NAVIN Corporation
www.navin.com.tw
NAVIN miniHomer is the world’s easiest to use personal GPS navigation device that
helps you find your way back to previously marked locations. Never again worry
about where you’ve parked your car at a shopping mall or stadium, finding way back
to a hotel traveling in a foreign city, getting back to a camp site while hiking in the
woods, or returning a favorite fishing spot...
miniHomer is a keychain-sized reverse navigation device that is accurate, easy to use,
and gives peace of mind for outdoor activities.
Never getting lost again outdoors!
Finding your way back with 100% confidence!
DISPLAY & KEY
Charging Status
Indicator
Satellite Icon, Position
Fix Quality Indicator
Distance to Location /
Time / Compass Heading
Compass Icon
Battery Indicator
Distance Unit
Heading Degree
Direction Arrow
Free Marking Icon
Location Icons
Where-AM-I Icon
Sports Icon
Satellite mode Icon
USB Charging Port
(Home, Car, Way Point,
Favorite Spot, Restaurant)
AM/PM Indicator
Clock Icon
Mark Key
Power / Mode Key
Key Ring
NAVIN Corporation
www.navin.com.tw
QUICK GUIDE
NAVIN Corporation
www.navin.com.tw
BEFORE USE
Checking Items
The miniHomer package contains following items:
miniHomer device
User’s guide
USB cable for charging
Charging Battery
It takes about 3 hours to fully charge the internal battery. First connect the USB cable
mini-USB connector to the USB port of the miniHomer. Then connect the other USB
cable connector to USB port of a PC or laptop to provide charge power. While
charging, the charging status indicator will light up. After the miniHomer is fully
charged, the charging status indicator will turn dark. The USB cable can then be
removed.
Powering On
The miniHomer is to be used outdoors; it will not work inside buildings.
Press and hold Power/Mode key for 2~3 seconds. The
backlight will turn on and full LCD screen will be displayed.
Momentarily, direction arrow formed circle will blink twice,
and then satellite icon
will start blinking, with distance
showing blank. At this stage the miniHomer is trying to
acquire satellite signal.
NAVIN Corporation
www.navin.com.tw
After satellite signal is acquired and your current position has
been determined, the miniHomer shows non-blinking satellite
icon with arcs
; more arcs meaning better signal quality
with more satellites used for an accurate position fix. The
miniHomer is now ready to be used.
The time it takes to reach position fix from powering on, after several hours of
unused period, may vary from 30 seconds to couple minutes, depending on the
surrounding environment. Places with unobstructed sky view will result in faster
position fix. If the miniHomer had been previously used within the 2 hour period
before powering on, the time to reach position fix will be very short.
Calibrating Digital Compass
The internal digital compass requires calibration for first time
use, or when the miniHomer has been moved 100miles
(160km) from the place of last calibration.
1. Lay the miniHomer on a flat surface with LCD facing up
and no metal object nearby.
2. Click Power/Mode key to select the compass mode with compass icon
showing.
3. Press and hold Mark key for 2~3 seconds, the LCD will display a 20 second count
down.
4. Within the 20 seconds, slowly rotate the miniHomer
360degrees twice, either clockwise or counterclockwise.
5. After the countdown is finished, the LCD will display the
direction triangle and heading number once again.
NAVIN Corporation
www.navin.com.tw
Setting Distance Unit
The distance unit for the distance measured by the
miniHomer can be changed between metric (meter/kilometer)
and English (feet/mile).
Press and hold both Mark and Power/Mode keys
simultaneously for 2~3 seconds and the distance unit will
toggle.
Setting Clock
The miniHomer is able to generate satellite time with accurate minute reading.
However, depending on your time zone, the hour reading may need to be adjusted.
1. Click Power/Mode key to select the clock mode with clock
icon
showing.
2. Press and hold Mark key to advance the hour digit for
adjustment, and release the key when correct hour is
reached.
Powering Off
Press and hold Power/Mode key for 2~3 seconds while the miniHomer is on.
NAVIN Corporation
www.navin.com.tw
USING miniHOMER
After powering on the miniHomer, you can select one of the four different operating
modes by clicking the Power/Mode key and the corresponding icons will show up on
the display one after another.
1. Homing mode
: Use the miniHomer to mark 5 locations of
your choice and later get back to the locations easily. Five different icons
(Home, Car, Waypoint, Favorite Spot, and Restaurant) are used to help
identify the locations.
2. Compass mode
3. Clock mode
: Use the miniHomer as a compass.
: Use the miniHomer as a timepiece.
4. Satellite mode
: Use the miniHomer to check the satellites.
5. Free Marking mode
6. Where-AM-i Mode
coordinates.
7. Sports mode
: Manually enter destination coordinates.
: Use the miniHomer to check current location
: Use the miniHomer to check speed, pace, traveled time,
distance.
Marking a Location
1. Click Power/Mode key to select one of the location
icons (Home, Car, Way Point, Favorite Spot,
Restaurant) for storing the current location.
2. Make sure satellite icon
is not blinking.
3. Press and hold Mark key, wait until the circle of
direction arrows shows up and then release Mark key.
4. The current location coordinate is stored with the
selected location icon.
NAVIN Corporation
www.navin.com.tw
Getting Back to a Location
1. Click Power/Mode key to select one of the location
icons to return to a previously stored location.
2. Make sure satellite icon
is not blinking.
3. The displayed number shows distance to the return
point, and the direction arrow shows the direction to
follow.
4. After reaching the destination, within a 5 meter (or 20
feet) radius, the circle of direction arrows will show
up.
Note that the internal digital compass for showing
direction works best when the miniHomer is held
horizontally.
Using as a Compass
1. Click Power/Mode key to select compass icon
.
2. An arrow will point to the direction of the magnetic north.
3. The displayed number indicates the clockwise angle
from the magnetic north to the forward direction of
the miniHomer.
Note that you can calibrate the compass in this mode.
NAVIN Corporation
www.navin.com.tw
Using as a Clock
1. Click Power/Mode key to select clock icon
.
2. The current time will be displayed.
Note that you can set the local time in this mode.
Checking Satellites (for the technically curious users)
1. Click Power/Mode key to select satellite mode icon
.
2. Satellite number (such as P28) and the satellite signal
strength (such as C36) of each tracked satellite will be
displayed.
3. After your current position is determined, direction
triangles will be shown. Each triangle represents a
used satellite and its quadrant orientation. When the
triangles are spread across the circle, GPS positioning result will be more
accurate.
For those satellites used in determining your location,
their number and signal strength will be shown with a
colon, e.g. P:28 and C:36.
NAVIN Corporation
www.navin.com.tw
Manual Input Of Coordinates (Free Marking)
1. Click Power/Mode key to select Free Marking icon
to input longitude and latitude manually.
2. Press and hold Mark key, wait until the triangle
pointing forward shows up, then release Mark key
and miniHomer is now ready for entering the latitude.
Clicking Mark key toggles between selection of
northern hemisphere
and southern hemisphere
. When the correct hemisphere shows, do nothing
wait for 3 seconds and the hemisphere is selected.
3. Next the first digit of latitude starts blinking, you can
click Mark key repeatedly to advance the digit for
adjustment, when the correct digit shows wait for 3
seconds and the first digit of latitude is entered.
Latitude in ddmm.mmmm format is entered
one-by-one in sequence.
4. After latitude is entered, the longitude is to be
entered using the same method. Clicking Mark key
first toggles between selection of western
hemisphere
and eastern hemisphere
Longitude in dddmm.mmmm format is entered in
sequence. After the longitude is entered, circle of direction arrows shows,
blinking twice, and the manually input coordinates is stored.
5. It then shows distance and direction to the manually input and stored
location under the
icon.
To make correction to the input coordinate, above steps
need to be repeated.
NAVIN Corporation
www.navin.com.tw
Checking Free Marking Coordinates
1. Click Power/Mode key to select Free Marking icon
.
2. The manually entered latitude (ddmm.mmmm) and
longitude (dddmm.mmmm) coordinate can be
checked by clicking Mark key. You will see latitude
degrees shown first, then latitude minutes and first
decimal digits shown, then the lower three decimal
digits shown lastly; with
denoting northern
hemisphere and
denoting southern hemisphere.
3. Next longitude degrees is shown first, then longitude
minutes and first decimal digits shown, then the
lower three decimal digits shown lastly; with
denoting western hemisphere and
eastern hemisphere.
denoting
Note that the unit of latitude and longitude coordinates
used in miniHomer is degrees and decimal minutes. The
latitude has 8 digits and the longitude has 9 digits, for
example, the latitude may be N24°47.0967’ and the
longitude may be E121°40.5236’.
NAVIN Corporation
www.navin.com.tw
Go to a Free Marked Location
1. Click Power/Mode key to select Free Marking icon
.
2. Make sure satellite icon
is not blinking and
showing arcs.
3. The displayed number shows distance to the stored
location, and the direction arrow shows the direction
to follow.
4. After reaching the destination, within a 5 meter (or
20 feet) radius, the circle of direction arrows will
show up.
Checking Current Location Coordinates (where-AM-i)
1. Click Power/Mode key to select where-AM-i icon
2. Make sure satellite icon
.
is not blinking.
3. The current latitude and longitude coordinates will be displayed in the same
manner as described in Checking Free Marking Coordinates section.
4. Clicking Mark key toggles between displays of latitude/longitude coordinates
and mean sea level altitude.
5. The maximum displayed altitude number is 19.99,
with unit in kilometer or mile.
Note: GPS altitude is much less accurate than horizontal position accuracy. GPS receivers with
more accurate altitude reading usually employ barometric pressure sensor for altitude
measurement. miniHomer does not have such sensor inside and shows GPS derived altitude
directly; thus altitude reading should be used as coarse estimate only.
NAVIN Corporation
www.navin.com.tw
SPORTS MODE
The Sports mode enables one to use miniHomer to track accumulated time,
accumulated distance, and current speed.
The sports mode is entered by clicking Power/Mode key to select Sports mode icon
. Upon entering Sports mode, it shows accumulated time by default. Short
clicking Mark key selects accumulated distance, current speed, current pace and back
to accumulated time in sequence.
The accumulated time and accumulated distance can be cleared and restarted by
pressing and holding Mark key, wait until the circle of direction arrows shows up and
then release Mark key.
Upon powering on miniHomer, the accumulated time only advance count after it has
GPS position fix, i.e. having satellite icon not blinking with arcs. Afterwards the count
will continue even if GPS position fix is lost. The accumulated distance will only
accumulate when there is GPS position fix.
Reading Accumulated Time
1. Upon selecting Sports icon
the accumulated
time is displayed.
2. If the accumulated time is less than 19 minutes and
59 seconds, it is displayed in <minute/second>
format.
3. If the accumulated time is more than 19 minutes and
59 seconds, <hour/minute> is displayed first, then
<second> is displayed.
4. If the accumulated time is more than 19 hours 59
minutes and 59 seconds, it will only show 19:59:59
5. You can restart the accumulated time by pressing and
holding Mark key, wait until the circle of direction
arrows shows up and then release Mark key.
NAVIN Corporation
www.navin.com.tw
Reading Accumulated Distance
1. Click Power/Mode key to select Sports icon
.
2. Click Mark key until m or km shows without flashing
under metric unit mode, or ft or mi shows without
flashing under English unit mode; the accumulated
distance is displayed.
3. The accumulated distance can be cleared and restarted by pressing and
holding Mark key, wait until the circle of direction arrows shows up and then
release Mark key.
Note: The accumulated distance is formed by summing distance between current measured
position and the position measured 1 second ago. As each position has inherent measurement
error, the errors add up in the accumulated distance. Thus the accumulated distance should be
used as a rough estimate only.
Reading Current Speed
1. Click Power/Mode key to select Sports icon
.
2. Click Mark key until km shows and flashing under
metric unit mode, or mi shows and flashing under
English unit mode. The current speed is displayed in
unit of km/hr or mi/hr.
Reading Current Pace
1. Click Power/Mode key to select Sports icon
.
2. Click Mark key until no unit shows and the current
pace is displayed.
3. Unit of pace is minutes/Km or minutes/mile
depending on whether metric unit or English unit is
currently used.
NAVIN Corporation
www.navin.com.tw
POWER SAVING FEATURES
Smart Backlighting
Clicking either the Power/Mode key or the Mark key will turn on a bright backlight
for 15 seconds. Afterwards, the backlight will be turned off automatically. If the
current time is between 5PM to 6AM, a dim backlight will be turned on, allowing
reading of the LCD display in the dark while keeping the power consumption low.
Clicking Mark key while not in the clock mode will toggle the PM indicator on and off.
When the PM indicator is on, a bright backlight will be kept constantly on. This is
useful whenever a bright backlight is needed, at the expense of higher power
consumption.
Auto Shutdown
The miniHomer will automatically power itself off under either one of the following
conditions:
1. No moving of the device for 2 minutes.
2. No satellite signal acquired for 2 minutes, and no key pressed.
3. No position fix for 5 minutes and no key pressed.
When charging, the auto shutdown function will be disabled.
NAVIN Corporation
www.navin.com.tw
BATTERY WARNING
If the following guidelines are not followed, the internal rechargeable battery may be
damaged and may present risk of leak, fire, chemical burn, or injury.
• Do not operate the device outside temperature range of -4°F ~ 140°F (-20°C ~ 60°C)
for discharging, and 32°F ~ 113°F (0°C ~ 45°C) for charging.
• Do not store the device outside temperature range of -4°F ~ 113°F (-20°C ~ 45°C)
for an extended period of time.
• Do not remove the battery.
CHARGING REQUIREMENTS
Use only the following power sources to charge the device:
• Standard desk-top or laptop computer USB port
• Car USB charger adapter: Input 12V, output 5.0V
• Wall USB charger adapter: Input 110/220V, output 5.0V
NAVIN Corporation
www.navin.com.tw
FAQ
Q1: Why can’t my miniHomer get a position fix?
A1: Make sure the miniHomer is operated outdoors with the LCD display facing
upward and there is a good sky view with less obstruction.
Q2: Why does the time to determine my location vary?
A2: In an open sky environment, it will be very fast to get a position fix if the
miniHomer has recently been used (within 2 hours); otherwise it will take about 30
to 40 seconds. Under tree foliage or beside tall buildings where satellite signal is
attenuated, it may take up to several minutes before the location can be determined.
Q3: Why can’t my miniHomer accurately point to the north in the compass mode?
A3: Make sure the miniHomer has been calibrated and there is no large metal object
in the vicinity. The digital compass inside a miniHomer includes a magnetic sensor,
whose accuracy will be affected by nearby metallic objects.
Q4: Why doesn’t the direction arrow of my miniHomer work properly when used
inside a slow moving car?
A4: At speed below 10km/hr, the miniHomer uses the internal digital compass to
calculate direction to the return point; if you are inside a car, the metallic structure of
the car will affect the accuracy of the digital compass so the direction may be wrong.
When the speed is over 10km/hr, the miniHomer will automatically switch to GPS to
calculate direction; as long as you hold the miniHomer in normal forward direction,
the direction triangle will correctly point to the return point.
Q5: What do those arcs of the satellite icon represent?
A5: The arcs of the satellite icon indicate the quality of position fix. More arcs mean
more satellite signals and better position accuracy. In a weak signal environment, you
can try to wait a while longer to see if more arcs will show up before marking the
location so the accuracy of the marking can be increased
Q6: Will my miniHomer remember the stored locations after powering off?
A6: You can turn off your miniHomer to save power and all the settings will be saved.
Next time when it’s turned on, you will be in the last operating mode with all marked
locations restored. The memory won’t be lost even if the battery is fully drained.
NAVIN Corporation
www.navin.com.tw
ONE YEAR LIMITED WARRANTY
The miniHomer product is warranted to be free of defects in materials and workmanship for one year
after the date of purchase. In the event of a defect under this warranty, we will, at our option, repair
or replace the product, provided that the returned product is postage prepaid. This warranty does not
cover damages caused by misuse, improper handling, installation, or maintenance provided by
someone other than a NAVIN authorized service center.
To obtain this limited warranty service, obtain a Return Materials Authorization (RMA) number prior
to shipping by submitting a repair request through NAVIN’s web site at www.navin.com.tw. Pack the
product securely in a shipping container with the RMA number clearly written on the outside of the
package. Send the product shipping-charge-prepaid to the authorized NAVIN service center address
provided with the RMA number. Any return made under this warranty must be accompanied by the
items listed below:
1. A check/money order in the amount of $20 to cover the cost of shipping and handling
2. Name and address for product return
3. An explanation of the defect
4. Receipt with the date of purchase or a dated bill of sale
5. Product should be well packed in a sturdy outside shipping carton, to prevent damage in transit,
with return postage prepaid to the address below:
NAVIN Corporation (Hsinchu Branch)
Attn: Repair Service
3F, No.26, Minsiang Street, Hsinchu City, Taiwan
If the sale receipt is not provided, is illegible, or incomplete, or if the product serial number is altered
or removed, NAVIN reserves the right to charge for service. NAVIN is not responsible for any loss or
damage to the product while it is in transit. The replacement or repaired product is warranted for 30
days from the date of the return shipment, or for the warranty day’s balance from the original date of
purchase, whichever is longer. This limited warranty does not apply to damages caused by misuse,
abuse, negligence, improper handling, accident, alteration or repair not authorized by NAVIN.
Your exclusive remedy under this written limited warranty shall be limited to the repair or
replacement, at NAVIN’s option, of any defective part covered by this limited warranty. In no event
shall NAVIN be liable for any incidental, special, indirect or consequential damages, whether resulting
from the use, misuse, or inability to use this product, or from defects in the product. In no event shall
NAVIN’s responsibility exceed replacement of the product.
The information provided is believed to be accurate and reliable. These materials are provided to customers and may
be used for informational purposes only. No responsibility is assumed for errors or omissions in these materials, or for
its use. Changes to specification can occur at any time without notice.
These materials are provides “as is” without warranty of any kind, either expressed or implied, relating to sale and/or
use including liability or warranties relating to fitness for a particular purpose, consequential or incidental damages,
merchantability, or infringement of any patent, copyright or other intellectual property right. No warrant on the accuracy
or completeness of the information, text, graphics or other items contained within these materials. No liability assumed
for any special, indirect, incidental, or consequential damages, including without limitation, lost revenues or lost profits,
which may result from the use of these materials.
The product is not intended for use in medical, life-support devices, or applications involving potential risk of death,
personal injury, or severe property damage in case of failure of the product.
NAVIN Corporation
www.navin.com.tw