1
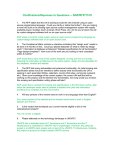
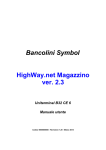
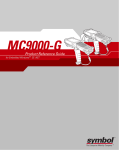
Uniterminal B32 User Guide Gennaio 2013 Version 1.0 Uniterminal B32 User Guide Content Content 2 1. Introduction.......................................................................................................................4 Get Started............................................................................................................................7 Set Up Your Device............................................................................................................12 Reset Your Device...............................................................................................................23 Barcode Scanning................................................................................................................24 Enter Data............................................................................................................................25 Using ActiveSync to Transfer Data.....................................................................................28 802.11 Wireless Configuration............................................................................................35 GPRS Settings.....................................................................................................................39 Bluetooth42 Regulatory and Warning .....................................................................................................48 Uniterminal B32 User Guide 1. Introduction About the Mobile Device If you are looking for a mobile computer that you can collect data for a whole day, your search is over. This series Uniterminal B32 - mobile computers is the answer to your request. It is just about 275g (normal battery), long battery life (10+ hours operation), big screen (3.2” diagonal) and yet comfortably to hold. This series mobile computers is a neat package that packs with functions your customers needed in a major industries, namely retail, health care, warehouse tracking and logistics. It is rugged (IP64 and 1.2 meters drop), fully connected (Bluetooth, WiFi b/g, GPRS) and has various options that you can customize for your customers' needs (multiple scan engines and OS support). Feature Summary Microsoft Windows CE 6.0 Small and light Full 3.2" color display High performance barcode scanning WLAN 802.11b/g and SUMMIT b/g options Bluetooth 128MB RAM / 128MB FLASH (256MB RAM / 256MB FLASH) memory User-accessible microSD card slot Sculpted to fit in the hand - truly pocketable Withstands multiple 4'/1.2m drops to concrete across a wide temperature range Sealed to IP64 standards Ten-layer PCB with grounding planes Hi-Speed USB 2.0 and serial output Full system of accessories 4 Uniterminal B32 User Guide Hardware Overview Front view numeric keypad 1. Power Button 2. Keypad 3. LCD display 4. Charging LCD 5. Status LED 6. I/O Connector / Mini USB Port 7. Lanyard hole 8. Stylus 9. Scan / action button 10. Action button 11. Battery cover 12. Scan / action button 13. Up button 14. Down button 15. Headset plug 5 Uniterminal B32 User Guide Rear, top & bottom views 1. Data capture window 2. Stylus 3. Speaker 4. Label recess 5. Battery cover latch 6. Battery cover 7. Handstrap clip 8. I/O connector lock guide pin 9. I/O Connector / Mini USB Port 10. Handstrap bar 11. Rest Key 12. Battery cover switch 6 Uniterminal B32 User Guide Get Started Unpack Your Device Make sure you have the following: Handheld computer Authorized battery Handstrap Charging accessory (ordered/packed separately) with one of the following kits: Single-slot cradle kit USB cable with AC adapter Recommended Host Computer Configuration/Requirements The Development Kit assists programmers with the development of applications for rugged barcode scanners running the Microsoft Windows CE 6.0 operating system. It contains all necessary details and instructions for developing applications that use libraries, including scanning, imaging and hardware utilities. The development kit is designed for use with Microsoft eMbedded Visual C++ 4.0 (SP4 or above) or Microsoft Visual Studio 2005. IBM-compatible host computer with Pentium 450 MHz processor or higher Microsoft Windows XP Service Pack 2, Microsoft Windows 2000 Service Pack 4, Windows Server 2003 Service Pack 1 or Windows Vista 192 MB RAM (Recommended: 256 MB) Hard disk space: Without Microsoft Developer Network (MSDN): 1 GB on system drive and 2 GB on installation drive With MSDN: 1 GB on system drive; 3.8 GB on installation drive with a full installation of MSDN; and 2 GB on installation drive with a default installation of MSDN CD-ROM or DVD-ROM drive One available serial port Video minimum 800 x 600, 256 colors (Recommended: 1024 x 768, high color 16-bit) Mouse or compatible pointing device 7 Uniterminal B32 User Guide Update Your Desktop Software Microsoft ActiveSync software is available at the Microsoft web site at http://www.microsoft.com. Attach the Handstrap 1. Separate the velcro of the handstrap. 2. Feed the loose end of the extended handstrap through the handstrap holder. 3. Wrap the handstrap around the holder and fasten together to close the strap. Install the Battery 1. If battery cover is installed on the device, slide the battery latch to the left. 2. The battery cover will lift up slightly, grasp the battery cover and remove it. 3. Insert the battery, left side (with golden contacts) first, into the battery compartment. 4. Press the battery down until the battery fully rests on the bottom of battery compartment. 5. Put the battery cover back, tab first, and press down until the latch secure the battery cover. Charge the Battery Cradling the device 1. Sliding the device into the cradle with slight angle. 8 Uniterminal B32 User Guide 2. Slightly push the device back. 3. The device is sitting on the cradle in a secure mode. To charge the device using the Single-Slot Cradle 1. Connect the power supply to the cradle. Make sure the cradle LED is green. 2. Put the device on the cradle. 3. Charging status LED on device. 4. The LED will illuminate to confirm connection (off indicates not charging, orange indicates charging, green indicates fully charged and red indicates fault). To charge the device using the USB / Charging Cable 1. Connect the power supply to the USB or charging cable. 2. Connect USB / charging cable to the bottom of the device. 3. Insert appropriate AC adapter and plug in the power supply. Removing Battery 1. Slide the battery latch to the left. 2. The battery cover will lift up slightly, grasp the battery cover and remove it. 3. Remove the battery, right side first, from the battery compartment. 9 Uniterminal B32 User Guide Turn the Device On After installing the battery in the device, press the power button at the top of the device. The first time the device is turned on, calibrate the screen using the stylus. The stylus is located on the back of the device. To calibrate, simply follow the onscreen instructions and remember to save your settings. --NOTE--: If your device came pre-loaded with a custom software application, a welcome utility may not appear. Follow the onscreen instructions. 1 Uniterminal B32 User Guide Understanding the Desktop Start Wireless Lan Status Current Application Time/Date Bluetooth Icon Toogle between desktop and applications Keypad/Input Panel 11 Uniterminal B32 User Guide Set Up Your Device --NOTE-Always use the stylus for tapping or making strokes on the handheld computer screen. DO NOT use a pen, pencil or any other object on the touch screen display. Recalibrate the Screen The first time you start the device handheld computer, setup instructions will appear on screen. These instructions include a calibration screen or digitizer. Calibration aligns the internal circuitry of the handheld computer with its touch-sensitive screen so the handheld can detect tapping selected elements on the screen. You can also recalibrate your screen at any time. To recalibrate your screen: 1. 2. Tap the Start menu > Settings > Control Panel > Stylus. Select Calibration Tab, tap Recalibrate, and follow the on-screen instructions. Set the Display Properties You may change the display appearance easily base on your preference in 1 Uniterminal B32 User Guide the Control Panel. 1 Uniterminal B32 User Guide To choose a background/theme 1. Tap Start > Settings > Control Panel. 2. Double tap Display icon. 3. Choose background from the dropdown menu or click Browse to select the background you like. 4. Click OK. To change backlight perference 1. 2. 3. Tap Start > Settings > Control Panel. 4. You may save battery life by choosing the on screen options 5. 6. Click on Advanced tap to adjust brightness by moving the arrow left side or right side. Double tap Display icon. Select Backlight tab. To disable the backlight, unclick the Enable Backlight box. 1 Uniterminal B32 User Guide Set Volume and Enable Sounds 1. Tap Start > Settings > Control Panel. 2. Double tap Volume & Sounds icon. 3. Tap the volume tap. Adjust base on your preferences. 4. Tap the Sounds tab to select sounds. You may click Preview to sample any sound. 5. Click OK. Change Keyboard Options To change repeat properties 1. Tap Start > Settings > Control Panel. 2. Double tap Keyboard icon and select Repeat tab. (a) Click the box to enable character repeat. 1 Uniterminal B32 User Guide (b) Use stylus to move the left and right arrow in the Repeat Delay bar and Repeat rate bar to set your preference. 3. You can tap in the blank box to test. To assign buttons function 1. Tap Start > Settings > Control Panel. 2. Double tap Keyboard icon and select Program Buttons tab. 3. Select button assignment for each button in the dropdown list. 4. To restore the default settings, click Restore Defaults. To change key size on soft keyboard 1. Tap Start > Settings > Control Panel. 2. Double tap Input Panel icon and select Options. 3. Select Large Keys or Small Keys. 4. You may check the gesture styles once you click Use gestures box. 1 Uniterminal B32 User Guide View the Device Information 1. Tap Start > Settings > Control Panel. 2. Double tap HHT Panel. 3. Click Information tab and you can find out information of the device. Change General Settings Options To change Wakeup sources 1. Tap Start > Settings > Control Panel. 2. Double tap HHT Panel. 3. 4. (a) Select General tab. (b) Use Trigger Key to wake up device. (c) Use Power Key to wake up device. Select one of the following: Use Any Key to wake up device. To adjust External Power status 1 Uniterminal B32 User Guide 1. Tap Start > Settings > Control Panel. 2. Double tap HHT Panel. 3. Select General tab. 4. Select Active On or Always On. To change Keypad Light preference 1. Tap Start > Settings > Control Panel. 2. Double tap HHT Panel. 3. Select General tab. 4. You can disable Keypad Light by clicking Always Off. To change Power Button preference Disable power button by clicking check box. To change Power Button preference 1. Tap Start > Settings > Control Panel. 2. Double tap HHT Panel. 3. Select Scanner Setting tab. 4. Choose your own scanning preferences. Change Language and Regional Settings To set lanuage, regional and input lanagues preference Your device ships with pre-set regional, language and input settings. To change these settings, follow the directions below. The style in which numbers, currency, dates and times are displayed is specified in regional settings. To change these: 1. Tap Start menu > Settings > Control Panel > Regional Settings. 1 Uniterminal B32 User Guide 2. Do the following: (a) On the Region tab, select your region from dropdown menu. (b) On the Language tab, select your interface language from dropdown menu. (c) On the Input tab, set or install your input language. To formet numbers, currency, time and date 1. Tap Start menu > Settings > Control Panel>Regional Settings. 2. In the Region tab, click Customize. 3. Make your changes by using drop down menu and click ok in each tab. Change the Date and Time Display To set the time and date 1 Uniterminal B32 User Guide 1. Tap Start > Settings > Control Panel > Date/Time. 2. Select the correct Time Zone, and change the Date or Time. Open Applications 1. Tap Start > Programs. 2. Select the application you want to open. 2 Uniterminal B32 User Guide Remove Applications 1. Go to Start > Settings > System > Remove Program. 2. Select the program you want to delete, and click Remove. 3. Click Remove. Set Internet Options 1. Tap Start > Settings > Control Panel. 2 Uniterminal B32 User Guide 2. Double tap Internet Options icon. 3. You can see six tabs for you to customize settings. (a) (b) (c) (d) (e) (f) General: customize your start page, search page and user agent. You may delete browsing history. Connection: set the parameters for online access. Security: provides intranet, Internet, trusted and restricted sites access, including Active X controls and plug-ins. Privacy: to accept, block or prompt for first and third party cookies. Advanced: set parameters for accessibility, browsing, multimedia, TV features and security options. Popups: block popups, set exceptions and enable advanced event options. 2 Uniterminal B32 User Guide Reset Your Device Soft Reset In most situations, a soft reset reboots the device and saves all stored data. However, any data that has not been saved will be lost. To perform a soft reset, do the following: 1. Slide the battery latch to the left and grasp the battery cover and remove it. 2. Use a stylus to press the reset key and release. 3. The device is reset. Hard Reset A hard reset returns the device to factory settings, removing ALL applications and data from the device. Be sure that all data is backed up before performing a hard reset. To perform a hard reset, do the following: 1. Slide the battery latch to the left and grasp the battery cover and remove it. 2. Press “2” (or “8” if you want to format the NAND flash as well) on the numeric keypad. 3. Keep pressing the key, use a stylus to press the reset key and release. 4. When the green LED is flashing, release key “2” or “8”. 5. Put back the battery cover and calibrate the screen. 2 Uniterminal B32 User Guide Flash Rom 1. Copy NK.bin, EBOOT.nb0 and splash,bin (optional) to the root directory of the microSD card. 2. Open the battery cover, remove the battery. 3. Insert the microSD card. 4. Press and hold the left and riht side Scan / Action button. 5. Install the battery to the battery compartment. 6. Continue to press and hold the left and right side Scan / Action button until the Update Screen appears. 7. Once NK.bin, EBOOT.nb0 and splash.bin (optional) have 100% complete updated. 8. Remove the battery and microSD card from the device. 9. Insert the battery to the battery compartment again. 10. Performing the hard reset with NFLASH format. Barcode Scanning Barcode Scanning Demonstration and Setup To run the demo: 1. Tap the Start menu > Programs > HHT Applications > ScanSamp2. 2. Select Codes. 3. Manually select the type of barcode you need. 4. Tap OK to save. 5. Point the scanner at a barcode, and press any of the barcode scan trigger buttons on the device. 6. The results will display after a successful scan. 2 Uniterminal B32 User Guide Enable the ScanWedge Feature When the ScanWedge feature is enabled, data can be entered into the specified application by opening the application on the handheld and scanning a barcode. 1. Go to Start menu > Programs > HHT Applications > ScanWedge. 2. Select Enable from the ScanWedge menu. 3. Tap Setup > Symbology Config. You can then select enable all to enable every type of barcode or manually select the barcode symbologies you need. 4. Tap OK. Enter Data Entering Information on the Device You can enter data into your mobile computer by following ways: Barcode scanning: use scanner to capture data. Typing: use device’s keyboard. Touch screen: use on screen keyboard. Synchronizing: use ActiveSync, refer to Chapter 7 for more details. Using the Barcode Scanner Capture data and images by scanning barcodes into the handheld computer. See chapter 5 for details. Using the Onscreen Keyboard To open the onscreen keyboard 2 Uniterminal B32 User Guide 1. From the desktop or any open application, tap the Keyboard icon in the command bar. 2. Tap Keyboard from the popup menu. 3. The keyboard appears on the desktop or application. 2 Uniterminal B32 User Guide To close the onscreen keyboard 1. Select the Keyboard icon and tap Hide Input Panel. To change input panels 1. The standard alpha with numeric keyboard is the default. 2 Uniterminal B32 User Guide 2. For international, tap on áü key in the lower left corner of the alpha keyboard. Using ActiveSync to Transfer Data ActiveSync software lets you synchronize data between a device and a PC. To synchronize data, you must connect your device and PC directly using a cable or cradle or use a modem or network. Create a User Profile You can create a user profile to load data into a device without associating that data with a user name. 2 Uniterminal B32 User Guide Identification Notes Network ID To create a user profile 1. Tap Start > Settings > Control Panel. 2. Choose Owner icon. 3. Enter information in Identification, Notes and Network ID tab. 4. Tap OK to save changes. Set up/Delete a Partnership There are two types of partnerships that you can create with your device as follow:- 1. Automatically synchronize the files on your handheld device with your PC 2. Establish a guest connection and manually copy the files you want to synchronize To set up a partnership to automatically sync files 1. Connect your device to your PC. 2. Window Mobile Device Centre dialog box prompts. Point to Mobile Devices Settings and select Set up your device. 2 Uniterminal B32 User Guide 3. A Set Up Windows Mobile Partnership window pops up. Click Yes to set up partnership and tap Next. 3 Uniterminal B32 User Guide 4. Select the Files you want to automatically sync between your mobile device and your computer. Then tap Next. 5. Enter your device name in the box. Tick the box if you need to create Window Mobile Centre icon on desktop. Choose the way to synchronize date. Then tap Set Up. 3 Uniterminal B32 User Guide 6. After partnership is set up, your device will start to synchronize with your computer. Once complete, it will show the last sync time at the left bottom corner in the Window Mobile Device Centre window. To end a partnership 1. Unplug USB cable to disconnect the USB ActiveSync connection between the device and the PC. 2. Open Windows Mobile Device Centre, click Mobile Device Settings > End a partnership. 3 Uniterminal B32 User Guide 3. Choose the device which you want to be deleted from the list, and then click End partnership. 4. Click Yes when confirmation screen appears. 3 Uniterminal B32 User Guide To set up a guest partnership 1. Connect your device to your PC. 2. Windows Mobile Device Centre pops up. Click Connect without setting up your device. 3. Click File Management > Browse the contents of your device. 4. The guest connection is established, as shown. Select Explore to manually copy the files on your handheld to your desktop computer. Windows Explorer will appear with the folders and files on your mobile device. 3 Uniterminal B32 User Guide 5. Select the file or file(s) you want to move or copy. 6. Choose copy files and select a destination folder on your PC. Partnership Settings To change partnership connection settings: 1. Open Windows Mobile Device Centre. 2. Choose Mobile Device Settings > Connection Settings . 3. The Connection Settings window appears. Choose your preferences from the dropdown menus. Tap OK. 802.11 Wireless Configuration Wireless Local Area Network Access AR6K settings. 1. Click Start > Settings > Network Connections. 3 Uniterminal B32 User Guide 2. Hold on the AR6K_SD1 icon and select Enable. 3. Double click Connection icon on the command bar. 4. Click on the right arrow at the top bar and choose Wireless Information. 5. The device will detect available Wi-Fi networks. Select the network you want to connect to, and then click Connect. If not, click Menu > Add New to configure your own network. 6. On the Settings screen, change any of the following information: 7. In Network name, enter a name for the connection. 8. If you want to connect directly to another device or computer, and not to a network through an access point, select This is an ad-hoc network. 9. Select the authentication and data encryption methods. 10. Enter the network key information or select the The key is automatically provided check box. If it is necessary, ask the network administrator for authentication, encryption, and network key information. 11. Select or clear the Use IEEE 802.1X network access control check box. 12. To use Extensible Authentication Protocol (EAP) or smart card authentication, make the selections appropriate to your choice of authentication. Choose Properties if you need to change Authentication Settings. 13. Click OK. 3 Uniterminal B32 User Guide SUMMIT settings To set up network profile 1. Click Start > Settings > Network Connections. 2. Hold on SDCSD30AG1 icon and select Enable. 3. Click Start > Programs > Summit > scu. Or Start > Settings > Control Panel > Wifi. 4. The Active Profile is set as “Default”. 5. Tap Admin Login and enter password SUMMIT (all in uppercase letters). 3 Uniterminal B32 User Guide 6. Select Profile tab and tap the Scan button to search nearby access points. 7. Select the network you want to access, click Configure to set the network profile. 8. Click Yes to complete the new profile configuration. 9. Click back to Main tab, change the Active Profile to the network you chose in the last step. 10. You may check the connection status by tapping Status tab. 3 Uniterminal B32 User Guide For more information regarding to SUMMIT Client Utility, you may refer to the SUMMIT User’s Guide for software Version 2.01. GPRS Settings 1. Click Start > Settings > Control Panel > Network and Dial Up Connections. 2. Click Make New Connections. 3. Type the name of the connection. Select the Connection type. Click Next. 4. In the Select a modem option, select Hayes Compatible on COM1 as a modem driver. Click the Configure button. 5. The Device Properties window will pop up. Leave the port settings as it is, and click the Call Options tap. 3 Uniterminal B32 User Guide 4 Uniterminal B32 User Guide 6. In the Call Option, enter the Special Modem commands in the text box. This command may differ from one service provider to another, please check with your service provider. Then click Next. 7. Enter the phone number. Click Finish. 8. The new GPRS connection appears in the Network and Connections wizard. 9. Hold on the GPRS icon and click Connect . 10. A pop up window will show the device has connected to the GPRS network . 4 Uniterminal B32 User Guide Bluetooth Bluetooth is a short-range wireless communications technology. Devices with Bluetooth function can exchange information over a distance of about 10 meters (30 feet) even if the devices are in different rooms. To turn Bluetooth on/off 1. Tap Start> Settings > Control Panel. 2. Tap Bluetooth Device Properties. 3. Bluetooth Device Manager will appear. Click Tools > Turn on Bluetooth. 4 Uniterminal B32 User Guide --NOTE--: By default, Bluetooth is turned off. If you turn Bluetooth on and then turn off the device, Bluetooth also turns off. To make a device visible Other devices with Bluetooth capabilities can detect your device and attempt to beam information to it, establish a partnership, or use a Bluetooth service. 4 Uniterminal B32 User Guide 1. Tap Start > Settings > Control Panel. 2. Tap Bluetooth Device Properties. 3. Click Device > My Bluetooth Device. 4. Enter Friendly Name in the text box. Select Discoverable to make the device visible. Select Connectable if you want to create partnership with other Device. Select Authentication when you need passcode to pair up with other devices. Bluetooth Partnerships A partnership is a relationship that you create between your device and another Bluetooth device to securely exchange information. You have to enter passcode on both device to create a partnership, the devices need only have Bluetooth turned on to exchange information; they do not need to be visible. Once you create a partnership on both devices, they can exchange information without entering the passcode afterwards. 4 Uniterminal B32 User Guide To create a Bluetooth partnership 1. Ensure that the two devices are turned on, visible, and within close range. 2. Tap Start > Settings > Control Panel. 3. Tap Bluetooth Properties > Tools > Search Device. 4. Scan Device Wizard will appear. You may adjust the time for the discovery process. Click Next. 5. Your device searches for other devices with Bluetooth capabilities and displays them in the list. 4 Uniterminal B32 User Guide 6. Tap the name of the device to be paired, and tap Next. 7. In Passcode, enter an alphanumeric passcode between 1 and 16 characters, and tap Next. If there is no passcode, the device will be paired up with another immediately. 8. Tap Finish. To accept a Bluetooth partnership 1. Ensure that your device is turned on, visible and within close range. 2. If a passcode is requested, enter an alphanumeric passcode between 0 and 16 characters in passcode, and tap OK. You must enter the same passcode that was entered on the device requesting the partnership. To delete a Bluetooth partnership 1. Tap Start > Settings > Control Panel> Bluetooth Properties. 2. Bluetooth Device Manager window will appear. You can see the paired up device on your list. 3. Click the partnership you want to end and tap the Cross icon on the tool bar. 4. A confirmation window will pop up. Tap Yes to confirm. 4 Uniterminal B32 User Guide To transfer file 1. Tap Start > Settings > Control Panel> Bluetooth Properties. 2. Bluetooth Device Manager window will appear. Tap File > Send File. 3. Click Search to search the device. 4. Enter passcode if it is required in both devices. 5. A file browser will pop up Select the file and 4 Uniterminal B32 User Guide click OK. 6. Send File window will appear. When the file is sent, click Cancel to exit. To exit bluetooth 1. Tap the Bluetooth icon on the command bar and click Exit. Regulatory and Warning Regulatory Information Device and the logo are trademarks of our company. Other product and brand names may be trademarked or registered trademarks of their respective owners. Our company assumes no responsibility for any damage or loss resulting from the use of this guide. Our company assumes no responsibility for any loss or claims by third parties which may arise through the use of this product. Our company assumes no responsibility for any damage or loss caused by deletion of data as a result of malfunction, dead battery or repairs. Be sure to make backup copies of all important data on other media to protect against data loss. 4 Uniterminal B32 User Guide CE Marking and European Economic Area (EEA) Hereby, our company declares that this product is in compliance with the essential requirements and other relevant provisions of Directive, 1999/5/EC. Our company shall not be liable for use of our product with equipment (i.e., power supplies, personal computers, etc.) that is not CE marked and does not comply with the Low Voltage Directive. FCC Compliance Radio Frequency Interference Requirements-FCC Note: This equipment has been tested and found to comply with the limits for a Class B digital device, pursuant to Part 15 of the FCC rules. These limits are designed to provide reasonable protection against harmful interference in a residential installation. This equipment generates, uses and can radiate radio frequency energy and, if not installed and used in accordance with the instructions, may cause harmful interference to radio communications. However there is no guarantee that interference will not occur in a particular installation. If this equipment does cause harmful interference to radio or television reception, which can be determined by turning the equipment off and on, the user is encouraged to try to correct the interference by one or more of the following measures: Reorient or relocate the receiving antenna Increase the separation between the equipment and receiver Connect the equipment into an outlet on a circuit different from that to which the receiver is connected Consult the dealer or an experienced radio/TV technician for help. Battery Warning 1. Use manufacturer's original battery and charger only. Any incompatible battery or charger may result in a fire, explosion, or other hazard. 2. Do not disassemble or open, crush, bend or deform, puncture, or shred the battery. 3. Do not short-circuit a battery by allowing conductive materials to contact the battery terminals. 4 Uniterminal B32 User Guide 4. Do not immerse or expose the battery to water or other liquids. 5. Do not dispose of batteries in fire or place the battery into a microwave oven or dryer. 6. If battery leakage is found, avoid the liquid to come in contact with the skin or eyes. 7. If contact has been made, rinse the affected area with water and seek medical advice. 8. If you suspect damage to your equipment or battery, contact the manufacturer for inspection. 9. Follow the local regulations to dispose or recycle the used re-chargeable batteries. General information 1. Before using the standard charger, read all instructions and warnings. 2. Please retain these instructions for future reference. For more battery safety and charger safety guidelines, refer to the Quick Start Guide. 5 Uniterminal B32 User Guide E’ vietata la traduzione in altra lingua, la riproduzione, anche parziale, effettuata con qualsiasi mezzo (fotocopie, registrazioni, scansioni, etc) se non espressamente autorizzata per iscritto da Bancolini Symbol. Chi viola i diritti d’autore è soggetto a responsabilità civile. Tutti i prodotti e le denominazioni citati nell’ambito della presente pubblicazione sono marchi commerciali dei rispettivi fabbricanti. Tutti i diritti sono riservati. UNITERMINAL è marchio commerciale registrato di Bancolini Symbol. Limiti di Responsabilità Bancolini Symbol si riserva il diritto di apportare modifiche alle specifiche ed alle altre informazioni riportate in questo documento senza preavviso e all’utente si raccomanda di rivolgersi sempre ad Bancolini Symbol per avere conferma di eventuali modifiche; le informazioni in questa pubblicazione non costituiscono alcun vincolo per Bancolini Symbol. Bancolini Symbol non può essere ritenuta responsabile per errori ed omissioni tecnici od editoriali; né per eventuali danni che derivino dalla fornitura, dalle prestazioni o dall’utilizzo di questo materiale. Bancolini Symbol non è responsabile per l’utilizzo del prodotto con dispositivi (es alimentatori, personal computer, ecc…) che non riportino il marchio CE e che non siano conformi alla Direttiva sulla Bassa Tensione.Si avverte l’utente che cambiamenti o modifiche non espressamente approvati da Bancolini Symbol potrebbero invalidare il diritto dell’utente ad utilizzare l’apparecchio. Esclusione di responsabilità per danni conseguenti In nessun caso Bancolini Symbol o chiunque abbia preso parte allo sviluppo, realizzazione o consegna del prodotto (sia hardware che software) potrà essere ritenuto responsabile per eventuali danni di qualsiasi genere (compresi in forma esemplificativa ma non esaustiva, danni derivanti da interruzione di attività, perdite di profitto, di informazioni commerciali, od altre perdite di denaro), derivanti dall’uso, dall’uso dei suoi risultati o dall’errato uso del prodotto, anche se si e’ preventivamente notificata ad Bancolini Symbol la possibilità di detti danni. Disimballaggio e notifica dei danni Conservare l’involucro ed il materiale di imballo dell’unità nel caso se ne rendesse necessaria la spedizione. Verificare che il terminale non abbia subito danni durante il trasporto; nel caso procedere immediatamente alla notifica ed alla sottoscrizione della relativa richiesta di risarcimento presso l’azienda del vettore. Bancolini Symbol non può essere ritenuta responsabile per danneggiamenti procurati all’attrezzatura durante il trasporto e non ne riconosce quindi la riparazione in garanzia. BANCOLINI SYMBOL srl VIA EMILIA 292 40068 SAN LAZZARO DI SAVENA (BO) tel +39 051 625.85.89 - fax +39 051 625.85.76 [email protected] www.bancolini.com © 2013 BANCOLINI SYMBOL srl. Bologna. Italia Tutti i diritti riservati 5