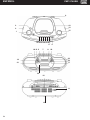
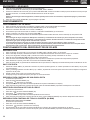
1
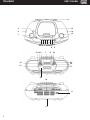
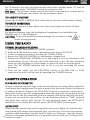
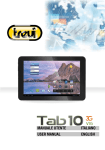
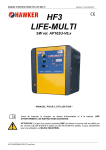
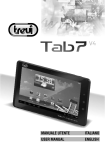
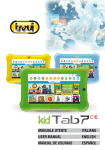
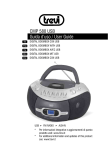
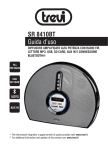
CMP 574 USB Guida d’uso / User guide RADIOREGISTRATORE STEREO STEREO RADIO RECORDER CON CD/MP3 / USB WITH CD/MP3 / USB Manuale d'uso e installazione Instruction manual RADIO-MEGNETOPHONE STEREO STEREO-RADIO KASSETTENRECORDER AVEC LECTEUR CD/MP3 / USB MIT CD/MP3 / USB Mode d’emploi et installation RADIO GRABADORA STEREO CON UNIDAD LECTORA DE CD/MP3 USB Manual de uso e instalación Gebrauchs- und Installationshandbuch CASSETTE PLAYBACK RECORDER USB INPUT ITALIANO CMP 574USB 6 3 10 2 12 15 1 25 26 27 28 29 30 9 18 13 5 7 8 4 23 22 24 17 19 21 20 16 11 14 2 ITALIANO CMP 574USB VOLTAGGIO PERICOLOSO Questo simbolo riportato sul retro dell'apparecchio ed in questo manuale segnala la presenza all'interno di questo apparecchio di componenti operanti ad alta tensione, non apritelo per evitare il rischio di scosse elettriche. AVVERTENZE SUL LASER ATTENZIONE Questo simbolo riportato sul retro dell'apparecchio ed in questo manuale indicano la presenza sugli stessi di importanti istruzioni per la sicurezza d'uso. Leggetele attentamente prima di utilizzare l'apparecchio. Questo apparecchio è dotato di un sistema di lettura con raggio laser. Benché il laser sia di bassa potenza e con dispositivo di sicurezza che ne impedisce il funzionamento a sportello aperto attenetevi scrupolosamente alle seguenti avvertenze: Non avvicinate l'occhio alla lente del laser con l'apparecchio aperto, pericolo di lesione della retina. Non tentate di smontare o manomettere l'unità laser, pericolo di assorbimento di radiazioni. NOTE D'USO Questo apparecchio è uno strumento elettronico di alta precisione, evitate quindi di utilizzarlo nei seguenti casi: • Vicino a forti fonti di calore come caloriferi e stufe. • In luoghi molto umidi come stanze da bagno, piscine, ecc. • In luoghi molto polverosi. • In luoghi soggetti a forti vibrazioni. Posizionate l'apparecchio in modo che ai suoi lati ci sia sempre abbastanza spazio per la libera circolazione di aria (almeno 5 cm). Non ostruite le feritoie di ventilazione. Se dei liquidi penetrano all'interno dell'apparecchio scollegate immediatamente la spina dalla presa e portate l'apparecchio al più vicino centro assistenza autorizzato TREVI. Controllate sempre prima di accendere l'apparecchio che i cavi di alimentazione e di collegamento siano installati correttamente. CURA E MANUTENZIONE Per la pulizia si consiglia l’ uso di un panno morbido, leggermente inumidito. Evitate solventi o sostanze abrasive. IMPORTANTE La buona costruzione di questo apparecchio ne garantisce per lungo tempo il perfetto funzionamento. Se tuttavia dovesse presentarsi qualche inconveniente, sarà opportuno consultare il più vicino Centro Assistenza autorizzato. TREVI persegue una politica di continua ricerca e sviluppo. Pertanto i prodotti possono presentare caratteristiche diverse da quelle descritte. DESCRIZIONE COMANDI 1. 2. 3. 4. 5. 6. 7. 8. 9. 10. 11. 12. 13. 14. 15. Controllo VOLUME Selettore funzioni CD-MP3-USB/TAPE/RADIO Tasto STANDBY Ingresso USB Indicatore STANDBY Antenna FM Display LCD Indicatore FM STEREO Vano CD Maniglia per il trasporto Ingresso alimentazione AC Selettore FM STEREO/AM Tasto BASS enfatizzazione bassi Vano batterie Controllo sintonia 16. 17. 18. 19. 20. 21. 22. 23. 24. 25. 26. 27. 28. 29. 30. Ingresso cuffie Tasto STOP, arresto CD Tasto PROG/P-MODE, programmazione ripetizione del CD Tasto SKIP -, salto brano precedente Vano cassetta Tasto SKIP +, salto brano successivo Tasto FOLD -/-10 Tasto FOLD +/+10 Tasto PLAY/PAUSE/USB, riproduzione/pausa CD Tasto PAUSE, pausa cassetta Tasto STOP/EJECT, arresto/espulsione cassetta Tasto F.FWD, avanzamento rapido cassetta Tasto RWD, riavvolgimento rapido cassetta Tasto PLAY, riproduzione cassetta Tasto REC, registrazione cassetta ALIMENTAZIONE BATTERIE Aprire il vano batterie (14) ed inserire 8 batterie formato "D" (UM-1) avendo cura di rispettare attentamente le polarità indicate. Sostituire immediatamente le batterie scariche e toglierle se prevedete di non utilizzare l' apparecchio per lungo tempo. RETE Collegare il cavo di alimentazione alla presa AC(11). Inserire la spina in una presa di corrente C.A. 230V - 50Hz. Non collegare l'apparecchio a prese con tensione diversa da quella indicata. 3 ITALIANO CMP 574USB ACCENSIONE/SPEGNIMENTO 1. Premere il tasto di accensione generale STANDBY (3). 2. Posizionare il selettore funzioni (2) su CD-MP3-USB, TAPE o RADIO per attivare l'apparecchio. 3. Posizionando il selettore funzioni (2) su CD-MP3-USB, se entro 15 min non verrà effettuata alcuna operazione il lettore entrerà in modalità STANDBY. NOTA A causa di evetuali scariche elettromagnetiche l'apparecchio potrebbe andare in reset. Per ripristinarlo è sufficiente spegnerlo e riaccenderlo. 4. Ripremere il pulsante STANDBY (3) per spegnere l'unità. FUNZIONAMENTO FUNZIONAMENTO RADIO 1. 2. 3. 4. 5. 6. Posizionare il selettore funzioni (2) su RADIO, il display LCD (7) della radio digitale s'illumina. Selezionare la banda che desiderate ascoltare (AM/FM stereo) con il selettore (12). Sintonizzatevi sull’emittente desiderata con il controllo TUNING (15). Se la stazione che state ascoltando è stereo l'indicatore FM STEREO (8) si illuminerà. Regolare il volume come desiderate con il controllo VOLUME (1). Se durante l’ascolto di una emittente FM stereo avvertite forti rumori di fondo e fruscii portare il selettore (12) sulla posizione FM. NOTE Per ottenere la migliore ricezione in FM estendete e orientate l’antenna (6). Se la ricezione non è buona provate a regolare diversamente la lunghezza e l’orientamento dell’antenna, comunque la qualità della ricezione in FM dipende molto dal luogo dove è posto l’apparecchio. L’antenna AM è interna all’apparecchio per cui orientate l’apparecchio per ottenere la migliore ricezione. L a vicinanza di apparecchi TV, lampade al neon o altri elettrodomestici può provocare disturbi nella ricezione di programmi radio, in questo caso allontanate il radioregistratore dall’apparecchio che disturba. FUNZIONAMENTO LETTORE CD-MP3 RIPRODUZIONE 1. 2. 3. 4. 5. 6. 7. Posizionare il selettore funzioni (2) sulla posizione CD-MP3-USB, il display LCD(7) s'illumina. Aprire il vano CD(9) e inserire il disco con il lato scritto rivolto verso l'alto. Richiudere lo sportello con cura. Dopo qualche secondo il display LCD(7) mostra il numero delle tracce (brani) presenti sul disco. Premete il tasto PLAY/PAUSE/USB (24) per iniziare la riproduzione. Premere il tasto PLAY/PAUSE/USB (24) per attivare la pausa; il simbolo di riproduzione inizia a lampeggiare. Per disinserire la pausa premere ancora una volta il tasto PLAY/PAUSE/USB(24). Premere il tasto STOP(17) per fermare definitivamente la riproduzione, il display LCD mostrerà le tracce presenti sul CD. SALTO TRACCIA 1. Premendo il tasto SKIP +(21) durante l’ascolto si passa alla traccia successiva, mentre con il tasto SKIP - (19) si passa alla traccia precedente. 2. Tenendo premuto il tasto SKIP +(21) o SKIP -(19) durante l'ascolto si ricerca velocemente un particolare passaggio musicale. 3. Rilasciare il tasto per tornare alla normale riproduzione. 4. Il display LCD(7) mostra sempre quale traccia si sta ascoltando. RIPRODUZIONE ININTERROTTA DI UNA SINGOLA TRACCIA - 1. 2. 3. 4. In modalità di riproduzione. Premere il tasto PROG./P-MODE (18). Il simbolo “ ” lampeggierà sul display. Il lettore CD riprodurrà ininterrottamente la traccia visualizzata sul display. Per cancellare la riproduzione continua della singola traccia, premere il tasto PROG./P-MODE (18) fino alla scomparsa del simbolo. RIPETIZIONE ININTERROTTA DELL’INTERO DISCO - 1. 2. 3. 4. In modalità di riproduzione. Premere due volte il tasto PROG./P-MODE(18). Il simbolo “ ” apparirà sul display. Il lettore CD riprodurrà ininterrottamente l’intero disco. Per cancellare la riproduzione continua dell'intero disco, premere il tasto PROG./P-MODE (18) fino alla scomparsa del simbolo. RIPRODUZIONE ININTERROTTA DELL'INTERA CARTELLA (FOLDER) NB: funzione valida solo per cd MP3. - 1. 2. 3. 4. In modalità di riproduzione. Premere tre volte il tasto PROG./P-MODE(18). Il simbolo “ FOLDER” apparirà sul display. Il lettore CD riprodurrà ininterrottamente il numero della cartella visualizzata sul display. Per cancellare la riproduzione continua del singolo album, premere il tasto PROG./P-MODE (18) fino alla scomparsa del simbolo. RIPRODUZIONE CASUALE DEI BRANI - 1. 4 In modalità di riproduzione. Premere quattro volte il tasto PROG./P-MODE(18). CMP 574USB ITALIANO 2. Sul display compare la scritta RAND. 3. Il lettore CD riproduce i brani secondo una sequenza casuale. 4. Per interrompere la riproduzione casuale dei brani premete una volta il tasto PROG./P-MODE(18). PROGRAMMAZIONE È possibile selezionare l'ordine con cui vengono riprodotti i brani. 1. Premere il tasto STOP (17) per fermare la riproduzione. 2. Premere il tasto PROG./P-MODE (18), sul display appare la scritta "P01" lampeggiante. 3. Selezionare il brano che desiderate riprodurre per primo con i tasti SKIP+ (21) o SKIP- (19). 4. Premere il tasto PROG./P-MODE (18) per confermare. 5. Ripetere i punti 3 e 4 per memorizzare e riprodurre i brani che desiderate; per i cd audio si possono memorizzare un massimo di 20 brani, mentre per i cd MP3 si possono memorizzare un massimo di 99 brani. 6. Premere il tasto PLAY/PAUSE/USB (24) per iniziare la riproduzione. 7. Premere due volte il tasto STOP (17) per annullare la programmazione. FUNZIONE ALBUM NB: funzione valida solo per cd MP3 contenenti directory o cartelle. 1. Quando ascoltate un brano Mp3 e volete cambiare directory, tenere premuto il tasto FOLD +/+10 (23) FOLD. -/-10 (22). per posizionarsi sulle cartelle successive/precedenti. 2. Premere il tasto FOLD. +/+10 (23) per ascoltare le dieci tracce successive. Premere il tasto FOLD -/-10 (23) per ascoltare le dieci tracce precedenti. FUNZIONAMENTO INGRESSO USB RIPRODUZIONE 1. 2. 3. 4. 5. 6. 7. 8. 9. - Per un corretto funzionamento del lettore mp3, assicuratevi che non sia presente alcun CD nel vano cd. Collegare un lettore MP3 dotato di presa USB all'ingresso USB(4). Posizionare il selettore funzioni (2) sulla posizione CD-MP3-USB. Premere e tenere premuto il tasto PLAY/PAUSE/USB (24) per commutare sull'ingresso USB. Sul display LCD(7) compare la scritta USB, attendere qualche secondo che il lettore carichi tutti i file MP3. Premete il tasto PLAY/PAUSE/USB (24) per iniziare la riproduzione. Per inserire la pausa premere una volta il tasto PLAY/PAUSE/USB(23). Per disinserire la pausa premere una seconda volta il tasto PLAY/PAUSE/USB(23). Premere il tasto STOP(17) per fermare definitivamente la riproduzione. Fare riferimento al paragrafo "funzionamento lettore cd-mp3" per il resto delle funzioni. FUNZIONAMENTO RIPRODUTTORE CASSETTE RIPRODUZIONE CASSETTE 1. 2. 3. 4. 5. 6. 7. 8. Posizionare il selettore (2) sulla posizione TAPE. Inserire un cassetta nel vano (20) con il lato che desiderate ascoltare rivolto verso l'esterno. Regolare a vostro piacimento il volume(1). Premere il tasto PLAY (29) per iniziare la riproduzione. Premere il tasto PAUSE (25) per fermare momentaneamente la riproduzione, premerlo nuovamente per riprenderla. Per far avanzare velocemente il nastro premete il tasto F.FWD(27). Per riavvolgere velocemente il nastro premete il tasto R.REW(28). Premere il tasto STOP/EJECT(26) per fermare definitivamente la riproduzione, premerlo nuovamente per estrarre la cassetta. REGISTRAZIONE DA ALTRE SORGENTI 1. 2. 3. 4. 5. Posizionare il selettore (2) su CD-MP3-USB e avviare la traccia desiderata, o su RADIO e sintonizzatevi sulla stazione desiderata. Inserire la cassetta nel vano (20). Premere il tasto REC(30) per iniziare la registrazione. Utilizzare il tasto PAUSE(25) per fermare momentaneamente la registrazione, premerlo nuovamente per riprenderla. Premere il tasto STOP/EJECT(17) per fermare definitivamente la registrazione. CARATTERISTICHE TECNICHE GENERALI Alimentazione:.................................................................................................. AC 230V - 50Hz Batterie 8 "D" (UM1) non incluse Potenza:........................................................................................................... 1.8 W x 2 (18 W pmpo) Consumo in Stand-by:...................................................................................... <0,5W Dimensioni:....................................................................................................... 358x155x240 mm 5 ENGLISH CMP 574USB IMPORTANT: Please read before using and keep for future reference. IMPORTANT SAFETY INSTRUCTIONS WARNING: TO PREVENT FIRE OR SHOCK HAZARD DO NOT USE THIS PLUG WITH AN EXTENSION CORD, RECEPTACLE OR OTHER OUTLET UNLESS THE BLADES CAN BE FULLY INSERTED TO PREVENT BLADE EXPOSURE. TO PREVENT FIRE OR SHOCK HAZARD. DO NOT EXPOSE THIS APPLIANCE TO RAIN OR MOISTURE. This lightning flash with arrowhead symbol, within an equilateral triangle, is intended to alert the user to the presence of insulated dangerous voltage within the products enclosure that may be of sufficient magnitude to constitute a risk of electric shock presents. 1. 2. 3. 4. 5. 6. 7. 6 Warning: to reduce the risk of electric shock, do not remove cover (or back ) no user serviceable part inside. Refer servicing to qualified service personnel. The exclamation point within an equilateral triangle is intended to alert the user to the presence of important operating and maintenance (servicing) instructions in the literature accompanying the appliance. Read these instructions. Keep these instructions. Heed all warnings. Follow all instructions. Do not use this apparatus near water. Clean only with dry cloth. Do not block any ventilation openings. Install in accordance with the manufactures instructions. 8. Do not install near any heat sources such as radiators, heat registers, stoves, or other apparatus (including amplifiers) that produce heat. 9. Do not defeat the safety purpose of the polarized or grounding type plug. A polarized plug has two blades with one wider than the other. A grounding type plug has two blades and a third grounding prong. The wide blade or the third prong are provided for your safety. If the provided plug does not fit into your outlet, consult an electrician for replacement of the obsolete outlet. 10. Protect the power cord from being walked on or pinched particularly at the plugs, convenience receptacles, and at the point where it exits from the apparatus. 11. Only use attachments/accessories specified by the manufacturer. CMP 574USB ENGLISH 12. Unplug the apparatus during lightening sorts or when unused for long periods of time. 13. Refer all servicing to qualified personnel. Servicing is required when the apparatus has been damaged in any way, such as power supply cord or plug is damaged, liquid has been spilled or objects have fallen into the apparatus, the apparatus has been exposed to rain or moisture, does not operate normally, or has been dropped. 14. This appliance should not be exposed to dripping or splashing water and no objects filled with liquids such as vases should be placed on apparatus. Dripping warning: The product shall not be exposed to dripping or splashing and that no objects filled with liquids, such as vases, shall be placed on the product. Ventilation warning: The normal ventilation of the product shall not be impeded for intended use Disconnect device warning: Main plug is used as the connection, so it should always remain ready operate. LOCATION OF CONTROLS 7 ENGLISH CMP 574USB FEATURES AND CONTROLS 1. 2. 3. 4. 5. 6. 7. 8. 9. 10. 11. 12. 13. FM ANTENNA HANDLE TUNING KNOB CD DOOR OPEN/CLOSE CASSETTE FUNCTION KEYS FM STEREO INDICATOR VOLUME CONTROL STANDBY BUTTON CD PROG./P-MODE BUTTON BASS BUTTON STANDBY INDICATOR LCD DISPLAY FOLD-/ -10 BUTTON 14. 15. 16. 17. 18. 19. 20. 21. 22. 23. 24. FOLD+/+10 BUTTON CD PLAY/PAUSE/USB BUTTON CD STOP BUTTON CD SKIP/SEARCH BACKWARD BUTTON CD SKIP/SEARCH FORWARD BUTTON PHONES JACK BATTERY DOOR AC SOCKET FUNCTION SWITCH BAND SELECTOR USB PORT INTRODUCTION Thank you for purchasing this product. Please read through these operating instructions, so you will know how to operate your equipment properly. After you finished reading the instructions manual, put it away in a safe place for future reference. CAUTION: 8 Do not block the ventilation openings or holes. Do not place any naked flame sources, such as lighted candles, on the apparatus. ENGLISH CMP 574USB When discarding batteries, environmental problems must be considered and local rules or laws governing the disposal of these batteries must be followed strictly. Invisible laser radiation when open and interlock failed or defeated. Avoid direct exposure to beam. To prevent fire or shock hazard, do not expose this appliance to rain or moisture. NOTE: The manufacturer is not responsible for any radio or TV interference caused by unauthorized modifications could void the user's authority to operate the equipment. IMPORTANT FOR LASER PRODUCTS REPRODUCTION OF LABELS 1. CLASSIFICATION LABEL, PLACED ON REAR ENCLOSURE. 2. WARNING LABEL, PLACED INSIDE THE UNIT. CAUTION: Do not open the unit. There are no user serviceable parts inside the unit; consult all servicing to qualified service personnel. Discs for Playback This system can playback all digital audio CD, MP3, WMA finalized digital audio CD-Recordable (CD-R) discs, finalized digital audio CD-Rewritable (CD-RW) discs and CD-DA format digital audio CD/CD-R/CD-RW discs. POWER SOURCE This unit is designed to be operated on AC/DC. AC OPERATION Plug the smaller end of AC power cord into AC jack on unit and the other bigger end into AC wall outlet. The batteries will be automatically disconnected. DC OPERATION Open the BATTERY COMPARTMENT DOOR. Install 8 pcs UM-1/D size batteries (not included) into compartment. Please follow correct polarities as indicated. CAUTION Remove batteries if they are flat or not being used for a long period of time. Batteries contain chemical substances, so they should be disposed of properly. BASIC FUNCTION SWITCHING ON THE UNIT Press the standby button and set the FUNCTION SWITCH to CD/MP3/USB or RADIO position to turn on the unit. NOTE: In CD/MP3/USB mode, when the unit is not providing the main function 4 9 ENGLISH CMP 574USB for 15 minutes, the unit will automatically switch into standby mode. To turn on the unit again, press "STANDBY" button or replug the unit. ESD hints – The product maybe reset or not reset to operation of control due to electrostatic discharge, just switch off and reconnect again. TO ADJUST VOLUME Rotate the VOLUME CONTROL back and forth to increase and decrease volume. TO ENJOY MORE BASS Depress BASS button to have more extra bass, press again to switch off bass. HEADPHONES For private listening, plug the headphones/earphones (not included) into PHONES jack (3.5 mm diameter). CAUTION: To prevent possible hearing damage, do not listen at high volume levels of long periods. USING THE RADIO TUNING IN RADIO STATIONS 1. 2. 3. 4. 5. Slide the FUNCTION switch to "RADIO" position. Slide the BAND switch to select the desired wave band: AM/FM ST. Tune to required station by rotating the TUNING KNOB. Rotate the VOLUME CONTROL to comfortable volume level. Extend the TELESCOPIC ANTENNA to its full length if you are listening to FM broadcasting. Gently rock the unit back and forth to get the best reception when you are listening to AM program, or place the unit in an open place. Note: The FM STEREO indicator will be on if you are receiving FM stereo program. 6. Turn off the radio, Set the FUNCTION switch to CD/MP3/USB or TAPE operation, or switch off the unit by pressing the STANDBY button. CASSETTE OPERATION PLAYBACK OF CASSETTE Be sure to tighten any slack tape in the cassette before use, using either a pencil or a ball-point pen, simply insert the pen or pencil into the centre of spool and rotate to remove slackness. Depress the STOP/EJECT button to open the cassette door. Insert the cassette into the compartment with the open end facing upwards and the full reel on the left hand side, push the cassette well down and close the door, be sure not to touch the tape surface, Set the Function switch to “TAPE” position and press the cassette play button. To stop playback, press the STOP/EJECT button once. To release the cassette, press the STOP/EJECT button again. AUTO STOP When the tape reaches the end during playback or recording, the built-in auto stop system will release the depressed play, record keys. The auto stop system operates while recording from the built-in radio or CD player, only the cassette function is brought automatically to stop mode and the radio or CD Player will 10 continue to play. ENGLISH CMP 574USB RADIO RECORDING A. Install blank cassette tape. B. Set FUNCTION SWITCH to “RADIO” position. After selecting the desired band and tune the TUNING KNOB to desired broadcast station. Then push down RECORD BUTTON and PLAY BUTTON simultaneously. C. After recording the desired broadcast, depress the STOP/EJECT BUTTON lightly, and then set FUNCTION SWITCH to “TAPE” position in order to listen to the recorded broadcast. D. Press REW button then play button to playback your recording. ERASURE: When you record over previously recorded tape, the original recording is automatically erased and replaced by the new recording. CD/MP3 RECORDING A. Install a blank tape into cassette compartment. B. Set the FUNCTION switch to “CD/MP3/USB” position. Load a disc into the disc compartment, start playback by pressing the PLAY/PAUSE/USB button after the unit finished reading the disc. C. Depress the RECORD BUTTON and PLAY BUTTON simultaneously. Recording starts. Press the STOP/EJECT BUTTON lightly to end recording, or the unit will stop recording automatically while the tape reaches its end. D. To listen to the recording, set the FUNCTION switch to select “TAPE” playing mode, then start tape playback. TYPES OF CASSETTE Use only good quality cassettes (IEC TYPE 1) for making recordings. May be used to replay other types of cassette but is unable to make proper recording on these more specialized tapes. The use of C120 cassettes is NOT recommended in this machine. PROTECTING RECORDING Normally, anything recorded on the tape is automatically erased when new recording is made. It is possible to protect your recording from accidental erasure by removing the tabs found on the rear of the cassette. ERASE TAB FOR SIDE “A” When the cassette is held with the recorded side upper-most and exposed tape facing the front, the protective tab will be found on the left rear of the cassette. All pre-recorded cassette are protected in this way to prevent accidental erasure of the commercial recording. “Protected” cassette will prevent the record button from being operated. If at any time you attempt to record and find that this button will not depress, never force the mechanism or it may be damaged. Check that a cassette has been loaded and that tab has not been removed. Recording on a cassette from which the tabs have been removed can be done by covering the tab openings with a piece of adhesive tape. 6 11 ENGLISH CMP 574USB CARE OF CASSETTE MECHANISM Gently clean the tape head and pinch wheel/capstan assemblies after every 10 hours of using the unit. A range of cassette care products are available. The erase head and record/play head and the surface of the pinch roller are delicate and must not be touched with metal objects such as screwdrivers. You may find it easier to clean the assembly by pressing the PLAY button to bright head and pinch roller into view. Be sure to press the STOP button after cleaning the mechanism. Damage to the pinch wheel can occur if the unit is left in PLAY mode with the power switch off. Under no circumstances should you attempt to lubricate any part of the machine. USING THE CD/MP3 LOADING A DISC 1. 2. 3. 4. Set the FUNCTION switch to CD/MP3/USB position. Open the CD door. “ OP ” will be shown on the display. Place an audio CD into the tray with the label side facing up. Close the CD door. The total number of tracks will appear on the display after several seconds. 5. To remove the CD, press to open CD compartment lid, grasp the CD by its edges, and carefully take it out. Note: To ensure good system performance; wait until the disc tray completely reads the disc before proceeding. If no disc is loaded into the compartment, or the disc is placed upside down, the display will show N0d. PLAYING A DISC 1. Press the PLAY/PAUSE/USB button to start playback. The playback starts from track 1, the “ ” indicator is shown on the display. To interrupt playback, press the PLAY/PAUSE/USB button. The “ ” indicator and the current track will flash on the display. To resume playback, press the PLAY/PAUSE/USB button again. 2. To stop playback, press the STOP button, the total number of tracks appears on the display. SELECTING A DESIRED TRACK/PASSAGE To select a desired track 12 7 ENGLISH CMP 574USB Press the CD SKIP/SEARCH FORWARD/BACKWARD button repeatedly in stop mode or during play until the desired track appears on the display. Press the PLAY/PAUSE/USB button to start play. To search for a particular passage during playback (track scanning at high speed) Press and hold the CD SKIP/SEARCH FORWARD/BACKWARD button to scan the current playing track at high speed until desired point passage, and then release the button. Playback will start again from this point. To select a song which track number exceeds 10 (for MP3 disc only) To select a song/track which number exceeds 10, Press the FOLD+/+10 or FOLD-/-10 button each time to skip forward/backward 10 tracks, then press the CD SKIP/SEARCH FORWARD/BACKWARD button to select desired track. For example: to select the 17th track, press FOLD+/+10 button, and then press the CD SKIP/SEARCH FORWARD button six times immediately. To Select A Desired Folder (for MP3 disc only) (if the MP3 disc contains more than one folder) Press and hold the FOLD+/+10 or FOLD-/-10 button more than 2 second to skip next/previous folder. Until the desired folder number appears on the LCD display, then release the button. PROGRAM TRACKS Programming tracks of disc are possible when playback is stopped. Up to CD 20 tracks /MP3 99 tracks can be stored in the memory in any order. 1. In stop mode, press the PROG./P-MODE button, the “PROGRAM” will flash and the P01 indicator will be on. 2. Press the CD SKIP/SEARCH FORWARD button to select the first desired track to be programmed. 3. Press the PROG./P-MODE button to enter. The display changes to show P02. 4. Repeat steps 2 & 3 to store other desired tracks until all tracks are programmed. 5. Press the PLAY/PAUSE/USB button to start playback from the first programmed track. 6. Press the STOP button to stop program playback. To Erase the Memory (Program) To clear the program, you have two options: 1. Press the STOP button when the disc is stopped, or 2. Open the CD compartment lid, program will be erased. REPEAT To Repeat a Single Track 1. Press the PROG./P-MODE button once in play mode, “ ” will flash on the display. The current track will be played repeatedly until the STOP button is pressed 2. To cancel Repeat function, press the PROG./P-MODE button, until the “ ” disappear on the LCD display. 8 13 ENGLISH CMP 574USB To repeat all the Tracks 1. Press PROG./P-MODE button twice in play mode, “ ” shows steady on the display, all tracks on the disc will be played repeatedly until the STOP button is pressed. 2. To cancel Repeat function, press the PROG./P-MODE button, until the “ ” disappear on the LCD display. To repeat current Directory (for MP3 only) 1. Press PROG./P-MODE button twice in play mode, “ FOLDER” shows steady on the display, the current directory will be played repeatedly until the STOP button is pressed. 2. To cancel Repeat function, press the PROG./P-MODE button, until the “ FOLDER” disappear on the LCD display. RANDOM PLAY Press the PROG./P-MODE button in play mode till the “RAND ” shows steady on the display, the random play will start from next track automatically(or press CD skip forward button), until all tracks are played over and then stop. Press the PROG./P-MODE button once to cancel. LISTENING TO USB FLASH DISK DEVICE 1. Set the FUNCTION switch to CD/MP3/USB position. 2. Connect the USB Flash Disk Device into the USB PORT. 3. If the audio CD in the tray, please press and hold the PLAY/PAUSE/USB button to select the USB function. 4. If the USB is readable, the display will show USB and The total number of tracks after several seconds. 5. Press the PLAY/PAUSE/USB button to start playback. 6. Press the STOP button to stop playing. The display will show total number of tracks. 7. You may proceed repeat play (repeat-1/repeat-folder/repeat-all)/program/program play/random play/skip up and down operation as the same described in above “USING THE CD/MP3”. Note To exit USB operation, press and hold PLAY/PAUSE/USB button to return the CD mode. CAUTION: Do not use any USB extension cable for connecting the USB stick which may cause harmful interference In case of malfunction due to electrostatic discharge, just reset the product (reconnect of power source may be required) to resume normal operation. 14 ENGLISH CMP 574USB SPECIFICATIONS GENERAL Power Requirement Power consumption Standby consumption Weight Dimension Operation Temperature AC 230V~50Hz DC 12V UM-1 x 8 PCS 18 Watts <0.5 Watts Approx. 2.3 kg Approx. 385mm (L) x 240mm (W) x 160mm (H) +5 °C - + 35 °C RECEIVER SECTION Receiving Bands Tuning Range AM / FM AM 540 - 1600 KHz FM 87.5 - 108 MHz COMPACT DISC SECTION Optical Pickup Frequency Response 3-Beam Laser 100Hz – 16 KHz CASSETTE SECTION Recording System Biasing System Frequency Response Wow and Flutter 2 Tracks 2 channel (Stereo) DC Bias 125 – 6.3 KHz 0.35 % WRMS (JIS) AUDIO SECTION Power Output Headphone Impedance 1.8 W x 2 32 Ohms ACCESSORIES Instruction Booklet AC Cord 1 1 CAUTION: To avoid electric shock, this unit must not be exposed to dripping water or water splash. Ventilation warning-The normal ventilation of the product shall not be impeded for intended use. 15 FRANÇAIS CMP 574USB 6 3 10 2 12 15 1 25 26 27 28 29 30 9 18 13 5 7 8 4 23 22 24 17 19 21 20 16 11 14 16 FRANÇAIS CMP 574USB VOLTAGE DANGEREUX Ce symbole apposé sur le dos de l’appareil et reproduit dans ce manuel indique la présence d’éléments fonctionnant à haute tension à l’intérieur de cet appareil; ne l’ouvrez pas, afin d’éviter le risque de décharges électriques. ATTENTION Ce symbole apposé sur le dos de l’appareil et reproduit dans ce manuel indique la présence d’instructions importantes pour la sécurité d’emploi. Lisez-les avec attention avant d’utiliser l’appareil. AVERTISSEMENT SUR LE LASER Cet appareil est pourvu d’un système de lecture à rayon laser. Bien que le laser soit de faible puissance et muni d’un dispositif de sécurité empêchant son fonctionnement lorsque le volet est ouvert, suivez scrupuleusement les précautions suivantes:n’approchez pas les yeux de la lentille du laser lorsque l’appareil est ouvert; danger de lesion de la retine.n’essayez pas de demonter ou d’alterer l’unite laser; danger d’absorption de radiations. AVERTISSEMENT NOTES D’EMPLOI Cet appareil est un instrument électronique de haute précision; évitez donc de l’employer dans les cas suivants: • A proximité de fortes sources de chaleur telles que des radiateurs ou tout appareil de chauffage. • Dans des lieux très humides tels que des salles de bains, des piscines, etc. • Dans des lieux très poussiéreux. • Dans des lieux sujets à des fortes vibrations. • Positionner l’appareil de façon à laisser toujours de l’espace pour la libre circulation de l’air à ses côtés (au moins 5 cm). • N’obstruez pas les fentes d’aération. • Si des substances liquides pénètrent à l’intérieur de l’appareil, débranchez immédiatement la fiche et apportez l’appareil au centre d’assistance agréé TREVI le plus proche. • Avant de mettre l’appareil en fonction, vérifiez toujours que les câbles d’alimentation et de connexion soient correctement installés. SOIN ET ENTRETIEN Pour le nettoyage on conseille l’emploi d’un chiffon doux, légèrement imbibé. Evitez les solvants ou les substances abrasives. IMPORTANT La bonne construction de cet appareil garantit pour longtemps son parfait fonctionnement. Si toutefois des inconvénients devaient se présenter, contactez le Centre d’Assistance agréé le plus proche. TREVI poursuit une politique de recherche et de développement continus. Par conséquent, les produits peuvent présenter des caractéristiques différentes par rapport aux données mentionnées. DESCRIPTION DES COMMANDES 1. 2. 3. 4. 5. 6. 7. 8. 9. 10. 11. 12. 13. 14. 15. Réglage du VOLUME Sélecteur fonctions CD-MP3-USB/TAPE/RADIO Touche STANDBY Port USB Indicateur STANDBY Antenne FM Afficheur LCD Indicateur FM STEREO Logement CD Poignée pour le transport Prise d’alimentation AC Sélecteur bande FM STEREO/AM Touche BASS Logement des piles Réglage TUNING, accord 16. 17. 18. 19. 20. 21. 22. 23. 24. 25. 26. 27. 28. 29. 30. Entrèe ècoteurs Touche STOP, arrêt du CD Touche PROG/P-MODE, répétition aléatoire du CD Touche SKIP -, passage au morceau précédent Logement cassette Touche SKIP +, passage au morceau suivant Touche FOLD-/-10 Touche FOLD+/+10 Touche PLAY/PAUSE/USB Touche PAUSE II, pause cassette Touche STOP/EJECT, arrêt/éjection cassette audio. Touche F.FWD, avance rapide Touche RWD, rembobinage rapide Touche PLAY, lecture cassette Touche REC, enregistrement ALIMENTATION PILES Ouvrez le logement des piles (14) et introduisez 8 piles format « D » (UM-1) en respectant attentivement les polarités indiquées. Remplacez immédiatement les piles déchargées et enlevez-les si l’appareil n’est pas utilisé pendant une longue période. CONNEXION AU RÉSEAU ÉLECTRIQUE Connectez le câble d’alimentation sur la prise AC(11). Branchez la fiche d’alimentation sur une prise de courant C.A. 230V - 50Hz. Ne branchez pas cet appareil sur des prises ayant une tension autre que celle indiquée. 17 FRANÇAIS CMP 574USB MARCHE/ARRÊT 1. Appuyez sur la touche STANDBY pour activer l’appareil. 2. Positionnez le sélecteur fonctions (2) sur CD-MP3-USB, TAPE ou RADIO. 3. Réglez le sélecteur fonctions (2) en position CD-MP3-USB, lorsque l'appareil ne fournit pas la fonction principale pendant 15 minutes, l'appareil se met automtiquement en mode STANDBY. REMARQUES En raison des rejets électromagnétiques l'appareil pouvait aller sur reset. Pour restaurer, il suffit de l'éteindre et tourner à nouveau sur. 4. Appuyez de noveau sur la touche STANDBY pour arrêter l’appareil. FONCTIONNEMENT FONCTIONNEMENT RADIO 1. 2. 3. 4. 5. 6. Positionnez le sélecteur fonctions (2) sur RADIO, l’afficheur LCD (7) de la radio à affichage numérique s’allume. Sélectionnez la bande que vous désirez écouter (AM/FM Stéréo) à l’aide du sélecteur (12). Syntonisez l’émetteur souhaité à l’aide de la commande TUNING (15). Si la station écoutée est en stéréo, l’indicateur FM STEREO (8) s’allume. Réglez le volume à votre gré, à l’aide du réglage VOLUME (1). Si pendant l’écoute d’une station FM stéréo, vous entendez des bruits de fond trop forts, positionnez le sélecteur (12) sur FM. REMARQUES D éployez et orientez l’antenne (6), afin d’obtenir la meilleure réception FM possible. Si la réception n’est pas bonne, essayez de régler de manière différente la longueur et l’orientation de l’antenne, la qualité de réception FM dépend toutefois beaucoup de l’endroit où est placé l’appareil. Puisque l’antenne AM se trouve à l’intérieur de l’appareil, orientez ce dernier de façon à obtenir la meilleure réception possible. La proximité d’appareils télé, de lampes au néon ou d’autres électroménagers peut provoquer des brouillages dans la réception de programmes radio ; si c’est le cas, éloignez la radiocassette de l’appareil en question. FONCTIONNEMENT DU LECTEUR CD-MP3 LECTURE 1. Positionnez le sélecteur de fonction(2) sur la position CD-MP3-USB, l’afficheur LCD (7) s’allume. 2. Ouvrez le logement CD (9) et introduisez le disque avec la face étiquetée tournée vers le haut. Refermez le volet en appuyant délicatement. 3. Après quelques secondes l’afficheur LCD(7) affiche le nombre de pistes (morceaux) présentes sur le disque. 4. Appuyez sur la touche PLAY/PAUSE/USB (24) pour commencer la lecture. 5. Appuyez sur la touche PLAY/PAUSE/USB(24) pour activer la pause. Le symbole de lecture commence à clignoter. 6. Pour désactiver la pause, appuyez encore une fois sur la touche PLAY/PAUSE/USB (24). 7. Appuyez sur la touche STOP (17) pour arrêter complètement la lecture. L’afficheur LCD montre les pistes présentes dans le CD. SAUT DE PISTE 1. En appuyant sur la touche SKIP+ (21) pendant l’écoute on passe à la piste suivante ; en appuyant sur SKIP- (19) on passe à la piste précédente. 2. Gardez la touche SKIP+ (21) ou SKIP- (19) appuyée pendant l’écoute pour chercher rapidement un passage particulier d’un morceau. 3. Relâchez la touche pour revenir à la lecture normale. 4. L’afficheur LCD(7) indique toujours le morceau en exécution. LECTURE ININTERROMPUE D’UNE SEULE PISTE - 1. 2. 3. 4. En mode de lecture. Appuyez sur la touche PROG./P-MODE(18). Le symbole “ ” clognotement sur l’afficheur. Le lecteur CD lira de façon continue la piste indiquée sur l’afficheur. Pour désactiver la répétition continue du morceau, appuyez sur la touche PROG. / P-MODE (18) jusqu'à la disparition du symbole. RÉPÉTITION ININTERROMPUE DU DISQUE ENTIER - 1. 2. 3. 4. En mode de lecture. Appuyez deux fois sur la touche PROG./P-MODE(18). Le symbole “ ” apparaît sur l’afficheur. Le lecteur de CD lira de façon continue le disque entier. Pour désactiver la répétition continue du disque entier, appuyez sur la touche PROG. / P-MODE (18) jusqu'à la disparition du symbole. RÉPÉTITION ININTERROMPUE DU DOSSIER ENTIER (ALBUM) REMARQUE : Fonction valable seulement pour les cd MP3. - 1. 2. 3. 4. 18 En mode de lecture. Appuyez trois fois sur la touche PROG./P-MODE(18). Le symbole “ FOLDER ” apparaît sur l’afficheur. Le lecteur CD lira de façon continue le numéro du dossier indiqué sur l’afficheur. Pour désactiver la répétition continue du morceau, appuyez sur la touche PROG. / P-MODE (18) jusqu'à la disparition du symbole. CMP 574USB FRANÇAIS LECTURE DES MORCEAUX DANS UN ORDRE ALÉATOIRE - 1. 2. 3. 4. En mode de lecture. Appuyez quatre fois sur la touche PROG./P-MODE (18). L’afficheur indique “RAND”. Le lecteur de CD lit les morceaux selon une séquence aléatoire. Pour arrêter la lecture e piste Appuyez sur la touche PROG./P-MODE (18). PROGRAMMATION Il est possible de sélectionner l’ordre de lecture des morceaux. 1. Appuyez sur la touche STOP(17) pour arrêter la lecture. 2. Appuyez sur la touche PROG./P-MODE(18) ; l’afficheur montre le message « P01 » clignotant. 3. Sélectionnez le morceau que vous souhaitez écouter en premier à l’aide des touches SKIP+ (21) ou SKIP- (19). 4. Appuyez sur la touche PROG./P-MODE(18) pour confirmer. 5. Répétez les points 3 et 4 pour mémoriser et lire les morceaux que vous souhaitez écouter, jusqu’à un maximum de 20 morceaux pour les CD audio et de 99 morceaux pour les CD MP3. 6. Appuyez sur la touche PLAY/PAUSE/USB(24) pour commencer la lecture. 7. Appuyez deux fois sur la touche STOP(17) pour annuler la programmation. FONCTION ALBUM REMARQUE : fonction valable seulement pour les CD MP3 contenants des répertoires et des dossiers. 1. Lorsque vous écoutez un morceau Mp3 et vous souhaitez changer de répertoire, gardez la touche FOLD+/+10 (23), FOLD-/-10 (22) pour passer aux dossiers suivants. 2. Pendant l'écoute d'un morceau mp3, appuyez sur la touche FOLD+/+10 (23), FOLD-/-10 (22) sur l'unité pour avancer de dix morceaux. FONCTIONNEMENT DU PORT USB LECTURE 1. 2. 3. 4. 5. Pour le fonctionnement correct du lecteur mp3, enlevez toujours le CD du logement CD. Branchez un lecteur MP3 avec interface USB sur le port USB (4). Positionnez le sélecteur de fonction(2) sur la position CD-MP3-USB-SD, l’afficheur LCD(7) s’allume. Appuyez et maintenez la touche PLAY/PAUSE/USB (24) pour basculer l'entrée USB. Le message USB apparaît sur l’afficheur LCD de votre appareil ; attendez quelques secondes pour que le lecteur charge tous les fichiers MP3. 6. Appuyez sur la touche PLAY/PAUSE/USB (24) pour commencer la lecture. 7. Pour activer la pause, appuyez une fois sur la touche PLAY/PAUSE/USB (23). 8. Pour désactiver la pause, appuyez une deuxième fois sur la touche PLAY/PAUSE/USB (23). 9. Appuyez sur la touche STOP(17) pour arrêter définitivement la lecture. - Consultez la section “fonctionnement du lecteur cd-mp3” pour l’utilisation des autres fonctions. FONCTIONNEMENT MAGNÉTOPHONE À CASSETTES LECTURE DE CASSETTES 1. 2. 3. 4. 5. Positionnez le sélecteur(2) sur TAPE. Insérez une cassette dans le logement(20) avec le côté que vous désirez écouter tourné vers l’extérieur. Réglez le volume(1) à votre gré. Appuyez sur la touche PLAY(29) pour commencer la lecture Appuyez sur la touche PAUSE(25) pour arrêter momentanément la lecture et appuyez-la de nouveau pour recommencer la lecture. 6. Pour faire avancer rapidement la bande, appuyez sur la touche F.FWD (27). 7. Pour rembobiner rapidement la bande, appuyez sur la touche RWD (28). 8. Appuyez sur la touche STOP/EJECT(26) pour arrêter complètement la lecture, et appuyez-la de nouveau pour extraire la cassette. ENREGISTREMENT D'AUTRES SOURCES 1. 2. 3. 4. Placez le sélecteur (2) sur CD-MP3-USB et démarrer la piste souhaitée ou à la RADIO et de régler à la station souhaitée. Insérez dans le logement(20) la cassette à utiliser pour l’enregistrement. Pour lancer l’enregistrement, appuyez sur la touche REC(30). Appuyez sur la touche PAUSE (25) pour arrêter momentanément l’enregistrement et appuyez-la de nouveau pour recommencer l’enregistrement. 5. Appuyez sur la touche STOP/EJECT(17) pour arrêter complètement l’enregistrement. CARACTÉRISTIQUES TECHNIQUES GÉNÉRALITÉS Alimentation :.................................................................................................... C.A. 230V - 50Hz 8 Piles « D » (UM1) pas fournies Puissance:......................................................................................................... 1.8 W x 2 (18 W pmpo) Consommation électrique en mode Stand-by:................................................ <0,5W Dimensions:...................................................................................................... 358x155x240 mm 19 DEUTSCH CMP 574USB 6 3 10 2 12 15 1 25 26 27 28 29 30 9 18 13 5 7 8 4 23 22 24 17 19 21 20 16 11 14 20 DEUTSCH CMP 574USB GEFÄHRLICHE SPANNUNGEN Dieses Symbol, das auf der Rückseite des Gerätes und auf diesem Handbuch abgebildet ist, weist den Benutzer auf das Vorhandensein von mit Hochspannung betriebenen Bauteilen im Innern des Gerätes hin. Um elektrische Schläge zu vermeiden, muß das Gerät nicht geöffnet werden. HINWEISE IN BEZUG AUF DEN LASER ACHTUNG Dieses Symbol, das auf der Rückseite des Gerätes und auf diesem Handbuch abgebildet ist, weist den Benutzer auf wichtige Anweisungen zum sicheren Gebrauch hin. Bevor das Gerät in Betrieb genommen wird, müssen diese Anweisungen aufmerksam gelesen werden. Dieses Gerät ist mit einem Laser-Lesesystem versehen. Der Laser verfügt über eine niedrige Leistung und ist mit einer Sicherheitsvorrichtung versehen, die den Betrieb bei geöffneter Klappe verhindert. Halten Sie sich trotzdem sorgfältig an folgende Hinweise:bei geöffnetem gerät, das auge nicht an die linse des lasers nähern. es besteht die gefahr, dass die netzhaut dabei verletzt wird. versuchen sie nicht, die lasereinheit abzumontieren oder unsachgemäss zu behandeln. es besteht die gefahr, daß strahlen dabei absorbiert werden. HINWEISE ANWEISUNGEN ZUM GEBRAUCH Dieses Gerät ist ein elektronisches Instrument höchster Präzision; vermeiden Sie deshalb, das Gerät in folgenden Fällen zu benutzen: • In der Nähe von Wärmequellen, wie z.B. Heizkörpern oder Öfen. • In sehr feuchten Räumen, wie z.B. Badezimmern, Schwimmbädern, usw. • In sehr staubigen Räumen. • An Plätzen, die starken Vibrationen ausgesetzt sind. • Das Gerät muß so aufgestellt werden, daß an den Seiten genügend Raum für den freien Luftumlauf vorhanden ist (mindestens 5 cm.). • Die Ventilationsöffnungen nicht abdecken. • Sollten Flüssigkeiten im Innern des Geräts eindringen, ziehen Sie den Stecker sofort aus der Steckdose und bringen Sie das Gerät in die nächstgelegene TREVI-autorisierte Kundendienststelle. • Vor Inbetriebnahme des Gerätes überprüfen Sie stets, daß die Netzkabel und die Verbindungskabel ordnungsgemäß installiert sind. PFLEGE UND WARTUNG Zum Reinigen benutzen Sie einen leicht angefeuchteten, weichen Lappen. Verwenden Sie keine Lösungsmittel oder Scheuermittel. WICHTIG Die gute Bauweise des Geräts gewährleistet den einwandfreien Betrieb auf längere Zeit hin. Sollten trotzdem irgendwelche Störungen auftreten, wenden Sie sich an die nächstgelegene TREVI-autorisierte Kundendienststelle. Die Firma TREVI ist für die ständige Forschung und Entwicklung seiner Produkte engagiert. Auf Grund dieser Tatsache können die Produkte andere Merkmale als die beschriebenen aufweisen. BESCHREIBUNG DER BEDIENELEMENTE 1. 2. 3. 4. 5. 6. 7. 8. 9. 10. 11. 12. 13. 14. 15. Lautstärkeregler VOLUME Funktionswahlschalter CD-MP3-USB/TAPE/RADIO Taste STANDBY USB-Eingang Anzeige STANDBY FM-Antenne LCD-Display FM-STEREO-Anzeige CD-Fach Tragegriff Eingang Stromversorgung AC Wahlschalter Frequenzband FM STEREO/AM Taste BASS Batteriefach TUNING-Regler, Abstimmung 16. 17. 18. 19. 20. 21. 22. 23. 24. 25. 26. 27. 28. 29. 30. Kopfhoerer STOP-Taste, Abbrechen der CD-Wiedergabe Taste PROG/P-MODE, Zufallswiedergabe der CD Taste SKIP -, Sprung zum vorhergehenden Titel Logement cassettes Taste SKIP +, Sprung zum nächsten Titel Taste FOLD -/-10, Anwahl des Ordners Taste FOLD +/+10, Anwahl des Ordners Taste PLAY/PAUSE/USB, Wiedergabe/Pause CD Touche PAUSE, pause cassette Touche STOP/EJECT Touche F.FWD Touche RWD Taste PLAY, Wiedergabe cassette Touche REC, enregistrement VERSORGUNG MIT BATTERIEN Das Batteriefach (14) öffnen und 8 Batterien des Formats “D” (UM-1) polaritätsrichtig gemäß der Hinweise einlegen. Leere Batterien sollten unverzüglich ausgetauscht werden. Bei längerem Nichtgebrauch des Geräts sollten die Batterien herausgenommen werden. NETZBETRIEB Das Netzkabel an der Buchse AC(11) anschließen. Den Stecker in eine Steckdose mit 230V - 50Hz Wechselstrom einstecken. Das Gerät nicht an einem Netz mit einer Spannung anschließen, die nicht den oben genannten Werten entspricht. 21 DEUTSCH CMP 574USB EIN-/AUSSCHALTEN 1. Die taste STANDBY um den Betrieb zu aktivieren. 2. Den funktionswahlschalter (2) auf CD-MP3-USB, TAPE oder RADIO stellen. 3. Den funktionswahlschalter (2), in CD-MP3-USB position, wenn das Gerät nicht mit einer Funktion für 15 Minuten, wird das Gerät automatisch in den Standby-Modus zu schalten. ANMERKUNGEN Aufgrund einer elektromagnetischen Entladungen konnte das Gerät zurücksetzen eingehen. Um wiederherzustellen, schalten ihn einfach aus und biegen ihn zurück auf. 4. Die Taste loslassen STANDBY das Gerät ausschalten. BETRIEB RADIOBETRIEB 1. 2. 3. 4. 5. 6. Den Funktionswahlschalter(2) auf RADIO stellen; das LCD-Display (7) des digitalen Radios leuchtet auf. Mit dem Wahlschalter (12) das gewünschten Frequenzband (AM/FM Stereo) wählen. Mit dem TUNING-Regler (15) den gewünschten Sender abstimmen. Handelt es sich bei dem Sender um einen Stereosender, leuchtet die Stereoanzeige (8) auf. Die Lautstärke wie gewünscht mit dem VOLUME-Regler (1) einstellen. Treten während des Empfangs eines FM-Stereo-Senders starke Hintergrundgeräusche und ein Rauschen auf, den Wahlschalter (12) auf FM stellen. ANMERKUNGEN Für einen guten Empfang in FM die Antenne (6) ausziehen und ausrichten. Ist der Empfang nicht zufriedenstellend, so sollte versucht werden, die Länge und die Ausrichtung der Antenne zu regulieren. Die Qualität des Empfangs in FM ist jedoch auch stark von der Umgebung abhängig, in der sich das Gerät befindet. D ie AM-Antenne befindet sich im Inneren des Geräts. Daher muss für einen guten Empfang das gesamte Gerät ausgerichtet werden. D ie Aufstellung in der Nähe von Fernsehapparaten, Neonlampen oder anderen Haushaltsgeräten kann zu Störungen beim Empfang von Radioprogrammen führen. In diesem Fall sollte der Radiorecorder an einem anderen Ort mit einer gewissen Entfernung von der Störungsquelle aufgestellt werden. BETRIEB DES CD-/MP3-PLAYERS WIEDERGABE 1. 2. 3. 4. 5. 6. 7. Den Funktionswahlschalter (2) auf die Position CD-MP3-USB stellen. Das LCD-Display (7) leuchtet auf. Das CD-Fach (9) öffnen und eine CD mit der beschriebenen Seite nach oben einlegen. Die Klappe vorsichtig schließen. Nach wenigen Sekunden erscheint auf dem LCD-Display (7) die Anzahl der Musikstücke (Tracks) der CD. Die Taste PLAY/PAUSE/USB (24) drücken, um die Wiedergabe zu starten. Die Taste PLAY/PAUSE/USB (24) drücken, um die Pausenfunktion zu aktivieren. Das Symbol der Wiedergabe beginnt zu blinken. Durch erneuten Druck der Taste PLAY/PAUSE/USB (24) wird die Pausenfunktion ausgeschaltet. Um die Wiedergabe endgültig abzubrechen, die STOP-Taste (17) drücken und das LCD-Display zeigt die Tracks auf der CD an. ÜBERSPRINGEN VON TITELN 1. Wird die Taste SKIP+ (21) während der Wiedergabe gedrückt, springt man zum nächsten Stück über. Mit der Taste SKIP- (19) springt man hingegen zum vorhergehenden Stück zurück. 2. Die Taste SKIP+ (21) oder SKIP- (19) während der Wiedergabe gedrückt halten, um schnell eine bestimmte Stelle des Musikstücks zu suchen. 3. Die Taste loslassen, um zur normalen Wiedergabe zurückzukehren. 4. Auf dem LCD-Display (7) wird immer das aktuelle Musikstück angezeigt. ENDLOSWIEDERGABE EINES EINZELNEN TITELS - 1. 2. 3. 4. In der Betriebsart der Wiedergabe. Die Taste PROG/P-MODE (18) drücken. Das symbol “ ” erscheint auf dem Display. Der CD-Player gibt den auf dem Display angezeigten Titel kontinuierlich wieder. Zum Löschen der Endloswiedergabe eines einzelnen Titels drücken Sie die PROG/P-MODE (18) bis das Ende des Symbols. ENDLOSWIEDERGABE DER GESAMTEN CD - 1. 2. 3. 4. In der Betriebsart der Wiedergabe. Die Taste PROG/P-MODE (18) zweimal drücken. Das symbol “ ” erscheint auf dem Display. Der CD-Player gibt die gesamte CD kontinuierlich wieder. Zum Löschen der Endloswiedergabe der gesamten CD wird drücken Sie die PROG/P-MODE (18) bis das Ende des Symbols. ENDLOSWIEDERGABE DES GESAMTEN ORDNERS (FOLDER) HINWEIS: diese Funktion kann nur bei MP3-CD aufgerufen werden. - 1. 2. 3. 4. 22 In der Betriebsart der Wiedergabe. Die Taste PROG/P-MODE (18) dreimal drücken. Das symbol “ FOLDER ” erscheint auf dem Display. Der CD-Player gibt den auf dem Display angezeigten Ordner kontinuierlich wieder. Zum Löschen der Endloswiedergabe eines einzelnen Titels drücken Sie die PROG/P-MODE (18) bis das Ende des Symbols. CMP 574USB DEUTSCH ZUFALLSWIEDERGABE - 1. 2. 3. 4. In der Betriebsart der Wiedergabe. Die Taste PROG/P-MODE (18) viermal drücken. Auf dem Display erscheint die Angabe RAND. Der CD-Player spielt die Titel in einer zufälligen Reihenfolge ab. Beenden Sie die Shuffl e Spuren drücken Sie die Taste PROG/P-MODE (18). PROGRAMMIERUNG Die Reihenfolge, in der die Stücke wiedergegeben werden, kann programmiert werden. 1. Um die Wiedergabe abzubrechen, die STOP-Taste(17) drücken. 2. Die Taste PROG/P-MODE (18) drücken, auf dem Display erscheint daraufhin die blinkende Anzeige “P01”. 3. Mit den Tasten SKIP+ (21) oder SKIP- (19) den Titel wählen, der als erster wiedergegeben werden soll. 4. Zur Bestätigung die PROG/P-MODE (18) Taste drücken. 5. Den Vorgang wiederholen (Schritte 3 und 4), bis alle gewünschten Titel gespeichert wurden und abgespielt werden können (für Audio-CD max. 20 Titel). Im Format MP3-CD können bis zu 99 Titel gespeichert werden. 6. Die Taste PLAY/PAUSE/USB (24) drücken, um die Wiedergabe zu starten. 7. Um die Programmierung zu löschen, wird die STOP-Taste (17) zweimal gedrückt. ALBUM-FUNKTION HINWEIS: diese Funktion kann nur bei MP3-CD mit Verzeichnisse oder Ordner aufgerufen werden. 1. Wenn der Benutzer während der Wiedergabe eines MP3-Titels das Verzeichnis wechseln und einen vorhergehenden Ordner anwählen möchte, wird die Taste FOLD.-/-10 (22) für einige Sekunden gedrückt gehalten. Um einen der nachfolgenden Ordner anzuwählen, wird die Taste FOLD.+/+10 (23) gedrückt gehalten. 2. Soll bei der Wiedergabe eines MP3-Titels um 10 Titel vorgesprungen werden, so wird die Taste FOLD.+/+10 (23) auf der Einheit gedrückt. BETRIEB USB-EINGANG WIEDERGABE 1. 2. 3. 4. 5. 6. 7. 8. 9. Für die korrekte Funktion des MP3-Players prüfen, dass sich keine CD im CD-Fach befindet. Einen MP3-Player mit USB-Anschlussbuchse an den USB-Eingang (4) anschließen. Den Funktionswahlschalter (2) auf die Position CD-MP3-USB stellen. Das LCD-Display (7) leuchtet auf. Drücken Sie und halten Sie die Taste PLAY/PAUSE/USB (24), die USB-Eingang umschalten. Auf dem LCD-Display (7) wird die Angabe USB angezeigt. Einige Sekunden warten, bis der Player alle MP3-Dateien lädt. Die Taste PLAY/PAUSE/USB (24) drücken, um die Wiedergabe zu starten. Durch erneuten Druck der Taste PLAY/PAUSE/USB (24) wird die Pausenfunktion eingeschaltet. Durch erneuten Druck der Taste PLAY/PAUSE/USB (24) wird die Pausenfunktion ausgeschaltet. Um die Wiedergabe endgültig abzubrechen, die STOP-Taste (17) drücken. BETRIEB DES KASSETTENGERÄTS WIEDERGABE VON KASSETTEN 1. 2. 3. 4. 5. 6. 7. 8. Den Wahlschalter FUNCTION(2) auf die Position TAPE stellen. Eine Kassette in das Kassettenfach(20) einlegen. Die Seite, die wiedergegeben werden soll, muss nach außen gerichtet sein. Die Lautstärke mit dem Regler VOLUME(1) einstellen. Die Taste PLAY(29) drücken, um die Wiedergabe zu starten. Die Taste PAUSE (25) drücken, um die Wiedergabe kurz zu unterbrechen. Bei erneutem Druck wird die Wiedergabe fortgesetzt. Für den Schnellvorlauf des Bandes die Taste F.FWD(27) drücken. Für den Schnellrücklauf des Bandes die Taste RWD(28) drücken. Um die Wiedergabe endgültig abzubrechen, die Taste STOP/EJECT(25) drücken. Die Taste nochmals drücken, um die Kassette herauszunehmen. AUFNAHME AUS ANDEREN QUELLEN 1. 2. 3. 4. 5. Den Selektor (2) auf USB-MP3-CD und starten Sie den gewünschten Titel oder auf RADIO und stellen Sie den gewünschten Sender. Die Kassette für die Aufnahme in das Kassetten-Fach (20) einlegen. Die Taste REC(30) drücken, um die Aufnahme zu starten. Die Taste PAUSE(25) drücken, um die Aufnahme kurz zu unterbrechen. Bei erneutem Druck wird die Aufnahme fortgesetzt. Um die Aufnahme endgültig abzubrechen, die Taste STOP/EJECT(17) drücken. TECHNISCHE EIGENSCHAFTEN ALLGEMEINES Versorgung:....................................................................................................... Wechselstrom 230V - 50Hz 8Batterien “D” (UM1) nicht im Lieferumfang enthalten Leistung:........................................................................................................... 1.8 W x 2 (18 W pmpo) Stromverbrauch im Stand-by-Modus:.............................................................. <0,5W Abmessungen:.................................................................................................. 358x155x240 mm 23 ESPAÑOL CMP 574USB 6 3 10 2 12 15 1 25 26 27 28 29 30 9 18 13 5 7 8 4 23 22 24 17 19 21 20 16 11 14 24 ESPAÑOL CMP 574USB VOLTAJE PELIGROSO Este símbolo se halla en la parte trasera del aparato y en el presente manual, su función es la de señalar la presencia, en el interior del aparato, de componentes que funcionan con alta tensión, no lo abra: evitará de este modo el riesgo de descargas eléctricas. ADVERTENCIAS RELATIVAS AL LASER ATENCION Este símbolo se halla en la parte trasera del aparato y en este manual, su función es la de indicar la presencia de instrucciones importantes para utilizar dichos aparatos con seguridad. Léalas atentamente antes de utilizar el aparato. Este aparato consta de un sistema de lectura con rayo láser. Aunque el láser sea de baja potencia y conste de dispositivo de seguridad que impide el funcionamiento con la tapa abierta, aténgase a las siguientes advertencias: no acerque el ojo a la lente del laser con el aparato abierto, peligro de lesiones en la retina. no intente desmontar ni modificar la unidad laser, peligro de absorcion de radiaciones. ADVERTENCIAS NOTAS DE UTILIZACION Este aparato es un instrumento electrónico de alta precisión, evite utilizarlo en los siguientes casos: • En proximidad de fuentes de calor como caloríferos y estufas. • En lugares donde exista alto grado de humedad como por ejemplo cuartos de baño, piscinas, etc.. • En lugares muy polvorientos. • En lugares sujetos a fuertes vibraciones. • Coloque el aparato de modo que por sus lados exista el espacio suficiente para que el aire pueda circular siempre libremente (por lo menos 5 cm). • No obstruya los orificios de ventilación. • Si entra líquido en el aparato, desconecte inmediatamente el enchufe de la corriente y lleve el aparato al centro de asistencia TREVI más cercano. • Controle siempre, antes de poner en funcionamiento el aparato, que los cables de alimentación y de conexión estén instalados correctamente. CUIDADOS Y MANTENIMIENTO Para la limpieza se aconseja utilizar un paño suave, ligeramente humedecido. Evitar disolventes y sustancias abrasivas. IMPORTANTE La buena fabricación de este aparato garantiza durante largo tiempo su perfecto funcionamiento. Si aún así se presenta algún inconveniente, resultará oportuno consultar el Centro Asistencia autorizado. TREVI sigue una política de continua investigación y desarrollo. Por lo tanto los productos pueden presentar características distintas a las descritas. DESCRIPCIÓN DE LOS MANDOS 1. 2. 3. 4. 5. 6. 7. 8. 9. 10. 11. 12. 13. 14. 15. Control VOLUME Selector de funciones CD-MP3-USB/TAPE/RADIO Botón STANDBY Puerto USB Indicador STANDBY Antena FM Display LCD Indicador FM STEREO Bandeja de CD Asa para el transporte Entrada de alimentación AC Selector de banda FM STEREO/AM Botón BASS Compartimiento de baterías Control TUNING, sintonía 16. 17. 18. 19. 20. 21. 22. 23. 24. 25. 26. 27. 28. 29. 30. Toma de auricolares Botón STOP, parada CD Botón PROG/P.MODE, repetición aleatoria del CD Botón SKIP -, salto a la pieza anterior Compartimiento de casetes Botón SKIP +, salto a la pieza siguiente Botón FOLD.-/-10 , selección de carpeta Botón FOLD.+/+10, selección de carpeta Botón PLAY/PAUSE, reproducción/pausa CD Botón PAUSA, pausa casete Botón STOP/EJECT, parada/expulsión casete Botón F.FWD, avance rápido Botón RWD, rebobinado rápido Botón PLAY, reproducción casete Botón REC, grabación ALIMENTACIÓN BATERÍAS Abra el compartimiento de baterías (14) e introduzca 8 baterías formato “D” (UM-1) asegurándose de respetar atentamente las polaridades indicadas. Sustituya inmediatamente las baterías agotadas y quítelas si no va a utilizar el aparato durante mucho tiempo. RED Conecte el cable de alimentación a la toma AC (11). Introduzca el enchufe en una toma de corriente C.A. 230V - 50Hz. No conecte el aparato a tomas de corriente con tensión distinta a la indicada. 25 ESPAÑOL CMP 574USB ENCENDIDO / APAGADO 1. Pulse el botón STANDBY (3) para activar el funcionamiento. 2. Posicione el Selector de funciones (2) en CD-MP3-USB, TAPE o RADIO. 3. Posicione el Selector de funciones (2) en posición CD-MP3-USB, cuando la unidad no está proporcionando la función principal durante 15 minutos, la unidad pasará automáticamente al modo de espera. NOTAS Debido a las descargas electromagnéticas, la unidad podría pasar al reset. Para restaurar, simplemente apague y encienda de nuevo en. 4. Pulse otra vez el botón STANDBY (3) para apagar el aparato. FUNCIONAMIENTO FUNCIONAMIENTO DE LA RADIO 1. 2. 3. 4. 5. 6. Sitúe el selector de funciones(2) en RADIO, el display LCD(7) de la radio digital se iluminará. Seleccione la banda que desea escuchar (AM/FM estéreo) con el selector (12). Sintonice la emisora deseada con el control TUNING(15). Si la emisora que está escuchando es estéreo, el indicador FM STEREO (8) se iluminará. Ajuste el volumen a su gusto con el control VOLUME(1). Si durante la escucha de una emisora de FM estéreo percibe fuertes ruidos de fondo, lleve el selector (12) a la posición FM. NOTAS Para conseguir la mejor recepción en FM ajuste la extensión y la orientación de la antena (6). Si la recepción no es buena, intente ajustar de otra manera la extensión y la orientación de la antena. De todas maneras, la calidad de la recepción en FM depende en gran parte del lugar donde está ubicado el aparato. L a antena AM es interna al aparato, de modo que deberá orientar el aparato para obtener la mejor recepción. L a cercanía de aparatos TV, lámparas de neón u otros electrodomésticos puede causar interferencias en la recepción de los programas de radio; en este caso, aleje el reproductor del aparato que causa interferencias. FUNCIONAMIENTO DEL REPRODUCTOR DE CD-MP3 REPRODUCCIÓN 1. 2. 3. 4. 5. 6. 7. Sitúe el selector de funciones(2) en la posición CD-MP3-USB, el display LCD(7) se iluminará. Abra la bandeja de CD(9) e introduzca el disco con la etiqueta hacia arriba. Cierre de nuevo la tapa con cuidado. A los pocos segundos el display LCD(7) muestra el número de pistas (piezas) contenidas en el disco. Pulse la tecla PLAY/PAUSE/USB(24) para iniciar la reproducción. Pulse el botón PLAY/PAUSE/USB (24) para activar la pausa; el símbolo de reproducción empezará a parpadear. Para desactivar la pausa, pulse otra vez el botón PLAY/PAUSE/USB (24). Pulse el botón STOP(17) para detener definitivamente la reproducción, el display LCD mostrará las pistas contenidas en el CD. SALTO DE PISTA 1. Pulsando el botón SKIP+ (21) durante la escucha se pasa a la pista siguiente, en cambio pulsando el botón SKIP- (19) se pasa a la pista anterior. 2. Pulse y mantenga pulsado el botón SKIP+ (21) o SKIP- (19) durante la escucha para buscar de manera rápida un fragmento específico de la pieza. 3. Suelte el botón para volver a la reproducción normal. 4. El display LCD(7) muestra siempre la pista que se está escuchando. REPRODUCCIÓN CONTINUA DE UNA ÚNICA PISTA - 1. 2. 3. 4. En modo de reproducción. Pulse el botón PROG/P-MODE (18). El símbolo “ ” aparecerá en el display. El reproductor de CD reproducirá ininterrumpidamente la pista visualizada en el display. Para cancelar la reproducción continua de la pista, pulse el PROG/P-MODE (18) hasta la desaparición del símbolo. REPETICIÓN CONTINUA DE TODO EL DISCO - 1. 2. 4. 5. En modo de reproducción. Pulse dos veces el botón PROG/P-MODE (18). El símbolo “ ” aparecerá en el display. El reproductor de CD reproducirá ininterrumpidamente todo el disco. Para cancelar la reproducción continua de todo el disco, pulse el PROG/P-MODE (18) hasta la desaparición del símbolo. REPRODUCCIÓN CONTINUA DE TODA LA CARPETA (ALBUM) NOTA: función válida sólo para CD MP3. - 1. 2. 3. 4. 26 En modo de reproducción. Pulse dos veces el botón PROG/P-MODE(18). El símbolo “ FOLDER ” aparecerá en el display. El reproductor de CD reproducirá ininterrumpidamente el número de la carpeta visualizada en el display. Para cancelar la reproducción continua de la pista, pulse el PROG/P-MODE (18) hasta la desaparición del símbolo. CMP 574USB ESPAÑOL REPRODUCCIÓN ALEATORIA DE LAS PIEZAS - 1. 2. 3. 4. En modo de reproducción. Pulse cuatro veces el botón PROG/P-MODE (18). En el display aparecerá el mensaje RAND. El reproductor de CD reproducirá las piezas según una secuencia aleatoria. Para detener shuffl e pistas Pulse la tecla PROG/P-MODE (18). PROGRAMACIÓN Es posible seleccionar el orden en el cual se desea reproducir las piezas. 1. Pulse el botón STOP (17) para detener la reproducción. 2. Pulse el botón PROG/P-MODE (18), en el display aparece “P01” parpadeando. 3. Pulsando los botones SKIP+ (21) o SKIP- (19), seleccione la primera pieza que desea escuchar. 4. Pulse el botón PROG/P-MODE (18) para confirmar. 5. Repita los puntos 3 y 4 para memorizar y reproducir las piezas que prefiera; en un CD audio se pueden memorizar un máximo de 20 piezas. En cambio, en un CD MP3 se pueden memorizar un máximo de 99 piezas. 6. Pulse el botón PLAY/PAUSE/USB (24) para iniciar la reproducción. 7. Pulse dos veces el botón STOP (17) para anular la programación. FUNCIÓN ALBUM NOTA: función válida sólo para CD MP3 que contienen directorios o carpetas. 1. Cuando escuche una pista Mp3 y desee cambiar de directorio, pulse y mantenga pulsado el botón FOLD+/+10 (23) para situarse en las carpetas anteriores, pulse y mantenga pulsado el botón FOLD-/-10 (22) para situarse en las carpetas siguientes. 2. Cuando escuche una pista Mp3 y desee saltar diez piezas, pulse en secuencia el botón FOLD+/+10 (23) FOLD-/-10 (22) para avanzar/detràs de forma progresiva. FUNCIONAMIENTO DEL PUERTO USB REPRODUCCIÓN 1. 2. 3. 4. 5. 6. 7. 8. 9. - Para el correcto funcionamiento del reproductor de MP3, asegúrese de que no se haya introducido ningún CD en la bandeja de CD. Conecte un reproductor de MP3 equipado de conexión USB al puerto USB (4). Sitúe el selector de funciones(2) en la posición CD-MP3-USB. Presione y sostenga la tecla PLAY/PAUSE/USB (24) para cambiar el entrada del USB. En el display LCD(7) aparece el mensaje USB, espere unos segundos hasta que el reproductor cargue todos los archivos MP3. Pulse la tecla PLAY/PAUSE/USB(24) para iniciar la reproducción. Para activar la pausa, pulse una vez el botón PLAY/PAUSE/USB (24). Para desactivar la pausa, pulse otra vez el botón PLAY/PAUSE/USB (24). Pulse el botón STOP(17) para detener definitivamente la reproducción. Consulte al apartado “Funcionamiento del reproductor de CD-MP3” para las demás funciones. FUNCIONAMIENTO CASETE REPRODUCCIÓN CASETE 1. 2. 3. 4. 5. 6. 7. 8. Lleve el selector(2) a la posición TAPE. Introduzca una casete en el compartimiento(20) con la parte que desea escuchar hacia el exterior. Regule el volumen a su gusto con el control VOLUME (1). Pulse el botón PLAY(29) para iniciar la reproducción. Pulse el botón PAUSE(25) para detener momentáneamente la reproducción, vuelva a pulsarla para reestablecerla. Para que la cinta avance rápidamente, pulse el botón F.FWD(27). Para que la cinta rebobine rápidamente, pulse el botón RWD(28). Pulse el botón STOP/EJECT (26) para detener definitivamente la reproducción, vuelva a pulsarla para extraer la casete. GRABACIÓN DE OTRAS FUENTES 1. 2. 3. 4. 5. Coloque el selector (2) CD-MP3-USB e iniciar la pista deseada o en la RADIO y sintonizar la estación deseada.. Inserte el compartimiento de cassette (20). Pulse el botón REC (30) para comenzar la grabación. Utilice el botón de pausa (25) temporalmente detener la grabación, vuelva a pulsar para reanudar. Presione STOP/EJECT (17) para detener la grabación. CARACTERÍSTICAS TÉCNICAS GENERALES Alimentación:.................................................................................................... C.A. 230V - 50Hz 8 Baterías “D” (UM1) no incluidas Potencia:............................................................................................................ 1.8 W x 2 (18 W pmpo) Consumo de energía en modo Stand-by:........................................................ <0,5W Dimensiones:.................................................................................................... 358x155x240 mm 27 AVVERTENZE SMALTIMENTO - CORRECT DISPOSAL CMP 574USB Avvertenze per il corretto smaltimento del prodotto. Il simbolo riportato sull'apparecchiatura indica che il rifiuto deve essere oggetto di "raccolta separata" pertanto il prodotto non deve essere smaltito insieme ai rifiuti urbani. L'utente dovrà consegnare il prodotto presso gli appositi "centri di raccolta differenziata" predisposti dalle amministrazioni comunali, oppure consegnarlo al rivenditore contro acquisto di un nuovo prodotto. La raccolta differenziata del rifiuto e le successive operazioni di trattamento, recupero e smaltimento favoriscono la produzione di apparecchiature con materiali riciclati e limitano gli effetti negativi sull'ambiente e sulla salute causati da una gestione impropria del rifiuto. Lo smaltimento abusivo del prodotto comporta l'applicazione di sanzioni amministrative. Precautions for correct disposal of the product. The symbol shown on the equipment indicates that waste must be disposed of in "separate collection" and so the product must not be disposed of together with urban waste. The user must take the product to special "separate waste collection centres" provided by local government, or deliver it to the retailer against the purchase of a new product. Separate collection of waste and subsequent treatment, recycling and disposal operations promotes the production of equipment with recycled materials and limits negative effects on the environment and on health caused by improper handling of waste. Illegal disposal of the product leads to the enforcement of administrative penalties. Recommandations pour l'élimination correcte du produit. Le symbole figurant sur l'appareil indique que le produit fait l'objet d'une " collecte séparée ". C'est pourquoi, le produit ne doit pas être éliminé avec les déchets urbains. L'utilisateur doit remettre le produit auprès de " décharges spécialisées de collecte séparée " prévues par les autorités locales, ou bien le rendre au revendeur quand il achètera un nouvel appareil équivalent. La collecte séparée du produit et les opérations successives de traitement, recyclage et élimination favorisent la production d'appareils composés par des matériaux recyclés ainsi que permettent d'éviter des effets négatifs sur l'environnement et sur la santé des personnes suite à une gestion impropre du déchet. Toute élimination abusive du produit entraîne l'application de sanctions administratives. Hinweise zur ordnungsgemäßen Entsorgung des Produkts. Das auf dem Gerät angebrachte Symbol weist darauf hin, dass das Altgerät "getrennt zu sammeln" ist und das Produkt daher nicht zusammen mit dem Gemeindeabfall entsorgt werden darf. Der Benutzer muss das Produkt zu den entsprechenden, von der Gemeindeverwaltung eingerichteten "Wertstoffsammelstellen" bringen oder dem Händler beim Kauf eines neuen Produkts übergeben. Die getrennte Müllsammlung und anschließende Aufbereitung, Wiederverwertung und Entsorgung fördern die Herstellung von Geräten unter Verwendung wiederverwerteter Materialien und vermindern die negativen Auswirkungen auf die Umwelt und Gesundheit in Folge einer falschen Müllverwaltung. Die widerrechtliche Entsorgung des Produkts führt zur Auferlegung von Verwaltungsstrafen. Advertencias para la correcta eliminaciòn del producto. El símbolo que aparece en el aparato indica que el residuo debe ser objeto de "recogida selectiva" por tanto el producto no se debe eliminar junto con residuos urbanos. El usuario deberá entregar el producto a los "centros de recogida selectiva" creados por las administraciones municipales o bien al distribuidor cuando adquiera un nuevo producto. La recogida selectiva del residuo y las sucesivas operaciones de tratamiento, recuperación y eliminación favorecen la fabricación de aparatos con materiales reciclados y limitan los efectos negativos en el medio ambiente y la salud causados por una gestión incorrecta del residuo. La eliminación abusiva del producto da lugar a la aplicación de sanciones administrativas. 28 CMP 574USB AVVERTENZE SMALTIMENTO - CORRECT DISPOSAL Advertências para a correcta demolição do produto. O símbolo indicado na aparelhagem indica que o resíduo deve ser objecto de "recolha separada" portanto o produto não deve ser desmantelado junto dos resíduos urbanos. O utilizador deverá entregar o produto nos apropriados "centros de recolha diferenciada" predispostos pelas administrações comunais, ou entregá-lo ao revendedor em troca de uma compra de um novo produto. A recolha diferenciada do resíduo e as sucessivas operações de tratamento, recuperação e desmantelamento favorecem a produção de aparelhagens com materiais reciclados e limitam os efeitos negativos no ambiente e na saúde causados por uma gestão imprópria do resíduo. O desmantelamento abusivo do produto comporta a aplicação de sanções administrativas. Προειδοποιήσεις για τη σωστή διάθεση του προϊόντος. Το σύμβολο που απεικονίζεται επάνω στη συσκευή υποδεικνύει ότι το απόβλητο πρέπει να αποτελέσει αντικείμενο “χωριστής συλλογής” ως εκ τούτου το προϊόν δεν πρέπει να διατίθεται μαζί με τα αστικά απόβλητα. Ο χρήστης θα πρέπει να παραδώσει το προϊόν στα ειδικά “κέντρα διαφοροποιημένης συλλογής” που έχουν διευθετηθεί από τις δημοτικές διοικήσεις, ή να το παραδώσει στο κατάστημα πώλησης με την αγορά ενός νέου προϊόντος. Η διαφοροποιημένη συλλογή του αποβλήτου και οι ακόλουθες επεμβάσεις επεξεργασίας, ανάκτησης και διάθεσης βοηθούν την παραγωγή συσκευών με ανακυκλωμένα υλικά και περιορίζουν τις αρνητικές επιπτώσεις για το περιβάλλον και την υγεία που προκαλούνται από την ακατάλληλη διαχείριση του αποβλήτου. Η αυθαίρετη διάθεση του προϊόντος συνεπάγεται την εφαρμογή διοικητικών κυρώσεων. 29 NOTE 30 CMP 574USB CMP 574USB NOTE 31 ATTENZIONE WARNING! RISCHIO DI SCOSSE ELETTRICHE! NON ESPORRE A PIOGGIA E UMIDITÀ DANGER OF ELECTRIC SHOCK! DO NOT EXPOSE TO RAIN OR HUMIDITY ATTENZIONE: NON APRITE L'APPARECCHIO.ALL'INTERNO NON VI SONO COMANDI MANIPOLABILI DALL'UTENTE NE PARTI DI RICAMBIO. PER TUTTE LE OPERAZIONI DI SERVIZIO RIVOLGERSI AD UN CENTRO DI ASSISTENZA AUTORIZZATO TREVI WARNING: DO NOT OPEN THE SET. NEITHER CONTROLS OR SPARE PARTS TO BE USED BY THE USER ARE TO BE FOUND INSIDE IT. APPLY TO AUTHORISED TREVI CENTERS FOR SERVICE OPERATIONS. ATTENTION ACHTUNG RISQUE DE DECHARGES ELECTRIQUES NE PAS EXPOSER A LA PLUIE ET A L’HUMIDITE GEFAHR ELEKTRISCHER SCHLÄGE NICHT DER FEUCHTIGKEIT UND DEM REGEN AUSSETZEN ATTENTION: NE PAS OUVRIR L’APPAREIL, A L’INTERIEUR IL N’Y A PAS DE COMMANDES A MANIPULER PAR L’UTILISATEUR OU DE PIECES DE RECHANGE. POUR TOUTES LES OPERATIONS DE SERVICE IL FAUT S’ADRESSER A UN SERVICE D’ASSISTANCE AUTORISE TREVI. ACHTUNG: DAS GERÄT NICHT ÖFFNEN. IM INNERN BEFINDEN SICH KEINE VOM BENUTZER SELBST INSTANDSETZBAREN TEILE UND AUCH KEINE ERSATZTEILE. FÜR JEGLICHE SERVICEARBEITEN,WENDEN SIE SICH BITTE AN EINE TREVI AUTORISIERTEN KUNDENDIENSTSTELLE. ATENCION UK PLUG ONLY WIRES CONNECTIONS TO A UK THREE-PIN PLUG PELIGRO DE CHOQUES ELECTRICOS NO EXPONER A LLUVIA Y HUMEDAD ATENCION: NO ABRIR EL APARATO, EN SU INTERIOR NO HAY MANDOS QUE PUEDAN SER MANIPULADOS POR EL USUARIO NI PARTES DE REPUESTO. PARA TODAS LAS OPERACIONES DE SERVICIO DIRIGIRSE A UN CENTRO DE ASISTENCIA AUTORIZADO TREVI. The wires in this mains lead are coloured in accordance with the following wiring codes: Blue:............................................................. Neutral Brown:......................................................... Live The wires in this mains lead must be connected to the terminals in the plug as follows: Blue wire:................................................... N or Black Brown wire:............................................... L or Red Neither wire is to be connected to the earth (E or W) terminal of three-pin plug. Should the fuse fail in the plug remove the plug form the wall socket and replace the fuse with a 3 Amp. ASTA approved BS 1362 fuse. DICHIARAZIONE DI CONFORMITÀ SI DICHIARA CHE: L'apparecchio: Lettore CD/MP3 con Radio AM/FM marca TREVI modello CMP 574USB risponde alle prescrizioni dell'art. 2 comma 1 del D.M. 28 agosto 1995, n° 548 Rimini, 31 Ottobre 2013 TREVI S.p.A. Strada Consolare Rimini-San Marino, 62 47924 Rimini (RN) Italia Trevi S.p.A. Strada Consolare Rimini-San Marino, 62 47924 RIMINI (RN) Italy Tel. 0541/756420 - Fax 0541/756430 www.trevi.it - E-mail: [email protected] MADE IN China