1
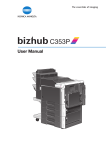
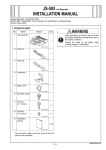
DK-504 Desk
INSTALLATION MANUAL
Applied Machines: C353/C253/C203/C353P
COLOR MFP (Color/B&W): 35 ppm / 35 ppm, 25 ppm / 25 ppm, 20 ppm / 20 ppm
COLOR PRT (Color/B&W): 35 ppm / 35 ppm
Product Code: A02E
Note:
Lifting the machine in an awkward position or
transporting it in a poorly balanced position could
result in personal injury. When transporting the
machine, assign an adequate number of persons
to the job and ensure that each person can take a
good position of not being excessively loaded
(mass: approx. 20 kg (44 lb)).
No.
Name
Shape
Q’ty
9. Installation
manual
1
set
4980IXC019DA
I. Accessory parts
No.
Name
Shape
After unpacking, be sure to get rid of the
packaging materials and keep them out of
the reach of children.
Q’ty
1. Fixing leg
Putting the head in the plastic bag
involves danger of suffocation.
4
Note:
When removing the desk from its shipping carton,
do not hold onto the reinforcement bracket (as a
personal injury or a deformed frame could result).
4348U020AB
2. Fixing leg
cover
4
Reinforcement bracket
4348U099AB
3. Fixing
bracket A
2
4658U021AA
4. Fixing
bracket B
1
A093IXC003DA
A093IXE075DA
5. Fixing
bracket C
II. When installing to C353P
1
This manual provides the illustration of the machine
used as MFP. However, the same installation procedure is used for C353P.
A093IXC004DA
6. Screw A
(black)
(4 × 8 mm)
4
4038IXC033DA
7. Screw B
(black)
(3 × 8 mm)
1
4040IXC046DA
8. Screw C
(4 × 8 mm)
12
4038IXC033DA
E-1
A093-9553-00
III. Installation procedures
5. Pull out the handles.
1. Turn off the machine.
2. Remove the cord clamp and unplug the power
cord from the machine (one screw).
A02EIXC008DA
6. Holding onto the transportation handles at the
right and left of the machine, place the machine
onto the desk. When placing the machine, use
the positioning pin in the rear of the desk to align
the machine correctly with the desk.
Note:
• Make available collective manpower of an
appropriate size for transporting the machine.
• When attaching the machine, as the reference
fit the machine with the corner A and B of the
desk.
A02EIXE097DA
3. Remove protective tape from the desk.
A093IXE076DA
4. If the cover is installed to the position shown in
the illustration, remove it (one screw).
A02EIXC009DA
A
A093IXC008DA
B
A093IXE077DA
E-2
7. Secure the desk to the machine by the fixing
bracket A (left) and the fixing bracket C (right).
Fixing bracket A :
one screw A furnished with the desk.
Fixing bracket C :
two screw A’s furnished with the desk.
Note:
The fixing bracket C can be placed upside down.
11. Move the machine and desk to the installation
site. Then, adjust the two adjusters at the front to
let the desk sit on the floor.
A093IXC072DA
12. Install the Fixing Legs at two locations in the
front shown in the illustration (six screw C’s furnished with the desk).
Note:
When mounting the finisher at the same time, do
not install the fixing leg or fixing leg cover at the
left front side.
A093IXE078DA
8. Slide out the second drawer from the paper feed
cabinet and the drawer from the desk.
9. Secure the desk to the machine by the fixing
bracket A (left) and the fixing bracket B (right).
Fixing bracket A :
one screw A furnished with the desk.
Fixing bracket B :
one screw B furnished with the desk.
To reduce the risk of injury due to unstable equipment, set stabilizers before use.
➀
➂
➂
A093IXC071DA
10. Slide the drawers back into the paper feed cabinet and the desk.
E-3
➁
➁
➀
A093IXC073DA
13. Install the fixing leg covers (two pieces) at two
locations in the front shown in the illustration.
Note:
• Insert the fixing leg covers in the direction
shown by arrow until they click into position.
• Insert the protruded portions of the fixing leg
covers shown by the arrows into the fixing leg.
15. Install the fixing leg covers (two pieces) at two
locations in the rear shown in the illustration.
Note:
• Insert the fixing leg covers in the direction
shown by arrow until they click into position.
• Insert the protruded portions of the fixing leg
covers shown by the arrows into the fixing leg.
A093IXC074DA
A093IXE062DA
14. Install the fixing legs at two locations in the rear
shown in the illustration (six screw C’s furnished
with the desk).
16. Plug the power cord into the machine and put
the cord clamp that has been removed in step 2
through the power cord to install it (one screw).
To reduce the risk of injury due to unstable equipment, set stabilizers before use.
➀
➂
➂
➁
A02EIXE097DA
➁
➀
A093IXE061DA
E-4