1
MediaManager Version 3.5
User Manual
System Requirements (with preview)
Windows 2000/XP
IBM compatible CPU Pentium 4 / Athlon 64 3.0GHz or faster,
SSE2 support
Min. 1 GB RAM, ATI Radeon X1650 videocard or better, nonshared memory
DirectX 9 Pixel Shader/Vertex Shader 2.0
500MB free hard disc space, hard disc with min. 7200RPM
Network adapter 100/1000Mbit
System Requirements (without preview)
Windows 2000/XP
IBM compatible CPU Pentium 4 / 2GHz or faster, 512MB RAM
Videocard supporting DirectX 9
500MB free hard disc space
Network adapter 100/1000Mbit
2
Table of Contents
1. Introduction
Realtime Media Playback & Control
4
2. Licence Agreement
5
3. Warranty
6
4. Timeline Control - Standalone Mode
Ɣ Playback and Key Animation
7
Ɣ Cue Markers & Loops
12
Ɣ DMX Remote Control
16
5. Remote Network Synchronization & Control
Ɣ Master & Client Setup
18
6. DMX Sheet
Ɣ Sequence Library
21
3
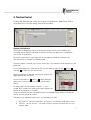
1. Realtime Media Playback & Control
Pandoras Box MediaServer provides the essential tools for projection design, real-time motion
graphics and live visual effects.
Pandoras Box is a real time compositing program. It translates DirectX commands into an
intuitive user interface.
It is designed to edit 2D and 3D content of any kind. Its main goal is to make production of real
time motion graphics as easy as drag and drop and allow you to combine various control
protocols.
With an industry standard animation editor, non linear animations and a wide variety of control
methods, Pandoras Box offers seamless integration of 3D, video, images and sounds with
complete flexibility and interactivity.
Go beyond the limits of traditional projection to explore the new possibilities of interactive live
image creation with a realtime system at your hands.
Realtime Media Control is the resulting technology term for a demand of customers, asking for
flexible projection systems for years. With nowadays computer technology it is finally possible
to offer realtime image processing for onsite production and end-users.
The history of this technology begins with the 3D animation and the film industry where high
standards rule for image processing and editing. Times have changed since large arrays of
computers had to be fed for generating one image. We are now at the beginning of a new age
of screen- and projection design.
The Pandoras Box MediaServer series are professional solutions for digital video and lighting.
With an advanced 3D feature set it can be learned fast and easy to have a quick integration
into existing show setups.
Multiple layers enable you to crossfade and combine various images and movies to a fully
customized design and look.
Additional features may be obtained to upgrade and grow with the system. Please check
regularly our website www.coolux.de.
4
2. Licence Agreement
coolux GmbH
SOFTWARE LICENCE AGREEMENT
NOTE: READ THE TERMS AND CLAUSES OF THIS SOFTWARE LICENCE AGREEMENT BEFORE
USING THE SOFTWARE AND OPERATING IT.
BY EITHER USING, INSTALLING, COPYING OR OTHERWISE USING THE SOFTWARE YOU
AGREE TO BE BOUND BY THE TERMS OF THIS SOFTWARE LICENCE AGREEMENT.
IF YOU DO NOT AGREE TO THE TERMS OF THIS LICENCE PLEASE DESTROY YOUR COPY OF
THE SOFTWARE TO AVOID FURTHER USE AT NO LICENCE.
This Agreement is between you and coolux GmbH (“coolux”), Venloer Str. 703, 50827 Koeln,
Germany whereby coolux GmbH licences to the Licensee this computer program ("Software")
for use in accordance with the following terms and conditions.
1. PERMITTED USE
The Software may only be used in the ordinary course of the Licensee's business.
2. LIMITATION OF LIABILITY
(i) coolux will not take any liability for performance issues, actual damages or data loss for any
cause whatsoever.
(ii) This software is licensed for use as standalone mediaserver only and is not licensed for use
as a component of an automated lighting product that incorporates a projector or light valve
technology.
(iii) Providing copies of this software version to third parties or other unauthorised distribution
is strictly prohibited.
(iv) Any problems with using this software should be immediately reported to coolux's R&D
department.
3. COPYRIGHT
Copyright and all other rights in the Software and associated data and printed material
supplied by coolux shall at all times remain in the ownership of coolux.
4. APPLICABLE LAW
This Licence shall be interpreted in accordance with the laws of Germany as applicable by the
date of software release.
Koeln, June 9th, 2005
coolux GmbH
5
3. Warranty
Limited Warranty. The Pandoras Box MediaServer is covered by a one year warranty on all
hardware parts and technical support limited warranty. It is the owner´s responsibility to
furnish invoices for verification of purchase date and dealer or distributor. If purchase date
cannot be provided, date of manufacture will be used to determine the warranty period.
Returning an item under warranty for repair.
It is necessary to obtain a Return Material Authorization (RMA) number from your dealer or
distributor before any units are returned for repair. The manufacturer will make the final
determination as to whether or not the unit is covered by warranty.
Any product or part returned to coolux must be packaged in a suitable manner to ensure the
protection of such product or part. The package should be marked clearly to indicate that the
package contains a returned product or parts as well as indicating the RMA number.
Please make sure to accompany all returned products or parts with a written explanation of the
problem or malfunction.
Freight Damage Claims are invalid for products or parts shipped in non-factory boxes and
packaging materials.
Freight. All shipping will be paid by the purchaser. Items under warranty shall have return
shipping paid by the manufacturer only in the US and Germany.
Any shipment does not include express delivery such as air freight.
If you install any other hardware than the one that is shipped with Pandoras Box MediaServer
your warranty will end immediately.
Repair or replacement as provided for under this warrant, is the exclusive remedy of the
consumer. Coolux makes no warranties, expressed or implied, with respect to any product, and
coolux specifically disclaims any warranty of merchantability or fitness for a particular purpose
Coolux shall not be liable for any indirect, incidental or consequential damage, including lost
profits, sustained or incurred in connection with any product or caused by product defects or
the partial or total failure of any product regardless of the form of action, whether in contract,
tort (including negligence), strict liability or otherwise, and whether or not such damage was
foreseen or unforeseen.
Any changes made by the purchaser to the operating system by installing Windows updates or
rd
any 3 party software, as well as if the product is misused or damaged in any way or for
unauthorized repairs or parts will void the warranty.
6
4. Timeline Control
Pandoras Box MediaManager allows you to control any MediaServer, MediaPlayer, DMX or
serial device with a nonlinear editing timeline control module.
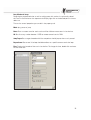
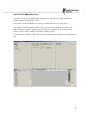
Playback & Key Animation
The timeline is designed to access all parameters directly and to create individual keys.
The header of the sequence tab holds the time bar and lets you add markers and playback
cues as well as jump points.
To create a new timeline, simply right-click on the sequences folder in the project tab.
Only one timeline is available in standalone mode.
Once the timeline is created, you will have access to it in the sequence tab by selecting it in the
project bin.
If the created sequence is selected, you will have transport controls for play
on top of the layer control tree.
and stop
, pause
When the sequence is selected, pressing the spacebar will
toggle between play and pause.
and out
buttons above the
You will find the zoom in
device tree as well as the current time in the timecode
display.
For direct zoom use the keyboard shortcuts “+” and “-“
or hold “Shift” and left click and drag the zoom range on the
timebar of the sequence in the editor.
To get to a specific time you may double click on the timecode display and enter the desired
time for the time cursor to jump to.
Two formats are allowed to enter time in any timecode entry field:
1. “00:10:05:14” - equals to zero hours, ten minutes, five seconds and fourteen frames
2. “100514” - you can skip the “:” for faster time entry to enter the same time as in the
example above
7
Framerate Setup
You also may want to set a specific framerate for each timeline sequence. To do this, select
the sequence from the project bin and change the framerate in the property tab of the
sequence.
8
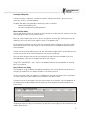
Creating & Editing Keys
In order to create a sequence, animate parameters and play them back , you may want to
store your values in a timed sequence.
Pandoras Box offers two methods to create keys within a timeline:
- direct timeline editing and
- the store and device tree editing process:
Direct timeline editing
You can edit directly within the timeline by right-clicking in the desired track, creating a new key
and changing the value at that frame in time.
After you have created a key like that, you can change the value by right-clicking the key or by
selecting it with a left click and change its values in the property tab.
For changing the position of a key in time you may either select and drag the key to its target
timeframe or select a key and change its current timeframe in its properties by entering the
exact timecode.
In order to see the exact editing results of your parameter changes within the timeline you may
set the time cursor to the same timeframe as the key you are editing.
You may either drag the time cursor to the location or type the exact timecode in the main
timecode display, next to the transport controls of the timeline.
Using CTRL and ARROW < and > keys is the keyboard shortcut to jump between all existing
keys in the timeline.
Store & Device tree editing
The concept of using the device tree editing method lets you use the device tree to store any
changes you made here at a specific location in the timeline later on.
Once a parameter value is changed, it is highlighted in red to let you know that it has become
an active value that can be stored into any timeline at any point in time.
Once you have set all parameters that you want to store in the timeline, set the nowpointer of
the sequence to the desired point of time where you want to generate events based on the
active values.
To generate these new keys in the timeline, you will then have to right-click on the time-bar and
choose “Store active”.
9
All active values will be set as keys in the timeline and be displayed as diamonds.
If you need to edit a specific value you can use the right click menue either on a device parent
node or the individual parameter itself.
You can, at any level of the tree, choose to activate, de-activate or reset all devices in the tree.
The reset will turn all values back to their default value.
Please note:
The activation state of a parameter has higher priority than the timeline playback value. If you
want to reset all parameters to have full timecontrol back again, you may also access the ‘all
activate’, ‘de-activate’ or ‘reset’ parameters for all devices from the context menu of the
timebar. Be aware that all changes will then be reset to the values of the timeline playback.
10
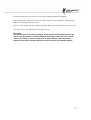
Select, Copy, Paste and Move Keys
Use the mouse to select multiple keys and move them in the sequence.
You can either select them by dragging a rectangle that captures all covered keys or by holding
shift and selecting one after another.
HINT: When moving individual keys or multiple keys at once, the first and last keys of the
selection will snap to the timecursor. This can be very useful to align sequences of keys to
specific timeframes in the sequence.
You can select the keys by opening the parameter tracks from the device tree or select all keys
of a device from its summary.
Ctrl+C can be used to copy keys to a new time, based on the nowpointer in the sequence by
pressing Crtl+V.
Another way of doing a quick copy is to first select all keys that have to be copied and then hold
CTRL and left click and and drag the keys to the target timeframe. Once you release the left
mouse button, a copy of the keys will be created at the target timeframe.
To copy keys from one layer to another, use the Ctrl+Shift+V to paste the values at the
nowpoint.
11
Cues, Markers & Loops
Designing the playback behavior as well as making notes with markers is quite easily solved
with cues in the time-bar or the sequence tab. Simply right-click at the desired point in time to
add a cue.
The cue has several properties you can edit in the property tab.
Mode: play, pause or jump
Name: Enter a custom name for each cue that will be visible on mouse over in the time-bar
ID: Set this to any number between 1-255 to remote control cues via DMX
Jump Target: Set a target timecode which the nowpointer should jump to when cue is passed.
Repeat Count: Set to zero if the loop should be endless or a specific amount to exit the loop.
Time: Displays the location of the cue in the timeline. To change the time, double click and enter
the new time here.
12
Selections & Groups
If you need to control a single layer on multiple machines or to add the same values to multiple
layer at once, the device tree control tab allows you to select multiple devices at the same time
by clicking and holding the CTRL key.
All selected device icons will turn white, showing that they are selection members.
To release the current selection press ESC.
Please note: When multiple devices are selected, all changes of parameter values will apply to all
members of the selction.
Creating & Editing Groups
Once a single or multiple device is selected you can store this specific selection as a group in
the group bin of the project tab.
To create a group please select the desired devices, then right click on the group bin in the
project folder and choose ‘create group’.
HINT: When working in device tree editing, you may also use the right click menu on groups to
determine if the members of the group should be activated, de-activated or reset.
13
Device Control
The timeline sequencer also allows external control of any serial or DMX device within any
timeline.
In order to control any serial or DMX device you will have to drag the device type from the type
tab to the device tree. Simply browse through the types tab and drag and drop the desired
device type onto the device tree. nce a new device is dragged into the tree a new unnamed
node will be created.
DMX Devices
For DMX devices you may patch them by clicking on the patch tab and then selecting the node
that you want to patch.
The DMX output patch is based on Artnet Subnet and Universe ID.
You will need an optional DMX Link breakout box to output to DMX.
Please make sure that all DMX ports are set up, according to your patch in your project file.
Please note:
Until a key has been stored in a timeline, the DMX data will not be sent constantly. Only changes
to DMX values will be sent over Artnet. Resetting a DMX node will send all values at once.
Custom DMX Device Creation
A custom DMX library file can be created as a text file with Wordpad. The file needs an extions
called “.clib” and needs to be stored in the installation folder of the Master under:
“\data\types\DMX Fixtures”
Please find here an example of a DMX .clib file for a Martin MAC500:
<?xml encoding="yes" ?>
<descripDevice type="fixtureDmx" artNetIndexScope="16">
<descripModule type="param8bit" name="STROBE" default="34" artNetIndexOff="0" />
<descripModule type="param8bit" name="DIM" default="0" artNetIndexOff="1" />
<descripModule type="param8bit" name="COLOR1" default="0" artNetIndexOff="2" />
<descripModule type="param8bit" name="COLOR2" default="0" artNetIndexOff="3" />
<descripModule type="param8bit" name="GOBO1" default="0" artNetIndexOff="4" />
<descripModule type="param8bit" name="GOBO1 ROT" default="0" artNetIndexOff="5" />
<descripModule type="param8bit" name="GOBO2" default="0" artNetIndexOff="6" />
<descripModule type="param8bit" name="FOCUS" default="50" artNetIndexOff="7" />
<descripModule type="param8bit" name="IRIS" default="0" artNetIndexOff="8" />
<descripModule type="param8bit" name="PRISMA1" default="0" artNetIndexOff="9" />
<descripModule type="param16bit" name="PAN" default="32768" artNetIndexOff="10" />
<descripModule type="param16bit" name="TILT" default="32768" artNetIndexOff="12" />
<descripModule type="param8bit" name="SPEED1" default="0" artNetIndexOff="14" />
<descripModule type="param8bit" name="SPEED2" default="0" artNetIndexOff="15" />
</descripDevice>
As you can see the first line gives the general Device description and the overall DMX channel
count “artNetIndexScope=”. The following lines describe each DMX Channel of the Fixture by a
zero based offset of the DMX channel count at the end of each line by “artNetIndexOff=”. #
You may also choose the type of paramters “param8bit” or “param16bit” as well as setting the
descriptive name and reset and default value.
14
Serial Devices
In order to control external serial devices over RS 232 or RS 422 you will need to add a serial
device to the device tree
The serial control will give you access and control to most routing switchers, projectors,
shutters or other device parameters that are remote controllable via the common RS 232 and
422 serial protocols.
Any serial ASCII or hex string can be stored and copied to any point in the timeline and be
recalled at any time the timecursor hits the stored serial key.
Once you set the first key you can assign the IP address and port ID in the keys properties as
well as the ASCII or hex command for that key.
You will need a serial link device to receive and output serial commands. See further
instructions in the serial link manual for port setting baudrates and parity settings.
Please find below the .clib code for the basic Serial Link device
<?xml encoding="yes" ?>
<descripDevice type="fixtureSerial" artNetIndexScope="1">
<descripModule type="paramSerial" name="Com" default="0" artNetIndexOff="0" />
</descripDevice>
15
External Timeline DMX Remote Control
Once you have set up and programmed your sequence, you may use a DMX controller for
remote playback control of the timeline.
The timeline can be controlled in its intensity, transport controls, cues and frames.
The timeline can be patched individually in the user interface by selecting the timeline and
opening the patch window. Here you may set a DMX start address for the timeline fixture.
Artnet as well as DMX via USB are available as external inputs.
To enable Artnet or DMX via USB, click on the desired protocol input option in the configuration
tab.
16
External Timeline Serial Remote Control
Once you have set up and programmed your sequence, you may use a serial link device to
control the playback control of the timeline via RS232 or RS422.
Once the serial connection is set up, the following commands are valid:
(Play)
Sets the sequence state to play
(Pause)
Sets the sequence state to pause
(Stop)
Stops and rewinds the sequence
(CueID)
ID = enter number based on cue ID to jump to that cue directly
Example:
(Cue13), sets the timeline nowpointer to the time of cue 13
External Device Control over IP
The MediaManger offers an easy way to trigger or send commands over IP to a remote
computer.
First of all the target computer needs to be in the same network IP address range as the
manager and the application has to establish and maintain a TCP/IP connection that listens to
port 23.
The packet data is formatted as follows:
FFh 00h 00h nn <data>
nn defines the virtual com port 00h, 01h, 02h or 03h that can be set in the serial device in
MediaManager, for IP direct IP communication without a Serial Link interface you may ignore
these virtual port values.
In MediaManager you have to assign only a serial device to the project. In the properties of the
device you can define the IP address of the target computer, the data to be sent as well as the
virtual port (which is normally only used by the serial link device).
17
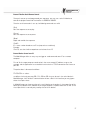
5. Remote Network Synchronization & Control
To link multiple Pandoras Box Playback-Systems via network, the system needs to be set up in
a Master/Client configuration.
You can run one Pandoras Box MediaServer as a Master and start on all other machines, that
you want to link together, the Pandoras Box Client.
There will be only one single project that you create on the Master that will hold all information
about the resource media files used on the network.
It is important to know that each Master and Slave needs to have a dedicated IP address in the
2.xxx.xxx.xxx range with a subnetmask 255.0.0.0.
Any Master Client setup relies on a unique domain ID which is the network session that all
units share via Ethernet. In case that you don´t have any connectivity please check first if all
clients as well as the master have the same domain ID.
The domain can be set in the configuration tab in the Master.
When the systems are setup in Master/Client Mode, all control parameters are automatically
sent via MediaNet. MediaNet takes care of the clock-synchronization of all machines within the
project and sends all incoming control-data like DMX or Artnet in sync to the Clients.
Please note: When working in Master/Client Mode, all connected units must be of the same
software revision. Please check the Rev. No. in the bottom right corner of the Master and the
main window of the Client. All videos must be encoded as Mpeg2 elementary video only!
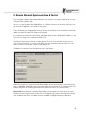
18
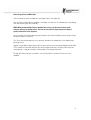
Once you start the Pandoras Box Client you will see the domain entry on the main screen.
A client does not necessarily need to be another server. Any other Pandoras Box Playback
System can be connected as a Client to a Master-System.
After the domain set up, you should see all the Clients in the asset browser of the Master and
the clients should display their Masters IP instead of “not connected”
To assign a Client to the Master-Project, take the units by clicking on the root node in the
asset browser and dragging it into the device tree tab.
Now the Client is in the project and files can be transferred across the network.
To share all file resources, you simply use the ‘spread’ or ‘spread all’ resources button in the
property tab of the files and folders.
Please note: When re-starting the project on the Master with unconnected Clients, they will
show up with a red“!”. Once the Clients are started, they will automatically reconnect to the
master and load their files.
If you want to assign a client that is not connected to the network yet you can also choose the
Pandoras Box Client type from the Device Types tab and drag it into the project from there.
Once the unit will be present on the network make sure that you set the correct IP adress in
the clients properties in order to be connected to the master.
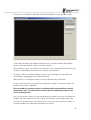
19
Remote Preview
To preview any connected or unconnected Client on the Master, please make sure that you
have a local node loaded in your device tree and that all resources are spread to the local node
as well.
Once this is done, any of the clients (no matter if online or not) can be previewed in the preview
window of the main tab.
If you have no client connected and you want to add new clients to the system, you can do this
be either dragging them from the asset browser into the device tree or choosing a Pandoras
Box Client from the types tab.
Please note: In version 3.5 only MediaServers have full preview support, MediaPlayers are
previewed without effects.
20
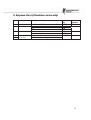
6. Sequence Library (Standalone version only)
Cha. Feature
1
2
3
4
5
Description
Level
Level Control 0-100%
Transport Control Pause
Play
Stop
Cue
No Cue
Selects Cue by ID
Frame
Sets Nowpointer to Frame Position
Frame Fine
No File selected – nothing is rendered
Value
Dec.
0-255
0
128
255
0
1-255
0-65535
Default
Value Dec.
255
0
0
0
21