1
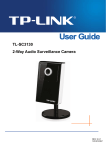
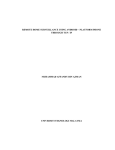
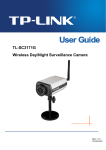
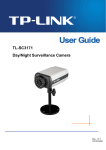
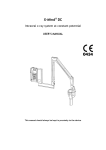
Messenger View Gear Configuration
If the firmware of your IP Camera has been updated to LM.1.6.16.03P5, then the Messenger
submenu will be displayed under the Network menu. Click the Messenger submenu, the
Messenger configuration page will be displayed similar to the figure shows below. This function
allows you to use the desired computer with MSN installed to view the video captured by the IP
camera.
¾
Messenger: Check the radio button before On, so you can use your IP Camera via this
function.
¾
Protocol: Displays the protocol used.
¾
Login Account: Enter the MSN account registered for you IP Camera.
¾
Password: Enter the password of the MSN account.
¾
Re-type password: Type the password again.
¾
Alias: Give an alias for the account of your IP Camera. The figure above takes
“TL-SC3130G” for example.
¾
Port range: Enter the port range used.
¾
IP Notification: When this feature is enabled, the IP camera would notify "friends" on MSN
about its IP address when it logs into the MSN account or when its IP address is changed.
¾
Privacy: When this feature is enabled, the MSN stream will be secured, then only users
whose MSN ids are in the Allow List can add the camera's MSN account and view the camera
video. When it's disabled, any user can add the camera's MSN id and see it.
1
¾
Allow list: Enter the account of the MSN user you want communicate with in “User” field.
Click Add button and then the account will be added to the “Allow list”. Choose an account in
the “Allow list” and click Remove button to delete it.
To use MSN to view the video captured by the IP camera, please follow the steps below.
A.
Configuring your IP camera
) Note:
If you use a Modem Router to access the Internet, you should set your IP Camera as the virtual
server with port range 20000-21000 on the Modem Router’s web-based management page.
1.
Click “BASIC->Network->Messenger” to enter the “Messenger” page. Enable Messenger
and then set the Login Account, Password, Alias, Port range, IP Notification, Privacy and
Allow list parameters as the above figure shows. Click OK to save your settings.
2.
Click “BASIC->Network->Information” to enter the “Information” page. Add 192.168.1.1 as
the Primary DNS server.
3.
Click “Advanced->System Log->Setting” to see if there is “Messenger is Ready” information
as the figure below shows. If there is, go on with the following steps.
2
B.
Add the camera’s msn account
1.
Make sure the desired computer is installed with MSN 9.0.
2.
Make sure the MSN view plugin is installed.
This plugin is embedded in IntelligentIPInstallerSetup(TPLink)-1.1.16.09.exe and will be
installed automatically when you install IntelligentIPInstallerSetup(TPLink)-1.1.16.09.exe.
▲ You can download the IntelligentIPInstallerSetup(TPLink)-1.1.16.09.exe here:
http://www.tp-link.com/download/ipcamera/Intelligent_IP_Installer.rar
3.
Log into your MSN account.
4.
Add the camera’s MSN account as a contact.
3
5.
Check its status. Normally it should be online.
6.
Click the camera icon
and select View a contact’s webcam to view the video.
4
7.
Wait for a moment, and you will see the video captured by your IP Camera.
5