1
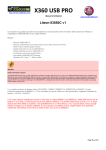
www.maximusgames.net
360 Xtractor 2 User Manual V 1.0
360 XTRACTOR 2
User Manual
-1-
www.maximusgames.net
360 Xtractor User Manual V 1.1
Table of Contents
CHANGELOG:..........................................................................................................................................3
Section 1 - Introducing 360 Xtractor 2......................................................................................................4
Section 2 – Setting up Xtractor 2...............................................................................................................6
Section 3 – Basic Functionality.................................................................................................................7
Powering Up Drives..............................................................................................................................7
Eject / Close Tray..................................................................................................................................7
Half Tray................................................................................................................................................8
Hitachi Hardware ModeB.....................................................................................................................8
Attaching an Accessory (Spear / Vampire)............................................................................................9
Reading Keys on Liteon 74 Drives with DVDKey/DVDkey32.........................................................10
Section 5.- Using the Force Status 0x72 Feature with Liteon Drives......................................................11
Using the Rebuild Board: ..................................................................................................................11
Using Wires.........................................................................................................................................14
Starting Mode 0x72 with Xtractor 2 and Jungleflasher......................................................................15
Section 6 – Xtractor 2 Firmware Update ................................................................................................19
Step 1. Set Jumpers for FW Update mode..........................................................................................19
Step 2. Check Communication Jumpers and Drivers..........................................................................19
Step 3.- Download Latest XT2 Updater Application and the Firmware Update................................20
Step 4.- Plug Xtractor 2 and launch updater application.....................................................................20
Step 6.- Connect..................................................................................................................................21
Step 7.- Flash Device...........................................................................................................................22
-2-
www.maximusgames.net
360 Xtractor 2 User Manual V 1.0
CHANGELOG:
V1,1 – 20-Apr-2010, written
-3-
www.maximusgames.net
360 Xtractor User Manual V 1.1
Section 1 - Introducing 360 Xtractor 2
Thanks for choosing 360 Xtractor 2, A small, but powerful device for all your 360 Dvd drive
hacking needs. This redesign incorporates the best of the Xtractor 1 project and a lot new
features. We hope you enjoy using it as we did it on the design.
Firmware Update
PPTC Fuses
Jumper
RS232 Connector
Eject/Close Switch
ON / OFF Switch
USB Upgradeable
On-board Controller
Beep Buzzer
Alert Led
Power On Indicator
Drive Connector
USB Connector
Communication
Selector Jumpers
Expansion Ports
-4-
www.maximusgames.net
360 Xtractor 2 User Manual V 1.0
Description
Eject/Close Switch
Provides Eject / Close tray function for attached drive, also incorporate a “long
press” feature to enable 0x72 status into Liteon Drives
PC Power Connector
Plugs to your PC Power Supply with a Molex connector
ON/OFF
Allows full turn on / off the device and drive attached
Upgradeable Controller This is the brain of the Xtractor 2, it handle all communications and commands
Alert Led
This red led will indicate some special situations like a Timer, Flash update mode,
etc
Power On Indicator
Blue Visible indicator of the ON/OFF status of the device
Drive Connector
Plugs to the Power and Data cable going to the Xbox 360 Drive
Expansion Ports
Connection port for Spear and Vampire
Communication
Selector Jumpers
This Jumpers will allow you specify the Communication port you will use to talk to
the Xtractor 2, it can be USB or RS232
RS232 Connector
Provides RS232 interface connection to PC
USB Connector
Provides USB interface connection to PC
Beep Buzzer
Audible Feedback for some special commands.
Firmware Update
Jumper
This Jumper will serve to enter on the firmware update mode, on this mode you can
update the main controller firmware, check always our website for latest updates
PPTC Fuses
Resettable fuses, will save the unit from damage due to wrong polarity insertions on
the Dvd drive.
-5-
www.maximusgames.net
360 Xtractor User Manual V 1.1
Section 2 – Setting up Xtractor 2
Before start working with your Xtractor 2 make sure all the jumpers are properly set as
follows.
Jumper on J2 header (located between the white Molex and the RS232 connectors) check
the jumper is NOT on the FW_UPDATE mode as show on the following picture.
Also please check the Jumpers on J3 are set to the communication port you will use:
Also if you choose USB its needed you download and install the USB drivers on your PC, the
easiest way is to use the self-installer, just download an execute the following file:
Http://www.ftdichip.com/Drivers/CDM/CDM20600.exe
Alternatively you can do a manual install of the drivers downloading the following file:
Http://www.ftdichip.com/Drivers/CDM/CDM20602.zip
*Both Install options are compatible with Windows XP, Windows Vista, Windows 7 (All
32 and 64 bit versions)
-6-
www.maximusgames.net
360 Xtractor 2 User Manual V 1.0
Section 3 – Basic Functionality
Powering Up Drives
This tool provides a safe regulated voltage supply to your drive, it can power up any brand of
XBOX 360 Drive currently out, basically you only need to plug the cable to the Xbox 360 Drive
and the other end to the Xtractor Tool and press the ON/OFF switch on the Xtractor. Also
note the cable has 2 wires in white to help you find the proper polarity before connecting to
the drive or to the Xtractor, check following picture to see how to connect it.
Eject / Close Tray
With the Eject/Close button you can open / close the drive tray, this is useful if you need to
load a disc on the XBOX 360 Drive or having to get the tray half opened, for testing Mode B,
etc. Remember that if you are plugging a Hitachi Drive on Mode B this will require 2 button
presses to eject and 2 button presses to load, this is normal Hitachi behavior
The current firmware on the Xtractor 2 Main controller requires some time (delay) between
presses, this delay can be adjusted in the future with firmware update releases.
-7-
www.maximusgames.net
360 Xtractor User Manual V 1.1
Half Tray
The Xtractor 2 has a new half tray mode, all you need to do is do a long press (2-3 seconds)
on the eject button. Once it detects the long press will put the Dvd drive with the tray in halfopen status.
Hitachi Hardware Mode B
Xtractor 2 like his predecessor it can force the Hitachi Drives into Mode B at start, to force the
Mode B you need turn on your Xtractor 2 while having pressed the eject button. As soon as
you see the red led turns on you can release the eject button and the Hitachi Drive will be in
Hardware Mode B
Please Note this feature only works for Hitachi Drives 59 and lower, for Hitachi 78/79 it can
work only if they have custom (aka hacked) firmware on them. For those 78/79 that are on
original state you need to use a software tool to start the Mode B (Jungle flasher)
-8-
www.maximusgames.net
360 Xtractor 2 User Manual V 1.0
Attaching an Accessory (Spear / Vampire)
The expansion port on Xtractor 2 is now bigger than the one in Xtractor 2 so make sure you
plug the Accessories in the proper location on the expansion port. Check following pictures
The Red Wire on the SPEAR OR VAMPIRE accessories, go to Pin 9 as shown on the
previous picture.
We will not cover the Use of the Spear or the Vampire on this Manual, please refer to the
Vampire or Spear Manual on the website: Http://www.360xtractorpro.com under “Downloads”
-9-
www.maximusgames.net
360 Xtractor User Manual V 1.1
Reading Keys on Liteon 74 Drives with DVDKey/DVDkey32
The read of the keys thru the serial method (only works on Liteon 74) is supported in Xtractor
2, the easier way is using the Accessory SPEAR. The use of the SPEAR is not covered on
this document as it has its own manual published on :
Http://www.360xtractorpro.com under “Downloads”
- 10 -
www.maximusgames.net
360 Xtractor 2 User Manual V 1.0
Section 5.- Using the Force Status 0x72 Feature with Liteon
Drives
There are several ways to enter status 0x72 into Liteon Drives, some users can choose to still
use the Vampire, or can also use the Xtractor 2 on-board “Force 0x72” feature. The use of
the vampire is not covered on this document, as it has is own manual published on :
Http://www.360xtractorpro.com under “Downloads”
To enter a Liteon Drive on Status 0x72 using the Xtractor 2 on-board feature you need first
to do 3 cuts to the traces of the Liteon Board and then route the Pin101 spot on the Liteon
DVD Drive to an unused pin on the Dvd drive power connector. This can be done with the
Liteon Rebuild Board or also with some wires.
Using the Rebuild Board:
If you using the rebuild board basically you need to do the 3 cuts and then install the rebuild
board as shown on the following pictures, (full instructions on how to install the rebuild board
can be read on the “Vampire With Rebuild Board” Manual
First do the Cuts as shown on this picture
- 11 -
www.maximusgames.net
360 Xtractor User Manual V 1.1
Then scrape the following spots with a sharp object
Finally place the Rebuild board and solder on the spots shown
NOTE: THE SPOT S1D IS OPTIONAL
- 12 -
www.maximusgames.net
360 Xtractor 2 User Manual V 1.0
Next Solder the Jumper J1 on the Rebuild Board to the XT2 setting
Also you need to run a wire from the XT2 spot on the Rebuild board to the Unused Pin on the
DVD drive shown on the below pictures:
- 13 -
www.maximusgames.net
360 Xtractor User Manual V 1.1
Using Wires
If you don't have Rebuild Board you can use the bellow image as reference on how you can
wire the drive (basically you need to do the 3 cuts and use wire to bridge spots as shown).
- 14 -
www.maximusgames.net
360 Xtractor 2 User Manual V 1.0
Starting Mode 0x72 with Xtractor 2 and Jungle flasher
Once you have your drive ready, plug it to the Xtractor 2 and also plug the Sata Cable coming
from your PC. Turn ON Xtractor 2 now.
Then launch Jungle flasher (use latest version available) and go to the MTK Flash 32 tab,
make sure you choose the proper I/O Port.
Now Execute a Execute a “SEND INTRO/DEVICE ID”. On the pop window that follow this
button Press “YES” to have Jungle Flasher keep trying, you will see the attempts of reading
with “........”.
- 15 -
www.maximusgames.net
360 Xtractor User Manual V 1.1
Now do a long press on the Eject button on the Xtractor which was already turn on, the press
length is about 2-3 seconds, you will see the tray of the drive goes to half tray position and
also Jungle flasher should catch the DVD drive into status 0x72
In case you get STATUS 72 but the VENDOR ID/DEVICE is 0xFF don't worry , just press the
“SEND INTRO/DEVICE ID” again and the status should be fine after this. Xtractor 2 has
been tested with all Liteon VENDOR ID/DEVICE ID existent (Winbond and MXIC).
- 16 -
www.maximusgames.net
360 Xtractor 2 User Manual V 1.0
Now Press the Read Button on Jungle Flasher
Choose the location for your file and check if Jungle Flasher detect it as a valid firmware, in
case you get any invalid firmware message power off the Xtractor and Repeat the Reading
procedure.
The Flashing procedure is not covered on this document but is pretty straight forward, you
don't need to turn off Xtractor or do changes to flash the drive from this point. Make sure you
choose (or leave JF choose) the proper Liteon firmware according to your Liteon model.
After Flashing your drive with the custom firmware just turn off Xtractor 2 and remove the Dvd
drive, the job is all done.
- 17 -
www.maximusgames.net
360 Xtractor User Manual V 1.1
NOTE: The drive should be working fine with the PIN101 routed to the unused pin on the Dvd
drive and no need to restore it again after you flash it with the custom firmware.
But, If it happens you get random eject problems or messages like “Open Tray” on the
console its possible the modification to route PIN101 to the outside is causing problems so
the recommendation for those cases is restore the cuts on the Dvd drive (rebuild cut traces),
or if you used the Rebuild Board all you have to do is change the Bridge on J1 on the Rebuild
board to the following setting:
With the jumper on this setting you cannot use the Force 0x72 status feature on the Xtractor 2
but you can always change the J1 setting to one or the other.
- 18 -
www.maximusgames.net
360 Xtractor 2 User Manual V 1.0
Section 6 – Xtractor 2 Firmware Update
Xtractor 2 come with an “Upload” mode, that allows you to update the controller firmware, this
will help for adjust times, add commands, add features and fix bugs. Its recommended you
check always the product page to download and apply the latest updates to your Xtractor 2.
The update of the Xtractor Firmware is easy all you need is download the latest “XT2
Updater” application and the latest firmware binary, both published on the product page:
Http//360xtractorpro.com
Follow the following Steps to update your Xtractor 2
Step 1. Set Jumpers for FW Update mode
Set the Jumper J2 as shown on the following picture to place the Xtractor 2 into Firmware
Update mode. (Xtractor 2 MUST BE TURNED OFF BEFORE DOING IT)
Step 2. Check Communication Jumpers and Drivers
If not done already setup the Jumpers for the communication port you will use (USB or
RS232) read Setup Xtractor 2 at beginning of this manual. Also note if you will use the USB
you need have installed the USB Drivers. If you are using the RS232 you will not require
install any driver.
- 19 -
www.maximusgames.net
360 Xtractor User Manual V 1.1
Step 3.- Download Latest XT2 Updater Application and the Firmware
Update
The Application can be downloaded from the product page under “Downloads” section,
Download it and save it on a folder on your PC.
The application is just an executable, it don't require install, but in order to run it you need to
have installed the .net framework 3.5 or above on your PC, if you don't have it installed (I.E.
The application don't run) you can download from the Microsoft Website.
The firmware update (xxxxx.cex) is usually a 4 to 8 KB file and it contains the new application
to update your Xtractor 2. Download it and save it preferable on the same directory you
placed the XT2 Updater application.
Step 4.- Plug Xtractor 2 and launch updater application
Now you need plug the usb or rs232 cable between the PC and the Xtractor, turn on Xtractor
2, you should hear a couple of beeps and the red led should turn on on the Xtractor.
Also execute (double click) on the XT2 Updater application you downloaded.
Step 5.- Choose COM port and Baud Speed
Select the Com port to connect to the Xtractor 2, on the left of the status bar of the
application, if don't appear click on Re-scan ports. Do the same for Baud Speed/Rate, the
recommended setting is 115200.
- 20 -
www.maximusgames.net
360 Xtractor 2 User Manual V 1.0
Step 6.- Connect
Click on the Connect Button, if all is OK you will be able to see some information displayed on
the Application like the Xtractor 2 Serial Number
If you get an error message double check you choose the proper COM port and also check
the jumpers on the Xtractor 2 are set properly on J3
- 21 -
www.maximusgames.net
360 Xtractor User Manual V 1.1
Step 7.- Flash Device
Click on the Flash Device button, a window should appear asking for the .cex file with the
update, choose the one you downloaded. After you choose it the flash procedure will start,
you will see progress bar on the bottom, the full erase/flash/verify procedure will take less
than 1 min on most computers.
After all procedure is complete you will see an OK message as shown on the next picture:
- 22 -
www.maximusgames.net
360 Xtractor 2 User Manual V 1.0
Step 8.- Disconnect and Set Jumpers again
Now you need Turn Off Xtractor, unplug it from the PC and change the jumper on J2 to the
following:
Now the next time you start up your Xtractor 2 it will boot with the controller updated.
- 23 -