1
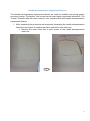
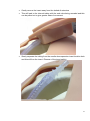
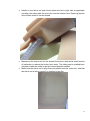
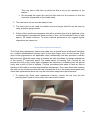
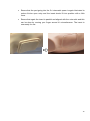
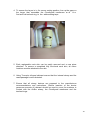
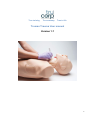
True training True anatomy True to life Truman Trauma User manual Version 1:1 1 Table of Contents Page no Introduction Introducing the Truman Trauma 3 Quick Set up guide General Quick set up guide 5 Tension pneumothorax 5 Needle Decompression replacement tissues 7 Chest Drain replacement tissues 10 Cricothryoidotomy and tracheostomy 13 Airway management 16 Care and maintenance 17 Warranty 18 2 Introduction The Trucorp mission is, to improve patient safety by offering anatomically accurate task trainers for training medical professionals. As our product line of medical task trainers expands from airway management to surgical simulation, we are focused on the priorities of providing value, durability, and product support. At Trucorp we pride ourselves on providing high quality products with high quality, affordable consumables and low running costs. With these core principles in mind, Trucorp has designed the Truman Trauma System for teaching medical professionals the necessary skills for dealing with a range of life threatening trauma situations. The Truman Trauma System offers an anatomically correct simulated human torso designed for trainees to practice several surgical procedures together with the renowned AirSim head for training the full range of airway management and resuscitation skills. The Truman Trauma System also allows the use of replaceable tissue sets that allow each learner a life-like & unique surgical experience. Skill Development: 1. Chest tube insertion: recognition of correct position, surgical incision, blunt dissection through chest wall, perforation of pleura, and finger sweep 2. Needle Decompression of tension pneumothorax 3. Cardio Pulmonary Resuscitation (CPR) 4. Needle and Surgical Cricothyroidotomy 5. Airway Management Skills including OP and NP airway tube insertion, tracheal intubation, bag valve mask techniques, supraglottic airway insertion and ventilation 6. Percutaneous Tracheostomy 7. Identification of tracheal deviation and jugular vein distension which are warning signs attributed to tension pneumothorax Features: Chest Tube Insertion: 1. Anatomically accurate chest tube insertion in the 5th intercostal space 2. Three layered tissue representing skin, fat tissue and muscle for “real feel” surgical incision 3. Realistic feel of all thoracic palpable landmarks 4. Cavity for introduction of optional liquids for simulation of haemothorax or pleural effusion Needle Decompression: 1. Option to introduce air to create either right or left tension pneumothorax 2. Needle decompression replacement tissue sets located in the 2nd intercostal space at mid clavicular line 3 3. Successful needle insertion will release air with the familiar “hiss” sound Cardio Pulmonary Resuscitation: 1. Realistic chest structure allows for easy identification of all anatomical landmarks 2. Full head tilt, chin lift and jaw thrust capabilities to allow the students to prepare the airway prior to resuscitation 3. Lifelike recoil during compressions 4. Successful ventilation will provide an accurate representation of chest rise and fall Airway Management Skills: 1. Anatomically accurate oral and naso pharyngeal AirSim airway 2. Larynx piece with palpable rings for both surgical and needle Cricothyroidotomy and percutaneous tracheostomy 3. Full use of supraglottic devices 4. Endo-tracheal tube insertion with direct laryngoscopy 5. Effective bag mask ventilation 6. Single lung isolation capabilities Tracheal deviation and jugular vein distension: 1. Jugular vein distension can be observed on either the left or right side of the neck during tension pneumothorax 2. Tracheal deviation can be palpitated and clearly visible moving away from the side that has tension pneumothorax 3. Both features revert back to neutral upon successful needle decompression Product Components: 1. Truman Trauma model (TTR2000) 2. Complete set of replaceable Chest drain (CD2000) and Needle decompression (ND2000) tissues 3. 1 Combo larynx piece (CL100) 4. 1 overlay neck skin attached on the model and 2 spare (RS1005) 5. 1 set of airway sealing tape (ST1000) 6. 1 bottle of Trucorp lubrication (TL100) 7. User's Guide/Instructor's Guide 8. Black Carrying Case 4 Quick set up guide General Quick set up guide – preparing model for use 1. Remove the Truman Trauma model from the black carry case 2. Ensure that all components are present and that the model has all tissue sets in place and are secure. 3. Place the model down on it’s back into the supine position 4. Ensure that the tongue is inflated with approx 20ml of air. This will create normal lingual tension. Increasing the amount of air will create a more difficult airway management scenario. 5. Using Trucorp’s silicone lubricant ensure that the internal airway is well lubricated including the tongue, hard palate, back of the mouth and epiglottis. If appropriate ensure that the nasal passage is lubricated. 6. Ensure that all airway devices are prepared to the manufactures recommendations and instructions. Before insertion of any device generous amounts of lubricant should be used to cover the surfaces in contact with the airway. Tension pneumothorax 1. The Truman Trauma model is designed to ensure a realistic experience but with simplicity to ensure time efficient set up and operation. 2. When choosing which side to have the tension pneumothorax on it is important to note that only one side can be chosen at any given time, due to the tracheal deviation feature. 3. The base is labeled to ensure that if either side is needed to create tension pneumothorax all that is simply needed is air inhalation from a resuscitation bag. The luer connector is positioned directly under the label stating which side the tension is on for e.g left tension pneumothorax. The number of lung bag inflations is dependent on the level of severity you want to create. The more inflations the greater the tension pneumothorax. PLEASE NOTE: it is recommended no more pumps are needed when the trachea has deviated to it’s maximum point and the jugular veins have swollen to the maximum point. 4. Upon successful inhalation you will notice the trachea will shift from the affected side to the non-affected side. This can be seen and felt. 5. You will also notice that the jugular vein on the affected side will swell and give the 5 characterize signs of jugular vein distension. This can be seen and felt. 6. At this point the needle decompression sites will also be filled with air and under pressure and the model is now ready for use. 7. Upon successful needle decompression the air will ‘hiss’ out and the tracheal deviation will revert back to it’s resting/neutral position. The Jugular vein distension will also revert back to a normal state. 8. At this stage step 3 can be repeated until the needle decompression tissue set has failed. 9. Both thoracic sides are operational giving a different viewpoint on each procedure. 6 Needle decompression replacement tissues The Needle decompression replacement tissues are made for multiple uses giving greater economy savings. The familiar ‘hiss’ sound can be heard upon a successful procedure. The Truman Trauma model will come ready for use, prepared with both needle decompression replacement tissues. 1. After completing the procedure and eventually exhausting the needle decompression tissue the next step is to replace the tissue sets with a new fresh one. Remove the outer chest skin to gain access to the needle decompression insert site 7 Gently remove the insert away from the slotted rib structure This will lead to the internal tubing with the end valve being revealed and this can be pulled out to give greater ease of movement Slowly separate the tubing from the needle decompression insert location hole and this will free the insert. (Dispose of the insert safely) 8 Handle a new tissue set and choose either the left or right side as applicable and align the tubing with the end valve into the location hole. Ensuring that the valve enters down to the last thread. Manoeuvre the tissue set into the slotted rib structure and add a small amount of lubrication to reduce the friction upon entry. The tubing can be pushed back internally inside the model to get the correct position needed. Make sure the tissue set is lying flush and parallel with the outer skin, and that the tissue set is sitting correctly in relation to the ribs. 9 This may take a little time to perfect as this is key to the operation of the feature. Re assemble the chest skin and tuck this back into the position so that the chest skin sits parallel to the needle insert. 2. The new tissue set can now be ready for use. 3. The tissue set can be used for multiple uses and longer shelf life can be seen by using a smaller gauge needle. 4. Failure of the needle decompression site will be evident when the air tightness of the model begins to decrease and there is a lack of ‘hiss’ but this shouldn’t occur to after approx. 50 needle incisions. To ensure optimal performance we suggest regular inspections are carried out. Chest Drain replacement tissues The Chest drain replacement tissues are made from a special blend of silicones that allow for a realistic differentiation between each of the three layers: skin, fat and muscle. Each layer is also pigmented to the applicable colour anatomically and also provides a realistic feel and touch. With the insert being in between the ribs this allows for realistic palpitations of the correct 5th intercostal space. The added option of inserting fluid (Trucorp do not provide the fluid) to the cavity again increases the experience of breaking into the pleural cavity and a gush of fluid is exhaled. (Trucorp recommend that water is used so that no staining of the modle is incurred with blood like substances.) Then upon chest tube insertion the skin can be sutured and this skill can be practiced. Due to the cutting techniques each chest drain replacement tissue can only be used once maybe twice per procedure. 1. To replace the Chest drain replacement tissues, remove the set from the ribs ensuring that if liquid is in the cavity extra care must be taken. 10 Dispose of the tissue insert safely Handle a new chest drain replacement tissue choosing either the left or right side and align it in the slotted compartment of the ribs. The ribs are designed so that the ribs slide into the slotted compartment with ease If liquid is used to illustrate haemothorax then remove the red sealing cap and insert the desired fluid, again we recommend water to avoid stains. Fill the cavity to the desired level and tighten the cap back on. The part is now ready for use. 11 Ensure that the part going into the 5th intercostal space is again lubricated to reduce friction upon entry and the insert should fit into position with a little force. Ensure that again the insert is parallel and aligned with the outer skin and this can be done by running your finger around it’s circumference. The insert is now ready for use. 12 Cricothryoidotomy and Tracheostomy 1. The Truman Trauma will be shipped ready to begin Cricothyroidotomy and Tracheostomy procedures but please ensure that the airway has sealing tape covering the Cric and Traci hole, the larynx is in its secured resting position and that the skin is attached to all the velcro points to enable a fully functioning product. 2. After a nominal amount of procedures ensure that the airway sealing tape is replaced as this will affect the airtight quality of the product. 3. The larynx can be removed easily and another piece of sealing tape cut to approx 5-6cm and attached over the Cric or Traci hole in the airway. Please ensure that the airway is clean and dry before attaching the tape to ensure secure tape adhesion. 13 4. To ensure the larynx is in it’s secure resting position, line up the gaps on the larynx that resembles the Cricothyroid membrane a n d t h e 2nd and 3rd tracheal ring, to the white sealing tape. 5. Each replaceable neck skin can be easily removed and a new piece attached. To ensure a completed fully functional neck skin, all velcro locations must be attached to the skin. 6. Using Trucorp’s silicone lubricant ensure that the internal airway and the nasal passage is well lubricated. 7. Ensure that all airway devices are prepared to the manufactures recommendations and instructions. Before insertion of the device generous amounts of lubricant should be used to cover the surfaces in contact with the AirSim airway, the Cricothyroid membrane and the tracheal rings. 14 Trucorp provide the following spare parts to facilitate cricothryoidotomy and tracheostomy use on the Truman Trauma. These can be ordered while purchasing using the following codes; CL100 - 1 x Combo Larynx –– Anatomical Larynx containing the Thyroid Cartilage, Cricothyroid membrane, Cricothyroid cartilage and tracheal rings. The Cricothyroid and tracheal location points are pre cut. RS1005 - Overlay neck skin attachments – (pack of 5) ST1000 - 1 x Sealing tape - Sealing tape used to replicate the Cricothyroid membrane. This interchangeable part is used to cover the Cricothyroid hole and the tracheostomy pre cut hole in the airway and is replaced after every surgical procedure. SFT1005 – Subcutaneous fat tissue (pack of 5) 15 Airway Management The Truman Trauma features the anatomically correct and visually accurate AirSim airway. In addition to this the model also has an anatomically correct nasal passage showing the internal features. The model can facilitate a wide variety of airway techniques to be demonstrated: Direct and video Laryngoscopy Oral and naso Pharyngeal intubation Fibreoptic examination Bag mask ventilation with chest rise and fall Full use of supraglottic devices ranging in all sizes Single lung isolation techniques Palpable tracheal rings Needle and surgical Cricothryoidotomy Percutaneous tracheostomy Due to the neck design it allows for a greater degree of flexion and extension giving the ability to fix the head into the ‘neutral’ or ‘sniffing’ position. With our anatomical jaw design, Jaw thrust training is also very effective on the model. Successful ventilation is observed visually though the rise and fall of the chest. As with all the Trucorp product range the tongue can be inflated, to demonstrate tongue oedema or anaphylactic reactions. TruCorp recommend the following equipment sizes for optimal performance: • 7.0-7.5 mm ID for nasal intubation • 8.0-9.0 mm ID for oral intubation • Size 3 - 5 for LMA laryngeal masks and IGels (similar respective sizes for other supraglottic devices) PLEASE NOTE: Mouth the mouth resuscitation is NOT recommended on the Truman Trauma as the airway and lungs are not interchangeable or replaceable. 16 Care and maintenance Cleaning and Storage Store in clean, dry conditions away from heat and direct sunlight; avoid contact with metals, solvents, oils or greases and strong detergents. Thoroughly wash the Truman Trauma airway in warm water, using a dilute (810% w/w) sodium bicarbonate solution until all visible foreign matter is removed. Warm soapy water is also an alternative cleaning solution Mild detergents or enzymatic cleaning agents may be used on the airway in accordance with the manufacturer's instructions and at the proper dilution. The detergent must not contain skin or mucous membrane irritants. Clean the airway using a small soft bristle brush (approximately ½ inch or 12.5mm in diameter). Gently insert the brush through the airway, taking care not to damage the material. Extra care must be taken when cleaning around the vocal cords. Carefully inspect the device to ensure that all visible foreign matter has been removed. The head and neck skin of the Truman Trauma is made from durable and very elastic polymer material. It can be cleaned using a lightly soaped, damp cloth. Please do not use and detergents or cleaning agents on the skin material. During Chest drain procedures with the addition of fluid (blood like fluid) in the cavity, the model may experience some residual deposits. Again these can be cleaned using warm soapy water and dried using a cloth. Please DO NOT USE any of the following when cleaning the AirSim product range • Germicides, disinfectants, or as glutaraldehyde (e.g. Cidex®), • Ethylene oxide, containing cleaners phenol-based chemical cleaners agents or such iodine- Such substances are absorbed by the Truman Trauma materials, resulting in exposure of the user to unnecessary risk and possible deterioration of the device. Do not use a device that has been exposed to any of these substances. 17 Warranty TruCorp warrants this unit to be free of defects in materials and workmanship and to give satisfactory service for a period of 1 year from the date of delivery. This ensures that our customers receive maximum coverage on each product. If the unit should malfunction it must be returned to the factory for evaluation. Upon examination by TruCorp, if the unit is found to be defective it will be repaired or replaced at no charge. However this warranty is VOID, if the unit shows evidence of having been tampered with or shows evidence of having been damaged by excessive heat, the use of sharp instruments, misapplication, misuse or other operating conditions outside of Trucorp’s control. Components which wear or are damaged by misuse are not warranted and will be charged if repair has been approved. Before returning any models please contact TruCorp. To avoid delays please ensure the following information is available 1. Returnee’s name, address and phone number. 2. Model and serial numbers 3. Repair instructions with potential issues (with images if possible) 4. Apparatus/devices and number of uses on the model Please direct all warranty and repair requests/inquires to TruCorp Ltd The Mount Business Park 2 Woodstock Link Belfast, BT6 8DD Northern Ireland Tel: +44 (0)28 9073 7281 Fax: +44 (0)28 9073 728 Email: [email protected] and/or [email protected] Every precaution for accuracy has been taken in the preparation of this manual, however, TruCorp neither assumes responsibility for any omissions or errors that may appear nor assumes liability for any damages that result from the use of the product in accordance with the information contained in the manual. 18 NOTES 19