1
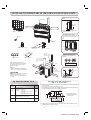
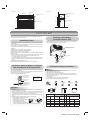
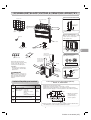
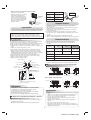
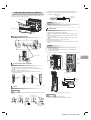
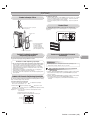
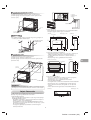
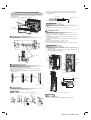
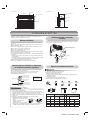
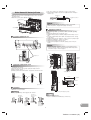
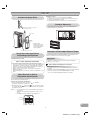
Mounting directly on the floor.
1) Fix the leg of indoor unit on the floor with 2 mounting screws.
2) Fix the upper part of indoor unit on the wall with 4 mounting screws.
For prevent dewfall
(Floor installation)
Wall burying mode
EN
Slit
ES
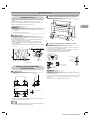
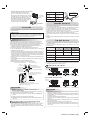
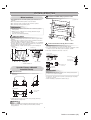
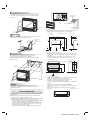
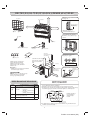
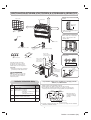
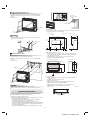
2. Wall hole size
Wall hole size should be enough to keep the distance with indoor unit as
shown in the following figure.
6 screw
(M4 x 25L)
(Front view)
(Unit : mm)
FR
(Side view)
70 or more
NOTE
240 to 250
IT
800 or more
• In case the plinth is fixed to the wall, please make sure to cut out the slit
on the left and right side of the main part.
(600)
(700)
Wall
Cut dot-line area
670 or more
Wall
DE
20 to 30
PL
Floor
50 or more
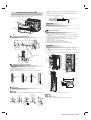
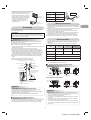
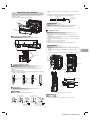
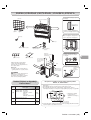
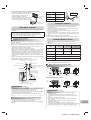
1) Fix the installation plate on the wall with 4 mounting screws.
2) Hook the indoor unit on the installation plate.
3) Fix the upper part of indoor unit on the wall with 4 mounting screws.
(Rear screws potion)
340
15
560
272
4 screw
(M4 x 25L)
1000 mm or less
670
240
288
15
670
CR
(Field supply)
(Field supply)
230
RU
HU
(Side view)
150
10
40
CZ
Floor
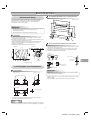
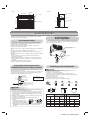
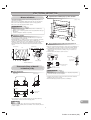
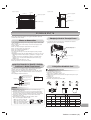
3. Installation using the supporting plate
• To install into the existing wall hole, if it is impossible to keep 20-30 mm
of depth, use the supporting plate for securing the distance.
• Arrange the screw positions and supporting plate as shown in the
figure.
• Be sure to switch to wall burying mode.
Installation on the wall
(Wall installation)
50 or more
Indoor unit
PT
(Unit : mm)
: Screw holes
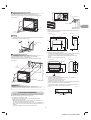
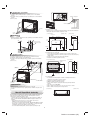
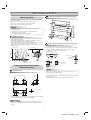
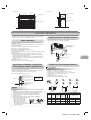
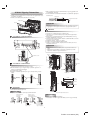
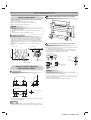
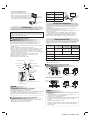
4. In case of lattice establishment
• Follow the following figure, make sure to keep enough distance
between lattice, frame and wall.
• Be sure to switch to wall burying mode.
• The lattice should be make of wood.
• Between the air inlet and outlet, should be devided with partition board.
• Be sure to establish the open part for RECEIVER.
• The open part of lattice must be opens 70 % or more of the wall hole.
• The open part of lattice must be arranged uniformly.
4 screw
(M4 x 25L)
CAUTION
(Top view)
Make sure to fix it at a designated position with the screws.
Failure may result the damage of piping by the turning over of a set.
(Unit : mm)
TR
NL
GR
SV
FI
NO
DK
RO
BG
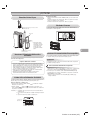
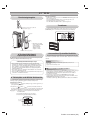
Concealed Installation
Partition board
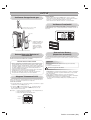
The special method to install the indoor unit bury in the wall is shown here.
Please make sure to change to wall burying mode.
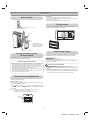
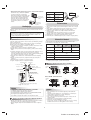
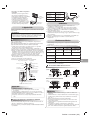
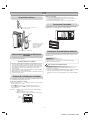
1. To switch to the wall burying mode
To switch to the wall burying mode, press and hold AIR OUTLET
SELECT button for 20 seconds.
- When the operation set up and 5 beep sounds. Then indication at
Temperature indicator will light up for 5 seconds.
- To cancel, press AIR OUTLET SELECT button for 20 seconds then, 5
beep sounds. Then indication at Temperature indicator will blinks for 5
seconds.
- To prevent dewfall, above plate angle should be narrow.
EE
LV
SK
SI
6
Toshiba 1112150201 (EN)