1
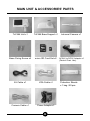
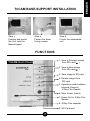
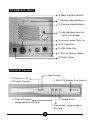
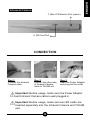
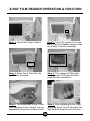
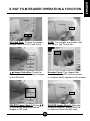
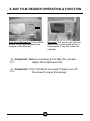
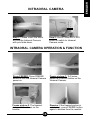
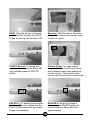
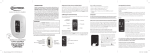
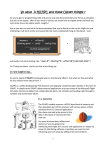
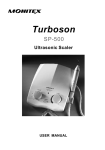
CX560
< User Manual >
Table of Contents
Table of Contents
2
About TriCAM CX560
3
Preface
3
Disclaimer
4
Safety Precautions
5
Main Unit & Accessories' Parts
TriCAM Base-Support Installation
6
7
Functions
7
Connection
9
X-Ray Film Reader Operation & Function
10
Intraoral Camera Operation & Function
13
Precaution of use SD Card
16
Installation to Dental Chair
17
Specifications
18
We reserve the rights of explanation in concerning
the discrepancy of the product caused by weather,
temperature, and used materials. The specifications
and functions are subject to change and revision
without prior notice.
2
TriCAM CX560 CVR is a 3-in-one multifuction dental image
system. It combines all the functions of intraoral camera,
X-ray film reader and LCD monitor which can save the image
in a micro SD card.
Besides the built-in 5.6 inches LCD monitor, TriCAM can
also output the image to other display media which allow the
user to reveal directly without the use of computer system.
PREFACE
Thank you for your purchase of the product:“TriCAM CX560”
CVR image system. Please pay attention to the following
content to ensure proper functioning and safety of this product.
Prior to operate this product, please read the USER MANUAL
carefully and thoroughly as it provides details of proper
implementation of the operations, maintenances, and
troubleshooting instructions.
Please keep this manual well preserved for future references.
3
ENGLISH
About TriCAM CX560
DISCLAIMER
1. We shall not assume any responsibility if any malfunction
or damage was caused by improper operation, removal,
modification or maintenance.
2. We shall not assume any responsibility if any malfunction
or damage was caused by operating under unsuited
environment.
3. We shall not assume any responsibility if any malfunction
or damage was caused by force majeure.
4. We hold the right to explain for the given cause of the
defective products which might have been caused by
natural disasters or abnormal temperature, humidity that
is in concurrent to the guidance instructed in this manual.
5. Please stop using this product if any damage or problem
occurs! Attempt to try and repair this unit by unauthorized
technician personnel WILL automatically lead to forfeit and
negation of the warranty agreement.
4
Please follow instruction steps in this manual for correct and
safe operations of the device. Pay special attentionto the
following warning signs beside the operation descriptions
where applicable.
CAUTION : This message appears where the operation
may cause slight damage to other object or slight bodily
harm if operation not properly conducted.
IMPORTANT : This message appears where the operation
may involve risk of damaging the device itself if not
properly conducted.
Product Cleaning:
If there is any dirt or stains on the surface of control panel
or surface of the camera handpiece, please use cloth to
wipe clean or use a neutral cleansing agent.
Note: Never use a solvent or volatile oil for cleaning.
This can lead to fading or cracking on the plastic
cover.
5
ENGLISH
SAFETY PRECAUTIONS
MAIN UNIT & ACCESSORIES' PARTS
TriCAM Unit x1
TriCAM Base-Support x1
Base Fixing Screw x2
micro SD Card Set x2
AV Cable x1
VGA Cable x1
Camera Cable x1
Power Adaptor x1
6
Intraoral Camera x1
AC24V to DC5V Adaptor x1
(Dental Chair Use)
Protection Sheets
x 1 bag / 50 pcs
Step 1.
Position and mount
the Unit onto the
Base-Support
Step 2.
Fasten the base
fixing screws
Step 3.
Check the assembled
unit
FUNCTIONS
1. View to Previous image
from SD card ( )
TriCAM Unit (Front)
2. View to Next image
from SD card ( )
3. Save image to SD card
4. Delete image from
SD card
5. Operation mode between
Intraoral Camera /
X-Ray Film Reader
6. Main Power Switch
7. Power On for X-Ray Film
Reader
8. X-Ray Film cassette
9. SD Card port
7
ENGLISH
TriCAM BASE-SUPPORT INSTALLATION
TriCAM Unit (Rear)
10.Main Function Button
11.Function Adjust Button(+)
12.Function Adjust Button(-)
13.Light Adjusting Knob for
X-Ray Film Reader
14.Intraoral Camera Cable Port
15.AV Cable Port
16.VGA Cable Port
17.Port for Factory Testing
18.Power Outlet
Intraoral Camera
2. Save Picture
1.1 Power on / off
1.2 Freeze Picture /
3. Mini LCD Monitor Port (option)
6. Delete Photo
4. View to Previous
image saved in SD Card
5. View to Next image saved in
SD Card
8
ENGLISH
Intraoral Camera
7. Mini LCD Monitor Port (option)
8. SD Card Port
CONNECTION
Step 1.
Connect the Intraoral
Camera cable
Step 2.
Connect the other side
of Intraoral Camera
cable to TriCAM unit
Step 3.
Insert the Power Adaptor
and plug into the outlet
Important: Before usage, make sure the Power Adaptor
and Intraoral Camera cable is well plugged in.
Important: Before usage, make sure two SD cards are
inserted separately into the Intraoral Camera and TriCAM
unit.
9
X-RAY FILM READER OPERATION & FUNCTION
Step 1. Press the Power Switch.
Step 2. The LCD monitor is on and
the X-Ray Film Reader power is also
on (empty X-ray film cassette).
Step 3. Place the X-Ray film into
the Plastic cassette.
Step 4. The image of X-Ray film
shows on the LCD monitor after
push the film cassette in.
Step 5. The brightness of the X-Ray
Film showing on the monitor can be
adjusted by the knob on Rear of unit.
Step 6. After adjusting by the Light
Adjusting Knob, for 2-3 seconds, the
light lens will auto focus on the film.
10
ENGLISH
X-RAY FILM READER OPERATION & FUNCTION
SD Card Port: To save the image,
please insert the SD Card firstly.
SAVE: The images are saved in the
SD card in “jpg” format file.
Image Selection: Press the
buttons to review the saved images
in the SD card.
Number Code: The images that
saved inside the SD card are coded
in numbers which appear on the screen.
DELETE Image Step-1: Press
to review and delete the saved
images in SD card.
DELETE Image Step-2: After the
image is selected, press DELETE
to remove it from the SD card.
11
X-RAY FILM READER OPERATION & FUNCTION
Exit from Reviewing: Press SAVE
button to exit from reviewing the
images in the SD card.
Resume: The monitor will resume
back to the review mode which is
showing the X-ray film inside the
cassette.
Important: Before reviewing the X-Ray film, please
adjust the brightness first.
Important: If the TriCAM is not used. Please turn off
the power to save the energy.
12
Step 1: Please insert the Micro
SD into the Intraoral Camera
with print side down.
Step 2: Press CAMERA/X-RAY
button to switch to Intraoral
Camera mode.
INTRAORAL CAMERA OPERATION & FUNCTION
Press FREEZE: Press FREEZE
button to turn the Intraoral Camera
power on.
Freeze picture-1: To Freeze,
press the FREEZE button on the
Intraoral Camera.
Freeze picture-2: The freezed
picture will be shown on the
monitor.
Dismiss: If the freezed picture is
not desired, press FREEZE button
again to dismiss from the monitor.
13
ENGLISH
INTRAORAL CAMERA
SAVE: After the picture is freezed
on the monitor to press the SAVE
button for saving into the Micro SD.
Resume: After Dismiss or Save the
picture, the monitor will resume back
to the Live mode.
PHOTO Review: To review the
saved images inside the Micro SD
card, please press the PHOTO
button.
Picture Code: For each saved
images in the Micro SD card, there
are numbers coded and appearing
on the monitor. This picture code
can be used to retrieve for download.
DELETE-1: To delete picture inside
the Micro SD card, please use the
PHOTO button to select the desire
image to be deleted.
DELETE-2: When the image is
chosen, press DELETE button to
remove from the Micro SD card
(permanently).
14
ENGLISH
Exit Review: To exit from reviewing
the saved pictures in the Micro SD
card, please press the SAVE button.
Live Mode: The image taking from
the Intraoral Camera is showing on
the monitor, for case check or
communication with patient.
Live Mode: The image taking from the
Intraoral camera is showing on the monitor.
The adjustment functions are:
BRIGHTNESS
CONTRAST
COLOUR
ROTATE (change picture 180 degree)
SLEEP (one time setting for the monitor
to turn off at setting time in Minutes.
Reactive is needed when the unit is turn
on again).
Important: Please insert the Micro SD card before turn
on the Intraoral Camera. If not, an error message (K835)
will appear and the transmission for picture will be slow.
Important: To turn off the Intraoral Camera power, please
press and hold the FREEZE button for 2 seconds.
15
PRECAUTIONS OF USE SD CARD
Important: Please attent to use SD Card in caution for
protection. Picture #1 below, the SD Card is locked.
Picture #2 below, the SD Card is unlocked to be able to
save and retrieve files.
Picture 1
Picture 2
Important: When using the SD card, do not rename the
directory and the file format.
16
Picture for TriCAM to install on dental chair.
AC-24V IN
17
ENGLISH
INSTALLATION TO DENTAL CHAIR
SPECIFICATIONS
TriCAM Unit:
Size : 235(L) x 102(W) x 212(H) mm
Weight : 1268 g
LCD monitor:
Size : 112.8(W) x 84.6(H) mm
Resolution : 640 x 480 pixels
Intraoral Camera:
Size : 235(L) x 22(W) x 25(H) mm
Weight : 48.6 g
TriCAM : (with Intraoral Camera)
Size : 234(L) x 102(W) x 295.2(H) mm
Weight : 1316 g
18
Class II equipment.
Type B applied parts
IP code: IPX0.
The equipment is not suitable for use in the presence of
flammable mixtures.
Continuous operation.
The AV port and VGA port shall be connected to
the equipment which comply with medical device standard
Environmental conditions of transport and storage
Temp: -20℃ to +60℃
RH: 10 to 90% RH
Symbol
Explantion
Class II equipment
Type B applied part
Attention, consult
ACCOMPANYING DOCUMENTS
19
ENGLISH
SPECIFICATIONS
INDUSTRIAL CO., LTD
6F, 70 GUANG-FU ROAD SEC. 1,
SAN-CHONG CITY, TAIPEI, TAIWAN
TEL : 886-2-29993869 FAX: 886-2-29993647
E-mail : [email protected]
http://www.monitex.com.tw
Copyright© 2010 MONITEX Industrial CO., LTD. All Rights Reserved. 2010.12 (Ver. 1)