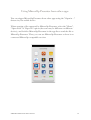
1
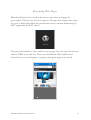
!
!
MirrorOp Presenter
User’s Manual
!
!
!
!
!
!
!
!
!
Version 1.0
8/7/14
Introduction
3
Key Features
3
Requirements
4
Setup with 3 easy steps
4
Network Connection
4
Selecting Receivers
5
Main Screen
6
Presenting Documents
7
Presenting Photos
9
Photo Tools
10
Dropbox Access
11
Presenting Web Pages
13
Using Camera
14
Showing Screenshots
15
Making Annotations
17
Using MirrorOp Presenter from other apps
19
Setting Preferences
20
Registration
22
Appendix: Uploading files in iOS
23
Frequently Asked Questions
24
!
Introduction
MirrorOp Presenter is the latest member of the MirrorOp family. As the
successor of popular WiFi-Doc app, MirrorOp Presenter adds more flexibility
for presenters and teachers by including build-in browser for showing web
pages, live camera to share non-digitized contents like printed materials or even
3D real objects. Also introducing the new annotation tools that helps presenters
highlight on presentation materials or write/draw any ideas that just pop up.
!
Key Features
★ Documents (Word, Excel, PowerPoint, PDF)
★ Photos (JPG, PNG)
★ Browser
★ Live Camera
★ Shot&Show
★ Annotation tools
MIRROROP PRESENTER USER’S MANUAL
"3
Requirements
!
★
★
★
!
!
1.
2.
3.
!
!
Free to use with wePresent WiPG-1500/wePresent WiPG-2000 receiver
devices (for more info visit www.awindinc.com or local wePresent
distributors)
Free to use with ClickShare for Conference Rooms (CSC) and ClickShare
for Meeting Rooms (CSM) receiver devices (firmware update may be
required, for more info please contact your local ClickShare support)
For other MirrorOp receivers, projection will be stopped after 5 minutes. In
next version user can buy activation key with in-app purchase to use with
all other MirrorOp receivers
Setup with 3 easy steps
Install receiver device
Connect to the receiver device
Launch the MirrorOp Presenter app and start presentation
Network Connection
MirrorOp Presenter is best used with MirrorOp Receivers connected to big
screen for presentation. Make sure the phone or tablet is connected to the same
network where your receiver is on, otherwise the MirrorOp Presenter may not
find the receiver you want to use.
!
During the presentation, internet connection is not always necessary, depending
on which feature you use. The following features require internet connection:
★ Register
★ Dropbox
★ Browser
MIRROROP PRESENTER USER’S MANUAL
"4
!
Selecting Receivers
When entering MirrorOp Presenter, the app would pop up a message asking if
you want to connect to a receiver. Select a receiver from the discovered receivers
list, or press the MENU key to manually enter the IP address of the receiver if
the receiver you want to connect to is not automatically discovered.
You can drag down to refresh the list if you want the app to search for receivers
on the network again.
!
If you want to skip this step for now, you can click "Cancel" on the message.
Later on when you want to connect to a receiver in the app, you can click the
receiver icon on the upper-right corner to bring up the receivers list.
!
When connected to a receiver, the receiver icon turns green.
MIRROROP PRESENTER USER’S MANUAL
"5
Main Screen
!
After entering MirrorOp Presenter, you will be brought to the main screen
where you can select which function to use. There are 5 buttons on the main
screen:
!
★
★
★
★
★
Library: Function to open documents, photos or Dropbox files
Browser: Built-in browser for presentation
Camera: Use the camera on your phone to show live images of non-digital
objects
Shot & Show: Take screenshots and send to receiver to show the audience
still images of your screen. This is an alternative way of showing step-bystep actions taken place on your mobile device without the system privilege
for full-screen mirroring.
Settings: Change settings, registration, show app info
MIRROROP PRESENTER USER’S MANUAL
"6
!
Presenting Documents
MirrorOp Presenter can open the following documents: Word (doc, docx), Excel
(xls, xlsx), PowerPoint (ppt, pptx), PDF.
!
★
To open documents for presentation, click the Library button on the main
page to show available options. You will see Documents, Photos and
Dropbox option.
★
Select Documents option.
[Android] A list of folders with documents inside will be shown. Select the folder you want to
use.
[iOS] The document uploaded to MirrorOp Presenter will be shown. For uploading files to
MirrorOp Presenter on iOS, please refer to Appendix: Uploading files in iOS.
MIRROROP PRESENTER USER’S MANUAL
"7
★
★
Select the document to open from the file list.
In the document view, click to toggle thumbnails on or off. Click the Play
button to start or stop projection to receiver.
!
MIRROROP PRESENTER USER’S MANUAL
"8
Presenting Photos
!
MirrorOp Presenter can open the following Photo formats: JPG, PNG.
!
To use photos in presentations, follow the same procedure as showing
documents, while clicking the Photos option in the list.
!
[Android] A list of folders with photos inside will be shown. Select the folder you want to use.
[iOS] The photos in your Camera Roll will be shown.
★
★
Select the photo to open from the list.
In the photo view, click to toggle thumbnails on or off. Click the Play
button to start or stop projection to receiver.
MIRROROP PRESENTER USER’S MANUAL
"9
Photo Tools
!
There are three tools in photo viewer: annotation tool, slideshow tool, rotate
tool.
★
★
★
!
!
Annotation: Please refer to Making Annotations.
Slideshow: Start/stop slideshow for the photos in the folder/camera roll.
The interval of each photo can be set in the Settings. See Setting
Preferences.
Rotate: Rotate current photo clockwise. Click again will rotate another 90
degrees.
MIRROROP PRESENTER USER’S MANUAL
"10
!
Dropbox Access
MirrorOp Presenter can open files directly from your Drop folders. To do do,
you need to link MirrorOp Presenter with your Dropbox account and grant
access to this app.
The first time when you choose Dropbox option, MirrorOp Presenter will
automatically bring out the authorization page to link your Dropbox account. If
you already have Dropbox account info on your mobile device, the default
account will be used. If you don’t have Dropbox account info already in the
phone, you will need to input your account in the authorisation page.
!
Click Allow to grant access to MirrorOp Presenter or click "Use a different
account" if you want to access another account.
You can revoke the authorization anytime by removing the check in the check
box in Settings page. Click the check box again will restart the authorization
process.
MIRROROP PRESENTER USER’S MANUAL
"11
!
Once authorized, you can see all your files in Dropbox inside MirrorOp
Presenter.
!
Select the file you want to open just like opening files directly from your phone.
MirrorOp Presenter will download the file from Dropbox and open once
download completed.
MIRROROP PRESENTER USER’S MANUAL
"12
Presenting Web Pages
!
MirrorOp Presenter has a built-in browser to open basic web pages for
presentation. This browser does not support web pages that require some plugins, such as Flash, Silverlight. For presentations most common disadvantage is
NOT supporting YouTube videos.
The page looks similar to other mobile browser apps. You can enter the web site
address (URL) in the edit box. There are also Refresh, Back and Forward
buttons for you to reload pages or navigate among the pages your visited.
!
!
!
MIRROROP PRESENTER USER’S MANUAL
"13
Using Camera
!
We’re living in a digital world, yet there are times something we want to show in
our presentation require more traditional approach. For example, you may want
to share a hand-written manuscript that are too delicate to scan. Or, you may
want to show the texture of the entire skin on an apple. Or, you just want to
share an extraordinary great painting done by a student in class to the other
students.
!
To help you in such situations, we added the Camera function in MirrorOp
Presenter so you can just grab your phone and use the built-in camera to start
live reporting.
!
To use the Camera function, select Camera on the main screen.
The live view from your camera will be shown. Point your camera to anything
you want to show.
MIRROROP PRESENTER USER’S MANUAL
"14
!
Showing Screenshots
It would be great to show everything happening on the mobile screen to the
audience in real time. However, due to security concerns, most phone and tablet
makers blocks apps from doing so. Every app can only see the data they created,
but not everything generated by other apps. The realtime screen data is only
allowed for the operating system or apps with system privilege. To allow a
normal app to get the system privilege, usually it would require special
procedures known as jailbreaking (iOS) or rooting (Android).
!
To allow showing the screen outside our app without the special procedure, we
created a special feature called "Show & Show". The concept is to take
screenshots manually by user, then automatically send the latest screenshot
image to the receiver. This allows the audience to show anything happening on
screen as showing still images, but not requiring any special privilege. It is useful
in most occasions unless realtime 30 frame per second is a must.
!
To use Shot & Show, click the Show & Show button on main screen.
!
You will see a simple guide on screen. Follow the guide to take a screenshot on
whatever you ant to show, and then MirrorOp Presenter will automatically send
it to the receiver.
!
[Notes for Android users] Every Android device may have different design to capture screenshots,
and may have different default locations to save the screenshot images. Our app tries to
automatically detect the best possible settings for your Android device based on our tests and
experience, however, there may be devices that have other design concept we do not handle well.
MIRROROP PRESENTER USER’S MANUAL
"15
In this case, please help us by sending the error log back with the Send problem log function in
Settings so we can improve.
MIRROROP PRESENTER USER’S MANUAL
"16
!
Making Annotations
One very useful function in MirrorOp Presenter is that you can annotate on all
the documents/photos/web pages/camara view/screenshots you share. That is,
you can use the Annotation tools to write, draw, highlight anywhere on screen
while you present.
!
To start annotation, click the Annotation button on the lower-right corner.
A tool palette will be expanded with options you can choose for annotation,
including color, pen size, pen type, eraser, etc.
Pen Type:
★
Highlighter mode (with yellow pen tip): With transparency, so you can use
it to draw on top of the lines you want to highlight without covering them.
★
Marker mode: Not transparent, good for writing or drawing.
★
One-stroke mode (with a number "1" in the corner): Draws one stroke each
time. Previous stroke will be clears when new stroke is being drawn. Good
when used in combination with highlighter.
Color: Switch color among red, green or blue.
!
Pen Size: Switch pen size among small, medium or large.
MIRROROP PRESENTER USER’S MANUAL
"17
!
Eraser: Cleans the annotation data where the eraser cursor moves.
!
Delete all: Delete all annotations on current image.
!
Save: Save current annotation and image as one image file to your phone.
!
Control: Leave annotation mode and return to control/navigation more.
!
MIRROROP PRESENTER USER’S MANUAL
"18
!
Using MirrorOp Presenter from other apps
You can trigger MirrorOp Presenter from other apps using the "Open in…"
feature in your mobile device.
!
When opening a file supported by MirrorOp Presenter, select the "Share",
"Open with" or "Open in" option (the term may be different on different
devices), and look for MirrorOp Presenter in the app list to send the file to
MirrorOp Presenter. Then, you can use MirrorOp Presenter to show it on
connected MirrorOp compatible receiver.
!
MIRROROP PRESENTER USER’S MANUAL
"19
Setting Preferences
!
MirrorOp Presenter provides some preference settings you can customise to fit
your needs. To access these settings, click the Settings button from the main
screen.
Share my screen with WebSlides: WebSlides is a feature on some MirrorOp
receivers which allows user to see current projection screen form a web browser
as viewing a (manually or automatically updated) JPEG image. You can choose
if you want the contents presented from this app being shared in such method.
If you want your contents to be included when WebSlides on MirrorOp
receivers are enabled, turn this option ON. Otherwise, leave it OFF.
!
MIRROROP PRESENTER USER’S MANUAL
"20
SlideShow interval time: Choose the interval of each photo when playing as
slideshow.
!
MirrorOp Presenter Start Guide: Revisit the Start Guide which was
automatically played the first time this app was launched.
!
Link to Dropbox: Initiate or revoke the authorization with Dropbox.
!
License Key: Register or de-register this app with an activation key (more info
see Registration).
!
Send problem log: If you encounter problems using this app, use this function to
generate error logs and send it to our engineering team. Run the app until
where the issue you want to report happens, then click this item to attach the log
to your mailing app. You can edit subject or any other description you want to
tell our engineers to help us understand and fix it earlier.
!
Version info: Version number of the currently installed app.
MIRROROP PRESENTER USER’S MANUAL
"21
!
Registration
MirrorOp Presenter is free to use with some receivers that already bundled the
license. If you’re connecting to a receiver with MirrorOp Presenter license, you
don’t need to worry about registration. However, if you use a receiver without
MirrorOp Presenter license, your projection will be stopped every 5 minutes.
You need to click the Play button to resume projection.
!
If you find this app useful, but don’t have a receiver with MirrorOp Presenter
license, we encourage you to buy your own personal license of MirrorOp
Presenter via the Google Play store or iOS App Store. You will receive a license
key from our server after receiving your order. You can enter the registration key
in this app to remove the time limitation.
Please note that each key is for one device only. That means, if you change to a
new phone, the registration on the old phone will be revoked once you register
your new phone.
!
If you lost your key but need to register again, you can try the "Find My Key"
button to ask our server to resend your key to the mail box you used to purchase.
!
MIRROROP PRESENTER USER’S MANUAL
"22
!
Appendix: Uploading files in iOS
For security concerns, iOS treat every app as separated sandboxes. That means,
every app can only "see" the files explicitly uploaded to that app, but not sharing
all the files in the iOS device. You need to upload the documents you want to
use to MirrorOp Presenter before you start your presentation.
!
To upload files to MirrorOp Presenter, follow these steps:
!
1. Connect the iOS device to your computer.
2. Open iTunes on your computer.
3. Click on your device in the list on the left side of iTunes. (It'll be under the
"DEVICES" header.)
4. Click the "Apps" tab up on top in the main panel of iTunes.
5. Select "MirrorOp Presenter" in the app list. You should see all files already
accessible by MirrorOp Presenter.
6. Click the "Add" button in iTunes.
7. Select files you want to upload in the file browser and start uploading.
MIRROROP PRESENTER USER’S MANUAL
"23
!
Frequently Asked Questions
Q: I cannot find any receiver!
A: The sender (this app) and the receiver must be on the same network (or more
specifically, the same subnet) for them to automatically find each other. Please
check the IP address of your phone or tablet running this app, and compare it
with the IP address shown on the receiver standby screen. They should be
identical for the first three sections, and only the last part is different. For
example, your phone has 192.168.100.11 and the receiver says 192.168.100.10.
If they are not on the same network, try to connect them to the same wireless
router, and make sure they get IP address automatically (by DHCP) from the
router.
!
Q: What can I do if my network prohibits me from making this app and my
receiver on the same subnet?
A: This sometimes happens in school or office network configurations where you
just cannot change the settings of the network you can connect to. If the devices
are different subnet can actually communicate with direct IP address, you can
try connecting to the receiver by manually input the IP address. To do so, press
MENU key on Android to bring out the Manual IP edit box, or click the
Manual IP item in device search page on iOS, then input the IP address you see
on the receiver standby screen, then click Connect.
!
Q: It disconnects every 5 minutes!
A: If you connect to receivers without bundling the license of MirrorOp
Presenter, it automatically stops projection every 5 minutes trial period. You can
buy a activation key for MirrorOp Presenter from App Store or Google Play,
and follow the instructions in Registration section to register your app, or
consider buying a professional receiver device such as wePresent WiPG series
from Awind or ClickShare series from Barco.
!
Q: I cannot show video on YouTube with this browser!
A: Due to the limited capability to built-in browser and screen capturing, so far
not all videos embedded in browsers can be captured and displayed. You can
MIRROROP PRESENTER USER’S MANUAL
"24
consider to use full mirroring app like MirrorOp Sender for Galaxy on Samsung
Galaxy devices instead.
!
Q: The presented document looks somewhat different from how it looks on a
PC.
A: The built-in Office engine tries to interpret the Office documents as accurate
as possible. However, the engine is not as powerful as PC version, and the
resource (for example fonts) installed on mobiles devices are limited. This is
shared limitation on all non-Microsoft readers, including the official iOS engine.
We will continue to improve its capability.
!
Q: I see blank pages/wrong character/missing objects in my PowerPoint!
A: This app uses mobile Office engine to decode and render the Office files. In
most cases it does the job, however, as Microsoft continues to introduce new
objects into PowerPoint, some components may not be interpreted perfectly.
This is especially an issue if new objects in SmartArt are used. If you want to
fully reproduce the context and layout of your PowerPoint file, we suggest to
save it to PDF format.
!
Q: Screenshot not automatically projected to receiver.
A: This issue usually due to the app failed to detect a new screenshot is saved.
Sometimes the phones saves screenshots to folders our app does not monitor,
especially if 3rd-party apps are used to do screen capture. Sometimes because
the detection is interfered by other actions or other apps. If this issue persisits,
you can try manually find the screenshot images from the Photo function and do
a manual projection there.
MIRROROP PRESENTER USER’S MANUAL
"25