1
Tau Pro user manual
LICENSE AGREEMENT
Decompressing the electronic distribution package of the Tau Pro software constitutes
acceptance of the following terms and conditions:
§
The Tau Pro program and supplementary files provided ("The Software") are copyright
Muon Software Ltd 2008. The Software may not be copied or distributed (by any means,
mechanical or electronic). This covers, but is not limited to, posting to websites,
newsgroups or sending via e-mail. Doing so would violate copyright law and is a criminal
offence.
§
You are granted a license to use The Software on one computer only at a time. You may
not resell, rent or otherwise transfer The Software to another party for benefit.
§
The Software has been extensively tested. Unfortunately, due to wide variance in computer
and software configurations no guarantee or warranty can realistically be offered or
expected. Therefore, no warranty either express or implied is given as to fitness for a
particular purpose.
§
In areas where limited guarantees/warranties cannot be enforced the maximum available
remedy will be, in case of dispute, the actual price you paid for The Software.
§
In the event of The Software being found to be defective, the remedy for purchasers is
limited to an updated version of The Software as and when one is made generally
available.
§
Muon Software Ltd cannot be held responsible for any direct or indirect/consequential loss
or damage caused by the use of, or inability to use, The Software.
§
Use of The Software is entirely at your risk.
§
You are encouraged to be careful with your amplification and monitoring equipment.
EXTRACTING THE PRODUCT FILE CONSTITUTES ACCEPTANCE OF THE TERMS OF
THIS AGREEMENT
Tau Pro User Manual
Page 2 of 11
1. Foreword
Thank you for choosing the Tau Pro virtual instrument plug-in. To get the best from your
software, we recommend that you read this manual carefully and keep a copy in a safe place
for future reference.
Should you experience problems operating this product and can’t find the answers in this
manual, please email [email protected] or visit the Muon Software internet forum at
http://www.muon-software.com/html/support.html
Don’t forget, when contacting technical support, to describe the problem in as much detail as
possible, and provide details of your system configuration (operating system, host program,
CPU, RAM, etc.).
2. Compatibility
The Tau Pro virtual instrument has been tested with a wide variety of Audio Unit and VST2compatible host programs. However, host programs vary in their specifications and some may
not implement features in the AU or VST2 specifications that Tau Pro relies upon. If you are
worried about compatibility issues please contact technical support using the email address
above.
3. Minimum System Requirements
§
§
§
Windows, Windows XP/Vista, 1ghz+ processor , 512mb RAM
Mac OS-X 10.4 or better, G4 1ghz+ / any G5 / any Intel processor, 512mb RAM
VST2.3, VST2.4 or Audio Unit plug-in compatible host software
You can find a list of Audio Unit or VST2.x plug-in compatible host software at
www.kvraudio.com, the internet’s best resource for information about audio plug-ins and hosts.
4. Introduction – What does Tau Pro do?
Tau Pro is a complex synthesiser, combining elements of classic analogue modules with some
new and innovative features. Tau Pro gets its fantastic sound from Muon's advanced 64-bit
Analogue Modelling technology, and adds the kind of hands on control that you need to take
your music to new heights.
Since Tau Pro is now VST2.4, Universal Binary and Audio Unit compatible you will be able to
use this software in all the latest hosts.
Tau Pro User Manual
Page 3 of 11
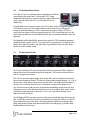
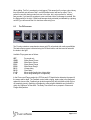
5. Front Panel Basics
Tau Pro has only one main editor screen, shown below:-
The main screen
On this editor screen you will see numerous controls, grouped into sections that allow you to
edit the various settings and use features of the software.
There are four basic types of controls used throughout Tau Pro’s user interface:Rotary controls (knobs)
To change the value of a rotary control, click on it, hold the
mouse button down and drag vertically, horizontally or in a
circular motion (depending on the knob mode selected).
Whenever you click on a control that does not have an
associated numeric display, a small pop-up box will display
the exact value you are changing (when parameter displays
are enabled).. To set a control to its default value, hold down
the CTRL key on your keyboard when clicking, and to
increase the mouse resolution hold down SHIFT when
dragging.
Buttons
The waveform, mix and FX selector button in Tau Pro’s user
interface have multiple states. To cycle forward through the
button’s states simply click on the button To cycle backwards
through the states, right-click (Command-click on Mac) on the
button. There are also two buttons in the top right that toggle
parameter displays and the current knob mode.
Switches
The retrig switch has two positions, on and off. To toggle the
switch state simply click on it. The filter selector has three
states. To change states click and drag with the mouse.
Pop-up menus
Controls that have additional features also have a pop-up
menu. Right-click (Command-click on Mac) on the control to
display the menu of choices, and then click in the menu to
select your desired option.
Tau Pro User Manual
Page 4 of 11
Tau Pro can also be controlled entirely from an external MIDI controller, providing that
controller is capable of sending MIDI Continuous Controller (CC) messages. A special MIDI
“learn” mode is provided to quickly build up your own MIDI CC mappings.
Simply right-click (Command-click on Mac) on any control to display a menu of the current MIDI
CC settings. Choose “link to next CC” from the menu to put a control into “learn” mode. Once a
control is in “learn” mode, it will automatically link itself to the next CC message that it receives.
Note that MIDI controller functionality may differ from host program to host program. Some
sequencers, for example, intercept and do not pass MIDI controller messages in their entirety
to loaded plug-ins (FL Studio, Logic Audio for example). You should refer to your sequencer’s
user manual for more information if you are not sure.
Section Summary
§
§
§
§
§
Tau Pro has only one editor screen
The buttons in the top right toggle user interface features such as knob mode
(circular/linear) and parameter displays (on/off)
CTRL-clicking most controls will reset them to their default value
Holding down shift while dragging a control will give you greater precision
Many of Tau Pro’s controls can be automated over MIDI by right-clicking on them
Tau Pro User Manual
Page 5 of 11
6. Tau Pro parameters
The controls on the main editor screen of Tau Pro flow roughly left to right and are grouped into
distinct sections as follows.
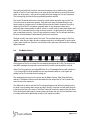
6.1.
The Oscillator Section
Each of Tau Pro's Virtual
Computerised Oscillators (VCO
for short) produces a single
sound waveform, and these are
mixed together in the Mixer
section (next) to make the basic
sound of the synth.
The oscillator section
You can adjust the individual oscillators so that the pitch they play is up to 12 semitones higher
or lower (using the transpose control) than the note the synth receives over MIDI. The fine pitch
(detune) can be adjusted for each oscillator also. Setting the detune on different oscillators to
different amounts will produce a wide, swirling effect as the oscillators "beat" against each
other - this is great for big, fat patches. You can also set the volume of each oscillator using the
level control.
The final output volume of both oscillators, and consequently the whole patch, is set using the
master volume control. See the section on master controls for more detail later on in this
manual.
You can choose the waveform generated by each oscillator by clicking the Mode button. There
are eleven built-in waveforms, five sawtooth, five rectangular and sine wave. The first sawtooth
and square waves (SAW1 and SQU1) are as you’d expect from a standard synthesiser, as is
the sine wave. The other four saw and four square waves have additional harmonics added in
increasing proportion for extra bite.
All waveforms in Tau Pro can be modulated in real time using the PWM Depth and Rate
controls. On a traditional synth pulse-width typically only refers to the square wave - this is true
in Muon synths such as the Electron and Atom Pro even. However, in Tau Pro, all waves can
be modulated in this way. The Depth Control is used to set the strength of the effect, and the
Rate control sets the speed of the sweep. The actual audible effect is that of different groups of
harmonics sweeping and swirling, like a complex filter or sound shaper. This is great in lead
sounds, filter sweeps and trancey basslines.
Tau Pro User Manual
Page 6 of 11
6.2.
The Oscillator Mixer Section
The output of Tau Pro’s oscillators can be combined in three different
ways using the Mix mode button. The first mode “OFF” simply
enables the balance knob to control the amount of each oscillator that
goes to the output (fully left=VCO1 only, fully right=VCO2 only,
middle=both).
If the Mix Mode is set to Sync the shape of the VCO1's wave output is retriggered whenever
VCO2 starts its cycle over. This causes a distortion that you can vary by changing the
transpose and detune settings for VCO1 - however the pitch will not change. If VCO1 is
syncing you can change its pitch by changing the pitch of VCO2. Note though that it is in the
nature of the oscillator sync in general that things can get a bit unstable towards the top of the
keyboard!
Ring Modulation (MIX Mode=RING) means that the output of VCO2 is multiplied (amplitude
modulated) with the output of VCO1. The strength of the ring modulation is controlled by the
balance knob (fully left=no effect, fully right=max). Ring modulation is great for hard, biting
timbres and atonal, metallic noises.
6.3.
The Articulation Section
The Articulation Section
Tau Pro has a powerful VCF and envelope section (Virtual Computerised Filter), capable of
warping the sound of the oscillators beyond all recognition. This is where the majority of the
work in creating a patch is done!
The VCF is a resonant lowpass design, which means that it removes brighter harmonics but
lets the lower frequencies through. The filter has three possible response settings - 18, 24 or 36
dB per octave. These settings control how strong the filter is, with 18dB being the weakest. In
all cases, the Cut off knob controls where in the frequency range the filter begins to act.
The Q control is used to add a boost to the frequencies immediately around the cut off point.
Setting this control to 100% will cause the filter to turn into an oscillator, which can be used to
great effect (though watch out for the levels - Tau Pro can easily distort the input of your
sequencer's mixer at high Q).
The EG Mod and EG Decay knobs govern how the synth automatically opens and closes the
filter. The EG Mod control sets how strong the opening and closing of the filter is, and the EG
decay determines how long this takes. Long decay times and high EG mod settings create
biting, deep sweeps. Shorter decay times and high EG mod settings give a “plucked” effect.
Experimentation is the key here!
Tau Pro User Manual
Page 7 of 11
Along with the Cutoff and Q controls, these are the primary way to create moving, dynamic
sounds in Tau Pro. Don’t forget that you can often get the best effects by turning the controls
whilst your riff is playing – and you can normally record the changes too into your sequencer.
This is everything you need for driving, pulsating basslines and riffs!
The Accent Threshold and Accent Level knobs control another important way in which Tau
Pro’s sound can be made more dynamic. Quite often with many keyboards hitting the key
harder results in a brighter sound - the Muon Electron has this feature. However, the style of
classic synth theTau Pro is based on originally had a 16-step sequencer rather than a
keyboard, where it was possible to add an “accent” to certain notes to make them brighter and
louder. Tau Pro simulates this by using the Accent controls - set the threshold to just above
your normal playing velocity. If you hit a key harder than normal, Tau Pro will open the filter a
bit more, the exact amount is determined by the Accent Level knob.
The final control in this section is the Drive knob. This overloads the input stage of Tau Pro’s
amplifier, much like you might do with an analogue tape deck, recording desk or electric guitar
to get a warm, fuzzed-out overdrive. Use the drive knob to get warm, full sounds with a searing
edge of distortion
6.4.
The Master Section
At the bottom of Tau Pro is a small 16-note virtual keyboard (from B1 to D3). The keys do not
send MIDI messages, but respond to mouse clicks if you wish to quickly audition a sound.
When Tau Pro receives an incoming MIDI Note On or Off messages the keys will animate too
– if you have a MIDI or Audio problem this can help determine whether or not signals are
getting into Tau Pro and that sound is getting out.
The remaining three controls in the section are the Master Volume, Glide Time and Retrig
selectors. The Master Volume control determines the final output level of Tau Pro before the
sound is sent to the sequencer.
The Glide knob is used to activate Tau Pro’s fingered legato mode. When the red light next to
the knob is one, pressing down one key and then “slurring” to another note will cause the pitch
to bend from the first to the second. The Glide Time knob controls the speed of this pitch bend.
These kind of pitch slides require a certain playing technique, but you can force particular notes
to overlap and therefore glide easily enough in your sequencer’s editor.
Tau Pro User Manual
Page 8 of 11
When gliding, Tau Pro’s envelope is not retriggered. This means that if you have a short decay
time the second note will sound “dull”, and the EnvMod control will have no effect. This is
perfect for smoothly slurring notes from one to the other, but is not so perfect for “ordinary”
bass sounds. If you want the envelope to open each time a Note On message is received, flick
the Retrig switch to the right. If Glide mode was previously activated (as indicated by a glowing
red LED) you will now see that it is shut down when retrig is on.
6.5.
The FX Processor
The FX Processor
Tau Pro also contains a comprehensive stereo multi FX unit packed with creative possibilities.
The basic effect program is selected using the FX Mode button, and then tuned to taste with
the knobs to the right.
Available FX programs are as follows:
OFF
CHR1
CHR2
FLG1
FLG2
DLY1
DLY2
C+D
F+D
Dry sound only
Warm Stereo Chorus
Wide Stereo Chorus
Warm Stereo Flange
Wide Stereo Flange
Vintage delay
Clean delay
Mono chorus feeding into vintage delay
Mono flange feeding into vintage delay
In the Chorus and Flange modes the LFO Rate and LFO depth knobs determine the speed of
the sweep and its depth. The Feedback control adds a ringing, watery edge to the flange and
makes the chorus richer. Feedback can be both negative (fully left) and positive (fully right) or
off completely (centre). Switching off feedback or using negative feedback can increase the
clarity and “tightness” off the effect. The Delay Time control has no purpose in Chorus and
Flange effect patches.
Tau Pro User Manual
Page 9 of 11
When a Delay patch is selected, the LFO Rate and LFO Depth controls have no purpose. The
Feedback control determines how much regeneration there is after each echo - high settings
will cause the echoes to die away very slowly. Negative feedback has the same effect as
positive feedback but the repeats can sometimes sit in a track better as they become inverted
and do not interfere so much with the main signal.
The final two patches are combined, and thus use all the available controls. However, in the
combined modes the Wet Mix control determines only the amount of echo - the mono
chorus/flange part of the effect is fixed.
Section Summary
§
§
§
§
§
§
§
§
Tau Pro has two oscillators that can be set to a range of waveforms
All oscillator waveforms can be dynamically modulated with the LFOs
The oscillator can glide from note to note as you play legato phrases
The oscillator outputs can sync or ring modulate each other
The filter is controlled by a single attack/decay envelope
There are three filter types
The FX Processor has eight presets to choose from
The accent feature is activated by playing harder
Tau Pro User Manual
Page 10 of 11
7.
Copyright notices and Credits
Tau Pro:
Graphics:
David Waugh for Muon Software Ltd
Ian Waugh for Muon Software Ltd
VST is a trademark of Steinberg Media Technologies AG.
Audio Units and Apple Loops are trademarks of Apple Inc.
All trademarks remain the exclusive property of their respective holders.
User manual
Tau Pro software
Muon Software Ltd 2008
Muon Software Ltd 2008
Tau Pro User Manual
Page 11 of 11