1
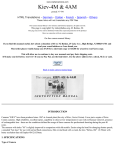
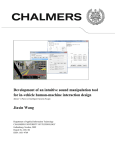
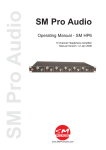
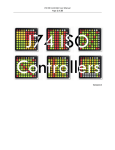
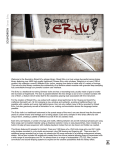
SonicProjects
VM Bundle
Demo Version
www.sonicprojects.ch
VFX software and V-Machine firmware requirements
This updated bundle at least requires this version of the VFX software and V-Machine
firmware:
2.0.20101204
In any lower version the bundle won't work correctly!
So before you install make sure your vfx software and V-Machine firmware at least has
this version. The 2.0. prefix means it's the 2.0 software and the numbers afterwards is
the date of release (year/month/day).
You can check the current software version like this:
VFX application:
Click on „MENU“ in the top bar of the VFX application. This will show the software
version below „Menu:System Info“
V-Machine:
Depress the two buttons of the highest row (labeled „MENU“ on the right) at the same
time which will show the firmware version below „Menu:System Info“.
How to update:
If the version and release date is lower than 2.0.20101204 then please first on update
your vfx software and then too the V-Machine firmware. The newest vfx software version
can be downloaded from SM Pro Audio:
http://www.smproaudio.com/
Once the vfx software is updated you also can upgrade the V-Machine firmware.
For this start VFX, click on the small white vfx icon in the top left corner and in the menu
choose „V-MACHINE -> update V-MACHINE firmware“ and follow the instructions. Note
that this could change in later versions so always too be sure to read the user manual
provided by SM Pro audio.
Demo Version - Quick Installation Guide
V-Machine users:
----------------------Just copy the „VM Bundle Demo.vfxlibrary“ file to a fast USB stick, and mount the stick
on your V-Machine. Then scroll forward to the banks in brackets [SonicProjects OP-X]
and [SonicProjects Stringer] and start playing.
Presets can be switched with the two buttons of the second row. Note that the lowest
row just shows the plugin's interal patches which are only a part of a preset.
You of course too can open the library in your VFX application to check out the GUIs,
either directly from the stick by temporary changing the library path to the library on the
stick, or by importing the library to your active library.
Directly from stick:
Mount the stick on your computer, start VFX and click on the white vfx icon at the top
left. Here choose „options“ (mac: „preferences“) to change the active library. In the top
field you can see the path of your current library (primary). Please remember where this
is so that you can switch back to it later. Now click on the browse button (...) and change
the primary library to the „VM Bundle Demo.vfxlibrary“ on the mounted stick.
Import to active library:
Start VFX, click on the small white vfx icon at the top left, choose file->import from
vfxlibrary and browse to the „VM Bundle Demo.vfxlibrary“ file and import it.
A detailed installation guide can be found on page 4.
Mac users who don't own a V-Machine:
--------------------------------------------------First on download and install the free VFX software from SM Pro Audio:
http://www.smproaudio.com/
Doubleclick on the „VM Bundle Demo.vfxlibrary“ file which will start VFX and promt you
to import the library. Be sure that „All Banks“ and „With Plugins“ are checked. After
importing the plugins can be found in the „SonicProjects OP-X“ and „SonicProjects
Stringer“ banks. Banks can be switched with the two buttons of the top row, presets with
the two of the second row. Note that the GUI can dissapear behind the VFX application.
Click on the white „X“ in the dock to bring it to the foreground again. If you can't see a
GUI at all then click on the small white vfx icon at the top left of VFX and in the menu
check „Show VST Editor“. Then it will be back. The program can be closed by clicking
on the small white „vfx“ on the top left and here choose „Quit VFX“.
A detailed installation guide can be found on page 8.
The single steps in detail:
1. After unpacking copy the „VM Bundle Demo.vfxlibrary“ to a fast (!) usb stick.
2. Start your v-machine, wait until startup is finished, and insert the stick
If there's endless long loading that looks like a hang then your usb stick is too slow or
damaged. Take a new and faster one in that case.
Based on our own experience the quality and speed of sticks can vary drastically even
within the same series, and sticks can get damaged easily.
3. Scroll forward in the banks until you see [SonicProjects OP-X]. Press „Load“.
4. Start playing and switch presets with the buttons of the second row
Press „Load“ to load a preset.
You can also switch presets remotely by midi program change. Switch program change
mode to „to Preset, then Plugin“ in the „MIDI Options“ menu for this. To access this
menu depress the two buttons of the top row and scroll left.
Here's the list of presets:
00 SEM Sweep
01 Jump!
02 OB-Xa SyncSolo
03 Shine On Solo
04 OB-Xa Brass
05 OB Nice Strings
06 OB Power Chords
07 Pulsemod Pad
08 BJH Train Solo
09 Live To Tell Strings
10 OB Broad Brass
11 Soft Interval Solo
12 Holiday Mini
13 Axel F.
14 Final Countdown
15 BJH Martyrs
16 SyncSolo
17 4-Voice SawSolo
18 Polymoog Vox Humana
19 Rush Tom Sawyer
20 Parsons Numbers
21 99 Luftballons Bass
22 Prince Let's Go Crazy
23 Bit99 LFO Brass
24 Jarre Magnetic ARP
25 Jarre Magnetic Brass
26 Journey Separate
27 Rush Subdivisions
28 Floyd Turns Prophet
29 Floyd Signs Flute
30 Floyd Signs Pad
31 BJH Life Is For Living
32 BJH Warm Solo
33 BJH Borderline
34 BJH Echoes
35 Parsons Vulture Bass
36 Jupiter Harp
37 Jupiter Envmod Pad
38 Jupiter8 Perc
39 Jupiter Sync Unison
40 Jupiter Dark Strings
41 Prophet Pad
42 Prophet Warm Strings
43 Prophet Sync Solo
44 Prophet Narrow Sync
45 Prophet Echoing Sync
46 Prophet Warm Bass
47 Prophet Clavinet
48 Prophet Closed Perc
49 Minimoog Octabass
50 Minimoog Bass Slow
51 Minimoog Saturn
52 Shining Clear Minimoog
53 Minimoog Filter LFO
54 Minimoog Percussive
55 Minimoog Snappy
56 Classic OB Brass
57 OB Sustained Strings
58 OB Deep Strings
59 OB-X Power Sweep
60 OB-X Pulse Brass
61 SEM Upsweep
62 OB Pitchup Strings
63 OB Fifth Slightbrass
Note that the plugin itself has 128 built in patches, the best ones chosen from the
existing library, and 82 parameters that allow to create your own sounds from scratch.
Have a look at the plugin within VFX for this.
The currently used built in patch used in the current preset is shown in the lowest row of
the display. You can scroll through those too within an active preset.
While playing you will soon get aware of the demo version limitation which features an
audio interrupt every few seconds.
5. Toggle forward to the [SonicProjects Stringer] bank to try out Stringer too.
6. Start playing and switch presets in the second row.
Note that the Stringer demo version comes with a cut down sample set to save space
that only covers one octave from C4 - C5.
Here's the list of presets:
00 Solina Combi
01 Moongirl Strings
02 Shine On Split
03 Logan Strings
04 Logan Organ
05 Solina Strings
06 ARP Omni Synth
07 Welson Brass
08 Welson Strings
09 Eternal Chords
10 Logan Strings Tight
11 Logan Strings Soft
12 Logan Strings Juicy
13 Logan Organ Tight
14 Logan Organ Soft
15 Logan Organ Juicy
16 Solina Strings Tight
17 Solina Strings Soft
18 Solina Strings Juicy
19 Omni Synth Tight
20 Omni Synth Soft
21 Omni Synth Juicy
22 Jarre Chords
23 Logan Combi
24 Double Organ
25 Welson Brass
26 Octave Solina
27 Juicy Omni
28 Omni Welsoned
29 Octave Logan
30 Organ Welsoned
31 Octave Stereo Brass
32 Logan Omni Split
33 Welson Omni Split
34 Power Combi
35 Organ Synth Combi
36 Sustained Organ
The (tight / soft / juicy) are variants of the same patch with different envelope types,
which vary in their cpu consumption and release behaviour. Have a look at the docs for
more information.
Splits patches where two different instruments are assigned to different keyboard zones
have been slightly adaped for the demo version by moving up the split point into the
available C4 - C5 range so that these patches can be auditioned as well.
While the sampleset has been cut down in its octave range and amount of samples per
octave (only four instead of each key) to save space, the quality of the available
samples is the same as in the full version.
How to open the library in VFX:
This step is optional, but recommended as well to get to know the plugins better. It
allows to explore the plugins and their GUIs inside VFX.
Method 1 (V-Machine users only): Point to Library on stick
If you don't want to import the VM Bundle library to your active library (which would add
plugins and banks) you can open it directly from the stick. For this mount the stick on
your computer, start VFX, click on the white small vfx icon at the top left and choose
options (mac:preferences). The „Primary“ field shows the currently active library. Please
remember this place so that you can switch back to it later. Now click on the browse (...)
button and browse to the library on the mounted stick (drive letter can vary):
After having chosen the library and closed the box VFX will load the new library and
show the SonicProjects OP-X and SonicProjects Stringer banks.
Method 2 : Import to current library
This will add the banks and plugins of the VM Bundle Demo library to your current
library, so that it will reside in your computer.
This is too the method of installing VM Bundle if you don't own a V-Machine and just
want to use VM Bundle on your computer (mainly Mac users).
Mac users:
The import can be started by just doubleclicking the „VM Bundle Demo.vfxlibrary“ file
which will start VFX and start import automatically. If this should't work then use the
method as described under „PC users“.
PC users (works too on Mac):
Start VFX, click on the white vfx icon at the top left and choose file->import from
vfxlibrary. Then browse to the „VM Bundle Demo.vfxlibrary“ file and apply import.
In the import dialog box check that „All Banks“ and „With Plugins“ is checked and click
import.
Now the VM Bundle library will be imported and is available for playing within the VFX
application. Read the following page to learn how to access and use the plugins.
Inside VFX:
After installing you will find the „SonicProjects OP-X“ and „SonicProjects Stringer“ bank
within vfx. Banks can be switched with the two buttons of the top, presets with the two
buttons below, marked yellow in the picture.
Mac Version of VFX:
Click on the white „X“ in the dock to bring the GUI of the plugin to the foreground if
necessary. Also check if „Show VST Editor“ is checked in vfx menu (see below).
Mac and PC Version of VFX:
Be sure that „Show VST Editor“ is checked in the main menu which can be opened by
clicking on the white vfx icon at the top left.
Banks (OP-X, Stringer) can be switched with the two buttons of the top row in VFX.
Presets can be switched with the two buttons of the second row (marked yellow in the
picture). Presets also can be remotely switched by MIDI program changes. For this you
before have to change program change mode from „Patch“ to „Preset“ in the main menu
(Menu:MIDI Options->ProgChange:Preset).
Apple: The free application „SoundFlower“ from Cycling74 allows to route the audio
stream to a sequencer of choice.
MIDI CC remote parameter control
One of the greatest experiences while playing the presets with the V-Machine is to
tweak parameters on the fly with external controller knobs and buttons using midi
continuous controllers (MIDI CC).
This e.g. lets you play with the filter cutoff, add a bit more or less resonance, detune
sounds with osc2 detune or spread, as well as countless other operations, up to
completely program new sounds from scratch if you have a controller device that offers
enough knobs and buttons for this.
The VFX application and the V-Machine offer MIDI-learn for this, but assigning multiple
controllers in each preset manually can be quite a bit of work, especially when you want
to map the full parameter set of OP-X which covers 82 parameters!
So you may be pleased to hear that the provided banks already are pre-mapped with
MIDI controllers. Every preset has the same pre-configured midi CC mapping that
covers all 82 parameters for OP-X and the most useful ones for Stringer. The used
mapping follows the popular Pro53 standard which matches the standard setting of most
available controllers for immediate tweaking.
These pre-mapped banks save you a lot of work which otherwise had to be applied for
each preset manually. So it's recommended to use this mapping as base and adapt your
controller to it if necessary (e.g. create a dedicated preset). The full version of the VM
Bundle too will include unmapped versions of the banks if you nevertheless want to
apply your own assignments from gound up on a blank base.
The exact listings of all parameters and their assigned midi controllers can be found in
the „docs“ folder of this package. The provided pre-mapping of these banks also
matches the included BCR2000 Toolkit that can be found too in the „docs“ folder. More
about this one on the next page.
While tweaking controllers the V-Machine display shows the number of the used CC
controller and its current value in the top line, in the third line the name of the tweaked
parameter that's mapped to it and in the bottom line the internal value of the parameter.
This is quite practical if you're not anymore sure to which parameter an external
controller is mapped to. Example for cc70 which is mapped to Cutoff:
Remote control using CC feedback:
If you want to go a step further then get a controller device with endless rotary controls
and led-buttons like the Behringer BCR2000. These types of controllers let you edit
parameters without any parameter jumps, because the buttons and knobs are able to
keep track with the changed settings of a new preset.
In the „docs“ folder there's provided a complete „BCR2000 Toolkit“ that contains a
custom MIDI Sysex preset for the BCR2000 as well as a comprehensive installation
guide and printable template pictures for OP-X and Stringer.
With the help of a MIDI sequencer or player you can load the preset into your BCR
which is easier than you would suppose.
The preset fits the preconfigured cc mapping of the mapped banks and offers direct
access to every single parameter of OP-X (82) and the most useful ones of Stringer.
The controls were grouped by function for easy oversight and the push functions of the
top knobs row either offer a separate function as button supplement or are used to reset
the rotatry function back to a standard value, e.g. standard tuning for master tune or
center position for the pan knobs.
This setup lets you completely remotely program OP-X like a hardware synth without
boring scrolling through the menues of the V-Machine or even reaching a computer with
the VFX software. When midi feedback is active in the V-Machine then the V-Machine
sends a complete dump of all mapped parameters to the BCR which updates all knobs
and buttons to the current setting of the new preset as if they they were moved with
ghost's hands, and all this within the fraction of a second.
How to activate MIDI feedback:
Depress both menu buttons to enter the main menu and scroll left with the top left
button to „Menu: MIDI Options“ and switch „Parameter Feedback“ to „On“ and then
depress the button next to „Back“ to again leave the menu.
Demo version limitation:
- repeated audio breaks
- no additional unmapped banks
- Stringer: only playable in the octave C4 - C5.
If the demo does not work at all or if there's an endless loading time then your usb stick
is too slow or damaged. Take a faster one in that case.
It's true that the Stringer demo is not really usable other than getting an impression of
the general quality of the sampled instruments. You will understand that we could not
provide the full sampleset (70mb) with the demo version. So we decided to leave the
quality untouched and reduce the sampleset to one octave, with just 4 keys sampled
instead of each key.
Split presets have been slightly adapted in the demo version so that the split point is
within the available keyboard range. In the full version this point will be in a lower range
by default, but of course can be adapted anytime.
List of adaptatios:
The standard versions of OP-X and Stringer went through a long and intense adaptation
process to fit the needs and limited power of the V-Machine, with astonishing results.
Here's the list of adaptations:
OP-X:
- CPU usage reduced by an average of 40% up to 50% (!)
- no keyboard animation to save unnecessary cpu cycles
- no popping up licensee window for faster loading after preset change
- starting phase offset correction for phasing-free startup after plugin sleep
- no internal CC functionality since this job is more efficiently done with VFX
- 128 instead of 64 internal presets, containing the best sounds of the library
- registration engine changed for easy licensing within vfx
Stringer:
- CPU usage reduced by an average of 40-60% by changing the envelopes
- linear envelope response in stacked sounds (two engines) to save cpu
- if only the upper engine is active the envelopes are logarithmic again
- in this case the lower attack knob can choose between 3 envelope types
- no keyboard animation to save unnecessary cpu cycles
- no internal CC functionality since this job is more efficiently done with VFX
- completely new gui; this will be the next standard version's one
- registration engine changed for easy licensing within vfx
Full version:
The full version of course will free you from the repeated audio interruptions for
unlimited playing. Stringer furthermore will offer the full sampleset that covers the entire
keyboard range.
CPU consumption is about the same or even (if at all measurable) a tad bit lower
because the demo limitations don't have to be calculated.
If you already should have set up custom presets with the demo version, then it may be
good news for you to know that they also can be used furthermore and neathlessly with
the full version.
In this case simply rename the banks they are in so that they aren't overwritten by the
full version banks. You will be able then to use the renamed customized banks
furthermore with the unrestricted full version plugins.
Licensing is extremely easy, no complicated wizard files or whatever else, just a few
mouseclicks and you're there. There's a licensing unit that was exclusively set up for
easy licensing within VFX, no matter if it's running on a PC or a Mac.
So also the full version package can be used on intel macs within the VFX application,
with no restrictions at all compared to PC. The installation guide also covers the Mac
side of all necessary steps.
With the full version package you will also receive the standard PC license of OP-X and
also the standard PC license of Stringer on the next update of it, which will be based on
the key you'll already receive for the vfx version in this package.
If you later should plan to upgrade to the more powerful V-Rack then it's good to know
too that you can install and use the package in this device then too without the need of
another license.
So you see that even apart from the sounds you've hopefully got addicted to there are
too some other good reasons to get the full version of this package!
So get serious, get the real sound - you've earned it
The full version can be bought as online download at:
http://www.sonicprojects.ch/
SonicProjects
All that matters is sound