1
Comersus Sophisticated Cart
User’s Guide
Welcome to Comersus Sophisticated
Cart
Under Open Source License
"Build a powerful online business today"
Comersus-based solutions enable your
electronic commerce needs today and
provide the framework that will support
new ways you can engage in e-commerce
in the future.
This document was last updated on November 8, 2005 for Comersus 6.06
This page was intentionally left blank.
1
Table of Contents
Welcome to Comersus
About the new guide
About the founder of Comersus
Requirements
Technical Support
Getting Started
Installing the software
Installation Wizard
BackOffice Lite
Security Concerns
About BackOffice Plus
Settings
4
4
5
5
7
8
8
10
13
19
20
21
StoreFront Basic Settings
(comersus/includes/settings.asp) 21
StoreFront Advanced Settings 22
E-mail Settings
24
Changing Your Password
25
Store Terms & Conditions
25
Currencies
25
States and Countries
25
Screen Messages
26
StoreFront
27
Getting Ready to Add Products 27
Adding New Products
28
Setting Product Options (variations)
30
Modifying & Deleting Products 31
Multilanguage Support
32
Creating and Modifying Product
Categories
32
Managing Inventory
34
Advanced Stock Calculations
35
Related Products
36
Bundle Products
36
Rental Products
36
Compare prices with Amazon
37
Suppliers
37
Moderating Reviews
38
Newsletter
38
News Page
38
Auctions
38
Wish List
39
Google Ad-Sense
39
Rss news Feeder
39
Donation Items
40
Discounts and Promotions
41
Specials and Featured Items
41
Discount by Code
41
Discount by Quantity
43
Discount per customer (special
prices)
44
Newsletter, Offer Box and Auctions
44
Shipping Options
45
Adding a New Shipping Option 45
Defining shipping by customer type
45
Viewing/Modifying Options for nonreal time shipping
45
Real Time Shipping (UPS, USPS,
Canada Post, Fedex)
45
InterShipper (UPS, USPS, Fedex
and DHL)
47
Bypassing Shipping Calculations 47
Volume Calculation
47
Payment Options
48
About Real Time Credit Card
Processing
48
About PayPal Payments
50
Adding a Payment Option
51
Configuring a Real Time Payment
Option
52
Configuring Offline Credit Card
Processing
52
Defining payment by customer type
53
Modifying a Payment Option
53
Delayed Payments
53
Phone Payments
53
Tax Options
55
Adding a New Tax Rate by Region
55
Viewing/Modifying Tax Rates by
Region
55
Adding a New Tax Rate by Product
55
Sales and Customers
56
Viewing Customer Information 56
Adding a New Customer
57
Orders
57
Adding custom fields
58
Managing Your Orders
58
How to Locate an Order
59
How to Charge Off-line Credit Card
Transactions
60
Fraud Prevention Package
61
TeleSign Customer Confirmation 61
Generating Invoices from the
BackOffice
62
Reward Points
62
Recurring Billing
62
Reports and Charts
63
Generating Sales Reports
63
Affiliates
64
Affiliates and Suppliers Own Sales
Listing
65
Comersus Sophisticated Software http://www.comersus.com
Adding Forbidden Keywords from
sales
65
Serial Codes Management
65
Store Survey
65
Utilities
66
Generic SQL
66
Reset Functions
66
Exporting data to Microsoft Excel
Spreadsheets
67
Exporting data to QuickBooks
67
Exporting data to VCF
67
Publishing on eBay
67
Deleting Unclosed Sessions
69
Generating StoreFront Links
69
Customer Menu
70
Enabling Digital Goods Download
71
Professional Databases
72
Creating the Microsoft SQL Server
Database
72
Creating the mySQL database 73
On-Line Payment Gateways
2Checkout
PayPal
PayPal Web Site Payments Pro
Authorize.net SIM
Authorize.net AIM
BeanStream
PayZip
Protx
OzHosting
SecurePost
CyberSource
Payment Processor
EPDQ
LinkPoint API
Bank of America
CCNow
eWay
Other payment gateways
74
74
75
75
76
77
77
78
78
79
79
80
80
80
81
81
81
82
82
Performance and Speed
83
Database
Static Pages
Image Optimization
Compiled Code
Load Balance
Other changes
83
83
84
84
84
85
Troubleshooting
Appendix B
Appendix C
How Language Works for
Comersus 6
Multilanguage step by step
Editing messages generated by
Comersus
Defining customer languages
selection
Appendix D
Frequently Asked Questions
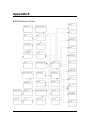
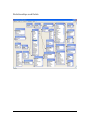
Appendix E
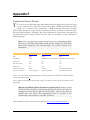
ERD Database Chart
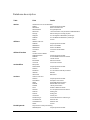
Relationships and fields
Database description
Appendix F
Comersus Power Packs
Appendix G
Programming reference
Contact Information
92
92
92
93
93
94
94
101
101
102
103
112
112
113
113
118
Comersus Open Technologies LC
118
86
Diagnose the trouble
86
Get Assistance
87
Useful Tips
87
Diagnostics and Tools Application
88
Appendix A
90
Customizing your store's graphical
interface
90
89
HTML links to main store pages 89
Comersus Sophisticated Software http://www.comersus.com
This page was intentionally left blank.
Comersus Sophisticated Software http://www.comersus.com
Chapter
1
Welcome to Comersus
omersus is a sophisticated e-commerce system resulting from research and experience
gained through years of work in electronic commerce strategies. The system's base was
developed in 1997 in response to a multinational firm's requirements. The company wanted
to replace its legacy e-commerce system, based on a famous product developed in Perl and
considered to be complex, rigid and expensive. Comersus was successfully installed in that site,
and then in others after numerous recommendations. Finally, the commercial launching of the
solution was decided. The commercial implementation of the system was accomplished in the
year 2000, in the Open Source mode.
C
Comersus has been installed all over the world in over 20,000 sites, and has gained recognition as
an economical, flexible, sound, and powerful solution.
Comersus solutions provide optimum performance in a variety of industries, including: Software,
Book Stores, Retail, High-Tech, Automotive, Consumer Goods, Medical and Services.
About the new guide
A question that users typically ask themselves is: Why is it so common that good pieces of
software have poor documentation?
Excuses abound. The first: the degree of innovation in some products makes it impossible to
maintain updated documentation or, rather, updating documentation would delay the release
of new versions. Another typical excuse: software developers do not like documenting, so
companies hire technical writers who never fully understand complex software products or
fail to grasp what common problems users are likely to face.
We could make excuses, but we believe that, no matter how complex the process, Comersus
users deserve documentation that is comprehensive, enjoyable, updated and user-friendly.
We are aware this would be a very ambitious endeavor without your help. Therefore we ask
that you contact us with any suggestions after reading this new Guide.
Thanks for your patience and support.
Comersus Open Technologies LC
4
Anecdote: The first-ever public release of Comersus only included one page of
instructions that covered installation, with special attention to assigning the
proper permissions. Of course, the first technical question from the first user
who downloaded Comersus was "How do I assign permissions?" Which gives us
the perfect excuse: Why bother writing a good user's guide when nobody will
read it anyway?
About the founder of Comersus
Comersus was started by Rodrigo S. Alhadeff, a 22-year-old Argentinian programmer of
Greek descent.
Rodrigo's first experience with computers came when he was 10, using an old Microdigital
TK-85 with 16Kb RAM. He learned Basic Language using the TK-85 owner's manual. Soon
he made his first artificial intelligence-based friend: "It was a small application to maintain a
chat in Spanish. Actually I made 3 friends, all with different personalities. I think I could
have replicated my primary school teachers' personalities with enough RAM at the time."
Twelve years later, Rodrigo developed Comersus 0.1 in one "long winter's night", rushing to
replace an old Perl Cart that had crashed suddenly under pressure from huge traffic at the
website of the company he was working for.
"Even with the emergency, I wanted to make one clean and scalable application to replace
our old cart. From the start I thought about modular small pieces of code that could grow to
compound a huge system. Easy to fix, debug and scale."
The company went bankrupt and, one week later, Rodrigo was still receiving orders from the
e-commerce site. "The cart was the only thing that survived, then I thought: I have to do
something with this cart." The name Comersus seemed suitable as a combination of
something new, modern, related to the shopping cart (e-commerce) and a sound with a
historical and solid feel to it (sus), which also includes the letters of the United States (US),
since the Internet and most programming was produced in the US. Why Open Source? "I
had read a lot about the Open Source movement: Raymond, Linus, Larry Wall; and apart
from liking their philosophy, I thought it was the only chance of getting skillful contributors
from all around the world in a short period of time."
A few months after the first public release, Rodrigo typed "Comersus" in a search engine
and became amazed at how many stores were using Comersus Cart. "I realized I was on the
right track and then I decided to dedicate 100% of my time to Comersus."
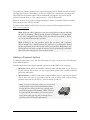
Requirements
Comersus requires very little for basic operation. Your website is probably hosted on a
Windows server. Just by uploading the Comersus files to your website, you will surely be
able to use the shopping cart and start selling in minutes.
5
However, Comersus is a flexible and feature-rich application. If you want to implement realtime shipping quotes or a payment gateway you may have to install specific components on
your server or support other server features. Use the requirements below as a starting point
and contact us if you have any doubts about additional requirements for the advanced
features you want to use.
Requirements for the server where you install Comersus
Note: Comersus offers hosting services designed especially for the shopping cart.
If you host with us, you don't need to worry about these requirements. Comersus
hosting also includes technical support by staff specialized in Comersus
configuration and customization.
- A Web Server that supports ASP scripts
- Support for one of the following databases: Access, SQL Server or mySQL
- 20mb disk space (live stores create records over time, so you may need more space in the
future)
Requirements for store management
- Web Bowser (preferrably Internet Explorer 6 or higher)
- FTP Client
- An email account where you can receive store notifications
Requirements for optional features
- One of the email components supported by Comesus (to send email): JMail,
ServerObjectsASPMail1, ServerObjectsASPMail2, PersistsASPMail, CDONTS, or
BambooSMTP.
- File System Object (for file upload, digital goods download, and export)
- XMLHTTP (for real-time shipping quotes, certain payment gateways, preCharge, and
Amazon comparison)
- ASPZIP (for digital goods download)
- ASPUpload (for image upload)
- An SSL certificate installed on your server (if you take offline payments or you want to log
in securely to your Backoffice, or present a secure Storefront to your customers)
Skill requirements
No special skills are required to use Comersus, but you may need basic FTP file transfer and
HTML knowledge to install the store, and ASP programming and SQL skills to customize it.
Comersus developers are available to provide training in Miami, Florida, or in-house
wherever you are based. Training courses are individual, allowing you to make the most of
all the features Comersus has to offer, based on your needs. As a store administrator, you
6
can learn to configure your store to achieve exactly what you need, as well as learn about
backups, security measures, file import, and many other tasks that will improve your store
management. Comersus training courses are affordable, and experience has shown that the
investment is quickly regained when applying the new knowledge.
Anecdote: A case in point is that of a music download store administrator who
modified his store to add sample tracks to each product after taking the training
course. His sales increased 30% in just one month. This is an example that
investment in the course is usually insignificant when compared to the benefits of
attending.
Technical Support
Comersus User's Guide covers most topics related to installing and using the shopping cart.
However, if you ever need some extra guidance you are free to use Comersus Technical
Forum:
http://www.comersus.org/forum
Anecdote: Many users are reluctant to use forums for support. They are used to
going through annoying registration and confirmation procedures and posting
messages that go unanswered for weeks. Far from being your typical support
forum, the Comersus forum does not require registration. All messages are
moderated and answered with great response time. You will find that the forum
is also a great place to discuss your ideas and request input and cooperation from
other users.
7
Chapter
2
Getting Started
B
efore you can start using Comersus, the software must be installed on your server and
configured. The following paragraph provides step-by-step instructions on how to perform
this task.
Installing the software
Installation on a local server
1. Unzip comersus.zip into a folder named comersus
2. Copy the contents of comersus folder inside WWWRoot (the root of your web server).
Your Comersus folder must have this structure:
.
<DIR>
12-20-01 9:22p .
..
<DIR>
12-20-01 9:22p ..
DEFAULT ASP
301 10-11-01 12:46p default.asp
GLOBAL ASA
634 12-02-01 12:33p global.asa
STORE
<DIR>
12-20-01 9:22p store
INCLUDES
<DIR>
12-20-01 9:22p includes
DATABASE
<DIR>
12-20-01 9:22p database
BACKOFFICELITE
<DIR>
12-20-01 9:22p backofficelite
3. Define full permissions on database folder and database/comersus.mdb file according to
the operating system you are using.
Windows 2000/3 permissions
. Browse to the comersus.mdb file on the server
. Right click on the database file
. Click on Properties, click on Security tab
. Add the IUSR_MACHINENAME user to the permissions list, and grant this user full
control (where MACHINENAME is the hostname of the server)
8
Windows XP permissions
. Disable the "Use simple file sharing" setting
Within Windows Explorer [Start -> All Programs -> Accessories -> Windows Explorer],
open the Folder Options interface [Tools -> Folder Options] and then go the the [View] tab
and deselect the "Use simple file sharing" option. Select [OK] to save the change. Now you
will see the [Security] tab within the Folder Properties interface and the [Sharing] tab of the
root file system of a drive shows the available setting options.
. Right click on comersus/database folder
. Go to Security tab, give all permissions to Anonymus Internet User
. Go to Sharing tab, Share the database folder
4. Open your Web Browser and load http://localhost/comersus/backofficelite
5. The first time you run BackOffice Lite an installation Wizard will be launched. Follow the
simple steps to complete installation. Among other settings, you will be asked for a
password. Write down the password so you can login to BackOffice Lite at a later time
Installation on a remote server
Note: If your hosting service is Linux, check that ASP scripts are supported. You
will then have to migrate the database to mySQL and modify the connection
string. We advise opening an account with any free ASP-enabled Windows
hosting service to test Comersus, since installation and configuration on Linux
will prove more complicated.
1. Unzip comersus.zip into a local folder named comersus
2. Use an FTP Client to upload the contents of the local folder to your web hosting space.
Copy the contents of comersus folder inside WWWRoot (the root of your web server).
http://www.yourSite.com/comersus folder must have this structure:
.
<DIR>
12-20-01 9:22p .
..
<DIR>
12-20-01 9:22p ..
DEFAULT ASP
301 10-11-01 12:46p default.asp
GLOBAL ASA
634 12-02-01 12:33p global.asa
STORE
<DIR>
12-20-01 9:22p store
INCLUDES
<DIR>
12-20-01 9:22p includes
DATABASE
<DIR>
12-20-01 9:22p database
BACKOFFICELITE
<DIR>
12-20-01 9:22p backofficelite
3. Define full permissions on database folder and database/comersus.mdb file according to
the instructions provided by your web hosting service. Usually, you will have a web control
9
panel to select the folder and assign permissions
4. Open your Web Browser and load http://www.yourSite.com/comersus/backofficelite
5. The first time you run BackOffice Lite an installation Wizard will be launched. Follow the
simple steps to complete installation. Among other settings, you will be asked for a
password. Write down the password so you can login to BackOffice Lite at a later time.
Anecdote: Most installation problems are related to assigning permissions on
the database. If you follow all steps closely, you should be able to achieve it. But if
you can't, don't despair; we can assist you at the forum. Another typical problem
is the case of servers with parent path disabled. In this case, you can download
the fixed folder version to be installed in the folder comersus6f. If you have
purchased a Power Pack, contact us to receive the fixed folder version of the addon as well.
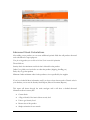
Installation Wizard
Comersus is a shopping cart with numerous configuration options, some of which require a
long description, so we have created an Installation Wizard with the most common
configuration options to help you set up the store in a matter of minutes.
After installation, when you try to access the store for the first time through the URL
http://localhost/comersus or http://www.yourSite.com/comersus you will be redirected to
the Installation Wizard.
- Step 1
The Wizard requests information on your company. The company name will be displayed in
outgoing emails, and full company details will be displayed on the order confirmation screen
and other internal pages with contact info.
Did you know that…? The address you enter at this Step has other uses. If you
set up real-time shipping quotes, this will be the address where goods are shipped
from. So you should pay special attention to the fields for country, state code and
zip code.
- Step 2
The Wizard requests region-specific information such as date format and currency. The
currency symbol will be displayed on all pages where prices are shown. The date format will
be used to interpret the date received from the server. Contact your web hosting support or
go to Settings/Regionalization to find out your server's date format.
10
- Step 3
Several shopping cart options are enabled or disabled: checking stock before adding an item
to the cart, setting a minimum purchase amount, disabling registration of new customers
(used for private stores), generating customer passwords automatically (so that they don't
need to specify one), displaying stock levels, and others. You can also choose how many
products to display on the home page and how to label optional fields during checkout (for
example: "How did you learn about our store?").
- Step 4
The Wizard requests information about the payment methods you want to enable in your
store. Consider that by default the Free Distribution supports offline credit card payments
(storing credit card data for manual processing later on), PayPal payments, and other offline
methods such as Wire Transfers and Checks.
Did you know that…? Comersus has a special offer for 2Checkout, a popular
online payment system. Users who sign up with 2Checkout through the link
provided by Comersus can request scripts to take credit cards online free of
charge. If you have an account with 2Checkout, enter your store number at Step
4, and the Wizard will take care of configuration. Remember to contact
Comersus and request your scripts after you sign up. Note: This special offer may
be discontinued at any time. Contact us to inquire about current offers.
- Step 5
The Wizard requests basic information to set up static shipping rules. If your store doesn't
require shipping (because you sell digital goods such as mp3, serial codes, or downloadable
software) you can set by-pass shipping.
Consider that the Wizard will help you set up basic shipping rules. Professional stores will
usually require real-time quoting systems or more complex rules that cover all options and
destinations. These can be configured later on.
The Wizard allows two service types for a local zip (considering the country and state where
the company is located) and one additional service type for customers abroad. Weight can be
specified in all cases. For example: $5 shipping by UPS to a local zip applies when the
package weighs between 1 and 3 lbs.
- Step 6
The Wizard performs basic tax configuration consistig in a tax percentage for customers in
the same state and a different percentage for customers elsewhere. Of course you will be
able to make adjustments later on, even configuring product-specific taxes.
11
- Step 7
The Wizard configures settings to send email from the store. If you are not sure about the
information required, leave NONE as the email component, since an incorrect configuration
could produce errors during checkout. We suggest you contact your web hosting support
and ask:
a
b
c
What email components are installed on the server?
What is the SMTP URL?
What POP accounts are configured for my domain?
The answers will help you configure this Wizard step.
If you have your own server and you are unsure about email configuration, we suggest the
following:
a
b
c
d
Download the free email component Jmail from www.dimac.net
Install it on your server
Select Jmail at this step of the Wizard
Take the SMTP mail server and email from account information as they are
configured in your mail client (Outlook or other)
- Step 8
The Wizard requests your administrator password and encryption key. The password will
then be used to log into the Backoffice, where you will be able to manage your products and
sales. Remember the user for login will be “admin".
The encryption key should be a combination of numbers and letters only known to you. It
will be used to encrypt sensitive data in your store. The string shown here by default is a
random combination, so you may leave it unmodified.
- Step 9
I you have purchased a Power Pack from http://www.comersus.com/purchase (to add
advanced features to your store) you can indicate it here, and the Wizard will configure the
internal access links to the Power Pack features.
After completing Step 9 you will be able to access the Backoffice to load categories and
products, and finally test the store.
If you have purchased Power Pack Medium or Premium, you may now refer to the section
that explains the use of BackOffice Plus (the full control panel). Otherwise, continue to the
section on BackOffice Lite (the basic control panel provided with the Free Distribution).
12
Did you know that…? Power Packs include many features to help you sell
more and offer more services to your customers. You may purchase Basic first
and then move on to Medium or Premium just by paying the difference in price.
Some of the most appealing features in Power Packs are: online payment
methods, real-time shipping quotes, BackOffice Plus, support for professional
databases (SQL Server and mySQL), Recurring Billing and Digital Goods
distribution, among many others. Power Packs are very conveniently priced,
since developing the advanced features in-house would prove far more expensive,
not to mention time-consuming.
BackOffice Lite
BackOffice Lite is the basic control panel you will use to manage your store if you have the
Free Distribution or Power Pack Basic. Power Pack Medium and Premium, however,
include the advanced control panel, BackOffice Plus.
Login
To enter BackOffice Lite, type in your browser the URL
http://www.yourSite.com/comersus/backofficelite, or
http://localhost/comersus/backofficelite in the case of a local installation.
Enter the user "admin" and the password you selected at step 8 of the Installation Wizard.
If the information is correct, you will see a menu with options.
Did you know that…? If you can't remember the password you selected,
download Diagnostics and Tools from Comersus website and reset the password.
Another option is repeating installation steps.
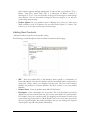
Products Menu
Products
From this option you can manage the categories and products in your store. The add
product page presents several fields for you to fill in. Remember only the fields marked with
an asterisk are required.
- SKU: An internal code for a product. Enter a code that is meaningful to you. Comersus
will automatically assign a number to each item as well.
- Description: A brief description of the product.
- Details: All product details. You may even use HTML tags to add format, for example:
<b>Great Product!</b>
13
Did you know that…? BackOffice Plus products management includes a mini
HTML editor to add format to Details easily, with no need for HTML tags.
- Price: Product retail price.
- List price: Price used for the notice "You save $x".
- Wholesale price: Price for wholesale customers.
- Weight: Product weight. This value is used for shipping charge calculations.
- Info to distribute: Static information you wish to distriute when the product is sold. For
example, a link to a private page in your website or a serial code for software.
Note: The information distributed is the same with each sale, so there is a risk that the information is shared
with others who have not purchased the item. Power Pack Premium supports advanced features such as
creating multiple serial codes and distributing unique links with expiry.
Category: Select up to 3 categories for the product. This information is used to access
products from a category list.
Did you know that…? A category can contain either products or further
categories (subcategories). Any given category cannot contain both products and
subcategories. Therefore, you may not see all existing categories for selection in
the drop down menu.
Form quantity: The field where you load the drop down menu for customers to choose
quantity. If you sell a unique product you will want to enter 1, but if you have a product with
multiple stock you will want to enter for example 10, or even more.
Clearance, Show In Home and List Hidden: These checkboxes define if the product will be
featured in a special section of the store: in a clearance listing, on the home page, or on a
page hidden from searches that can only be accessed with a direct link (the ideal
configuration for private products).
Variations: Options on a product that the customer can select. In the case of clothing, the
variations are typically colors and sizes. Here you can configure up to 2 variation groups with
3 variations each.
With BackOffice Lite you can also edit and delete products. You should first search the
product by entering a string from Description, Details or SKU, and then choose the desired
action. Note that only products that have no related orders can be deleted. If the product
has been previously sold, you can disable it from the store, rather than delete it.
Categories
From this option you can add and edit categories. The add category page prompts you to
14
enter the category name and choose the parent category. If you are adding a main category,
choose Root as parent. Then the new category will be displayed as a main root of the tree.
With the edit option you can modify the category description and location within the tree, as
well as delete unnecessary categories. Note that only empty categories can be deleted.
Relocate or delete producs and subcategories before deleting a category.
Sales Menu
From this menu you can manage customers, orders, reports and commissions.
Customers
From this option you can search customers by entering a string from their names or email
addresses. After locating a customer you can send an email, modify personal information,
modify customer type, and disable them if you don't want them to log in and purchase.
Did you know that…? You can define Retail and Wholesale prices. Customers
who register from the Storefront are automatically loaded as Retail, but the admin
can then mark them as Wholesale so that they pay these special prices.
Orders
From this option you can list the orders that were placed at the store. An order list is
displayed first. You can click on any order to see details.
The orders list in BackOffice Lite is not paginated. If your store has a large number of
historic orders it will be preferrable to use BackOffice Plus, where lists are paginated and
orders can be selected with no need to list them first.
Did you know that…? Orders are not necessarily the same as payments.
Hundreds of orders may be placed at your store, but this doesn't mean they have
all been paid for. When a customer enters their information at checkout and
confirms order details, Comersus generates an order that remains Pending until
the customer enters payment and the order becomes Paid. Payment notification
can come from an online payment gateway with call back response or IPN, or
from the BackOffice when the admin processes a payment manually and marks
the order as Paid.
At the order details page you can see all information on the order. If the payment method is
offline credit cards, you can click on View Credit Card and obtain the encrypted credit card
number. To decrypt it, copy and paste the string at Utilities/Decrypt.
From this section you can also delete an order, roll it back or mark it as Paid. Marking an
order as Paid will trigger internal processes to update stock, increase sales, distribute digital
15
goods (if any), and send email notifications. If you use an online payment gateway with call
back response, such as 2Checkout, you don't need to change order status manually since the
gateway does this automatically with an online notification to Comersus.
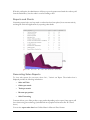
Sales Report
From this option you can get a simple sales report by month, including a chart.
The Free Distribution does not offer further reporting capabilities, but it does store all sales
data, so you will be able to get reports later on.
When you install BackOffice Plus you will be able to view detailed historic reports including
sales, stock, costs and profit.
Affiliate Commissions
If your store has affiliates, from this option you can list their commissions, calculated based
on paid orders. We suggest you keep a detailed record of payments that you can consult in
the future to verify differences, for example in the case of chargeback on a payment.
Utilities Menu
In this menu you will find utilities to maintain, configure and diagnose your store.
Settings
From this option you can modify most configurable aspects of your store. Some settings
require that you enter -1 (true) or 0 (false). This is a Vbscript convention.
Before making a change, make sure you understand the scope of your actions. If you are
running the Free Distribution and select Real Time Shipping, your customers will not be
able to check out since Real Time Shipping utilities are not available with the Free
Distribution.
You should also be especially carefull with the pEncryptionPassword field. Any
modification to this setting will disable all passwords stored previously.
Diagnostics
From this option you can diagnose database functions, ASP support, security, emails and
sessions. If you report a technical problem, our support staff may ask you to perform some
of these tests to check the functioning of the store.
Launch Store
This is a direct link to your store URL. If you have just made changes and wish to test them,
16
you can use this link for direct access to your store.
Encryption
From this option you can enter strings for encryption or decryption. It is especially useful to
decrypt credit card information in the Free Distribution.
SQL Query
From this option you can operate on the database by means of SQL sentences. Using this
utility requires SQL knowledge, and incorrect use could delete important data from the
database and damage the store.
Users with SQL knowledge will find it very useful to diagnose poblems, execute simple
reports, and configure aspects of the Free Distribution that are not readily manageable from
Backoffice Lite.
Change admin password
From this option you can modify the password for the store administrator (admin). Make
sure you use a combination of letters and numbers from 6 to 10 characters long.
Import Menu
If you have an existing catalog, you will surely prefer to import it rather than load all the
information manually. From this option you can import CSV text files with your categories
and products.
Consider File System Object must be enabled in your server, and the import files must be
located in the BackOffice Lite folder.
Detailed instructions about the name and format of the import file are available in the
BackOffice.
For product import, you may choose which fields to import, as well as their order.
Remember sku, description, details and price are required.
Shipping Menu
While Comersus is compatible with real time shipping quotes, the Free Distribution online
supports offline shipping rules. This means you will configure shipping charges based on
order details. For example, you can indicate that a 2 lb package to Miami, Florida, will be
shipped by UPS Ground at $5.
The add shipping page prompts you to enter a description (usually the service type, such as
UPS Ground or Fedex 2nd day), type of customer, weight range, number of items in the
cart, order total, shipping charges (an order percentage or dollar value), and customer
17
location.
Did you know that…? If your store sells digital goods or services, you may
disable shipping screens at checkout. Simply set pByPassShipping at -1 (true)
from BackOffice Settings.
At edit shipments you can list current shipping rules and delete those you don't want to
display at checkout. Modify shipments is not included in BackOffice Lite.
Payment Menu
From this option you can manage the payment methods enabled in your store. Remember
the Free Distribution supports PayPal, offline credit cards, and other offline methods such
as Wire Transfers and Checks. If you have followed all Wizard steps, you probably have
payment methods configured already.
The add payment page prompts you to enter a description (to be shown to the customer at
checkout), product quantity (this allows you to offer credit card from 1 to 10 products and
Wire Transfer only for over 10 products, for example), order total (with the same purpose as
product quantity), fixed or percentage price (an additional charge for choosing this payment
method, used in some countries), redirectionUrl (optional field to define where the user is
redirected to place payment or find payment information), information to distribute
(additional details, such as account number, that the customer will receive by email provided
the setting pDisableSaveOrderEmail is disabled).
At edit payments you can list current payment methods and delete those you don't want to
display at checkout.
Make sure there is at least one payment method available at all times, otherwise your
customers will not be able to check out.
Logoff
Make sure you log off after using BackOffice Lite so that nobody else can access your
control panel while you are away from the computer.
Notes on BackOffice Lite
BackOffice Lite is a basic management utility designed to set up a store and manage main
functions at the early stages of an e-commerce implementation. If your store is already
getting orders and payments, and you are sure about your choice for Comersus, we strongly
recommend you upgrade to Power Pack Medium or Premium. You will receive BackOffice
Plus, the full control panel, with many advanced utilities and reports described below. You
can try the online demo at http://www.comersus.com/demo.html
18
Security Concerns
Before going live with your store you will have to verify your company security policies and
maybe obtain advice from a Security Specialist to avoid the attack of Crackers and fraudulent
activities from users.
We will provide some initial tips to secure your store.
Database: if you are using Access you must consider that the database is stored in one file named
comersus.mdb By default anyone can download the file by knowing the real location and name.
What can you do to prevent this? 1- Rename the database file and change the database folder
name also reflecting those changes at comersus/includes/settings.asp 2- If it’s possible move the
database file to some folder outside public access and relate the file to your store using DSN 3Add a password to the database folder so if anyone tries to download the file the login screen will
appear (Comersus Hosting Service lets you do this since Comersus uses an exclusive mix of
Windows and Linux Server) 4- Add a password to the database file from Access and reflect that
change to comersus/includes/settings.asp
If you are using SQL Server and mySQL just be sure that your password is not the default and
prevent remote DB administration if possible. You may also check with your database vendor for
regular patches to security bugs.
Encrypted information: Comersus stores sensitive information using RC4 algorithm (or DES if
you have purchased Power Pack Premium). If anyone gets a password or credit card directly from
the database, he will still have to decrypt that information. The only way to decrypt the
information is with the Encryption Key located at settings table. We provide a default encryption
setting that must be changed to any other string prior to going live. Consider that all your
previous passwords and encrypted data will not be accessible anymore if you change the key. You
can use Diagnostics and Tools to reset the password once you have changed the Key in order to
grant BackOffice access.
You can also use any other encryption system with Comersus but this will require a
customization. Comersus Official Hosting has Third-Party encryption components just in case
you need additional security.
Web Server: Microsoft IIS had some well known bugs in 3.0 and 4.0 that allow Internet users to
view the source code of ASP scripts. As you may imagine this is a dangerous security threat since
anyone can view your database location and Encryption Key with access to the source code.
Update your web server with the latest patches and subscribe yourself to security lists to be
notified about the latest security bugs in the software you are using.
Logs: ask your hosting provider about the possibility to view the logs of your FTP server in order
to determine if someone else is accessing the files in your web server.
Passwords: do not use easy to guess passwords for your database file, FTP server and Comersus
admin passwords. Use a combination of letters and numbers and avoid known English dictionary
words. Do not write the passwords and change them on a regular basis.
BackOffice: Rename BackOffice Folder and use Web Server security to prevent outside access
to that folder if possible. The BackOffice will log the last login date so you can verify that nobody
uses the BackOffice with your own profile.
19
Credit Card information: Try to use an online payment gateway since in that case you will get
more security validations (CVV2, AVS, etc) and the card number will not be stored in your
database. You can always retrieve credit card numbers by using your payment gateway reports.
Silent Responses: Rename all Silent Response scripts to avoid the situation where a customer
posts an order and then loads in the browser address the Silent Response to change the order
status to paid without making the payment. Note that this cracking method will not work with
some payments like PayPal since they provide additional security rules, but we advise to rename
those scripts anyway. Consider also that you will have to set the new script name in the Payment
Gateway Control Panel.
Trojans: you can implement all security policies explained above but if someone places a Trojan
application in your machine, they will probably have access to your files and keystrokes. Avoid the
execution of attachments and use an updated Antivirus and IDS such as Black-Ice Defender,
Norton Internet Security or Zone-Alarm.
About Security Check: you can download Diagnostics and Tools from Comersus Downloads
Page. There you can find a Security Check option that will make tests and provide automatic
recommendations that could be used as a complement of a manual verification of security
conditions.
About BackOffice Plus
As explained above, the basic control panel provided with Free Distribution Comersus Cart,
BackOffice Lite, will help you manage the vital features of your shopping cart. For complete
and professional management of all features you will need the advanced control panel,
BackOffice Plus.
In the following pages you will find a discussion of all shopping cart features that can only
be managed from BackOffice Plus. Even if you don't have this tool, you will find this
information useful to learn about all of the shopping cart's capabilities.
20
Chapter
3
Settings
T
he file Comersus/includes/settings.asp allows you to configure the database location, database
type and default email configuration for Error Trap script. All other settings are contained in
settings table in the database and you can modify them with BackOffice+ or Lite.
BackOffice Lite and + Programs also have their own settings.asp file located in
Comersus/backoffice+(or Lite)/includes/settings.asp where you can configure some basic
functions of the BackOffice (like demo mode, path for upload, etc)
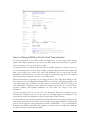
StoreFront Basic Settings (comersus/includes/settings.asp)
By editing this file with a text editor you will be able to define an alternate connection string,
database type or database location. You can also define Email Settings for Support Error script:
these settings are used for outbound Support Error. Email configuration of Advanced Settings is
not used for Support Error since those settings are stored into the database and if some error
occurs, probably database will not be accessible.
' Alternate connection strings
' SQL Server local or remote IP in SERVER=
'pDatabaseConnectionString
=
"Driver={SQL
Server};UID=comersus;password=123456;DATABASE=comersus;SERVER=127.0.0.1"
' Jet Oledb connection
'pDatabaseConnectionString
=
"Provider=Microsoft.Jet.OLEDB.4.0;"
Source="&server.mappath("../database/comersus.mdb")
' DSN connection, you must define the DSN first in your server
' pDatabaseConnectionString = "DSN=comersus"
21
&
"Data
' DSN less connection
pDatabaseConnectionString= "Driver={Microsoft
&server.MapPath("../database/comersus.mdb")&";"
Access
Driver
(*.mdb)};DBQ="
' Email Settings for Support Error script (if there's a DB error, this data cannot be retrieved from
the DB)
pSupportErrorEmailFrom = "[email protected]"
pSupportErrorSMTP
= "smtp.yourDomain.com"
pSupportErrorEmailComponent= "Jmail" ' options are Jmail, ServerObjectsASPMail1,
ServerObjectsASPMail2, PersitsASPMail, CDONTS and BambooSMTP
pSupportErrorShowDetails= -1
StoreFront Advanced Settings
Using BackOffice+ you can browse to Settings/Configuration.
From this option you can edit in real time all the advanced settings of the store grouped in several
categories.
o Company Information: Company or store name and address appear on many shopping
cart pages and on most e-mail messages sent to customers. Here you can also specify the
phone, fax, zip code, etc
o StoreFront Behaviour: pMaxAddCartQuantity is the largest quantity your customers will
be able to order for one product (i.e. 20 means that they can only order up to 20 units of a
certain product). pMinimumPurchase is the minimum dollar value of the products added to
the shopping cart for your store to accept the order. Orders below the minimum are
considered too small and will not be processed. In all cases, customers whose shopping
cart contents don’t meet one or more of these criteria are notified of the problem during
the check out process. pStoreFrontDemoMode is an important setting for testing purposes. If
you have an error in your store you should switch to demo mode in order to make a
debug and try to determine which SQL sentence or script is causing the error. pOrderPrefix
and pCustomerPrefix are used to determine a prefix to be added in the beginning of all
automatic numbers for customers and orders. pIdStore is used to identify each unique
store in a mall or multilanguage environment (stores should be previously defined in
stores tables). pNoStockAvoidAdding is used to detect if the product has stock. If it doesn’t,
Add Button and links will disappear for that product. pShowStocjView is used to show the
stock for the products in the storefront. pUseShippingAddress is used to enable the link to
shipping address form in the checkout process. pRandomPassword is used to enable random
password generator for new customers pAllowNewCustomer is used to enable new
customers form in checkout process; if you don’t want new customers to register just
change this setting. pStoreLocation is very important since it defines the domain and folder
22
where Comersus is installed in the server and this location is used by several scripts to
send emails, determine the location of certain files, etc. Don’t use http; a valid location is
localhost/comersus. pForceSelectOptionals is used to check if the customer selects at least
one variation of the drop down variations before adding. pEncryptionPassword is the
encryption string for RC4 algorithm. If you want to change this setting, all your previous
passwords and encrypted credit cards will not be recognized. Make sure to change the
password before you logout or you will not be able to login again to the BackOffice if you
changed the encryption password. pIndexVisitsCounter is used to register the visits to your
store if they arrive to default.asp script (direct access to categories or other parts of the
store will not be added). Sometimes you want to disable this setting for performance
reasons since you can also count visits using any Visits Counter provided by the web
server. pUseEncryptedTotal is used to encrypt the order total before filling an online
payment form such as Authorize.net form. pSendPlainText is used to send credit card
information unencrypted (useful just for testing purposes, don’t enable this setting for a
real world store). pItemsShown is used for the home page table that displays a table filled
with products. pStockQuantityControl is used to check if there is enough stock in add and
recalculate steps.
o Optional Features:
•
In settings table there are also settings to enable or disable links to features
inlcuded in Power Packs. If you have executed the Wizard, that application will
set the links automatically according to your Power Pack. Then you have to go to
Settings in order to define additional configuration options like
pGetRelatedProductsLimit (a setting to define how many related products to
retrieve), pProductReviewsAutoActive (to activate all reviews without BackOffice
moderation), etc.
These optional features are only available with Power Packs. You can find more
information about Power Packs in the Appendix Section
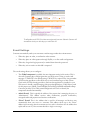
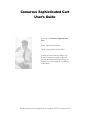
Note: The Wish List feature of Comersus allows your customers to place items that they like, but
are not ready to buy right at that moment, in an ideal basket from which they can retrieve them
at any time. The advantage is that when they are ready to order, they don’t need to search for
those products again. All they have to do is log into their account, select View Wish List, and
add to the shopping cart the products that they are now ready to purchase (see image below).
To add a product to their Wish List, users will click on the Add to Wish List button located on
every product details page in your store. If the Wish List feature is not active, that button is not
displayed.
Wish list can also be used to distribute a gift list link.
23
To add products to the Wish List visitors must register with your store. Otherwise Comersus will
not remember who they are when they try to retrieve their list.
E-mail Settings
Comersus automatically sends your customers e-mail messages under these circumstances:
o When they place an order, to confirm the order contents.
o When they place an online payment through PayPal, or on-line credit card payments.
o When they forget their login password, to remind them about the password.
o When they win an auction or their bid is surpassed.
The e-mail settings allows you to configure:
o The E-Mail component is probably the most important setting in this section. This is
what tells Comersus the e-mail program that your Web server is using to send e-mail
messages. "CDONTS" is the default setting. CDONTS is a script used by a large number
of Web hosting providers to allow Web sites to send e-mail messages to their visitors.
Check with your Web hosting provider to find out what application is installed on your
Web server to handle e-mail messaging. Other popular applications (COM Objects) used
for this purpose are: JMAIL, PersitsASPMail, ServerObjectsASPMail and BambooSmtp.
Comersus provides a Free Utility named Diagnostics and Tools to identify the
components installed automatically.
o Admin E-mail: This is typically the address of the person that is managing the store, or
“administrator”. This address receives order notifications, payment notifications,
encrypted credit card payments and auctions notifications.
o “From” E-mail: This is the address that is used for all messages and invoices sent
automatically from your store to a customer. This address shows up as the “From”
address in the message that the customer receives, and it is therefore also the address that
replies will be sent to, if the customer decides to reply to a message.
24
o SMTP Server. This is the send mail transfer protocol server. It can be a remote server
also.
o Debug Email: This option is useful to determine the cause of email sending errors since
it will display the error description on screen.
Changing Your Password
To change the login password for your BackOffice+ or to add more administrator profiles select
Settings, Administrators.
Create a new user or modify an existing one. Note that the admin profile that you are using may
not have the permissions to modify other profiles.
If for any reason you cannot login to BackOffice+ you can download and install Free Diagnostics
and Tools to create a new user admin.
Note: Whoever is in possession of the BackOffice +’s User and Password has
access to virtually every aspect of your online store. Make sure that you keep your
password in a safe place and that you do not share it with anybody other than
those people that you want to have full access to your store.
Store Terms & Conditions
At checkout time, the customer will have a caption: “You have to agree to the following
conditions to make a purchase”. The conditions can be changed from BackOffice+ using this link
at Settings Menu.
Note: If you want to change General Conditions using BackOffice Lite you will have to perform a SQL sentence.
Currencies
From this option of BackOffice Plus you can create new currencies defining sign, name and
conversion factor. If you have the optional Currency Conversion Feature included with some
Power Packs your customers will be able to make conversions between currencies in the
storefront.
States and Countries
From this option of BackOffice Plus you can administer the states and countries displayed in your
checkout and registration script. If your store only allows purchases from US, you can delete all
other countries for example.
25
Screen Messages
From this option of BackOffice Plus you can manage all messages that appear on screen. Real ID
is the id provided by the database. Assigned ID is one number assigned by the administrator, if
you have a multilanguage store, this ID should be the same for the original string and the
translated string. Then you have the file name, which is only used as a reference, the screen
message and the store ID (if you have a mall or a multilanguage store)
If you want to add more messages not included by default, you have to post a SQL Sentence to
create new records and then you will be able to edit those sentences from the BackOffice Plus.
Tax, Payment and Shipping are covered in special chapters of this guide.
26
Chapter
4
StoreFront
he StoreFront menu allows you to add products to your on-line catalog using a form. It also
allows you to modify existing products, add product options (e.g. color and size), add or edit
product categories, and more. You can also moderate Customer Reviews, Define Discounts,
Distribute a Newsletter, add new records to Store News and create Auctions. You can also
manage stock, define Related Products and administer suppliers.
T
Getting Ready to Add Products
Before you start adding product information to your on-line catalog, it is a good idea to get the
product information ready. Here is a list of the things that you can add to your product catalog,
along with some comments related to their formats.
o Product name, SKU, and a description. The description field supports HTML tags, so
you can use the product description that you have already used in another Web page, by
copying and pasting the HTML code. If you don't have a formatted product description,
just use plain text, as you will be able to format it using BackOffice+ (e.g. bold, italics,
bullets, etc.)
o Pricing information. You can set 3 prices for each product: List price, retail price and
wholesale price. The only one required by Comersus is "retail price", which may or may
not coincide with the list price. If it doesn’t, the store will show “you save $XXX”
message.
o Product images. You can have 5 images for each product.
-
Thumbnail. This is the small image that typically appears on all pages that display
more than one product (e.g. search pages, etc.). The size of this image must be
100 x 100 pixels or less. The supported formats are JPEG and GIF, which are
the standard graphic formats acceptable for the Internet.
-
Main Image. This is the image that is displayed on the product details page. The
size of this image must be 200 x 200 pixels or less. The supported formats are
JPEG and GIF. Then you can add 3 optional images that customer is able to
switch from main image
-
3 optional Images This images can be rotated by the customer to obtain a more
detailed view of the item.
o Product Categories. Are your products organized in categories? If not, you may want to
consider organizing them in categories before you start adding them to the catalog. Note
27
that Comersus supports multiple subcategories. In other words, you could have "Toys /
Babies / Bath Toys" where "Bath Toys" is a subcategory of "Babies", which is a
subcategory of "Toys". You can also define an image for each category to make listings
more attractive. You can also include an image for each root category, so you will get a
good looking categories page.
o Product Options. Do your products come in different sizes, colors, etc.? Have those
details available as well. In Comersus, they are called Product Options or Variations. Since
Comersus 6 you can also define variation images and variation types.
Adding New Products
Add Product adds a new product to the product catalog.
The following is a brief description of the form fields contained on the first page.
o SKU - Enter the product SKU or Part Number, which typically is a combination of
letters and numbers. Note that the database will also automatically add to each product a
unique Item Number, which is not displayed on this form. The Item Number uniquely
identifies the product in Comersus' database. The SKU, instead, is your own product
identifier.
o Product Name - Enter the product name (Max 255 characters).
o Description - Enter a description for the product. This is the description that will be
displayed to your store visitors when they opt to receive more details on a certain product.
For example, if they run a product search, the shopping cart will return N items on the
search results page. If they click on "More Details" next to any of the items, they will be
shown a page that displays the product description that you are entering here (together
with the general image and other product information).
28
Note: You can use any HTML tag to format the text in this field. For example,
you can use the <b></b> tag to make a word bold. This also allows you to link
to other pages on your Web site, display additional product images, etc.
o Retail price - Enter the price you will be charging your retail customers. You can
automatically charge wholesale customers a different price (see B2B prices below).
o List price - Enter the list price for the product. This is an optional, but very useful field.
If you enter a price here, then you can use the Show Savings feature described below. Note:
make sure the list price is higher than the on-line price.
o B2B (Wholesale) Price: This is also an optional field. The field defines the price that is
displayed to B2B wholesale customers and used to calculate their order totals. You can
define which store visitors are wholesale customers under Customers Menu. See the
section of this user guide dedicated to that topic for more details. B2B wholesale
customers are automatically shown the wholesale price.
o Special Prices: Since Comersus 4.00 you can also define special prices for each
customer. List the customer from Sales and Customers menu and select Assign Special
Prices.
o Thumbnail image - Enter the thumbnail image file name and extension. Do not enter
any directory path, just the file name (e.g. "myimage.gif"). Comersus assumes that images
for the product that you are adding have already been uploaded (or will be uploaded) to
your server. All images must be uploaded to the following directory:
www.yourwebsite.com/Comersus/store/catalog
If you haven’t already uploaded images to your server, you can do so by using Comersus’
automatic upload component, accessible by selecting Upload Images from the Products
menu.
To upload images using this component, Browse your computer until you locate the file(s).
When you are done locating the file(s), click on Upload to automatically move them to the
right directory on your Web server. You will receive a confirmation message indicating
that the upload was successful.
To upload images to your server you can also use any FTP program. Many are available
in the market, often free of charge. In addition, your Web hosting service provider may
have some for you to download as well. For a list of good FTP programs available for
download, run a search for "ftp" at http://www.download.com
o Image - Enter the file name for the product’s general image. Make sure that the image
has been uploaded to your server, as described above.
o Category 1, 2 and 3 - To give you maximum flexibility, Comersus allows you to assign a
product to multiple categories. For example, a gift shop could have the same poster
appear under "Posters" (first category) and under "Home Décor" (second category). To
manage categories and subcategories, see Create and Modify Product Categories. You can
assign the same product to unlimited using unlimited categories assignment link in
Backoffice Plus. By default it comes with 3 categories since it is unusual to assign one
product to more than 3 categories.
o Active - All products are active by default. If you uncheck this option, the product
becomes inactive, and will not be shown in your store. The product will stop showing up
29
o
o
o
o
o
o
in any search and/or catalog page. Make sure that you have not placed hard-coded links
to this particular product on any other page of your Web site.
Show In Home and Clearance (Hot Deal) - You can set any item in your product
catalog as a Show In Home or Hot Deals. This gives you the ability to promote certain
products in your on-line store. All Hot Deals are displayed in a special page that you can
link to from any other page on your Web site. For example, many Web stores link to the
Specials page right from their home page. Show in Home Products will be shown at
comersus_dynamicindex.asp
Weight - Enter the product's weight, in pounds. The weight can be used for dynamically
calculating shipping charges. For information about configuring shipping options see
Shipping Options. If you set the weight to zero, then customers will not be prompted to
select a shipping option during the check out process. This can help you both with items
that you do not ship and with those for which you want to offer free shipping.
Form Quantity - You can define the quantity to be allowed in the drop down quantity
selection of viewitem page.
Availability Time in the viewitem page you can show the usual Delivering Time for this
product.
Personalization- In Backoffice Plus, if you turn on this setting, the cart will allow the
customer to enter a personalization string before purchasing the product. Ideal for
engraving, etc
Digital Goods You can define a download link, a serial code or any other digital goods
text to be distributed automatically with Silent Response from payment gateways.
Remember that since Comersus 4.10 you can also use optional Unique Serial Codes that
will distribute unlimited serial codes defined previously for each product to be sold. There
is also an optional package to distribute digital goods from Customer Menu (Show Order
screen) with the advantage that the customer will not find out the real location and name
of the file downloaded.
Click on the Add button to add the product to your catalog. A confirmation page will be
displayed. Then you can opt to add Options to your product (discussed in the next section), modify
the stock, upload an image, modify it, add another product, or return to the product management
window.
After adding the product in BackOffice+ you can distribute a Newsletter to all the customers with
the information about the product just added.
Setting Product Options (variations)
Comersus allows you to add sets of options to each product. These are additional purchasing
options that you are offering to your customers on certain products. For example, a product may
be available in different sizes, colors, etc. Customers select these options (if any) on the product
details page before adding a product to the shopping cart.
Comersus gives you a great deal of flexibility in creating and managing product options:
o You can add an option to just one product in your catalog or all of them at the same time.
30
o You have the ability to associate an additional fee with each product option. The fee is
automatically added to the product’s base price when the product is added to the
shopping cart. So an oak frame may cost an additional $20 for a certain painting, but $30
for a larger painting. Different sizes on a t-shirt, instead, may not add any amount to the
base price.
o With BackOffice Plus you can define the variation type like drop down, checkbox or
radiobutton. You can set an additional image for the option that will be displayed into
product details page.
Before you add options to your products, take a look at how they are organized in your store’s
database. Product options work as follows:
o Option Groups – Option groups define the main attribute (size, color, weight, etc.).
o Options – Options are the choices within that attribute (small, medium, large, etc.). So to
assign a product a certain set of additional options (e.g. three sizes), you will first associate
the product with an option group (e.g. size), then select three options to add to that group
(e.g. small, medium, and large).
To create options and option groups, follow the steps outlined below.
Create a new Option Group at StoreFront/Products/Option Groups Menu by typing the
group name in the Group Name field and then clicking on the Create New Option Group button. For
example, "color" or "size" could be the name of a new option group. The new entry will not
appear in the list.
o From the StoreFront/Products menu, select Modify OptionGroups to Products Assignments. The
window that is displayed lists the current option groups for the selected product.
Modifying & Deleting Products
To modify an existing product, click on Modify Products. You can locate the product that needs to
be modified by searching for it, or by viewing a complete list of the products per category saved in
your product catalog. Searches are conducted on the product’s name and description.
If you select list per category, you will be shown n products per page in order to locate some specific
product.
In both cases (search or list all), the results page will list the product SKU, product name, and the
following links:
o Modify - Click on the Modify button to modify the product properties. The form that is
loaded is very similar to the Add New Product form. Refer to that section of this document
for more information on each form field.
o Delete - Click on the Delete button to delete the product from the database. Note: if you
want to prevent the product from being displayed on your on-line store, but you want to keep it in the
database, make the product inactive, do not delete it. This allows you to temporarily prevent people from
buying an item, but it gives you the ability to make the item available for sale again at any time. Instead,
31
deleted products are permanently removed from the product catalog. Consider that sold products cannot be
deleted before deleting order first for integrity reasons.
Multilanguage Support
From Comersus 6, multilanguage is implemented using a multiple store schema. If you want your
store to be in english and spanish, you are going to install 2 storefronts, one of them is the main
Comersus/store (english)
Comersus/spanish
From BackOffice Plus you have to create the additional store and get the IDStore. That idStore
should be loaded into comersus/spanish/includes/settings.asp
Then you have to define settings for the new store and translate all screenMessages (or download
the translation if it’s available)
From BackOffice Plus, main menu you can define which store are you managing (english or
spanish) Then you can define products, settings, etc for every store.
Regarding categories, you have to use the following structure
Root
Root/English
Root/Spanish
Root/English/Books…
Root/Spanish/Libros
And then load in store management the ID of the starting category.
Regarding main layout (header and footer) you have to translate and use specific images for every
language.
Then you can use a main store page to select the language or redirect the customer to the
appropriate store according to USER IP or Browser language.
Creating and Modifying Product Categories
Product categories allow you to organize your product catalog and make it easier for customers to
browse through your on-line store. With Comersus you can create multiple categories and
subcategories, and assign a product to up to three categories or subcategories. In addition, you can
create up to four subcategory levels in the category tree. For example: "greeting cards" (category),
32
“business” (subcategory of "greeting cards"), "thank you cards" (subcategory of "business"),
"classic" (subcategory of "thank you cards"), etc.
Note the following definitions to understand how to create a new category:
o Root. This is the top level in the category tree. When you create a new category, you will
set it as a root category unless you want it to be a subcategory of another category.
o Categories. You can have unlimited categories.
o Parent Category. This is the category to which a subcategory belongs. When you create
a new subcategory, select the category that it belongs to from the Parent Category drop
down menu. Note that parent categories cannot contain products. Their subcategories
can, unless you want them to also be parent categories. Therefore, you will not be able to
select a category as a parent category if it contains products.
o Subcategories. The process of creating a subcategory is the same as creating a category.
The only difference is that you will have to specify which parent category or parent
subcategory this subcategory belongs to. Comersus supports up to four category levels.
To create a new category or subcategory:
o Click on StoreFront / Products / Add Category.
o Enter a category Description. This is the category name that will be displayed in your store
when people browse the store by category, together with the category image.
o Specify which category this subcategory belongs to from the drop-down menu. If this is a
top level category (i.e. this is not a subcategory of any other category), select Root from the
drop-down menu. If a category does not appear in the Parent Category drop-down menu
the reason is that either the category has products assigned to it or it is the lowest level of
category that Comersus supports (i.e. it cannot have subcategories).
o Click Save to add the category to your store. You may assign products to this category
when adding a new product, by using the Modify Products feature under Storefront / Products.
To modify an existing category or subcategory:
o Click on Storefront / Products / Categories / Modify
o A list of all existing categories and subcategories is displayed. Subcategories are displayed
below the parent category to which they belong.
o Select the category that you would like to modify by clicking on Modify/Delete on the right
side. You will be shown a window identical to the Add New Category window discussed
earlier in this section.
To turn a category into a subcategory, select what will become its parent category
from the drop down menu and click Modify.
To turn a subcategory into a top level category, select Root from the drop down
menu and click Modify
To delete a category, click on the Delete button. Note that to be able to delete a
category, it must not contain any subcategories, and no products can be assigned
to it. You will first have to delete its subcategories (or assign them to another
33
category or subcategory), and delete the products that belong to it (or assign them
to another category).
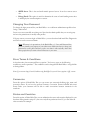
Managing Inventory
Comersus automatically keeps inventory levels updated for you. When you add a new product to
your product catalog, you have the ability to specify the initial inventory level. As orders are
submitted and paid or marked as paid for a particular product, the inventory level for that product
is adjusted accordingly.
Since you may receive new shipments of products, or produce new ones, etc. you need to be able
to change the inventory settings at any time. To view and modify inventory levels, select Storefront
/ Products / Stock main menu.
You will be shown several choices to list, view charts and modify the stock of all products in your
product catalog
To adjust the stock for some product click on Modify Stock.
Regarding the adjustment of stock at purchase time, you have to consider that you should not
update stock with each order since it’s very common for payments to be rejected and for online
orders to remain uncompleted. It’s a better schema to update stock only after payment. With
Comersus you can update stock using the Silent Response of your payment gateway. You can also
update stock for off line payment orders using BackOffice+ by marking one order as paid, the
stock and sales statistics of that product will be updated. If you get a chargeback for one payment
you can make a RollBack for the order using the BackOffice and the stock will be updated.
Note: you can also modify the stock value for a certain product from Modify Product menu but remember that
Comersus will not maintain records of this change. We advise always using Modify Stock Option included with
BackOffice Plus.
34
Advanced Stock Calculations
After adding a new product you can enter additional optional fields that will produce advanced
stock calculation for report purposes.
Note: for existing products you can click on Set Stock Levels to enter this information.
Those fields are:
Security Stock: the minimum stock level that is allowed for that product
Order Cost: global costs involved to re-order that product (shipping, handling, etc)
Delay: days to get that product
Minimum Order: minimum order for that product as it was specified by the supplier.
If you have loaded all these information and if you have at least three months of historic sales in
your database you can use the Security Stock Report (Sales & Customers/Reports).
This report will iterate through the entire catalogue and it will show a detailed advanced
information about inventory like:
•
Current Stock
•
A flag to identify if the item is below security level
•
Units to get Security Level
•
Recent sales of this product
•
Simple estimation for next month
35
•
Re-order recommendation including costs and delay times
•
Direct link to Supplier Information
Related Products
You can define related products for one item. This is a great marketing tool since it allows to
create a Cross Selling Schema. At product details page you can get related products and show
them to the customer so they can decide to purchase those products also. For example: if the
customer purchases a radio you can offer batteries as related products.
Related Products are managed from StoreFront/Products/RelatedProducts
Bundle Products
A Bundle Product is a product made with other products. You may want to use this feature in the
following scenario: a clothing company with T-Shirts in different sizes, colors and models with
the requirement of maintaining stock for each variation.
You can also use one product with Optionals but in this case you cannot maintain stock for each
variation, you cannot run Sales Reports differentiated by variation and you cannot use different
images for each variation.
All this problems are now solved by Bundle Products.
Instructions:
1. Create the main product in the usual way, consider that the description and details should
be generic to include every product of the bundle (like T-Shirt in several sizes and colors).
Price and stock of this product will not be used so you can leave them empty.
2. Create each product contained in this Bundle. Here you have to load price and stock.
3. From Products Menu, Select Main Bundle, select the product just created.
4. Then click on the Assign Products link.
5. Select each one of the products contained in this Bundle.
Each one of the products contained in the Bundle will not appear in the store as individual
products (they will not be listed in Searches and Listings). Only the main Bundle Product will
appear there. When you click on the details page for the Main Bundle, you will get a compound
page with each one of the products contained, the stock, price, images and links to add to the cart
Rental Products
If you want to rent rooms, DVDs, CDs, etc you have to specify that the item is a rental product.
In this case the product cannot be added directly to the cart. The customer will have to select
36
from/until dates. The selection will be compared with current reservations and if the period is not
reserved the item can be added to the cart. The price will be calculated as item price * number of
days.
To simplify user selection you can enable Java calendar from BackOffice/Settings/Configuration.
In this case two calendars will appear in the screen to select from/until.
Note that current reservation will not be saved until the payment is made and a silent response is
posted back to the cart or until the administrator mark the order as paid.
Rental products cannot be recalculated inside the cart since the quantity is determined directly
using the period provided.
Compare prices with Amazon
With this feature enabled Comersus is able to perform a real time comparison with Amazon.com
catalogue, if your price is better it will show a message “Better price than Amazon” and a link so
the customer is able to verify that information.
Note: This feature is available only for Books at this time. The script needed for this function is included with Power
Packs.
To configure Compare with Amazon, go to Amazon site and get a Token, then go to
https://associates.amazon.com/gp/flex/associates/apply-login.html/104-2225054-3286341and get an
associate ID. Enter your Developer Token and Associate ID in Comersus BackOffice
Settings/Configuration inside pAmazonDevKey and pAmazonAssociateKey and enable
pCompareWithAmazon.
Edit all the books in your store and enter the ISBN inside Comersus sku field. Then you can load
the details page for a specific item and show to final customers if your prices are lower than
Amazon prices.
Suppliers
You can manage suppliers from StoreFront/Products/Suppliers menu. There you can add and
modify suppliers and you can also view a Report of products ordered by Supplier and a chart of
products quantity per supplier.
Suppliers are important since Comersus may also send email notifications to one supplier when
the stock is less than a certain value. You can make an automatic procedure of new orders with
your suppliers using Comersus.
Note that this Supplier Notification feature is originated from Silent Response notifications of
Payment Gateways or from BackOffice+ (changing order status to paid).
37
Moderating Reviews
You can moderate customer Reviews from the BackOffice. Reviews are not activated by default
in order to avoid rude or offensive messages. Then you can login into the BackOffice and delete
or activate Reviews.
Newsletter
From this option you can distribute a Newsletter to your users. As an incentive, the Newsletter
Package may be configured to distribute Discount Certificates so you will get a lot of users in your
Newsletter quickly.
From this option you can distribute to Regular Retail/Wholesale Customers or to the users
subscribed to the Newsletter. You can define From, Email, Subject and Body.
By default, Newsletter emails are text only emails but you can develop a customization to allow
HTML emails also.
Discounts are explained in a special Discounts and Promotions chapter.
News Page
From this option you can add records to the Dynamic Store Newspage such as Blow Out Sale
Notifications and more.
Auctions
With Comersus you can define Auctions using your standard catalog. You can define an auction
name, the valid period, the starting and ending price, the customer bid increment and the
customer auction type (Retail/Wholesale)
Using BackOffice you can view current offers, delete bids, change the ending time, etc.
When you create a new Auction, your customers will see a message in the product details page:
“Auctions available for this product”.
Only registered customers can bid for auctions. If a customer surpasses someone else’s bid, the
previous customer will receive a notification of bid surpassed.
If a customer wins the auction, they will receive by email a discount certificate calculated
automatically with the following rule:
38
Discount Amount = Price (Retail or Wholesale) – Last Offer
At a later time, the customer may return to the store and post a new order with the discount
certificate won in the auction.
The auction could be finished due to a bid equal to final price or due to final date reached. Final
date is computed each time a user views an auction. If you need another method you canexecute
at regular intervals the script comersus_optAuctionExpirationCheck.asp using WSH or any other
facility provided by the web server.
Wish List
With Comersus customers can save certain items in their Wish List. They will obtain a private link
to distribute the Wish List to their friends. Any visitor of the Wish List can place an order for
Wish List products. In this case the destination address will be automatically loaded with Wish
List owner address and it cannot be modified. After placing an order the item will be removed
from the Wish List.
To enable the Wish List feature just go to BackOffice/Settings/Configuration and change
pWishList to -1
Google Ad-Sense
You can earn money by showing ads in your site. Comersus is compatible with Google Ad-Sense.
A dynamic Ad-Sense banner will appear inside comersus_viewItem.asp script if you configure this
feature.
Instructions:
1. Sign-Up and login into your Google Ad Sense acccount
2. Go to Settings, Ad Layout Code
3. Retrieve your ad client code in the second line, example: pub-1234296487474744
4. Enter that code inside BackOffice/Settings/Configuration pAdSenseClient key
Rss news Feeder
Your Comersus store is able to publish information on new items released every day in RSS
format.
1. Go to BackOffice/Settings/Configuration and enable pRssFeedServer (switch to -1)
2. In the store home, a link will appear with the information about the RSS feed
39
To test the RSS Feed, open
http://www.yourStore.com/comersus/rss
your
RSS
client
and
enter
the
URL
Note: you have to enter a new product in the BackOffice+ to enable the feed for every day
Donation Items
To define an item as a Donation:
1. Create a new item with price $1 and the mark the item as a donation with the checkbox
The store will present a special donation page for that item with the textbox to specify the
amount.
40
Chapter
5
Discounts and Promotions
anaging an on-line store is no different than running a retail shop. Through special
promotions and discounts you can increase sales for certain items and draw your
customers' attention to specific products. Comersus gives you the ability to easily set up a
variety of promotions and discounts. First, we’ll look at how Comersus can help you automatically
create "Hot Deals" and "Show in Home" items. Then, we’ll focus on product discounts.
M
Specials and Featured Items
Comersus allows you to increase the visibility of certain products in your on-line store in two
ways: by creating Hot Deals and by setting certain products as ”Show in Home” like featured
items.
Discount by Code
Comersus allows you to set a variety of discounts. We will start by describing the Discount by Code.
This discount works as follows:
o When you create a discount, you will assign a code to it.
o Then, you will notify your customers about it (through e-mail, your Web site, flyers,
advertising, or any other way).
o When customers visit your on-line store, they will add products to their shopping cart as
usual. No discount will be shown at that time. Upon check out, they will be prompted to
enter the discount code, if they have one. The order verification page will display the
savings.
To create a Discount by Code, select that link from the Storefront / Discounts menu. A list of
existing discounts will be displayed. To create a new Discount by Code, click on Add new discount. To
edit an existing discount, click on the Modify button. To delete an existing discount, click on the
Delete button.
To create a new discount, fill out the form shown below and click on Save. The following is a brief
description of the form fields and how they affect your customers' orders.
o Description. Enter a description for this discount, e.g. "Thanksgiving Sale".
41
o Price Discount. If you wish to set the discount as a flat dollar amount, enter it here,
without the dollar sign. For example, you could give your customers $10 off the total of
an order. This type of discount is often associated to a minimum purchase amount, which
you can specify below under Order Amount.
o Percent Discount. If you wish to set the discount as a percentage of the order total,
enter the percentage value here, without the % sign.
o Active. To disable or enable a discount, use this option. This allows you to create a
discount code, but use it at a later point.
o One Time. If you want to allow your customers to be able to only use the discount code
once, make sure this option is checked. For example, this is typically the case with Gift
Certificates: once a customer uses the gift certificate, the same customer cannot use it
again.
o Discount Parameters. These parameters limit the applicability of the discount. Note
that you do not need to specify any of these parameters, unless you want to.
Quantity. You can limit the validity of the discount to orders that fall within a
certain quantity range (e.g. higher than 3, or between 5 and 10, etc.).
Weight. Same as for quantity, but calculated on the total weight of the order.
Order Amount. Here the parameter is the total order amount. Typically, you
would set a minimum dollar amount for the purchase and any order under the
minimum dollar amount would not receive the discount.
o Discount Code. Enter the code that your customers must use to obtain the discount.
The code is entered by customers on the checkout page.
Discounts by Code allows you to implement a variety of scenarios, such as Coupons, Gift
Certificates, Corporate Discounts, etc. For example:
o You can send a $10 Gift Certificate to all customers that have purchased more than
$100 in the last year to encourage them to purchase again. You can obtain the list of
customers that meet that requirement from the Reports module. Then you would create a
$10 discount, with expiration after the first use, generate a code, and e-mail it to them.
o You could reward customers that spend more than $50 at your store by granting them a
10% discount on the purchase. The discount code in this scenario could be advertised
right on your store’s home page to motivate customers to place orders that exceed the
amount set in the discount settings.
o Corporate Discount. Everyone that works at Company X gets 10% off. You could mail
a discount certificate to the Human Resources department of that company and ask them
to let all the employees know about it.
o Repeat Customers. You make the discount code part of the confirmation e-mail that is
sent to your customers (after their order is submitted), advertising that they’ll receive $10
off the next order from your store.
42
Discount by Quantity
Comersus allows you to associate tiered prices with any of your products. In other words, you can
charge your customers different prices for different quantity levels. The price can also vary
depending on whether the buyer is a retail or wholesale customer. You can create unlimited
discounts levels for each product in your product catalog.
To apply quantity-based discounts to a product, select Storefront / Discounts / Add Discount Per
Quantity from the navigation menu. Next, locate the product that you would like to apply quantity
discounts to.
To modify previously created discounts you can list all discounts per quantity at once from the
listing option.
The quantity discount that will be applied to the product can be:
o a dollar amount off the "on-line price" (e.g. $10 off the on-line price)
Therefore, first select the type of discount that you would like to apply. Then, enter the "from"
and "to" quantity values (up to 5 tiers). Finally, specify the discount value, for retail and/or for
wholesale customers.
This feature gives you the ability to charge a lower price as the quantities go up, both with your
retail and wholesale customers. The right price is automatically calculated when the product is
added to the shopping cart. If a customer changes the quantity for the product and presses the
Recalculate button, the correct price is once again located and used to calculate the total for the
order.
Example - Dollar Amount
Let's assume that you have an on-line wine store and that you sell a certain bottle of wine for $20
(the on-line price). You may want to reward customers that buy the wine in large quantity. So you
could set a dollar amount discount of $1 for people that buy from 5 to 10 bottles, $2 for
customers that buy from 11 to 25 bottles, and so on. Let's also assume that your resellers buy the
same wine at a wholesale price of $14 per bottle. You could give them a $0.50 discount if they buy
from 5 to 10 bottles, $1.50 if they buy from 11 to 25 bottles, and so on.
Example - Percentage
Let's again assume that the on-line price for the same bottle of wine is $20. This time you could
set the discount as a percentage of the on-line price. So you could set a 5% discount for people
that buy from 5 to 10 bottles (which in this case translates to a discount of $1), 10% for customers that
buy from 11 to 25 bottles (which in this case translates to a discount of $2), and so on.
Note: Applying percentage discounts allows you to keep the discount
proportionally consistent even if you change the on-line price. For example, if the
price for that bottle of wine went down to $15, the discount for an order of 5 to
10 units would automatically go down to 5% * $15 = $0.75. On the contrary, the
discount would remain $1 (which translates to a discount of 6.6%) had you set it up as
a dollar amount.
43
Discount per customer (special prices)
You can also define a special price for certain products and certain customers. List the customer,
then click on Assign Special Price. The customer should authenticate in order to obtain the special
price.
Special prices override Wholesale and Retail prices.
Newsletter, Offer Box and Auctions
There are other packages that create automatic discounts. 1- Newsletter: to encourage the email
subscription the Newsletter Package can be configured to generate discount codes automatically.
2- Offer Box: this treasure box appears when the customer is logged in, then it will rotate Hot
Deals with a predefined discount percentage and finally it will create a discount code valid for
selected products. 3- Auctions: when a customer wins an Auction they will receive by email a
discount code to be used.
44
Chapter
6
Shipping Options
omersus allows you to set flexible shipping options by dynamically connecting to the
following shipping providers: UPS, US Postal Service, FedEx and Canada Post. Shipping
costs are calculated in real time based on the shipping address and the order weight. You
can also set shipping using dynamic rules depending on customer cart contents and delivery
region. The shipping options you define will be available to your customers during the checkout
process.
C
Adding a New Shipping Option
To configure non-real time shipping options, click on Settings / Shipping Options on the navigation
menu, and Add New Shipping Option.
In this screen you can select the shipping method name, the percentage amount, the fixed
amount, handling charges and the rules when this shipping method will be used based on
location, weight, cart contents, etc
Defining shipping by customer type
You can define that one shipping method is valid for certain customer types (Retail, Wholesale,
etc.) or that one shipping method is valid for all of them.
Viewing/Modifying Options for non-real time shipping
To view or modify the shipping options that are currently active on your store, select View/Modify
Options from the Shipping Options menu. A list of the active domestic and international shipping
providers will be displayed.
o To remove a shipping option, click on Delete.
Real Time Shipping (UPS, USPS, Canada Post, Fedex)
To configure Real Time shipping options you will need Power Pack Premium installed. Then you
will need to configure Real Time Shipping in the Configuration section of your BackOffice in
order to indicate that you will use Real Time Shipping.
You cannot mix off line shipping and online shipping. Only one method can be used. And you
cannot mix two or more companies since your store has to connect with a remote server to get
real time quotes and with more than one server it will take a lot of time to retrieve quotes.
45
Note: you can request a customization if you need the ability to mix Real Time Quotation from different companies.
The shipping costs shown are dynamically calculated based on the total weight of the order and
the shipping address provided by the customer. You have to verify that your address is correct
since the quoting will be calculated taking your company address as the origin of the delivery.
UPS instructions: 1- Sign-up at www.ups.com and get a user, license and password 1- Select this
method in pRealTimeShipping setting and enter UPS user, XML Access key and password inside
pUpsLicense, pUpsUser and pUpsPassword setting keys. 2- Make sure that all your products have
weight defined in lbs 3- Ask your hosting provider if you can use Microsoft.XMLHTTP
component (installed by default in IIS 5) 4- Consider that some UPS services have a limit of
150lbs 5- If you get a huge shipping amount try to change pChangeDecimalPoint in
Configuration to reformat the value obtained.
USPS instructions: 1- USPS can be only used for US destinations at this time 2- Register at
http://www.shippingapis.com and ask the switch to production server 3- Use pounds as weight
unit for all the products 4- Define pUSPSDefaultFee just in case your server cannot temporarily
retrieve quotes from USPS 5- Ask USPS about min/max weights for each service type 6- Enter
your USPS user in BackOffice/Settings pUSPSUser key
Canada Post instructions: 1- Register at http://www.canadapost.ca to obtain a merchant ID
and password and request the production server configuration for your account. 2- Open
comersus_opCheckoutCaShipment.asp with a text editor and enter your merchant inside
pRealTimeCanadaMerchant variable 3- Open BackOffice Configuration and set Real Time
Shipping to CA 4- Make sure that all your product weights are expressed in KG and that your
company Zip is correct.
Fedex instructions: First of all consider that you will have to install Fedex software into your
server. If you have a hosting service you may not be able to do so. Consider also that Fedex
configuration and certification procedure is complicated.
1. Register at www.fedex.com in order to obtain an Account Number 2. Register at
www.fedex.com/globaldeveloper/shipapi to download the software 3. Install the software
according to Fedex documentation 4. Write an e-mail to [email protected] and ask for the
account activation 5. Wait for their email and then wait 24 hours to start using the account
number 6. Open the file trans.in included inside VBS example of Fedex and add this line:
3003:0,"211"1,"1st transaction to FedEx!"4003,"Your Name"4007,"Your Company"4011"Your
City"4008,"Your Address"4015,"Your Phone"4012"Your State Code"10,"Your Account
Number"4013,"Your ZIP code"4014,"Your Country Code"99,""
6. Execute vbssample.asp and write down the response obtained from Fedex (Meter Number) 7.
Enter your Meter Number and Account Number inside BackOffice+ Configuration 8. Select
Fedex as the real time 9. If you cannot get quotes, switch your store to demo mode and view the
error messages obtained.
46
InterShipper (UPS, USPS, Fedex and DHL)
Comersus is also compatible with InterShipper Service. You can signup for this service at
https://www.intershipper.com/Shipping/Intershipper/Website/MainPage.jsp?Page=Signup1&I
ntershipperID=26637
There are pros and cons if you decide to use InterShipper. Pros: you can mix different shipment
companies (DHL, UPS, etc) without losing performance in the quoting procedure. Cons: you
have to pay for this middle company service while you don’t have to pay if you are using the Real
Time forms directly connected with each shipment company.
Instructions for InterShipper:
1. Sing up for the service.
2. Load your InterShipper ID and password at pIsUsername and pIsPassword. Keys of
Comersus Configuration.
3. Copy the script Comersus_optSelectIsShipment.asp into Comersus/store folder (and
make sure that you have the Power Pack that includes this shipment form).
Bypassing Shipping Calculations
If you sell software, music or services you don’t need shipping calculations. Comersus includes a
setting to completely bypass shipping related screens.
Go to BackOffice/Settings/Configuration and change pByPassShipping to -1
Volume Calculation
Comersus is able to calculate the volume of the shipping package using the following method:
1. Consider the maximum height
2. Consider the maximum length
3. Sum the weights of each package
4. Add an inter-weight value
This method is not the best calculation but it will provide an approximate volume to make more
advanced shipping calculations than if you only have the weight of the package.
The volume will be shown inside order details of BackOffice+ and it can be passed to online
shipping calculations. In Comersus 5.10 InterShipper method obtains the volume calculation
from Comersus.
47
Chapter
7
Payment Options
he Payment Options module allows you to define how customers will be able to pay for an
order. You can offer one or more payment options. Comersus allows you to define a variety
of real time and non-real time payment methods. Real time payment methods (e.g. credit
card) lead to monetary transactions that are processed immediately: if the transaction goes
through successfully (e.g. the credit card is approved), then the order is processed; otherwise the
customer is asked to provide different billing information. Non-real time payment methods (e.g.
COD - cash on delivery) lead to transactions that are processed at a later time. The order is
processed immediately, but money is collected later.
T
With Comersus you can accept credit cards on your store by setting up either a real time or a
non-real time payment option. The following is a brief overview about real time credit card
processing on the Internet.
About Real Time Credit Card Processing
When credit cards are processed in real time on the Internet, credit card information provided by
the customer during the checkout process is typically passed to a service called "payment
gateway". Payment gateways connect the online store with a credit card processor, on one side,
and with your bank on the other side.
Comersus order form Payment gateway Your bank
Credit card processor
There are a number of payment gateways that offer a different array of services. One of the most
important things to look for in a payment gateway is whether or not the payment gateway allows
you access to a secured area where you can manually refund previously processed credit card
transactions. This will help you in handling returns on your store.
To process credit cards in real time you will need:
o A business bank account
o A credit card merchant account. Your bank or the gateway that you sign up with will help
you get a merchant account. Note that credit card companies often handle online and
offline credit card processing accounts separately. So even if you already have a merchant
account that, for instance, is being used to process credit cards at your retail location, you
may have to apply for an additional merchant account.
48
o An account with a payment gateway. Some credit card processors also act as a payment
gateway, in which case you would not be required to take this further step. CardService
International, a large credit card processor, is one of them (their gateway is called LinkPoint).
To use a payment gateway, you need to separately set up an account with one. Make sure that you
create an account with a payment gateway that your bank can work with. Start by contacting your
bank to find out what payment gateways they support. When you do so, keep in mind that
Comersus supports the following payment gateways:
o
o
o
o
o
Authorize.Net (SIM)
Ka Chinng
LinkPoint (CardService International’s gateway)
UTCI
VeriSign
o IntelliPay
o National Secure
o UsaEPay
o 2CheckOut
o GoEMerchant
o RoboCharge
o PayByCheck
o QuickCommercePro
o Yahoo PayDirect
o CyberCash
o Planet Payment
o WorldPay
o Transaction Central
o SecureTrading
o Protx
o IonGate
o SecPay
o Velocity Pay
o Bank of America
o White Label
o PlugNPay
o SkipJack
o Wells Fargo
49
o BeanStream
o Moneris
o Viborgnet
o Echonline
o PaySystems
o MoneyBookers
o EPDQ
o AsiaDebit PayZip
And many more, view the complete listing of gateways at http://www.comersus.com/store
Additional payment gateways can be added to Comersus for a fee. Contact us for more
information. Check out features page at www.comersus.com to find an updated list of payment
gateways supported.
Note: Typically, payment gateways provide merchants with an administration
tool to view past transactions, process refunds, add new charges to a credit card
account, etc. Inquire your payment gateway about such a service.
Note: When a payment gateway is involved in a credit card transaction,
Comersus does not keep credit card information for that transaction in your
store’s database. The payment gateway does. This ensures added security as
payment gateways have highly secure servers.
About PayPal Payments
Comersus allows you to use another type of real time payment through the PayPal network. You
can set up PayPal as the only payment method, or in conjunction with other payment methods to
provide your customers with multiple payment options.
The advantage of using PayPal, as the store owner, is that you can process payments instantly, but
without having to sign up for a merchant and a gateway account as described above. In fact, with
PayPal you don't even need a business bank account, as PayPal accounts can be linked to personal
bank accounts. As a store visitor, the advantage of using PayPal is also that you don’t need to have
or use a credit card to place an order.
In a nutshell, PayPal allows people to securely exchange payments online via e-mail.
The company works as a clearing house between sender (your store customers) and receiver
(you). Both sender and receiver open an account with PayPal. At any time they can deposit and
withdraw money from that account by linking it to their bank account or to a credit card.
50
The sender can submit a payment to the receiver by logging into the PayPal network and simply
specifying the receiver's e-mail address. In the case of your store’s transactions, customers that
select PayPal as the payment option will be automatically prompted to log into the PayPal
network, and send money to your e-mail account (i.e. your PayPal account).
When the receiver (you) gets the message and accepts it, money is transferred from the sender's
PayPal account to the receiver's account.
To become more familiar with PayPal or set up an account, visit the company's web site at
http://www.paypal.com
Note: When an order is placed on your store using PayPal, Comersus will label
the order as “Pending”. That is because payment confirmation is not immediate.
If you have configured PayPal IPN feature the order will be marked as Paid as
soon as the funds are received in real time.
Note: If PayPal is the only payment option that you allow, and a customer
doesn't already have a PayPal account, they will have to go through the PayPal
account registration process before they can buy your products. Registering a new
PayPal account only takes a couple of minutes, but you should keep in mind that
there will be this extra step for your customers to take.
Adding a Payment Option
To add a payment option, select Add New Option from the Settings / Payment menu. The following
screen will be displayed.
As mentioned earlier in this chapter, payment options can be divided into two categories:
o Real time Funds will be automatically collected online and deposited in your bank (or
PayPal) account. This is where you can set up payment options such as online credit card
processing and PayPal.
o Non-real time (or offline). Funds will be collected offline, after an order has been placed.
This is where you can set up payment options such as offline credit card processing,
payment terms (Net 30, Net 60, etc.), cash on delivery (COD), etc.
Note: To process credit cards offline you will still need
a business bank account and a credit card merchant
account, but you will not need to use a gateway since
transactions are processed manually, offline. This may
be a good option, for example, if you do not expect
many online orders per day, and you already have a
retail store with a POS credit card terminal.
51
Configuring a Real Time Payment Option
To add a new real time payment option make sure that you load redirectionUrl with the URL of
the payment form.
To configure a real time payment option, you will need the gateway (or PayPal) account number,
plus other information specific to each gateway. Once you provide the information requested by
Comersus, your shopping cart will be automatically integrated with the selected gateway.
Note: To test a real time credit card processing option on your store, you should
submit an order using credit card information that is valid, but not real. This is
what some payment gateways call a "dummy" account. The transaction is real (so
you can test the system), but no credit card is actually charged. Most payment
gateways will provide you with dummy account information for testing purposes.
Others will allow you to set your account in testing mode, at which time you can
use any credit card number, without actually being charged.
To configure PayPal, all you need to provide is the e-mail address used for your PayPal account.
The rest of the information is already provided by Comersus.
Configuring Offline Credit Card Processing
To add a new non-real time payment option make sure that you enter all the information
regarding the payment in the email text field. That information will be sent along with order
confirmation to the customer.
Because there is no gateway involved, setting up a non real-time payment option is easy.
To configure offline credit card processing, simply define the URL of the Off Line Payment
form. When customers check out, credit card information will be collected, but the card will not
be charged. To avoid orders submitted with false credit card information, Comersus will do a
basic check on the credit card number before allowing the order to go through. If the number is
incorrect, customers will receive an error message. If the number is a valid credit card number,
then the order will go through.
Comersus, as always, will send you a confirmation e-mail once the order has been placed. It will
then be up to you to charge the credit card offline, using a POS terminal, software that may be
installed on your PC, or any other solution that you may be using. For security reasons, credit card
information will not be included in the order confirmation e-mail. To retrieve such information,
you will have to use the Sales Menu / Show Order component of the Comersus BackOffice +. See
the Managing Your Orders section of this document for more information.
Note: All credit card information collected from your customers during non-real
time credit card transactions is stored in the store database in an encrypted format
to ensure data security.
52
Defining payment by customer type
You can define that one payment is valid for certain customer types (Retail, Wholesale, etc) or
that one payment type is valid for all of them.
Modifying a Payment Option
To modify an existing payment option select Settings / Payment / Modify. You will be shown a list
of the payment options that are currently active. Click on the Modify button to edit an option.
Delayed Payments
With an optional feature included with Power Packs customers are able to post payments at a
later time. This is useful if the connection is broken for any reason after the order was saved but
before payment is posted. This is a common situation with an overloaded payment gateway. With
this feature your customers will not have to re-post the order. The link to post payments for
pending orders will appear inside customer’s menu.
This feature can also be used for Recurring Billing since orders are created but payment must be
posted by the customer for these new orders.
This utility will determine all available payment methods and it will show a drop down list so the
customer is able to select which payment method to use (online credit cards, checks, wire, etc)
Phone Payments
What if you have customers that don’t want to post their credit card information using the
Internet? Don’t worry, Comersus is able to capture credit card payments using an automatic
phone system like big service companies do.
How does it work? First of all verify that you have the extension named Comersus Phone
Payment. Consider also that this application is an EXE program and you will not be able to install
the system in a shared hosting service.
Requirements: Voice Modem TAPI and DTMF compliant installed in the Phone Payment
machine (could be the same box that runs the web server), the ability to install an EXE file in that
box.
Instructions:
1. Install the Voice Modem and connect the phone line cable to the external phone line
used to get payments.
2. Install the software SETUP.EXE.
3. Run Phone Payment application.
4. Select Modem Configuration and choose the modem from the list.
53
5. Make sure that the database string is correct and try the TEST Button.
6. Call from an outside line and try to post the payment for an existing order.
The system will ask for a valid order number, then it will ask for credit card number and
expiration. The information entered will be stored in Comersus database, inside creditCards table
using encryption. The store administrator can retrieve that information from BackOffice+.
Note: the application is compatible with RC4 encryption at this time.
You can add a new payment method named Phone Payment with instructions like the number to
call, hours, time limit to post the payment, etc.
54
Chapter
8
Tax Options
n the United States, taxation on online sales is typically handled as follows: orders submitted
by customers that reside in the same state where the company managing the online store is
located are taxed; orders submitted by out-of-state customers are not taxed (this includes
international customers). Comersus also supports country-based taxation for international stores.
I
Adding a New Tax Rate by Region
To add a tax rule that applies taxes to an order based on the location where the customer resides,
click on Store Settings / Taxes / Tax per place. Set the tax rate (to add a 6.5% tax rate, enter 0.065),
and define the geographic limitation by selecting a zip code, or a state and how that rule will apply:
countryCode=US and countryCodeEq=-1 means that the rule will be calculated for the
US.countryCode=US and countryCodeEq=0 means that the rule will not be calculated for the
US.
Viewing/Modifying Tax Rates by Region
Click on View/Modify Tax Rates to display a list of all tax rules currently active in your store. To
modify any of them, click on the Modify button. To delete a tax rule, click on the Delete button. To
add a new tax rule, click on Add New.
Adding a New Tax Rate by Product
You can also define special taxes by region for some specific products. To do so click on Store
Settings / Taxes / Tax per product (Add and modify)
55
Chapter
9
Sales and Customers
his section includes everything related to Sales and Customers such as viewing information
about your customers, changing the customer type from retail B2C to wholesale B2B (which
affects how much they are charged when they order products from your store), e-mailing a
customer, adding a new customer to the database, viewing reports and charts, creating affiliates
and more.
T
Viewing Customer Information
To locate a specific customer, you can search using the customer name. Or you can browse all
registered customers by clicking on Sales / Customers / List All.
When you find the customer you were looking for, click on the Modify button to view customer
details, change the customer type from retail to wholesale (or vice versa), or delete the customer
from the database.
Note: Be careful when using the Delete function. If you delete a customer, all
orders placed by that customer will also be deleted. Generally speaking, you
should not delete customers from the database if they ever placed an order.
As mentioned above, this is also the area where you can change the customer type from Retail,
which is the default setting, to Wholesale. There are many settings in your Web store that work
differently depending on the customer type. Here is a list of them:
o Retail customers are shown and charged the online price. Wholesale customers are shown
and charged the wholesale price. You define the two prices when you add or modify a
product using the Manage Products menu.
o Quantity discounts can be different for wholesale customers. These are the price breaks
that you may offer to customers that order large quantities of a certain product. To
configure quantity discounts, select Discount by Qty under Storefront/Discounts.
o Payment options can be set differently for wholesale customers. This feature, for instance,
allows you to grant wholesale customers special payment terms (such as Net 30) that retail
customers do not receive. To configure payment terms and assign them to wholesale
customers only, select Add New Option from the Payment Options menu, and then Non-Real
Time Payment Options. When you add the new option, make sure to check Apply to wholesale
customers only.
56
Adding a New Customer
The ability to add a new customer right from your BackOffice+ may come of use to you
especially if you deal with resellers (wholesale customers). Indeed, you can make it even easier for
your resellers to use your online store, by using this feature to register them in advance with your
store. You can then e-mail them their user name and password, and a link to your storefront.
When they place an order, they will not have to register with the store, as their account has already
been set up. All they will have to do is log in with the user name and password that you provided,
and contact, billing, and shipping information will already be there.
Note: If you set up a new customer, remember to provide him/her with the login information that you created (user name & password). The customer’s e-mail
address is the user name.
Note: For security purposes, billing information such as credit card details are
not kept in the customer database unless you are using Off Line Credit Card
option. The drawback is that customers will have to re-enter their credit card
information (if that is the payment option of choice) the next time they place an
order.
Orders
You can locate one specific order with the order number, list all orders or list orders by status.
Once you have selected one order you can view all the details of that order such as Date, Total,
Tax, Shipping Details, Products, etc
You can also add information about the Shipping Tracking like date shipped, UPS, USPS, FedEx
tracking numbers and any other information about shipping. This information will be available
from Order Tracking listing to the final customer. Shipping Tracking can be updated using
BackOffice +, included with Power Pack Medium and Premium. An e-mail will be sent to the
customer with tracking information and the order will be marked as Delivered.
One of the most important functions of the Order Display is the ability to change the status of
the order. By default all orders are stored as Pending. Once the payment is submitted, the status
may change automatically with a Silent Response from the payment gateway.
You can view other topics about Silent Response Configuration. Remember that not all payment
gateways have this feature and that you will need to define the URL of the Silent Response script
in the control panel provided by the payment gateway.
If your Payment Gateway has no Silent Response functionality you can still use the BackOffice to
mark orders as paid. Marking an order as paid will:
1. Decrease the stock
57
2. Increase the sales for that product
3. Distribute Serial Codes or Digital Goods
4. Assign the authorization code to the order
You can also change the status of the order for off line payments like Checks, Wire Transfers or
for Off Line Credit Cards (where you will process the credit card payment using a manual
method).
From Order Display you can also Roll Back a paid order so the stock and sales are rolled back.
You can also mark the order as Cancelled or even delete the entire order.
Adding custom fields
You can add up to three custom fields to each order. You can use these fields for information
like: date to receive the order, where did you hear about us, etc
Instructions:
1. Go to BackOffice/Settings/Configuration
2. Enter the field label for orderFieldName1 orderFieldName2 and orderFieldName3
Managing Your Orders
To understand how the Manage Orders component of Comersus works, let us first summarize how
orders are handled by your store.
Status
Id
Previous status Comments
Pending
1
N/A
At first all orders will be saved as Pending.
Paid
4
1
An order can be marked as Paid by the Silent
Response of the Payment Gateway or
manually using the BackOffice.
Delivered
2
4
When you enter the tracking information, the
order will be marked as Delivered and an email will be sent to the customer with
Tracking Information.
Cancelled
3
1, 2, 4
Cancel an order if you receive invalid orders
and you don’t want to remove the records
related to the order. Cancelled orders will not
be considered for reports and charts.
ChargeBack
5
4, 2
If you receive a Chargeback for one payment
you can use this option .An e-mail will be sent
58
you can use this option .An e-mail will be sent
to the customer so they can repost the
payment or contact the store administrator.
Refunded
5
4,2
Use this option to reflect a Refund. Stock and
Sales will be updated and the amount refunded
will be deducted from order total.
How to Locate an Order
To search for a particular order, view information about it, change order status, or cancel an
order, you will use the Sales / Orders / Locate component of Comersus BackOffice +.
In the main menu, Comersus lists a summary of orders received that day, and in Sales Menu View
All Orders button allows you to view all orders that were ever placed on your store (you can then
sort them by date or order status).
By clicking on an order, you will load a page containing details on the order itself, the customer
that submitted it, the payment option, and the order status. You can then modify the order status.,
shipment tracking and Transaction Results. To change the order status, simply click on the Update
Order Status button or use the specific boxes for Shipment, Refund, Transaction Results, etc.
You can also Cancel an order using this window. When you do so, the order is no longer
computed in your sales or order reports, but it is not actually deleted from the database. You can
reinstate the order at any time (for example if you do receive a late payment).
You can also use Roll Back option to make a reverse in stock, sales, etc.
Note: When you cancel an order that was submitted using a real-time credit card
payment option, the payment is not refunded. To refund the amount, you will
have to contact your payment gateway or use the online administration tools that
most payment gateways provide.
Comersus provides a number of ways to locate an order that was placed on your store, such as list
per status, list all, list per customer, locate one.
59
How to Charge Off-line Credit Card Transactions
For more information about off-line credit card transactions, see that section under Payment
Options. This chapter assumes that your store uses offline credit card transactions as a payment
option and focuses on how to process those orders.
As mentioned above, all offline credit card orders are labelled Pending by Comersus as you have
not yet received payment for them. After locating a pending order paid with off line credit card,
click on the Change status button. The credit card information can be viewed with the link
provided in Show Order view. You can now charge the credit card using your POS terminal,
software that may be installed on your PC, or any other system.
When the transaction is approved, you can change the status of the order from Pending to Paid.
The order can now be packaged and shipped. When you do ship it, add shipping details to the
same order details page, and update the order status to Delivered. This will not only keep your
store’s BackOffice+ updated, but also update the customer service area of your store, which
provides customers with updated information on their orders. See Chapter 12 for more
information.
(!) Since Comersus 4.20 you can also store the Transaction Results for payments such as
Authorization Numbers and you can also store the Tracking Number for Shipments. The
customer may retrieve this information using Customer Menu, Order Tracking.
To ensure data security, all credit card information collected from your customers during non-real
time credit card transactions is stored in the store database in an encrypted format. It is decrypted
on-the-fly only through the order management module of BackOffice +. If you download the
Comersus store database (an MS® Access database) or make a query over SQL Server database
you will not be able to read credit card details.
60
Also for security reasons, credit card information is never included in an order confirmation email. You can configure Off Line Payment Package to send encrypted CC data by e-mail.
Note: When users submit their orders, they will simply select “Credit Card” from
the payment option drop down menu on the checkout page. They will not know
whether credit cards are processed online (real-time) or off-line on your store.
Fraud Prevention Package
This feature helps you block presumably fraudulent orders before they reach the payment step,
thanks to four filters.
The first and most important filter uses keywords. If you have found that orders from the email
address [email protected] are fraudulent, you can add this string to the list of
forbidden words. The next time this person tries to post an order, it will be blocked. The same
applies to keywords for name, address and company.
The second filter is the purchase of a "bait product". You can configure a product in your store
with a high price that will lure possible frauders, and load the product ID in the setting
pFraudPreventionExpensiveItem. Fraud buyers don't intend to pay for what they purchase, so
they won't pay attention to the price. When the buyer tries to check out this bait product, the
order will be blocked.
The third filter is a high order total. You must have an idea from historic orders about the average
order totals in your store. It would be unusual to receive an order much higher than that. You can
load a suspiciously high amount in the setting pFraudPreventionExpensiveOrder. Any order with
a total equal to or higher than this amount will be blocked.
The fourth filter is an inspection of the customer's IP address. The anonymizers used to post
fraudulent orders report local IP addresses. This filter checks the IP address and reports purchase
attempts from an invalid IP.
To enable fraud prevention, set the variable pFraudPreventionMode to "caution" or "paranoid".
At "caution" mode, your store will save suspicious orders as usual but send a warning email to the
administrator. If your store is set to "paranoid" mode, the order will be blocked and prevented
from checking out.
TeleSign Customer Confirmation
With TeleSign you can verify your customers with an automated phone call.
To enable TeleSign register at telesign.com and enter your customer ID at pTeleSignCustomerId
inside BackOffice/Settings/Configuration.
When this feature is enabled, your customers must register to shop. In the middle of the
registrarion procedure, they will receive a phone call to verify the phone number provided. Only if
the verification is correct, they can register.
61
Generating Invoices from the BackOffice
With BackOffice+ and BackOffice Lite Extensions you can generate Invoices based on online
orders. You will have to select one specific order and then you will be able to print the invoice in
your printer directly from the web application.
The Invoice template is located in the script comersus_backoffice_generateInvoiceExec.asp
You can change the layout using any HTML editor. If you have BackOffice+ a bar code chart
will be printed in the Invoice so you can use a Bar Code Reader for your Accounting programs or
third-party applications.
Reward Points
Your store can automatically provide Reward Points to your customers so they can use those
points to make payments. You can define how many points per order total you are going to
provide. That setting can be modified from BackOffice, Configuration, Settings,
pBonusPointsPerPrice key. If you enter 0.5 the customer will receive ½ point per each dollar
spent. Then he can return to the store and use those points earned to pay for an order. Note that
the points can only be used to pay for subtotal (shipping price and taxes cannot be paid with
Reward points).
You can also verify and modify Reward Points from BackOffice+, Sales and Customers, Modify
Customer.
Note: Points will be assigned when the order is marked as paid from BackOffice+ and not when the order is posted.
Recurring Billing
With Power Pack Premium you can use Recurring Billing, an interesting feature to make
automatic invoices at regular periods (monthly, weekly, etc).
To enable this feature you need one posted order as the base order. From BackOffice +, Sales,
List Orders you can browse that base order.
At the bottom of the Order Details page you can find a drop down menu to select the Period in
days (7, 15, 30, 60, etc) and a box to define the next billing date for that order. After submitting
that form the order will be listed with a small icon indicating that you have defined recurring
billing.
Regarding the execution and verification of the order to be resubmitted you can find a file named
store/comersus_optRecurringBillingVerification.asp
Using WSH (Windows Scripting Host) or any other way to auto execute or load ASP pages in
your server, you have to define once a day for this script.
If you cannot create WSH execution in your server you can link that script to your BackOffice
and execute it manually once a day.
Note: there are also other custom options for this regular execution that can be developed by any ASP Programmer.
Once the automatic verification is made and if there is a pending order to be billed that day, the
order will be created and the store administrator will receive an e-mail notification.
62
With this notification, the administrator will have to post the payment and mark the order as paid
from the BackOffice, since the order is saved as Pending at first.
Reports and Charts
Generating reports helps you keep track on orders that have been placed, view customer activity,
and integrate with other applications by exporting order details.
Generating Sales Reports
To view sales reports for your store, select Sales / Statistics and Reports. The window that is
displayed provides the following information:
o Sales and Visits
o Orders per month
o Totals per month
o Revenue per product
o Sales Forecasting
Comersus allows you to filter per date or per product depending on the report. Some reports will
show charts using Java technology (included with most popular web browsers like IE 5.0 and
above).
You can also export sales data from Utilities Menu in Microsoft Excel format.
63
Note: consider that some reports only get data from paid or delivered orders and that is why sometimes you can get an
error message “not enough information to create reports”: You can change this with a small customization .
Affiliates
Affiliate marketing is what has been behind the success of many of the largest online stores in the
world. Are there other Web sites on the Internet that may be interested in promoting your
products, or just talking about them? If the answer is yes, then it may be a good idea for you to set
up an affiliate program.
The concept of using affiliates is simple: a Web site other than yours refers potential customers to
your store and, if they order, receives a commission on the sale. Affiliates can generate significant
incremental revenues for your store, and are rewarded for doing so by the commissions that you
will pay out to them.
To implement an affiliate marketing program, you need a system that tracks who referred the
customer who placed an order, and keeps a log of commissions accrued by each referrer.
Comersus provides you with a basic affiliate management system.
To set up a new affiliate program, follow these steps:
o Create a new affiliate. To create a new affiliate, select Sales Menu / Affiliates form. To set
up the new affiliate Web site: add a name for this affiliate, a contact e-mail, and the
commission rate. If the rate is 11.50%, enter 11.5. Comersus will automatically generate a
unique ID for the new affiliate, which is what will be used to identify orders coming from
its Web site.
o Generate links for the affiliate. For Comersus to recognize which affiliate referred a
certain customer, the link that the customer clicks on must contain a special code that
identifies the affiliate. For example, let's say that a Web site would like to insert on their
Web pages a link to your store so that whatever a customer buys, they would get a
commission. The link would look like this:
http://www.yourwebsite.com/Comersus/store/default.asp?idaffiliate=9
This is the exact same link that you are using on your own Web site to link any page of
your site to the store's front page, except for the code that appears at the end of the link:
"idaffiliate=9". This code identifies that affiliate number 9 is the one sending the
customer to your Web site. Without the identifier, Comersus would not recognize that a
Web site referred the customer, and you would not know if you owed a commission.
You can also let any store visitor to signup as an affiliate if you have Power Pack Premium. To do
so just enable the affiliate registration link from store configuration. In this case a link will appear
in the storefront and any visitor will be able to enter their personal information, as a result they
will obtain a page with the link and available banners. You can configure banner file names from
store configuration also.
List commissions reports. Periodically, you will have to generate reports to see how many sales
your affiliates have generated and calculate their commissions. To obtain a quick snapshot of sales
generated
by
affiliates
click
on
list
commissions.
Note: If your affiliate network grows to a point where computing and paying commissions
64
becomes too time consuming, you may want to investigate other systems that can help you
manage that part of your store. Sophisticated affiliate management systems are available in the
market, allowing you to do things such as automatically computing commissions and paying your
affiliates, applying different discounts for different products, and much more.
Affiliates and Suppliers Own Sales Listing
Using BackOffice+ you can create a new admin record with 75 level (listing) and assign an
existing supplier or affiliate. Those profiles will have access only to specific parts of the
BackOffice (reports for own products) and in the case of suppliers they can also add and modify
products under their supplier group.
Adding Forbidden Keywords from sales
From the Display Order or from Sales/Forbidden Keywords you can add certain strings that will
be filtered if you have Fraud Prevention enabled. This is useful if you are just browsing orders and
you realize that you have one order like:
-
Name: John Test
-
Email: [email protected]
Just with one click you can add the last name or the email to the forbidden keywords list and the
next time Fraud Prevention Package will stop the user before reaching the gateway.
You can also add and remove forbidden keywords from the menu.
Serial Codes Management
From this menu you can define unique serial codes by product. Each time you sell one of those
products, the Serial Code will be distributed by email as a Digital Good and the Serial Code will be
marked as used.
Note: if you want to distribute the same serial code to all your sales of the same product you can use Digital Goods
field directly.
Store Survey
With Store Survey you can obtain important information about customers experience in your
store. The survey link is always available in store footer
Survey results will be sent by e-mail to the administrator along with the date of the survey.
65
Chapter
10
Utilities
U
tilities menu is a compilation of tools that will assist you in the day by day management.
Here you can find a Decryption/Encryption Tool, a form to post SQL Queries to the
database, Reset Functions to blank the database, Export Utilities, etc.
Generic SQL
This menu is one of the most important for debugging and testing. You can post SQL Queries
such as:
SELECT * FROM CUSTOMERS
DELETE FROM suppliers WHERE idSupplier>2
INSERT INTO admins…
You can find several guides and resources about SQL in the Internet such as
http://www.w3schools.com/sql
Reset Functions
Be careful with these links. The main purpose of Reset Functions is to clear certain parts of the
database. You can clear all sales and customer records with one click. If you want to make this
procedure manually it will get complicated since there are more than 8 related tables and
sometimes you cannot delete one record if there is another related record.
Note: if you want to start from scratch remember that you can download a clean MDB database from Comersus
Free Downloads Page or you can obtain SQL and mySQL scripts to create a clean structure (included only with
Power Packs).
66
Exporting data to Microsoft Excel Spreadsheets
With this function you can export products, customers and sales to an Excel Spreadsheet.
Your server must be able to use the component: OWC.Spreadsheet
Ask your webmaster about this possibility. Almost all Windows 2000 servers with Office installed
have this component available.
Exported files will be placed into comersus/database folder
Note: If your BackOffice is not exporting the files you have to verify that you have defined all permissions over
comersus/database folder and that you have that component installed.
Exporting data to QuickBooks
Use this function to export Comersus data to Quickbooks. At this time only Customers and
orders Data is supported. We will add more export functions soon for this popular application.
Exported file will be placed at comersus/database folder so you have to create this folder with all
permissions, even if you are not using Access database. Note: regarding invoice export you must account
for every item in Quickbooks or the application will crash during import.
Exporting data to VCF
Use this function to export customer records into VCF cards. These cards can be used in PDA’s,
in iPods Contacts and in several applications like Microsoft Outlook, etc
Publishing on eBay
Configuring eBay XML API
This document explains how to configure Comersus shopping cart to work with eBay.
Step-by-Step Guide for New Affiliate Developers
(1) Sign up for an account on eBay (if you don’t have one yet)
- Go to http://www.ebay.com and click on "Register".
- You'll choose an eBay Username.
(2) Sign up for the eBay Affiliate Program
- Go to http://affiliates.ebay.com and click on "Join Now".
- This will take you to Commission Junction to become an eBay
Affiliate. You'll choose an Account Name and be assigned an Account
Number.
67
(3) Sign up for the Affiliate API Tier of the eBay Developers Program.
- Go to http://developer.ebay.com/affiliates and click on "Join API
Program".
- In the first field, "Affiliate Name", put in the Account Name you
chose in Step (2). In the tenth field, "CJ PID", put in the Account
Number you were assigned in Step (2).
- You'll create a Developers Program Username.
(4) Create a Sandbox Username to use in the test environment.
- Go to http://sandbox.ebay.com and click on "Register".
- This will look almost exactly like the real eBay site, but is only
a test environment (you can tell the difference in the URL). They call the
real, live eBay site the "Production" environment and the test site the
"Sandbox" environment.
- You'll choose a Sandbox Username.
(5) Retrieve your Production keys.
- You will have received an e-mail about how to get the credentials
you need to access the Production environment (live eBay site). These are
three keys: DeveloperID, ApplicationID, and CertificateID.
- Follow the link in the e-mail and enter the code from the e-mail.
Save the keys somewhere.
(6) Generate a Production token.
- Go to http://developer.ebay.com/tokentool. Choose "Production" and
enter your Production keys.
- This Authentication & Authorization token is used whenever you
make API calls in Production. Save this somewhere.
(7) Generate Comersus settings in Backoffice.
- Log into Backoffice, go to Utilities > Generic SQL query, and copy and execute the
following sentences one by one :
INSERT INTO settings (settingKey, settingValue, comments, idSettingGroup, idStore)
VALUES ('peBayDevId','','eBay Developer Id Key', 4, 1);
INSERT INTO settings (settingKey, settingValue, comments, idSettingGroup, idStore)
VALUES ('peBayAppId','','eBay Application Id Key', 4, 1);
INSERT INTO settings (settingKey, settingValue, comments, idSettingGroup, idStore)
VALUES ('peBayCertificate','','eBay Certificate Key', 4, 1);
(8) Fill Comersus settings with eBay information.
- Go to Comersus Backoffice > Settings > Configuration
- Search the settings peBayDevId, peBayAppId and peBayCertificate and fill them with
the values obtained from eBay.
68
(9) Add your Authorization Token to the Comersus export file.
- Open the file /backofficeplus/comersus_backoffice_eBayExportExec.asp with a text
editor.
- Find the line peBayAuthToken = "" and write your authorization token between the
quotes.
Exporting to eBay
1. Go to BackOffice > Utilities > Export to eBay.
2. Select the item to export, enter the eBay category, price, stock to publish, duration and
payment methods.
3. Click on Publish.
Deleting Unclosed Sessions
With this option you can delete dbSession records. Why do you have unused dbSession records?
Sometimes if a customer leaves the store without closing the session with logoff or cancel order
and they have products in the cart, some records remain in the database with no use. If your store
has considerable traffic, these records could become more and more and it's a good idea to delete
them once in a while.
Generating StoreFront Links
With this option you can create storefront links for
-
One specific product
-
One specific category
-
A listing with links to all categories
-
Links for customer actions such as ShowCart, Checkout, etc.
Note: this utility creates the absolute links based on StoreLocation setting. If this setting is not correct, all links will
reflect a wrong location.
69
Chapter
11
Customer Menu
Y
our store automatically provides your customer with dynamically updated information
regarding their past orders. It also allows them to edit their account information, and use
the “Wish List” feature of Comersus, if you enabled it. You can link to this section of your
store from your Web site navigation (e.g. “Customer Service” or alike) or from the customer
service area of your Web site, if you have one.
To log into the customer service area, your store visitors will have to first register with your store.
Then, at any time, they can use their user name (which is their e-mail) and their password to log
in. If they forget their password, Comersus can automatically send it to their e-mail address if they
provide an e-mail address that does in fact belong to a registered customer.
From the customer service area, your customers can:
o Cancel an order. With this feature the customer is able to cancel a pending order . An email notification will be sent to the store administrator.
o Track an order. This feature provides a customer with details regarding how the order
was shipped, when, and related tracking number, if available. This is information that you
would add to the order when changing its status from “Pending” to “Delivered” using
the Manage Orders component of Comersus BackOffice +.
o Download Digital Goods With this optional feature the customers can download zip
files related to their orders without knowing the real location and name of the file.
o Modify personal information. Here is where customers can edit their account
information such as their billing or shipping address. Even if they used a credit card to
place a previous order, for security reasons their credit card information is not shown on
this page.
o View wish list. If the Wish List feature of Comersus is enabled on your store, customers
can add items to their Wish List when browsing your catalog, instead of purchasing them.
This allows them to virtually “save” a list of items in which they are interested, but which
they are not ready to buy at that time. They can later view the list and add any of the items
to the shopping cart at any time by logging into the customer service area and viewing
their Wish List.
o List Auctions. Customers can list all current active auctions. Auctions will be listed
depending on customer type (Retail, Wholesale).
o Contact a store representative. With this option the customer can contact store
representatives using a predefined form with categories to define the destination of the
contact form.
70
o Log out. By clicking on Log Out, a customer forces the store to “forget” who he/she is.
The customer will then have to either log in again, or register as a new customer. Closing
the browser also logs a customer out of the store.
Enabling Digital Goods Download
To enable Digital Goods Download you need the Power Pack that contains this individual
feature. If you have a product that can be distributed as a digital good (like e-books, mp3 files,
movies, etc) you have to follow this guide:
1- Zip the files and copy them into digitalGoods folder (you can rename this folder for
security purposes and then rename also the setting inside
comersus_optDownloadDigitalGoods.asp)
2- Edit each individual product using the BackOffice and enter the file name into
digitalGoods field.
3- Consider that orders should be marked as PAID or DELIVERED to enable the
customer download, so configure your online payment gateway’s Silent Response or
manually mark orders as paid from BackOffice when you confirm the payments.
4- Your customers may download purchased files from Customer Menu, Order Tracking.
The files will be renamed in real time with OrderNumber_FileName.zip (like
Order2008_File8.zip) and the Browser will show a download popup box. You can also
use ASPUpload component to hide the original location of the file and even use Dynamic
Zip File creation to create one file per customer password protected.
5- If you want to limit the number of days to let the download link you can edit the setting
key pDaysToDownloadGoods
6- You can include a custom message in the outbound email with payment confirmation so
your customers will know where to go in order to obtain the purchased files.
71
Chapter
12
Professional Databases
Y
our store has an Access database for testing and small stores; however we advise to use
Microsoft SQL Server or mySQL databases. You can migrate the data from the mdb file to
SQL Server or mySQL using third party tools or you can get Power Pack Medium and
Premium since they include the scripts to create professional database structures in order to
obtain a blank database prepared for Comersus.
SQL Server or mySQL?
The decision is up to you. Both are professional databases and are fully supported by Comersus. The
main differences lie in price and licensing schemas. MySQL is free for certain situations and the license
is Open Source. SQL Server is more popular and some companies have contracts with Microsoft so
they don’t have additional license fees to pay.
Creating the Microsoft SQL Server Database
Note: you need Power Pack Premium to obtain MS SQL Server scripts.
1. Open SQL Enterprise Manager and Create a new database called "Comersus".
2. In SQL Enterprise Manager go to Tools>SQL Server Query Analyzer.
On the drop down box at the top right make sure your database "Comersus" is selected.
Then copy and paste the contents of SQLServer60Structure.txt into the Query Analyser.
Click the green play button at the top. Some errors may appear but this is normal.
If you get some error like "Specified owner name 'dbo' either does not exist or you do not have
permission to use it", then maybe you are have not logged in as administrator. Just open the file
with some text editor and replace all "dbo" by "yourLoginName". Then copy & paste and try
again.
3. Now copy and paste the contents of SQLServerData.txt and repeat the procedure explained
before.
4. Go to Security, Login Sessions, add a user name "Comersus" using database "Comersus". Put
SQL Server authentication.
72
5. Select Users in tree view. New Database User named "Comersus". With public and db_owner
checked.
6. Open comersus/includes/settings.asp and change the connection to SQL method. Change the
IP of the server (127.0.0.1 for local server) and change the password by the one you selected on
item 4.
7. Now you can open the store with BackOffice+ and add categories, define payments, etc.
Creating the mySQL database
You need Power Pack Medium or Premium to use mySQL database.
Since Comersus 4.10 you can use mySQL since the StoreFront and BackOffice+ are
compatible with mySQL database. First of all download mySQL Database and myODBC
from www.mysql.com , then follow these simple steps:
1- Open winMySQLAdmin
2- Create a new database named `comersus` at Databases TAB
3- Open mySQLManager
4- Copy and Paste mySQL60Structure.txt contents
5- Press > green button once for each segment
6- Repeat the procedure with mySQLData.txt
6- Create a new System ODBC named comersus with Host=localhost and User=root (blank
password)
7- Open comersus/includes/settings.asp and change connection method to DSN (you have
an example commented)
8- Open comersus/includes/settings.asp and change pDatabase="mySQL"
9- Add at least one new shipment and payment methods
73
Chapter
14
On-Line Payment Gateways
Y
ou can set up several payment gateways with Comersus Cart. This chapter will contain
specific instructions for each payment gateway. Why do you have to use On-Line
Payment Gateways? Some valid reasons: it is very convenient, you can focus on tasks
other than charging each payment manually, you can use security tools from Payment
Gateways to avoid frauds, your customer will obtain the authorization code in real time, you
can deliver digital goods in real time, and you can update stock and sales automatically with
Silent Responses from Payment Gateways.
2Checkout
First of all you have to sign up at http://www.2checkout.com/cgi-bin/aff.2c?affid=33169.
With this system you don’t have to wait weeks to get approved; after making the initial setup
payment you are able to sell online.
Make sure that you have the Power Pack that contains the 2Checkout payment form. More information at
http://www.comersus.com/store
2Checkout will send you a Store Number. Write down this number since you are going to
need it in order to set up the payment in Comersus.
Make sure that you have copied the files comersus_gateway2Checkout.asp and
comersus_gateway2CheckoutOrderConfirmation.asp into comersus/store folder.
Using the BackOffice create a new payment method named Credit Cards with redirection
URL pointing to comersus_gateway2Checkout.asp.
Using BackOffice, Settings, Configuration open the setting named p2CheckoutSID and
insert there the Store Number.
At this point you are ready to sell and charge credit cards. If you also want to configure the PassBack to
notify Comersus when the order is approved, mark the order as paid and distribute an automatic payment
invoice, continue with following steps.
74
Log in now to 2Checkout Control Panel at https://www.2checkout.com/2co/login and
select Account Details, Return.
Go to Look & Feel Settings / Approved URL and enter
http://www.yourSite.com/comersus/store/comersus_gateway2CheckoutOrderConfirmatio
n.asp
In the Secret Word box enter any secret word as a combination of letters and numbers, then
press Save PassBack Parameters.
Open BackOffice, Settings, Configuration and enter the Secret Word into
p2CheckoutHashWord key.
Now you are ready to accept online payments and to deliver digital goods in real time.
PayPal
First of all you have to sign up at http://www.paypal.com Then you have to enter your
PayPal Merchant Email inside BackOffice/Settings/Configuration (key named
pPayPalMerchantEmail) Then you have to create a new payment method named PayPal with
redirectionUrl pointing to comersus_gatewayPayPal.asp
PayPal Web Site Payments Pro
First of all consider that Web Site Payments Pro has a lot of requirements, among them:
You need a PayPal business account, your company must be located in US, you need SSN to
get a Web Site Payments Pro account, you need a component named XMLHTTP 4.0 with a
Microsoft Hot Fix installed, you will have to install a personal certificate in your web server
with special permissions, you have to enable PayPal checkout (your customers will decide if
they want to checkout in the shopping cart or in PayPal)
Comersus will request your complete working public URL and may require other verification
information like PayPal verified address before sending Web Site Payments Pro scripts.
Steps:
1.
2.
3.
4.
5.
6.
7.
Sign up for Web Site Payments Pro
Get approved
Generate and download a PayPal key from Profile/API Access/Get new cert
Convert the certificate to .p12 format
Install the key in your web server, assign permissions for iWAN and iUsr users
Enter your API user and password inside BackOffice/Settings/Configuration
Set pPayPalExpressCheckout as true
75
8. Copy Web Site Payments Pro scripts in comersus/store folder
9. Add a new payment method named Credit Cards with redirectionUrl pointing to
https://www.yoursite.com/comersus/store/comersus_gatewayPayPalDirectPaymen
tForm.asp
10. Add a new payment method named Express Checkout with redirectionUrl pointing
to comersus_gatewayPayPalExpress3.asp and price from 0 to 0
Note about SandBox:
. If you want to use the SandBox make sure to install SandBox cert/user/pass and set
pStoreFrontDemoMode=-1
Authorize.net SIM
1. Sign up using any Commercial Partner at www.authorize.net. You will obtain an account
name and password.
2. Make sure that you have Power Pack Premium and that you have selected Authorize.net
SIM gateway. More information at http://www.comersus.com/store.
3. Copy comersus_gatewayAuthorizeNetSim.asp,
comersus_gatewayAuthorizenetOrderConfirmation.asp and
comersus_gatewayAuthorizeNetSilentResponse31.asp into comersus/store folder
3. Using BackOffice, create a new payment method named Credit Cards and complete the
field redirect URL with comersus_gatewayAuthorizeNetSim.asp
4. Log into https://secure.authorize.net, go to Settings, go to Receipt Page/Receipt
Method/Default Receipt Link URL, enter
http://www.yourDomain.com/comersus/store/comersus_gatewayAuthorizeNetOrderConf
irmation.asp
5. Select Receipt Method: Link, and enter "Return to the store" as the text.
6. Go to Settings, Obtain Transaction Key. Using the secret answer you will obtain a new
transaction key. Copy and Paste this key or write it down.
7. Go to Silent Post URL and enter
http://www.yourDomain.com/comersus/store/comersus_gatewayAuthorizeNetSilentResp
onse31.asp
That script will execute the order status update (set order as paid, update stock, etc).
Note: we advice to change the silent response file name to avoid any hacking over Silent
Response scripts.
8. Log out and return to BackOffice Plus.
9. Go to Settings, Configuration and insert your Login ID into pAuthorizeSimID key and
the Transaction Key obtained from Authorize.net into pAuthorizeSimTxnKey
10. If your store is in demo mode you can make test transactions to a Test Server. For that
purpose you can use 4300000000000 as the credit card number.
Everything should be ready to start selling with AuthorizeNet online payments.
Common error & fix: if you get Error 97 (The time period for this request has expired.
Applicable only to SIM API). The most likely cause is that the clock on your server is set
incorrectly (check to see if it adjusts itself for Daylight Savings Time).
76
This will help you determine if you need to either adjust the time on your server, or if that
isn't possible, adjust the timestamp your SIM script generates.
This error appears if the timestamp is either five minutes ahead of GMT or fifteen minutes
behind GMT.
The below URL is setup for Error 97 testing. This tool will tell you if the timestamp your
script is generating is significantly off:
http://www.sluggis.com/error97.htm
If you are having error 99 you can find some help here
http://www.sluggis.com/error99.htm
Authorize.net AIM
First of all sign up using any Commercial Partner at www.authorize.net.
You will obtain an account and password.
Make sure that you have Power Pack Premium, that contains Authorize.net payment forms. More
information at http://www.comersus.com/store
Copy comersus_gatewayAuthorizenetAimForm.asp
comersus_gatewayAuthorizenetAimExec.asp into comersus/store folder.
Log into Authorize.net Control Panel.
Go to Settings / Transaction Key menu, enter your secret response and obtain the
Transaction Key (copy and paste to some temporary text document).
Go to Settings / Password required mode and set Require Password for all transactions.
Log in to your BackOffice+ and encrypt the Transaction Key obtained from AuthorizeNet
using Utilities/Encryption. Then paste the encrypted transaction key (something like
157|123|145|…) into Configuration/Settings/pAuthTransactionKey.
Create a new payment method named Credit Cards with redirection URL pointing to the full
path with HTTPS like
https://www.yoursite.com/comersus/store/comersus_gateawayAuthorizenetAimForm.asp.
BeanStream
First of all go to www.microsoft.com and download MS Soap Toolkit 3.0. After the
download, install it in your server. Then sign up at www.beanstream.com ; you will obtain a
merchant ID and password.
Note: Make sure that you have the Power Pack that contains BeanStream payment forms. More information at
http://www.comersus.com/store.
77
Copy the files comersus_gatewayBeanStreamFormSoap.asp,
comersus_gatewayBeanStreamExec.asp and
comersus_gatewayBeanStreamSilentResponse.asp into comersus/store folder.
Using BackOffice, create a new payment method named Credit Cards with redirection URL
pointing to comersus_gatewayBeanStreamFormSoap.asp.
Go to Settings, Configuration and insert your Merchant ID into pMerchantIdBeanStream
key.
You can make test transactions using a test merchant id that you will receive from
BeanStream. For that purpose you can use 4300000000000 as the credit card number. After
testing you can
log into your BeanStream account and retrieve those transactions.
Everything should be ready to start selling with BeanStream online payments.
Note: If you want to install the basic version it is not necessary to install the Soap Toolkit and the name of
the files to copy are comersus_gatewayBeanStreamForm.asp and comersus_gatewayBeanStreamResponse.asp.
Remember that this version doesn’t decrease the stock and doesn’t change the order status. The most
important difference is that this option links to the BeanStream server to enter the Credit Card information.
PayZip
1. First of all verify that your server supports the component MSXML2.ServerXMLHTTP.
2. Then sign up at www.payzip.com , you will obtain an merchant ID and password.
3. Login into your account and set this script name
comersus_gatewayPayZipSilentResponse.asp as the silent response script.
4. Copy the files comersus_gatewayPayZip.asp, comersus_gatewayPayZipStatus.asp and
comersus_gatewayPayZipSilentResponse.asp into comersus/store folder.
5. Using BackOffice, create a new payment method named Credit Cards with Redirection
URL pointing to comersus_gatewayPayZip.asp.
6. Go to Settings, Configuration and insert your Merchant ID and password for PayZip.
7. You can make test transactions using a test merchant id that you will receive from
Payzip. For that purpose you can use 4567350000427977 as the credit card number, 421 as
the CVC and 12/06 as the expiration date.
8. For live transactions open the scripts comersus_gatewayPayZip.asp and
comersus_gatewayPayZipStatus.asp and you will find some instructions.
9. Everything should be ready to start selling with PayZip online payments.
Protx
1. Sign up at www.protx.com , you will obtain a Vendor ID and password.
2. You should also receive a script named functions.asp, place it into includes folder.
78
3. Copy the files comersus_gatewayProtx.asp and
comersus_gatewayProtxSilentResponse.asp into comersus/store folder.
4. Using BackOffice, create a new payment method named Credit Cards redirection URL
pointing to comersus_gatewayProtx.asp
5. Go to Settings, Configuration and insert your Vendor ID and password for Protx.
6. You can make test transactions using a test Vendor ID that you will receive from
Protx.
7. Everything should be ready to start selling with Protx online payments.
OzHosting
1. Sign up at http://www.ozhosting.com (look for the feature ecommerce web transactions)
you will obtain a merchant ID and software applications.
2. Install the software and follow the instructions in order to register the components in your
server.
3. Copy the files comersus_gatewayOzHosting.asp, comersus_gatewayOzHostingForm.asp
and comersus_gatewayOzHostingExec.asp into comersus/store folder.
4. Using BackOffice, create a new payment method named Credit Cards with Redirection
URL pointing to comersus_gatewayOzHostingForm.asp.
5. Go to Settings, Configuration and insert your Merchant ID for OzHosting.
6. You can make test transactions using a test merchant id that you will receive from
OzHosting. For that purpose you can use 4242424242424242 as the credit card number.
7. If you change the demo mode of the storefront to false Comersus will send live
transactions to the ozHosting gateway.
Note: if you are using a password you can enter it inside the script
comersus_gatewayOzHostingExec.asp
SecurePost
1. Sign up at www.merchantpartners.com , you will obtain a merchant ID and a component.
2 Register the component in your server named ATSSecurePost.dll.
3. Copy the files comersus_gatewaySecurePostForm.asp and
comersus_gatewaySecurePostExec.asp into comersus/store folder.
4. Using BackOffice, create a new payment method named Credit Cards and redirection
URL pointing to comersus_gatewaySecurePostForm.asp.
5. Go to Settings, Configuration and insert your Merchant ID that you had received from
SecurePost.
6. For test purposes you can contact them and ask for a test merchant id and a test credit
card number.
7 For test purposes you can use merchant id equal to TEST0 and credit card number
5454545454545454.
8. Everything should be ready to start selling with SecurePost online payments.
79
CyberSource
1. Verify that your server supports the component MSXML2.ServerXMLHTTP.
2. Sign up at www.cybersource.com, you will obtain a merchant ID, a reference code and a
component CybsWSSecurity.dll.
3. Register the component and obtain a key (this is a file name yourMerchantId.p12).
4. Copy the files comersus_gatewayCyberSourceForm.asp and
comersus_gatewayCyberSourceExec.asp into comersus/store folder.
5. Using BackOffice, create a new payment method named Credit Cards and redirection
URL pointing to comersus_gatewayCyberSourceForm.asp.
6. Go to Settings, Configuration and insert your Merchant ID, Reference Code
(merchantReferenceCode) and the CyberSource key location.
7. You can make test transactions using your merchant id. For that purpose you can use
4111111111111111 as the credit card number and 10/2010 as the expiration date.
8. For live transactions open the scripts comersus_gatewayCyberSourceExec.asp and
replace https://ics2wstest.ic3.com/commerce/1.x/transactionProcessor with
https://ics2ws.ic3.com/commerce/1.x/transactionProcessor
9. Everything should be ready to start selling with CyberSource online payments.
Payment Processor
1. Sign up at www.paymentprocessor.com to get a merchant ID.
2. Copy the files comersus_gatewayPaymentProcessorForm.asp,
comersus_gatewayPaymentProcessorResponse.asp and
comersus_gatewayPaymentProcessorExec.asp into comersus/store folder.
3. Using BackOffice, create a new payment method named Credit Cards and redirection
URL pointing to comersus_gatewayPaymentProcessorForm.asp.
4. Go to Settings, Configuration and insert the Merchant ID received from
PaymentProcessor.
5. For test purposes you can contact them and ask for a test merchant id and a test credit
card number.
6. Everything should be ready to start selling with PaymentProcessor online payments.
EPDQ
1. Sign-Up for the payment gateway and get a User and Password
2. Login at https://secure2.epdq.co.uk/cgi-bin/CcxBarclaysEpdqAdminTool.e
3. Configure pass-phrase with a password, allowed URL as
http://www.yourSite.com/comersus/store/comersus_gatewayEPDQ.asp, Post URL as
http://www.yourSIte.com/comersus/epdq/comersus_gatewayEPDQSilentResponse.asp,
post user: your EPDQ user name, post password your EPDQ password (these values could
be different also)
4. Create a new folder comersus/epdq and place there
comersus_gatewayEPDQSilentResponse.asp and comersus_gatewayPaymentApproved.asp
80
5. Using your Web Site Control Panel add a user and password to comersus/epdq folder so
if you load comersus_gatewayEPDQSilentResponse.asp in your browser it will appear a
password pop-up window. Use the same user and password sepecified in point 3
6. Create a new payment method in Comersus BackOffice named Credit Cards with
redirectionUrl as comersus_gatewayEPDQForm.asp
7. Configure the user and passphrase into Comersus/Settings/Configuration keys pEpdqId
and pEpdqPass
LinkPoint API
1. Download the LinkPoint API COM for Windows from http://www.linkpoint.com
2. Register the linkPoint DLL that came inside the zip file
3. Extract the pem file text that came with your LinkPoint welcome e-mail to a
file named xxxxxx.pem and place that file inside your server
4. Open Comersus BackOffice, Settings, Configuration and load your LinkPoint store ID
and complete
path to PEM file
5. Create a new payment method named Credit Cards with redirection Url pointing to
https://www.yourSite.com/comersus/store/comersus_gatewayLinkPointApi.asp
Bank of America
1. Login at https://manager.bamart.com/Login.asp
2) Click on Manage Store, order rules
3) Security Settings, select Minimum Enforcement radiobutton
4) Enter your site URL inside Authorized Web Site textbox
5) Create 2 static pages, one of them with approval message and another one with rejection
message, upload the pages to your store and enter the URL of these pages into Redirect To
Merchant Approval/Declined Pages
6) Click in the upper bar Publish Changes icon and then click in Activate button
7) Create a payment method named Credit Cards with redirection url as
https://www.yoursite.com/comersus/store/comersus_gatewayBankOfAmerica.asp
CCNow
First you have to sign up to CCNOW at www.ccnow.com to obtain the CCNow Login and
CCNow Activation Key
Make sure that you have the Power Pack that contains the CCNow payment script. More information at
http://www.comersus.com/store
CCNow will send you an Activation Key. Write down this number since you are going to
81
need it in order to set up the payment in Comersus. Make sure that you have copied the file
comersus_gatewayCCNow.asp into comersus/store folder.
Using the BackOffice create a new payment method named CCNow with redirection
URL pointing to comersus_gatewayCCNow.asp.
Using BackOffice, Settings, Configuration search the setting named pCCNowLogin and
insert there your Login from CCNow. Also search the setting named
pCCNowActivationKey and insert there your Activation Key provided by CCNow.
At this point you are ready to sell and charge credit cards.
Log In to CCNow to see your account status.
eWay
1. Copy comersus_gatewayEWayForm.asp comersus_gatewayEWayExec.asp and
comersus_gatewayEWayIncludes.asp inside comersus/store folder
2. From Comersus Backoffice/Payments create a new payment method named Credit Cards
with redirectionUrl pointing to comersus_gatewayeWayForm.asp
3. In Comersus BackOffice/Settings/pEwayCustomerID load your eWay Customer ID
Other payment gateways
1. Usually you will have to load your payment gateway settings into
Configuration/Settings
2. Then you have to create a new payment method with redirectionUrl pointing to the
payment gateway form (example comersus_gatewaySomeGatewayForm.asp)
If you need specific gateway instructions not covered here please contact us at the forum
www.comersus.org/forum
82
Chapter
15
Performance and Speed
Y
ou can install and use the default version with Access database in most of the cases
but sometimes it is necessary to make some modifications in order to get better
performance and speed in your store. Some modifications are easy to apply and others
will require the assistance of programmers, webmasters or database administrators.
Database
The first variable to consider is the database to be used. Comersus is prepared to work with
Access, mySQL and SQL Server. Access comes with the default version and you don’t need
special skills to use this database. However, if your store has some traffic and you have a big
catalog it may be necessary to switch to one professional database like mySQL or SQL Server.
In some cases you will get a store 5 times faster just by changing the database to mySQL or SQL
Server. You will also get a more reliable system with tuning tools, backup sub-systems, security
and additional features that cannot be implemented in Access. Another consideration is the
number of visitors: based on several technical documents found on the Internet, with Access you
cannot have more than 300 simultaneous users browsing your store. With a professional database
you can easily provide service to all your customers at the same time.
Note: you will need Power Pack Medium or Premium to use Professional Databases since they come with the SQL
scripts to create database structures. You can also migrate from Access using third-party tools but you will need
manual adjustments.
Using Diagnostics and Tools, Speed Test, in a Compaq Proliant DL-380 with 256mb and 1
processor it took 4 seconds to insert 1000 records into products table for Access database. Using
mySQL database, the same test took only 1,64 seconds.
Static Pages
By default, Comersus uses a dynamic script to retrieve some products, categories and other
information to your Store Entry Page. If you have huge traffic, and all users come to the same
83
Entry Page, you will have an overload to your database. In some cases it is good to design a static
Entry Page with all images, product description and prices hard-coded. You will lose some
flexibility but you will have performance benefits.
Without using this extreme schema you can create a simplified version of the dynamic home with
less queries to the database or queries that are updated to a temporary file once a day.
You can also replace dynamic categories pages with static pages with hard-coded categories if they
don’t change so often.
Image Optimization
Try to maintain Header and Footer templates light. Avoid several GIF animations and huge
images. Try to cut big images into small pieces. Use the same idea for product images. You
can use specific graphic software to make optimizations of all web images to be used.
Compiled Code
Comersus is developed in a scripting language. However, it can be optimized by compiling
the ASP files into a DLL. This option is not designed for everyone since not all hosting
spaces accept DLLs. You must also consider that you cannot include changes immediately as
you can do with default version.
Anyway, this is a good choice for companies that run their own web server, looking for
another speed layer.
Load Balance
Since Comersus 5 you can also use a new utility named Load Balance. For high traffic stores,
sometimes the web server reaches the limit of http requests. With this utility you can
configure two web servers running Comersus store connected to the same database.
The utility will retrieve traffic conditions in each web server and it will route visitors to
primary or secondary web server.
Instructions:
1. Copy comersus_optLoadBalanceMain.asp and default.asp into your main web server,
comersus folder
2. Copy comersus_optLoadBalanceRemote.asp into your secondary web server, comersus
folder directory
3. Copy comersus_optLoadBalanceActiveUsersRoutines.asp into comersus/store folder in
both servers
3. Configure Remote Server Location inside pRemoteServerLocation (IP or URL)
4. Open your main and remote web server's comersus/store/default.asp and insert the
following line to track visitors
84
<!--#include file="comersus_optLoadBalanceActiveUsersRoutines.asp"-->
Other changes
There are other things that can be modified in order to speed up your store.
1. You can replace ASP Includes by inserting the included file in the base script for
most popular pages.
2. You can replace Dictionary Object translation messages for static HTML if you are
not going to need the Multilanguage option.
3. You can remove all IF comparisons for unused features of Comersus like Hot Deals,
Reviews, Best Sellers, 1StepCheckout, etc.
4. You can disable visit counters for products and main store counter.
5. You can rewrite SQL Sentences and create additional indexes for specific scripts
depending on your database system and catalog size.
6. You can replace wildcard keyword searches (‘%b%’) with complete field searches
(‘books’).
7. You can install the store in one dedicated server and the database in one or several
dedicated server/s and make a fine tuning with a database administrator.
85
Chapter
16
Troubleshooting
If you get errors in your store don’t panic. Comersus has been prepared to obtain comprehensive
information about any database error (the most common), email errors and other types of errors.
What can you do? Here you will find a guide to diagnose, obtain free or paid assistance and finally
solve your trouble.
Diagnose the trouble
First of all try to obtain all the information about the error:
1- The error is produced always or just randomly?
2- The error is related to the StoreFront or BackOffice Utilities (management part)?
3- Which script caused the error? (you can obtain the script name from Temporary Error
Email).
4- You have verified the error or your customers told you? If your customers told you, did
you get an automatic email with the error report?
5- The error is related to database, syntax, outbound emails, third-party credit card gateway,
etc?
6- Can you verify the same error at current Comersus Demo? (Sometimes the error cannot
be verified there since you need to preload some specific data to test it).
7- The error is related to any script modified or customized by you? Or is it produced over
the original scripts?
8- Which Comersus StoreFront Version do you have? Which BackOffice version? Are you
sure that your BackOffice or Power Pack is compatible with your StoreFront version?
9- Did you try Diagnostics and Tools? This free utility is very helpful to determine common
installation errors.
86
Get Assistance
You can get free assistance at Comersus Forum located at http://www.comersus.org/forum. You
can run a search by software version, keywords, etc. in order to determine if any other person has
had a similar issue. Most problems are solved using a previous technical response.
If you can’t find a previous message regarding the same topic, you can post a new message.
Remember that you have to include all the information about the error. Use the Diagnose the
Trouble guide to categorize your error.
Note: if you don’t have time to wait for free assistance remember that you can get professional support services at
Comersus.com. These paid services include phone support, remote installation, remote trouble fixing, data recovery,
password reset and more.
If you have purchased a Support Program at Comersus.com you can use Comersus Support
System to request one to one technical assistance.
Useful Tips
1. If your error was produced just once or once in a while, maybe the reasons were
temporary (like database was down, connection trouble, session lost due to a specific
condition of the server, etc). Try to determine whether the error deserves attention or not.
2. Make sure that you did follow all installation instructions.
3. If you get a database error you will also get an email with the SQL sentence that caused
the error. You can try to run that sentence from SQL Utility of the BackOffice in order to
determine the error nature and debug the situation.
4. All scripts have a sentence ON ERROR RESUME NEXT that causes execution to
continue with the statement immediately following the statement that caused the run-time
error, or with the statement immediately following the most recent call out of the
procedure containing the On Error Resume Next statement. If you get one specific error
in one script you can comment that line and try the execution in order to verify if some
other error is being trapped.
5. If the error is produced after custom modifications you can try to restore original scripts
in order to debug which modification caused the error.
6. If you get email errors make sure that you have used Diagnostics and Tools to determine
the email configuration and that email from address is not causing Relay troubles with
your SMTP server.
7. If you get frequent database errors using Access in a high traffic store consider migrating
to SQL Server or mySQL databases. Access has limitations in a high-traffic environment.
You can ask about Comersus.com official hosting plans with mySQL databases enabled.
8. Make sure that you are using paid add-ons compatible with the version of the database
and Storefront. For example: you cannot use 4.05 add-ons for Comersus StoreFront 4.11
87
(if one of the first 2 number changes, then some database modifications were included
and that means that your old scripts will not be 100% compatible). To obtain upgrades of
paid add-ons Version Upgrade Program is needed. Ask Comersus.com about this.
9. You can open includes/settings.asp with a text editor and change pTrapDbErrors=0. In
this case most database errors will not be trapped and you can eventually see the SQL
sentence that is producing the error printed on screen.
10. If you have defined an email component that is not installed in your server, then you are
going to get execution errors in all scripts with email functions involved like saveOrder,
newsletter, forgot password, email to friend, etc Set the email component to NONE and
try again
Diagnostics and Tools Application
You can download Diagnostics and Tools in Comersus Free Downloads page. This application
has several tests to verify and diagnose technical troubles.
Some of the options included are:
•
ASP compatibility
•
Session variables
•
Database read and write
•
Security Check
Other tools included are:
•
Reset password of the Backend
•
Session variables retrieval
88
Appendix A
Web site home page and store home page
Your Web site's home page may or may not also be the store's home page. This is up to you. All store
pages are saved in a directory on your Web server called comersus/store. The file name and location
of the store's home page is as follows:
http://www.yourwebsite.com/comersus/store/default.asp
The easiest way to make your home page the store's home is to redirect your home page to this page.
You can redirect a page to another page on your Web site in many different ways. An easy way to do it
is to add the following META tag to the <head> section of your home page:
<meta http-equiv="refresh" content="0; url= http://www.yourwebsite.com/comersus/store/default.asp">
HTML links to main store pages
The following is a list of links to special store pages. Remember that you can also use Generate Links
from BackOffice+ to create these links dynamically.
Store home:
http://www.yourwebsite.com/comersus/store
Hot Deals:
http://www.yourwebsite.com/comersus/store/comersus_listItems.asp?hotDeal=1
Browse by Category:
http://www.yourwebsite.com/comersus/store/comersus_listcategoriesAndProducts.asp
Catalog Search:
http://www.yourwebsite.com/comersus/store/comersus_advancedSearchForm.asp
View cart:
http://www.yourwebsite.com/comersus/store/comersus_showCart.asp
Customer Login:
http://www.yourwebsite.com/comersus/store/comersus_customerAuthenticateForm.asp
Product Links:
http://www.yourwebsite.com/comersus/store/comersus_viewItem.asp?idProduct=productID
For example, if the productID is 168, the link will be:
http://www.yourwebsite.com/Comersus/store/comersus_ viewItem.asp?idproduct=168
You can obtain the productID from the Manage Products / Modify Products page.
89
Appendix B
Customizing your store's graphical interface
It is a good idea to keep the look & feel of your Web site consistent across all pages. This helps you
convey a sense of professionalism and quality to your Web site visitors. For this reason, your online
store pages should appear just like any other page of your Web site. This section explains how to
integrate your Web site's design with the pages generated dynamically by Comersus.
The following paragraphs require a basic understanding of HTML.
First Step: create a template.
A template is typically a Web page that contains the main
graphic and navigation elements that make up a Web site's
interface. For example, the template on the right features a
few graphic elements at the top, and a navigation menu on
the left side. The page content would typically go where the
"Insert Code Here" message is located. Comersus code
would be inserted in the same area.
When you create a template, it is a good idea to change all
the navigation and image locations from relative (e.g.
images/myimage.gif) to absolute
(http://www.mysite.com/images/myimage.gif). This ensures
that none of the links will be broken, regardless of the
directory or subdirectory where the page may be located.
Second Step: create "header.asp" and "footer.asp".
Place your mouse cursor at the beginning of the section where the page content should appear. If you
are using an HTML editor such as Macromedia® DreamWeaver or Microsoft® FrontPage, you can do
this in the design view by positioning the cursor at the center of the cell that is going to contain the page
content (i.e. shopping cart code, etc.).
Now switch to the HTML view to display the code. Copy all the code from that point to the beginning of
the page, paste it into a new Notepad file, and save it as "header.asp". Go back to the template file and
now copy all the code from that point to the end of the document, paste it into a new Notepad file, and
save it as "footer.asp".
Third Step: upload the files.
Upload both files to the "comersus/store/" folder on your Web server. You will see that sample files
are already located in that folder. Rename the sample files before you upload your files to the server so
that you can use them as a reference.
Note: Linking from the template to the shopping cart.
You may want to add links to pages of your Web store directly from your template, so that the links are
available to your site visitors from any page. For example, a link to the search page, to the "browse by
category" page, the login page, etc.
90
For more information about how to generate links through Comersus, see Store Options / Generate
Links or Appendix A.
91
Appendix C
How Language Works for Comersus 6
Language schema in Comersus 6 is organized in 3 parts.
Part
Stored in
Modify with
Screen and email messages
screenMessages table and related Backoffice Plus
to one specific store ID
Catalog descriptions
(products, categories,
optionals)
Products, optionsGroups, etc
BackOffice Plus or Lite
HTML or Flash Layout
Comersus/store/header.asp
footer.asp
Graphic
Modification
Program like Photoshop and
HTML
editor
like
DreamWeaver
If you want a full multilanguage store you will have to install one store per language and create a
layout per translation.
Multilanguage step by step
Example with english (base) and spanish (translated) stores
1. Using BackOffice Plus create a new store named as spanish
2. Copy comersus/ folder as spanish/ excluding BackOffice folder
3. Edit spanish/includes/settings.asp and change the pIdStore according to the store ID
obtained in step 1
4. Edit the layout of spanish/store/ to include spanish translations
5. Go to BackOffice and translate the screen messages for the spanish store
6. To translate every product, create a new product associated to the main product (Using
the link Create a new product with existing stock repository)
7. Create a category schema like
Root
Root/English
Root/Spanish
92
And assign the idCategoryStart for every store.
Editing messages generated by Comersus
Most of the text messages, links and form field descriptions that you see on your store are not
hard-coded in the shopping cart pages, but rather fed automatically from the database. Those
messsages can be edited from BackOffice Plus, Settings, Screen Messages.
Layout messages must be modified using HTML editors like DreamWeaver.
Defining customer languages selection
To enable a customer language selection you can create different links in your main site or an
intermmediate page Select your language with links to every language store.
93
Appendix D
Frequently Asked Questions
For an updated list of answers to frequently asked questions, visit the Comersus forum area
located at the following address: http://www.comersus.org/forum
What is the difference between Hot Deals/Clearance and Show In Home items?
Show In Home items automatically appear on your store's front page. Hot Deals appear on the
"Clearance" page that you can link to from anywhere on your Web site. A product may be both a
Hot Deal and Show In Home item, or just one of the two. To set Hot Deals and Show In Home
items, use the 'Modify Product ' module of BackOffice +.
Note that the store's front page may or may not be your Web site's home page. It's up to you to
set it up either way. For more information, see Appendix A of Comersus User’s Guide.
What happens when I change the customer type to Wholesale?
Retail (BtoC) customers are shown and charged the online price. Wholesale customers are shown
and charged the wholesale price. You define the two prices when you add or modify a product
using the Manage Products menu. In addition to prices, note that quantity discounts can be
different for wholesale customers.
Will Retail customers or casual site visitors see the pricing I've set for wholesale
customers?
Every customer will get their own price after login
If I don’t want to ship a certain product, how can I have shipping options not appear
during the checkout process when customers select that product?
Simply set the weight to zero in the product details page. To do so, select Modify Products in the
Manage Products menu. When the weight is set to zero and your shipping options are defined from
weights>0 your shipping options are not displayed during the checkout process. This does not
affect other products. You can define “Shipping is not needed” for weight =0.
Can I print an invoice from within BackOffice +?
Yes. To print an invoice, click on Generate Invoice link at Sales Menu. Find the order you want to
generate an invoice for and click on the Invoice icon. You can now print the invoice for faxing or
mailing.
94
How do I find out the credit card number used for a transaction?
If you use real-time credit card processing on your store, then the payment gateway that you set
up to handle your transactions will securely hold that information. Since transactions are
processed automatically, you will rarely need to know the credit card number. If you needed credit
card details, you would log into the administration area that most gateways provide, or contact the
gateway directly.
If you use off-line credit card processing on your store, then you need to retrieve credit card
details to process the transaction after an order has been placed. Credit card information is
encrypted and stored in your store’s database. It is never included in confirmation e-mails sent to
you or the customer by Comersus. The only way to view it is to display details for a particular
order via the Sales and Customers menu, show order module of BackOffice +. The information is
decrypted on-the-fly for you to view through BackOffice +.
How do I link my Web site to the shopping cart?
Linking static pages on your Web site to the dynamic Web pages generated by Comersus is very
easy. In this guide you can see most important links’ HTML code to link any page of your Web
site to the area of your on-line store that you have selected.
There are two types of links that you will likely use:
•
Product links, which allow you to deep-link into the product catalog to a product details
page.
•
Store links, which allow you to link to store pages such as the "search" page, the "browse
by category" page, the "view shopping cart" page, etc.
Can I change the store buttons?
You can customize the appearance of your shopping cart buttons by uploading new buttons to
your Web server. You also need to change the HTML templates involved by checking that you
are not touching ASP tags or any other programming code. Usually you will need to modify
comersus_viewitem.asp and itemdetailsm.asp files.
Note: before you upload new buttons to your on-line store, make sure that the buttons have been
saved in a compatible format (JPEG or GIF), and that they are small enough to display properly
on your store (try not to exceed 110 x 25 pixels).
Can I modify some of the wording on the shopping cart?
Yes, any message or field description that appears on your storefront can be changed. Comersus
keeps virtually all of them in screenMessages database table, that can be modified with Backoffice
Plus or with plain SQL Sentences if you don’t have BackOffice Plus.
When customers browse my store by category, only 10 categories are displayed per page.
Is there a way to change that number?
95
There is a line of code in a file named "comersus_listProductsAndCategories.asp" that reads:
const pNumPerPage = 10
You can change that number to have more or fewer categories appear on each page.
How can I have NO pictures associated with a product or a category?
There is an easy way to accomplish this. Just create a 1 x 1 pixel transparent GIF file. Name it
"clearpixel.gif". Upload it to your Comersus store using the Upload Images component of
BackOffice +. From then on, whenever you want a product or category not to have any image
associated with it, enter "clearpixel.gif" in the image field.
I would like to use pages that are already on my Web site as product descriptions. How
can I do that?
Comersus allows you to use HTML tags in the product description field. This means that you can
easily link from your shopping cart's product details page to other pages on your site.
How can I define different shipment methods based on weight (or price, quantity)
and address?
1. Define a new Shipment Method (table Shipments).
2. Put WeightFrom=0 and WeightUntil=10 for cart total weight between 0 and 10 so this
shipment method will appear only in that case.
3. If you want that Shipping method for California state, put CA in stateCode and
stateCodeEq=-1 (That shipment will apply only for California). To define another shipment
for the other states you can include another shipment row with CA in stateCode and
stateCodeEq=0.
You can also use Real Time UPS/USPS/Fedex/DHL calculation instead of defining all shipping rules
manually.
How can I import the product database from other programs?
You can use BackOffice Lite/Utilites/Import to perform this task. Consider that you will
need the exported products table from the previous program in a plain text format, and that
only basic attributes will be imported. If you need a fine importing automatic procedure
contact us to make an estimate based on your file format.
How can I give special prices to some customers?
96
Using BackOffice Plus, Sales and Customers menu, List All Customers, you can assign
special prices for certain customers. Remember that the customer must log in in order to be
authenticated and receive the special prices.
How can I define a Tax of 0.21 for customers in one state (country, zip) and no Tax if
the user is from another place?
1. Using BackOffice+ define a new taxPerPlace record.
2. Insert a new row containing stateCode=CA, stateCodeEq=-1 and taxPerPlace=0,21.
How can I define different Taxes depending on the product if the user is from Italy?
1. Using BackOffice+ define a new taxPerProduct record.
2. Insert a new row with CountryCode=IT, countryCodeEq=1 and taxPerProduct=0,25
3. You can add another row for another product with different Tax (0,28…).
How can I force the user to select product variations like Color, Size, etc?
You can use the setting pForceSelectOptionals=-1.
How can I remove shipping selection? My store doesn’t need shipping options.
Edit pByPassShipping setting and no shipping selection will be required to the customers.
How can I distribute serials or download links automatically with each purchase of
my product named “Software-2001”?
Edit the product “Software-2001” and insert the serial or download link in DigitalGoods
field (emailText). Configure your payment gateway to make a silent response to
comersus_gatewayXXXSilentResponse.asp (rename the file for security reasons).
Each time you receive a payment, the information entered into emailText will be sent to the
customer by email.
You can also distribute serials and download links using PayPal.
1. Log in to your PayPal account, go to Profile, Instant Payment Notification Preferences.
97
2. Change IPN: on, IPN Url:
http://yourDomain.com/comersus/store/comersus_gatewayPayPalSilentResponse.asp
3. Make some payment to your store using PayPal and test the configuration.
Note: you can also make that distribution manually from BackOffice +, when you mark an order as paid.
How can I set up PayPal IPN (Instant Payment Notification)?
1. Log in to your Business or Premier PayPal account.2. Go to the `Profile’ subtab .
3. Click on the `Instant Payment Notification Preferences’ link in the `Selling Preferences’
column4. Click on Edit .
5. Check the box and enter
http://www.yourdomain.com/comersus/store/comersus_gatewayPayPalSilentResponse.asp to
receive your IPN Notifications.
6. Click on Save.
How can I assign a product to several categories?
If you are using BackOffice +, just use unlimited category assignment.
If you don’t have BackOffice +, or if you want to understand categories structure better,
here you have a more complete explanation.
Since Comersus 3.7x you can assign one product to several categories. You just have to add
a new row to categories_products indicating idProduct, idCategory.
Example: Windows Millenium (idProduct=2) to categories Computers (idCategory=5) and
OS (idCategory=8).
Add to rows:
2,5
2,8
My Gateway for online credit card payments is not included. Can I still use
Comersus with it?
Sure, you can send us the gateway documentation and we will try to include it in our next
release. You can also make some modifications to the provided examples.
98
1. Open any comersus_gatewayXXXX.asp and save it using a different name (like
comersus_gatewayYourGatewayHere.asp).
2. Check your gateway system documentation and change the Action Form tag in the script
comersus_gatewayYourGatewayHere.asp .
3. Check also all necessary hidden and non-hidden fields. Replace those INPUT tags using
gateway system documentation (usually you will need to verify total field, idOrder - Invoice
number - ,personal data of the customer, CC number and expiration date).
4. Add a new payment method named “Credit Cards” or similar with redirectionUrl pointing
to the new script renamed.
I don’t understand how Real Time Shipping (UPS or USPS) feature works
Real Time UPS and Real Time USPS packages are included in some Power Packs. Real Time
Shipping disables all manual shipping settings defined and acts as an interface between
Comersus and UPS/USPS.
When the customer makes the checkout process, Real Time Shipping sends all relevant
transaction details like: total weight, shipping address at origin and shipping address at
destination, etc. The package retrieves in Real Time 4/5 configurable shipping types for
those specifications and then returns to Comersus in order to create a Drop Down Box
showing different combinations of shipping types and shipping charges. The customer
completes the order as usual. All this process is hidden to the customer and it takes no
relevant time to get the Real Time Quotes.
Can I use one BackOffice Package for multiple stores?
BackOffice Plus comes with Per Store License, so you can install just one copy of the
BackOffice software in your server. Anyway you can still use one BackOffice with several
stores by developing a script that connects the BackOffice to different stores at login time.
Check out Reseller Kit Hosting Company Edition and Reseller Kit Software Integrator
Edition if you need special prices for Per Server and Unlimited licenses.
My BackOffice Plus shows demo warnings everywhere. How do I disable demo mode?
You have to change the setting pDemoStoreFront
= 0.
How can I replace the “No Image Available” graphic file?
99
Whenever you don’t upload images for a certain product, a default graphic is shown on any
page that displays information about that product (search pages, product details page, etc.).
You can easily replace the default graphic with your own by following these simple steps.
1. Create the new image file that will be displayed whenever a product image is not available.
The image should be 100 x 100 pixels.
2. Save the file as “imageNa.gif”.
Upload the file to the “comersus/store/catalog” subfolder on your Web server, using any
FTP program, or using the Upload Product Images module of Comersus, which is located in
the Manage Products menu of the Comersus administration console.
From now on this image will be displayed whenever a product image is not available.
How can I limit the admins access to certain parts of the BackOffice?
Using BackOffice+ you can create a new admin record and assign an existing admin level such as
moderator (admin level 50) or listing (admin level 75) or you can also create a new level. Those
admins will have access only to specific parts of the BackOffice that you can limit by modifying
page level variable.
For example, the script comersus_backoffice_menuListing.asp has this header:
<%
' Comersus BackOffice
' e-commerce ASP Open Source
' http://www.comersus.com
pPageLevel=Cint(75)
%>
In this script the line pPageLevel=Cint(75) says that all the admins whose admin level is
more than 75 will receive this message from the script: “You don't have enough
permissions”.
Knowing this you have to modify this line pPageLevel=Cint(75) from the script in order to
limit the access by the different admins.
For an updated list of answers to frequently asked questions, visit the Public Forum located at
the following address: http://www.comersus.org/forum
100
Appendix E
ERD Database Chart
101
Relationships and fields
102
Database description
Table
Field
admins
Administrator users for the BackOffice
affiliates
affiliatesTransfers
auctionOffers
auctions
blockKeywords
Details
idAdmin
Unique key field for the table
adminName
Name of the admin user
adminPassword
Encrypted password
adminLevel
Lower level means more permissions inside BackOffice+
lastLogin
Date of last login for security purposes
idSupplier
Id of the supplier for BackOffice+ private login
idAffiliate
Id of the affiliate for BackOffice+ private login
IdStore
Id Store
Affiliates of the store
idAffiliate
Unique key field for the table
affiliateName
Name of the affiliate
affiliateEmail
Email of the affiliate
commission
commission for the affiliate
idStore
Id Store
Transfers made to affiliates
idAffiliateTransfers
Unique key field for the table
idAffiliate
ID of the affiliate used for this transfer
amount
Transfer amount
transferDate
Date of the transfer
comments
Comments of transfer
Bids posted
idAuctionOffer
Unique key field for the table
idAuction
Id of the auction
idCustomer
Id of the customer that did post the bid
offerDate
Bid date
offerAmount
Bid amount
Auctions of the store
idAuction
Unique key field for the table
auctionName
Description of the auction
details
More details about the auction
startDate
Release date of the auction
endDate
Last day of the auction
active
Enable or disable the auction
idProduct
Id of the product used for this auction
startPrice
Starting price
endPrice
Ending price
currentPrice
Current price
idCustomerType
Auction defined for this customer type
minOfferAmount
Minimum offer
maxOfferAmount
Maximum offer
idStore
Id Store
Keywords to be used by fraud filtering
idBlockKeyword
Unique key field for the table
103
bundles
cartRows
cartRowsOptions
keywordText
keyword to be blocked
idStore
Id Store
Bundle products structure
idBundle
Unique key field for the table
mainIdProduct
id of the product that will appear in search and listing
idProduct
id of each sub-product of the bundle
cart details structure for current carts and historic orders
idCartRow
Unique key field for the table
idProduct
id of each product in the cart
quantity
Quanity for that product
unitPrice
Price per unit
unitCost
Cost per unit
unitWeight
Weight per unit
unitBtoBPrice
Wholesale price per unit
idDbSessionCart
id of the dbSession cart record
personalizationDesc
Personalization text of that product
Variations for cart contents
idCartRow
categories
Id of the cart row with this variation
idOption
Id of the variation related to the cartRow
priceToAdd
Price of the variation
optionDescrip
Variation name
Categories structure
idCategory
categories_products
countryCodes
creditCards
Unique key field for the table
categoryDesc
Category name
idParentCategory
Id of the parent category, NULL for root
displayOrder
Index order for display purposes
active
Enable or disable the category
imageCategory
Image file name for the category
RelationShip between categories and products
idProduct
Id of the product
IdCategory
Id of the category assigned to that product
Countries used for customers, orders, suppliers, etc
countryCode
Code of the country: US, BR, etc
countryName
Complete name of the country
Off line credit card payments
idOrder
conditions
currencyStatic
customer_specialPrices
Id of the order with this offline payment
cardType
Credit card code type: VI, AM, etc
cardNumber
Number of the card
expiration
Expiration date
seqCode
CVV2 code
obs
Comments for this payment
Only used for store conditions, to be replaced soon
conditions
Store general Conditions HTML text
idStore
Id Store
Currency conversion with static table
idCurrencyStatic
Unique key field for the table
currencyName
Description of the currency
conversion
Conversion factor considering main currency
currencySign
Sign of the currency
Special prices for specific customers
104
customers
customerTypes
dbSession
idCustomer_specialPrices
Unique key field for the table
idCustomer
Id of the customer
idProduct
Id of the product
specialPrice
Special price of that product for that customer
Customers table
idCustomer
Unique key field for the table
name
First Name
lastName
Last Name
customerCompany
Company
phone
Phone
birthday
birthday
email
Email
password
Encrypted password
address
Address
zip
Zip code
stateCode
State code for the main country
state
Another state (if state code is not used)
countryCode
Code of the country: US, BR, etc
shippingName
If shipping is different than billing
shippingLastName
If shipping is different than billing
shippingAddress
If shipping is different than billing
shippingCity
If shipping is different than billing
shippingStateCode
If shipping is different than billing
shippingState
If shipping is different than billing
shippingCountryCode
If shipping is different than billing
shippingZip
If shipping is different than billing
idCustomerType
Customer Type (Retail, Wholesale, etc)
idLanguage
Language of the customer
bonusPoints
Current reward points
wapAccess
If it has access to WAP store (cell phones)
active
If customer is active
user1
Custom field for customer record
user2
Custom field for customer record
user3
Custom field for customer record
idStore
Id Store
Customer types
idCustomerType
Unique key field for the table
customerTypeDesc
Description
Session headers stored in database
idDbSession
dbSessionCart
Unique key field for the table
randomKey
Random contents used to retrieve fields
idCustomer
Customer of that session
sessionData
Field to store temporary form fields
sessionType
WEB, WAP, etc
dbSessionDate
Date of the session
Cart headers related to dbSession
idDbSessionCart
Unique key field for the table
idDbSession
Cart is related to one session
idOrder
Filled only if the order is saved to relate cart to orders
cartOpen
Boolean, the cart is closed when the order is saved
105
discounts
Discounts with code
idDiscount
discountsPerQuantity
Unique key field for the table
discountDesc
Description
priceToDiscount
Fixed price to discount
percentageToDiscount
Percentage of the purchase to discount
discountCode
Customer code for the discount
active
Boolean, to enable or disable the discount
used
Boolean, if it has been used
oneTime
Use the discount one or many times
quantityFrom
Filter for cart content
quantityUntil
Filter for cart content
weightFrom
Filter for cart content
weightUntil
Filter for cart content
priceFrom
Filter for cart content
priceUntil
Filter for cart content
idProduct
If the discount is specific for one product, otherwise is Null
idStore
Id Store
Discounts based on quantity ordered
idDiscountPerQuantity
Unique key field for the table
idProduct
Id of the product
discountDesc
Description
quantityFrom
Quantity bounds of that product
quantityUntil
Quantity bounds of that product
discountPerUnit
Fixed amount to discount per product
emails
conditions
newsLetter
options
options_optionsGroups
optionsGroups
idEmail
Id of the email
emailDescription
Email Description
emailSubject
Email Subject
emailBody
Email Body
idStore
Id Store
Only used for store conditions, to be replaced soon
conditions
Store general Conditions HTML text
idStore
Id Store
Newsletter emails
idEmail
Unique key field for the table
email
Email
idStore
Id Store
Variations structure
idOption
Unique key field for the table
optionDescrip
Description of the variation
priceToAdd
Price of the variation
weight
Weight of the variation
imageUrl
Image name
Relationship between options and options groups
idOptionGroup
Id of the option group
idOption
Id of the option
Options groups
idOptionGroup
Unique key field for the table
optionGroupDesc
Description of the group
type
Type of the group (R=Radio, C=Checkbox, D=Dropdown)
106
optionLink
Link
optionsGroups_products Relationship between options groups and products
orders
idProduct
Id of the product
idOptionGroup
Id of the group
Orders table
idOrder
Unique key field for the table
orderDate
Date
idCustomer
Id of the customer
details
Products ordered snapshot
total
order amount
address
Billing Address
zip
Idem
stateCode
Idem
state
Idem
city
Idem
countryCode
Idem
obs
Customer comments
taxAmount
Order tax amount
shipmentDetails
Description and amount of shipment
paymentDetails
Description and amount of payment
discountDetails
Description and amount of discount
nroRan
Random contents used to retrieve fields
shippingName
Name for shipping
shippingLastName
Name for shipping
shippingAddress
Shipping Address
shippingStateCode
Shipping Address
shippingState
Shipping Address
shippingCity
Shipping Address
shippingCountryCode
Shipping Address
shippingZip
Shipping Address
orderStatus
Status of the order (1-5)
viewed
If the order has been viewed in BackOffice+
URL of digital goods or any other information to be
distributed
digitalEmailText
payments
idAffiliate
Id of the affiliate used for this order
idCustomerType
Customer Type when the order was saved
browserIP
IP of the client when the order was saved
transactionResults
Authorisation codes, etc
shipmentTracking
Shipment tracking information
vatNumber
VAT number
wishListIdCustomer
If the order was posted using a wish list
user1
Custom order fields
user2
Custom order fields
user3
Custom order fields
idStore
Id Store
Payment types with rules
idPayment
Unique key field for the table
paymentDesc
Description
priceToAdd
If the payment type increases the amount
percentageToAdd
Idem with percentages of the order
redirectionUrl
URL for payment forms
107
products
emailText
Information abuot the payment to be distributed by email
quantityFrom
Filtering purposes
quantityUntil
Filtering purposes
weightFrom
Filtering purposes
weightUntil
Filtering purposes
priceFrom
Filtering purposes
priceUntil
Filtering purposes
idCustomerType
Type of customers for this payment
idStore
Id Store
Products catalog structure
idProduct
Unique key field for the table
idSupplier
Id of the supplier
idStock
Id of Stock related.
description
Shoty description
details
Details with HTML
searchKeywords
Keywords for meta tags
price
retail price
listPrice
Comparison price
bToBPrice
Wholesale price
imageUrl
URL of the main image
smallImageUrl
URL of small image
sku
Product code
listHidden
Hide the product in listings
weight
Weight of the product
deliveringTime
Time to obtain the product
active
Product is active
hotDeal
Product is a hot deal
freeShipping
Product has free shipping
isBundleMain
Product is the main of the bundle
bonusPoints
How many bonus points provides
cost
Cost price
visits
How many visits
sales
How many sales
emailText
Digital goods to be distrbiuted
stockSecurity
Level to maintain
stockCostOrder
Cost of purchasing a new order
stockDelay
Delay to replace since order is posted
stockMinimumOrder
Minimum qty to order
stockLevelAlert
Alert to administrators at this level
showInHome
Show product in dynamic home
dateAdded
Date of product creation
rental
Product is rental
length
Size
width
Size
height
Size
hasPersonalization
Custom engraving, etc
idStore
Id Store
user1
Custom field 1
user2
Custom field 2
user3
Custom field 3
108
imageUrl2
Image name 2
imageUrl3
Image name 3
imageUrl4
Image name 4
stores
recurringBilling
idStore
Unique key field for the table
storeDescription
description
idCategoryStart
Starting ID for categories tree
Structure to maintain recurring billing
idRecurringBilling
relatedProducts
reviews
screenMessages
serials
shipments
Unique key field for the table
idOrder
Id of the order to be re-created
daysPeriod
Period to re-create the order
nextBillingDate
Next date to create the order
Relationship between products and related products
idProduct
Id of the product
idRelatedProduct
Id of the related product
Customer reviews
idReview
Unique key field for the table
review
Review text
author
Name of the author
email
Email of the author
idProduct
Id of the product that has the review
stars
How many starts 1-5
subject
Review subject
Active
Review is active
Messages displayes in screens
dbIdScreenMessage
Unique key field for the table
idScreenMessage
Id Message
idStore
Id Store
screenMessage
Message
fileName
Reference to file where the message is used.
Serial codes to be distributed
idSerial
Unique key field for the table
serialCode
Unique code
idProduct
Id of the product that has this serial
used
Serial has been distributed already
Shipment types and rules
idShipment
Unique key field for the table
shipmentDesc
Description
priceToAdd
Shipment fixed price
percentageToAdd
Shipment percentage price
shipmentTime
Time of the delivery
quantityFrom
Filtering purposes
quantityUntil
Filtering purposes
weightFrom
Filtering purposes
weightUntil
Filtering purposes
priceFrom
Filtering purposes
priceUntil
Filtering purposes
stateCode
State code of this rule
stateCodeEq
State code of the order equal to rule state
zip
Zip code of this rule
109
stateCodes
stock
stockMovements
storeNews
suppliers
taxPerPlace
zipEq
Zip code of the order eq to rule
countryCode
Country code of the rule
countryCodeEq
Country code of the order equal to rule
handlingPercentage
Percentage for handling
handlingFix
Fix amount for handling
idCustomerType
Customer type for this shipment
idStore
Id Store
State description and codes
stateCode
Code for the state
stateName
State name
Stock for each product
idStock
Id of the stock
idProductMain
Id of the product
stock
Stock
stockSecurity
Stock security
stockCostOrder
Stock cost order
stockDelay
Stock delay
stockMinimumOrder
Minimum stock to make an order
stockLevelAlert
Stock level to alert
Movements of stock (including movements with each paid order)
idProduct
Id of the product
dateMovement
Date of the movement
quantity
Quantity (positive or negative)
obs
Simple news to be shown in
store
Comments
idStoreNews
Unique field
newsText
News text (HTML allowed)
newsDate
News date
idStore
Id Store
Suppliers table
idSupplier
Unique field
supplierName
Name of the supplier
supplierEmail
Email of the supplier
supplierAddress
Address of the supplier
supplierZip
Address of the supplier
supplierCity
Address of the supplier
supplierStateCode
Address of the supplier
supplierAnotherState
Address of the supplier
supplierCountryCode
Address of the supplier
supplierPhone
Phone of the supplier
receiveSellEmail
Receive a notification with each sale
receiveUnderStockAlert
Receive a notification with under stock
Tax per location
idTaxPerPlace
Unique key field for the table
countryCode
Country code for this tax
countryCodeEq
If the rule tax is equal to order tax
stateCode
State code for this tax rule
stateCodeEq
If the rule is equal to order
zip
Zip of the tax rule
zipEq
If the rule is equal to order
110
taxPerProduct
taxPerPlace
tax percentage
idCustomerType
Customer types
Tax per product and location
idTaxPerProduct
visits
Unique key field for the table
idProduct
Id of the product
countryCode
Country code for this tax
countryCodeEq
If the rule tax is equal to order tax
stateCode
State code for this tax rule
stateCodeEq
If the rule is equal to order
zip
Zip of the tax rule
zipEq
If the rule is equal to order
taxPerProduct
tax percentage
Carts stored for wap cell phones
idVisit
wapCarts
Unique key field for the table
userIP
User ip address
referrer
Referrer
keywords
Keywords
visitDate
Date of visit
visitTime
Time of visit
idStore
Id Store
Carts stored for wap cell phones
idWapSession
Unique key field for the table
idProduct
Id of the product
quantity
wapSessions
Session stored for wap cell phones
idWapSession
wishList
settings
Unique key field for the table
randomKey
Random contents used to retrieve fields
idCustomer
Id of the customer
idPayment
Id of the payment used
isdShipment
Id of the shipment used
Customer wish list
idCustomer
Id of the customer
idProduct
Id of the product
Store settings
idSetting
rentals
Unique key field for the table
settingKey
Key of the setting (pStoreFrontDemo)
settingValue
Value for that key
comments
Key description
idSettingGroup
For grouping purposes
IdStore
Id Store
Rental table
idRental
Unique key field for the table
idProduct
Id of the product
fromDate
Rental interval
untilDate
Rental interval
idOrder
Id of the order
111
Appendix F
Comersus Power Packs
he Power Packs are optional packages with additional features designed to increase the power
of your Comersus Store. There are 3 Power Packs (Basic, Medium and Premium) which
include a lot of features such as: BackOffice +, Random Product, Best Sellers, Email to
friend, Fraud Prevention, Forgot Password, Auctions, Currency Conversion, Real Time UPS,
Reviews, Related Products, Newsletter, Real Time United States Postal Service, Dynamic Price
List, Digital Download, 1 Step Checkout and more. Here you will find a list with a summary of
different packages.
T
Note: You can also develop these features if you have programming skills.
However you will find it more reliable, sound and time saving to use this Official
Power Packs designed by the same developers who created Comersus Free
Distribution.
Power Pack Basic
Power Pack Medium
Power Pack Premium
Price
$49
$239
$370
BackOffice
None
BackOffice+ Full Featured
BackOffice+ Full Featured
Access DB
Yes
Yes
Yes
SQL Server DB
No
No
Yes
MySQL DB
No
Yes
Yes
Advanced Features
Basic
Medium
All advanced features
Payment Gateways
Basic gateways
Popular gateways
All payment gateways
Note 1: You have to choose one payment gateway of available options for each Power Pack. Only Reseller Kits
includes all payment gateways.
Note 2: features of each package and prices may change. Visit comersus.com to verify the latest features of each
Power Pack.
Why do you sell Power Packs if Comersus is Open Source?: there are several
business models associated to Open Source Software. We choose this option of
charging for services and for great value Power Packs. However any user may
develop their own Power Pack replacements since we provide all the
documentation and assistance to customize Comersus.
More information about Comersus Power Packs at http://www.comersus.com/store
112
Appendix G
Programming reference
ere you will find a general reference to customize Comersus Cart. With simple lines of
code you can retrieve and insert data into Comersus database. We will also provide a
Vbscript reference so you can manipulate the information and create advanced scripts to
extend default functionality of the cart.
H
Retrieve data from the database
1. Open your text editor and create a new file with .asp extension placed inside
comersus/store folder.
2. At the beginning of the script place all the necessary includes.
<!--#include file="../includes/settings.asp"-->
<!--#include file="../includes/databaseFunctions.asp"-->
<!--#include file="../includes/getSettingKey.asp"-->
<!--#include file="../includes/sessionFunctions.asp"-->
Note: settings and databaseFunctions are used to establish a database connection to retrieve
or insert data. getSettingKey and sessionFunctions are used to retrieve certain configuration
keys from settings table.
3. Open the ASP tag and enter the basic lines needed in almost all headers. In this case we
are telling the web server to continue, even if some error occurs, we define some local
variables used for the database connection and we retrieve a configuration key (the name
of the logo image).
<%
on error resume next
dim connTemp, rsTemp
pCompanyLogo
= getSettingKey("pCompanyLogo")
4. We will get how many customers we have in the store with a simple SQL query
mySql="SELECT COUNT(*) AS pCount FROM customers"
call getFromDatabase (mySql, rsTemp, "test")
%>
5. Then we print the result using the store layout defined by header and footer templates.
<!--#include file="header.asp"-->
113
<br>There are <%=rstemp("pCount")%> customers in this store.
<%call closeDb()%>
<!--#include file="footer.asp"-->
If you execute this script you will get the number of customers printed on the screen.
In this case the result of the SQL Query was just one row, so we didn’t have to iterate
between the recordset. What if we need the ability to show a listing? We will have to make a
loop to print all returned records.
1. First of all we send the new SQL Query. In this case we will get the idproduct, the sku
and the stock for the whole catalog.
mySql="SELECT idProduct, sku, stock FROM products"
call getFromDatabase (mySql, rsTemp, "test")
2. If the query returns an empty recordset we redirect to a message screen informing this
situation
if rstemp.eof then response.redirect
"comersus_message.asp?message="&Server.Urlencode("There are no products in the
database")
%>
3. Then we print the layout and we make the iteration inside the recordset
<!--#include file="header.asp"-->
<%do while not rstemp.eof%>
<br>ID: <%=rstemp("idProduct")%> - SKU: <%=rstemp("sku")%> - STOCK:
<%=rstemp("stock")%>
<%rstemp.movenext
loop%>
<%call closeDb()%>
<!--#include file="footer.asp"-->
Inserting data in the database
The situation is very similar. In this case we will add a new supplier named John Doe to the
database.
mySql="INSERT INTO suppliers (supplierName) VALUES ('John Doe')"
call updateDatabase (mySql, rsTemp, "test")
114
response.redirect "comersus_message.asp?message="&Server.Urlencode("Supplier added.")
call closeDb()
Note that we have used updateDatabase function instead of getFromDatabase. Since we used a
query to add a record to the database, we don’t need to show any result from the database. We
only redirect to a message screen with a confirmation message.
Vbscript Reference
Comersus was developed using Active Server Pages with Vbscript programming language. Here
you can find a reference with most used sentences.
Conditional Statements
You can control the flow of your script with conditional statements and looping statements.
Using conditional statements, you can write VBScript code that makes decisions and repeats
actions.
IF THEN ELSE
The If...Then...Else statement is used to evaluate whether a condition is True or False and,
depending on the result, to specify one or more statements to run. Usually the condition is an
expression that uses a comparison operator to compare one value or variable with another
If value = 0 Then
Response.write “The value is 0!”
End if
Looping
Looping allows you to run a group of statements repeatedly. Some loops repeat statements until a
condition is False; others repeat statements until a condition is True. There are also loops that
repeat statements a specific number of times.
Do while not rstemp.eof
Response.write “<br>Record: ”&rstemp(“idProduct”)
rstemp.movenext
loop
For Next
Repeats a group of statements a specified number of times.
For f=0 to 10
115
response.write “<br>Number: ”&f
next
Functions
Array(): Returns a Variant containing an array.
Cint():Returns an expression that has been converted to a Variant of subtype Integer.
Cdbl():Returns an expression that has been converted to a Variant of subtype Double.
Date: Returns the current system date.
Instr():Returns the position of the first occurrence of one string within another..
Left():Returns a specified number of characters from the left side of a string.
Len():Returns the number of characters in a string or the number of bytes required to store a
variable.
SQL Reference
Create a table
CREATE TABLE tableName
(
columnName1 dataType,
columnName2 dataType,
.......)
Create index
CREATE UNIQUE INDEX indexName
ON tableName (columnName)
Delete index
DROP INDEX tableName.indexName
Delete table
DROP TABLE tableName
Select
SELECT columnName(s) FROM tableName
116
Select with GroupBy
SELECT column,SUM(column) FROM table GROUP BY column
Insert new rows
INSERT INTO tableName (column1, column2,...)
VALUES (value1, value2,....)
Update
UPDATE tableName SET columnName = newValue
WHERE columnName = someValue
Delete rows
DELETE FROM tableName WHERE columnName = someValue
117
Contact Information
Comersus Open Technologies LC
8345 NW 66TH ST #3537
Miami FL 33166-2626
United States
Phone: 1 (305) 735-8008
http://www.comersus.com
(1) Contact us for installations, modifications, training, contributions and Power Packs.
All suggestions are welcome.
(2) Ask about Reseller Plans, packages designed for Hosting Companies and investor
opportunities.
118
Final Notes and acknowledgments
Vbscript refernce based on Vbscript Language Reference, Microsoft Corporation
Your contributions are important and welcome. Please contact us at http://www.comersus.com/contact.asp to send
us corrections to this User’s Guide. If you are interested in maintaining a translated version of this document let us
know.
119