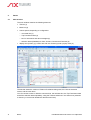
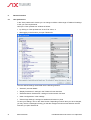
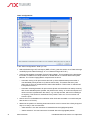
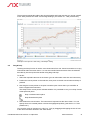
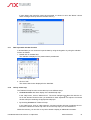
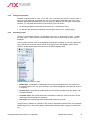
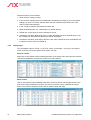
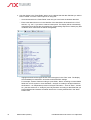
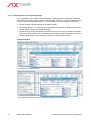
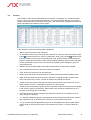
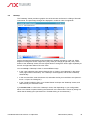
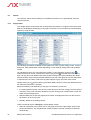
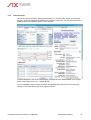
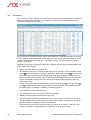
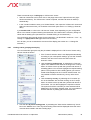
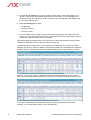
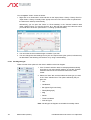
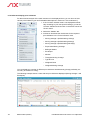
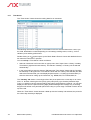
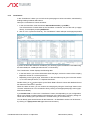
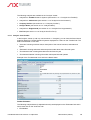
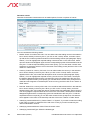
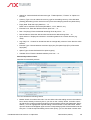
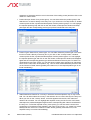
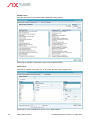
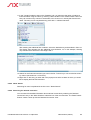
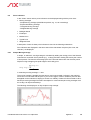
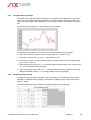
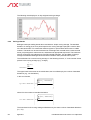
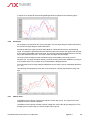
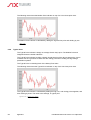
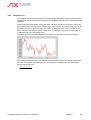
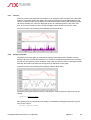
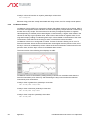
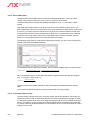
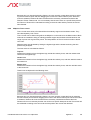
1
a SIX Telekurs display User Manual Telekurs iD Java – version 8.3 Information As the Telekurs iD software is being continuously developed, some terms used in the user manual might not be consistent with your current Telekurs iD version. We will endeavor to update the user manual with the next version. No guarantee can be given for the information contained in this user manual, which is subject to change without notice. The user manual is protected by copyright. SIX Telekurs reserves all rights relating to this manual. The user manual may be saved, printed or copied for in-house use only. Although great care has been taken in the compilation and preparation of this work to ensure its accuracy, errors and omissions cannot be entirely ruled out. SIX Telekurs accepts no responsibility in this context, subject to statutory requirements. If you detect any errors or omissions in this user manual or have any ideas or suggestions for improvements we would be extremely grateful if you would notify these to SIX Telekurs Help Desk by sending an e-mail to [email protected]. Telekurs iD is a registered trademark of SIX Telekurs. Windows, Excel and Internet Explorer are registered trademarks of Microsoft Corp. All other trademarks are the property of the respective legal owner. © Copyright 2010 SIX Telekurs, CH-8021 Zurich 2 Information User Manual Telekurs iD / Version 8.3 / 15 April 2010 Table of contents 1. Introduction .................................................................................................................................................. 8 2. Summary ..................................................................................................................................................... 2.1 Packages (product components) ........................................................................................................ 2.2 Basic configuration for all packages ................................................................................................... 2.3 Package-specific data and functions .................................................................................................. 2.4 Domicile-dependent data and functions ............................................................................................. 2.5 Benefits ............................................................................................................................................... 10 10 11 12 13 13 3. Starting and closing ................................................................................................................................... 3.1 Starting ................................................................................................................................................ 3.2 Change password ............................................................................................................................... 3.3 Requesting Help ................................................................................................................................. 3.4 Closing ................................................................................................................................................ 14 14 16 17 17 4. Basics .......................................................................................................................................................... 4.1 Main window ....................................................................................................................................... 4.2 Keyboard commands .......................................................................................................................... 4.3 Significance of the colors .................................................................................................................... 4.4 Lists ..................................................................................................................................................... 4.5 Context ................................................................................................................................................ 4.6 Screens ............................................................................................................................................... 4.7 Favorites ............................................................................................................................................. 4.8 Command line ..................................................................................................................................... 4.9 Shortcuts ............................................................................................................................................. 4.10 Info/Alert box ....................................................................................................................................... 4.11 Top favorites toolbar ........................................................................................................................... 18 18 19 19 20 21 23 24 26 26 29 29 5. General functions ....................................................................................................................................... 5.1 User preferences ................................................................................................................................ 5.2 Set font and font size .......................................................................................................................... 5.3 Print ..................................................................................................................................................... 5.4 Drag & Drop ........................................................................................................................................ 5.5 Double-clicking on an instrument ........................................................................................................ 5.6 Tooltips ............................................................................................................................................... 5.7 Calling up financial data ...................................................................................................................... 5.8 Calling up detailed instrument information ......................................................................................... 5.9 Working with screens .......................................................................................................................... 5.9.1 Calling up viewer ................................................................................................................... 5.9.2 Switching title bars of viewers on and off .............................................................................. 5.9.3 Open an existing screen ........................................................................................................ 5.9.4 Set startup screens ................................................................................................................ 5.9.5 Maximise and restore tabbed pages ..................................................................................... 5.10 Saving or deleting objects ................................................................................................................... 5.10.1 Saving user-specific objects .................................................................................................. 5.10.2 Deleting user-specific objects ................................................................................................ 5.11 Link objects ......................................................................................................................................... 5.12 Data exchange via DDE (Dynamic Data Exchange) .......................................................................... 5.13 Data exchange via FinXL .................................................................................................................... 5.14 Exporting data ..................................................................................................................................... 5.15 Exporting references ........................................................................................................................... 5.16 Importing data ..................................................................................................................................... 30 30 39 40 41 42 42 43 44 44 45 45 45 45 46 47 47 49 49 50 51 52 53 55 User Manual Telekurs iD / Version 8.3 / 15 April 2010 Table of contents 3 5.17 Date input with calendar function ........................................................................................................ 57 5.18 Call up online help .............................................................................................................................. 57 6. Main functions (viewers) ........................................................................................................................... 58 6.1 List ...................................................................................................................................................... 58 6.1.1 Compile a new list ................................................................................................................. 61 6.1.2 Open an existing list .............................................................................................................. 61 6.1.3 Change an existing list .......................................................................................................... 62 6.1.4 Change list structure .............................................................................................................. 63 6.1.5 Allocating a style .................................................................................................................... 63 6.1.6 Change style .......................................................................................................................... 64 6.1.7 Change column width ............................................................................................................ 71 6.1.8 Sort list ................................................................................................................................... 71 6.1.9 Comment list items ................................................................................................................ 71 6.1.10 Select list items ...................................................................................................................... 72 6.1.11 Loading several lists in a viewer ............................................................................................ 73 6.1.12 Adding lists to Favorites or to Top Favorites ......................................................................... 73 6.1.13 Displaying lists in the original language ................................................................................ 74 6.2 Multiple Column List ............................................................................................................................ 75 6.3 My Index List ....................................................................................................................................... 76 6.4 Portfolio ............................................................................................................................................... 79 6.4.1 Create a new portfolio ........................................................................................................... 80 6.4.2 Edit a portfolio entry ............................................................................................................... 81 6.4.3 Change an existing portfolio .................................................................................................. 82 6.5 Heatmap ............................................................................................................................................. 83 6.6 Ticker .................................................................................................................................................. 84 6.6.1 Display current prices ............................................................................................................ 84 6.6.2 Change ticker background color ............................................................................................ 85 6.6.3 Display news headlines ......................................................................................................... 85 6.7 Quotes ................................................................................................................................................ 86 6.7.1 Single Quote .......................................................................................................................... 86 6.7.2 Quote Overview ..................................................................................................................... 93 6.8 All Sources .......................................................................................................................................... 94 6.8.1 Limiting and/or grouping the display ...................................................................................... 95 6.8.2 Save settings ......................................................................................................................... 97 6.9 Chaining .............................................................................................................................................. 98 6.9.1 Select type of derivative instruments ..................................................................................... 99 6.9.2 Limit display ......................................................................................................................... 100 6.10 Chart ................................................................................................................................................. 103 6.10.1 Set diagram type ................................................................................................................. 104 6.10.2 Set gridline properties .......................................................................................................... 107 6.10.3 Set display colors ................................................................................................................ 109 6.10.4 Set axis properties ............................................................................................................... 111 6.10.5 Turn display areas on and off .............................................................................................. 113 6.10.6 Set cursor properties ........................................................................................................... 114 6.10.7 Setting the logarithmic price scale ....................................................................................... 115 6.10.8 Set and show comparisons ................................................................................................. 116 6.10.9 Set period ............................................................................................................................ 117 6.10.10 Selecting the day for the Intraday chart ............................................................................... 120 6.10.11 Selecting the data intervals ................................................................................................. 120 6.10.12 Setting the curve resolution ................................................................................................. 121 6.10.13 Display or adjust jumps in share prices ............................................................................... 122 6.10.14 Display events ..................................................................................................................... 123 4 Table of contents User Manual Telekurs iD / Version 8.3 / 15 April 2010 6.10.15 Currency conversion ............................................................................................................ 6.10.16 Set and display price indicators ........................................................................................... 6.10.17 Set and display technical indicators .................................................................................... 6.10.18 Using interactive drawing features ...................................................................................... 6.10.19 Enhance chart view with drawing features .......................................................................... 6.10.20 Saving and reapplying chart settings .................................................................................. 6.10.21 Defining basic chart settings ............................................................................................... 6.10.22 Copy charts into other applications ..................................................................................... Time Series ....................................................................................................................................... Limits ................................................................................................................................................. 6.12.1 Set new limits ...................................................................................................................... 6.12.2 Working with limits ............................................................................................................... 6.12.3 Notifications ......................................................................................................................... Watchdog .......................................................................................................................................... Contributors ...................................................................................................................................... Forex ................................................................................................................................................. Basic Data & Events ......................................................................................................................... 6.16.1 Navigation viewer ................................................................................................................ 6.16.2 Financial instruments ........................................................................................................... 6.16.3 Companies .......................................................................................................................... 6.16.4 Trading centres .................................................................................................................... 6.16.5 Custom Page ....................................................................................................................... Analysis ............................................................................................................................................. 6.17.1 Analysis from FactSet .......................................................................................................... 6.17.2 Analysis from theScreener .................................................................................................. 6.17.3 Company Profiles ................................................................................................................ 6.17.4 Analysis News ..................................................................................................................... 6.17.5 Analysis from Hoppenstedt ................................................................................................. 6.17.6 Analysis from Eco Fact ........................................................................................................ GPRV Analysis ................................................................................................................................. Analysis from Zacks .......................................................................................................................... Yield Curves ...................................................................................................................................... Fair Value Pricing Service ................................................................................................................ Search functions ............................................................................................................................... 6.22.1 Quick Search ....................................................................................................................... 6.22.2 Search Extended ................................................................................................................. 6.22.3 Market Search ..................................................................................................................... 6.22.4 News Search ....................................................................................................................... 6.22.5 Searching for national currencies ........................................................................................ News ................................................................................................................................................. 6.23.1 News Search ....................................................................................................................... 6.23.2 Display news story ............................................................................................................... 6.23.3 Display latest news .............................................................................................................. 6.23.4 Displaying news items about particular companies ............................................................ 6.23.5 Display document ................................................................................................................ 6.23.6 Limit news items .................................................................................................................. 6.23.7 Save settings ....................................................................................................................... 123 124 125 127 128 130 131 131 132 137 138 139 140 141 143 145 147 149 149 150 151 152 152 153 157 162 163 163 164 165 166 167 168 170 170 178 198 201 201 203 203 206 207 207 208 209 210 7. Auxiliary functions ................................................................................................................................... 7.1 Tables ............................................................................................................................................... 7.2 Information ........................................................................................................................................ 7.3 System Messages ............................................................................................................................. 211 211 212 213 6.11 6.12 6.13 6.14 6.15 6.16 6.17 6.18 6.19 6.20 6.21 6.22 6.23 User Manual Telekurs iD / Version 8.3 / 15 April 2010 Table of contents 5 8. Tools .......................................................................................................................................................... 8.1 Stock Option Calculator .................................................................................................................... 8.1.1 Short description of the Stock Option Calculator ................................................................ 8.1.2 Calculating the fair option price ........................................................................................... 8.1.3 Calculating the implied volatility .......................................................................................... 8.2 Index Option Calculator .................................................................................................................... 8.3 Currency Option Calculator .............................................................................................................. 8.4 Commodity Option Calculator ........................................................................................................... 8.5 Bond Calculator ................................................................................................................................ 8.5.1 Bond Calculator ................................................................................................................... 8.5.2 Bond Liquidity and Spreads ................................................................................................ 8.5.3 Bond Simulator .................................................................................................................... 8.6 Broken Date Calculator ..................................................................................................................... 214 214 215 216 216 217 219 221 223 224 230 234 237 9. Appendix 1: Chart types, indicators and drawing features ................................................................. 9.1 Chart types ........................................................................................................................................ 9.1.1 Analytical charts .................................................................................................................. 9.1.2 Point and Figure Charts ....................................................................................................... 9.1.3 Renko Charts ....................................................................................................................... 9.1.4 Kagi Charts .......................................................................................................................... 9.1.5 Three-Line Break Charts ..................................................................................................... 9.2 Price indicators ................................................................................................................................. 9.2.1 Simple Moving Average ....................................................................................................... 9.2.2 Exponential Moving Average ............................................................................................... 9.2.3 Triangular Moving Average ................................................................................................. 9.2.4 Weighted Moving Average .................................................................................................. 9.2.5 Bollinger Bands ................................................................................................................... 9.2.6 Envelopes ............................................................................................................................ 9.2.7 Median Price ........................................................................................................................ 9.2.8 Typical Price ........................................................................................................................ 9.2.9 Weighted Close ................................................................................................................... 9.3 Technical indicators .......................................................................................................................... 9.3.1 Volume ................................................................................................................................ 9.3.2 Money Flow Index ............................................................................................................... 9.3.3 Price and Volume Trend ...................................................................................................... 9.3.4 Negative Volume Index ....................................................................................................... 9.3.5 Positive Volume Index ......................................................................................................... 9.3.6 On Balance Volume ............................................................................................................. 9.3.7 Accumulation/Distribution Indicator ..................................................................................... 9.3.8 Chaikin Oscillator ................................................................................................................. 9.3.9 Volume Oscillator ................................................................................................................ 9.3.10 Detrended Price Oscillator .................................................................................................. 9.3.11 Lanes Stochastics %D %K Oscillator ................................................................................. 9.3.12 Chaikin's Volatility ................................................................................................................ 9.3.13 Williams %R ........................................................................................................................ 9.3.14 Ease of Movement ............................................................................................................... 9.3.15 Commodity Channel Index .................................................................................................. 9.3.16 Moving Average Convergence/Divergence ......................................................................... 9.3.17 Relative Strength Index ....................................................................................................... 9.3.18 Average True Range ........................................................................................................... 9.3.19 Standard Deviation .............................................................................................................. 9.3.20 TRIX ..................................................................................................................................... 9.3.21 Mass Index .......................................................................................................................... 238 238 238 239 240 241 242 243 243 244 245 245 246 247 247 248 249 250 251 251 252 252 253 254 255 255 256 257 257 258 259 260 260 261 262 263 263 264 265 6 Table of contents User Manual Telekurs iD / Version 8.3 / 15 April 2010 9.3.22 Performance ........................................................................................................................ 9.3.23 Vertical Horizontal Filter ...................................................................................................... 9.3.24 Price Rate of Change .......................................................................................................... 9.3.25 Rate of Change Percentual ................................................................................................. 9.3.26 Momentum ........................................................................................................................... Drawing features ............................................................................................................................... 9.4.1 Gann Fan ............................................................................................................................. 9.4.2 Fibonacci Arcs ..................................................................................................................... 9.4.3 Fibonacci Fan ...................................................................................................................... 9.4.4 Fibonacci Retracements ...................................................................................................... 9.4.5 Fibonacci Time Zones ......................................................................................................... 9.4.6 Midpoint Tirone Levels ........................................................................................................ 9.4.7 Mean Tirone Levels ............................................................................................................. 9.4.8 Speed Resistance Lines ...................................................................................................... 9.4.9 Quadrant Lines .................................................................................................................... 9.4.10 Trend Lines .......................................................................................................................... Bibliography ...................................................................................................................................... 266 266 267 268 269 270 270 271 271 272 272 273 274 275 275 276 276 10.Appendix 2: Definitions of terms relating to analytical data from theScreener ................................ 10.1 Bad News Factor ........................................................................................................................... 10.2 Bear Market Factor ........................................................................................................................ 10.3 Beta 1 year in basis pts ................................................................................................................. 10.4 Correlation ..................................................................................................................................... 10.5 Dividend ........................................................................................................................................ 10.6 Earnings Revision Trend ............................................................................................................... 10.7 Group ............................................................................................................................................ 10.8 Growth to PE Ratio ........................................................................................................................ 10.9 Long Term Growth ........................................................................................................................ 10.10 Long Term P/E .............................................................................................................................. 10.11 Market Capitalization in $bn .......................................................................................................... 10.12 Medium Term Technical Trend ..................................................................................................... 10.13 Risk Zone ...................................................................................................................................... 10.14 Stars .............................................................................................................................................. 10.15 Technical Reverse ......................................................................................................................... 10.16 Timing / Trading Opportunities ...................................................................................................... 10.17 Valuation Rating ............................................................................................................................ 10.18 Volatility ......................................................................................................................................... 10.19 4wk Rel Perf .................................................................................................................................. 10.20 7wk EPS Rev ................................................................................................................................ 277 277 277 278 279 279 279 280 280 280 281 281 281 281 282 282 283 283 284 284 284 9.4 9.5 11.Index .......................................................................................................................................................... 285 User Manual Telekurs iD / Version 8.3 / 15 April 2010 Table of contents 7 1. Introduction Purpose of this user manual This user manual provides you with the information you need to use Telekurs iD - intelligent Display. It includes information on setting up and displaying Telekurs iD in your Internet browser, the range of functions, general procedures, and detailed, illustrated instructions for using Telekurs iD. Assumed knowledge Extranet or Internet access is gained to the Telekurs iD application via a browser running under the Microsoft Windows desktop on your personal computer. In order to take full advantage of this user guide you should have a working knowledge of the browser being used, Microsoft Windows and the terminology used in this environment, as well as general personal computer application know-how. It is also assumed that you have a sufficient knowledge of the subject field to make use of the functions of Telekurs iD. Installation How to install Telekurs iD is described in the Installation Guide, which you can call up via the following link: http://www.tkfweb.com/vegahelp/manuals_1_0/s4/installation-manual.pdf Conditions of use To enable you to receive the authorisation data you need in order to use Telekurs iD (customer number, user identification and initial password), you must sign a contract with SIX Telekurs. You will be given access to the functions you need in accordance with the terms of your contract. In order to use the Export, DDE, Print and Clipboard functions, entries have to be made in the "java.policy" file. For DDE an additional DLL file must be copied. Please note the relevant details in the installation handbook. Online help Telekurs iD has a user-friendly and context-sensitive online help function. Select the link to "Guided Tours" to access our online tutorial. New features in Telekurs iD Version 8.3 In Version 8.3 of Telekurs iD, the following new or improved functionality is available to you: Functionality adapted to meet the requirements of your particular working environment, with a choice of four products: Wealth Management Package, Reference Package, Treasury & Risk Package and Asset Management Package. The previously separate optional additions such as the "Advisory Package" or "Streaming Package" are no longer available, as they are included in the new products (section 2). The Telekurs iD interface has been completely redesigned and is now also available in Spanish (section 5.1) The way viewers are linked can now be customised using a linking button (section 5.5) Tabs can now be maximised for display (section 5.9.5) Data exchange also possible via FinXL in addition to DDE (section 5.13) 8 Introduction User Manual Telekurs iD / Version 8.3 / 15 April 2010 Read and unread messages are displayed with different symbols (grey or blue) (sections 6.1, 6.4, 6.7.1, 6.8 and 6.17.2) New data fields are available for data display as bars (section 6.1.6) Some indexes can be combined for comparison purposes (section 6.3) Options calculator functions can be performed on the “Greeks“ tab in the "Chaining" viewer (section 6.9) Extra limiting options now available in the "Chaining" viewer (section 6.9.2) Currency of the price axis can be converted on charts (sections 6.10.8 and 6.10.15) Company events, dividend payments and changes of financial instrument identification numbers can be highlighted on charts (section 6.10.14) New STF Contributor pages available (section 6.14) New Contributor data available from ICAP (from mid-April 2010) New data sources available for Fundamentals and Estimates: FactSet and EcoFact (section 6.16) Infinancials analyses available with full access or limited to GPRV analysis functions (section 6.16) Analysis from different providers can be called up in a new "Analyse" viewer: FactSet, theScreener, Hoppenstedt, EcoFact. News with company profiles and analysis news are also available on the same viewer (section 6.17) New yield structure curves (STF Yield Curves) available for different currencies and risk classes (section 6.20) Access to Fair Value Pricing Service available(section 6.21) New ICB industry code (Industry Classification Benchmark) available (section 6.22.2) New data available from Dow Jones (Macro Economic Data, Forecast, Calendar) (from midApril 2010) Note: In order to be able to make full use of the new features of Version 8.3 of Telekurs iD, you must have Java Version 1.6 (JRE 6 Update 10 or higher) installed on your personal computer. User Manual Telekurs iD / Version 8.3 / 15 April 2010 Introduction 9 2. Summary Telekurs iD provides you with easy access to the entire range of data from SIX Telekurs: Current prices and intraday prices with details of trading volumes Access to all asset classes, such as equities, bonds, commodities and currencies Chaining of options, futures, warrants and structured products Fundamental data and corporate actions for more than 5 million financial instruments Historical time series for over one million securities going back as far as ten years Rating information from the major agencies Current worldwide business news 2.1 Packages (product components) Telekurs iD is available in four packages with different functionality designed to meet the needs of your particular working environment: Wealth Management Package (WM) This package is designed to meet the needs of financial advisors and asset managers. The emphasis is on information that provides optimum support for investment decisions, as well as on ensuring that data can be accessed wherever the user may be. The Wealth Management Package also permits the modeling of baskets and other mathematical operations. Reference Package (RE) This package is suitable for users in the securities management sector. This package has a particularly user-friendly and powerful search function for securities, prospectus data, information about prices and previous or pre-announced events. However, the Reference Package also offers data which enables transactions executed to be checked against regulatory requirements. The contents of the Reference Package also support the valuation of assets according to various criteria. Treasury & Risk Package (TR) This package is aimed at users in the trading and risk management sectors. The emphasis is on the type of data used for simulating risk exposure. Also, the Treasury & Risk Package helps users check their activities in light of current regulations. Asset Management Package (AM) This package contains the most features: all the data and functions included in the other three packages plus additionally further news services (Dow Jones European Equity Spotlight or Dow Jones Money Market) and data sources (Infinancial Corporate Focus and FactSet Fundamentals). 10 Summary User Manual Telekurs iD / Version 8.3 / 15 April 2010 2.2 Basic configuration for all packages In addition to the package specific data, all four packages contain a common basic configuration of data and functions: Screens Quote Lists Styles Single Quote Order Book All Sources Option Chaining Option Calculator (single instruments) Chart Limit Minder Watchdog Portfolio Ticker free Quotes regulatory news Forex and Money Market Contributors (daily closing or delayed prices), Forex Spot Rates (real time) Yield Curves (daily closing or delayed prices) extended search for instruments and news ICB Classification (Industry Classification Benchmark) historical prices for up to ten years time series 1 to 10 days Standard & Poor's, Fitch and JCR current ratings Telekurs FinXL (Excel spreadsheet tool) for up to 200 instruments Bond Calculator The previously separate optional additions such as the "Advisory Package", "Search & Link Package" or "Streaming Package" are no longer available, as they are included in the new packages. User Manual Telekurs iD / Version 8.3 / 15 April 2010 Summary 11 2.3 Package-specific data and functions The following table shows which data and functions are not included in the basic configuration but only in specific packages. Data or functions Option Calculation inside of chaining M E R M Forex and Money Market Contributors (realtime) Enhanced Yield Curves Historical prices going back more than ten years Time series 11 up to 180 days Standard & Poor's historical ratings Moody's current and historical ratings Fitch historical ratings JCR (Japan Credit Rating Agency) historical ratings Telekurs FinXL for up to 500 instruments Securities data (all) Securities data (selection) Extended search for securities data Fair Value Pricing Service Bond Pricing All termsheets Broken date calculator Reputational Risk Indicator News on reputational risk Analysis Zacks Analysis Hoppenstedt* Analysis theScreener (short profile) Analysis theScreener (PDF) Macro Economic Calendar Analysis FactSet Estimates (4 years outlook)* Analysis FactSet Estimates (5 years history & export)* Analysis FactSet Fundamentals (2 years history)* Analysis FactSet Fundamentals (5 years history & export)* Analysis Infinancials GPRV Analysis Infinancials Corporate Focus Telekurs iD mobile DUNS (Dun&Bradstreet Data Universal Numbering System) MiFID (if not subscribed with VDF) EUZS [2005] (if not subscribed with VDF) 12 Summary User Manual Telekurs iD / Version 8.3 / 15 April 2010 EUZS strukturierte Produkte (if not subscribed with VDF) "Steuerbare Urkunde" (if not subscribed with VDF) SNB-Reporting (if not subscribed with VDF) SEC Rule 22 (if not subscribed with VDF) Austria Report Funds Data (if not subscribed with VDF) WM = Wealth Management Package RE = Reference Package TR = Treasury & Risk Package AM = Asset Management Package x = included in the package – = not included in the package o = available as an option * = being planned Further details on Telekurs iD can be found at http://www.telekursid.com or under the heading "Products" on the SIX Telekurs website at http://www.six-telekurs.com. 2.4 Domicile-dependent data and functions Certain data and functions can be made available or suppressed depending on the country. Normally, access is given to those instruments for which the company or trading centre is domiciled in the same country as the client. Also dependent on their domicile, each customer has access in the basic configuration to local news agencies and to Dow Jones News. 2.5 Benefits The benefits of using Telekurs iD are: clearly laid out displays of the up-to-date information you want, from the widest possible range of data sources fast, direct searches for complex, time-critical information simple, consistent navigation proactive system functions very user-friendly a wide range of predefined lists, market reviews and screens personalised settings (language, display, functionality, system functions, data sources, identification numbering system, notification times etc.) XML interfaces for exporting data to other applications links to market data, basic data and event data, and news real time data exchange (e.g. to Excel) with DDE (Dynamic Date Exchange) or FinXL professional chart tools with over 40 analyses for over 400,000 instruments with time series going back more than 10 years User Manual Telekurs iD / Version 8.3 / 15 April 2010 Summary 13 3. Starting and closing 3.1 Starting In order to use the Telekurs iD software, you must have an existing connection via the Telekurs Extranet or the Internet. 1. Open your Internet browser, e.g. Microsoft Internet Explorer. 2. Enter the Telekurs iD web address: www.tkfweb.com for access via the Internet www.tkflink.com for access via the Extranet 3. Press Enter on your keyboard. The SIX Telekurs Frontdoor login window will appear: Add the address of this login window to the Favorites list in your Internet browser to make it easier to call up the page in future. 4. Enter the authorisation details you have received from SIX Telekurs (customer number, user identification and password) into the appropriate boxes "CustomerID", "UserID" and "Password or RSA SecurID Passcode". The authorisation details are case sensitive. The password is not shown, but each character you enter is represented by a "*". The "CustomerID" and "UserID" entries are saved until the next time you log in, so you do not need to enter them each time. 5. Mark the password type that applies to you. "Password" for normal passwords or "RSA SecureID" for a number string generated by a SecureID device. 14 Starting and closing User Manual Telekurs iD / Version 8.3 / 15 April 2010 6. Click on the Login button. Your entries will be checked and access to Telekurs iD granted if the result of the check is positive. If you are opening Telekurs iD for the first time and are still using the initial password supplied to you by SIX Telekurs, you should replace this with your own password (see section 3.2 "Change password"). 7. Click on the link "Telekurs iD java" at the left-hand side of the window. Telekurs iD will open. A progress indicator can be seen in the browser window during the startup process. This may take a little while the first time you start Telekurs iD, as all the program components have to be downloaded from the server. After startup the Telekurs iD window appears. You can now use Telekurs iD. The first time you open Telekurs iD, the screen will automatically display the User Preferences window, in which you have to enter certain details (see section 5.1 "User preferences"). As long as the mandatory fields (marked with *) remain incomplete, the "User Preferences" window will appear each time Telekurs iD is started up. While you are working in Telekurs iD, another browser window remains active in the background in addition to the Telekurs iD window. You can close this window at any time as it is not needed to operate Telekurs iD. User Manual Telekurs iD / Version 8.3 / 15 April 2010 Starting and closing 15 3.2 Change password As soon as possible you should replace the initial password supplied to you by SIX Telekurs with your own password, known only to yourself. It is best to change your password the first time you start up Telekurs iD. We recommend that you also change your password from time to time in the future. Remember your password. If you write it down, make sure that no one else has access to it, and do not keep it near the computer. You can change your password after login, when the following window appears: 1. Click on the "Change password" tab. A tab will appear containing text boxes for changing your password. 2. Enter your current password into the "Current password" box. 3. Enter your new password into the "New password" box. The password can be made up of letters and numbers, and must contain at least 6 characters. Please note that the password function is case sensitive. 4. Enter your new password again into the "New password again" box. 5. Click on the Change button. Your password has now been changed. 16 Starting and closing User Manual Telekurs iD / Version 8.3 / 15 April 2010 3.3 Requesting Help After you have logged in, when the following window comes up, you can request help about Telekurs iD. Click on the link "iD Help" at the left-hand side of the window. Different links come up for requesting online help and documents or for downloading support tools, e.g.: Telekurs iD Online Help Telekurs iD User Manual in PDF format Telekurs iD Quick Reference Guide in PDF format Update information about the latest version of Telekurs iD Technical support with installation instructions for Telekurs iD and support tools such as Java plug-ins in various versions. 3.4 Closing To close Telekurs iD, open the File menu and click Exit. If you have not yet saved objects that you have changed (see section 5.10 "Saving or deleting objects"), a message will come up advising you of this. The save dialogue boxes do not appear if you close Telekurs iD by clicking on the the top right-hand corner. User Manual Telekurs iD / Version 8.3 / 15 April 2010 Starting and closing button in 17 4. Basics 4.1 Main window The main window contains the following elements: Title bar (1) Menu bar (2) Various panels, depending on configuration: – command line (3) – Top Favorites toolbar (4) – box for information and alert messages (5) – selection areas (SideBars) for Lists, Screens, Context and Favorites (6) display area (screen) (7), shown here with two viewers (8) and a popup menu (9) The title bar shows the version of Telekurs iD software being used, the name of the active screen, and the user name. You can choose to show or hide the command line, the Info/Alert box, the Top Favorites toolbar and all the selection areas separately, using the Toolbars submenu in the View menu (selection is shown by a check mark beside the relevant menu item). 18 Basics User Manual Telekurs iD / Version 8.3 / 15 April 2010 You can use drag and drop to reposition the command line, the Info/Alert box, the Top Favorites toolbar and all the selection areas on your screen to suit your own needs. By clicking on the separation line between the selection areas and the display area, you can completely minimize and then maximize the selection areas. You can call up context-sensitive popup menus by clicking the right-hand mouse button. 4.2 Keyboard commands The keyboard may be used instead of the mouse in some viewers and lists. The keys have the following effect: Home: Moves the window contents display to the left if the displayed content is wider than the window (corresponds to the horizontal scrollbar) End: Moves the window contents display to the right if the displayed content is wider than the window (corresponds to the horizontal scrollbar) Page Up: Moves up by one window Page Down: Moves down by one window Up Arrow: Moves up one line Down Arrow: Moves down one line F9: Refreshes the data if the user does not receive streaming data Delete: Deletes entries Ctrl+C: Copies selected text to the Clipboard provided that a corresponding entry has been made in the "java.policy" file Ctrl+P: prints the active window or a highlighted area of the active window Ctrl+V: Copies the contents of the Clipboard to other applications (e.g. Microsoft Word) 4.3 Significance of the colors With standard settings the significance of the colors is as follows: Field with yellow background: The corresponding quote has just been updated. The highlighting will disappear after approximately 1 second. Line with light blue background: The instrument is highlighted. Drag-and-drop is performed with this instrument or these instruments (more than one line can be highlighted simultaneously). Ctrl+Click removes an existing highlight. User Manual Telekurs iD / Version 8.3 / 15 April 2010 Basics 19 If the appropriate setting is made in the user settings, the red/black/blue color scheme can also be put to use for quotes that have just be updated: Field with red background: The corresponding quote has just been updated and the value has dropped. The red highlighting will disappear after approximately 1 second. Field with black background: The corresponding quote has just been updated and the value has not changed. The black highlighting will disappear after approximately 1 second. Field with blue background: The corresponding quote has just been updated and the value has risen. The blue highlighting will disappear after approximately 1 second. 4.4 Lists Lists are listings of specific financial instruments. They define which instruments are shown and in which order, and the data fields they contain. Lists are opened in the "List" viewer (see section 6.1 "List"). All defined lists are listed in the "Lists" selection area in a tree structure. Telekurs iD has four types of list: Global List: lists of financial instruments defined by SIX Telekurs, e.g. Top Performers, financial markets, indices, exchange rates, interest rates, warrants, futures, metals and coins. These lists of financial instruments are arranged more or less alphabetically in two blocks – markets and securities types – to make it easier to find what you are looking for. Country List: lists of financial instruments or portfolios defined by SIX Telekurs for the users of a particular country. Customer List: listings of financial instruments or portfolios drawn up by Telekurs iD users for the users within the same financial institution. User List: listings of financial instruments or portfolios defined by an individual user. You can set the order of items individually using drag & drop. How to use lists is described in detail in section 6.1 "List". 20 Basics User Manual Telekurs iD / Version 8.3 / 15 April 2010 4.5 Context The "Context" selection area offers context-sensitive settings for lists, viewers and screens. Depending on the preference you have set (see section 5.1 "User preferences") the "Context" selection area is either automatically displayed, or you have to display it by right-clicking in the active area of the list, the viewer or the screen and then selecting the menu item "Show Context" on the pop-up menu which appears. In Screens the screen tabs also belong to the active area. You can also click on the "Context" tab first and then in the active areas of the list or viewer. The selection area "Context" is also displayed when you click on "Open Viewer" under "File" in the menu bar. Lists can be allocated a variety of styles in the "Context" selection area (see section 6.1.5 "Allocating a style"). A wide range of settings can be applied in different viewers. The procedure for this is given in detail in the description of each viewer (see section 6 "Main functions (viewers)"). In Screens all available viewers are listed in a tree structure in the "Context" selection area. Telekurs iD has four types of viewer: Global Viewer: viewer defined by SIX Telekurs for all users for the visualisation of financial instruments: – "All Sources" shows the main quotes for an instrument from all the exchanges and contributors that set quotes (see section 6.8 "All Sources"). – "Basic Data & Events" shows comprehensive, up-to-date basic data and administrative information on financial instruments, and information on companies and trading centres (see section 6.16 "Basic Data & Events"). – "Chaining" shows derivative instruments such as options, warrants or futures (see section 6.9 "Chaining"). – "Chart" and "Chart Intraday" show the quote movements of one or more instruments (see section 6.10 "Chart"). – "Contributors" shows the quote pages of various securities, maintained by leading banking institutes and brokers (see section 6.14 "Contributors"). – "Heatmap" shows a table, arranged in order of percentage change, for a list of instruments (see section 6.5 "Heatmap"). – "History (List)" shows a chronological list with historical data for an instrument (see section 6.11 "Time Series"). – "Limits" shows defined limits for instruments. Where quotes exceed or fall below these limits, a news message is sent (see section 6.12 "Limits"). – "List" and "Multiple Tabbed Lists" show market data, basic data as well as events data for a list of instruments (see section 6.1 "List"). – "News Headlines" shows the day's news headlines (see section 6.23 "News"). – "Portfolio" shows developments in a selection of instruments compiled by you in which you have carried out transactions (see section 6.4 "Portfolio"). – "Quotes" shows the most significant information on a specific instrument (see section 6.7 "Quotes"). User Manual Telekurs iD / Version 8.3 / 15 April 2010 Basics 21 – "Ticker" shows news items or the current quotes of instruments in a ticker (see section 6.6 "Ticker"). – "Time & Sales (List)" shows a chronological list of the current day's paid prices for an instrument (see section 6.11 "Time Series"). for controlling the functions: – "Search" allows you to search for basic data on instruments, companies or trading centres, quote information or news items (see section 6.22.1 "Quick Search"). – "Search Extended" opens the extended search function of the VDB (Valordata browser) to search for basic data on instruments, companies or trading centres (see section 6.22.2 "Search Extended"). – Using "Market Search" all financial instruments quoted at particular trading centres can be specifically searched for (see section 6.22.3 "Market Search"). – "News Search" allows you to search for specific news items (see section 6.23.1 "News Search"). – "Tables" allows you to view all the figures in the Telekurs iD tables (see section 7.1 "Tables"). – "Watchdog" monitors current reports on instruments (see section 6.13 "Watchdog"). Country Viewer: viewer defined by SIX Telekurs for all users in a particular country. Customer Viewer: viewers created by Telekurs iD users for the users within the same financial institution to visualise financial instruments. User Viewer: viewers created by an individual user to visualise financial instruments. You can open a viewer from the "Context" selection area using one of the following methods: Highlight the relevant viewer and drag-and-drop it on to the screen. Double-click on the relevant viewer. Click on "Open" in the context menu (right-hand mouse button). The significance of the individual viewers, and how to operate them, are explained in section 6 "Main functions (viewers)" and partly in section 7 "Auxiliary functions". 22 Basics User Manual Telekurs iD / Version 8.3 / 15 April 2010 4.6 Screens The display area (screen) shows the individual viewers which visualise the actual data for the financial instruments (see section 4.1 "Main window"). When Telekurs iD is started it shows the empty screen "Screen - untitled0", which you can fill with viewers of your choice. If you have defined one or several startup screens, these will appear instead of the empty "Screen - untitled0". You can have more than one screen open at the same time. Please note that this may put a substantial strain on your computer system. The tab of the active screen is displayed brightly highlighted. All defined screens are listed in a tree structure in the "Screens" selection area. Telekurs iD has four types of screens: Global Screen: lists of viewers defined by SIX Telekurs for all users for particular tasks such as analysis, trading etc. Country Screen: lists of viewers defined by SIX Telekurs for all users in a particular country. Customer Screen: lists of viewers drawn up by Telekurs iD users for all users within the same financial institute. User Screen: lists of viewers defined by individual users. You can set the order of items individually using drag & drop. Lists of viewers defined by individual users. You can set the order of items individually using drag & drop. How to use screens is explained in section 5.9 "Working with screens" in detail. User Manual Telekurs iD / Version 8.3 / 15 April 2010 Basics 23 4.7 Favorites In the "Favorites" selection area, the "History" folder lists the last 10 screens, lists or viewers called up during the current session. These items can be included permanently in the "Favorites" folder, where they can be renamed. All items imported into the "Top Bar" sub-folder are displayed in the top favorites toolbar as icons (see section 4.11 "Top favorites toolbar"). Double-clicking on an item or click on an icon in the top favorites toolbar calls it up again. This allows actions that are carried out frequently to be combined and effected quickly. You can also right-click on an entry in the "Favorites" selection area or on a symbol in the top favorites toolbar and then choose one of the types of execution from the pop-up menu that comes up, for example to call up a list in a particular viewer: The startup screens that have been set are also listed in a sub-folder in the "Favorites" folder. (see section 5.9.4 "Set startup screens"). "History" folder The "History" folder contains a list of the last 10 screens, lists or viewers called up during the current session, together with the time when the actions were carried out. To repeat an action, double-click on the relevant item. Alternatively, you can click on "Execute" in the popup menu (right-hand mouse button). Please note that in the case of viewers, an empty viewer only is opened up (in the same way as when the first item is called up from the "Context" selection area). Items in the "History" folder are not saved when a session is closed. 24 Basics User Manual Telekurs iD / Version 8.3 / 15 April 2010 To import an action from the "History" folder to the "Favorites" folder or the top favorites toolbar, right-click the relevant item and then click on the popup menu item "Add to Favorites". The "Favourite Properties" window appears in which you can enter all the necessary details: Name (displayed in the "Favorites" folder or in the top favorites toolbar) Description (displayed as a short help text when the mouse pointer is positioned over the relevant item in the "Favorites" folder or over the relevant icon in the top favorites toolbar) Shortcut (for direct call up via the command line) When shortcuts are used there must be a leading $ character, e.g. $d, if you have entered d in the "direct call up" field. Please note that a distinction is made between upper and lower case. Save to (selectable in the displayed folder tree) If saved in the "Top Bar" folder the item is imported into the top favorites toolbar. To create folders or sub-folders, right click on the required location in the "Favorites" selection area and then on the "New Folder" menu item in Favorites. To complete the entry details, click on "OK". "Favorites" folder Items in the "Favorites" folder are saved automatically at the end of a session, and are available for use again at the next session. To rename an item, right-click on the relevant item and then on the popup menu item "Rename". Enter the new name into the window that appears, then click on "OK". To change other item information, right-click on the relevant item and then on the "Properties" popup menu item. Change the relevant details into the window that appears, then click on (Name, Description and Shortcut) "OK". You can set the order of items individually using drag & drop. To delete individual items, right-click on the relevant item and then on the popup menu item "Delete". User Manual Telekurs iD / Version 8.3 / 15 April 2010 Basics 25 4.8 Command line In the text box in the command line (left) you make all keyboard entries in the normal Windows manner. Instead of entering text, you can also select one of the last ten commands entered using the selection button. The two buttons have the following effect: Opens the "Short Cuts Overview" window, which contains a complete list of predefined commands, sorted into categories. By entering such predefined commands – shortcuts – in the command line, you can directly call up specific viewers for a financial instrument or specific screens (see section 4.9 "Shortcuts"). Accepts the entry or selection in the command line for processing. Alternatively, press the Enter key. By entering search criteria in the entry box of the command line, you can start a direct search (see section 6.22.1 "Quick Search"). However, you can also select a certain category for the search in the "More Searches" selection box, whereupon the "Search Extended" viewer is displayed for the entry of detailed search criteria (see section 6.22.2 "Search Extended"). 4.9 Shortcuts Summary of shortcuts Clicking on the button in the command line shows a complete list of all the available shortcuts arranged by category. You can also call up this list in the "Help" menu with the "direct access summary" menu item or by entering .? in the command line. Some examples of available shortcuts is listed below. 26 Basics User Manual Telekurs iD / Version 8.3 / 15 April 2010 General shortcuts Shortcut Example Result <instrument>,<market>,Q 38863350,380,q Opens the "Single Quote" viewer (see section 6.7 "Quotes") for the corresponding instrument. <instrument>,<market>,X ABBN,380,x Opens the "All Sources" viewer (see section 6.8 "All Sources") for the corresponding instrument. <instrument>,<market>,C CH0013269698,13,c Opens the "Chart" viewer (see section 6.10 xxxxxxxxxxxxxxxxxxxxxxxx xxxxxxxxxxxxxxxxx "Chart") for the corresponding instrument. At <instrument> you can enter, for example, the symbol (abbreviation), national identification number (e.g. valor number, WPK number) or international identification number (ISIN). At <market> you can enter the stock exchange code number or symbol. If you omit this information, then the main trading centre for the instrument is selected automatically, e.g. SWX (SIX Swiss Exchange) if you enter "UHRN,,C" to display the quote movements for Swatch Group shares. Shortcuts for lists, screens and viewers Shortcut Example Result .FTSE .ftse Opens the "List" viewer (see section 6.1 "List") with the corresponding list, in the example shown "London - FTSE 100 Index Stocks". .WI .wi Opens the appropriate Global screen – in this case "World Indices". .N .n Opens the "News Search Results" viewer xxxxxxxxxxxxxxxxxxxxxxxx xxxxxxxxxxxxxxxxx (see section 6.23 "News") with news headlines. Contributing Shortcuts Shortcut Example Result 85,E or .?CONT 85,e or .?cont Opens the "Tables" viewer (see section 7.1 "Tables") with all contributor codes. 85,<pagename> 85,BPL1 Opens the "Contributors" viewer (see section 6.14 "Contributors") with the corresponding page. .ZKB .zkb Opens the "Zürcher Kantonalbank" screen xxxxxxxxxxxxxxxxxxxxxxxx xxxxxxxxxxxxxxxxx with data of the contributor "Zürcher Kantonalbank". User Manual Telekurs iD / Version 8.3 / 15 April 2010 Basics 27 Instrument data shortcuts Shortcut Example <instrument>,<market>,BD nesn,swl,bd Result Opens the "Basic Data & Events" viewer (see section 6.16 "Basic Data & Events") containing the basic data of the instrument concerned. <instrument>,<market>,? NESN,380,? Opens an overview of identification numxxxxxxxxxxxxxxxxxxxxxxxx xxxxxxxxxxxxxxxxx bers, symbols and basic data of the instrument concerned. At <instrument> you can enter, for example, the symbol (abbreviation), national identification number (e.g. valor number, WPK number) or international identification number (ISIN). At <market> you can enter the stock exchange code number or symbol. If you omit this information, then the main trading centre for the instrument is selected automatically, e.g. SWX (SIX Swiss Exchange) if you enter "NESN,,?" to display the quote movements for Nestle shares. Tables shortcuts Shortcut Example Result .TAB .tab Opens the "Tables" viewer (see section 7.1 "Tables") in the language currently selected for the Telekurs iD user interface. .?X .?x Opens the "Tables" viewer (see section 7.1 xxxxxxxxxxxxxxxxxxxxxxxx xxxxxxxxxxxxxxxxx "Tables") with the market code table in the language currently selected for the Telekurs iD user interface. News agencies shortcuts Shortcut Example .<agency> .AWP xxxxxxxxxxxxxxxxxxxxxxxx .DJN .KYODO xxxxxxxxxxxxxxxxx Result Opens a screen with a "News Search Results" viewer divided into categories (see section 6.23 "News") with news headlines of the selected agency. At <agency> you can enter the agency code, e.g AWP for "Agentur für Wirtschaftsinformationen", DJN for "Dow Jones News" or KYODO for "Kyodo Japan News". Personal shortcuts You can set up direct call ups for all of your Favorites (see section 4.7 "Favorites"). To call up personal shortcuts you must always enter a leading $ character. Example: Specified shortcut = xyz. Call up = $xyz. Note: Please note that, unlike with the shortcuts that are preset by SIX Telekurs, for your own shortcuts a distinction is made between upper and lower case. 28 Basics User Manual Telekurs iD / Version 8.3 / 15 April 2010 4.10 Info/Alert box The Info/Alert box shows the latest message: blue text: marketing messages from SIX Telekurs red text: system messages (e.g. error messages etc.) and SIX Telekurs messages (information about stock exchanges) green text: messages picked up by the watchdog (see section 6.13 "Watchdog"). The buttons have the following effects: Opens the Internet browser at the appropriate Telekurs iD page. Opens the "System Messages" viewer (see section 7.3 "System Messages") containing all system messages. Opens the "Watchdog Messages" viewer (see section 6.13 "Watchdog") containing all the messages picked up by the watchdog. A flashing button indicates that there is a new message in the relevant viewer. Once you have opened the viewer, the flashing stops. 4.11 Top favorites toolbar Specific favorites are available in the top favorites toolbar (see section 4.7 "Favorites") for rapid one-click selection. The icon shows the type of top favourite available: List or portfolio Viewer Screen Folder Others, e.g. News or Ticker A selection menu with more top favorites is displayed by clicking on a folder icon. You can right-click on a symbol in the top favorites toolbar and then choose one of the types of execution from the pop-up menu that comes up, for example to call up a list in a particular viewer: You can also transfer lists and screens from the selection area directly into the top favorites toolbar using drag-and-drop. User Manual Telekurs iD / Version 8.3 / 15 April 2010 Basics 29 5. General functions 5.1 User preferences In the "User preferences" window you can change or define a wide range of Telekurs iD settings to suit your own requirements. Call up the "User preferences" window as follows: by clicking on "User preferences" in the "File" menu, or after logging in the first time you open Telekurs iD. The user-defined settings are divided into the following sections: "General": personal details "Display Preferences": settings in the Telekurs iD user interface "Extended Search Preferences": settings of various search functions "Other Configurations": other settings "Printer Page Settings": settings for headers and footers on prints To save your settings, click on the "Save" button. Depending on which items you have changed, you may receive a message informing you that the changes will not become effective until the next time you open Telekurs iD. 30 General functions User Manual Telekurs iD / Version 8.3 / 15 April 2010 General The "First email address" in the "General" folder is compulsory. Enter your e-mail address. This can be used to notify you when limits are exceeded or not achieved (see also section 6.12 "Limits"). If you set a particular time zone, all time information will be displayed converted to this time zone, i.e. if, for example, in Zurich you select the Central European time zone GMT + 01:00, the times for rates at all stock exchanges worldwide will be displayed using the time in Zurich. If you use the "Default" setting, the rates are shown in local time, the rates for shares on the DJ index in New York time and the rates for shares on the Nikkei index in Tokyo time. User Manual Telekurs iD / Version 8.3 / 15 April 2010 General functions 31 Display Preferences In the "Display Preferences" folder you can make the following settings (we recommend that you accept the default setting preset by SIX Telekurs): Standard setting for font type and font size (general and for news stories). To display nonLatin characters e.g. for Chinese, font type "Arial Unicode MS" must be set. Language used by the Telekurs iD interface (German, English, French, Italian or Spanish). Data language, i.e. the language in which names can be displayed. The selection includes Nordic languages and Japanese and Chinese. Language mode for determining how names are displayed: – if you set "Interface language", the names are displayed in the language set under "Language" – if you set "Data language", the names are displayed in the language set under "Data language" – if you set "Combined", the names are displayed in the interface language followed by the data language Date and number format source (Default Regional Settings or iD specific) Representation formats for dates and digit grouping characters (only observed if the format source "iD specific" is selected for date and number format source) National or international identification numbering system 32 General functions User Manual Telekurs iD / Version 8.3 / 15 April 2010 Default currency Choice of the countries for which the lists should be displayed in the "Country List" folder in the "Lists" selection area. The selection is made in the "Custom editor" window, which comes up when you click on the button to the right of the "Country List" entry. The symbols for the selected countries are displayed after you click on "OK" on the button to the right of the "Country List" entry. Preferred link to "Basic Data & Events" viewer Preferred representation for currencies, for which various representations are possible (for example, the English currency GBP is shown in pounds sterling if the setting "Major Currency" is selected and in pence if the setting "Minor Currency" is selected, with the latter being more common in Great Britain) Selection of the sections which you want to be displayed in the "Basic Data & Events" viewer in "Custom Page" view (see section 6.16.5 "Custom Page"). The selection is made in the "Custom editor" window which appears by clicking on the "Selection active" button to the right of the "VDB Custom Page" item. User Manual Telekurs iD / Version 8.3 / 15 April 2010 General functions 33 Procedure for the selection of the sections: 1. Highlight the required sections by selecting them in the "Available sections" field and then clicking on the button. The selected sections will be transferred into the "Selected sec- button, you can move all the available sections into the tions" field. By clicking on the "Selected sections" field simultaneously. 2. If you wish, you can remove sections from the "Selected sections" field by highlighting them and then deleting them using the button. By clicking on the all the sections in the "Selected sections" field simultaneously. button, you can delete 3. If you wish, you can change the sequence of the sections by highlighting one section in the "Selected sections" field and moving it up with the button or down with the button. 4. Click on the "OK" button to save your definitions. Selection of the currencies which you want to be displayed in the "Basic Data & Events" viewer in "Custom Page" view (see section 6.16.5 "Custom Page"). The selection is made in the "Custom editor" window which appears by clicking on the "Selection active" button to the right of the "Currency Custom Page" item. The selection is made in the same way as above for VDB Custom Page. Selection of the color scheme for the representation of quotes that have just been updated. The selection is made in the "Custom editor" window which appears by clicking on the "Color Scheme" button to the right of the "Update Color Scheme" item. 34 General functions User Manual Telekurs iD / Version 8.3 / 15 April 2010 – If the "Default" setting is selected, prices that have just been updated are highlighted in yellow for approximately one second. – If the "Red/Black/Blue" setting is selected, prices that have just been updated are highlighted for approximately one second in red (price fell), black (price remained the same) or blue (price rose). Choice of list display with alternating color for the line backgrounds (zebra pattern) or the same color for all line backgrounds. Extended Search Preferences In the "Extended Search Preferences" folder you can change the settings of various search functions and the sort order for search results. User Manual Telekurs iD / Version 8.3 / 15 April 2010 General functions 35 Other Configurations In the "Other Configurations" folder you can: select the desired type of Excel export (DDE or FinXL) (see also section 5.12 "Data exchange via DDE (Dynamic Data Exchange)" or 5.13 "Data exchange via FinXL") . configure the separate chargeable "Screen Paging Mode". This is suitable for the demonstration mode of Telekurs iD in shop windows or central halls or in customer areas with system advisors. The "Screen Paging Mode" comprises two functions: – Automatic closing of all open screens and call up of the defined startup screen after a user-definable period (at least 10 s) without user activity. This means that every new demo user to arrive is greeted with the same initial situation. This function is switched off if the period is set to 0. – Automatic switching between all open screens (these must be defined as startup screens) after a user-definable period (at least 10s) without user activity. A continuous sequence of various screens is presented to the viewer, e.g. in a shop window, without him needing to do anything. This function is switched off if the period is set to 0 or if no more than one screen is open. enter a second e-mail address for notification when limits are exceeded or not achieved (see also section 6.12 "Limits"). determine the position for inserting instruments which are to be moved into a list by drag-anddrop or an entry in the command line: – "after selection": the new instrument is inserted below the highlighted position. – "before selection": the new instrument is inserted above the highlighted position. 36 General functions User Manual Telekurs iD / Version 8.3 / 15 April 2010 enter the export/import path (see also section 5.14 "Exporting data" and section 5.16 "Importing data"). define whether your user-specific objects (your own data and preferences) should be saved on the server or locally. If they are to be saved locally, you must enter the local path. define the default setting for quick search (this is pre-set in the "Context" selection area as "Search for"). define the way information is displayed in the "Context" selection area (always jump to context): – "Yes": the "Context" selection area of the active viewer is always displayed automatically. – "No": the "Context" selection area must be displayed manually. define the way the symbol bars and selection area (SideBar) are displayed: – "Load default settings": the symbol bars and the SideBar are displayed according to the standard settings. – "Load saved settings": the symbol bars and the SideBar are displayed according to the settings last saved. These settings are not saved when you quit the application. – "Always Save": the way the symbol bars and the SideBar are displayed is saved each time you quit the application and comes up again each time you restart Telekurs iD. It can be called up again later using "Load saved settings". Printer Page Settings User Manual Telekurs iD / Version 8.3 / 15 April 2010 General functions 37 Under "Printer Page Settings" you can change the header and footer lines on prints (see also section 5.3 "Print"). The settings are made in the "Page Setup" window which appears by clicking on the "..." button to the right of the "Printer Page Settings" item. In the "Left", "Center" and "Right" entry fields, you can enter the required header and footer text. When you click on the "Title", "Page Number", "Date" or "Time" buttons, the corresponding command is entered in the entry field in which the cursor is located. 38 General functions User Manual Telekurs iD / Version 8.3 / 15 April 2010 5.2 Set font and font size You can set the font and font size as defaults for all windows (see section 5.1 "User preferences"). We recommend that the default SIX Telekurs settings for font and font size are left unchanged. In addition, you can also set them temporarily for a window that you have just displayed, by right-clicking on the title line of that window and selecting the font type and size on the pop-up menu which comes up. After you have made the selection, the font and font size of the window will be changed immediately, in this example from "Arial Medium" to "Verdana Largest": User Manual Telekurs iD / Version 8.3 / 15 April 2010 General functions 39 5.3 Print With the print function you can choose to print the whole screen, the displayed content of a viewer or all or only selected data from lists (for historic time series you need the appropriate authorisation). You make the selection on the sub-menu "File / Print". "Screen" prints out the whole display area of the screen as a screenshot, i.e. exactly as it is displayed on the screen. "Viewer" prints out the displayed content of the viewer. You can also click on the the title line of the viewer instead of selecting this menu item. button in "Block" prints out the displayed content of the viewer as a screenshot, i.e. exactly as it is displayed on the screen. "All" prints out all data from lists (including those that are not visible in the viewer). "Selected" prints out only the selected data from lists. Produce the print your require as follows: 1. Call up the required print function either using the button in the title line of the viewer (for the content of the viewer) or using the relevant menu item on the sub-menu "File / Print". The "Print (Drucken)" window opens. 2. Under the "General (Allgemein)", "Page Setup (Seite einrichten)" and "Properties (Aussehen)" tabs, check that the existing printer and print setting options are correct. Some setting options vary according to the printer model used (black and white or color printing, doublesided printing etc). 3. Click on "Print (Drucken)". The print will appear on the selected printer. 40 General functions User Manual Telekurs iD / Version 8.3 / 15 April 2010 The program automatically adds to the print the header and footer text that you can set yourself in the "User preferences" under "Printer Page Settings" (see section 5.1 "User preferences"). Example of color print of a chart using "Landscape" setting. 5.4 Drag & Drop The drag-and-drop function is used to move instruments from one viewer into another or to copy instruments within the same viewer. You can also transfer lists and screens from the selection area directly into the top favorites toolbar using drag-and-drop. To do this: 1. Select the required instrument in the viewer (you can also select more than one instrument). 2. Position the mouse pointer on the selection, then press on the left mouse button and keep it pressed. 3. Now drag the mouse pointer to the point in another open viewer where you would like to insert or append the instrument. The shape of the mouse pointer indicates whether it is permitted to carry out a drop function at that particular place: Drop not allowed at this place Drop allowed at this place 4. Now release the mouse button. The instrument is imported into the other viewer. You can specify where it is inserted (above or below the highlighted position) (see section 5.1 "User preferences"). You can also move an instrument in a list (e.g. "List") by dragging and dropping the box in front of the name to another location in the same viewer. User Manual Telekurs iD / Version 8.3 / 15 April 2010 General functions 41 5.5 Double-clicking on an instrument When you double-click on an instrument then, depending on the configuration, a new viewer opens with the instrument, e.g. if you double-click on an instrument in a list, the "Single Quote" viewer opens, or, if you double-click in a viewer giving details about a particular instrument, e.g. "Chart" or "Single Quote", then the "Basic Data & Events" viewer opens. If, in viewers that are already open, the linking symbol is displayed on the title bar, then double-clicking on an instrument will move that instrument to all linked viewers (in the case of linked lists, above or below the highlighted line, depending on your user settings). Clicking on the linking symbol cancels the link. The linking symbol changes to , which means that no new instrument can be loaded or added in this viewer by double-clicking on an instrument in a different viewer. 5.6 Tooltips In various windows a short explanation can be displayed by positioning the mouse cursor over a particular spot (e.g. on a column heading or on a displayed value) – a so-called tooltip. Tooltip examples in a list: The meaning of the "T(adj)" column heading and the displayed data (here the Avantest share price) are explained. 42 General functions User Manual Telekurs iD / Version 8.3 / 15 April 2010 Tooltip example in a chart: The data is displayed from the point on the graph where the cursor is. This example shows the name, the date and the closing price of Siemens shares and the HDAX comparative index. 5.7 Calling up financial data Telekurs iD gives you a number of options for calling up financial data: by entering the instrument and the financial market directly in the command line (see description below and section 6.22.1 "Quick Search") by opening an existing list (see section 6.1.2 "Open an existing list") by using drag-and-drop editing to move instruments from an other viewer (see section 6.1.10 "Select list items" and section 5.4 "Drag & Drop") by searching for instruments using the "Search Extended" viewer (see section 6.22.2 "Search Extended") Direct entering of financial markets and instruments To call up data using the command line method, enter: <instrument>,<market> At <instrument> you can enter, for example, the symbol (abbreviation), the identification, national identification number (e.g. valor number, WPK number) or international identification number (ISIN). At <market> you can enter the stock exchange code number or symbol. Example: Lufthansa on the Frankfurt stock exchange: 667979,13 valor number, numeric exchange code LHA,FRA financial instrument symbol, alphabetic exchange code 823212,13 national ID number (WPK), numeric exchange code DE0008232125,13 international security identification number (ISIN), numeric exchange code LHA financial instrument symbol itself (searchs all keywords with LHA in the instrument identification (name, symbol)) User Manual Telekurs iD / Version 8.3 / 15 April 2010 General functions 43 Lufthansa identification itself (searchs all keywords with Lufthansa in the instrument identification (name, symbol)) LHA, financial instrument symbol, (automatically searches only for the main trading centre) If the meaning of what you have entered is completely clear, the instrument is imported into the active viewer. If there is no active viewer open, the "Single Quote" viewer is opened for the instrument. If what you have entered can have more than one meaning, the system searches for all instruments containing this sequence of figures or letters (see also section 6.22.1 "Quick Search"). Highlight the instrument you want, and then drag-and-drop it on to the viewer provided (see section 5.4 "Drag & Drop"). 5.8 Calling up detailed instrument information In some viewers symbols appear before certain values. If you double-click on that symbol, a "Basic Data & Events" viewer comes up with the corresponding detailed instrument information (see also section 6.16 "Basic Data & Events"). 5.9 Working with screens Telekurs iD offers several different ways of working with screens. You can: open a new screen. To do this, click on "File", then on "New Screen". An empty screen "Untitled screen" is opened, which you can then fill with viewers. fill up a screen with viewers (see section 5.9.1 "Calling up viewer") open an existing screen (see section 5.9.3 "Open an existing screen") set a screen as a startup screen (see section 5.9.4 "Set startup screens") set up the order of the user screen items individually in the "Screens" display area using drag-and-drop (see section 4.6 "Screens") save your own arrangement of viewers as a user screen. To do this, click on "File", then on "Save Screen As" (see section 5.10 "Saving or deleting objects"). If Telekurs iD has the appropriate configuration, you can also save your own arrangement of viewers as a customer screen. add a screen to Favorites or Top Favorites Click with the right mouse button on a screen in the "Screens" selection area and on the popup menu which appears select "Add to Favorites" or "Add to Top Bar". close a screen. To do this, click on "File", then on "Close Screen". If the screen is not empty, the "Save As" window appears (assuming that you have set this accordingly in the user settings), requesting you to save the screen. 44 General functions User Manual Telekurs iD / Version 8.3 / 15 April 2010 5.9.1 Calling up viewer There are various ways of calling up a viewer for display on a screen. For each viewer details are provided in section 6 "Main functions (viewers)" describing the ways this can occur. By clicking on the menu item "Show Viewer" on the "File" menu or by right-clicking in the display area of the screen or on a screen tab, and then selecting the "Show context" menu item, all viewers available for call up are listed in the "Context" selection area (see section 4.5 "Context"). However, viewers called up by this method are in most cases still blank. Another way of calling up a viewer is to enter the relevant Viewer Shortcut in the command line, e.g. .N to call up the "News Headlines" viewer (see also section 4.9 "Shortcuts"). 5.9.2 Switching title bars of viewers on and off All pop-up menus of viewers include a "Show Titlebar" menu item, which allows the title bar of the viewer to be switched on and off (e.g. to allow better use to be made of the space in the display area). If it is switched on, this is indicated in the pop-up menu by a tick in front of the menu item. 5.9.3 Open an existing screen Screens which have already been defined can be found in the "Screen" selection area (see section 4.6 "Screens"). Select the screen (e.g. "My Screen") that you would like to display. You can open it in the following ways: by double-clicking on the item by clicking on "Open" in the popup menu (right-hand mouse button) by dragging and dropping it into the display area. Another way of calling up a screen is to enter the relevant Screen Shortcut in the command line, e.g. .IR to call up the "Interest Rates" screen (see also section 4.9 "Shortcuts"). 5.9.4 Set startup screens To set startup screens right-click in the display area of the screen you want or on the screen tab or in the "Screen" selection area on the the screen you want and select "Add to Startup Screens" in the popup menu that appears. The name of the screen will then be listed in the "Favorites" selection area (siehe section 4.7 "Favorites") in a "Startup Screens" folder, and will open when Telekurs iD is started up. You can set up to 8 screens as startup screens. User Manual Telekurs iD / Version 8.3 / 15 April 2010 General functions 45 5.9.5 Maximise and restore tabbed pages On certain viewers, and especially on screens defined by SIX Telekurs, the information, which can sometimes be quite detailed, is displayed on tabbed pages where, depending on your screen size, the available space may be quite restricted. If you double-click on a tab, the content is maximised to occupy the full size of the viewer or screen. In the following example, the user double-clicks in the "Word Indices" screen on the "NASDAQ 100" tab in the "Indices Benchmark Futures" section. The name of the tab and the word "maximized" are added on the title bar. To return to the normal viewer or screen display, right-click on the title bar and select the menu item "Restore" on the pop-up menu which comes up. 46 General functions User Manual Telekurs iD / Version 8.3 / 15 April 2010 5.10 Saving or deleting objects Telekurs iD gives you the option of saving or deleting the following user-specific objects: User List: listing of financial instruments (see section 6.1 "List") Portfolio: listing of financial instruments with portfolio valuation (see section 6.4 "Portfolio") User Screen: listing of viewers in the display area (see section 5.9 "Working with screens") User Style: data field combinations in lists (see section 6.1.6 "Change style") User Viewer: viewer settings (e.g. Chart Styles) User Settings: news limits settings (see section 6.23 "News") Watchdog: financial instruments in the watchdog If Telekurs iD has the appropriate configuration, you can also save and delete customer lists, customer screens, customer styles und customer viewers. 5.10.1 Saving user-specific objects To save user-specific objects (a user list or portfolio are used in the example below), follow the directions below: 1. Click inside the active area of the "List" viewer. 2. Click on "File", then on "Save List As". The "Save As" window appears. User Manual Telekurs iD / Version 8.3 / 15 April 2010 General functions 47 3. Open the “User List” folder in the "Save in" area if this is not already open. All existing defined objects and folders are shown. If your Telekurs iD has the appropriate configuration, you can open the "Customer List" folder instead of this to obtain access to certain objects from all Telekurs iD users within the same financial institution. 4. If you wish, you can order objects in a hierarchy, as in Windows Explorer. To show sub-folders, click on the plus sign (+) beside the relevant folder in the "Save in" area, or double-click on the folder. To create a new folder: – Click on the "New folder" button. – Enter a name for your folder into the "New folder" dialog box. – Click on "OK". 5. Enter a name for your new object in the "Name" text box. 6. Activate the checkbox "Add to Favorites", if you want to add the new object to your Favorites. 7. To save, click on "OK". Other objects, such as user screens etc, are saved in the same way. When saving user-specific objects, the following applies: Screens With the "Save Screen" or "Save Screen as" functions on the "File" menu, a screen is saved as it is displayed at the time when it is saved (WYSIWYG). Chart settings must be saved separately first using the "Save Chart Settings" or "Save Chart Settings as" functions. Lists and Portfolios By using the "Save List/Portfolio" or "Save List/Portfolio As" functions, lists and portfolios are saved with column headings and sorted line sequence. The default style is displayed in the "Context" selection area in bold. If lines or columns have been added to or removed from a list or portfolio, the user is warned of this on closing the file. Styles The column headings can be saved as a separate style using the "Save Style" or "Save Style As" functions. A user list can be linked with a particular user style and then saved. Linked styles are shown in bold in the "Context" selection area. The checkbox "Keep style" has the following effect: if a new list is added to an existing “List“ viewer and the checkbox is deactivated, then the style of the new list is displayed. If the checkbox is activated, then the style of the new list is ignored and the previous style continues to be used. 48 General functions User Manual Telekurs iD / Version 8.3 / 15 April 2010 5.10.2 Deleting user-specific objects To delete user-specific objects (a user list or portfolio are used in the example below), follow the directions below: 1. In the "Lists" selection area, double-click on "User List". All defined objects and folders are shown. 2. To show sub-folders, click on the plus sign (+) beside the relevant folder, or double-click on the folder. 3. Right-click on the object concerned, and then click on "Delete" in the popup menu. 4. In the "Confirmation of deletion" window, click on "Yes". The object is deleted. Other objects, such as user screens etc, are deleted in the same way. 5.11 Link objects You can link objects such as screens, lists, viewers and styles with drag & drop from a higher level (e.g. Global) to a lower level (e.g. Customer or User). The linked object is shown with a shortcut arrow on the icon: linked list linked viewer linked screen linked style In contrast to saving to new, a link has the advantage that all changes at the higher level are also automatically performed in the link. It is not possible to establish a link from a lower level to a higher one. Neither is it possible to further link an already linked object. User Manual Telekurs iD / Version 8.3 / 15 April 2010 General functions 49 5.12 Data exchange via DDE (Dynamic Data Exchange) You can export the financial instrument data on a list via the DDE interface to other applications such as Microsoft Excel for example. Requirements: The export type DDE must be selected under "Other Configurations" in "User Preferences" (see section 5.1 "User preferences"), the policy file of the Java Virtual Machine must contain an appropriate entry and the DLL file must be saved on the PC (your system administrator will help you with this). DDE of complete lists or highlighted list entries 1. Click inside the active area of the list which you would like to export the data into another application from. 2. If you do not want to export the full list contents, highlight the items to be exported. 3. In the "Edit" menu, call up the DDE exchange function via the "Data Exchange with Excel (DDE) / All" (to export the full list contents) menu item or "Data Exchange with Excel (DDE) / Selection" (to export the highlighted items). You can also select the relevant menu items in the popup menu (right-hand mouse button). 4. Open the DDE partner application, e.g. Microsoft Excel. 5. Paste in the data using the paste function (e.g. Ctrl+V). The data is then linked dynamically to Telekurs iD via the DDE interface and will therefore be automatically updated every time there is a change. 50 General functions User Manual Telekurs iD / Version 8.3 / 15 April 2010 DDE of individual fields from lists 1. Open the DDE partner application, to which the field is to be exported, e.g. Microsoft Excel. 2. Click in the list on the field to be exported and use Drag & Drop to move it to the required location in the DDE partner application. The field is then linked dynamically to Telekurs iD via the DDE interface and will therefore be automatically updated every time there is a change. 5.13 Data exchange via FinXL You can export the financial instrument data on a list via the FinXL interface to Microsoft Excel. Requirements: The export type FinXL must be selected under "Other Configurations" in "User Preferences" (see section 5.1 "User preferences") and FinXL must be installed on your PC (your system administrator will help you with this). 1. Click inside the active area of the list which you would like to export the data into another application from. 2. If you do not want to export the full list contents, highlight the items to be exported. 3. In the "Edit" menu, call up the FinXL exchange function via the "Data Exchange with Excel (FinXL) / All" (to export the full list contents) menu item or "Data Exchange with Excel (FinXL) / Selection" (to export the highlighted items). You can also select the relevant menu items in the popup menu (right-hand mouse button). 4. Open Microsoft Excel. 5. Paste in the data using the paste function (e.g. Ctrl+V). 6. Activate FinXL and edit the data as required. Detailed instructions can be found in the FinXL Quick User Guide. User Manual Telekurs iD / Version 8.3 / 15 April 2010 General functions 51 5.14 Exporting data You can export the contents of viewers to an XML file, which can be opened and worked on in a number of different programs. Requirements: An export/import path must be given under "Other Configurations" in "User Preferences" (see section 5.1 "User preferences"). The folder stated there must be set up prior to the exporting process. In addition, the policy file of the Java Virtual Machine must contain an appropriate entry (your system administrator will help you with this). To export data: 1. Click inside the active area of the viewer from which you wish to export data. 2. If you do not want to export the full contents of lists, highlight the items to be exported. 3. In the "File" menu, call up the export function via the "Export (File)" menu item and select the required sub-menu item: – "Viewer", to export the displayed viewer as an image – "All", to export all entries in a list – "Selected", to export the selected entries in a list – "ISIN/NSIN", to export the reference data for a list (see section 5.15 "Exporting references"). You can also select the relevant menu items on the pop-up menu (right-hand mouse button). The following window appears: 4. Select the directory to which the data is to be exported. Use to create new folders and to move to the next directory up. 5. Enter the filename you want without extension, e.g. "Bluechip-Selection". Depending on the type of export you have selected, the appropriate extension for the entry in the "File Type" field will automatically be added to the file (.xls for exported data, .png for exported images and.txt for exported references). 52 General functions User Manual Telekurs iD / Version 8.3 / 15 April 2010 6. Click on "Export". The data is saved in XML format in the specified export folder. If you want to open the saved file directly using a different program, you can alter the file extension by hand (e.g. to.xls for Excel). 7. Open the exported file in a suitable program (e.g. in Excel for XLS files). Example: Exported file opened in Microsoft Excel 5.15 Exporting references You can also export the financial instrument reference entries only in a list (identification number and numeric stock exchange code separated by a comma) into a text file. This file can then be (see section 5.16 "Importing data") reimported into a list using the import function. Requirements: An export/import path must be given under "Other Configurations" in "User Preferences" (see section 5.1 "User preferences"). The folder stated there must be set up prior to the exporting process. In addition, the policy file of the Java Virtual Machine must contain an appropriate entry (your system administrator will help you with this). To export references: 1. Click inside the active area of the list you wish to export. 2. If you do not want to export all reference entries in the list, highlight the items to be exported. 3. In the "File" menu, call up the reference export function via the "Export (File) / ISIN/NSIN / All" (to export all list reference entries) menu item or "Export (File) / ISIN/NSIN / Selection" (to export the highlighted items). You can also select the relevant menu items in the popup menu (right-hand mouse button). The following window appears: User Manual Telekurs iD / Version 8.3 / 15 April 2010 General functions 53 4. Select the directory to which the data is to be exported. Use to create new folders and to move to the next directory up. 5. Enter the filename you want without extension. The extension.txt is automatically added to the file. 6. In the "Instrument Scheme" selection box, select the required scheme, if you want to export only data with a specific instrument scheme: – use "ALL" to export data with the default instrument scheme defined in your user settings – use "Symbol" to export data with a symbol – use "ISIN" to export data with ISIN identification numbers – use a national identification number system, e.g. "CH-Valoren", to export data with the corresponding NSIN numbers. 7. Click on "Export". The data is saved in text format in the specified export/import folder. 8. Open the exported file in a text editor. Example: A file exported using the "Symbol" instrument scheme is opened in the text editor 54 General functions User Manual Telekurs iD / Version 8.3 / 15 April 2010 5.16 Importing data You can import lists from an import text file. Each financial instrument to be imported must be defined with its identification number and numeric stock exchange code separated by a comma. You can also import lists from an Excel file if you save it in CSV format. Here, the identification number must be entered into the first column and the stock exchange code into the second column. Requirements: An export/import path must be given under "Other Configurations" in "User Preferences" (see section 5.1 "User preferences"). The folder stated there must be set up prior to the importing process. In addition, the policy file of the Java Virtual Machine must contain an appropriate entry (your system administrator will help you with this). Please note that to import from a CSV file you must ensure that the comma has been set as list separator (customise in the Control Panel under "Regional and Language Options / Regional Options, on the "Numbers" register.) To import data: 1. Create a text file or an Excel file in CSV format with the financial instruments to be imported (identification number, stock exchange code or symbol, stock exchange code). If you omit the stock exchange code – so only enter the identification number and comma – then the main trading centre for the instrument is selected automatically, e.g. SWX (SIX Swiss Exchange) if you enter "3886335," to import the Nestle share. If you omit the comma and the stock exchange code, then all trading centres for the instrument are selected automatically, e.g. if you enter "CH0011037469" to import the Syngenta share from all sources. You can also create a text file by exporting the references from a list (see section 5.15 "Exporting references"). 2. Save this file in the specified export/import folder. 3. Open a new user list ("File / New List" menu), if you want to import the data into a new list, or open an existing list to which you want to transfer the data to be imported. To import into an existing list, you have to define where the data is to be inserted, by highlighting a line after which it is to be inserted. 4. In the "File" menu, call up the import function via the "Import" menu item. The following window appears: User Manual Telekurs iD / Version 8.3 / 15 April 2010 General functions 55 5. Select the directory from which the data is to be imported. Use to create new folders and to move to the next directory up. 6. Select the name of the file to be imported in the export/import directory which comes up or enter the file name in the "File Name" field. 7. In the "Instrument Scheme" selection box, select the required scheme if you want to import only data with a particular instrument scheme: – use "Symbol" to import only data with a symbol – use "ISIN" to import only data with ISIN identification numbers – use a national identification number system, e.g. "NSIN CH Switzerland", to import only data with the corresponding NSIN numbers. 8. Deactivate the "Most Liquid Trading Place" checkbox if you want to import an instrument using all trading places and have therefore omitted the comma and the trading centre code in the import file. Otherwise only the instrument from the main trading place will be imported. 9. Click on "Import". The data is imported into the open list. 56 General functions User Manual Telekurs iD / Version 8.3 / 15 April 2010 If some data in the import file cannot be processed, it is shown in red in the "Name" column and a message comes up with the relevant data, e.g. 5.17 Date input with calendar function In all date fields you can choose to input the date by using the keypad or by using the calendar function as follows: 1. Double-click in the date field. The calendar is displayed. The present date is preselected. 2. Select the required date. 3. Click on "OK". The chosen date is then displayed in the date field. 5.18 Call up online help The Telekurs iD help function can be called up in two different ways: Context-sensitive with direct display of the desired help topic In the "Help" menu, click on "What is this?". The cursor changes to . Now click with the cursor on the element whose function you would like to have explained in a help text. A browser window will open containing the appropriate help topic. By choosing Contents in Telekurs iD help In the "Help" menu, click on "Help contents". A browser window will open containing the contents list of Telekurs iD online help. Now click on the help topic you are interested in. Within the browser, you can click on any link to obtain a display of additional information. User Manual Telekurs iD / Version 8.3 / 15 April 2010 General functions 57 6. Main functions (viewers) A viewer is used to provide a visual representation of financial instrument data, or to control the functions provided by Telekurs iD. Viewers specify the way in which data is shown, but not the data themselves. Viewers are opened in the screen (see section 4.6 "Screens") and then supplied with data. 6.1 List The "List" viewer shows market data, basic data, events data as well as analytical data for a list of financial instruments. Depending on the type of list, the data displayed can include the following: "Name" shows the name of the instrument. "N" indicates if there is any news about the instrument or company. If the information symbol is blue it means that there is current, unread news, while a grey symbol indicates news that is more than one day old or has already been read. Double-clicking on the symbol displays the "News Search Results" viewer with the relevant headlines from the news agencies you are subscribed to (see section 6.23 "News") and a blue symbol changes to grey until more news arrives. "T(adj)" (Trend, adjusted) indicates whether the quote (Last) is down , at the same level or up compared with the closing price (Close) of the previous day. Trend adjusts for any price swings due, for example, to splitting or dividend payments. "Cur" shows the currency in which the instrument is traded. "dl Last" indicates the stock exchange delay for the "Last" column in minutes. For some exchanges bid/ask prices are also delayed according to permission. This delay can also be displayed in addition by adding the relevant field attribute. The remaining columns display the main quotes. The values in the "% NC2", "NC2" and "Net Act/Pr.YC%" columns are shown in color (positive: blue; negative: red; unchanged: black). There are different ways of calling up a "List" viewer: open an existing list of financial instruments (see section 6.1.2 "Open an existing list") or create a new list (see section 6.1.1 "Compile a new list"). 58 Main functions (viewers) User Manual Telekurs iD / Version 8.3 / 15 April 2010 You can change the contents of the "List" viewer to suit your own preferences (see section 6.1.3 "Change an existing list"). If you double-click on a line in the "List" viewer, then depending on your configuration, either a new viewer is opened showing the instrument or the instrument is moved by linking to a viewer that is already open (see section 5.5 "Double-clicking on an instrument"). In the "User preferences" (see section 5.1 "User preferences") under "Display Preferences, Alternating Rows" you can also set the list display to alternating colors for the line backgrounds (zebra pattern). Clicking on an item in the popup menu (right-hand mouse button) enables you to call up directly the following viewers for the instrument: "Open Single Quote" opens a new "Single Quote" viewer (see section 6.7.1 "Single Quote"). "Open Quote Overview" opens a new "Quote Overview" viewer with a quote overview (see section 6.7.2 "Quote Overview"). "Open All Sources" opens a new "All Sources" viewer (see section 6.8 "All Sources") with all the trading centres. "Open related companies" opens the "Listing Search Results" viewer showing all the companies to which the same sector code is assigned as this instrument. "Open All History" opens a new "All Sources Historylist" viewer (see section 6.8 "All Sources") showing all trading centres and the valuation rates for those trading centres during the past month. This pop-up menu item is only available with certain configurations. "Market Info" opens a new "Basic Data & Events" viewer (see section 6.16 "Basic Data & Events") with trading centre details. "Open News" opens the "News Search Results" viewer containing all the news headlines for the instrument. "Open Underlayer News" opens the "News Search Results" viewer showing all the company news headlines for this instrument. This pop-up menu item is only available if you have clicked on a list entry for which the underlying instrument is available (derivatives). "Open Underlying" opens up – if an Underlying Instrument exists, e.g. with derivatives – the "Listing Search Results" viewer, showing all the trading centres for this instrument or goes straight to the "Single Quote" viewer if the instrument is only traded at one trading centre. User Manual Telekurs iD / Version 8.3 / 15 April 2010 Main functions (viewers) 59 "Open Stock Option Calculator" opens the "Option Calculator" viewer for this instrument (see section 8.1 "Stock Option Calculator"). This pop-up menu item is only there if you have clicked on a list entry where the Option Calculator can be used (shares or derivatives). "Open Index Option Calculator" opens the "Index Option Calculator" viewer for this instrument (see section 8.2 "Index Option Calculator"). This pop-up menu item is only there if you have clicked on a list entry where the Index Option Calculator can be used (derivatives). "Open Currency Option Calculator" opens the "Currency Option Calculator" viewer for this instrument (see section 8.3 "Currency Option Calculator"). This pop-up menu item is only there if you have clicked on a list entry where the Currency Option Calculator can be used (derivatives). "Open Commodity Option Calculator" opens the "Commodity Option Calculator" viewer for this instrument (see section 8.4 "Commodity Option Calculator"). This pop-up menu item is only there if you have clicked on a list entry where the Commodity Option Calculator can be used (shares or derivatives). "Open Bond Calculator" opens the "Bond Calculator" viewer for this instrument (see section 8.5 "Bond Calculator"). This pop-up menu item is only there if you have clicked on a list entry where the Bond Calculator can be used (bonds). "Open Derivatives" with its sub-items "Options", "Warrants", "Futures" or "Options on Futures" opens the "Chaining" viewer with the corresponding derivatives for this instrument (see section 6.9 "Chaining"). "Open Structured Products" with its sub-items "All Structured Products", "Leverage", "Yield Optimisation", "Capital Protection", "Participation" or "Other" opens the "Chaining" viewer with the corresponding structured products for this instrument (see section 6.9 "Chaining"). "Open Chart + History" with its sub-items "Intraday Chart", "Intraday Time Series", "History Chart" or "History Time Series" opens a new "Chart" viewer (see section 6.10 "Chart") or "Time Series" viewer (see section 6.11 "Time Series"). "Instrument Info" with its sub-items, opens the "Basic Data & Events" viewer with the relevant view (see section 6.16 "Basic Data & Events"). "Company Info" with its sub-items, opens a viewer showing more details about the company. Further details are given in section 6.16 "Basic Data & Events". "Currency Info" with the available currencies USD, CHF, EUR, GPB, JPY and SGD as submenus opens the "Convert" window and shows the corresponding converted value and the exchange rate (this pop-up menu item is only available if the user has clicked upon an exchange rate value). "Add to Watchdog" opens the "Watchdog" viewer and takes the instrument into the watchdog (see section 6.13 "Watchdog"). "Add List to Favorites" opens the window "Favourite Properties" (see section 4.7 "Favorites"). "Add Limit" opens the "Limits" viewer and the "Limit settings" window so that you can set a new limit for the instrument (see section 6.12 "Limits"). 60 Main functions (viewers) User Manual Telekurs iD / Version 8.3 / 15 April 2010 6.1.1 Compile a new list You can create a new list of financial instruments as follows: 1. Click on "File" and then on "New List / Standard List" or enter the shortcut .LIST in the command line. An empty "List" viewer opens. 2. Select the instrument you wish to be displayed (see section 5.7 "Calling up financial data"). 3. Change the structure of the list (see section 6.1.4 "Change list structure"). 4. Save your list as a user list. To do this, click inside the active area of the viewer, then click on "File" and then on "Save List As" (see section 5.10 "Saving or deleting objects"). 6.1.2 Open an existing list Lists that have already been defined are in the "Lists" selection area (see section 4.4 "Lists"). Open the listing you want (e.g. the item "Athens" under "Global List"), and select the list of instruments you would like to have displayed (e.g. "Composite Index"): Drag and drop the list you want on to the screen, or on to an open "List" viewer of an existing screen. In the first case, a new "List" viewer will be opened with the selected list (see section 6.1 "List"); in the second case, the selected list will be imported into the open "List" viewer. Double-click on the relevant list. The selected list will open up a new "List" viewer (see section 6.1 "List"). Right-click on the appropriate list to display the popup menu. – Click on "Open" in the popup menu. The list will be taken into the active viewer "List". If no “List” viewer is active, a new one will be opened with the selected list (see section 6.1 "List"). – Click on "Open in New Quote List" in the popup menu. The selected list will be opened in a new "List" viewer (see section 6.1 "List"). User Manual Telekurs iD / Version 8.3 / 15 April 2010 Main functions (viewers) 61 – Click on "Open in New Multiple Quote List" in the popup menu. The selected list will be opened in a new "Multiple Quote List" viewer (see section 6.2 "Multiple Column List"). In contrast to the normal lists, up to 6 columns can be selected here for the representation of the instruments. – Click on "Open in Multiple Tabbed Lists" in the popup menu. A new "Multiple Tabbed Lists" viewer is opened with the selected list on the first tab (see section 6.1.11 "Loading several lists in a viewer"). In contrast to normal lists, up to 5 lists can be loaded here. To load another list, click on the pop-up menu item "Open List in next tab". – Click on "Open in New Heatmap" in the popup menu. The selected list will be opened in a new "Heatmap" viewer (see section 6.5 "Heatmap"). – Click on "Open in New Ticker" in the popup menu. The selected list will be opened in a new "Ticker" viewer (see section 6.6 "Ticker"). – Click on "Add to Watchdog" in the popup menu. The "Watchdog" viewer will open, and the list will be imported into the watchdog (see section 6.13 "Watchdog"). If you wish to include an already defined list in a new, empty "List" viewer, click on the "File" menu, then click on "New List / Standard List" to open an empty "List" viewer. You can now include the list you want in the empty viewer as described above, or you can make up a new list by dragging and dropping instruments from other lists. 6.1.3 Change an existing list You can change a list in various ways to suit your own requirements: Delete instruments you no longer need. To do this, highlight the items concerned and click on "Remove Row (Quote)" in the popup menu (right-hand mouse button). Copy instruments from other viewers using drag and drop. Enter text directly into the command line. Change the order of the list items (see section 6.1.8 "Sort list") Change the structure of the list (see section 6.1.4 "Change list structure") Return the list back to its original state, i.e. re-display all the financial instruments in their original order (this does not change the style). To do this, right-click in the active area of the list and select the "Revert instrument list" popup menu item which then appears. Save the list as a new user list. To do this, click inside the active area of the viewer, then click on "File" and then on "Save List As" (see section 5.10 "Saving or deleting objects"). Save changes to a user list. To do this, click inside the active area of the viewer, than click on "File" and then on "Save List". When you save a list, the contents of the list (in the appropriate order) and the list structure (style) are saved. 62 Main functions (viewers) User Manual Telekurs iD / Version 8.3 / 15 April 2010 6.1.4 Change list structure The data or quotes shown in a list – e.g. in the "List" or "All Sources" viewers – and the order in which they are displayed, are defined in a style (a combination of data fields). Each list is allocated the appropriate standard style when it is called up, depending on the types of instrument. However, you can adapt the structure of the list at any time, as follows: by allocating a different saved style (see section 6.1.5 "Allocating a style") by changing the data field combination manually (see section 6.1.6 "Change style") 6.1.5 Allocating a style The way in which lists are shown – for example, in the "List" or "All Sources" viewer – is determined by styles. A style specifies the data fields to be shown, and the order in which they are displayed. If the "Context" selection area is not displayed automatically according to your user-specific settings, right-click in the active area of the list. In the popup menu that appears, select "Show Context". All the defined styles are listed in the "Context" selection area. Telekurs iD has four types of style: Global Style: combinations of data fields which have been predefined by SIX Telekurs for the various types of list. The style currently in use will be highlighted, in the example shown it is "Equities". Country Style: combinations of data fields which have been predefined by SIX Telekurs for individual countries. Customer Style: user-specific data field combinations created by Telekurs iD users for the users within the same financial institution. User Style: user-specific data field combinations created by yourself. The style set by Telekurs as a default for the currently displayed list will be shown as a separate "Default Style" entry, and can be rapidly restored after temporary style changes by double-clicking. User Manual Telekurs iD / Version 8.3 / 15 April 2010 Main functions (viewers) 63 Allocate a style to a list as follows: 1. Open the list or listing you want. 2. If the "Context" selection area is not displayed automatically according to your user-specific settings, go into the "Context" selection area and click inside the active area of the "List" viewer (a red border appears). 3. In the "Context" selection area select the "Style" tab. 4. Open the desired folder, e.g. "Global Style" by double-clicking. 5. Double-click on the style you wish to allocate to the list. 6. Activate the checkbox "Keep style" if the currently allocated style is be retained when a new list is loaded up. Otherwise the default style will be used again. 7. Activate the checkbox "Auto-adjust columns" if the column widths are to be automatically set to optimum when a new list is loaded up. 6.1.6 Change style You can adapt the layout of a list – in the "List" viewer, for example – to suit your own requirements, and save it as a user-specific User Style if you wish. Remove column Right-click on the relevant column heading and then on the popup menu item "Remove Column". The column disappears, and the next column is moved to the left. Move column Click on the relevant column heading. Hold down the mouse button and drag the pointer to the point in the column heading row to which you want to move the column. Release the mouse button. The column has been moved to its new position (drag and drop). 64 Main functions (viewers) User Manual Telekurs iD / Version 8.3 / 15 April 2010 Add column by Drag & Drop If the field you want to insert for the new column is already available on a different open viewer, you can simply use Drag & Drop to move it to the required place in the column headings for the list. That is much quicker than inserting it by selecting a field, which is described in the next section. 1. In an open viewer such as "Single Quote", click on the value (not the field name) for the field which you would like to insert as a new column in the list, keep the mouse button pressed down and drag the cursor to the place in the column headings line on the list where you would like to enter the new column. 2. Release the mouse button in the required place. The column is inserted. Add column by field selection 1. Right-click on the column heading after the point at which you wish to insert a new column, and then on the popup menu item "Add Field". In the "Context" selection area the "Field Chooser" register will be selected. 2. Widen the "Context" selection area until the selection button in the "Language" area is visible. 3. In the “Language” selection box select the desired language for the data field identifiers. This is a good idea, for example, if you are more familiar with the data field identifier in a different language. User Manual Telekurs iD / Version 8.3 / 15 April 2010 Main functions (viewers) 65 4. Limit the display in the "Data Fields" area to such a degree that the data field that you wish to insert is visible. You have various options for doing this: – Scroll downwards in the "Data Fields" area until you have found the desired data field. – Enter a few letters that occur in the identifier of the data field to be inserted in the “Find” text box, e.g. “low”, if you want to insert a lowest quote. The display will be automatically restricted to those entries that incorporate the corresponding sequence of letters (any filter conditions which have been set will be disregarded). – Highlight the desired field types and/or instrument types in the “Filter” area. The display will immediately be restricted in accordance with these filter settings. For example, "Quotes" filters according to quote fields, “News” according to news-related fields such as info symbol or news headlines, “Analysis” according to analysis data from theScreener – an independent provider of analysis information – such as "stars", "trends" etc. (see also section 6.17 "Analysis") and "My favorites" according to data fields that you have highlighted and saved at an earlier date for the currently selected list in the "Data Fields" area. 66 Main functions (viewers) User Manual Telekurs iD / Version 8.3 / 15 April 2010 5. Insert the desired data field into the list in one of the following ways: – Double-click in the "Data Fields" area on the data field identifier. The data field will be inserted as the first column in the list. – In the "Data Fields" area, click with the right-hand mouse button on the data field identifier and in the pop-up menu select either the menu item "Add" (the data field will be inserted as the first column in the list) or "Add after" (the data field will be inserted into the list after the selected data field). User Manual Telekurs iD / Version 8.3 / 15 April 2010 Main functions (viewers) 67 – In the case of data fields with a folder symbol you can open the folder by clicking on the plus symbol to specify which information relating to this data field you wish to insert into the list, e.g. the trading volume or the time instead of the value. 6. If required, insert further data fields into the list. 7. If you want to save a selection of data fields so that they can be more quickly located later on, you can highlight the checkboxes in question in the “Data Fields” area and then click on the "Save my favorites" button. If you select the filter condition "My favorites", all highlighted data fields are shown in the "Data Fields" area. 68 Main functions (viewers) User Manual Telekurs iD / Version 8.3 / 15 April 2010 8. If you want to restore the settings of the "Field Chooser" registration card to their original state, click on the “Reset” button. Inserting a column with an advanced quotes field Advanced quotes fields are generally rarely used fields which are not listed in the normal choice of fields in the "Context" selection area, but they can be inserted as columns in a list as follows. 1. Right-click on the column heading and then on the pop-up menu item "Add Advanced quotes". The "Field selection" window is opened. 2. In the "Statistic Type (STT)" selection list, select the required statistic type, in the "Value Type (VAT)" list select the required value type, in the "Generation Flag (GF)" list select the required generation and if necessary select an additional attribute in the "Price Record Field" selection list. Your selection is displayed in the "selected" field. If you cannot find the values you require in the selection lists, you can also enter the relevant codes (which can be found in the tables) manually in the "custom" field. Then at the next stage you have to click on the "Add custom Field" button. 3. Click on the "Add selected Field" button. The column with the quotes field you have defined is inserted on the left in the list. (You can subsequently move the column to a different position as described above). 4. If required, insert further advanced quote fields into the list. User Manual Telekurs iD / Version 8.3 / 15 April 2010 Main functions (viewers) 69 Inserting columns with bar charts Certain comparative figures can be displayed on lists not only as normal percentages but also by using bar charts. The following example shows changes over the last 52 weeks, since the beginning of the year and during the last week. You can insert these fields with bar charts in the same way as previously described for other columns. They can be found in the "Context" selection area on the "Field Chooser" tab in the "Data Fields" section as "Barchart" entries. Revert style If you would like to use the original data field combination again, click on the column header and then on the popup menu item "Revert Style" (right-hand mouse button). Save user style 1. If you want to save the new data field combination as a user style, right-click in the column heading row and then on the popup menu item "Save Style As". The "Save As" window appears. 2. In the "Save in" area, double-click on "User Style". All the styles already defined are displayed. If Telekurs iD has the appropriate configuration, you can also double-click on "Customer Style" to gain access to certain styles from all Telekurs iD users within the same financial institution. 3. In the "Name" box, enter a name for the new user style. 4. Activate the "Add to Favorites" checkbox if you want to add the new User Style to your Favorites. 5. Click on OK to save. You can now allocate the new user style to any list. 70 Main functions (viewers) User Manual Telekurs iD / Version 8.3 / 15 April 2010 6.1.7 Change column width You can change the width of a column manually or automatically: To change the width of a column manually, move the mouse pointer inside the column heading to the right-hand border. The mouse pointer changes to a double arrow. Hold down the mouse button and drag the pointer to the left or right to reduce or increase the column width as required. Release the mouse button. The column remains at the width you have chosen. To change column width automatically, click on the symbol in the left-hand corner of the column heading row. The columns will be displayed at the most appropriate width. Note: Column widths are only saved, if the lists are saved in a screen. 6.1.8 Sort list You can sort the contents of a list by clicking twice on the relevant column heading. The list contents are sorted alphanumerically, and the sort order is indicated in the column heading: = ascending, = descending. If you add new items to a list, they are not sorted automatically but are always added in at the top. Note: There are lists, for example the results of search queries, which can include up to a maximum of 30,000 entries. These lists are automatically subdivided into selectable pages of 1000 entries each. In such a case, they are sorted only page by page and not across all the data. If all 30,000 entries had to be sorted, this would result in a massive overloading of the system. In this context, performance and stability were judged to be higher priorities. You can also set the order of list items manually using drag & drop. The grip point is the grey area at the beginning of the line. Note: The sort order is not saved in a style, but must be changed again each time. 6.1.9 Comment list items You can supplement the list entries for each list and each portfolio with personal comments, by inserting a column for the data field "Free Text" (see section 6.1.6 "Change style"). To enter or amend your comments, double-click on the required free text field in the list and enter your comments in the "Edit freetext" window which comes up. The following picture shows a list with comments inserted in the "Free text" column: User Manual Telekurs iD / Version 8.3 / 15 April 2010 Main functions (viewers) 71 If you enter an Internet address as free text (the complete URL preceded by http://), you can call up the website directly by right-clicking on the free text field in question and then on the menu item "Open URL in Browser" on the pop-up menu that comes up. 6.1.10 Select list items List items – such as instruments in the "List" viewer, or search results in the "Search Results" viewer – can be selected in order to move them into another viewer by drag and drop. You select a list item by clicking on it. The line is then shown with a colored background. You can also select more than one item: To select non-adjacent items in a list, click on the item, then hold down the CTRL key and click on any other items you wish to select. To select adjacent items in the lists, click on the first item, then hold down the mouse button and drag the cursor to the last item you wish to select (you can also press down the Shift key and then click on the last entry to be selected). Note: If you select the wrong item by mistake, hold down the CTRL key and click on the item again. 72 Main functions (viewers) User Manual Telekurs iD / Version 8.3 / 15 April 2010 6.1.11 Loading several lists in a viewer You can load up to 5 lists in the "Multiple Tabbed Lists" viewer instead of having to open each list in its own viewer. Using the tab key you can comfortably switch between the individual lists. You can call up a "Multiple Tabbed Lists" viewer in various ways: Lists that have already been defined can be found in the "Lists” selection area (see section 4.4 "Lists"). Open the required lists that you would like to have displayed in a "Multiple Tabbed Lists" viewer by right-clicking in the "Lists" selection area on the relevant list, to display the pop-up menu and then click on the pop-up menu item "Open in Multiple Tabbed List" for the first list or on the pop-up menu item "Open List in next tab" for the next four lists. You can also open an empty "Multiple Tabbed Lists" viewer either in the "Context" selection area under "Global Viewer" or by using the shortcut .ML in the command line. In each of the 5 page tab lists of the "Multiple Tabbed Lists" viewer you can also create a new list (see section 5.7 "Calling up financial data"). 6.1.12 Adding lists to Favorites or to Top Favorites You can add a list to the Favorites or to the Top Favorites. Right-click in the "Lists" selection area on a list and then on the pop-up menu which comes up select "Add to Favorites" or "Add to Top Bar". User Manual Telekurs iD / Version 8.3 / 15 April 2010 Main functions (viewers) 73 6.1.13 Displaying lists in the original language You can display a list in various original languages, including the Nordic languages, Japanese and Chinese. All names are then shown in that language. To do this, you have to make the relevant user-specific settings (see section 5.1 "User preferences") under "Display Preferences": Set the required original language as the data language. Set "Data language" or "Combined" as the language mode (names are displayed in the interface language, followed by the data language) Set the font type "Arial Unicode MS", because other font types can only display Latin characters (if only certain viewers are to be displayed in the relevant original language, the font type can also be set directly in the viewer (see section 5.2 "Set font and font size"). Display examples: Viewer display with original Chinese Viewer display combining the interface language and original Japanese (in brackets) 74 Main functions (viewers) User Manual Telekurs iD / Version 8.3 / 15 April 2010 6.2 Multiple Column List The "Multiple Column List" viewer shows a listing of financial instruments. In contrast to the normal lists, up to 6 columns can be selected here for the representation of the instruments. You can customise the representation of the lists as follows: 1. If the "Context" selection area is not displayed automatically according to your user-specific settings, go into the "Context" selection area and click in the active area of the "Multiple Column List" viewer. 2. Select the sort direction in the “Sort Direction” selection box. “Horizontal” sorts by rows from left to right and “Vertical” sorts in columns from top to bottom. You can set the sort criteria in the column heading (see section 6.1.8 "Sort list"). 3. Select the desired number of columns in the “Number of Columns” selection box (1 to 6 columns are possible). 4. Highlight "Realtime Sorting", if the sort order is to be automatically adjusted in real time (only has an effect when sorting by prices). 5. Select the desired style in the "Styles" selection box. Example: 3-column representation, horizontal sort direction, sorted by name in ascending order: User Manual Telekurs iD / Version 8.3 / 15 April 2010 Main functions (viewers) 75 You can call up a "Multiple Column List" viewer in various ways: Lists that have already been defined can be found in the "Lists” selection area (see section 4.4 "Lists"). Open the desired listing that you want to display in a "Multiple Column List" viewer by clicking with the right-hand mouse button on the list in question to display the pop-up menu and then click on the pop-up menu item "Open in New Multiple Quote List". By clicking on a pop-up menu item (right-hand mouse button) you can directly call up further viewers for the instrument in the same way as in the "List” viewer (see section 6.1 "List"). 6.3 My Index List The "My Index List" viewer enables you to put together your own index which can then be used to make comparisons with other indexes or individual financial instruments. Here is how to put together your new index list: 1. On the menu bar, under "File" click on "New List / My Index List". A blank "My Index List" viewer opens. 2. Select the instruments you wish to include in your own index list (see section 5.7 "Calling up financial data"), e.g. corresponding to your portfolio. Weighting is carried out automatically according to the value of the instruments, i.e. each instrument value is given Factor 1. 76 Main functions (viewers) User Manual Telekurs iD / Version 8.3 / 15 April 2010 3. To adjust the weighting, double-click on the "Weight %" column. The "Weightings" window appears. 4. Change the weighting, e.g. according to the weighting in your portfolio. Note that the total must add up to exactly 100 %. Only then does the "Apply" button become available. 5. Click on the "Apply" button. The new weighting is applied and the factors are recalculated. 6. By double-clicking in the "Operator", "Field" or "Factor" columns, you can change them individually using the options shown. 7. Save the newly compiled Index List as User My Index. To do this, click in the active area in the "My Index List" viewer and then click on the menu bar under "File" on "Save My Index as" (see section 5.10 "Saving or deleting objects"). User Manual Telekurs iD / Version 8.3 / 15 April 2010 Main functions (viewers) 77 Mathematical operations instead of weighting You can also set up your index using mathematical operations instead of weighting the different financial instruments. That is what the operators and factors are for which can be selected by double-clicking on the "Operator" and "Factor" columns. Example: 3 shares (e.g. Intel, ABB and Adidas) with different currencies (USD, CHF and EUR) are to be included in the index, converted into Swiss francs with the weighting 2:3:1. To do this, the 3 instruments and exchange rates are moved into the "My Index List" viewer, and the operators "/" (division) and "*" (multiplication) are selected for the currency conversion and the factors 2, 3 and 1 for the weighting. With the figures shown in the picture above, the following calculation is carried out: (((((22.43*2/1.07215)+(22.91*3))*1.42905)+39.295)/1.42905 Note: The values used are not real-time values but the closing rates from the previous day. Using indexes you have compiled yourself If you click on the menu item "Show My Index in Chart" (right mouse button), your own index is displayed in the "Chart" viewer as an annual diagram (shown on the left). You can also compare your own index with other financial instruments or indexes (shown on the right), to show the relative performance of your portfolio. This procedure is described in Section 6.10.8 "Set and show comparisons". 78 Main functions (viewers) User Manual Telekurs iD / Version 8.3 / 15 April 2010 6.4 Portfolio The "Portfolio" viewer shows developments in a selection, compiled by you, of financial instruments in which you have carried out transactions. The amounts paid at the time of purchase – for each instrument and for the portfolio as a whole – are continuously compared with the actual values calculated on the basis of current quotes. In the "Portfolio" viewer the following data is displayed: "Name" shows the name of the instrument. "N" indicates if there is any news about the instrument or company. If the information symbol is blue it means that there is current, unread news, while a grey symbol indicates news that is more than one day old or has already been read. Double-clicking on the symbol displays the "News Search Results" viewer with the relevant headlines from the news agencies you are subscribed to (see section 6.23 "News") and a blue symbol changes to grey until more news arrives. "Market" shows the abbreviation of the trading centre where an instrument is traded. "Cur" indicates the currency in which an instrument is traded. "LVal" shows the current price of the instrument. "Quant" gives the volume of all transactions for each instrument and each trading centre. "Paid" shows the amount paid at the time of purchase, including charges, for each instrument. The bottom line ("TOTAL") shows the total for the portfolio as a whole. "Actual" shows the current actual value for each instrument and, in the bottom line, for the entire portfolio ("TOTAL"), calculated on the basis of current quotes. "P.Rate" gives the exchange rate at the time of purchase (where the instrument is not traded in the currency used for the portfolio). Where there are a number of transactions for an instrument, the average rate is calculated. "Act.Rate" gives the current exchange rate (where the instrument is not traded in the currency used for the portfolio). "+/-" shows the difference (profit or loss) between the amount paid and the current value for each instrument and, in the bottom line ("TOTAL"), for the portfolio as a whole. "+/-(%)" shows the percentage difference (profit or loss) between the amount paid and the current value for each instrument and, in the bottom line ("TOTAL"), for the portfolio as a whole. User Manual Telekurs iD / Version 8.3 / 15 April 2010 Main functions (viewers) 79 If you double-click on a line in the "Portfolio" viewer, then depending on your configuration, either a new viewer is opened showing the instrument or the instrument is moved by linking to a viewer that is already open (see section 5.5 "Double-clicking on an instrument"). Currencies (e.g. USD/CHF,148) can also be assigned to portfolios. 6.4.1 Create a new portfolio 1. Click on "File" and then on "New portfolio" or enter the shortcut .P in the command line. An empty "Portfolio" viewer is opened. Alternatively, in the "Context" selection area, go to "Global Viewer" and open the "Portfolio" viewer. The "New portfolio" window appears. 2. In the "Currency" selection box, select the currency in which you would like to run the portfolio and click on OK. The proposed currency depends on the user setting "Default Currency". 3. Select the instrument you would like to include in the portfolio (see section 5.7 "Calling up financial data"). Another entry window appears: 4. Enter the dates that apply to this transaction: – date of purchase (Date), – price valid at the time of purchase (Paid price), – the quantity purchased (Quantity) and – the charge paid (Fees). The current date and price of the instrument are already entered in the appropriate boxes for your guidance, but you can change these entries if you wish. 80 Main functions (viewers) User Manual Telekurs iD / Version 8.3 / 15 April 2010 5. If the instrument is not traded in the currency used for the portfolio, enter the exchange rate which is valid at the time of purchase (Exchange rate). The current exchange rate is already entered in the appropriate box for your guidance, but you can change this figure if required. 6. You can enter any notes you may wish to add (Comment). 7. Click on the button "OK". 8. Other transactions are added to the portfolio in the same way. The entries made in this window can be changed later at any time. If you put more than one transaction into the portfolio for a single instrument at the same trading centre, these will be combined. You can extend a portfolio at any time, and edit the entries in it. 6.4.2 Edit a portfolio entry The entries made when the portfolio was first set up can be viewed and edited as follows: 1. Right-click on an instrument in the portfolio, then select "Portfolio Detail" from the popup menu. The "Portfolio Detail" viewer for this instrument opens. This lists all the transactions for the instrument. 2. To change an entry, double-click on the transaction concerned. The text window is opened again. User Manual Telekurs iD / Version 8.3 / 15 April 2010 Main functions (viewers) 81 3. Change the data as required, and save it again. To delete a transaction, select it in the "Portfolio Details" window and click on "Remove row" in the popup menu (right-hand mouse button). To delete an instrument completely from the portfolio, delete all the transactions that relate to it. 6.4.3 Change an existing portfolio You can adapt a portfolio to your individual requirements in several ways, for example by: changing the structure of the list (see section 6.1.4 "Change list structure") saving the portfolio under a different name. To do this, click inside the active area of the viewer, click on "File" in the menu bar, then click on "Save Portfolio As" (see section 5.10 "Saving or deleting objects"). saving changes made to a portfolio. To do this, click inside the active area of the viewer, click on "File" in the menu bar, then click on "Save portfolio". You can open saved portfolios under "User Lists" in the same way as lists (see section 6.1.2 "Open an existing list"). taking the portfolio into the watchdog. To do this, click inside the active area of the viewer with the right-hand mouse button and then click on the pop-up menu item "Add to Watchdog". The “Watchdog” viewer will be opened and the list taken into the watchdog (see section 6.13 "Watchdog"). 82 Main functions (viewers) User Manual Telekurs iD / Version 8.3 / 15 April 2010 6.5 Heatmap The "Heatmap" viewer provides a graphic view of the winners and losers in a listing of financial instruments. The percentage changes are displayed in a table in order of magnitude. Positive changes are indicated by a blue background, negative changes by a red one. Slight degrees of change are shown in light blue (>0%), white (no change) or light red (<0%). At the bottom of the "Heatmap" viewer, the two highest levels of change are shown again separately at the left- and right-hand sides of the color scale. You can call up a "Heatmap" viewer in several different ways: In the "Lists" selection area, select a list and click on "Open in new Heatmap" in the popup menu (right-hand mouse button). The "Heatmap" viewer appears, and the list is called up automatically. In the command line, enter the shortcut .H, and select the list you would like to see (see section 6.1.2 "Open an existing list"). In the "Context" selection area, go to "Global Viewer" and open the "Heatmap" viewer, and select the list you would like to see. If you double-click on a line in the "Heatmap" viewer, then depending on your configuration, either a new viewer is opened showing the instrument or the instrument is moved by linking to a viewer that is already open (see section 5.5 "Double-clicking on an instrument"). User Manual Telekurs iD / Version 8.3 / 15 April 2010 Main functions (viewers) 83 6.6 Ticker The "Ticker" viewer displays: the current quotes for a selection of instruments which you have compiled. The data for each instrument is displayed in accordance with the style setting in the “Context” selection area, e.g. for the "S-Last-Net" the symbol, the current price (Last) and the deviation from the previous day's closing price (Close). The display color indicate whether there has been a daily profit (blue), a daily loss (red) or no change (white). Double-clicking on an entry brings up the "Single Quotes" viewer. Clicking on the popup menu item (right-hand mouse button) opens the normal viewer (see also section 6.1 "List") for the instrument. headlines from a news agency, or all news agencies, relating to one or all subject field(s) (see section 6.6.1 "Display current prices"). Double-clicking on a headline opens the "News Story" viewer containing the news item in full. The display in the "Ticker" viewer runs continuously from right to left. Clicking on the "Stop Ticker" button in the "Context" selection area halts the display, i.e. the empty "Ticker" viewer is shown. Clicking again on the button starts the display running again. 6.6.1 Display current prices To display current prices in the ticker, follow the instructions below: 1. In the "Context" selection area, go to "Global Viewer" and open the "Ticker" viewer or enter the shortcut .T in the command line. Alternatively, if you wish to take a predefined list into a new ticker you can click on the pop-up menu item “Open in New Ticker” in the “Lists” selection area at the appropriate list entry. 2. Select the instruments that you would like to be shown (see section 5.7 "Calling up financial data"). In the case of very long lists, it is best not to have more than one viewer open at the same time, as the incoming messages can overload your system. 3. If the "Context" selection area is not displayed automatically according to your user-specific settings, go into the "Context" selection area and click in the active area of the "Ticker" viewer. 4. Select the "All Listings" option if all the listings are to be displayed, or the "Updated Listings" option if only changed listings are to be displayed. 5. Use the slide bar faster, right for slower). to select the speed at which the ticker display runs (left for To delete the full selection of instruments again, change to the "Context" selection area and click on "Clear". You cannot delete individual instruments: you must set up your selection again from the beginning. 84 Main functions (viewers) User Manual Telekurs iD / Version 8.3 / 15 April 2010 Note: If you have set a ticker as a Favourite or Top Favourite, you can also call it up under Favorites or from the Top navigation bar. 6.6.2 Change ticker background color If you would like to display the ticker not with the (default) black background, but with grey, yellow, orange or light blue instead, you can select a ticker with the relevant background color in the "Context" selection area under "Global Viewer" in the "Ticker" folder, and transfer the required instruments into it, e.g. into a "Ticker Orange" viewer: 6.6.3 Display news headlines Follow the instructions below to display news headlines in the ticker: 1. In the "Context" selection area, go to "Global Viewer" and open the "Ticker" viewer or enter the shortcut .T in the command line. 2. If the "Context" selection area is not displayed automatically according to your user-specific settings, go into the "Context" selection area and click in the active area of the "Ticker" viewer. 3. Select option field "Latest News". 4. You can restrict the headlines displayed if you wish: – In the "Provider" selection box, select the news agency you require (e.g. "AWP" for "Agentur für Wirtschaftsinformationen"). Only the news agencies to which you have subscribed will be displayed. – In the "Topic" selection box, select the subject field you want (e.g. "MON" for "Monetary policy, interest rates"). The range of subject fields depends on the news agency selected. 5. Click on the "Change" button, to start the "Ticker" with the new settings. All headlines transmitted after the time of activation will now be displayed in real time. These will now be added on like beads on a string, and displayed at intervals. For this reason you should reset the display from time to time with the "Clear" button and then start again. User Manual Telekurs iD / Version 8.3 / 15 April 2010 Main functions (viewers) 85 6.7 Quotes The "Quotes" viewer can be called up in two different versions: as a "Single Quote" and as a "Quote Overview". 6.7.1 Single Quote The "Single Quote" viewer shows the most important information on a specific instrument. Other data may be displayed, depending on the type of instrument. You can select the various display options by using the tabs. The following information will appear in the header line: name, symbol, trading centre, currency, delay time, ISIN, identification number depending on user settings, listing event and the News symbol. "N" indicates if there is any news about the company. If the information symbol is blue it means that there is current, unread news, while a grey symbol indicates news that is more than one day old or has already been read. Double-clicking on the symbol displays the "News Search Results" viewer with the relevant headlines from the news agencies you are subscribed to (see section 6.23 "News") and a blue symbol changes to grey until more news arrives. Double-clicking on a symbol opens up the "Basic Data & Events" viewer with detailed information about the instrument in question. Below the heading, and depending on the type of instrument, you will see: the most significant quotes, such as the current day's price and the closing price from the previous day. In the case of shares, deviations from the closing price are also shown in both absolute and percentage terms. statistical data such as the daily high and low values, and highs and lows over the previous 52 weeks or in the current year. possibly, details on the trading volume. There are several ways of calling up a "Single Quote" viewer: Select an instrument in a list, then click on the popup menu item "Open single quote" (righthand mouse button). The "Single Quote" viewer is opened, and the instrument is called up automatically. 86 Main functions (viewers) User Manual Telekurs iD / Version 8.3 / 15 April 2010 By using Shortcuts (see also section 4.9), for example, "nesn,swl,q" if an additional viewer is to be opened, or "nesn,swl" if a "Single Quote" viewer is already open and active. Double-click on an instrument in a list. The "Single Quote" viewer is opened and the instrument called up automatically. Please note that the instrument is imported into the viewer that is already open (definition dependent on configuration). In the "Context" selection area, go to "Global Viewer", then open the "Single Quote" viewer or enter the shortcut .Q in the command line and select an instrument which you would like to be shown (see section 5.7 "Calling up financial data"). Select the display option For the "Single Quote" viewer you can select the following display options by using the tabs: "Overview" shows the standard setting as described above. "Full" shows additional quotes to those given in the standard setting. For improved legibility, this data is divided between the "Summary", "All Market Data" and "All Basic Data" tabs. For the "All Market Data" and "All Basic Data" tabs, you can customise the display in the "Context" selection area (see section on "Defining settings" below). User Manual Telekurs iD / Version 8.3 / 15 April 2010 Main functions (viewers) 87 "Level 2" shows additional trading data. For instruments traded on the Euronext (symbol ENX), additional data is available: "Volume" gives trading volume and details of sales. 88 Main functions (viewers) User Manual Telekurs iD / Version 8.3 / 15 April 2010 "Figures" gives various instrument-related key figures. "NSIN/Symbols" lists the available NSINs and symbols of the instrument. "Time&Sales" shows a chronological list of the prices paid on the current day for an instrument. User Manual Telekurs iD / Version 8.3 / 15 April 2010 Main functions (viewers) 89 "Chart" shows the historical chart of the previous year. "News" lists the relevant news headlines. "Instr. Data" shows an instrument summary. 90 Main functions (viewers) User Manual Telekurs iD / Version 8.3 / 15 April 2010 "Comp. Data" shows company details. User Manual Telekurs iD / Version 8.3 / 15 April 2010 Main functions (viewers) 91 Defining settings On the "Full / All Market Data" and "Full / All Basic Data" tabs, you can define various settings for how data is displayed: 1. If the "Context" selection area is not displayed automatically according to your user-specific settings, go into the "Context" selection area and click in the active area of the "Single Quote" viewer. 2. In the "Sort Label by" section, select the required sorting method (either by symbol name or by key values). 3. In the "Show Keys" section, choose whether the key values STT (Statistic Type), VAT (Value Type) and GF (Generation Flag) should be displayed or not. 4. In the "Price Generation" section, select the type of price data required (price generation). The options are (for market data only): – Most Recent Data – Actual Data – Previous Data – Previous Previous Data For each type of price data you select, a new set of additional columns is inserted on the "All Market Data" tab, showing all the fields you have selected in the "Price Record Fields" section. 5. In the "Price Record Fields" section (only available for market data), choose the fields you require for each type of price generation or select "All Fields". All the settings you define are implemented on the tab immediately. If you have chosen to have more than one type of price generation displayed, any fields that are not required for one type of price generation will remain blank. The descriptions of market data in the "Label" column may be different for different price generation types (e.g. "Trade" for "Most Recent Data" and "Last" for "Actual Data"). Example: All market data for price generation types "Most Recent Data" and "Actual Data", with the key values displayed (Show Keys = Yes) and including the fields "Value" and "Date or Time", sorted by key values. 92 Main functions (viewers) User Manual Telekurs iD / Version 8.3 / 15 April 2010 6.7.2 Quote Overview The viewer "Quote Overview" displays general data, e.g. overview data, a chart, an instrument summary as well as related news headlines for a specific instrument. You can select the various display options in the different areas by using the tabs. The data displayed in the various areas largely corresponds to the data available in the "Single Quote" viewer (see section 6.7.1 "Single Quote"). You can call up the viewer "Quote Overview" by highlighting an instrument in a list and rightclicking on the "Open Quote Overview" popup menu item. User Manual Telekurs iD / Version 8.3 / 15 April 2010 Main functions (viewers) 93 6.8 All Sources The "All Sources" viewer displays the main quotes from all the stock exchanges and contributors which set quotes for an instrument. In the context of the MiFID Financial Markets Directive, it supports the "Best Execution Policy". The top section of the window shows various quote data for the selected instrument. If you want to use a different style (combination of data fields), you can, as with other lists, select this in the "Context" display area (see section 6.1.5 "Allocating a style"). The same applies to the lower section of the window. Depending on the type of instrument, this quote comparison shows you the following data in the lower section of the window: "Name" gives the name of the instrument. "N" indicates if there is any news about the instrument or company. If the information symbol is blue it means that there is current, unread news, while a grey symbol indicates news that is more than one day old or has already been read. Double-clicking on the symbol displays the "News Search Results" viewer with the relevant headlines from the news agencies you are subscribed to (see section 6.23 "News") and a blue symbol changes to grey until more news arrives. "T(adj)" (Trend, adjusted) indicates whether the quote (Last) is down , at the same level or up compared with the closing price (Close) of the previous day. Trend adjusts for any price swings due, for example, to splitting or dividend payments. "LVal" shows the current valuation price. "Cur" shows the currency in which the instrument is traded. "Market" shows the alphanumerical exchange code. "dl Last" indicates the stock exchange delay for the "Last" column in minutes. For some exchanges bid/ask prices are also delayed according to permission. This delay can also be displayed in addition by adding the relevant field attribute. The remaining columns show the main quotes. The values in the "Net L/C" and "Net L/C%" columns are shown in color (positive: blue; negative: red; unchanged: black). 94 Main functions (viewers) User Manual Telekurs iD / Version 8.3 / 15 April 2010 There are several ways of calling up an "All Sources" viewer: Select an instrument in a list, then click on the popup menu item "Open all sources" (righthand mouse button). The "All Sources" viewer is opened, and the instrument is called up automatically. In the "Context" selection area, go to "Global Viewer", then open the "All Sources" viewer and select an instrument which you would like to be shown (see section 5.7 "Calling up financial data"). If you double-click on a line in the "All Sources" viewer, then depending on your configuration, either a new viewer is opened showing the instrument or the instrument is moved by linking to a viewer that is already open (see section 5.5 "Double-clicking on an instrument"). You can directly open several viewers for the instrument – as described in section 6.1 "List" – by clicking on a popup menu item (right-hand mouse button). As in all lists, you can customise the structure of the display (see section 6.1.4 "Change list structure"). 6.8.1 Limiting and/or grouping the display You can limit and/or group the way the price data is displayed in the "All Sources" viewer using various criteria as follows: 1. If the "Context" selection area is not displayed automatically according to your user-specific settings, go into the "Context" selection area and click in the active area of the "All Sources" viewer. 2. Limit the data by trading place, by selecting the "Sources" option in the "Markets" box and then clicking on the "Lookup" button. A window comes up with the symbols and names of all trading places. You can then highlight the required trading places. The symbols for all the trading places you have selected will be displayed in the "Context" selection area. It is not possible to limit the selection by country at the same time. 3. Limit the data by country, by selecting the "Countries" option in the "Markets" box and then clicking on the "Lookup" button. A window comes up with the symbols and names of all countries. You can then highlight the required countries. The symbols for all the countries you have selected will be displayed in the "Context" selection area. It is not possible to limit the selection by trading place at the same time. 4. Limit the data by active trading place, by activating the "Show active markets only" checkbox in the "Markets" box. Then only those trading centers will be displayed where the instrument has been traded in the last 5 trading days. User Manual Telekurs iD / Version 8.3 / 15 April 2010 Main functions (viewers) 95 5. Limit the data by currency, by clicking on the "Lookup" button in the "Other filters" box. A window comes up with the symbols and names of all currencies. You can highlight the required currencies. The symbols for all the currencies you have selected will be displayed in the "Context" selection area. 6. Select the Grouping of the data: – No grouping – Group by currency – Group by country 7. If you would like to have foreign currency information automatically converted into a base currency, you can select the base currency in the selection box of the "Other filters" box and activate the "Change to base currency" checkbox. Each setting takes immediate effect in the "All Sources" viewer, with the title line of the viewer changing to "Selected Sources" when the limits have been set. The settings remain in effect when a new instrument is brought into the "All Sources" viewer. Example: "All Sources" viewer for Nestle named shares limited to the Swiss Blue Chip Segment, Frankfurt, Munich, Hamburg and other OTC markets trading places and grouped by currency: Example: "All Sources" viewer for Nestle named shares limited to Switzerland, Italy and the USA, only active trading places, grouped by country and converted into the base currency USD: If you have saved settings for limiting and grouping previously (see section 6.8.2 "Save settings"), you can call these up again on the "Settings" tab. 96 Main functions (viewers) User Manual Telekurs iD / Version 8.3 / 15 April 2010 6.8.2 Save settings You can save for future use the settings for limiting and grouping that you have set in the "Context" selection area (see section 6.8.1 "Limiting and/or grouping the display"), as follows: 1. Click inside the active area of the "All Sources" viewer. 2. Click on "File", then on "Save All Sources Settings As". The "Save As" window appears. 3. In the "Save in" area, select the entry "User Settings". All the settings you have already saved will be displayed. If your Telekurs iD has the appropriate configuration, you can also select the entry "Customer Settings", to make your settings accessible to all Telekurs iD users at the same financial institution. 4. If you wish, you can order objects in a hierarchy, as in Windows Explorer. To show sub-folders, click on the plus sign (+) beside the relevant folder in the "Save in" area, or double-click on the folder. To create a new folder: – Click on the "New folder" button. – Enter a name for your folder into the "New folder" dialog box. – Click on OK. 5. Enter a name for your new presets in the "Name" text box. 6. Click on OK. You can call up the saved settings in the "Context" selection area on the "Settings" tab. User Manual Telekurs iD / Version 8.3 / 15 April 2010 Main functions (viewers) 97 6.9 Chaining In the "Chaining" viewer you can have derivative instruments such as options, warrants and futures displayed. Comparisons between calls and puts are possible for various options and warrants. In the upper part of the window various price data for the selected underlying instrument are displayed. Underneath the various details such as name, exercise price, maturity date, valor number, trading centre etc. are displayed. If you would like to use another style (data field combination, you can select one in the "Context" display area in the same way as other lists (see section 6.1.5 "Allocating a style"). You can sort the data that is displayed by double-clicking on the relevant column heading (see also section 6.1.8 "Sort list"). Double-clicking on a symbol opens up the "Basic Data & Events" viewer with detailed information about the instrument in question. There are several ways of calling up a "Chaining" viewer: in a "List" viewer that is already open, click on the popup menu item "Open Derivatives" (right-hand mouse button) and then on one of the sub-menu items "Options", "Warrants", "Futures" or "Options on Futures" or in a "List" viewer that is already open, click on the popup menu item "Open Structured Products" (right-hand mouse button) and then on one of the sub-menu items "All Structured Products", "Leverage", "Yield Optimisation", "Capital Protection", "Participation" or "Other" or enter the appropriate shortcut in the command line, e.g. ,CO or ,W and select an instrument which you would like to be shown (see section 5.7 "Calling up financial data") or in the "Context" selection area, go to "Global Viewer", then open the "Chaining" viewer and select an instrument which you would like to be shown. 98 Main functions (viewers) User Manual Telekurs iD / Version 8.3 / 15 April 2010 6.9.1 Select type of derivative instruments You can also select the type of derivative instrument after opening the "Chaining" viewer: 1. If the "Context" selection area is not displayed automatically according to your userspecific settings, go into the "Context" selection area and click in the active area of the "Chaining" viewer. 2. Select the required option for the derivative instrument in the "Type" box. The following selections are normally available: – Call and Put Options (individually and in comparison) – Call and Put Warrants (individually and in comparison) – Futures – Structured Products (individually or all) Depending on the "Chaining" viewer called up other entries may also be available for selection. Example: "Chaining" viewer with selected structured products: If more than 1000 instruments are found, these are displayed on pages of 1000 entries each. You can choose a different page by using the navigation buttons at the bottom of the viewer, next to the number of instruments and the current page. Note: If you sort the list (see also section 6.1.8 "Sort list"), this only applies to the entries shown on one page. User Manual Telekurs iD / Version 8.3 / 15 April 2010 Main functions (viewers) 99 6.9.2 Limit display If there are too many lines preventing a clear view, you can limit the display in various ways to items that are of interest to you. 1. If the "Context" selection area is not displayed automatically according to your userspecific settings, go into the "Context" selection area and click in the active area of the "Chaining" viewer. 2. Limit the data by trading place, by selecting the "Sources" option in the "Define Markets" area and then clicking on the "Lookup" button. A window comes up with the symbols and names of all trading places. You can then highlight the required trading places. The symbols for all the trading places you have selected will be displayed in the "Context" selection area. It is not possible to limit the selection by country at the same time. 3. Limit the data by country, by selecting the "Countries" option in the "Define Markets" area and then clicking on the "Lookup" button. A window comes up with the symbols and names of all countries. You can then highlight the required countries. The symbols for all the countries you have selected will be displayed in the "Context" selection area. It is not possible to limit the selection by trading place at the same time. 4. Limit the data by active trading place, by activating the "Show active markets only" checkbox in the "Define Markets" area. Then only those trading centers will be displayed where the instrument has been traded in the last 5 trading days. 5. Limit the data by final maturity date, either by entering a date range in the "From" and "To" fields in the "Maturity Date" section or by selecting this range in the selection boxs (the result is automatically entered in the entry fields). By using the "<"and ">" buttons, you can move the range you have set back or forward by a month. If you activate the "All Instruments" checkbox, all instruments are displayed regardless of any limiting by final maturity date. 6. Limit the data by price deviation, by either entering the maximum variation from the underlying price in the "+/- %" entry field in the "Moneyness" section or setting it using the slide. It is not possible to limit by Moneyness at the same time. 7. Limit the data by Moneyness (current rate in relation to the rate for the base value), by activating one or more of the checkboxes "Out of the money", "At the money" or "In the money" in the Moneyness section. It is not possible to limit by price deviation at the same time. 100 Main functions (viewers) User Manual Telekurs iD / Version 8.3 / 15 April 2010 Each setting takes immediate effect in the "Chaining" viewer. The settings remain in effect when a new instrument is brought into the "Chaining" viewer. You can save your settings by clicking on "Make this my default" and call them up again later by clicking on "Reset to default". By clicking on the "Reset to TK-Default" you can also call up the default settings set by SIX Telekurs. Example: "Chaining" viewer limited to "Scoach Switzerland AG" (symbol QMH): Example: "Chaining" viewer limited to final maturity date "May 2010": User Manual Telekurs iD / Version 8.3 / 15 April 2010 Main functions (viewers) 101 Example: "Chaining" viewer limited to price deviation +/- 3 %: 102 Main functions (viewers) User Manual Telekurs iD / Version 8.3 / 15 April 2010 6.10 Chart The "Chart" viewer shows the trend of quotes for one or more instruments. A chart can show historical trends in both predefined periods or any periods of your choice, and can also show the Intraday trend for the current day. In Intraday charts each traded contract is displayed. A number of options are available for you to set the "Chart" viewer display to your own requirements: Diagram type (see section 6.10.1 "Set diagram type"). Gridlines (see section 6.10.2 "Set gridline properties") Display colors (see section 6.10.3 "Set display colors") Axes (see section 6.10.4 "Set axis properties") Display zones (see section 6.10.5 "Turn display areas on and off") Cursor (see section 6.10.6 "Set cursor properties") Comparison instruments and indices (see section 6.10.8 "Set and show comparisons") Show period (see section 6.10.9 "Set period") Behaviour when share prices jump (see section 6.10.13 "Display or adjust jumps in share prices") Price indicators (see section 6.10.16 "Set and display price indicators") Technical indicators (see section 6.10.17 "Set and display technical indicators") Interactive drawing features (see section 6.10.18 "Using interactive drawing features") Drawing elements (see section 6.10.19 "Enhance chart view with drawing features") You can also save the settings entered as a chart style so that they can be reused at a later point (see section 6.10.20 "Saving and reapplying chart settings"). You can also use predefined chart styles to avoid having to enter all the settings yourself. User Manual Telekurs iD / Version 8.3 / 15 April 2010 Main functions (viewers) 103 You can open a "Chart" viewer as follows: 1. Right-click on an instrument in a list and then on the "Open Chart + History / History Chart" or "Open Chart + History / Intraday Chart" popup menu item The "Chart" viewer is opened and the instrument called up automatically. Alternatively, you can open the "Chart" or "Chart Intraday" in the "Context" selection area under "Global Viewer" (or with the shortcut .C or .IC) and then select the instrument which you would like to be shown (see section 5.7 "Calling up financial data"). 2. You can make the chart window larger or smaller if you wish. 3. You can change the chart settings to suit your own requirements (view, period, indicators etc) as described in the following sub-sections or by using a saved setting. 6.10.1 Set diagram type There are other view options for the chart in addition to the line diagram. 1. If the "Context" selection area is not displayed automatically according to your user-specific settings, go into the "Context" selection area and click in the active area of the "Chart" viewer. 2. Select the "View" tab, and then select the view type you want in the "View" selection box. The options offered by the program are: – Line, – Candlestick, – Bar (Open-High-Low-Close), – Filled (filled graph), – Kagi – Renko – Three Line Break – Point & Figure Note: Not all types of diagram are suitable for Intraday charts. 104 Main functions (viewers) User Manual Telekurs iD / Version 8.3 / 15 April 2010 In the line diagram, each point on the graph indicates a closing price. The points are joined by straight lines. In the Open-High-Low-Close diagram, each day is represented by a bar. The upper or lower edge of the bar represents the relevant highest or lowest price respectively, the small horizontal line pointing to the left indicates the opening price and the small horizontal line pointing to the right indicates the closing price. The candlestick diagram shows exactly the same information as the Open-High-Low-Close diagram. The section of the bar between the opening and closing prices is broader, and there are no small horizontal lines. If the closing price is lower than the opening price (= loss), then the section of the bar in the middle is filled in, whereas in the opposite case (= profit) it remains blank. The "Filled" diagram is the same as the line diagram, but the area below the graph line is filled with a different color. User Manual Telekurs iD / Version 8.3 / 15 April 2010 Main functions (viewers) 105 In the Kagi chart, the length of the vertical lines indicates a price change in the same direction. The thickness of the lines shows the trend, i.e. sell recommendation when the lines become thick, and buy recommendation when the lines become thin. In the Renko chart, white rectangles represent rising prices and black ones falling prices. Each rectangle corresponds to a specific price change. Here, too, the number of consecutive rectangles of the same color indicates the duration of the relevant phase. The Three-Line Break chart is similar to the Renko chart in that it uses white rectangles for rising prices and black ones for falling prices, but here the rectangles are not all the same size. Unlike the Renko chart, brief changes in the direction of price changes are not shown. In the Point and Figure chart, there are alternate X and O columns, X representing phases with rising prices, and O phases with falling prices. The height of the column indicates the duration of each phase. 106 Main functions (viewers) User Manual Telekurs iD / Version 8.3 / 15 April 2010 6.10.2 Set gridline properties In the display area of the chart and any technical indicators displayed, vertical and horizontal major and minor gridlines can be displayed. The number and positions of the gridlines depend on the axis scale entered (see also section 6.10.4 "Set axis properties"). 1. If the "Context" selection area is not displayed automatically according to your user-specific settings, go into the "Context" selection area and click in the active area of the "Chart" viewer. 2. Select the "View" tab. 3. In the "Axis" area, deactivate or activate the "Vertical Gridlines" and "Horizontal Gridlines" checkboxes to turn the major gridlines off or on. Minor gridlines are not affected by this. 4. Click on "More Properties" in the "Axis" area if you would also like to turn the minor gridlines on, or if you would like to set the color, style and weight of the gridlines. The "Axis Properties" window appears. 5. In the selection box select the required axis (e.g. "Date axis" for vertical minor gridlines in the chart) and then activate the checkbox: "Minor unit: Show gridlines". 6. Click on "Apply". The relevant minor gridlines are displayed. 7. Activate the horizontal minor gridlines for the other axes in the same way if you wish. 8. To set the color, style and weight of the gridlines, select the required axis in the selection box again and then click on "Details". Another "Axis Properties" window opens with three tabs. 9. Select the "Grid lines" tab. User Manual Telekurs iD / Version 8.3 / 15 April 2010 Main functions (viewers) 107 10.If you would like to change a gridline color, click on "..." and select the line color you want in the color palette which appears (see also section 6.10.3 "Set display colors"). 11.If you would like to change the gridline type, select the required option in the "Style" selection box. 12.If you would like to change the gridline weight, select the required option in the "Weight" selection box. 13.Click on "OK" to close the open "Axis Properties" windows. 108 Main functions (viewers) User Manual Telekurs iD / Version 8.3 / 15 April 2010 6.10.3 Set display colors You can customise the color of the background and the border of the chart display. 1. If the "Context" selection area is not displayed automatically according to your user-specific settings, go into the "Context" selection area and click in the active area of the "Chart" viewer. 2. Select the "View" tab. 3. In the "Color" area, click on the "..." button to see the selection of background and border colors, and select the color you require from the range which comes up. 4. If you do not want to use a color that is available in the color palette you can click on the “Custom” button and define a new color: – In the “Pattern (Muster)” register by selection in the large color pattern. – In the "HSB" (Hue-Saturation-Brightness) register by using the color slider and clicking in the square field or by entering values. The representation for the selection changes depending on whether H, S or B is selected. User Manual Telekurs iD / Version 8.3 / 15 April 2010 Main functions (viewers) 109 – In the "RGB" (Red-Green-Blue) register by using the sliders for the individual colors or by entering values. The new color settings apply only to the "Chart" viewer which is currently open. 110 Main functions (viewers) User Manual Telekurs iD / Version 8.3 / 15 April 2010 6.10.4 Set axis properties In the "Chart" viewer you can decide for each axis whether the axis scale and labelling should be displayed. The horizontal time axis can only be turned on and off for the chart and any displayed technical indicators collectively while the vertical axes can be turned on and off individually. Scaling of the horizontal axis is an automatic function. It can be set for the vertical axes. The number of minor gridlines depends on the scale. For each axis you can set the scale type option. 1. If the "Context" selection area is not displayed automatically according to your user-specific settings, go into the "Context" selection area and click in the active area of the "Chart" viewer. 2. Select the "View" tab. 3. Click on "More Properties" in the "Axis" area. The "Axis Properties" window appears. 4. Select the axis you want in the selection box: – Price axis = vertical value axis of the chart – Date axis = horizontal time axis – Indicator axis = vertical value axis of the displayed technical indicators (for each displayed technical indicator a corresponding entry is available) 5. You can turn the axis labelling on or off for all axes apart from the price axis by activating or deactivating the "Visible" checkbox. 6. Enter the required scale divisions in the "Major unit" input field. The chart's automatically calculated value range is roughly divided into the number of sections entered. If the value range displayed is, for example between 80 and 100, then if 10 is entered this will be scaled in twos, i.e. there will be a main scale mark at 80, 82, 84, etc. and the value will be displayed. 7. In the "Tick Mark Type" areas, select the type of scale marks for the rough scale (major unit) and the fine scale (minor unit): – None: turns off axis marking User Manual Telekurs iD / Version 8.3 / 15 April 2010 Main functions (viewers) 111 – Outside: gives marking only on the outside (labelled side) of the axis – Inside: gives marking only on the inside of the axis – Cross: gives marking on both sides of the axis 8. Click on "Apply". The settings are displayed (You can also click on "Apply" after each individual setting to see the result). 9. For additional scale settings – for the vertical value axis that is – select the required axis in the selection box again and then click on "Details". Another "Axis Properties" window opens with three tabs. 10.Select the "Scale" tab. 11.In the "Scale" input field you can set the scale unit (default value is 1). Each actual axis value on the vertical axis is divided by the scale unit as set for the display: for example, entering the value of 1000 would mean that an actual axis value of 1,500,000 would be shown as 1,500 (thousands). 12.In the "Left Axis" and "Right Axis" selection boxs, you can set, in relation to the price axis, what is to be displayed on the left- and right-hand vertical axes. The settings you can choose are: – "None" (the axis in question is not displayed), – "Values" (absolute prices), – "Percent (Base 100%)" (percentage values, with the starting value for the chart being 100%) – "Percent (Base 0%)" (percentage values, with the starting value for the chart being 0%)) The default value for the left-hand axis is "Values", and for the right-hand axis "Percent (Base 100%)". 13.In the "Focus on" selection box, you can choose, in relation to the price axis, whether the grid lines should be aligned with the price values (Values) or the percentage values (Percent). The default value is "Values". 112 Main functions (viewers) User Manual Telekurs iD / Version 8.3 / 15 April 2010 14.In the "Format" selection box you can set the number format. Available formats are: – "None" (unformatted numbers), – "Number" (numerical display, i.e. thousands are separated by an inverted comma), – "Currency" (the currency is indicated in front of the numerical value, e.g. "CHF") – "Scientific notation" (scientific exponential notation, e.g. 400 is shown as 4.0e+002) – "Percentage" (value is shown as a percentage, e.g. 400 is shown as 40000%) The default value is the "Number" format. 15.In the "Decimal" selection box, you can set the number of decimal places. The default value is "auto". 16.Click on "OK" to close the open "Axis Properties" windows. 6.10.5 Turn display areas on and off In the "Chart" viewer you can individually activate or deactivate various display areas (toolbars, data, legends etc.) In the "Chart" viewer below all display zones are activated. They are (from top to bottom): Zone "Time Period" with buttons for the direct selection of different view time periods (see section 6.10.9 "Set period"). Zone "Label" with the name of the instrument as well as the stock exchange, the closing price, the previous daily profit or loss together with the time. Zone "History" with the date and closing price (and any other rate information – depending on your settings) as well as any price indicator values (e.g. moving average 1) and technical indicator values (e.g. volume) of the time you last clicked on the chart. Zone "Annotate" with the toolbar for drawing elements (see section 6.10.19 "Enhance chart view with drawing features"). User Manual Telekurs iD / Version 8.3 / 15 April 2010 Main functions (viewers) 113 Zone "Drawing" with the drawing toolbar (see section 6.10.18 "Using interactive drawing features"). Zone "Closing Price" with a dark-blue horizontal line that marks the closing price. This zone is only applicable for Intraday charts. Zone "Current Price" with a light-blue horizontal line that marks the current price. Zone "High/Low Price" with two black dotted horizontal lines that mark the highest and lowest price. The lines are labelled with the appropriate values. Zone "Legend" with a legend of the instruments and indicators displayed. Zone "Date scroll" with two input fields for start and finish of the view time period and a scrollbar (see section 6.10.9 "Set period"). This zone is not applicable for Intraday charts. To activate or deactivate display zones, proceed as follows: 1. If the "Context" selection area is not displayed automatically according to your user-specific settings, go into the "Context" selection area and click in the active area of the "Chart" viewer. 2. Select the "View" tab. 3. Deactivate or activate the required display zones in the "Zones" area: – Time Period – Label – History – Annotate – Drawing – Legend – Date Scroll (not applicable for Intraday charts) – Closing Price (only applicable for Intraday charts) – Current Price – High/Low Price 6.10.6 Set cursor properties You can allocate a vertical and/or horizontal line to the cursor (mouse pointer) as well as setting the behaviour of the tooltip display (see section 5.6 "Tooltips"). 1. If the "Context" selection area is not displayed automatically according to your user-specific settings, go into the "Context" selection area and click in the active area of the "Chart" viewer. 2. Select the "View" tab. 3. Deactivate or activate the required cursor properties in the "Cursor" area: – Vertical Line – Horizontal Line – Permanent Tooltip 114 Main functions (viewers) User Manual Telekurs iD / Version 8.3 / 15 April 2010 Permanent Tooltip: Normally a tooltip is only displayed for a short time when the cursor is positioned over the relevant item. With permanent tooltip it is displayed for longer and is for example constantly updated in line with the current values as the cursor is moved horizontally across. A mouse click hides the tooltip. 6.10.7 Setting the logarithmic price scale You can set the scale for the price axis in either linear or logarithmic mode. 1. If the "Context" selection area is not displayed automatically according to your user-specific settings, go into the "Context" selection area and click in the active area of the "Chart" viewer. 2. Select the "View" tab. 3. Activate or deactivate the "Logarithmic Scale" checkbox in the "Axis" area to set the price scale in either logarithmic or linear mode. Example of a chart with logarithmic price scale: User Manual Telekurs iD / Version 8.3 / 15 April 2010 Main functions (viewers) 115 6.10.8 Set and show comparisons Various comparison indices (e.g. SMI, DAX, NIKKEI etc.) and up to 9 comparison instruments can be shown directly in the chart. Any selected technical indicators refer at all times to the chart's main instrument. 1. If the "Context" selection area is not displayed automatically according to your user-specific settings, go into the "Context" selection area and click in the active area of the "Chart" viewer. 2. Select the "Compare" tab. 3. In addition to the main instrument you can display up to 9 further comparison instruments. To do this, select the financial instruments you want by entering the instrument and financial market in the "Listing" input fields (input formats see section 5.7 "Calling up financial data"). The entry must be completed by pressing the Enter key. 4. If you would like to display a comparison index in the chart, select it in the "Index" selection box. 5. If you want to convert the currency of the chart axes, select the required currency in the "Currency conversion" selection box. The selected currency is then displayed in front of each figure. 6. Select the required view option in the "Misc" area (Normalised or Absolute), if you do not wish to accept the automatic choice (normal display for an absolute instrument display, for more than one instrument or for a comparative index to be displayed). 7. Activate or deactivate the checkbox "Tooltip/History in %" in the "Misc" area. Then the values displayed in the "History" zone are shown as percentages or absolute values respectively. 8. If you wish to use any further settings options such as color, style and weight of the graph line or set the list price to be viewed, click on "More Properties" and enter the required setting in the window which appears. In each case the settings apply for the main instrument selected (first click the corresponding "Main" option button). Note: With "Clear all listings" and "Deselect all listings" you can delete or temporarily deactivate all comparison instruments. Using drag & drop into the legend you can add an instrument from a list. 116 Main functions (viewers) User Manual Telekurs iD / Version 8.3 / 15 April 2010 Display options In the Absolute view, prices are shown as absolute values along the same vertical axis. This chart can be difficult to interpret where there is a wide variation in the prices of the instruments. The Normalised view (prices shown as percentages) makes it easier to compare prices, particularly where the values of the various graphs are spaced well apart. In this view the start of the time scale represents 100%. To show the chart again without the comparison index and comparison instruments, select "No index" in the selection box and delete the text boxes. To temporarily hide a comparison instrument, you can deactivate the relevant "Selected" checkbox. 6.10.9 Set period A chart can display either the Intraday trend for the current day or for one of the last 10 days, or the historical trend over predefined periods or periods selected by the user. You can set or change the required period in various ways. User Manual Telekurs iD / Version 8.3 / 15 April 2010 Main functions (viewers) 117 Setting the period in the "Context" selection area 1. If the "Context" selection area is not displayed automatically according to your user-specific settings, go into the "Context" selection area and click in the active area of the "Chart" viewer. 2. Select the "Period" tab – in the "Predefined" option, select the predefined period in the relevant selection box, or – in the "Custom" option, enter the start date you want in the "From" field (charts from up to ten years ago can be displayed) and the required finish date in the "To" field. 3. If you have set a period between 2 and 180 days, you can select the data intervals i.e. the granularity (see also section 6.10.11 "Selecting the data intervals"): – "Day" means that every closing rate is used as a point on the curve – "5-Min" means that the rates at 5 minute intervals are used as the points on the curve 4. If you have set Intraday, you can select the day (today or up to 10 days in the past) and the Intraday update status will be displayed (see also section 6.10.11 "Selecting the day for the Intraday chart"). 5. By using the options in the "Conflation" area you can change the curve resolution (see also section 6.10.12 "Setting the curve resolution"). Setting the period by direct input and/or moving Once you have activated the "Date Scroll" display zone (see section 6.10.5 "Turn display areas on and off"), you can enter the show period dates individually in the two input fields directly in the "Chart" viewer. Using the scrollbar you can move the period settings. Setting the period via direct selection buttons Once you have activated the "Time Period" display zone (see section 6.10.5 "Turn display areas on and off"), you can directly set or change the show period via the buttons displayed in the "Chart" viewer. When setting the period via the direct selection buttons, the finish date is always the current date. The start date is then shifted to the past by the periods indicated on the buttons. One exception is the "YTD" (Year to Date) button which always allows the period from the start of the current calendar year up to the current date to be set. The maximum period depends on the dates saved and on the package version. It can cover up to 30 years (for Asset Management Package and Treasury & Risk Package, for all other packages up to 10 years). 118 Main functions (viewers) User Manual Telekurs iD / Version 8.3 / 15 April 2010 If you have set "Intra" (Intraday) and checkbox "Show Update Status" is activated, the current update status is shown on the "Intraday" button: green, if updates are being displayed, or red, if updates are no longer being displayed. Click on the button to change the update status. Setting the period by zooming (enlarge section) You can also select the view period as a zoom section in the current view. To do this, position the mouse pointer at the start or finish of the required section, press on the left mouse button and keep it pressed while moving the mouse pointer to the right or left. The selection is highlighted in a different color. As soon as the left mouse button is released the selection temporarily becomes the new show period. User Manual Telekurs iD / Version 8.3 / 15 April 2010 Main functions (viewers) 119 The input fields in the "Date Scroll" display zone show the new start and finish dates. By clicking on the pop-up menu item "Zoom Reset" (right-hand mouse button) you can reset the chart display to the original period. By repeating the action you can further expand any enlarged section in the same way if you wish. 6.10.10 Selecting the day for the Intraday chart If you have set the period to be Intraday, you can select the day displayed in the Intraday chart (up to 10 days in the past). 1. If the "Context" selection area is not displayed automatically according to your user-specific settings, go into the "Context" selection area and click in the active area of the "Chart" viewer. 2. Select the "Period" tab. 3. Use the buttons "Prev.", "Today" or "Next" to select the required day. The day you select will be displayed. 6.10.11 Selecting the data intervals You can select the data intervals in the "Granularity" area (5 minute intervals or daily intervals), provided you have set a period of between 2 and 180 days. 1. If the "Context" selection area is not displayed automatically according to your user-specific settings, go into the "Context" selection area and click in the active area of the "Chart" viewer. 2. Select the "Period" tab. 3. Select "5-Min" to use the rates at 5 minute intervals as the points on the curve or "Day", to use the day-end rates as points on the curve. On the left you can see a monthly chart with a 1 day data interval and on the right one with a 5 minute data interval. 120 Main functions (viewers) User Manual Telekurs iD / Version 8.3 / 15 April 2010 6.10.12 Setting the curve resolution You can change the curve resolution by conflating points on the curve (smoothing out the curve). This means that the opening, highest, lowest and closing prices and the cumulative volume for the selected conflation interval are recalculated and used as one point on the curve. 1. If the "Context" selection area is not displayed automatically according to your user-specific settings, go into the "Context" selection area and click in the active area of the "Chart" viewer. 2. Select the "Period" tab. 3. Select the curve resolution in the "Conflation" area. The options that can be selected depend on the settings for the data interval (granularity) and the timeframe. Quarterly chart with "Day" data interval with no conflation (left-hand picture) and with conflation interval of "1 week" (right-hand picture): Intraday chart with no conflation (left-hand picture) and with conflation interval of "15 min" (righthand picture). User Manual Telekurs iD / Version 8.3 / 15 April 2010 Main functions (viewers) 121 6.10.13 Display or adjust jumps in share prices You can specify whether jumps in share prices resulting from splits or dividend payments should be automatically evened out or not. 1. If the "Context" selection area is not displayed automatically according to your user-specific settings, go into the "Context" selection area and click in the active area of the "Chart" viewer. 2. Select the "Studies" tab. 3. Deactivate or activate the "Adjust" checkbox to display or even out jumps in share prices. 4. Deactivate or activate the "Dividend Adjustment" checkbox to display or even out price jumps caused by dividend payments. By using the "Price" and "Yield to Maturity" checkboxes (the latter only available if a security with a maturity date is displayed on the chart), the price curve and the YTM curve can be displayed or not. The other checkboxes allow events such as splits, dividend payments, corporate actions and changes of financial instrument identification numbers to be displayed or not. Price jump caused by split On the left you can see a non-adjusted chart and on the right an adjusted one. Price jump caused by dividend payment On the left you can see a non-adjusted chart and on the right a dividend adjusted one (blue curve). 122 Main functions (viewers) User Manual Telekurs iD / Version 8.3 / 15 April 2010 6.10.14 Display events On the chart which is displayed, you can show any company events, dividend payments and changes of financial instrument identification number (valor) with a triangular symbol, by activating the "Corporate Actions", "Ex Dividends" and/or "Valor Change" checkboxes on the “Studies“ tab in the "Context" selection area. The chart below shows these items displayed (company events with a yellow triangle, dividend payment with a black triangle, valor change with a blue triangle and the previous valor number). 6.10.15 Currency conversion You can have the currency of the price axis converted on the chart which is displayed, for example an instrument trading in euros converted to Swiss francs. Select the currency into which the conversion should be carried out by selecting it in the "Currency conversion" field on the "Compare" tab in the "Context" selection area. The chart below shows the rate for Ford and BMW shares in dollars. Note: The rate used for conversion is the closing rate from the previous day. User Manual Telekurs iD / Version 8.3 / 15 April 2010 Main functions (viewers) 123 6.10.16 Set and display price indicators For the technical analysis of the main instrument in the displayed chart, you can show or hide various price indicators (you can find detailed descriptions in section 9.2 "Price indicators"). 1. If the "Context" selection area is not displayed automatically according to your user-specific settings, go into the "Context" selection area and click in the active area of the "Chart" viewer. 2. Select the "Studies" tab. 3. Activate or deactivate the checkboxes for the required price indicators in the "Price Indicators" area: – Moving average 1 (default setting 10 days) – Moving average 2 (default setting 50 days) – Moving average 3 (default setting 200 days) – Exponential Moving Average – Bollinger Bands 1 – Envelopes – Median – Triangular Moving Average – Typical Price – Weighted Close – Weighted Moving Average You can display any number of different price indicators simultaneously (though preferably not too many for reasons of clarity). The following example shows a chart with two price indicators displayed (Moving average 1 and Envelopes). 124 Main functions (viewers) User Manual Telekurs iD / Version 8.3 / 15 April 2010 4. Click on one of the price indicator buttons to set its properties. The "Chart Properties" window appears. 5. Set the required price indicator properties: e.g. view option, color, style, weight, legend text, parameters etc. Other parameters are available depending on the price indicator selected. Before changing parameters, consult the descriptions in section 9.2 "Price indicators", if you are not familiar with the effects of the individual parameters. 6. If you wish to change the value to be used on the indicator, you can select it in the "Perform on" option field (e.g. highest price instead of closing price). 7. If you want your changes to be displayed in the chart straight away, click on "Apply". The relevant indicator must be displayed in the chart. 8. Click on "OK" to close the "Chart Properties" window. 6.10.17 Set and display technical indicators For the technical analysis of the main instrument in the displayed chart, you can show or hide various technical indicators (you can find detailed descriptions in section 9.3 "Technical indicators") below the chart. 1. If the "Context" selection area is not displayed automatically according to your user-specific settings, go into the "Context" selection area and click in the active area of the "Chart" viewer. 2. Select the "Studies" tab. 3. Activate or deactivate the frequently used "Cumulative Volume" technical indicator which is located above the price indicators and in the "Technical Indicators" area, do the same with the checkboxes for the technical indicators that you additionally require (there is a selection of 26 technical indicators in total). User Manual Telekurs iD / Version 8.3 / 15 April 2010 Main functions (viewers) 125 The following example shows a chart with two technical indicators displayed underneath it (Cumulative Volume and Relative Strength Index). 4. Click on one of the technical indicator buttons to set its properties. The "Chart Properties" window appears. 5. Set the required technical indicator properties: e.g. view option, color, style, weight, legend text, parameters etc. Other parameters are available depending on the technical indicator selected. Before changing parameters, consult the descriptions in section 9.3 "Technical indicators", if you are not familiar with the effects of the individual parameters. 6. If you wish to change the value to be used on the indicator, you can select it in the "Perform on" option field (e.g. highest price instead of closing price). 7. If you want your changes to be displayed in the chart straight away, click on "Apply". The relevant technical indicator must be displayed in the chart. 8. Click on "OK" to close the "Chart Properties" window. 126 Main functions (viewers) User Manual Telekurs iD / Version 8.3 / 15 April 2010 6.10.18 Using interactive drawing features For the technical analysis of the main instrument in the displayed chart, you can use various interactive drawing features (you can find detailed descriptions in section 9.4 "Drawing features"). You can select the required drawing feature via buttons when the "Drawing" display zone is activated (see section 6.10.5 "Turn display areas on and off"). Certain drawing features cannot be selected with the logarithmic price axis (see section 6.10.7 "Setting the logarithmic price scale"). Drawing features are additional guide lines which you can place on the chart. They are defined and drawn in as follows: 1. Click on the button for the required drawing feature. The mouse pointer changes to a cross. 2. Position the mouse pointer at the required start position on the chart, press the left mouse button and hold it down, then drag the pointer to the required end position. 3. Release the mouse button. The drawn guide lines are still highlighted which can be seen by the black grip points. 4. If you would like to change the properties of the drawn guide lines, right-click on them and select the "Properties" entry on the popup menu which appears. The "Properties" window appears. 5. Set the required drawing feature properties: e.g. color, style, width, value range. 6. For certain drawing features there is a "Configuration" tab available which allows you to set individual configuration values, e.g. the angle values for a Gann Fan. 7. Click on "OK" to close the "Properties" window. The settings entered are displayed. The following example shows how a Gann Fan is displayed. User Manual Telekurs iD / Version 8.3 / 15 April 2010 Main functions (viewers) 127 You can remove the drawing features individually or all together from the chart, set the order (foreground, background) as well as carry out other actions such as copy and paste using the popup menu which appears when you right-click. Clicking on deletes all drawing features at once. 6.10.19 Enhance chart view with drawing features By using the functions provided in the Annotate toolbar you can add drawing elements (text and graphics) to a chart, for example to print out a chart containing comments. When the "Annotate" (see section 6.10.5 "Turn display areas on and off") display zone is activated, the drawing tool is visible and contains the following buttons: Select turns on the mouse pointer in the chart area, allowing features to be selected and moved. Line turns on the drawing function for a line or arrow in the chart area. Curve turns on the drawing function for an arc in the chart area. Elipse turns on the drawing function for a circle in the chart area. Box turns on the drawing function for a rectangle in the chart area. Text turns on the drawing function for a text box in the chart area. Ballon with text turns on the drawing function for a balloon in the chart area. Properties shows a properties dialog window for the selected object in the chart area. Not Attached: The selected object in the chart area is not attached to the chart: if the window is re-sized, the size and position of the object remain unchanged. Attach Centre: The selected object in the chart area is attached to the chart at its centre point: if the window is re-sized, the position of the object is changed but its size remains the same Attach Elastic: The selected object in the chart area is attached elastically to the chart: if the window is re-sized, both the size and the position of the object are changed in proportion. Flip Vertical flips the selected object vertically. Flip Horizontal flips the selected object horizontally. Remove All removes all annotated objects in the chart area. Cut removes the selected object in the chart area. Copy copies the selected object in the chart area to the clipboard. Paste inserts an object from the clipboard to the chart area. 128 Main functions (viewers) User Manual Telekurs iD / Version 8.3 / 15 April 2010 The various drawing elements (objects) are handled basically in the same way you are familiar with from commercial graphics programs: you select an object in the Annotate toolbar, mark the start by clicking with the mouse, hold down the mouse button and drag the object to the required size and location, and release the mouse button. An object which has just been positioned is still highlighted, as indicated by the black handles. You can highlight any object in your chart again later by clicking on it. When you place the mouse pointer over a handle, the mouse pointer changes shape to indicate how you can re-size the object by dragging and dropping it with the mouse (vertically, horizontally or diagonally). You can move the whole object by drag and drop, or you can copy it using Copy and Paste. If you would like to change the properties of an object, right-click on it and select the "Properties" entry on the popup menu which appears. Alternatively, you can also click on the corresponding button on the drawing toolbar or double-click on the object. The "Properties" window appears in which you can enter all the relevant settings for the object. Example of a balloon: User Manual Telekurs iD / Version 8.3 / 15 April 2010 Main functions (viewers) 129 6.10.20 Saving and reapplying chart settings You can also save the settings used as chart styles so that they can be reused at a later point (see section 5.10 "Saving or deleting objects"). The instruments selected together with the visible drawing features and additional drawing elements are not saved. What's more you can also call up predefined chart styles to avoid having to enter all the settings yourself. 1. If the "Context" selection area is not displayed automatically according to your user-specific settings, go into the "Context" selection area and click in the active area of the "Chart" viewer. 2. Select the "Chart Settings" tab. 3. Double-click on the chart style you want. All the stored settings are incorporated. Telekurs iD has four types of chart styles: Global Settings: chart settings defined by SIX Telekurs for all users. Country Settings: chart settings defined by SIX Telekurs for the users of a particular country. Customer Settings: chart settings created by Telekurs iD users within the same financial institution. User Settings: individually defined chart settings. Click on "Revert Settings" to recall the settings from the last selected chart style. 130 Main functions (viewers) User Manual Telekurs iD / Version 8.3 / 15 April 2010 6.10.21 Defining basic chart settings When you open up a "Chart" viewer as a historic chart or as an Intraday chart, the chart style "History Default" or "Intraday Default" is automatically used as the basic setting. Both chart styles are provided by Telekurs as global settings and in some cases as country settings. You can also set these two default chart styles yourself as user settings and as customer settings (provided you are authorised to save them), as follows: 1. If the "Context" selection area is not displayed automatically according to your user-specific settings, go into the "Context" selection area and click in the active area of the "Chart" viewer. 2. Select the "Chart Settings" tab. 3. Right-click on the required style which you want to make the basic chart setting and then on the pop-up menu item "Set As Default History Style" or "Set As Default Intraday Style". (If the style does not yet exist, you can make the required settings on a chart and then save the chart style as described in section 6.10.20 "Saving and reapplying chart settings".) The basic chart settings you have defined will be used next time you open a "Chart" viewer. If the chart styles "History Default" or "Intraday Default" exist at more than one level (User, Customer, Country, Global), they are implemented in that order. 6.10.22 Copy charts into other applications You can copy charts via the Windows clipboard into other applications as an image: 1. Click on the active area in the "Chart" viewer. 2. Under "Edit" in the menu bar, select "Copy / Viewer". The chart is copied into the Windows clipboard. 3. Open the application program (e.g. Microsoft Word) which you would like to paste the image into. 4. Paste the image from the Windows clipboard within the application program using the paste function (e.g. Ctrl+V). User Manual Telekurs iD / Version 8.3 / 15 April 2010 Main functions (viewers) 131 6.11 Time Series The "Time Series" viewer shows the trading data for an instrument. The following information will appear in the header line for the selected instrument: name, symbol, ISIN, identification number depending on user settings, trading centre, currency, current valuation price and day performance. Double-clicking on a symbol opens up the "Basic Data & Events" viewer with detailed information about the instrument in question. You can call up a "Time Series" viewer as follows: Select an instrument in a list and click on popup menu item "Open Chart + History / Intraday Time Series" (right-hand mouse button). The relevant "Intraday" or "History" tab is selected automatically. In the command line, enter the shortcut .TS (opens the "Time Series" viewer with the "Intraday" tab selected) or .HL (opens the "Time Series" viewer with the "History" tab selected) and then select the instrument that you want displayed (see section 5.7 "Calling up financial data") or enter the shortcut for calling up the instrument, e.g. NESN,SWL,TS or NESN,SWL,HL. The "Intraday" tab shows a chronological list of the prices paid on the current day for an instrument, i.e. all sales, showing the time (Time), price paid (Price), type of trade (Valuation Style Type, e.g. OOB for over-the-counter trading) and volume of transactions. However, you can also display the lists from the past 30 working days (Wealth Management Package only 10 working days) as well as filter out a particular period of the day or a price range. The date is shown at the top of the tab. When the "Time Series" viewer has been called up with the "Intraday" tab selected, the prices for the current day are always displayed. 132 Main functions (viewers) User Manual Telekurs iD / Version 8.3 / 15 April 2010 To display the prices from another day, proceed as follows: 1. If the "Context" selection area is not displayed automatically according to your user-specific settings, go into the "Context" selection area and click in the active area of the "Time Series" viewer. 2. Click on one of the buttons in the "Select Day" area: – "Prev." selects the previous day (up to a maximum 10 working days before the current date) – "Today" selects the current day – "Next" selects the next day (may not be in the future) Instead of selecting the date using the "Prev.", "Today" and "Next" buttons, you can also click on the calendar symbol and select the date on the calendar (see also section 5.17 "Date input with calendar function"). The dates available for selection are shown in red on the calendar. In order not to use too much computer power, only a certain number of paid rates are shown for the date selected in the viewer "Time series". If more paid rates are available than those displayed, the time interval for the paid rates that are displayed will be shown at the bottom of the "Time Series" viewer. The navigation buttons can be used to select different time intervals. If you need rates beyond the period displayed, you can bring them up using the filter function. The date of the selected day is visible in the "Select Day" area and at the top of the tab. User Manual Telekurs iD / Version 8.3 / 15 April 2010 Main functions (viewers) 133 To filter the display, proceed as follows: 1. If the "Context" selection area is not displayed automatically according to your user-specific settings, go into the "Context" selection area and click in the active area of the "Time Series" viewer. 2. If you would like to limit the display to a particular period of the day, activate the "Time Range" checkbox in the "Filter" area and enter the start and end time of the required period in the "From" and "To" input fields. 3. If you would like to limit the display to a particular price range, activate the "Price Range" checkbox in the "Filter" area and enter the lowest and highest price paid to be displayed in the "From" and "To" input fields. 4. If you would like to limit the display to a particular volume range, activate the "Volume Range" checkbox in the "Filter" area and enter the lowest and highest volume to be displayed in the "From" and "To" input fields. The "5min Snapshot" tab shows the time and date, the average rate (price) for the last 5 minutes before the given time, the type of trade (Valuation Style Type, e.g. OOB for over-the-counter trading), the trading status (Valuation Trade Type, e.g. TRA for traded), the opening, highest and lowest prices, each with the relevant trading status, the volume, the volume weighted average price (VWAP, Volume Weighted Average Price) and the moving average price (MAVP, Moving Average Price) during the last 5 minutes before the given time. 134 Main functions (viewers) User Manual Telekurs iD / Version 8.3 / 15 April 2010 To reduce or enlarge the range displayed on the "5min Snapshot" tab, proceed as follows: 1. If the "Context" selection area is not displayed automatically according to your user-specific settings, go into the "Context" selection area and click in the active area of the "Time Series" viewer. 2. In the "Period" area, select a predefined period (you can select "1 Week", "1 Month", "3 Month" or "Maximum") or select the "Custom" option and enter the start and finish date for the required display area. To even out jumps in share prices due to splits etc., you can activate the "Adjust" checkbox. The rates are then shown converted accordingly. The "History" tab shows a chronological list with historical data from the previous year for an instrument. For each trading day, the date, the valuation price, the trading status (Valuation Trade Typ, e.g. TRA for traded), the opening price, the intraday high price and the intraday low price are given, each with the trading status, trading volume (Volume), volume of off-market trading (Off volume), total volume (On+Off volume) and any events that occurred (e.g. dividend payments). You can also reduce or enlarge the display area. When the "Time Series" viewer has been called up with the "Intraday" tab selected, the historical data from the previous year is always displayed without filtering. User Manual Telekurs iD / Version 8.3 / 15 April 2010 Main functions (viewers) 135 To reduce or enlarge the display area, proceed as follows: 1. If the "Context" selection area is not displayed automatically according to your user-specific settings, go into the "Context" selection area and click in the active area of the "Time Series" viewer. 2. In the "Period" area, select a predefined period (you can select "1 Week", "1 Month", "3 Month", "1 Year", "YTD (year to date)", "5 Years", "10 Years" or "Maximum") or select the "Custom" option and enter the start and finish date for the required display area. All historical data from the selected display area is displayed in the "History" viewer. To even out jumps in share prices due to splits etc., you can activate the "Adjust" checkbox. The rates are then shown converted accordingly. The "Summary" tab shows a summary of key statistics. 136 Main functions (viewers) User Manual Telekurs iD / Version 8.3 / 15 April 2010 6.12 Limits The "Limits" viewer shows the limits defined for a selection of financial instruments compiled by you. When the limit set for a list price is reached, you are notified that it has been exceeded or not achieved, as the case may be. The following data is displayed: "Name" gives the name of the instrument for which the limit has been set. "Field" designates the type of price – "Last", "Ask" etc – for which the limit has been set. "Limit" indicates the price which is being monitored. If this is exceeded or not achieved, as appropriate, a notification message is generated. "LVal" shows the current valuation price. "vtLVal" shows the valuation type e.g. TRA for traded "Date limit reached" and "Time limit reached" give the date and the time when the limit was exceeded or not achieved. Once the limit has been broken, it is no longer monitored. However, you can reset the time setting by double-clicking on the limit. This brings up the "Limit settings" window where you can save the limit again without changing it. "Valid until" contains the date to which the limit is valid. If the date is in the past, the breaking of the limit is no longer monitored. "Comment" shows comments that have been entered. These are displayed with the notification (see section 6.12.3 "Notifications"). There are various ways of calling up a "Limits" viewer: In the "Lists" selection area, under "User List" open the "Limits" viewer like a normal list (see section 6.1.2 "Open an existing list") and select the instruments for which you would like to set limits (see section 5.7 "Calling up financial data"). Click on "File" and then on "Open Limit Minder". The "Limits" viewer is opened and you can select the instruments for which you would like to set limits. Select an instrument in a list or another viewer, and click on "Add Limit" in the popup menu (right-hand mouse button). The "Limits" viewer is opened and the "Limit settings" window appears. Enter a shortcut into the command line, e.g. NESN,SWL,L. The "Limits" viewer is opened and the "Limit settings" window appears. In the "Context" selection area, go to "Global Viewer", open the "Limits" viewer or enter the shortcut .L in the command line and select the instruments for which you would like to set limits. User Manual Telekurs iD / Version 8.3 / 15 April 2010 Main functions (viewers) 137 6.12.1 Set new limits To set a limit for a financial instrument: 1. In the "Context" selection area, go to "Global Viewer" and open the "Limits" viewer or enter the shortcut .L in the command line. Select the instrument for which you wish to set a limit (see section 5.7 "Calling up financial data"). You can also select an instrument in a list and click on "Add Limit" in the popup menu (right-hand mouse button). The "Limit settings" window appears. 2. Under "Watch for", choose the type of price – "Last Trade", "Ask" etc. – for which you wish to set the limit. 3. You can choose whether you want to set an upper limit or a lower limit or both limits, by activating or deactivating the relevant checkboxes. 4. You can choose how you want to enter the limit: – as an absolute value ("absolute") – relative to the current value ("relative") – as a percentage variation on the current value ("Percentage"). All values should be entered without prefixes. When you enter a limit value in one field, the values in the other two fields are automatically recalculated and displayed. In the following example, with a current "Ask" rate of 53.85, you will be notified, for example, – if the "Ask" rate rises by 5, i.e. if the value of 58.85 is exceeded (upper Limit) and – if the "Ask" rate falls by 3%, i.e. if the value falls below 52.23 (lower Limit). 138 Main functions (viewers) User Manual Telekurs iD / Version 8.3 / 15 April 2010 5. Under "Notification via", select the type(s) of notification (see also section 6.12.3 "Notifications"): – "Popup" will give the notification in a separate window. – "Sound" means that you will be notified with a signalling tone. – You can use "Mail 1" and "Mail 2" to have an e-mail message sent to the appropriate address (see section 5.1 "User preferences"). 6. If you wish you can enter a comment, no more than 50 characters long, on these limits in the “Comment” field. This will be displayed both in the “Limits” viewer and with the notification (see section 6.12.3 "Notifications"). 7. Under "Valid until", enter the date up to which the limit is to be applied. 8. Finish by clicking "OK". The limit will now be incorporated into the "Limits" viewer. 6.12.2 Working with limits To change a limit which has been set, double-click on the appropriate entry in the "Limits" viewer, or click on "Add Limit" in the popup menu (right-hand mouse button). The "Limit settings" window appears containing the defined values, which you can then change. You can also reset the "Date limit reached" item only, by clicking on the "OK" button to save the limit again without changing it. To remove a limit which has been set, select the appropriate entry in the "Limits" viewer and click on "Remove row" in the popup menu (right-hand mouse button). User Manual Telekurs iD / Version 8.3 / 15 April 2010 Main functions (viewers) 139 6.12.3 Notifications Depending on what type of notification you have selected in the "Limit settings" window, you will receive messages as follows: If you have activated "Popup": If you have activated "Mail 1" and/or "Mail 2": 140 Main functions (viewers) User Manual Telekurs iD / Version 8.3 / 15 April 2010 6.13 Watchdog The "Watchdog" viewer displays the selection of instruments or lists which you have compiled and for which the watchdog collects current messages. If a news message arrives that relates to one of the objects being monitored, the headline is displayed in the Info/Alert box (see also section 4.10 "Info/Alert box"). The following data is displayed: "Name" gives the name of the instrument or list being monitored. "News?" indicates whether incoming news items are to be shown. "Quote events?" indicates whether incoming messages from data sources are to be shown. "Corporate actions?" indicates whether incoming events data is to be shown. When the appropriate checkbox is activated, the watchdog will pick up the linked news items, which can be displayed in the "Watchdog Messages" viewer by clicking on in the Info/Alert box. The headline, date and time are displayed for each news item. Note: Messages are only picked up by the watchdog while Telekurs iD is running. User Manual Telekurs iD / Version 8.3 / 15 April 2010 Main functions (viewers) 141 To read the full text of the news item, double-click on the required item in the "Watchdog Messages" viewer. Depending on the type of item, it will be displayed in either the "News Story" viewer or the "Basic Data & Events" viewer (see section 6.16 "Basic Data & Events"). There are various ways of calling up a "Watchdog" viewer: In the "Lists" selection area, under "User List" open the Watchdog like a normal list (see section 6.1.2 "Open an existing list"). The "Watchdog" viewer is opened and you can select the instruments which you would like to watch for (see section 5.7 "Calling up financial data"). Enter the shortcut .L In the command line. The "Watchdog" viewer is opened and you can select the instruments which you would like to watch for. Click on "File" and then on "Open Watchdog". The "Watchdog" viewer is opened and you can select the instruments which you would like to watch for. Select an instrument or more than one instrument in a list or in a portfolio, and click on "Add in watchdog" in the popup menu (right-hand mouse button). The "Watchdog" viewer is opened and the instrument is automatically imported into the watchdog. Select a list in the "Lists" selection area, and click on "Add to Watchdog" in the popup menu (right-hand mouse button). The "Watchdog" viewer is opened and the list is automatically imported into the watchdog. In the "Context" selection area, go to "Global Viewer", open the "Watchdog" viewer and select the instruments which you would like to watch for. To delete an item, highlight it and click on "Remove row" in the popup menu (right-hand mouse button). 142 Main functions (viewers) User Manual Telekurs iD / Version 8.3 / 15 April 2010 6.14 Contributors In the "Contributors" viewer you can look at the quote pages of various securities, maintained by leading banking institutes and brokers. Call up the "Contributors" viewer as follows: 1. In the command line, enter the shortcut 85,contributorcode (e.g. 85,BPL). You will receive the contents index of the contributor concerned. You can also call up a page directly, for example by entering 85,BPL101. 2. Click on "Go" or press the Enter key. The "Contributors" viewer will open at the page requested. If you do not know the code for a contributor, you can bring up the Contributor Code table using the shortcut 85,? or .?cont (see also section 4.9 "Shortcuts"). The "Contributors" viewer displays the following data: In the text section you will see information about the page, such as the name of the company, telephone number of a contact person etc. Depending on the type of page, information on the securities may be given in the text section or, as in the example above, in a separate list section. Double-clicking on a symbol opens up the "Basic Data & Events" viewer with detailed information about the instrument in question. When the viewer is active, you can scroll to the next page by using the "next Page" button in the "Context" selection area. You can also do this by clicking on the appropriate popup menu (righthand mouse button). If you double-click on a line in the "Contributors" viewer, then depending on your configuration, either a new viewer is opened showing the instrument or the instrument is moved by linking to a viewer that is already open (see section 5.5 "Double-clicking on an instrument"). You can directly open several viewers for the instrument – as described in section 6.8 "All Sources" – by clicking on a popup menu item (right-hand mouse button). User Manual Telekurs iD / Version 8.3 / 15 April 2010 Main functions (viewers) 143 Contributors pages from SIX Telekurs France On the "File / STF Contributed Pages" menu, you can open the "STF Contributors" viewer and call up a contributor page from SIX Telekurs France (STF) in the "Context" selection area. 144 Main functions (viewers) User Manual Telekurs iD / Version 8.3 / 15 April 2010 6.15 Forex The "Forex" viewer shows the principal exchange rates (Ask and Bid) in the form of a table. The USD/CHF exchange rate for example, can be read off where the USD line intersects the CHF column (1 USD = 1.2089 / 95 CHF). The Bid price is shown in second place after the Ask price (1.2089 / 95 signifies Bid=1.2089 and Ask=1.2095). The contributor is also quoted e.g. ZKB for the USD/CHF exchange rate. You can open a "Forex" viewer in the "Context" selection area under "Global Viewer" or by using the shortcut .F in the command line. You can set up the individual currencies to be displayed in the "Forex" viewer as follows: 1. If the "Context" selection area is not displayed automatically according to your user-specific settings, go into the "Context" selection area and click in the active area of the "Forex" viewer. 2. In the "Selectable Items" area select all currencies, which should be displayed in the matrix. 3. Click on the "Update viewer" button. The matrix will be displayed according to your selected items. 4. Select the required style in the "Style" selection box. The matrix will then be displayed again in accordance with your choice. Please note: your individual selection will not be saved. When you next call up the "Forex" viewer the standard setting of the currencies with USD, EUR, CHF, GBP and JPY will be displayed. User Manual Telekurs iD / Version 8.3 / 15 April 2010 Main functions (viewers) 145 Example: individual selection of exchange rates AUD, CAD, CHF, EUR, GBP, JPY, SEK and USD displayed using the "Bid-Ask/Full" style, i.e. without showing the contributor, but giving the Ask rate in full: 146 Main functions (viewers) User Manual Telekurs iD / Version 8.3 / 15 April 2010 6.16 Basic Data & Events In the "Basic Data & Events" viewer you can look at comprehensive, up-to-date basic data and administrative information on financial instruments, and at information on companies and trading centres. In the same way as when using an Internet browser such as Internet Explorer, you can click on each link (shown in blue and underscored) in order to have several different views displayed inside the same window. Call up the "Basic Data & Events" viewer as follows: Double-click on a search result in the "Search Results" viewer, or click on an item in the popup menu (right-hand mouse button). Enter a suitable shortcut (see also section 4.9), e.g. "abbn,380,id" or "abbn,380,cp", to open the "Basic Data & Events" viewer with the "Instrument Details" or "Custom Page" view. Select a financial instrument in a list, for example in the "List" or "Search Results" viewers, and click on the relevant item in the popup menu (right-hand mouse button) under "Instrument Info" or "Company Info". Double-click on a corporate actions message in the "Watchdog Messages" viewer. The "Instrument Info" popup sub-menu in the "List" and "Search Results" viewers gives the following options: Clicking on a menu item opens the "Basic Data & Events" viewer with the appropriate view (exception "Documents"): Instrument Summary: "Instrument Summary" view (see section 6.16.2 "Financial instruments") Instrument Details: "Instrument Details" view All Corporate Actions: "All Corporate Actions" view Markets: "Markets" view NSINs: "Identification Directory" view Documents: Opens the "TMS Headlines" window with the available documents relating to this instrument (e.g. prospectus data). Dividends: "Dividends Overview" view Custom Page: "Custom Page" view (see section 6.16.5 "Custom Page") User Manual Telekurs iD / Version 8.3 / 15 April 2010 Main functions (viewers) 147 The "Company Info" popup sub-menu in the "List" and "Search Results" viewers gives the following options: The options that are not available for the selected instrument are not shown, i.e. the "Analysis Zacks" option is mainly available for American and Canadian instruments. Clicking on the individual menu items has the following effect: "Details" opens the "Basic Data & Events" viewer with the "Company Details" view (see section 6.16.3 "Companies"). "Analysis" opens the "Analyse" viewer with analytical data from several providers of company, product and financial information (see section 6.17 "Analysis"). "Analysis - Infinancials" opens the "Infinancials" website – a provider of high-quality fundamental data and analysis of listed companies around the world. By clicking on the link http://www.infinancials.com/quicktour/flash/telekurs/quick_tour_telekurs.html#top you can call up a short interactive introduction to calling up and using the "Infinancials" website. "Analysis - Zacks" with its sub-items "Company Quote", "Company Profile", "Research Summary", "EPS Consensus Perspective", "Insider Transactions" or "Price Performance" opens a data summary compiled by "Zacks" for SIX Telekurs, showing the relevant section for this company (mainly for American and Canadian companies, see section 6.19 "Analysis from Zacks"). "Analysis - GPRV" opens the Infinancials GPRV analysis functions (GPRV = Growth, Profitability, Risk, Value) which can be used to compare the instrument in relation to growth, profitability, risk and value with various other companies in the same sector. There is a link to call up a description of the function (Concept Guide). "All Instruments" opens the "All Instruments" viewer with a list of all the company's financial instruments. On the various other tabs, individual instrument categories (e.g. shares or bonds) can also be displayed. In the same way as in the "All Sources" viewer, the display in the "All Instruments" viewer can also be limited or grouped according to various criteria (see section 6.8.1 "Limiting and/or grouping the display"). "All Equities" opens the "Listing Search Results" viewer with a list of all the company's equities. "All Bonds" opens the "Listing Search Results" viewer with a list of all the company's bonds. "All CV Bonds" opens the "Listing Search Results" with a list of all the company's CV bonds. "Custom Page" opens the "Basic Data & Events" viewer with the "Custom Page" view. 148 Main functions (viewers) User Manual Telekurs iD / Version 8.3 / 15 April 2010 6.16.1 Navigation viewer With the help of various links in the "Basic Data & Events" viewer, you can change to different views. As soon as a change like this has happened, the "Back" button becomes available in the "Context" selection area, so that you can change back to the views you were using before. Once you have changed back, the "Forward" button becomes available, so that you can navigate forwards again. To navigate in the "Basic Data & Events" viewer, you can also click on the relevant pop-up menu items (with the right mouse button). If you activate the "Keep page type" checkbox, then when the "Basic Data & Events" viewer is opened, for each company that view of a new instrument is automatically called up in which you activated the checkbox. If you save a screen with the "Keep page type" checkbox activated, this setting still applies when you open the "Basic Data & Events" viewer. Note: When the "Keep page type" checkbox is activated, other views cannot be called up directly, either by selecting them in the pop-up menu of a list or by shortcuts. The view that has been set is always displayed. 6.16.2 Financial instruments The "Instrument Summary" view shows the most important details about the company, the principal basic data about the instrument, and the latest event messages, in chronological order, in the form of a summary. The heading shows the type of view, e.g. "Instrument Summary". User Manual Telekurs iD / Version 8.3 / 15 April 2010 Main functions (viewers) 149 The navigation bar shows all the links available for an instrument. Clicking on a link opens the relevant view in the same window. The main views are as follows: – "Instrument Details" gives all the information provided in the "Instrument Summary", plus additional basic and issue data, all event messages in chronological order in the form of a summary, and dividends listed separately. – "Custom Page" shows the specific data that you defined (see section 5.1 "User preferences"). – "Markets" shows all quote sources (markets, banks, brokers etc) and symbols, together with the valuation price (previous day or earlier). – "Identification Directory" shows all National Securities Identification Numbers (NSINs). – "All Corporate Actions" shows a summary of all events messages in chronological order. Clicking on the date will display the full text of the corporate action message. You can also click on further texts with associated links to find alternative information from that displayed by calling up the date. The title bar shows the name of the instrument. The relevant data is given below this. In the same way as when using an Internet browser such as Internet Explorer, you can click on each link (shown in blue) to see the data concerned. For example, clicking on the name of the company (Issuer) will display the "Company Details" view. When the viewer is active, you can use the "Back" and "Forward" buttons in the "Context" selection area to scroll through the corporate actions. You can also click on the appropriate popup menu item (right-hand mouse button). 6.16.3 Companies The "Company Details" view gives more detailed information on a company, such as sector, domicile etc, and the latest event messages in chronological order in the form of a summary. 150 Main functions (viewers) User Manual Telekurs iD / Version 8.3 / 15 April 2010 You can access the following search functions in the navigation bar: "Search Issued Instruments" opens a new "VDB Instruments for Company Query" window, where you can limit or expand your search for instruments from the company concerned. Start the search by clicking on the "Search" button. "All Issued Instruments" searches directly for all instruments of the company concerned without any limitations. "All Corporate Actions" gives a summary of all events messages in chronological order. Clicking on the date will display the full text of the corporate action message. The results are listed in the "Search Results" viewer, from where you can call up the "Basic Data & Events" viewer again. 6.16.4 Trading centres The "Trading Place Details" view gives more detailed information on a trading centre, such as designations, time differences and a list of the stock exchange holidays. This view is displayed if, for example, you click on the "Most Liquid Market" link in the "Instrument Summary" view. User Manual Telekurs iD / Version 8.3 / 15 April 2010 Main functions (viewers) 151 6.16.5 Custom Page The "Custom Page" view shows the data that you specifically defined (see section 5.1 "User preferences") for the selected instrument. This view is displayed by clicking on the "Custom Page" link in the "Instrument Summary" view. 6.17 Analysis In the "Analyse" viewer, you can display analytical data from several providers of company, product and financial information about a share by highlighting the share in a list, e.g. in the "List" viewer and then right-clicking on the corresponding pop-up menu item under "Company Info". The "FactSet / Overview" tab is shown as the default. 152 Main functions (viewers) User Manual Telekurs iD / Version 8.3 / 15 April 2010 The following analyses are available in the "Analyse" viewer: Analysis from FactSet Research Systems (see section 6.17.1 "Analysis from FactSet"). Analysis from theScreener (see section 6.17.2 "Analysis from theScreener"). Company Profiles (see section 6.17.3 "Company Profiles"). Analysis News (see section 6.17.4 "Analysis News"). Analysis from Hoppenstedt (see section 6.17.5 "Analysis from Hoppenstedt"). Eco Fact (see section 6.17.6 "Analysis from Eco Fact"). 6.17.1 Analysis from FactSet In the"Analyse" viewer (to call it up, see section 6.17 "Analysis") you can have the financial and analytical data from FactSet Research Systems displayed for a share on the "FactSet" tab. The data are distributed on four tabs: "Overview" showing overview data, a description of the area of business, estimates and figures "Estimates" showing estimates and assumptions made about future financial years "Fundamental Year" showing data about the last financial year "Fundamental Quarter" showing information about past financial quarters Example of the "Fundamental Year" tab for the Nestle share: FactSet Estimates The following analytical data (in alphabetical order) are displayed on the "Estimates" tab and in some cases also on the "Overview" tab: EPS Median User Manual Telekurs iD / Version 8.3 / 15 April 2010 Main functions (viewers) 153 EPS Num.Estim. EPS Revisions UP EPS Revisions Down EPS Revisions Unchanged EPS 1 Month Revisions EPS 3 Month Revisions EPS 6 Month Revisions EPS High EPS Low EPS %Change Dividend %Change NTM EPS LTM EPS Long Term Growth BVPS Median CFPS Median Dividend Median Net Income Median EBIT Median EBITDA Median Total Assets Median Net Debt Median Sales Median P/E Median Target Price Median Recommendations Buy Recommendations Overweight Recommendations Hold Recommendations Underweight Recommendations Sell Total Recommendations Recommendations Mark 1Y Beta Relative to short indice WACC Risk Premium 154 Main functions (viewers) User Manual Telekurs iD / Version 8.3 / 15 April 2010 FactSet analytical data (Fundamental) The following analytical data (in alphabetical order) are shown on the "Fundamental Year" and "Fundamental Quarter" tabs and in some cases also on the "Overview" tab: Accounting Class Book Value per Share It is the shareholder’s equity per share. Shareholder’s equity is the money brought by shareholders at the constitution of the company or after, or left to the company’s disposal (retained net result i.e not distributed thanks to dividends). Business Description Cash & cash equivalents Cash And Short Term Investments Cash Flow Per Share Cash Flow per Share is the Cash flow from Operations divided by the number of shares. Common Equity & Other Paid-In Capital (Shareholders Equity) Current Assets Current Liabilities Date Of Fiscal Year End Dividend Payout Per Share Dividends Per Share Dividend is part of net income distributed in cash to the company’s shareholders. It is collected per share. EBIT Abbreviation for Earnings Before Interest & Taxes. EBIT, or operating profit, represents the earnings generated by investment cycle and operating cycle for a given period. Operating income is the product of the company’s industrial and commercial activities before its financing operations are taken into account. EBITDA Abbreviation for Earnings Before Interest, Taxes, Depreciation & Amortization. It is what the company still has after having paid salaries and the Estate, via the balance between operating revenues and cash operating charges incurred to obtain these revenues. It is thus not impacted neither by the financing policy of the company, nor by potential non-recurring items that should have impacted the company’s results, nor by the company’s amortization policy. Employees EPS Earnings Per Share is the net result per common share, that is to say the company’s net result divided by the outstanding number of shares held by the company. EPS serves as an indicator of a company’s profitability. As Net Income, it can be reported or adjusted. And despite the fact that we do have 3 kinds of EPS in Factset Estimates database, we only consider two definitions. Goodwill Goodwill is the positive difference between the purchase cost and the fair market value of the assets and liabilities acquired with a company. Goodwill may exist due to one of the following: the assets recorded on the acquired company’s balance sheet are worth more than their historical cost; some assets such as patents, licenses and market share that the company User Manual Telekurs iD / Version 8.3 / 15 April 2010 Main functions (viewers) 155 has accumulated over the years without wishing to or even being able to account for them, may not appear on the balance sheet; the merger between the two companies may create synergies, either in the form of cost reductions and / or revenue enhancement. Goodwill is assessed each year to verify whether its value is at least equal to its net book value as shown on the Group’s balance sheet. This assessment is carried out by means of impairments tests. If the market value of goodwill is below its book value, goodwill is written down to its market value and a corresponding impairment loss is recorded on the income statement. More than impoverishing a company, goodwill amortization is linked to the profits paid at the moment of acquisition, so that the company does not forget that a part of those profits was already paid for. Gross Income Long Term Debt Market Value Net Cash Flow - Financing The cash generated from the financing activities of a company such as receiving or paying loans, issuing or repurchasing stock, and paying dividends. The Cash Flow from Financing Activities can be found on the statement of cash flows. Net Cash Flow - Investing The Cash Flow from Investing Activities represents the purchase or sale of productive assets (physical assets and investments) for cash. Investing cash flow includes: capital expenditure for long-term assets, proceeds from the sales of assets and cash flow from investments in joint ventures and affiliates and long-term investment in securities. Net Cash Flow - Operating Activities The cash generated from the operations of a company, generally defined as revenues less all operating expenses, but calculated through a series of adjustments to net income. The Cash Flow from Operations can be found on the statement of cash flows. Operating cash flow is the cash that a company generates through running its business. It's arguably a better measure of a business's profits than earnings because a company can show positive net earnings (on the income statement) and still not be able to pay its debts. It's cash flow that pays the bills! You can also use Cash Flow from Operations as a check on the quality of a company's earnings. If a firm reports record earnings but negative cash, it may be using aggressive accounting techniques. Net debt Net financial debt is the total financial debt net of short-term financial investments. Net financial debt and shareholders’ equity represent the capital invested in the company. It shows the financial position of the company. Net Income Available to Common Net Sales Or Revenues Sales represent what the company has been able to sell to its customers. It shows the total of goods & services net sales, invoiced by a company during a particular fiscal year. Consolidated Sales is the turnover of all the companies belonging to a same Group. It is the subsidiaries net sales sum, after elimination of internal sales between subsidiaries. Operating Income Net Profit is one of the most widely used accounting indicators of value creation. The company’s net result shows if the company has succeeded in making profits or if it has lost money, during the fiscal year. This is the operating profit that still remains to shareholders, after paying creditors and the Estate. This result can be either distributed (dividends), or retained. Short Term Investments 156 Main functions (viewers) User Manual Telekurs iD / Version 8.3 / 15 April 2010 Stockholder's Equity It is the owners' interest in the assets of the enterprise after deducting all its liabilities. For example, a firm making profits receives more cash for its products than the cost at which it produced these goods, and so in the act of making a profit it is increasing its assets. Also, an issuance of new equity in which the firm obtains new capital increases the total shareholders' equity. Equity will decrease, for example, when machinery depreciates, which is registered as a decline in the value of the asset, and on the liabilities side of the firm's balance sheet as a decrease in shareholders' equity. Total Assets The Total Assets represent everything that the company owns and what owed to it. Assets represent the uses to which the resources the company raises from all providers of funds (shareholders, creditors, suppliers, tax authorities, etc.) are put. Total Liabilities 6.17.2 Analysis from theScreener In the"Analyse" viewer (to call it up, see section 6.17 "Analysis") you can have the analytical data derived from theScreener, an independent provider of analytical information, displayed for a share on the "theScreener" tab. In the header line you can see the name and symbol for the instrument, the trading centre, the currency in which the instrument is traded, the product category, the ISIN, the identification number as given in your user settings, the News symbol and 4 PDF symbols (one for each available language). The News symbol indicates if there is any news about the company. If the information symbol is blue it means that there is current, unread news, while a grey symbol indicates news that is more than one day old or has already been read. Double-clicking on the symbol displays the "News Search Results" viewer with the relevant headlines from the news agencies you are subscribed to (see section 6.23 "News") and a blue symbol changes to grey until more news arrives. User Manual Telekurs iD / Version 8.3 / 15 April 2010 Main functions (viewers) 157 If you double-click on a PDF symbol you will see an analytical report on the company in PDF format in the corresponding language (see following paragraph "Analytical data from theScreener"). This is an optional service for an additional fee. You can call up an "Analysis Profile" viewer (this is a similar viewer to "Analyse", but only showing data from theScreener) – e.g. for the Nestle share – by using the shortcut (see also section 4.9) "nesn,swl,ap", if an additional viewer is to be opened, or with "nesn,swl" if an "Analysis Profile" viewer is already open and active. Analytical data from theScreener On the "theScreener" tab, the following analytical data is displayed (you can find more detailed information in "Appendix 2: Definitions of terms relating to analytical data from theScreener"): Stars: valuation of the share using 0 ( star symbols count in the valuation. ) to max. 4 stars ( ). Only the filled-in Stars are allocated according to the following criteria: Earnings Revision Trend = Valuation Rating , Medium Term Technical Trend = 4wk Rel Perf , = > 1% = The highest rating is shown with 4 stars, the lowest with no stars. Note For each category, once a stock has earned its star it will keep it until: Earnings Revision Trend The arrow turns red ( ) Valuation Rating The arrow turns red ( , Medium Term Technical Trend The arrow turns red ( ) 4wk Rel Perf Drops below -1% (< -1%). ) Mkt Cap in $bn (market capitalisation in billion $): this sum is calculated by multiplying the share price by the number of shares in circulation. Earnings Rev Trend (earnings revisions trends): information about whether the earnings estimates have been increased or reduced by more than 1 % or are considered to be neutral compared with the earnings revisions of seven weeks ago. The symbol indicates that the revisions were positive before the neutral situation, while the use of the symbol indicates that they were negative before the neutral situation. Valuation Rating: The price is evaluated in one of 5 categories and reflects whether a share is being traded with a relatively higher price or a lower price on the basis of its potential for growth. The categories are shown using the following symbols: = very undervalued (more than 15 %) = undervalued (more than 5 %) = fairly evaluated (less than 5 % difference between the estimated value and the actual price) = overvalued (more than 5 %) = very overvalued (more than 15 %) 158 Main functions (viewers) User Manual Telekurs iD / Version 8.3 / 15 April 2010 GY/PE Ratio (growth to PE ratio): estimated growth of future profits plus dividends as a percentage, divided by the estimated long-term PE ratio. LT PE (long-term PE ratio): PE ratio calculated on the basis of long-term earnings estimates. LT Growth (long-term earnings growth): estimated annual growth rate for future earnings as a percentage, normally predicted for the next two to three years (this is stated in the Variable column). Avg. Nb analysts (average number of analysts): analysts who are evaluating the company. MT Tech Trend (medium-term technical trend): simple indicator with three categories to calculate the sustainability of a trend (trend tracker). The categories are shown using the following symbols: = positive trend (the market is buying the stock) = neutral (the symbol indicates that the trend was positive before the neutral situation, while use of the symbol indicates a negative trend before the neutral situation). = negative trend (the market is selling the stock) 4wk Rel Perf (relative performance over 4 weeks): performance of the share relative to the index (over 4 weeks). The reference index is given in the "Variable" column. Dividend Yield: the value of the dividends is shown in different colors depending on the distribution ratio (percentage share of the profit which is expected to have to be used for dividend distribution): – black if the distribution ratio = 0 – green if the distribution ratio is between 0 and 40 – blue if the distribution ratio is between 40 and 70 – red if the distribution ratio is over 70 Risk Zone: the three risk zones are defined by the sensitivity to bear market phases and to bad news, compared with a global reference value: = low risk (lower than the global average) = average risk (higher than the global average, but lower than the global average plus the simple standard deviation). = high risk (higher than the global average plus the simple standard deviation). Bear Market (sensitivity to bear market phases): predicts how the share price will react in a falling market (risk that the share will fall more than the index in a falling index): = low risk = average risk = high risk Bad News (sensitivity to bad news): predicts how the share price will react in a rising market (risk that the share price will fall in a rising index): = low risk = average risk = high risk User Manual Telekurs iD / Version 8.3 / 15 April 2010 Main functions (viewers) 159 Beta (Beta 1 year in base points): the Beta measures the sensitivity of a share relative to movements in the market (=100). Shares with a Beta greater than 100 tend to amplify the overall movements of the market, while shares with a Beta of less than 100 tend to minimise them. The reference index is shown in the "Variable" column. Correlation: alignment of the share relative to the index. The correlation is expressed in values between 1 (total alignment) and -1 (no alignment at all). If a share is positively correlated with the index, it tends to rise when the market rises. If a share is negatively correlated with the index, it tends not to follow market movements. The reference index is shown in the "Variable" column. Value at Risk (potential loss): the maximum potential loss for the share is calculated for a medium-term period with a probability (reliability degree) of 95 %. Global Evaluation: 5-stage evaluation scale from "Negative", "Slightly negative", "Neutral", "Slightly positive" to "Positive" saying when this overall impression dates from. First Analysis Date (date when the first analysis was produced) Analysis from (date when the analysis was produced) Analytical report from theScreener Double-clicking on a symbol in the header line of the "Analysie" viewer displays an analytical report about the company in PDF format in the corresponding language, which you can save or print out. This is an optional service for an additional fee. The analytical reports contain on two pages the main analytical criteria which are used in financial management to value shares. The information includes fundamental criteria: price valuations and earnings estimates from financial analysts help you to work out the potential of the share price; 160 Main functions (viewers) User Manual Telekurs iD / Version 8.3 / 15 April 2010 technical analysis: the technical trend and relative performance of a stock in relation to its index; risk measurement: the risk profile of a share is calculated based on statistical analysis of historical data. The sensitivity of the stock to falls in the index and its reaction to companyspecific problems are shown in graph form. Detailed figures on the analysis reports from theScreener 1 2 1 A short description of the company and its stock. 2 The "Speedometer" shows at a glance the results of fundamental, technical and risk analysis plus the overall rating of the stock. 3 Table with key parameters comparing the stock to competitors of the same industry group and market index. 4 Price-Chart of the last 12 months comparing the stock to the reference market and industry group. 5 Analysis of the stock price (valuation rating) following the PEG-Methodology. 6 Consensus analysts signal (Earnings Revision Trend) based on the earnings forecasts. 3 4 8 9 10 5 6 7 7 Analysis of the technical trend on the basis of a medium term technical trend (40-days moving average) and the relative performance to the market (reference index). 8 Analysis of the projected dividend yield and payout-ratio. 9 Summary of the fundamental and technical analysis of the selected stock. 10 Overview of key parameters. User Manual Telekurs iD / Version 8.3 / 15 April 2010 Main functions (viewers) 161 11 Comparison of competitors with the key parameters of the fundamental, technical and risk analysis. 11 12 Price-Chart of the last 12 months with the medium term technical trend (40days moving average). 12 17 13 18 14 19 15 16 13 Development of the risk rating over the last 12 month. 14 Analysis of the classical risk parameters beta, correlation and volatility. 15 Riskprofile in decreasing markets (sensitivity to market risk). 16 Riskprofile in increasing markets (sensitivity to specific risk). 17 Important events in the stocks development. 18 Conclusion of the analysis and the stocks overall rating. 19 Legal notice (Disclaimer) referring to this report. 6.17.3 Company Profiles In the"Analyse" viewer (to call it up, see section 6.17 "Analysis") you can have news from the "Company Profiles" area for a company displayed on the "Company Profiles" tab. 162 Main functions (viewers) User Manual Telekurs iD / Version 8.3 / 15 April 2010 The name and company code are shown in the "News for:" section of the "Context" selection area. 6.17.4 Analysis News In the"Analyse" viewer (to call it up, see section 6.17 "Analysis") you can have news from the "Analyses" area for a company displayed on the "Analysis News" tab. The name and company code are shown in the "News for:" section of the "Context" selection area. 6.17.5 Analysis from Hoppenstedt In the"Analyse" viewer (to call it up, see section 6.17 "Analysis") you can have company figures from Hoppenstedt – a provider of company, product and financial information (mainly for German companies) – displayed on the "Hoppenstedt" tab. User Manual Telekurs iD / Version 8.3 / 15 April 2010 Main functions (viewers) 163 6.17.6 Analysis from Eco Fact In the"Analyse" viewer (to call it up, see section 6.17 "Analysis") you can have the RepRisk Index and Eco Fact news displayed on the "Eco Fact" tab. Note: Eco Fact news is available from mid-April 2010. If you double-click on a news headline, the relevant news item is displayed in the bottom part of the "Analyse" viewer. The Reputational Risk Index (RRI) displayed in the header line is a quantitative risk measure of a company's exposure to controversial environmental and social issues. It facilitates an initial assessment of the risks attached to investments and business relationships, allows the comparison of a company’s exposure with that of its peers, and helps track risk trends over time. (RRI) Note: The RRI is a measure of risk and not a measure of the overall reputation of a company. The RRI refers only to environmental and social risks. The Current RRI measures the present level of criticism of a company (covering a two month period). The RRI Trend is the change of the RRI over the last 30 days. The Peak RRI is the maximum RRI value over the last two years and is an indicator of the environmental, social, reputational and investment risks associated with a company. The RRI calculation is based on the influence of news sources, frequency and timing of news, as well as the news content, i.e. severity and novelty of the issues addressed. The RRI ranges from 0 to 100 and is calibrated as follows: 0-25: low reputational risk 25-50: medium reputational risk 50-75: high reputational risk 75-100: very high reputational risk The RRI emphasizes companies which are newly criticized or have had less criticism in the past. Expressed differently, companies with a lot of criticism in the past are less sensitive to new allegations. If no new criticism is captured, the RRI of a company decays to zero over a period of two years. The RRI does not depend on the sequence of news. 164 Main functions (viewers) User Manual Telekurs iD / Version 8.3 / 15 April 2010 6.18 GPRV Analysis The Infinancials GPRV analysis function (GPRV = Growth, Profitability, Risk, Value) allows you to compare a company with other companies in the same sector with regard to growth, profitability, risk and value. You can call up the Infinancials GPRV analysis function by highlighting a financial instrument for that company in a list, e.g. in the "List" viewer, and then clicking on the pop-up menu item "Company information / GPRV analysis" (right mouse button). The link bottom left can be used to call up a "Concept Guide" describing this function. The other companies in the same sector which have been used for the comparison can be seen on the "Peers" tab. User Manual Telekurs iD / Version 8.3 / 15 April 2010 Main functions (viewers) 165 6.19 Analysis from Zacks In a data summary compiled by "Zacks" for SIX Telekurs, you can have analytical data from Zacks about an American company displayed, by highlighting a financial instrument for this company in a list, for example in the "List" viewer, and then clicking (right mouse button) on the pop-up menu item "Company Info / Zacks Analysis" and then selecting the required summary from the sub-menu that comes up. Zacks is an investment research company for obtaining company information, focusing on American and Canadian companies. Zacks gathers and processes the so-called “Fundamentals”, using a historical database that comprises over 16,000 active and passive titles over a period of 20 years. In the Zacks data summary, the following headings can be selected (either directly when calling the summary up or in a selection box after you have called it up): "Company Quote" giving pricing data about the company’s shares "Company Profile" giving the main company information "Research Summary" giving a summary of the company analysis "EPS Consensus Perspective" giving information about the profit outlook for the company’s shares "Insider Transactions" giving all buying and selling transactions by employees of the company "Price Performance" giving the returns on the company’s shares over various periods Links at the top of the data summary can be used to access further data. 166 Main functions (viewers) User Manual Telekurs iD / Version 8.3 / 15 April 2010 6.20 Yield Curves Yield Curves are available for various currencies and risk classes. From the "File / STF Contributed Pages" menu, you can open the "STF Yield Curve" viewer and call up one or more yield curves from SIX Telekurs France (STF) in the "Context" selection area. A yield curve is called up by double-clicking. Use Drag & Drop or the pop-up menu (right mouse button) to add yield curves. The vertical axis shows the yield and the horizontal axis the remaining life. If you position the cursor over a point on the curve you can see the associated values displayed as a tool tip. The example below shows yield curves for German, American, Greek, Japanese and Australian state loans. User Manual Telekurs iD / Version 8.3 / 15 April 2010 Main functions (viewers) 167 6.21 Fair Value Pricing Service SIX Telekurs' Fair Value Pricing Service offers highly transparent valuations for your fixed income securities, and supports you in adhering to new accounting standards. It delivers calculated prices for around 56‘000 investment grade bonds (including 51‘000 straight bonds and 5‘000 zero bonds), and 26‘000 floating rate notes. Fair value prices are provided in eleven currencies, and are calculated four times a day, at 08:40, 11:50, 14:50 and 20:45 (+GMT). Accessible for all packages except the Wealth Management Package. You can see the bonds valued by the SIX Telekurs Fair Value Pricing Service by searching for "bc=FVS" (FVS = Fair Value Service) (see section 6.22.1 "Quick Search"). Then in the "Search results" viewer click on the required line and on the pop-up menu that appears click on "Instrument Info / Markets". The "Basic Data & Events" viewer appears showing the market data for the instrument. On the "Fair Value" line, click on the "Val. Price" column to show the market price information. On the "Valuation Telekurs" line, click on the value to reach the Fair Value Pricing Service. This opens in a new browser window. 168 Main functions (viewers) User Manual Telekurs iD / Version 8.3 / 15 April 2010 In the Fair Value Pricing Service, you can see all the data underlying the fair value assessment shown on different tabs. A short description and detailed technical documentation can be called up on the "Documentation" tab. User Manual Telekurs iD / Version 8.3 / 15 April 2010 Main functions (viewers) 169 6.22 Search functions 6.22.1 Quick Search You can start a quick search by the entry of a search term (e.g. name, symbol, number etc.) or up to maximum 3 search terms separated by empty lines in the command line. Defining the search object in as much detail as possible will give you more accurate results. As soon as you begin making entries the “Context” selection area displays the default settings for the quick search, which you can usually define yourself (see section 5.1 "User preferences"). Adapt the search criteria for the desired search: 1. Select what you want to search for in the "Search for" area: – "Quotes" for quote information on individual financial instruments – "Instrument" for basic data and administrative information about financial instruments – "Company" for information about companies – "Trading Place" for information about trading centres – "News" for a search for news You can define the default value (see section 5.1 "User preferences"). 2. In the "Status" area, define whether the search should encompass only "active", only "inactive" or "all" instruments. The "Status" area is only available when searching for quotes, instruments or companies. You can find a detailed explanation of the different statuses in section 6.22.2 "Search Extended". 3. In the "Search by" selection box, select the criterion for your search, e.g. "Name", "Symbol" etc. The selection offered depends upon the selection under "Search for". The "Search by" selection area is not available when searching for news items. 4. When searching for basic data or quote information ("Search for" = "Instrument" or "Quotes"), you can use the checkboxes in the "Instrument Types" area to define the types of instrument you are searching for. First deactivate the "All" checkbox (this deactivates all checkboxes) and then highlight the instrument type you wish to search for, e.g. "Warrants". When searching for News you can specify the time period. 170 Main functions (viewers) User Manual Telekurs iD / Version 8.3 / 15 April 2010 5. When searching for rates information ("Search for" = "Quotes"), you can select in the "Market" selection box whether all markets should be searched or only the most liquid market (Most Liquid Trading Place). 6. When searching for news items, you can define the period for the search in the "Period UTC" area, either by selecting a preset period or by selecting "Custom" in the selection area and entering a date range. 7. If you want to open a new viewer to display the results of every new search, check the "Show Results in New Viewer" checkbox. 8. If you wish to use the set search criteria as the default setting, click on the "Make this my default" button. This default is restored every time you click on "Reset to default". By using the "Reset to TK-Default" button, you can reset the Telekurs standard setting. 9. Start the search by clicking on the "Go" button in the command line. The data that is found is displayed in the "Search results" viewer (search for instrument, company or trading place), in the "Listing Search Results" viewer (search for quotes) or in the "News Headlines“ viewer (search for news). You can also export or copy the data displayed in the "Search results" or "Listing Search Results" viewers (but not the news), using the pop-up menu (right mouse button). The number of results found is shown at the top of the views, and when searching for quotes also the search settings in the "Market" and "Status" areas (e.g. Most Liquid Trading Place and Active) together with the search term and any other search settings. This latter information can be displayed or masked by clicking on the plus or minus symbol before the "Total Results" heading. If more than 1000 relevant hits are found in a search, they are shown on pages of 1000 entries each. You select another page either by using the navigation buttons that come up at the top of the page or by entering the page number in the entry field "Go to page". It is recommended that, if necessary, if there are too many relevant hits, the search results are further restricted in the "Context" selection area on the "Statistics" tab (further explanations can be found in section 6.22.3 "Market Search"). User Manual Telekurs iD / Version 8.3 / 15 April 2010 Main functions (viewers) 171 Note: If you sort the data (see also section 6.1.8 "Sort list"), this only applies to the entries contained on one page. There are search queries which can result in up to a maximum of 30,000 results. If all 30,000 entries had to be sorted, this would result in a massive overloading of the system. In this context, performance and stability were judged to be higher priorities. In what follows you find various examples for the quick search. Searching for quote information Searching for quote information, e.g. with the following search criteria: Entry in command line: 874251 (Swisscom CH valor number) Search for: Quotes Status: Active Search by: CH-VALOREN Market: All brings up a list in the "Search Results" viewer of all exchanges and contributors setting prices for this instrument (see also section 6.8 "All Sources"). You can adapt this list in the same way as any other list (e.g. the "List" viewer). Note: If only one result is found for a search (e.g. if "Most Liquid Trading Place" was set in the "Market" area instead of "All"), this result is shown directly in the "Single Quote" viewer. 172 Main functions (viewers) User Manual Telekurs iD / Version 8.3 / 15 April 2010 Searching for financial instruments When searching for a financial instrument, e.g. with the following search criteria: Entry in command line: Schlatter Search for: Instrument Status: All Search by: Name Instrument Types: All the most significant basic data is listed in the "Search Result" viewer – e.g. valor number, NSIN, short name, instrument type. Double-clicking on an entry opens the "Corporate Actions" viewer with the view defined in your user-specific settings for the instrument concerned. By clicking on a popup menu item (righthand mouse button) you can directly call up the following views in the "Basic Data & Events" viewer (see also section 6.16 "Basic Data & Events"): "Instrument Summary" (the same as double-clicking on the instrument) "Instrument Details" "All Corporate Actions" "Markets" "Identification Directory" ("NSINs" popup menu item) Clicking on "Open all sources" in the popup menu (right-hand mouse button) opens a new "All Sources" viewer for the instrument concerned (see section 6.8 "All Sources"). This popup menu is context-sensitive, i.e. cannot be selected for all instruments (e.g. not for inactive instruments). User Manual Telekurs iD / Version 8.3 / 15 April 2010 Main functions (viewers) 173 Searching for companies When searching for companies, e.g. with the following search criteria: Entry in command line: Gallus Search for: Company Status: Active Search by: Name the most significant data is listed in the "Search Result" viewer – e.g. company key, name, domicile etc. Double-clicking on an entry opens the "Basic Data & Events" viewer with the view defined in your user-specific settings for the company concerned. By clicking on a popup menu item (righthand mouse button) you can directly call up the following views in the "Basic Data & Events" viewer (see also section 6.16 "Basic Data & Events"): "Company Details" (the same as double-clicking on the company) "All Corporate Actions" "VPDoubleTaxDetail" 174 Main functions (viewers) User Manual Telekurs iD / Version 8.3 / 15 April 2010 Searching information about trading places When searching for information about trading places, e.g. with the following search criteria: Entry in command line: 03.06.2010 Search for: Trading Place Search by: Exchange Holidays the "Search Result" viewer lists the trading place codes, the symbols, the names of the trading places and the domicile of all trading places that are closed for the Corpus Christi holiday on 3th June 2008. Double-clicking on an entry opens the "Basic Data & Events" viewer with the "Trading Place Details" view for the trading centre concerned (see also section 6.16 "Basic Data & Events"). User Manual Telekurs iD / Version 8.3 / 15 April 2010 Main functions (viewers) 175 Searching for news When searching for news, e.g. with the following search criteria: Entry in command line: Ford Search for: News Period UTC: Custom from 05.03.2010 to 07.03.2010 brings up a list in the "News Search Results" viewer of all the headlines that relate to this keyword for the selected period (in the "Period UTC" selection box, you can also select pre-set periods such as "Intraday", "Yesterday", "2 Days", "Week" etc. for the search). The date and time of each news item are given in front of the headline. The end columns show the news agency and subject field for each item. To read a news item in full, double-click on the headline you wish to read, or click on "Open Story" in the popup menu (right-hand mouse button). The full news item is now displayed in the "News Story" viewer. 176 Main functions (viewers) User Manual Telekurs iD / Version 8.3 / 15 April 2010 Quick search with several search terms In the command line you can enter up to 3 search keywords separated by spaces to search for a specific instrument. Instruments which contain all the search keywords entered (AND operation) are displayed as hits. Each search keyword can consist of one or more characters as described in the following conventions: Any number of characters (the search keyword must appear exactly in the instrument identification, but it can be completed at any point with a * wildcard character) This item is not case-sensitive special characters are allowed, e.g. "&" special commands are allowed, e.g. "search bc=4;sc=1," searches solely for shares (securities type 1) on SWX (stock exchange code 4) The search for a specific Lindt&Sprüngli instrument with the search criteria: Entry in command line: lin* & spr* Search for: Quotes Status: All Search by: Name Instrument Types: All Market: Most Liquid Trading Place generates the following display of results from which you can select the search instrument: In the "Context" selection area, an evaluation of the search is shown on the "Statistics" tab: You can further limit the results that are displayed by using the statistics data or the additional filter (see description and example in section 6.22.3 "Market Search"). User Manual Telekurs iD / Version 8.3 / 15 April 2010 Main functions (viewers) 177 6.22.2 Search Extended The "Search Extended" viewer enables you to carry out a detailed search. You can enter detailed search criteria to search for current basic data and administrative information on financial instruments, and for information on companies. The results are collected in the "Search Results" viewer, from where you can call up the "Basic Data & Events" viewer (see section 6.16 "Basic Data & Events") with the appropriate data. Start an extended search as follows: 1. Select the entry for the desired search in the "More Searches" selection box in the command line. The "Search Extended" window appears with the tab appropriate to the selection. 2. Enter the desired search criteria. Note: A full stop must be entered as a separator in all value fields! In the case of input fields for ranges (from ... to), entering values in both fields is optional. 3. Provide the following additional information for the search: – In the "Sort Results by" selection box you can define your preferred sorting order. You can change the standard sorting in the user settings. – If the "Show Results in new Viewer" checkbox is activated, a new viewer is opened to show the results of each new search. – In the "Status" selection box (only available on certain search templates), you can choose whether the search should include only "active", only "inactive" or "all" instruments. Depending on your selection, certain fields for entries or selections will be blocked (shown in grey) and the search results will appear differently. The following table shows the main differences between the "All" and "Active" status. 178 Criterion Status "All" Status "Active" Data base Active and inactive instruments (without realtime prices) Only active listings Search result/Coverage 500 instruments 1'000 listings per page (max. 30'000) Search result/Workflow Static export only List can be saved (Export, DDE and as User List) Search result/Statistics – Display and filter options Search result/Style Static style only New fields can be added Main functions (viewers) User Manual Telekurs iD / Version 8.3 / 15 April 2010 Criterion Status "All" Status "Active" Search mask Limited (master data only) Price and master data News – Direct access to news via icon Further information via right mouse button Limited Single Quote, Limits, Chart, Watchdog, company information, etc. You can customise the default value for the "Status" selection box in your user-specific settings for instruments and companies. – In the "Market" selection box (only available on certain search templates), you can choose whether the search should include all trading places or only the most liquid trading place. 4. You can cancel all entries made by pressing "Reset". 5. If you leave the "Hide Search Criteria" checkbox in the "Context" selection area activated (default), the search criteria are not automatically displayed in the results display. When the checkbox is deactivated they are displayed (see example below). 6. Click on "Search". The search result is displayed in the "Search Result" or "Listing Search Results" viewer. The results display is essentially the same as that of a fast search (see section 6.22.1 "Quick Search"). Example of a results display with (top) and without (below) search criteria displayed: By clicking on the plus or minus symbol in front of the "Total Results" heading, the search criteria can be displayed or masked in the results display. You can obtain full details of the "Search Extended" viewer covering the various search categories in the following sections. User Manual Telekurs iD / Version 8.3 / 15 April 2010 Main functions (viewers) 179 Equity search Searches for equities such as shares, trust units, etc. You can combine the following criteria: Market: Search for market ISO code. You can either select the trading centre in the selection box or enter it directly in the entry box. If you click on the "Lockup" button, a window comes up with the IDs, market symbols and names of all the trading centres. You can highlight the required trading centre and click on the "OK" button, whereupon the window will disappear again and the corresponding symbol will be transferred to the entry box. To find the required trading centre more quickly, you can also enter a search term (sequence of characters which occurs in the name of the trading centre, e.g. "swl" for Swiss Blue Chip Segment) and then click on the "Search in Table" button (possibly more than once, if the required trading place is not found immediately). Currency: Search for currency ISO code. You can either select the currency in the selection box or enter it directly in the entry box. When you click on the "Lockup" button, a window appears with the IDs, ISO codes and descriptions of all currencies. You can highlight the required currency and click on the "OK" button, whereupon the window disappears again and 180 Main functions (viewers) User Manual Telekurs iD / Version 8.3 / 15 April 2010 the corresponding symbol is transferred to the entry box. To find the required currency more quickly you can also enter a search term (a sequence of characters which appears in the description of the currency, e.g. "swi" for Swiss Franc) and then click on the "Search in Table" button (possibly more than once, if the required currency is not found immediately). Domicile: Search for a country's ISO code. You can either select the domicile in the selection box or enter it directly in the entry box. When you click on the "Lockup" button, a window appears with the IDs, ISO codes and names of all domiciles. You can highlight the required domicile and click on the "OK" button, whereupon the window disappears again and the corresponding symbol is transferred to the entry box. To find the required domicile more quickly you can also enter a search term (a sequence of characters which appears in the name of the domicile, e.g. "germ" for Germany) and then click on the "Search in Table" button (possibly more than once, if the required domicile is not found immediately). Classification: Select equity type (shares, domestic or foreign equities, or select in the selection box). Listingstatus: Select the status in the selection box. MiFID Complex Instrument: select/search for stocks as classified by MiFID (Markets in Financial Instruments Directive) None: The search criteria is not checked (default setting) Complex Instrument: only those stocks are searched for which are classified as complex instruments Non Complex Instrument: stocks classified as complex instruments are excluded from the search MiFID Liquid Shares: select the most liquid MiFID instruments (default: not selected) User Manual Telekurs iD / Version 8.3 / 15 April 2010 Main functions (viewers) 181 Shares admitted to trading on regulated markets: select MiFID instruments permitted for trading on regulated markets (default: not selected) Dividend Yield: Enter the desired dividend yield from ... to (without % sign). Dividend p. a.: Enter the desired annual dividend from ... to. Dividend Date: Enter the desired dividend distribution date from ... to. Dividend Cash: Enter the desired cash dividends from ... to. Dividend Type: Select the dividend type in the selection box. Valuation Price: Enter the desired valuation price from ... to. Av. Daily Vol.: Enter the desired average daily volume from ... to. Market Cap.: Enter the desired market capitalisation from ... to. Earning p. Sh.: Select an earnings category in the selection box. Name: Enter the name of the issuer. Sector code: Selection of one or more economic sectors. You can choose between the TK sector code (SIX Telekurs, see below left) and the ICB sector code (Industry Classification Benchmark, see below right). In order for the ICB sector code to be available as an option, the status must be "Active". Highlight the required sector(s) with the mouse. (ICB) 182 Main functions (viewers) User Manual Telekurs iD / Version 8.3 / 15 April 2010 Bond search Searches for debt instruments such as bonds, notes, etc. that meet specific criteria. You can combine the following criteria: Market: Search for market ISO code. You can either select the trading centre in the selection box or enter it directly in the entry box. If you click on the "Lockup" button, a window comes up with the IDs, market symbols and names of all the trading centres (see paragraph "Equity Search"). You can highlight the required trading centre and click on the "OK" button, whereupon the window will disappear again and the corresponding symbol will be transferred to the entry box. To find the required trading centre more quickly, you can also enter a search term (sequence of characters which occurs in the name of the trading centre) and then click on the "Search in Table" button. Currency: Search for currency ISO code. You can either select the currency in the selection box or enter it directly in the entry box. When you click on the "Lockup" button, a window appears with the IDs, ISO codes and descriptions of all currencies (see paragraph "Equity Search"). You can highlight the required currency and click on the "OK" button, whereupon the window disappears again and the corresponding symbol is transferred to the entry box. To find the required currency more quickly you can also enter a search term (a sequence of characters which appears in the description of the currency) and then click on the "Search in Table" button. Domicile: Search for a country's ISO code. You can either select the domicile in the selection box or enter it directly in the entry box. When you click on the "Lockup" button, a window appears with the IDs, ISO codes and names of all domiciles (see paragraph "Equity Search"). You can highlight the required domicile and click on the "OK" button, whereupon the window disappears again and the corresponding symbol is transferred to the entry box. To find the required domicile more quickly you can also enter a search term (a sequence of characters which appears in the name of the domicile) and then click on the "Search in Table" button. User Manual Telekurs iD / Version 8.3 / 15 April 2010 Main functions (viewers) 183 Classification: Select the type of bond (bonds, globalbond, foreign bonds, convertible bonds, money market, eurobonds, medium term notes or floating rate notes). In Scope / out of Scope: Select/Search bonds which are subject (in scope) or not subject (out of scope) to EU interest income tax in respect of yields and sales revenues because of their domicile or legal form. Any: The search criteria is not checked (default setting) In Scope: a search will be carried out for bonds only which are subject to EU interest income tax Out of Scope: a search will be carried out only for bonds which are not subject to EU interest income tax Grandfathered: Select/Search of "grandfathered bonds" (protected bonds which are not subject to taxation until 2010 in accordance with the EU interest taxation directive). Any: The search criteria is not checked (default setting) Yes: a search will be carried out for "grandfathered bonds" only No: "grandfathered bonds" are excluded from the search Amortization: select/search for bonds to be redeemed. Any: the search criteria is not checked (default setting) Yes: only loans to be redeemed are searched for No: loans to be redeemed are excluded from the search Price < 100%: Select/search for bonds that are traded below par. Any: The search criteria is not checked (default setting) Yes: A search is made only for bonds traded below par No: Bonds traded below par are excluded from the search Callable: Select/search for bonds callable before maturity. Any: The search criteria is not checked (default setting) Yes: A search is made only for bonds callable before maturity No: Bonds callable before maturity are excluded from the search Retractable: Select/search for bonds retractable by the creditor before maturity. Any: The search criteria is not checked (default setting) Yes: A search is made only for retractable bonds No: Retractable bonds are excluded from the search Convertible: Select/search for convertible bonds. Any: The search criteria is not checked (default setting) Yes: A search is made only for convertible bonds No: Convertible bonds are excluded from the search Interest Type: Select/search for bonds with fixed/variable interest rate Any: The search criteria is not checked (default setting) Fixed: A search is made only for bonds with fixed interest rate Float/Var.: A search is made only for bonds with floating interest rate In Default: Select/Search of non-performing bonds Any: The search criteria is not checked (default setting) Yes: a search will be carried out for non-performing bonds only No: non-performing bonds are excluded from the search MiFID Complex Instrument: select/search for stocks as classified by MiFID (Markets in Financial Instruments Directive) None: The search criteria is not checked (default setting) Complex Instrument: only those stocks are searched for which are classified as complex instruments 184 Main functions (viewers) User Manual Telekurs iD / Version 8.3 / 15 April 2010 Non Complex Instrument: stocks classified as complex instruments are excluded from the search Coupon: Enter the desired interest margin from ... to (without % sign). Final Maturity: Enter the desired maturity from ... to. Dates can be entered in all formats (DD.MM.YY, YYYY, MM.YY, etc.) Yield to Maturity: Enter the desired yield to maturity from ... to (without % sign). Duration to Final Mat.: Weighted remaining life of a bond, e.g., 2-5 years. Remaining Life: Remaining life of a bond to final maturity. Modif. Duration to Final Mat.: Weighted remaining life of a bond to final maturity, i.e. life of e.g. 2 to 5 years etc. Yield next Call: Yield to next call, enter the desired yield to the next possible redemption date from ... to (without % sign). Duration to next Call: Duration of a bond to next call. Modif. Duration to next Call: Modified duration of a bond to next call. Current Yield: Current Yield, enter the current yield from ... to (without % sign) Issue Date: Enter the desired issue date from ... to. Dates can be entered in all formats (DD.MM.YY, YYYY, MM.YY, etc.) Issued Volume (in Mio.): Enter the desired volume in Mio (e.g. 100=100'000'000). Val. Price not older than: Search for bonds with valuation rates no older than 1, 2, 3 or 4 weeks. Val. Price: Enter the desired valuation price from ... to. Issuer Name: Enter the name of the issuer. Ratings: Narrow the company search criteria using the rating diagram. Activating the "Rating Trend" checkbox displays only those bonds that have been placed on the selected rating agency's watchlist (in connection with a possible rating upgrade or downgrade, or confirmation of the current rating). Sector code: Selection of one or more economic sectors. You can choose between the TK sector code (SIX Telekurs, see below left) and the ICB sector code (Industry Classification Benchmark, see below right). In order for the ICB sector code to be available as an option, the status must be "Active". Highlight the required sector(s) with the mouse. User Manual Telekurs iD / Version 8.3 / 15 April 2010 Main functions (viewers) 185 Derivative search Searches for derivative instruments such as traded options, futures or options on futures. You can combine the following criteria: Market: Search for market ISO code. You can either select the trading centre in the selection box or enter it directly in the entry box. If you click on the "Lockup" button, a window comes up with the IDs, market symbols and names of all the trading centres (see paragraph "Equity Search"). You can highlight the required trading centre and click on the "OK" button, whereupon the window will disappear again and the corresponding symbol will be transferred to the entry box. To find the required trading centre more quickly, you can also enter a search term (sequence of characters which occurs in the name of the trading centre) and then click on the "Search in Table" button. Currency: Search for currency ISO code. You can either select the currency in the selection box or enter it directly in the entry box. When you click on the "Lockup" button, a window appears with the IDs, ISO codes and descriptions of all currencies (see paragraph "Equity Search"). You can highlight the required currency and click on the "OK" button, whereupon the window disappears again and the corresponding symbol is transferred to the entry box. To find the required currency more quickly you can also enter a search term (a sequence of characters which appears in the description of the currency) and then click on the "Search in Table" button. Domicile: Search for a country's ISO code. You can either select the domicile in the selection box or enter it directly in the entry box. When you click on the "Lockup" button, a window appears with the IDs, ISO codes and names of all domiciles (see paragraph "Equity Search"). You can highlight the required domicile and click on the "OK" button, whereupon the window disappears again and the corresponding symbol is transferred to the entry box. To find the required domicile more quickly you can also enter a search term (a sequence of characters which appears in the name of the domicile) and then click on the "Search in Table" button. Underlying Instrument/Search by: Select "Name" or "Symbol", if you wish to search according to the name or symbol, or select the ISO code of the country if you wish to search by the national identification number. Underlying Instrument/Search Value: Enter the search value. Underlying Instrument/Type: Select the desired type. 186 Main functions (viewers) User Manual Telekurs iD / Version 8.3 / 15 April 2010 Search for: Select the desired instrument type: "Traded Options", "Futures" or "Options on Futures". Currency Type: You can select the currency type for the trading currency of the derivative (Trading (Derivative)) or the nominal currency from the underlying instrument (Strike Price). Expiry Date: Enter the expiry date from ... to. Dates can be entered in all formats (DD.MM.YY, YYYY, MM.YY, etc.). Exercise Price: Enter the desired exercise price from ... to. Rem. Life (Days): Enter the desired remaining life in days from ... to. Derived Values: Select the derived value and enter the desired range from ... to. Open Interest >: Displays all contracts in circulation greater than a certain amount (e.g. 1000). Avg. Daily Vol. >: Search for derivatives with an average daily volume of more than the value entered. Exercise Type: Choose between American Style (Am), European Style (Eur) or Bermuda Style (Ber). Option Type: Choose Call and/or Put options type(s). Valuation Price: Enter the desired valuation price from ... to. Structured products search Searches for structured products. You can combine the following criteria: Market: Search for market ISO code. You can either select the trading centre in the selection box or enter it directly in the entry box. If you click on the "Lockup" button, a window comes up with the IDs, market symbols and names of all the trading centres (see paragraph "Equity Search"). You can highlight the required trading centre and click on the "OK" button, whereupon the window will disappear again and the corresponding symbol will be transferred to the entry box. To find the required trading centre more quickly, you can also enter a search term User Manual Telekurs iD / Version 8.3 / 15 April 2010 Main functions (viewers) 187 (sequence of characters which occurs in the name of the trading centre) and then click on the "Search in Table" button. Product Groups: Search for a product group. You can either select the product group in the selection box or enter it directly in the entry box. If you click on the "Lockup" button, a window comes up with the IDs, symbols and descriptions of all the product groups. You can highlight the required product group and click on the "OK" button, whereupon the window will disappear again and the corresponding product group will be transferred to the entry box. Product Types: Search for a product type. You can either select the product type in the selection box or enter it directly in the entry box. If you click on the "Lockup" button, a window comes up with the IDs, symbols and descriptions of all the product types. You can highlight the required product type and click on the "OK" button, whereupon the window will disappear again and the corresponding product type will be transferred to the entry box. To find the required product type more quickly, you can also enter a search term (sequence of characters which occurs in the name of the product, e.g. "van" für Plain Vanilla Warrants) and then click on the "Search in Table" button (possibly more than once, if the required product type is not found immediately). Sales Restrictions: Search for a country in which the structured product may or may not be sold. You can either select the country in the selection box or enter it directly in the entry box. When you click on the "Lockup" button, a window appears with the IDs, ISO codes and names of all countries. You can highlight the required country and click on the "OK" button, whereupon the window disappears again and the corresponding ISO codes is transferred to the entry box. To find the required country more quickly you can also enter a search term (a sequence of characters which appears in the name of the country, e.g. "states" for United States) and then click on the "Search in Table" button (possibly more than once, if the required country is not found immediately). 188 Main functions (viewers) User Manual Telekurs iD / Version 8.3 / 15 April 2010 Allowed in / Not allowed in: Select whether the distribution of the structured product is or is not allowed in the selected country. Issuer Name: Enter the name of the issuer. Product Name: Enter the name of the product. Underlying Instrument/Search by: Select "Name" or "Symbol", if you wish to search according to the name or symbol, or select the ISO code of the country if you wish to search by the national identification number. Underlying Instrument/Search Value: Enter the search value. Underlying Instrument/Type: Select the desired type. Coupon: Enter the desired interest margin from ... to (without % sign). Final Maturity: Enter the desired maturity from ... to. Dates can be entered in all formats (DD.MM.YY, YYYY, MM.YY, etc.) Settlement Type: Select the desired settlement type (cash, cash or stock, cash and stock, minimunm repayment, other, stock). User Manual Telekurs iD / Version 8.3 / 15 April 2010 Main functions (viewers) 189 Funds search Search for funds of different types and characteristics. You can combine the following criteria: Fund Name: Enter the name of the fund. Fund Management: Enter the name of the fund manager. Fund Domicile: Search for a country's ISO code. You can either select the domicile in the selection box or enter it directly in the entry box. When you click on the "Lockup" button, a window appears with the IDs, ISO codes and names of all domiciles (see paragraph "Equity Search"). You can highlight the required domicile and click on the "OK" button, whereupon the window disappears again and the corresponding symbol is transferred to the entry box. To find the required domicile more quickly you can also enter a search term (a sequence of characters which appears in the name of the domicile) and then click on the "Search in Table" button. Reference Currency: Search for currency ISO code. You can either select the currency in the selection box or enter it directly in the entry box. When you click on the "Lockup" button, a window appears with the IDs, ISO codes and descriptions of all currencies (see paragraph "Equity Search"). You can highlight the required currency and click on the "OK" button, whereupon the window disappears again and the corresponding symbol is transferred to the entry box. To find the required currency more quickly you can also enter a search term (a sequence of characters which appears in the description of the currency) and then click on the "Search in Table" button. Sales Authorization: Search for a country in which the fund may or may not be sold. You can either select the country in the selection box or enter it directly in the entry box. When you click on the "Lockup" button, a window appears with the IDs, ISO codes and names of all countries (see paragraph "Equity Search"). You can highlight the required country and click on the "OK" button, whereupon the window disappears again and the corresponding ISO codes is transferred to the entry box. To find the required country more quickly you can also 190 Main functions (viewers) User Manual Telekurs iD / Version 8.3 / 15 April 2010 enter a search term (a sequence of characters which appears in the name of the country) and then click on the "Search in Table" button. Country of Taxation: Select the country of taxation (ISO code) in the selection box. Inception Date: Enter the inception date from ... to. Asset Amount: Enter the amount from ... to. Closed/Open Fond: Select the fund type to search for: Any: The search criteria is not checked (default setting) Closed-End: only funds with a fixed term will be searched for Open-End: only funds with no fixed term will be searched for. Fund Income Type: Select the fund yield type to search for: Any: The search criteria is not checked (default setting) Cumulative: only funds without dividend distribution will be searched for Distributive: only funds with dividend distribution will be searched for In Scope / Out of Scope: Select/Search funds which are subject (in scope) or not subject (out of scope) to EU interest income tax in respect of yields and sales revenues because of their domicile or legal form. Any: The search criteria is not checked (default setting) In Scope: a search will be carried out for funds only which are subject to EU interest income tax Out of Scope: a search will be carried out only for funds which are not subject to EU interest income tax MiFID Complex Instrument: select/search for stocks as classified by MiFID (Markets in Financial Instruments Directive) None: The search criteria is not checked (default setting) Complex Instrument: only those stocks are searched for which are classified as complex instruments Non Complex Instrument: stocks classified as complex instruments are excluded from the search Distribution Taxable: Select whether the distribution for the fund you are searching for is taxable: Any: The search criteria is not checked (default setting) Yes: only those funds are searched for where the distribution is taxable No: only those funds are searched for where the distribution is not taxable. Sales Taxable: Select whether sales for the fund your are searching for are taxable: Any: The search criteria is not checked (default setting) Relevant: only those funds are searched for where sales are taxable Not relevant: only those funds are searched for where sales are not taxable. Special Fund Classification: Select the classification system and/or the classification icon in the selection box. Fund Investment Type: Search for all funds of one or more types. Highlight the required type(s) with the mouse. User Manual Telekurs iD / Version 8.3 / 15 April 2010 Main functions (viewers) 191 Search for other instruments Searches for other financial instruments such as interest rates, commodities, currencies, indices etc. You can combine the following criteria: Market: Search for market ISO code. You can either select the trading centre in the selection box or enter it directly in the entry box. If you click on the "Lockup" button, a window comes up with the IDs, market symbols and names of all the trading centres (see paragraph "Equity Search"). You can highlight the required trading centre and click on the "OK" button, whereupon the window will disappear again and the corresponding symbol will be transferred to the entry box. To find the required trading centre more quickly, you can also enter a search term (sequence of characters which occurs in the name of the trading centre) and then click on the "Search in Table" button. Currency: Search for currency ISO code. You can either select the currency in the selection box or enter it directly in the entry box. When you click on the "Lockup" button, a window appears with the IDs, ISO codes and descriptions of all currencies (see paragraph "Equity Search"). You can highlight the required currency and click on the "OK" button, whereupon the window disappears again and the corresponding symbol is transferred to the entry box. To find the required currency more quickly you can also enter a search term (a sequence of characters which appears in the description of the currency) and then click on the "Search in Table" button. Domicile: Search for a country's ISO code. You can either select the domicile in the selection box or enter it directly in the entry box. When you click on the "Lockup" button, a window appears with the IDs, ISO codes and names of all domiciles (see paragraph "Equity Search"). You can highlight the required domicile and click on the "OK" button, whereupon the window disappears again and the corresponding symbol is transferred to the entry box. To find the required domicile more quickly you can also enter a search term (a sequence of characters which appears in the name of the domicile) and then click on the "Search in Table" button. 192 Main functions (viewers) User Manual Telekurs iD / Version 8.3 / 15 April 2010 Classification: Select the desired instrument type (interest rates, rights, commodities, coins and metals, currencies, indices or make a selection in the selection box). Name: Enter the name of the issuer. Sector code: Selection of one or more economic sectors. You can choose between the TK sector code (SIX Telekurs, see below left) and the ICB sector code (Industry Classification Benchmark, see below right). In order for the ICB sector code to be available as an option, the status must be "Active". Highlight the required sector(s) with the mouse. Search for new instruments/listings Searches for new instruments or new listings. You can combine the following criteria: Date: Select the required date. The only options are the current date together with the two previous working days of the bank. Domicile: Search for a country's ISO code. You can either select the domicile in the selection box or enter it directly in the entry box. When you click on the "Lockup" button, a window appears with the IDs, ISO codes and names of all domiciles (see paragraph "Equity Search"). You can highlight the required domicile and click on the "OK" button, whereupon the window disappears again and the corresponding symbol is transferred to the entry box. To find the required domicile more quickly you can also enter a search term (a sequence of characters which appears in the name of the domicile) and then click on the "Search in Table" button. Sector: Select one or more economic sectors. Highlight the required sector(s) with the mouse. New Listing (Market or Contributor): Search for the market symbol of the trading centre where the instrument is listed. You can either select the trading centre in the selection box or enter it directly in the entry box. If you click on the "Lockup" button, a window comes up with the IDs, market symbols and names of all the trading centres (see paragraph "Equity Search"). You can highlight the required trading centre and click on the "OK" button, whereupon the window will disappear again and the corresponding symbol will be transferred to the entry box. To find the required trading centre more quickly, you can also enter a search term (sequence of characters which occurs in the name of the trading centre) and then click on the "Search in Table" button. User Manual Telekurs iD / Version 8.3 / 15 April 2010 Main functions (viewers) 193 Company search Searches for one or more companies in a particular country and/or specific economic sectors, as well as company ratings. Following input and selection boxes can be combined: Company Name: Searches for the name of a company in all countries and all economic sectors. Enter the name (or part of the name) in plain text. Example: Heineken, Hein*, hein*, british air* Company Rating: Narrow the company search criteria using the rating diagram. Activating the "Rating Trend" checkbox displays only those companies that have been placed on the selected rating agency's watchlist (in connection with a possible rating upgrade or downgrade, or confirmation of the current rating). Domicile: Search for a country's ISO code. You can either select the domicile in the selection box or enter it directly in the entry box. When you click on the "Lockup" button, a window appears with the IDs, ISO codes and names of all domiciles (see paragraph "Equity Search"). You can highlight the required domicile and click on the "OK" button, whereupon the window disappears again and the corresponding symbol is transferred to the entry box. To find the required domicile more quickly you can also enter a search term (a sequence of characters which appears in the name of the domicile) and then click on the "Search in Table" button. Sector: Searches for all companies in one or more economic sectors. Highlight the required sector(s) with the mouse. 194 Main functions (viewers) User Manual Telekurs iD / Version 8.3 / 15 April 2010 Corporate action search Searches for the corporate actions on companies and instruments. You can combine the following criteria: Corp. Action Type: Select the desired categories of corporate actions by clicking on the corresponding checkboxes. If you click on a + symbol, all possible event types related to this group will be shown and can be individually selected. Click on "all" and all categories will be selected, or on "none" to deselect all categories again. Note: If no selection is made all messages will be shown. Domicile: Search for a country's ISO code. You can either select the domicile in the selection box or enter it directly in the entry box. When you click on the "Lockup" button, a window appears with the IDs, ISO codes and names of all domiciles (see paragraph "Equity Search"). You can highlight the required domicile and click on the "OK" button, whereupon the window disappears again and the corresponding symbol is transferred to the entry box. To find the required domicile more quickly you can also enter a search term (a sequence of characters which appears in the name of the domicile, e.g. "germ" für Germany) and then click on the "Search in Table" button. Action Date: Enter the date of the selected corporate action from ... to. Dates can be entered in all formats (DD.MM.YY, YYYY, MM.YY, etc.) Message Date: Enter the message date from ... to. Last Update Date: According to the day selection all messages from the last two days (yesterday or day before) will be provided. Make Search: Select the domicile-related search or the market-related search. Sector: Searches for all corporate actions in one or more economic sectors. Highlight the required sector(s) with the mouse. User Manual Telekurs iD / Version 8.3 / 15 April 2010 Main functions (viewers) 195 Market search Searches for financial instruments listed at particular trading centres: Searching for markets is explained in section 6.22.3 "Market Search". News search Searches for specific news items, e.g. by key word, provider, topic, language etc.: Searching for news is explained in section 6.23.1 "News Search". 196 Main functions (viewers) User Manual Telekurs iD / Version 8.3 / 15 April 2010 Issue calendar Displays all new instruments, sorted by bonds, shares, warrants, trusts and structured instruments. You can combine the following criteria: Market: Search for market ISO code. You can either select the trading centre in the selection box or enter it directly in the entry box. If you click on the "Lockup" button, a window comes up with the IDs, market symbols and names of all the trading centres (see paragraph "Equity Search"). You can highlight the required trading centre and click on the "OK" button, whereupon the window will disappear again and the corresponding symbol will be transferred to the entry box. To find the required trading centre more quickly, you can also enter a search term (sequence of characters which occurs in the name of the trading centre) and then click on the "Search in Table" button. Currency: Search for currency ISO code. You can either select the currency in the selection box or enter it directly in the entry box. When you click on the "Lockup" button, a window appears with the IDs, ISO codes and descriptions of all currencies (see paragraph "Equity Search"). You can highlight the required currency and click on the "OK" button, whereupon the window disappears again and the corresponding symbol is transferred to the entry box. To find the required currency more quickly you can also enter a search term (a sequence of characters which appears in the description of the currency) and then click on the "Search in Table" button. Domicile: Search for a country's ISO code. You can either select the domicile in the selection box or enter it directly in the entry box. When you click on the "Lockup" button, a window appears with the IDs, ISO codes and names of all domiciles (see paragraph "Equity Search"). You can highlight the required domicile and click on the "OK" button, whereupon the window disappears again and the corresponding symbol is transferred to the entry box. To find the required domicile more quickly you can also enter a search term (a sequence of characters which appears in the name of the domicile) and then click on the "Search in Table" button. Search for: Select the desired instrument type: "Bonds", "Stocks", "Warrants", "Trust Units / Shares" or "Structured Instruments / others". Pay Date: Default query is 30 days in the future. The time frame can be reduced. Enter any date greater than or equal to today. User Manual Telekurs iD / Version 8.3 / 15 April 2010 Main functions (viewers) 197 6.22.3 Market Search Using the "Market Search" viewer you can search for all financial instruments quoted at particular trading centres: 1. Select the entry “Markets” in the "More Searches" selection box in the command line, to open up the "Search Extended" viewer with the "Markets" tab selected or in the "Context" selection area, open the "Market Search" viewer under "Global Viewer" (you can also open this using the shortcut .MS). You have the same search options in both viewers. 2. Enter a stock exchange code or stock exchange symbol in the input field (e.g. 13 or FRA for the Frankfurt stock exchange). You can also make several entries separated by a space. In the selection you can select again entries that you have searched for before. 3. If you do not know the stock exchange codes or stock exchange symbols, click on "Lookup". The "Lookup" window appears. 4. Search for the trading centre you want either by scrolling through the table, or enter a search keyword in the input field and then click on "Search in Table". 198 Main functions (viewers) User Manual Telekurs iD / Version 8.3 / 15 April 2010 5. Activate the checkboxes for all the trading centres you want and then click on "OK". The stock exchange symbols of the selected trading centres are incorporated in the "Market Search" viewer input field. 6. Search for the desired currency (default value is "All"). You can either select the currency in the selection box or enter it directly in the entry box. When you click on the "Lockup" button, a window appears with the IDs, ISO codes and descriptions of all currencies. You can highlight the required currency and click on the "OK" button, whereupon the window disappears again and the corresponding symbol is transferred to the entry box. To find the required currency more quickly you can also enter a search term (a sequence of characters which appears in the description of the currency, e.g. "yen" for Japanese Yen) and then click on the "Search in Table" button. 7. If appropriate, select the required instrument types and sectors in the two list fields. 8. Start the search by clicking "Search". The search results are displayed in the "Listing Search Results" window. The top line shows the total number of results found. If you click on "Total Results", the search criteria will also be displayed. 9. In the "Context" selection area, limit the search results on the "Statistics" tab using the required category, e.g. by currency, type of security or the sector code. The number of entries found for the various categories is stated after the identification. User Manual Telekurs iD / Version 8.3 / 15 April 2010 Main functions (viewers) 199 10.Right-click on the entry you want, e.g. on the sector "Countries & central governments" and then select the required pop-up menu item: – With "Search and keep statistics" the limited search results are displayed on the "Listing Results" tab in the same "Listing Search Results" window, and the statistics remain unchanged, so that you can make a further limitation if necessary. The same thing happens if you double-click on an entry in the statistics display. – With "Search and replace statistics" the limited search results are displayed on the "Listing Results" tab in the same "Listing Search Results" window, and the statistics are modified according to the limitation. This means that a further limitation is possible, but not a limitation of a different type. – With "Search and open new result viewer" the limited search results are shown in a new "Listing Search Results" window. The window showing the unlimited search results is retained unchanged. 200 Main functions (viewers) User Manual Telekurs iD / Version 8.3 / 15 April 2010 11.In the "Context" selection area on the "Statistics" tab, you also have the option of making a further limitation using the name, by entering a filter condition in the "Name Pattern" field. The entry can consist of any number of characters, but it must occur in exactly that format in the name. The entry can be completed at any point with a * wildcard character. After entering the additional filter condition, select the desired entry as described in Point 10. The display then appears with the additional name limitation, so, in this example, showing only instruments for which the name begins with 1. 12.Search for the financial instrument you want in the list. To do this you can sort the list column by column (see section 6.1.8 "Sort list"). 13. Right-click on the entry you want and in the popup menu select a viewer in which you would like to display the financial instrument. 6.22.4 News Search Searching for news is explained in section 6.23.1 "News Search". 6.22.5 Searching for national currencies You can search for detailed information about national currencies by selecting the "National Currencies" entry in the "More Searches" selection box of the command line. The "Basic Data & Events" viewer comes up with the "National Currencies“ view. User Manual Telekurs iD / Version 8.3 / 15 April 2010 Main functions (viewers) 201 The currencies are shown sorted by ISO code when they are called up. You can alter the sorting by clicking on the links in the column headings. By clicking on the link in the "Instrument ID", column, the "Instrument Summary" view for the relevant currency is displayed. 202 Main functions (viewers) User Manual Telekurs iD / Version 8.3 / 15 April 2010 6.23 News 6.23.1 News Search You can search selectively for news items using the "News Search" viewer. Select the entry “News” in the "More Searches" selection box in the command line, to open up the "Search Extended" viewer with the "News" tab selected or in the "Context" selection area, go to "Global Viewer" and open the "News Search" viewer (you can also open this using the shortcut .NS). You have the same search options in both viewers. You can enter the following search criteria: In the "Keywords" entry box you can enter a maximum of 3 search terms which are used for the search as follows (this item is not case-sensitive): – if you enter the search terms with a space between the words, then all the search terms must be included in the news item (an AND operation). Example: the entry "Obama Clinton" shows all the news items where the words "Obama" AND "Clinton" occur. – if you enter "or" between the words, only one of the search terms has to be included in the news item (an OR operation). Example: the entry "obama or clinton" shows all the news items where either the word "Obama" OR the word "Clinton" occurs. – if you enter a minus sign before a search term, that search term must NOT be included in the news item (exclusion). The minus sign must stand immediately before the excluded word (with no space after it). Example: the entry "Obama -Clinton" shows all the news items where the word "Obama" occurs, but NOT the word "Clinton". By using the "incl. Stories" checkbox, you can specify whether the search terms should be searched for only in the headlines (checkbox deactivated) or in the whole news item (checkbox activated). User Manual Telekurs iD / Version 8.3 / 15 April 2010 Main functions (viewers) 203 In the "Provider" selection box, select the news agency or agencies you want. Only the news agencies to which you have subscribed will be displayed. If you position the cursor over an entry, you will see the full name of the agency as a tool tip, e.g. "Agentur für Wirtschaftsinformationen" for AWP. Note: by selecting the provider "TKF" (Telekurs), you can search for various documents (prospectuses, term-sheets etc.). In the "Topics" selection box, select the topics you want. The range of topic fields available depends on the news agency selected. In the selection box you can choose between Telekurs topics and original topics and either enter the ID number for a subject area in the entry box (e.g. 112 for general news, or you can enter more than one ID number, separated by commas), or, if you do not know the ID numbers, click on one of the blue links shown in the selection, and the "News Filter Lookup" window will come up with a selection corresponding to the selected news agencies. Search for the topics you want either by scrolling through the table or enter a search term in the entry box and then clicking on the "Search in Table" button. Activate the checkboxes for all the topics you want and then click on the "OK" button. These selected topics are then displayed in the selection: You can limit the news according to the desired language in the "Language" selection box. You can set limits for the publication dates of news items under "Period". You can choose between – a predefined period (e.g. Intraday, Yesterday, 2 Days, Week, Month, Maximum) or – "Custom": a period of your choice, which you define by entering the start date and time ("From:") and the finish date and time ("To:"). 204 Main functions (viewers) User Manual Telekurs iD / Version 8.3 / 15 April 2010 You can enter all your keywords and search delimiters either individually or in combination with others. Click on the "Search" button to start the search. If your search is successful, the headlines of the appropriate news items are displayed in the "News Search Results" viewer. You can set the maximum number at between 100 and 500. The list is in chronological order, with the most recent message at the top. The following data is displayed: "Date" and "Time" indicate the date and time of the news item. "Headline" displays the headline. "Agency" shows the news agency source of the news item concerned. "Topic" shows the subject area of the news item concerned. Newly arrived news items which meet the search criteria will be displayed automatically at the top in the "News Search Results" viewer in real-time. The news items classified as important by the Dow Jones News agency (DJN) are displayed in red in the "News Search Results" viewer. If you have set a limit in terms of a period in the past, such as "Yesterday" or a date range in the past, newly arriving news items will never meet this criterion and are therefore not displayed. You can use the navigation buttons at the bottom of the viewer to display news from other periods: shows older news, shows more recent news and shows the very latest news. Note: please note that no time period criteria can be entered in the "Context" selection area, and that therefore if you subsequently try to limit the display (see section 6.23.6 "Limit news items") any time period limitation made for a search in the "News Search" viewer will be ineffective. User Manual Telekurs iD / Version 8.3 / 15 April 2010 Main functions (viewers) 205 6.23.2 Display news story To read a news item in its entirety, double-click in the "News Search Results" viewer resp. in the "News Headlines" viewer on the headline you wish to read, or click on "Open Story" in the popup menu (right-hand mouse button). The full news item is now displayed in the "News Story" viewer: The headline is displayed in the title bar. The news agency is given below this, together with the date and time of the news item. The text of the story follows. For certain news agencies, depending on the news item, there may be links to additional information above the content of the report, e.g. to related companies or to related themes and industries. If you click on the link to an associated company, the "Single Quote" viewer is displayed giving information about the shares for that company. If you click on the "Related Subjects" or "Related Industries" link, the "News Story" viewer scrolls down to where the links to related subjects and industries are listed. Clicking on these links brings up a selection of news headlines on the theme or industry in question. 206 Main functions (viewers) User Manual Telekurs iD / Version 8.3 / 15 April 2010 You can call up the "News Story" viewer from other locations too, for example if you double-click on a headline in the "Ticker" or in the "Watchdog Messages" viewer. If in the "News Search" viewer you have searched for keywords with the "incl. Stories" checkbox activated, all occurrences of the keyword entered for the search will be shown highlighted. 6.23.3 Display latest news You can call up a "News Search Results" viewer with the latest 100 news headlines from all the news agencies to which you have subscribed, as follows: In the command line enter the shortcut .N (see also section 4.9 "Shortcuts"). Click on "File" and then on "Open News Headlines". All new news items which arrive subsequently will be displayed at the top in the "News Search Results" viewer automatically in real-time. In the "Context" selection area, you can limit the display by various criteria (see section 6.23.6 "Limit news items"), if you no longer wish to have all newly arriving news items displayed. 6.23.4 Displaying news items about particular companies To display news items about a particular company, you have the following options: Carry out a quick search for the name of the company (see section 6.22.1 "Quick Search"). Click on the "File" menu on the menu item "Open News Headlines" and then carry out a full text search (only in the headlines) for the name of the company in the "News Headlines" viewer. Carry out a full text search (including news stories) for the name of the company in the "News Search" viewer (see section 6.23.1 "News Search"). Right click in a prices list on one of the company’s instruments and, on the pop-up menu which comes up, select the menu item "Open News". The "News Headlines" viewer comes up (see the following example for ABB) with the "Company News" tab selected. The news items about the company are always subdivided between the three tabs: – "Company News" shows news items from all areas – "Company Profiles" shows news items from the company profile area – "Analysis News" shows news items from the analysis area The news items can be limited in the "Context" selection area (see section 6.23.6 "Limit news items"). User Manual Telekurs iD / Version 8.3 / 15 April 2010 Main functions (viewers) 207 6.23.5 Display document Telekurs iD gives you easy access to approx. 230,000 documents (for all packages except Wealth Management Package). By selecting the agency "TKF" (Telekurs) when searching for news, you can find these documents. To display a document that has been found – e.g. a prospectus (PRO) or term-sheet (TER), double-click on the required headline in the "News Search Results" viewer or click on the pop-up menu item "Open Attachment PDF" (right-hand mouse button). The document is now displayed in PDF format. 208 Main functions (viewers) User Manual Telekurs iD / Version 8.3 / 15 April 2010 6.23.6 Limit news items You can filter the headlines displayed in the "News Search Results" viewer according to various criteria as follows: 1. If the "Context" selection area is not displayed automatically according to your user-specific settings, go into the "Context" selection area and click in the active area of the "News Search Results" viewer. 2. In the "Keywords" entry box enter no, one or more (maximum three) search keywords. This item is not case-sensitive. The type of entry (AND operation by putting a space between the search terms, OR operation by putting an "or" between the search terms or excluding search terms by putting a minus sign before them) is described in detail in section 6.23.1 "News Search". 3. In the "Provider" selection box, select the news agency (or agencies) you want. Only the news agencies to which you have subscribed will be displayed. If you position the cursor over an entry, you will see the full name of the agency as a tool tip, e.g. "Agentur für Wirtschaftsinformationen" for AWP. 4. In the "Topics" selection box, select the topics you want. The range of topic fields available depends on the news agency selected. In the selection box you can choose between Telekurs topics and original topics and either enter the ID number for a subject area in the entry box (e.g. 112 for general news, or you can enter more than one ID number, separated by commas), or, if you do not know the ID numbers, click on one of the blue links shown in the selection, and the "Look up news filter" window will come up with a selection corresponding to the selected news agencies (see also section 6.23.1 "News Search"). 5. In the "Language" selection box, select the language you want. 6. Click on "Search". The headlines in the "News Search Results" viewer are filtered according to your choice. If you have saved settings previously (see section 6.23.7 "Save settings"), you can call these up again on the "Settings" tab: User Manual Telekurs iD / Version 8.3 / 15 April 2010 Main functions (viewers) 209 6.23.7 Save settings You can save for future use the settings you have made for your news search (see section 6.23.1 "News Search") or the limits you have set in the "Context" selection area (see section 6.23.6 "Limit news items"), as follows: 1. Click inside the active area of the "News Search Results" viewer. 2. Click on "File", then on "Save News Settings As". The "Save As" window appears. 3. In the "Save in" area, select the entry "User Settings". All the settings you have already saved will be displayed. If your Telekurs iD has the appropriate configuration, you can also select the entry "Customer Settings", to make your settings accessible to all Telekurs iD users at the same financial institution. 4. If you wish, you can order objects in a hierarchy, as in Windows Explorer. To show sub-folders, click on the plus sign (+) beside the relevant folder in the "Save in" area, or double-click on the folder. To create a new folder: – Click on the "New folder" button. – Enter a name for your folder into the "New folder" dialog box. – Click on OK. 5. Enter a name for your new presets in the "Name" text box. 6. Click on OK. You can call up the saved settings in the "Context" selection area on the "Settings" tab. 210 Main functions (viewers) User Manual Telekurs iD / Version 8.3 / 15 April 2010 7. Auxiliary functions 7.1 Tables The "Tables" viewer shows all the figures in the Telekurs iD tables. The following data is displayed: The "Language" area indicates the language which has been set for the table display. You can select the language you want by activating the appropriate checkbox. The top list shows all the master tables. The middle list shows the individual tables belonging to the master table selected (e.g. "DATASOURCES"). The bottom list shows the details for the individual table selected (e.g. "SIX Swiss Exchange"). You can call up a "Tables" viewer in several different ways: In the menu bar click on "Help" and then on "Tables". In the command line, enter a shortcut, e.g. .TAB or .?x for the market code table (see also section 4.9 "Shortcuts"). In the "Context" selection area, go to "Global Viewer" and open the "Tables" viewer. User Manual Telekurs iD / Version 8.3 / 15 April 2010 Auxiliary functions 211 7.2 Information In the "About" viewer, you can display information on the Telekurs iD application, the current session, entitlements and system events. The information is distributed across four tabs: About iD displays the current program version as well as various links to other information. Session Info displays information about your system and on the current sessions. System Events displays information of system events that have occurred. Entitlements displays information about the permissions allocated. You can call up the "About" viewer by selecting the "About" or "Entitlements" menu item in the "Help" menu. With "About" the "About iD" tab is displayed, with "Entitlements" the "Entitlements / Markets" tab. 212 Auxiliary functions User Manual Telekurs iD / Version 8.3 / 15 April 2010 7.3 System Messages The "System Messages" viewer displays system messages, and also error messages. You can call up the "System Messages" viewer by clicking on in the Info/Alert box. The message header, date and time are displayed for each message. To read the full message again, double-click on the required item in the "System Messages" viewer. The full message is displayed in the "Messages" window. User Manual Telekurs iD / Version 8.3 / 15 April 2010 Auxiliary functions 213 8. Tools 8.1 Stock Option Calculator The Stock Option Calculator can be used to calculate various statistics for stock options based on known or assumed values (see also section 8.1.1 "Short description of the Stock Option Calculator"). Other options calculators are available for calculating other options: Index Option Calculator (see section 8.2) Currency Option Calculator (see section 8.3) Commodity Option Calculator (see section 8.4) Note: The Stock Option Calculator is currently only available as a beta version. At the top of the window you can see the underlying instrument with its name, symbol, ISIN, identification number according to your user settings, trading center, currency, rate, percentage change and date or time of the rate, while underneath you can see the relevant data for the selected option. 214 Tools User Manual Telekurs iD / Version 8.3 / 15 April 2010 In the "Data Definition for Fair Value" section, you can enter or change the values for calculating the fair option price and the key statistics (some values are filled in automatically if the Stock Option Calculator is called up for a particular option). If you click on the "Calculate" button, the result is displayed on the right-hand side. In the "Data Definition for Implied Volatility" section, you can also enter the option price. If you click on the "Calculate" button, the implied volatility is shown as the result on the right-hand side. You can call up the Stock Option Calculator in various ways: On the menu bar under "File" call up the menu item "Open Calculator" and then on the submenu which comes up, select the menu item "Open Stock Option Calculator". A blank "Option Calculator" viewer is opened and you can bring a suitable instrument into it from another viewer using Drag & Drop (see section 5.4 "Drag & Drop"). If you have a "Chaining" or "List" viewer already open, click on the pop-up menu item "Open Option Calculator" (right-hand mouse button). Enter the shortcut .SOC in the command line and select an instrument which you would like to be shown (see section 5.7 "Calling up financial data"). If you have an "Option Calculator" viewer already open containing information, you can bring in another suitable instrument at any time using Drag & Drop. 8.1.1 Short description of the Stock Option Calculator The Stock Option Calculator handles American and European style call and put options with or without dividends, determining option fair values, implied volatilities and risk sensitivity measures (also known as hedge parameters or "Greeks"). The Stock Option Calculator can also be used to price warrants. It offers a choice of different theoretical models depending on the option style (European or American) and if dividend are paid or not. Option Style Known Dividend Data Calculation Method Call Calculation Method Put European No dividend Black and Scholes Black and Scholes European Discret dividend Black and Scholes Black and Scholes European Dividend Yield Black and Scholes Black and Scholes American No dividend Black and Scholes Binomial American Discret dividend Binomial Binomial American Dividend Yield Binomial Binomial While options are analytically complex, the Stock Option Calculator has been designed to be easy to use. If the Stock Option Calculator is called up for an existing option, its data appear in the entry fields as default values. Inputs to any pricing model can also be manually adjusted, to illustrate the impact of stock movement, volatility changes and time to expiration on the price of the option. By holding constant all the variables in the option pricing model except volatility, the user can enter a price of an option observed on the market to see what volatility is used to create that price. This volatility is called implied volatility. It is one of the most important elements in evaluating options because it is usually the only input variable not known with certainty in advance. Telekurs has been long providing calculations of historical volatility and that now paired with the implied volatility calculation implemented in the Stock Option Calculator provides the user with powerful information for option analysis and trading strategies. User Manual Telekurs iD / Version 8.3 / 15 April 2010 Tools 215 8.1.2 Calculating the fair option price The following entries are possible as parameters for calculating the fair option price: Option Type: Call or Put Option Style: American or European. "American" options can generally be exercised on any trading day until the expiry date, whereas "European" options can only be exercised on the expiry date. Price of Underlying: Price of the underlying instrument in the given currency Strike Price in the given currency Expiration Date: Double-clicking on this field brings up a calendar where you can select the required date (see also section 5.17 "Date input with calendar function"). Days to Expiration: Remaining time (days) until the expiry date Interest Rate as a percentage Volatility: Range of expected variations in rate as a percentage Dividend Date: Date of dividend payment Dividend Amount in the given currency (if this field is selected for this entry, the "Dividend Yield" entry field is not available) Dividend Frequency: annually, twice yearly, quarterly or monthly Dividend Yield as a percentage (if this field is selected for this entry, the "Dividend Amount" entry field is not available) Ratio: Number of options needed for an underlying instrument All entry fields must contain a value greater than zero (exception: dividend data – here either the Dividend Date, Dividend Amount and Dividend Frequency or Dividend Yield can be entered, or nothing). If required values are missing, the program shows this when you click on the "Calculate" button. The result of the calculation comprises the following statistics: Fair Value: Fair option price Delta: Change in the option price depending on the price of the underlying instrument Gamma: Change in delta depending on price changes in the underlying instrument Theta: Change in the option price depending on the time remaining for the option Vega: Change in the option price depending on the change in the volatility of the underlying instrument Rho: Change in the option price depending on the risk-free interest rate Premium: Option premium (relationship between the option costs and the theoretical price) Premium / Year: Annualised option premium Moneyness: Position in relation to money (in the money, out of the money or at the money). Gearing: Relationship between the price of the underlying instrument and the option price (lever). 8.1.3 Calculating the implied volatility To calculate the implied volatility, i.e. the volatility expected by the market, then in addition to the entries made to calculate the fair value (see section 8.1.2 "Calculating the fair option price") the option price must also be entered. 216 Tools User Manual Telekurs iD / Version 8.3 / 15 April 2010 8.2 Index Option Calculator The Index Option Calculator can be used to calculate various statistics for index options based on known or assumed values. Other options calculators are available for calculating other options: Stock Option Calculator (see section 8.1) Currency Option Calculator (see section 8.3) Commodity Option Calculator (see section 8.4) Note: The Index Option Calculator is currently only available as a beta version. At the top of the window you can see the underlying index with its name, symbol, ISIN, identification number according to your user settings, trading center, currency, rate, percentage change and date or time of the rate, while underneath you can see the relevant data for the selected option. In the "Data Definition for Fair Value" section, you can enter or change the values for calculating the fair option price and the key statistics (some values are filled in automatically if the Index Option Calculator is called up for a particular option). If you click on the "Calculate" button, the result is displayed on the right-hand side. In the "Data Definition for Implied Volatility" section, you can also enter the option price. If you click on the "Calculate" button, the implied volatility is shown as the result on the right-hand side. User Manual Telekurs iD / Version 8.3 / 15 April 2010 Tools 217 You can call up the Index Option Calculator in various ways: On the menu bar under "File" call up the menu item "Open Calculator" and then on the submenu which comes up, select the menu item "Open Index Option Calculator". A blank "Index Option Calculator" viewer is opened and you can bring a suitable instrument into it from another viewer using Drag & Drop (see section 5.4 "Drag & Drop"). If you have a "Chaining" or "List" viewer already open, click on the pop-up menu item "Open Index Option Calculator" (right-hand mouse button). If you have an "Index Option Calculator" viewer already open containing information, you can bring in another suitable instrument at any time using Drag & Drop. Differences from the Stock Option Calculator The Index Option Calculator functions in the same way as the Stock Option Calculator (see section 8.1 "Stock Option Calculator"). The only difference is that in the "Data Definition for Fair Value" area, the "Dividend Date", "Dividend Amount" and "Dividend Frequency" fields that are not needed for index options are omitted. 218 Tools User Manual Telekurs iD / Version 8.3 / 15 April 2010 8.3 Currency Option Calculator The Currency Option Calculator can be used to calculate various statistics for currency options based on known or assumed values. Other options calculators are available for calculating other options: Stock Option Calculator (see section 8.1) Index Option Calculator (see section 8.2) Commodity Option Calculator (see section 8.4) Note: The Currency Option Calculator is currently only available as a beta version. At the top of the window you can see the underlying currency ratio with its name, symbol, ISIN, identification number according to your user settings, trading center, currency, rate, percentage change and date or time of the rate, while underneath you can see the relevant data for the selected option. In the "Data Definition for Fair Value" section, you can enter or change the values for calculating the fair option price and the key statistics (some values are filled in automatically if the Currency Option Calculator is called up for a particular option). If you click on the "Calculate" button, the result is displayed on the right-hand side. In the "Data Definition for Implied Volatility" section, you can also enter the option price. If you click on the "Calculate" button, the implied volatility is shown as the result on the right-hand side. User Manual Telekurs iD / Version 8.3 / 15 April 2010 Tools 219 You can call up the Currency Option Calculator in various ways: On the menu bar under "File" call up the menu item "Open Calculator" and then on the submenu which comes up, select the menu item "Open Currency Option Calculator". A blank "Currency Option Calculator" viewer is opened and you can bring a suitable instrument into it from another viewer using Drag & Drop (see section 5.4 "Drag & Drop"). If you have a "Chaining" or "List" viewer already open, click on the pop-up menu item "Open Currency Option Calculator" (right-hand mouse button). If you have an "Currency Option Calculator" viewer already open containing information, you can bring in another suitable instrument at any time using Drag & Drop. Differences from the Stock Option Calculator The Currency Option Calculator functions in the same way as the Stock Option Calculator with the following exceptions (see section 8.1 "Stock Option Calculator"): The "Interest Rate for Base Currency" field replaces the "Interest Rate" field of the Stock Option Calculator. The "Interest Rate for Foreign Currency" field is new. The value given there replaces the "Dividend Yield" in the calculations. The "Dividend Date", "Dividend Amount", "Dividend Frequency" and "Dividend Yield" fields are not needed and are therefore omitted. 220 Tools User Manual Telekurs iD / Version 8.3 / 15 April 2010 8.4 Commodity Option Calculator The Commodity Option Calculator can be used to calculate various statistics for commodity options based on known or assumed values. Other options calculators are available for calculating other options: Stock Option Calculator (see section 8.1) Index Option Calculator (see section 8.2) Currency Option Calculator (see section 8.3) Note: The Commodity Option Calculator is currently only available as a beta version. At the top of the window you can see the underlying commodity with its name, symbol, ISIN, identification number according to your user settings, trading center, currency, rate, percentage change and date or time of the rate, while underneath you can see the relevant data for the selected option. In the "Data Definition for Fair Value" section, you can enter or change the values for calculating the fair option price and the key statistics (some values are filled in automatically if the Commodity Option Calculator is called up for a particular option). If you click on the "Calculate" button, the result is displayed on the right-hand side. In the "Data Definition for Implied Volatility" section, you can also enter the option price. If you click on the "Calculate" button, the implied volatility is shown as the result on the right-hand side. User Manual Telekurs iD / Version 8.3 / 15 April 2010 Tools 221 You can call up the Commodity Option Calculator in various ways: On the menu bar under "File" call up the menu item "Open Calculator" and then on the submenu which comes up, select the menu item "Open Commodity Option Calculator". A blank "Commodity Option Calculator" viewer is opened and you can bring a suitable instrument into it from another viewer using Drag & Drop (see section 5.4 "Drag & Drop"). If you have a "Chaining" or "List" viewer already open, click on the pop-up menu item "Open Commodity Option Calculator" (right-hand mouse button). If you have an "Commodity Option Calculator" viewer already open containing information, you can bring in another suitable instrument at any time using Drag & Drop. Differences from the Stock Option Calculator The Commodity Option Calculator functions in the same way as the Stock Option Calculator with the following exceptions (see section 8.1 "Stock Option Calculator"): The "Net Convenience Yield" field is new. The value given there replaces the "Dividend Yield" in the calculations. The "Dividend Date", "Dividend Amount", "Dividend Frequency" and "Dividend Yield" fields are not needed and are therefore omitted. 222 Tools User Manual Telekurs iD / Version 8.3 / 15 April 2010 8.5 Bond Calculator With the Bond Calculator, you can perform various calculations for debenture stocks (loans, bonds, notes) and have the latest prices and basic data for the stocks in question displayed. Note: The Bond Calculator is currently only available with reduced functionability. It can currently only carry out calculations for fixed-rate bonds including perpetual bonds and for zero rate bonds. These bonds may be callable bonds or put bonds. However, no calculations can be carried out for floating rate notes, money market instruments, step-up/step-down notes or redeemable securities. If an instrument appears in the viewer that is not supported by the Bond Calculator, a warning message comes up briefly in the information/warning message field. The "Next Call/Put" data is not calculated by the Bond Calculator but is supplied by the TKF HPS system (these calculations are not carried out in real time). The following information will appear in the header line for the selected bond: name, symbol, trading center, currency, sector, ISIN and identification number according to your user settings. The Bond Calculator has three main tabs: "Bond Calculator" to carry out various yield, price and transaction cost calculations (see section 8.5.1 "Bond Calculator"). "Bond Liquidity & Spreads" to display information about the bond such as liquidity information and price and interest rate spreads (see section 8.5.2 "Bond Liquidity and Spreads"). "Bond Simulator" has the same functionality as the Bond Calculator tab, but with extended input options and so greater flexibility for calculations (see section 8.5.3 "Bond Simulator"). User Manual Telekurs iD / Version 8.3 / 15 April 2010 Tools 223 You can call up the Bond Calculator in various ways: On the menu bar under "File" call up the menu item "Open Calculator" and then on the submenu which comes up, select the menu item "Open Bond Calculator". A blank "Bond Calculator" viewer is opened and you can bring a suitable instrument into it from another viewer using Drag & Drop (see section 5.4 "Drag & Drop"). If you have a "Listing Search Results" or "List" viewer already open, click on the pop-up menu item "Open Bond Calculator" (right-hand mouse button). The "Bond Calculator" viewer is opened with the corresponding bond. Enter the shortcut .BC in the command line and select an instrument which you would like to be shown (see section 5.7 "Calling up financial data"). If you have a "Bond Calculator" viewer already open containing information, you can bring in another bond at any time using Drag & Drop. 8.5.1 Bond Calculator On the "Bond Calculator" tab, the latest price data, basic data and life data are shown on the lefthand side. On the left-hand side at the bottom you can carry out various calculations: Yield dependent on price and price dependent on yield (Yield and Price Calculator) Total capital return (Total Return Calculator) Total transaction costs (Total Price Calculator) On the right-hand side, instrument data or company data is displayed. Current Price Data The current price data for the bond is shown in the following fields: LVal: Most recent valuation price with valuation type and time. P-Val: Previous day valuation price with valuation type and date. 224 Tools User Manual Telekurs iD / Version 8.3 / 15 April 2010 Bid: Market bid with date. Ask: Market ask with date. Bond Basic Data Bond basic data are shown in the "Bond Basic Data" table: Interest Rate: annual interest rate with interest type ("% Fixed" for fixed rate bonds or "Zero C." for zero rate bonds). Payment Frequency: interest payment frequency per year ("1 per year" means annual payments, "2 per year" means semi-annual payments, etc.). Last Bond Rating: most recent bond rating given by the displayed rating agency. Accrued Interest: interest accrued over the interest payment period up to the current date. Correction Factor: most recent bond price correction factor. Flat Code: status information for bonds in default. Day Count Conv.: interest rate calculating convention (e.g. 30E/360, if each month is reckoned to have 30 days and each year 360 days, or ACT/ACT, if the calculation is based on the actual number of days). Bond Life Data Bond life data are shown in the "Bond Life Data" table: Issue Total Life: life duration of the bond from the issue dated date to the bond maturity date. Issue Rem. Life: remaining life of the bond from the current date to the bond maturity date. Next Coupon R. Life: remaining life of the next coupon from the current date to the next coupon payment date. Issue Dated Date: start date of the bond coupon payments. First Interest Paym.: first coupon payment date. Next Payment Date: next coupon payment date. Maturity Date: bond maturity date (for perpetual bonds "Perpet." is displayed instead of a date). User Manual Telekurs iD / Version 8.3 / 15 April 2010 Tools 225 Yield and Price Calculator The "Yield and Price Calculator" calculates the yield dependent on price and the price dependent on yield for a particular date. In addition, other values are calculated depending on the values entered for date, price and yield. Static data displayed for the bond: Redemption Date: date of the repayment of the principal value. Redemption: repaid principal value (in %). Last Yield (LVal): calculated yield for the current date and the current valuation price LVal. Entry fields for calculations: Actual Date: date for the calculation (the current date is shown as the default). By doubleclicking on this field you can also select the date on the calendar (see section 5.17 "Date input with calendar function"). Calc. Price: price for the calculation (the current LVal rate is shown as the default). As soon as an entry is made in this field, the "Calc. Yield" field is deleted. Calc. Yield: price for the calculation (the static value "Last Yield" is shown as the default). As soon as an entry is made in this field, the "Calc. Price" field is deleted. The calculation is carried out by clicking on the "Calculate" button (alternatively you can click on the Enter key if the cursor is in one of the entry fields). Depending on what you entered, the result of the calculation is displayed in either the "Calc. Yield" or "Calc. Price" field, and shown in the following results output fields. By using the "Reset" button, all entries can be reset to the default values (the results are recalculated using these default values). Results output fields: Rem. Life (Years): remaining life of the bond from the current date to the bond maturity date. Duration: calculated duration. Mod. Duration: calculated modified duration . Convexity: calculated convexity. Basis Point Value: calculated basis point value (1 basis point = 1/100 percent point). dYield / 0.1 % Price: yield change per 1/10 % price change. 226 Tools User Manual Telekurs iD / Version 8.3 / 15 April 2010 Note: The information in the "Next Call" column – if any, i.e. only for callable bonds or put bonds – shows the relevant "Next Call/Put" data. This information is calculated for the date in the "Actual Date" field of the "Next Call" column. At present, the "Redemption Date", "Redemption" and "Rem. Life (Years)" fields for the "Next Call" column cannot be displayed. Total Return Calculator The "Total Return Calculator" calculates the return data for a particular period depending on the investment period and the interest rate of the bond. The risk-free rate gives the annual interest rate for a risk-free investment (default value is the current IBOR interest rate for the bond currency). It is only used to compare the two investments (the selected bond and a risk-free investment) for the required investment period. Entry fields for calculations: Invested From: start date of the investment period (default: blank). Invested To: final date of the investment period (default: blank). Risk-free Rate: annual interest rate of the risk-free investment (default: the instrument’s currency related current IBOR rate). The calculation is carried out by clicking on the "Calculate" button (alternatively you can click on the Enter key if the cursor is in one of the entry fields). Depending on what you entered, the result of the calculation is displayed in the following results output fields. By using the "Reset" button, all entries can be reset to the default values (the results will be deleted). Results output fields (all percentage values as a percentage of the nominal value): Investment Period: duration of the investment period (in years). Payment Number: number of payments during the investment period. Payment Amount: total paid interest during the investment period. Risk-free Return: total earned risk-free interest during investment period. Price on Date From: bond clean price at the start date of the investment period. Accrued Interest From: accrued interest at the start date of the investment period. Price on Date To: bond clean price at the final date of the investment period. Accrued Interest To: accrued interest at the final date of the investment period. User Manual Telekurs iD / Version 8.3 / 15 April 2010 Tools 227 Coupon Reinvested: interest payments reinvested on the payment date with the same returns and interest rates. Total on Date To: sum of fields "Price on Date To", "Accrued Interest To" and "Coupon Reinvested". Total Return (Differ.): price difference between fields "Total on Date To" and "Price on Date From". Total Price Calculator The "Total Price Calculator" calculates the transaction costs for buying a bond. Static data displayed for the bond: Bourse: symbol of the trading centre. Settlement Day: usual processing time or delay in delivery for the trading centre. Currency: currency symbol of the bond currency. Entry fields for calculations: Transaction Date: date of transaction order. Clean Price: rate of the bond with no accrued interest on the date of the transaction order, as a percentage of the nominal value. Amount: transaction amount (in bond currency). Transaction Fees: transaction fees charged on the price of the bond and the accrued interest as a percentage (optional entry field). Accrued Int. Fees: additional fees charged only on the accrued interest as a percentage (optional entry field). The calculation is carried out by clicking on the "Calculate" button (alternatively you can click on the Enter key if the cursor is in one of the entry fields). Depending on what you entered, the result of the calculation is displayed in the following results output fields. By using the "Reset" button, all entries can be reset to the default values (the results will be deleted). Results output fields: Settlement Date: definite settlement or delivery date. Total Clean Price: total value of the purchased bonds with no accrued interest. 228 Tools User Manual Telekurs iD / Version 8.3 / 15 April 2010 Accrued Interest: interest accrued up to the date of processing or delivery. Total Gross Price: total cost of the transaction (sum of fields "Total Clean Price", "Accrued Interest", "Transaction Fees" and "Accrued Int. Fees"). Instrument and company data Instrument data and company data are displayed on the two tabs "Instrument Data" and "Company Data" (see also section 6.16 "Basic Data & Events"). User Manual Telekurs iD / Version 8.3 / 15 April 2010 Tools 229 8.5.2 Bond Liquidity and Spreads On the "Bond Liquidity & Spreads" tab, the following information about the bond is displayed in tabular form on the left-hand side: Issue data Liquidity data (Bid/Ask Spreads) Volume data (daily and monthly volumes) Rating data (S & P, Moody’s and Fitch ratings) Spreads to Interest Rate Swaps and to Benchmarks Money and capital market data (Interbank Offered Rate, Interest Rate Swaps) On the right-hand side, the rates for the bond at all trading centres where it is traded are displayed at the top, and underneath, the data and graphic representation of the interest rate curve for zero rate bonds in the relevant currency. Issue data The bond issue data are shown in the following fields: Issue Amount: Issue amount with related currency. Issue Price: Issue price as percentage of nominal price. Market Bid/Ask and Market Bid/Ask Spreads 230 Tools User Manual Telekurs iD / Version 8.3 / 15 April 2010 Bid/Ask and Bid/Ask Spreads are shown in the "Current Market Bid/Ask and Market Bid/Ask Spreads" tables: Bid (Market Bid): Market Bid with trading center symbol, size and time Ask (Market Ask): Market Ask with trading center symbol, size and time Spread Bid/Ask: Spread between Bid and Ask (in percent) with trading center symbol, size and date Monthly Spread Bid/Ask: previous month average daily Spread between Bid and Ask trading center symbol, size and date Volume data Volume data are shown in the "Previous Day, Average Daily and Previous Month Volumes" tables: Prev. Day Vol. On/Off: previous day volume of the indiated trading centre on and off bourse (only on bourse if there is no off bourse data). Prev. M. Av. Vol. On/Off: previous month average daily volume on and off bourse (only on bourse if there is no off bourse data). Prev. Month Vol. On/Off: previous month total volume on and off bourse (only on bourse if there is no off bourse data). Rating data Bond rating data from different rating agencies are shown in the following fields: S & P: Standard & Poor’s rating for the bond. MOODY’S: Moody’s rating for the bond. Fitch: Fitch rating for the bond. Interest Rate Swaps and Bond Benchmark This table contains information about Interest Rate Swap, IRS, and the associated benchmark (average state loan for the relevant country and currency), in this example for Germany (DE) and the euro (EUR). IRS: bid and ask rate with average value between bid and ask rate (MID), rating (if available) and time. Benchmark: bid and ask rate with average interest rate (YieldMid), rating (if available) and time. User Manual Telekurs iD / Version 8.3 / 15 April 2010 Tools 231 Note: The ratings given are from S & P/Moody’s. The IRS data is taken from the "Tullett / AS Interest Rate Swaps" list and the benchmark data from the "Tullett / TM - Benchmarks" list. Yield Spreads The rise and fall in return from the bond compared with the interest rate swap and the benchmark are shown in the "Last Yield Spreads" table: Issue Rem. Life: remaining life of the bond from the current date to the bond maturity date. Last Yield (LVal): calculated yield for the current date and the current valuation price LVal. Spread to IRS (MID): The rise and fall in return (difference in basic points) for the current LVal analysis rate compared with the IRS average value MID. Spread to Benchmark: The rise and fall in return (difference in basic points) for the current LVal analysis rate in relation to the average benchmark return (YieldMid). Note: The comparative figures MID (IRS average) and YieldMID (average benchmark return) are converted according to the interest payment frequency of the bond and adjusted for its remaining life. Money and capital market data The money market data (reference interest rates for short-term inter-bank credits, Interbank Offered Rate – IBOR) and capital market data (reference interest rates for long-term credits Interest Rate Swaps – IRS) for the bond currency are shown in the "Money/Capital Market" table: IBOR 3 M: Interbank Offered Rate (IBOR) for 3 months. IBOR 12 M: Interbank Offered Rate (IBOR) for 12 months. IRS 5 Y ASK: Rate asked for 5-year interest swaps. IRS 10 Y ASK: Rate asked for 10-year interest swaps. Note: The IRS data is taken from the "Tullett / AS - Interest Rate Swaps" list and the IBOR data from the "Tullett / MN - Interbank Offered Rates" list. If no data is available for the bond currency, the fields remain blank. 232 Tools User Manual Telekurs iD / Version 8.3 / 15 April 2010 Rates at all trading centres The rates for the bond at all trading centres are shown in one list. By double-clicking on an entry or using Drag & Drop you can transfer the relevant data into the fields on the right-hand side. Interest rate curve for zero rate bonds A second list shows the data for zero rate bonds in the bond currency for periods of from 1 to 30 years. Alongside, the interest rate curve is shown as a chart. If no data is available in Telekurs iD for the bond currency, the data for zero rate bonds in euros is displayed. User Manual Telekurs iD / Version 8.3 / 15 April 2010 Tools 233 8.5.3 Bond Simulator The "Bond Simulator" tab has essentially the same functionality as the "Bond Calculator" tab (see section 8.5.1), but has additional input options and therefore greater flexibility for calculating a simulated bond. The default values shown in the fields relate to the bond for which the Bond Calculator was opened or which was transferred into it by Drag & Drop. On the "Bond Simulator" tab, the basic data and the life data are shown at the top. At the bottom, the following calculations can be carried out, as on the "Bond Calculator" tab: Yield dependent on price and price dependent on yield (Yield and Price Calculator) Total capital return (Total Return Calculator) Total transaction costs (Total Price Calculator) Bond Basic Data 234 Tools User Manual Telekurs iD / Version 8.3 / 15 April 2010 Unlike on the "Bond Calculator" tab, on the "Bond Simulator" tab the following basic data can be changed: Interest Rate: annual interest rate (enter "0" for zero rate bonds). Payment Frequency: interest payment frequency per year (enter "0" for zero rate bonds). Day Count Conv.: interest rate calculation convention (all options can be selected). Bond Life Data Unlike on the "Bond Calculator" tab, on the "Bond Simulator" tab the following life data can be changed: Issue Dated Date: start date of the bond coupon payments. First Interest Paym.: first coupon payment date. Maturity Date: bond maturity date (left blank for bonds with no limit on their life). Yield and Price Calculator The "Yield and Price Calculator" on the "Bond Simulator" tab has the same functions as the one on the "Bond Calculator" tab. Only the "Last Yield (LVal)" field is not there, because there is no current LVal rate for the simulated bonds here. User Manual Telekurs iD / Version 8.3 / 15 April 2010 Tools 235 Total Return Calculator The "Total Return Calculator" on the "Bond Simulator" tab has the same functions as the one on the "Bond Calculator" tab. However, on the "Yield and Price Calculator" on the "Bond Simulator" tab, the following additional entry fields are available for calculations: Price on Date From: rate for the bond with no accrued interest (clean price) at the starting date of the investment period. Price on Date To: rate for the bond with no accrued interest (clean price) at the final date of the investment period. Total Price Calculator The "Total Price Calculator" on the "Bond Simulator" tab has the same functions as the one on the "Bond Calculator" tab. However, on the "Total Price Calculator" on the "Bond Simulator" tab, the following additional entry field is available for calculations: Settlement Day: usual processing time or delay in delivery for the trading centre (all options can be selected). 236 Tools User Manual Telekurs iD / Version 8.3 / 15 April 2010 8.6 Broken Date Calculator You can use the Broken Date Calculator to calculate exchange rates for any time period (broken dates). Note: The Broken Date Calculator is currently only available as a beta version for the Asset Management Package and the Treasury & Risk Package. At the top of the window you can enter the following parameters for the calculation: Date Starting currency (Base) Target currency (Quote) You can also select the date in the calendar (see also section 5.17 "Date input with calendar function") and the two currencies in the selection window which is displayed when you click on the relevant button . When you click on "OK", the result is shown on a line at the bottom of the window with the following data: Date: date entered Days: time span calculated between the present date and the date entered Base: selected starting currency B.Depo (Bid and Ask): base rate calculated for the starting currency (Base Deposit Rate) for the date entered Quoted: selected target currency Q.Depo (Bid and Ask): base rate calculated for the target currency (Quote Deposit Rate) for the date entered Spot Bid and Ask: current spot market exchange rates Bid and Ask: exchange rates calculated for the date entered You can carry out more calculations, the results of which will each be shown on a separate line. By clicking on the "Remove Forward" pop-up menu item, (right mouse button) you can delete lines that are no longer needed. You can call up the Broken Date Calculator by selecting the menu item "Open Calculator" on the "File" menu and then selecting the menu item "Open Broken Date Calculator" on the submenu which comes up. User Manual Telekurs iD / Version 8.3 / 15 April 2010 Tools 237 9. Appendix 1: Chart types, indicators and drawing features 9.1 Chart types In the "Chart" viewer various chart types can be displayed: Analytical Charts (Line, Candlestick, Bar, Area) Kagi Charts Renko Charts Three-Line Break Charts Point & Figure Charts A description of each of these chart types is found in the following subsections. 9.1.1 Analytical charts In an analytical chart many indicators, both price and technical, can be displayed. Because it usually contains more data than just closing prices (like open, hi, lo and volume) many other indicators can be displayed in the chart. These indicators usually enhance the analytical capabilities of the candlestick or hi-lo-close charts. In the "Chart" viewer, we provide many advanced functions in analytical charts, among them: price indicators that are calculated automatically technical indicators that can be used to enhanced the chart analysis interactive drawing features that allow the user to select different areas in the chart to perform additional features and display additional technical analysis information (i.e. Fibonacci Fans, Arcs, etc.) An analytical chart is a line chart, an [open]-hi-lo-close or candlestick chart which displays price indicators in the section where the main chart is displayed and technical indicators in a separate chart. A sample analytical chart is depicted in the following figure: 238 Appendix 1 User Manual Telekurs iD / Version 8.3 / 15 April 2010 9.1.2 Point and Figure Charts Point and figure (P&F) charting concentrates on price and its changes by eliminating other elements such as time and volume. This chart is popular because it is simple and provides the following advantages: P&F charting uses price data with minimum manipulation. P&F charts are indigenous to stock market trading which give you both the immediate and long term view. Formations, patterns and signals are easy to recognize and interpret, and tend to repeat themselves. It enables the investor to do what he should do – stay on a winner while it is winning and get off a loser quickly. The method is dynamic. The fixed interval of plotting may be made to fit whatever you want to chart – stocks, bonds, commodities, speculation or investment. It ignores the static time factor, the confusing volume indications, and irrelevant minor fluctuations. The basic point and figure chart shows columns of X's and O's which display the underlying supply and demand of prices. A column of X's means the stock price or index is going up. A column of O's means the stock price is going down. Columns of X's and O's alternate back and forth. However, they never appear in the same column. A simple P&F chart is depicted in the following figure: In order to create a P&F chart, you must specify a "box size" and "reversal amount" and if the box size is expressed as percentage or relative to the price given in the data set. The common practice is to use the high and low prices (not just the close) to decide if prices have changed enough to display a new box. The interaction between these variables is as follows: P&F charts display an X when prices rise by the box size and display an O when prices fall by the box size. Note that no Xs or Os are drawn if prices rise or fall by an amount that is less than the box size. The box size may be expressed as percentage. This means that the box size refers to a percentage instead of a fixed price. For example, if you set a non-percentage box size of 10, Telekurs iD Chart will draw an X or an O if the price changes by 10 points. For a percentage box size of 5, Telekurs iD Chart will draw an X or an O if the price changed by 5%. In order to change columns (e.g., from an X column to an O column), prices must reverse by the "reversal amount" (another value you specify) multiplied by the box size. For example, if the box size is three points and the reversal amount is two boxes, then prices must reverse direction six points (three multiplied by two) in order to change columns. If you are in a col- User Manual Telekurs iD / Version 8.3 / 15 April 2010 Appendix 1 239 umn of Xs, the price must fall six points to change to a column of Os. If you are in a column of Os, the price must rise six points to change to a column of Xs. Because prices must reverse direction by the reversal amount, the minimum number of Xs or Os that can appear in a column is equal to the "reversal amount". By default Telekurs iD Chart sets a box size of 5, non-percentage and a reversal amount of 1. 9.1.3 Renko Charts Renko charts provide the following advantages: As mutual fund prices are based only on the closing price and candlestick charts require the open, hi, low and closing prices, Japanese charts, like Renko, are particularly useful for analyzing stock mutual funds. Easy to interpret bullish and bearish signs in the stock. The Renko chart looks similar to the Three-Line Break chart (see section 9.1.5) since they both have blocks. The individual blocks that form the Renko chart are sometimes referred to as bricks. For a Renko chart, a block is drawn in the direction of the prior move if a fixed amount has been exceeded. For example, if there is a white brick on the Renko chart, the stock has to advance by a predetermined fixed amount before a new white brick can be drawn. A Renko chart is depicted in the following figure: The general rules for calculating a Renko chart are: Renko charts are always based on closing prices. You specify a "box size" which determines the minimum price change to display. To draw Renko bricks, today's close is compared with the high and low of the previous brick (white or black): – If the closing price rises above the top of the previous brick by at least the box size, one or more white bricks are drawn in new columns. The height of the bricks is always equal to the box size. – If the closing price falls below the bottom of the previous brick by at least the box size, one or more black bricks are drawn in new columns. Again, the height of the bricks is always equal to the box size. – If prices move more than the box size, but not enough to create two bricks, only one brick is drawn. For example, in a two-unit Renko chart, if the prices move from 100 to 103, only one white brick is drawn from 100 to 102. The rest of the move, from 102 to 103, is not shown on the Renko chart. 240 Appendix 1 User Manual Telekurs iD / Version 8.3 / 15 April 2010 9.1.4 Kagi Charts Kagi charts provide the following advantages: The goal of the Kagi chart is to catch longer term trends. As mutual fund prices are based only on the closing price and candlestick charts require the open, hi, low and closing prices. Japanese charts, like Kagi, are particularly useful for analyzing stock mutual funds. Using a Kagi, it is easy to obtain an insight into who has the balance of power – the bulls or the bears. Easy to interpret, buy when line goes from thin to thick and sell when the line goes from thick to thin. Kagi charts display a series of connecting vertical lines where the thickness and direction of the lines are dependent on the price action. If closing prices continue to move in the direction of the prior vertical Kagi line, then that line is extended. However, if the closing price reverses by a predetermined "reversal" amount, a new Kagi line is drawn in the next column in the opposite direction. An interesting aspect of the Kagi chart is that when closing prices penetrate the prior column's high or low, the thickness of the Kagi line changes. A Kagi chart is depicted in the following figure: The general rules for calculating a Kagi chart are: Kagi charts are always based on closing prices. The first closing price in a Kagi chart is the "starting price". To properly construct a Kagi chart a reversal amount must be chosen. This is the minimum price movement that is needed before a new reversal line can be drawn in the next column. To draw the first Kagi line, today’s close is compared to the starting price. – If today’s price is greater than or equal to the starting price, then a thick line (yang) is drawn from the starting price to the new closing price. – If today’s price is less than or equal to the starting price, then a thin line (yin) is drawn from the starting price to the new closing price. To draw subsequent lines, compare the closing price to the tip (i.e. bottom or top) of the previous Kagi line: – If the price continued in the same direction as the previous line, the line is extended in the same direction, no matter how small the move. – If the price moved in the opposite direction by at least the reversal amount (this may take several days), then a short horizontal line is drawn to the next column and a new vertical line is drawn to the closing price. User Manual Telekurs iD / Version 8.3 / 15 April 2010 Appendix 1 241 – If the price moved in the opposite direction of the current column by less than the reversal amount no lines are drawn. If a thin Kagi line (yin) exceeds the prior high point on the chart, the line becomes thick (yang). Likewise, if a thick Kagi line (yang) falls below the prior low point, the line becomes thin (yin). 9.1.5 Three-Line Break Charts As opposed to Analytical charts, Three-Line Break charts ignore the passage of time. They specialize in trend analysis, which is similar to P&F charting (see section 9.1.2). Their main advantage is that there is no arbitrary fixed reversal amount. It is the market's action that will give the indication of a reversal. . The Three-Line Break chart looks like a series of black and white boxes of varying heights (although in Telekurs iD Chart you can assign different colors to the boxes). A new block is in a separate column. Each of these blocks is called a line. Using the closing price, a new white box is added if the previous high is exceeded and a new black line is drawn if the price reaches a new low. If there is neither a new high nor a low, nothing is drawn. If a rally is powerful enough to form three consecutive white lines, then the low of the last three white lines has to be exceeded before the opposite color line is drawn. The term "Three-Line Break" comes from the fact that the market has to "break" above the prior three lines before a new opposite color line is drawn. A Three-Line Break chart is depicted in the following figure: The general rules for calculating a Three-Line Break chart are: Three-Line Break charts are always based on closing prices. If the price exceeds the previous line's high price, a new white line (box) is drawn. If the price falls below the previous line's low price, a new black line (box) is drawn. If the price does not rise above nor fall below the previous line, nothing is drawn. 242 Appendix 1 User Manual Telekurs iD / Version 8.3 / 15 April 2010 9.2 Price indicators In the "Chart" viewer various price indicators can be displayed along with the price chart: Moving Averages - Simple Moving Average (with different periods, e.g. 10, 50 or 200 days) - Exponential Moving Average - Triangular Moving Average - Weighted Moving Average Bollinger Bands Envelopes Median Price Typical Price Weighted Close A description of each of these price indicators is found in the following subsections. Price indicators are displayed in the same area of the chart where the prices (line chart, bar chart etc.) are displayed. 9.2.1 Simple Moving Average A simple, or arithmetic, moving average is calculated by adding the closing price of the financial instrument for a number of time periods (e.g., 10 days) and then dividing this total by the number of time periods. The result is the average price of the financial instrument over the time period. Simple moving averages give equal weight to each daily price. n Closing Pr ice Moving Average 1 n In a 200-days moving average; n = 200 The moving average is probably the best known, and most versatile, indicator in the analyst’s tool chest. It can be used with the price of your choice (highs, closes or whatever) and can also be applied to other indicators, helping to smooth out volatility. Telekurs iD Chart is able to calculate simple moving averages and there are objects for most used simple moving averages such as 10-days, 50-days and 200-days. The following chart displays a 10-day simple moving average: User Manual Telekurs iD / Version 8.3 / 15 April 2010 Appendix 1 243 9.2.2 Exponential Moving Average An exponential (or exponentially weighted) moving average is calculated by applying a percentage of today's closing price to yesterday's moving average value. Exponential moving averages place more weight on recent prices. The following chart displays a 10-day exponential moving average: For example, to calculate a 9% exponential moving average, you would first take today's closing price and multiply it by 9%. Next, you would add this product to the value of yesterday's moving average multiplied by 91% (100% - 9% = 91%). (Today's Close * 0.09) + (Yesterday's Moving Average * 0.91) Because most investors feel more comfortable working with time periods, rather than with percentages, the exponential percentage can be converted into an approximate number of days. For example, a 9% moving average is equal to a 21.2 time period (rounded to 21) exponential moving average. The formula for converting exponential percentages to time periods is: 2 1 Time Periods Percentage You can use the above formula to determine that a 9% moving average is equivalent to a 21-day exponential moving average: 2 21.2 Days 1 0.09 The formula for converting time periods to exponential percentages is: Exponential Percentage 2 Time Periods 1 You can use the above formula to determine that a 21-day exponential moving average is actually a 9% moving average: 0 ,09 244 2 21 1 Appendix 1 User Manual Telekurs iD / Version 8.3 / 15 April 2010 9.2.3 Triangular Moving Average Triangular moving averages place the majority of the weight on the middle portion of the price series. They are actually double-smoothed simple moving averages. The periods used in the simple moving averages varies depending on if you specify an odd or even number of time periods. The following chart displays a 10-day triangular moving average: The following steps explain how to calculate a 12-period triangular moving average. 1. Add 1 to the number of periods in the moving average (e.g., 12 plus 1 is 13). 2. Divide the sum from step 1 by 2 (e.g., 13 divided by 2 is 6.5). 3. If the result of step 2 contains a fractional portion, round the result up to the nearest integer (e.g., round 6.5 up to 7). 4. Using the value from step 3 (i.e., 7), calculate a simple moving average of the closing prices (i.e., a 7-period simple moving average). 5. Again using the value from step 3 (i.e., 7) calculate a simple moving average of the moving average calculated in step 4 (i.e., a moving average of a moving average). 9.2.4 Weighted Moving Average A weighted moving average is designed to put more weight on recent data and less weight on past data. A weighted moving average is calculated by multiplying each of the previous day's data by a weight. The following table shows the calculation of a 5-day weighted moving average. User Manual Telekurs iD / Version 8.3 / 15 April 2010 Appendix 1 245 The following chart displays a 10-day weighted moving average: 9.2.5 Bollinger Bands Bollinger bands plot trading bands above and below a simple moving average. The standard deviation of closing prices for a period equal to the moving average employed is used to determine the band width. This causes the bands to tighten in quiet markets and loosen in volatile markets. The bands can be used to determine overbought and oversold levels, locate reversal areas, project targets for market moves, and determine appropriate stop levels. The bands are used in conjunction with indicators such as RSI, MACD histogram, CCI and Rate of Change. Divergences between Bollinger bands and other indicators show potential action points. The middle band is a normal moving average. In the following formula, "n" is the number of time periods in the moving average (e.g., 20 days). n Close j Middle Band j 1 n The upper band is the same as the middle band, but it is shifted up by the number of standard deviations (e.g., two deviations). In this next formula, n Close j Middle Band 2 j 1 Upper Band Middle Band D n where D is the number of standard deviations. Lower Band Middle Band D 2 Close j Middle Band j 1 n n The lower band is the moving average shifted down by the same number of standard deviations (i.e., "D"). 246 Appendix 1 User Manual Telekurs iD / Version 8.3 / 15 April 2010 A sample of an analytical chart showing Bollinger bands is depicted in the following figure: 9.2.6 Envelopes An envelope is comprised of two moving averages. One moving average is shifted upward and the second moving average is shifted downward. Envelopes define the upper and lower boundaries of a financial instrument's normal trading range. A sell signal is generated when the financial instrument reaches the upper band whereas a buy signal is generated at the lower band. The optimum percentage shift depends on the volatility of the financial instrument – the more volatile, the larger the percentage. The logic behind envelopes is that overzealous buyers and sellers push the price to the extremes (i.e., the upper and lower bands), at which point the prices often stabilize by moving to more realistic levels. This is similar to the interpretation of Bollinger bands. The lower band is the moving average shifted down by the same number of standard deviations (i.e., "D"). The following chart displays a stock with a 6% envelope of a 25-day exponential moving average: 9.2.7 Median Price The Median Price indicator is simply the midpoint of each day's price. The Typical Price and Weighted Close are similar indicators. The Median Price indicator provides a simple, single-line chart of the day's average price. This average price is useful when you want a simpler view of prices. User Manual Telekurs iD / Version 8.3 / 15 April 2010 Appendix 1 247 The following chart shows the Median Price indicator on top of a hi-low-close price chart. The Median Price indicator is calculated by adding the high and low price and dividing by two. High Low 2 9.2.8 Typical Price The Typical Price indicator is simply an average of each day's price. The Median Price and Weighted Close are similar indicators. The Typical Price indicator provides a simple, single-line plot of the day's average price. Some investors use the Typical Price rather than the closing price when creating moving average penetration systems. The Typical Price is a building block of the Money Flow Index. The following chart shows the Typical Price indicator on top of a hi-low-close price chart. The Typical Price indicator is calculated by adding the high, low, and closing prices together, and then dividing by three. The result is the average, or typical price. Typical Pr ice 248 Appendix 1 High Low Close 3 User Manual Telekurs iD / Version 8.3 / 15 April 2010 9.2.9 Weighted Close The Weighted Close indicator is simply an average of each day's price. It gets its name from the fact that extra weight is given to the closing price. The Median Price and Typical Price are similar indicators. When plotting and back-testing moving averages, indicators, trendlines, etc, some investors like the simplicity that a line chart offers. However, line charts that only show the closing price can be misleading since they ignore the high and low price. A Weighted Close chart combines the simplicity of the line chart with the scope of a bar chart, by plotting a single point for each day that includes the high, low, and closing price. The following chart shows the Weighted Close indicator on top of a hi-low-close price chart: The Weighted Close indicator is calculated by multiplying the close by two, adding the high and the low to this product, and dividing by four. The result is the average price with extra weight given to the closing price. Close 2 High Low 4 User Manual Telekurs iD / Version 8.3 / 15 April 2010 Appendix 1 249 9.3 Technical indicators In the "Chart" viewer various technical indicators can be displayed in a separate section of the chart (max. 3 at the same time): Volume related technical indicators - Volume - Money Flow Index - Price and Volume Trend - Negative Volume Index - Positive Volume Index - On Balance Volume - Accumulation/Distribution Indicator Oscillators - Chaikin Oscillator - Volume Oscillator - Detrended Price Oscillator - Lanes Stochastics %D %K Oscillator - Chaikin's Volatility - Williams %R Ease of Movement Commodity Channel Index Moving Average Convergence/Divergence Relative Strenght Index Average True Range Standard Deviation TRIX Mass Index Performance Vertical Horizontal Filter Price Rate of Change Rate of Change Percentual Momentum A description of each of these technical indicators is found in the following subsections. Technical indicators are displayed in a separate section underneath the price chart. This is depicted in the following figure: 250 Appendix 1 User Manual Telekurs iD / Version 8.3 / 15 April 2010 9.3.1 Volume The most common and used technical indicator in an analytical chart is Volume or the total units traded on a particular trading day. Many other technical indicators are calculated based on the volume, so we encourage you to display the volume series when creating and displaying analytical charts. Normally, the volume is displayed as bars in a separate section of the chart. However, in the "Chart" viewer you may choose to display volume as bars, area or line charts. The lower section of the following chart displays the volume as bars: 9.3.2 Money Flow Index The Money Flow Index (MFI) is a momentum indicator that measures the strength of money flowing in and out of a financial instrument. It is related to the Relative Strength Index, but where the RSI only incorporates prices, the Money Flow Index accounts for volume. Lines again should be drawn at 80 and 20 as these are turning points of relevance for this graph. The lower section of the following chart displays a Money Flow Index: The Money Flow Index requires a series of calculations. First, the period's Typical Price is calculated. Typical Pr ice High Low Close 3 Next, Money Flow (not the Money Flow Index) is calculated by multiplying the period's Typical Price by the volume. Money Flow = Typical Price * Volume User Manual Telekurs iD / Version 8.3 / 15 April 2010 Appendix 1 251 If today's Typical Price is greater than yesterday's Typical Price, it is considered Positive Money Flow. If today's price is less, it is considered Negative Money Flow. Positive Money Flow is the sum of the Positive Money over the specified number of periods. Negative Money Flow is the sum of the Negative Money over the specified number of periods. The Money Ratio is then calculated by dividing the Positive Money Flow by the Negative Money Flow. Money Ratio Positive Money Flow Negative Money Flow Finally, the Money Flow Index is calculated using the Money Ratio. 9.3.3 Price and Volume Trend The Price and Volume Trend (PVT) is similar to On Balance Volume (OBV) in that it is a cumulative total of volume that is adjusted depending on changes in closing prices. But where OBV adds all volume on days when prices close higher and subtracts all volume on days when prices close lower, the PVT adds/subtracts only a portion of the daily volume. The amount of volume added to the PVT is determined by the amount that prices rose or fell relative to the previous day's close. The PVT is calculated by multiplying the day's volume by the percent that the financial instrument's price changed, and adding this value to a cumulative total. Close Yesterday s Close Volume Yesterday s PVT Yesterda y s Close For example, if the financial instrument's price increased 0.5% on volume of 10,000 shares, we would add 50 (i.e., 0.005 * 10,000) to the PVT. If the financial instrument's price had closed down 0.5%, we would have subtracted 50 from the PVT. The lower section of the following chart displays a PVT: 9.3.4 Negative Volume Index The Negative Volume Index (NVI) focuses on days where the volume decreases from the previous day. The premise being that the "smart money" takes positions on days when volume decreases. If today's volume is less than yesterday's volume then: Close Yesterday s Close NVI Yesterday s NVI Yesterday s NVI Yesterday s Close 252 Appendix 1 User Manual Telekurs iD / Version 8.3 / 15 April 2010 If today's volume is greater than or equal to yesterday's volume then: NVI = Yesterday's NVI Because falling prices are usually associated with falling volume, the NVI usually trends downward. The lower section of the following chart displays a NVI: 9.3.5 Positive Volume Index The Positive Volume Index (PVI) focuses on days where the volume increased from the previous day. The premise being that the "crowd" takes positions on days when volume increases. Interpretation of the PVI assumes that on days when volume increases, the crowd-following "uninformed" investors are in the market. Conversely, on days with decreased volume, the "smart money" is quietly taking positions. Thus, the PVI displays what the not-so-smart-money is doing. (The Negative Volume Index, displays what the smart money is doing.) Note, however, that the PVI is not a contrarian indicator. Even though the PVI is supposed to show what the notso-smart-money is doing, it still trends in the same direction as prices. The lower section of the following chart displays a PVI: The PVI is calculated as follows: If today's volume is greater than yesterday's volume then: Close Yesterday s Close PVI Yesterday s PVI Yesterday s PVI Yesterday s Close User Manual Telekurs iD / Version 8.3 / 15 April 2010 Appendix 1 253 If today's volume is less than or equal to yesterday's volume then: PVI = Yesterday's PVI Because rising prices are usually associated with rising volume, the PVI usually trends upward. 9.3.6 On Balance Volume On Balance Volume (OBV) is a momentum indicator that relates volume to price change. OBV is one of the most popular volume indicators and was developed by Joseph Granville. Constructing an OBV line is very simple: The total volume for each day is assigned a positive or negative value depending on whether prices closed higher or lower that day. A higher close results in the volume for that day to get a positive value, while a lower close results in negative value. A running total is kept by adding or subtracting each day's volume based on the direction of the close. The direction of the OBV line is the thing to watch, not the actual volume numbers. On Balance Volume is a running total of volume. It shows if volume is flowing into or out of a financial instrument. When the financial instrument closes higher than the previous close, all of the day's volume is considered up-volume. When the financial instrument closes lower than the previous close, all of the day's volume is considered down-volume. The lower section of the following chart displays an OBV: On Balance Volume is calculated by adding the day's volume to a cumulative total when the financial instrument's price closes up, and subtracting the day's volume when the financial instrument's price closes down. If today's close is greater than yesterday's close then: OBV = Yesterday's OBV + Today's Volume If today's close is less than yesterday's close then: OBV = Yesterday's OBV - Today's Volume If today's close is equal to yesterday's close then: OBV = Yesterday's OBV 254 Appendix 1 User Manual Telekurs iD / Version 8.3 / 15 April 2010 9.3.7 Accumulation/Distribution Indicator The Accumulation/Distribution is a momentum indicator that associates changes in price and volume. The indicator is based on the premise that the more volume that accompanies a price move, the more significant the price move. A portion of each day's volume is added or subtracted from a cumulative total. The nearer the closing price is to the high for the day, the more volume added to the cumulative total. The nearer the closing price is to the low for the day, the more volume subtracted from the cumulative total. If the close is exactly between the high and low prices, nothing is added to the cumulative total. High Close Volume Close Low High Low The lower section of the following chart displays an Accumulation/Distribution Indicator: 9.3.8 Chaikin Oscillator The Chaikin Oscillator is created by subtracting a 10 period exponential moving average of the Accumulation/Distribution line from a 3 period moving average of the Accumulation/Distribution Line. The lower section of the following chart displays a Chaikin Oscillator: User Manual Telekurs iD / Version 8.3 / 15 April 2010 Appendix 1 255 9.3.9 Volume Oscillator The Volume Oscillator displays the difference between two moving averages of a financial instrument's volume. The difference between the moving averages can be expressed in either points or percentages. You can use the difference between two moving averages of volume to determine if the overall volume trend is increasing or decreasing. When the Volume Oscillator rises above zero, it signifies that the shorter-term volume moving average has risen above the longer-term volume moving average, and thus, that the short-term volume trend is higher (i.e., more volume) than the longer-term volume trend. There are many ways to interpret changes in volume trends. One common belief is that rising prices coupled with increased volume, and falling prices coupled with decreased volume, is bullish. Conversely, if volume increases when prices fall, and volume decreases when prices rise, the market is showing signs of underlying weakness. The theory behind this is straight forward. Rising prices coupled with increased volume signifies increased upside participation (more buyers) that should lead to a continued move. Conversely, falling prices coupled with increased volume (more sellers) signifies decreased upside participation. The lower section of the following chart displays a Volume Oscillator: The Volume Oscillator can display the difference between the two moving averages as either points or percentages. To see the difference in points, subtract the longer-term moving average of volume from the shorter-term moving average of volume: Shorter Moving Average - Longer Moving Average To display the difference between the moving averages in percentages, divide the difference between the two moving averages by the shorter-term moving average: Shorter Moving Average Longer Moving Average 100 Shorter Moving Average 256 Appendix 1 User Manual Telekurs iD / Version 8.3 / 15 April 2010 9.3.10 Detrended Price Oscillator The Detrended Price Oscillator (DPO) attempts to eliminate the trend in prices. Detrended prices allow you to more easily identify cycles and overbought/oversold levels. To calculate the DPO, you specify a time period. Cycles longer than this time period are removed from prices, leaving the shorter-term cycles. To calculate the Detrended Price Oscillator, first create an n-period simple moving average (where "n" is the number of periods in the moving average). n Closing Price Moving Average 1 n Now, subtract the moving average "(n / 2) + 1" days ago, from the closing price. The result is the DPO. DPO = Close - (Moving Average "((n/2)+1)" days ago) The DPO would be shown the same way as the moving average graph where the user can provide the value of n. The lower section of the following chart displays a DPO: 9.3.11 Lanes Stochastics %D %K Oscillator The Stochastic Indicator is based on the observation that as prices increase, closing prices tend to accumulate ever closer to the highs for the period. Conversely, as prices decrease, closing prices tend to accumulate ever closer to the lows for the period. Trading decisions are made with respect to divergence between % of "D" (one of the two lines generated by the study) and the item's price. For example, when a commodity or stock makes a high, reacts, and subsequently moves to a higher high while corresponding peaks on the % of "D" line make a high and then a lower high, a bearish divergence is indicated. When a commodity or stock has established a new low, reacts, and moves to a lower low while the corresponding low points on the % of "D" line make a low and then a higher low, a bullish divergence is indicated. Traders act upon this divergence when the other line generated by the study (K) crosses on the right-hand side of the peak of the % of "D" line in the case of a top, or on the right-hand side of the low point of the % of "D" line in the case of a bottom. The Stochastic Oscillator is displayed as two lines. The main line is called "%K." The second line, called "%D," is a moving average of %K. The %K line is usually displayed as a solid line and the %D line is usually displayed as a dotted line. User Manual Telekurs iD / Version 8.3 / 15 April 2010 Appendix 1 257 The lower section of the following chart displays a Lanes Stochastics indicator: The formula for %K is: Today' s Close Lowest Low for K Periods Highest High for K Periods Lowest Low for K Periods 100 The default value for K is 10 (Although 5 Days is the most commonly used value for %K) Because %D is a moving average of %K a number of days or periods should be specified when displaying the Lanes Stochastics indicator. 9.3.12 Chaikin's Volatility The Chaikin's Volatility indicator compares the spread between a financial instrument's high and low prices. It quantifies volatility as a widening of the range between the high and the low price. There are two ways to interpret this measure of volatility. One method assumes that market tops are generally accompanied by increased volatility (as investors get nervous and indecisive) and that the latter stages of a market bottom are generally accompanied by decreased volatility (as investors get bored). Another method (Mr. Chaikin's) assumes that an increase in the Volatility indicator over a relatively short time period indicates that a bottom is near (e.g., a panic sell-off) and that a decrease in volatility over a longer time period indicates an approaching top (e.g., a mature bull market). As with almost all experienced investors, Mr. Chaikin recommends that you do not rely on any one indicator. He suggests using a moving average penetration or trading band system to confirm this (or any) indicator. The lower section of the following chart displays a Chaikin's Volatility indicator: 258 Appendix 1 User Manual Telekurs iD / Version 8.3 / 15 April 2010 Chaikin's Volatility is calculated by first calculating an exponential moving average of the difference between the daily high and low prices. Chaikin recommends a 10-day moving average. H - L Average = Exponential moving average of (High - Low) Next, calculate the percent that this moving average has changed over a specified time period. Chaikin again recommends 10 days. H L Average H L Average n Periods Ago 100 H L Average n Periods Ago 9.3.13 Williams %R Williams' %R (pronounced "percent R") is a momentum indicator that measures overbought/oversold levels. Williams' %R was developed by Larry Williams. The interpretation of Williams' %R is very similar to that of the Stochastic Oscillator except that %R is plotted upside-down and the Stochastic Oscillator has internal smoothing. To display the Williams' %R indicator on an upside-down scale, it is usually plotted using negative values (e.g., -20%). Readings in the range of 80 to 100% indicate that the financial instrument is oversold while readings in the 0 to 20% range suggest that it is overbought. As with all overbought/oversold indicators, it is best to wait for the financial instrument's price to change direction before placing your trades. For example, if an overbought/oversold indicator (such as the Stochastic Oscillator or Williams' %R) is showing an overbought condition, it is wise to wait for the financial instrument's price to turn down before selling the financial instrument. (The MACD is a good indicator to monitor change in a financial instrument's price.) It is not unusual for overbought/oversold indicators to remain in an overbought/oversold condition for a long time period as the financial instrument's price continues to climb/fall. Selling simply because the financial instrument appears overbought may take you out of the financial instrument long before its price shows signs of deterioration. The lower section of the following chart displays a Williams %R oscillator: The formula used to calculate Williams' %R is similar to the Stochastic Oscillator: Highest High in n Periods Today s Close Highest High in n Periods Lowest Low in n Periods 100 User Manual Telekurs iD / Version 8.3 / 15 April 2010 Appendix 1 259 9.3.14 Ease of Movement The Ease of Movement (EMV) indicator shows the relationship between volume and price change. This indicator shows how much volume is required to move prices. The Ease of Movement indicator was developed Richard W. Arms, Jr., the creator of Equivolume. High Ease of Movement values occur when prices are moving upward on light volume. Low Ease of Movement values occur when prices are moving downward on light volume. If prices are not moving, or if heavy volume is required to move prices, then indicator will also be near zero. The Ease of Movement indicator produces a buy signal when it crosses above zero, indicating that prices are moving upward more easily; a sell signal is given when the indicator crosses below zero, indicating that prices are moving downward more easily. The following chart shows a 14-day Ease of Movement indicator. A 9-day moving average was plotted on the Ease of Movement indicator. To calculate the Ease of Movement indicator, first calculate the Midpoint Move as shown below. Midpoint Move Today s High Today s Low Yesterday s High Yesterday' s Low 2 2 Next, calculate the "High-Low" Box Ratio expressed in eighths with the denominator dropped (e.g., 1-1/2 points = 12/8 or just 12). Box Ratio Volume in 10 ,000 s High Low in eighths The Ease of Movement (EMV) indicator is then calculated from the Midpoint Move and Box Ratio. The raw Ease of Movement value is usually smoothed with a moving average. 9.3.15 Commodity Channel Index The Commodity Channel Index (CCI) is a timing system that is best applied to commodity contracts which have cyclical or seasonal tendencies. CCI does not determine the length of cycles – it is designed to detect when such cycles begin and end through the use of a statistical analysis which incorporates a moving average and a divisor reflecting both the possible and actual trading ranges. Although developed primarily for commodities, the CCI could conceivably be used to analyze stocks as well. 260 Appendix 1 User Manual Telekurs iD / Version 8.3 / 15 April 2010 The Commodity Channel Index (CCI) measures the variation of a financial instrument's price from its statistical mean. High values show that prices are unusually high compared to average prices whereas low values indicate that prices are unusually low. The calculation of this is somewhat complicated but these are the steps: 1. Add each period's high, low, and close and divide this sum by 3. This is the typical price. 2. Calculate an n-period simple moving average of the typical prices computed in step 1. 3. For each of the prior n-periods, subtract today's step 2 value from step 1's value n days ago. For example, if you were calculating a 5-day CCI, you would perform five subtractions using today's step 2 value. 4. Calculate an n-period simple moving average of the absolute values of each of the results in step 3. 5. Multiply the value in step 4 by 0.015. 6. Subtract the value from step 2 from the value in step1. 7. Divide the value in step 6 by the value in step 5. The lower section of the following chart displays a CCI: 9.3.16 Moving Average Convergence/Divergence The Moving Average Convergence/Divergence (MACD) is used to determine overbought or oversold conditions in the market. Written for stocks and stock indices, MACD can be used for commodities as well. The MACD line is the difference between the long and short exponential moving averages of the chosen item. The signal line is an exponential moving average of the MACD line. Signals are generated by the relationship of the two lines. As with RSI and Stochastics, divergences between the MACD and prices may indicate an upcoming trend reversal. The MACD is a trend following momentum indicator that shows the relationship between two moving averages of prices. The MACD is the difference between a 26-day and 12-day exponential moving average. A 9-day exponential moving average, called the "signal" (or "trigger") line is plotted on top of the MACD to show buy/sell opportunities. The MACD is calculated by subtracting the value of a 26-day exponential moving average from a 12-day exponential moving average. A 9-day dotted exponential moving average of the MACD (the "signal" line) is then plotted on top of the MACD. User Manual Telekurs iD / Version 8.3 / 15 April 2010 Appendix 1 261 The lower section of the following chart displays a MACD: 9.3.17 Relative Strength Index The Relative Strength Index (RSI) was developed by Welles Wilder Jr. Relative Strength is often used to identify price tops and bottoms by keying on specific levels (usually "30" and "70") on the RSI chart which is scaled from 0 - 100. The study is also useful to detect the following: 1. Movement which might not be as readily apparent on the bar chart 2. Failure swings above 70 or below 30 which can warn of coming reversals 3. Support and resistance levels 4. Divergence between the RSI and price which is often a useful reversal indicator The Relative Strength Index requires a certain amount of lead-up time in order to operate successfully. When Wilder introduced the RSI, he recommended using a 14-day RSI. Since then, the 9-day and 25-day RSI's have also gained popularity. The fewer days used to calculate the RSI, the more volatile the indicator. The RSI is a price-following oscillator that ranges between 0 and 100. The lower section of the following chart displays a RSI: The basic formula is: 100 RSI 100 U 1 D 262 Appendix 1 where: U = average of upward price closes (MA of gains) D = average of downward price closes (MA of losses) User Manual Telekurs iD / Version 8.3 / 15 April 2010 9.3.18 Average True Range The Average True Range (ATR) is a measure of volatility. It was introduced by Welles Wilder in his book, New Concepts in Technical Trading Systems, and has since been used as a component of many indicators and trading systems. Wilder has found that high ATR values often occur at market bottoms following a "panic" sell-off. Low Average True Range values are often found during extended sideways periods, such as those found at tops and after consolidation periods. The Average True Range can be interpreted using the same techniques that are used with the other volatility indicators. The lower section of the following chart displays an Average True Range: The True Range indicator is the greatest of the following: The distance from today's high to today's low. The distance from yesterday's close to today's high. The distance from yesterday's close to today's low. The Average True Range is a moving average (typically 14-days) of the True Ranges. 9.3.19 Standard Deviation Standard Deviation is a statistical measure of volatility. Standard Deviation is typically used as a component of other indicators, rather than as a stand-alone indicator. For example, Bollinger bands are calculated by adding a financial instrument's Standard Deviation to a moving average. High Standard Deviation values occur when the data item being analyzed (e.g., prices or an indicator) is changing dramatically. Similarly, low Standard Deviation values occur when prices are stable. Many analysts feel that major tops are accompanied with high volatility as investors struggle with both euphoria and fear. Major bottoms are expected to be calmer as investors have few expectations of profits. The following chart displays a line diagram and its 10-week Standard Deviation: User Manual Telekurs iD / Version 8.3 / 15 April 2010 Appendix 1 263 The Standard Deviation is calculated as follows: n Close j n period SMA of Close 2 j 1 n where SMA = Simple Moving Average n = Number of time periods 9.3.20 TRIX TRIX is a momentum indicator that displays the percent rate-of-change of a triple exponentially smoothed moving average of the financial instrument's closing price. It is designed to keep you in trends equal to or shorter than the number of periods you specify. The TRIX indicator oscillates around a zero line. Its triple exponential smoothing is designed to filter out "insignificant" cycles (i.e., those that are shorter than the number of periods you specify). Trades should be placed when the indicator changes direction (i.e., buy when it turns up and sell when it turns down). You may want to plot a 9-period moving average of the TRIX to create a "signal" line (similar to the MACD indicator), and then buy when the TRIX rises above its signal, and sell when it falls below its signal. Divergences between the financial instrument and the TRIX can also help identify turning points. The following chart shows a line diagram, its 12-day TRIX (dark line), and a 9-day "signal" moving average of the TRIX (bright line). 264 Appendix 1 User Manual Telekurs iD / Version 8.3 / 15 April 2010 The TRIX indicator is calculated as follows: 1. Calculate an n-period exponential moving average of the closing prices. 2. Calculate an n-period exponential moving average of the moving average calculated in step 1. 3. Calculate an n-period exponential moving average of the moving average calculated in step 2. 4. Calculate the 1-period (e.g., 1-day) percent change of the moving average calculated in step 3. 9.3.21 Mass Index The Mass Index was designed to identify trend reversals by measuring the narrowing and widening of the range between the high and low prices. As this range widens, the Mass Index increases; as the range narrows the Mass Index decreases. The Mass Index was developed by Donald Dorsey. According to Mr. Dorsey, the most significant pattern to watch for is a "reversal bulge." A reversal bulge occurs when a 25-period Mass Index rises above 27.0 and subsequently falls below 26.5. A reversal in price is then likely. The overall price trend (i.e., trending or trading range) is unimportant. A 9-period exponential moving average of prices is often used to determine whether the reversal bulge indicates a buy or sell signal. When the reversal bulge occurs, you should buy if the moving average is trending down (in anticipation of the reversal) and sell if it is trending up. The lower section of the following chart displays a Mass Index: To calculate the Mass Index: 1. Calculate a 9-day exponential moving average (EMA) of the difference between the high and low prices. 2. Calculate a 9-day exponential moving average of the moving average calculated in step 1. 3. Divide the moving average calculated in step 1 by the moving average calculated in step 2. 4. Total the values in step 3 for the number of periods in the Mass Index (e.g., 25 days). 25 9 Day EMA of High Low 9 Day EMA of a 9 Day EMA of High Low 1 User Manual Telekurs iD / Version 8.3 / 15 April 2010 Appendix 1 265 9.3.22 Performance The Performance indicator displays a financial instrument's price performance as a percentage. This is sometimes called a "normalized" chart. The Performance indicator displays the percentage that the financial instrument has increased since the first period displayed. For example, if the Performance indicator is 10, it means that the financial instrument's price has increased 10% since the first period displayed on the left side of the chart. Similarly, a value of -10% means that the financial instrument's price has fallen by 10% since the first period displayed. Performance charts are helpful for comparing the price movements of different financial instruments. The lower section of the following chart displays a Performance indicator: The Performance indicator is calculated by dividing the change in prices by the first price displayed. Current Close First Close 100 First Close 9.3.23 Vertical Horizontal Filter The Vertical Horizontal Filter (VHF) determines whether prices are in a trending phase or a congestion phase. The VHF was first presented by Adam White in an article published in the August, 1991 issue of Futures Magazine. Probably the biggest dilemma in technical analysis is determining if prices are trending or are in a trading-range. Trend-following indicators such as the MACD and moving averages are excellent in trending markets, but they usually generate multiple conflicting trades during tradingrange (or "congestion") periods. On the other hand, oscillators such as the RSI and Stochastics work well when prices fluctuate within a trading range, but they almost always close positions prematurely during trending markets. The VHF indicator attempts to determine the "trendiness" of prices to help you decide which indicators to use. There are three ways to interpret the VHF indicator: 1. You can use the VHF values themselves to determine the degree that prices are trending. The higher the VHF, the higher the degree of trending and the more you should be using trend-following indicators. 266 Appendix 1 User Manual Telekurs iD / Version 8.3 / 15 April 2010 2. You can use the direction of the VHF to determine whether a trending or congestion phase is developing. A rising VHF indicates a developing trend; a falling VHF indicates that prices may be entering a congestion phase. 3. You can use the VHF as a contrarian indicator. Expect congestion periods to follow high VHF values; expect prices to trend following low VHF values. The lower section of the following chart displays a VHF indicator: To calculate the VHF indicator, first determine the highest closing price (HCP) and the lowest closing price (LCP) over the specified time period (often 28-days). HCP = Highest closing price in n-periods LCP = Lowest closing price in n-periods Next, subtract the lowest closing price from the highest closing price and take the absolute value of this difference. This value will be the numerator. Numerator = Absolute value of (HCP - LCP) To determine the denominator, sum the absolute value of the difference between each day's price and the previous day's price over the specified time periods. n Denominator Absolute value of Close j Close j 1 j 1 The VHF is then calculated by dividing the previously defined numerator by the denominator. VHF Numerator Deno min ator 9.3.24 Price Rate of Change Rate of Change (ROC) is used to monitor momentum by making direct comparisons between current and past prices on a continual basis. The results can be used to determine the strength of price trends. Note: This study is the same as the Momentum except that Momentum uses subtraction in its calculations while Rate of Change uses division. The resulting lines of these two studies operated over the same data will look exactly the same – only the scale values will differ. The Price Rate of Change indicator displays the difference between the current price and the price x-time periods ago. The difference can be displayed in either points or as a percentage. The Momentum indicator displays the same information, but expresses it as a ratio. User Manual Telekurs iD / Version 8.3 / 15 April 2010 Appendix 1 267 When the Rate of Change displays the price change in points, it subtracts the price x-time periods ago from today's price: Today's Close - Close x periods ago When the Rate of Change displays the price change as a percentage, it divides the price change by price x-time periods ago: Today' s Close Close x Periods Ago 100 Close x Periods Ago The lower section of the following chart displays a Price Rate of Change: 9.3.25 Rate of Change Percentual The Rate of Change Percentual shows the Rate of Change as a percentage. For details consult the information given in section 9.3.24 "Price Rate of Change". The lower section of the following chart displays a Rate of Change Percentual: 268 Appendix 1 User Manual Telekurs iD / Version 8.3 / 15 April 2010 9.3.26 Momentum The Momentum indicator displays the same information as the Price Rate of Change, but expresses it as a ratio. For details consult the information given in section 9.3.24 "Price Rate of Change". The lower section of the following chart displays a Momentum indicator: User Manual Telekurs iD / Version 8.3 / 15 April 2010 Appendix 1 269 9.4 Drawing features In the "Chart" viewer various interactive drawing features can be used to display additional technical analysis information in the chart: Gann Fan Fibonacci Arcs Fibonacci Fan Fibonacci Retracements Fibonacci Time Zones Midpoint Tirone Levels Mean Tirone Levels Speed Resistance Lines Quadrant Lines Trend Lines A description of each of these interactive drawing features is found in the following subsections. 9.4.1 Gann Fan Gann Angles are drawn between a significant bottom and top (or vice versa) at various angles. Gann identified nine significant angles, with the 1 x 1 being the most important: 1 x 8 - 82.5 degrees 1 x 4 - 75 degrees 1 x 3 - 71.25 degrees 1 x 2 - 63.75 degrees 1 x 1 - 45 degrees 2 x 1 - 26.25 degrees 3 x 1 - 18.75 degrees 4 x 1 - 15 degrees 8 x 1 - 7 degrees Note that in order for the rise/run values (e.g., 1 x 1, 1 x 8, etc) to match the actual angles (in degrees), the x- and y-axes must have equally spaced intervals. This means that one unit on the x-axis (i.e., hour, day, week, month, etc) must be the same distance as one unit on the y-axis. The easiest way to calibrate the chart is make sure that a 1 x 1 angle produces a 45 degree angle. A sample Gann Fan is depicted in the following figure: 270 Appendix 1 User Manual Telekurs iD / Version 8.3 / 15 April 2010 Because this is an interactive drawing feature, the user normally creates the Gann Fan by selecting the first extreme point and then dragging the mouse to the other extreme point. When the mouse is released, Telekurs iD Chart will make all the necessary calculations and draw the Gann Fan. Please note it is not necessary that the user clicks on a specific data point as the Gann Fan will be calculated according to the axis scale and the position the mouse was released. 9.4.2 Fibonacci Arcs Fibonacci Arcs are displayed by first drawing a trendline between two extreme points, for example, a through and opposing peak. Three arcs are then drawn, centered on the second extreme point, so they intersect the trendline at the Fibonacci levels of 38.2%, 50.0%, and 61.8%. A sample Fibonacci Arcs is depicted in the following figure: Because this is an interactive drawing feature, the user normally creates these arcs by selecting the first extreme point and then dragging the mouse to the other extreme point. When the mouse is released, Telekurs iD Chart will make all the necessary calculations and draw the Fibonacci Arcs. Please note it is not necessary that the user clicks on a specific data point as the Fibonacci Arcs will be calculated according to the axis scale and the position the mouse was released. 9.4.3 Fibonacci Fan Fibonacci Fan lines are displayed by drawing a trendline between two extreme points, for example, a trough and opposing peak. Then an "invisible" vertical line is drawn through the second extreme point. Three trendlines are then drawn from the first extreme point so they pass through the invisible vertical line at the Fibonacci levels of 38.2%, 50.0%, and 61.8%. A sample Fibonacci Fan is depicted in the following figure: User Manual Telekurs iD / Version 8.3 / 15 April 2010 Appendix 1 271 Because this is an interactive drawing feature, the user normally creates the Fibonacci Fan by selecting the first extreme point and then dragging the mouse to the other extreme point. When the mouse is released, Telekurs iD Chart will make all the necessary calculations and draw the Fibonacci Fan. Please note it is not necessary that the user clicks on a specific data point as the Fibonacci Fan will be calculated according to the axis scale and the position the mouse was released. 9.4.4 Fibonacci Retracements Fibonacci Retracements are displayed by first drawing a trendline between two extreme points, for example, a trough and opposing peak. A series of nine horizontal lines are drawn intersecting the trendline at the Fibonacci levels of 0.0%, 23.6%, 38.2%, 50%, 61.8%, 100%, 161.8%, 261.8%, and 423.6%. (Some of the lines will probably not be visible because they will be off the scale.) A sample Fibonacci Retracements is depicted in the following figure: Because this is an interactive drawing feature, the user normally creates these retracements by selecting the first extreme point and then dragging the mouse to the other extreme point. When the mouse is released, Telekurs iD Chart will make all the necessary calculations and draw the Fibonacci Retracements. Please note it is not necessary that the user clicks on a specific data point as the Fibonacci Retracements will be calculated according to the axis scale and the position the mouse was released. 9.4.5 Fibonacci Time Zones Fibonacci Time Zones are a series of vertical lines. They are spaced at the Fibonacci intervals of 1, 2, 3, 5, 8, 13, 21, 34, etc. The interpretation of Fibonacci Time Zones involves looking for significant changes in price near the vertical lines. A sample Fibonacci Time Zones is depicted in the following figure: 272 Appendix 1 User Manual Telekurs iD / Version 8.3 / 15 April 2010 Because this is an interactive drawing feature, the user normally creates these zones by selecting the first extreme point and then dragging the mouse to the other extreme point. When the mouse is released, Telekurs iD Chart will make all the necessary calculations and draw the Fibonacci Zones. Please note. it is not necessary that the user clicks on a specific data point as the Fibonacci Zones will be calculated according to the axis scale and the position the mouse was released. 9.4.6 Midpoint Tirone Levels Tirone Levels are a series of horizontal lines that identify support and resistance levels. They were developed by John Tirone. Tirone Levels can be drawn using either the Midpoint 1/3-2/3 method or the Mean method. Both methods are intended to help you identify potential support and resistance levels based on the range of prices over a given time period. The interpretation of Tirone Levels is similar to Quadrant Lines. Midpoint levels are calculated by finding the highest high and the lowest low during the time period being analyzed. The lines are then calculated as follows: Top line: Subtract the lowest low from the highest high, divide this value by three, and then subtract this result from the highest high. Center Line: Subtract the lowest low from the highest high, divide this value by two, and then add this result to the lowest low. Bottom Line: Subtract the lowest low from the highest high, divide this value by three, and then add this result to the lowest low. These lines are depicted in the following chart: Because this is an interactive drawing feature, the user normally creates the lines by selecting the first extreme point and then dragging the mouse to the other extreme point. When the mouse is released, Telekurs iD Chart will make all the necessary calculations and draw the lines. Please note it is not necessary that the user clicks on a specific data point as the Tirone lines will be calculated according to the axis scale and the position the mouse was released. User Manual Telekurs iD / Version 8.3 / 15 April 2010 Appendix 1 273 9.4.7 Mean Tirone Levels Tirone Levels are a series of horizontal lines that identify support and resistance levels. They were developed by John Tirone. Tirone Levels can be drawn using either the Midpoint 1/3-2/3 method or the Mean method. Both methods are intended to help you identify potential support and resistance levels based on the range of prices over a given time period. The interpretation of Tirone Levels is similar to Quadrant Lines. Mean levels are displayed as five lines (the spacing between the lines is not necessarily symmetrical). The lines are calculated as follows: Extreme High: Subtract the lowest low from the highest high and add this value to the Adjusted Mean. Regular High: Subtract the lowest low from the value of the Adjusted Mean multiplied by two. Adjusted Mean: This is the sum of the highest high, the lowest low, and the most recent closing price, divided by three. Regular Low: Subtract the highest high from the value of the Adjusted Mean multiplied by two. Extreme Low: Subtract the lowest low from the highest high and then subtract this value from the Adjusted Mean. These lines are depicted in the following chart: Because this is an interactive drawing feature, the user normally creates the lines by selecting the first extreme point and then dragging the mouse to the other extreme point. When the mouse is released, Telekurs iD Chart will make all the necessary calculations and draw the lines. Please note it is not necessary that the user clicks on a specific data point as the Tirone lines will be calculated according to the axis scale and the position the mouse was released. 274 Appendix 1 User Manual Telekurs iD / Version 8.3 / 15 April 2010 9.4.8 Speed Resistance Lines Speed Resistance Lines (SRL), sometimes called 1/3-2/3 lines, are a series of trendlines that divide a price move into three equal sections. They are similar in construction and interpretation to Fibonacci Fan Lines. Speed Resistance Lines display three trendlines. The slope of each line defines a different rate at which pricing expectations are changing. Prices should find support above the 2/3 line. When prices do fall below the 2/3 line, they should quickly drop to the 1/3 line where they should then again find support. To draw Speed Resistance Lines: 1. Draw a line from a major low to a major high. 2. Draw a vertical line on the day the major high occurred. Divide this vertical line into thirds. 3. Draw lines from the major low so they intersect the vertical line at the 1/3 and 2/3 levels. These lines are depicted in the following chart: Because this is an interactive drawing feature, the user normally creates the lines by selecting the first extreme point and then dragging the mouse to the other extreme point. When the mouse is released, Telekurs iD Chart will make all the necessary calculations and draw the lines. Please note it is not necessary that the user clicks on a specific data point as the SR lines will be calculated according to the axis scale and the position the mouse was released. 9.4.9 Quadrant Lines Quadrant Lines are a series of horizontal lines that divide the highest and lowest values (usually prices) into four equal sections. Quadrant Lines are primarily intended to aid in the visual inspection of price movements. They help you see the highest, lowest, and average price during a specified period. Quadrant Lines are calculated by finding the highest-high and the lowest-low during the time period being analyzed. The top line is drawn at the highest price during the time period and the bottom line is drawn at the lowest price during the time period. The remaining three lines are then drawn so they divide the section between the highest-high and the lowest-low into four equal sections. The center line (the "mean") is usually displayed as a dotted line. A chart with quadrant lines is depicted in the following figure: User Manual Telekurs iD / Version 8.3 / 15 April 2010 Appendix 1 275 Because this is an interactive drawing feature, the user normally creates the quadrants by selecting the first extreme point and then dragging the mouse to the other extreme point. When the mouse is released, Telekurs iD Chart will make all the necessary calculations and draw the lines. Please note it is not necessary that the user clicks on a specific data point as the quadrant lines will be calculated according to the axis scale and the position the mouse was released. 9.4.10 Trend Lines Trends are often measured and identified by "trend lines." A trend line is a sloping line that is drawn between two points on a chart. Rising trends are defined by a trend line that is drawn between two or more troughs (low points) to identify price support. Falling trends are defined by trend lines that are drawn between two or more peaks (high points) to identify price resistance. One of these lines is depicted in the following chart: Because this is an interactive drawing feature, the user normally creates the lines by selecting the first extreme point and then dragging the mouse to the other extreme point. When the mouse is released, Telekurs iD Chart will make all the necessary calculations and draw the lines. Please note it is not necessary that the user clicks on a specific data point as the trend lines will be calculated according to the axis scale and the position the mouse was released. 9.5 Bibliography Terminology, definitions and additional information about formulas on Technical and Price Indicators were taken from the following books: Nison, Steven. Beyond Candlesticks. New York, NY. John Wiley Sons, Inc. 1994. ISBN 0-471-00720-X Achelis, Steven B. Technical Analysis from A to Z. New York, NY. McGraw Hill. 1995. ISBN 1-55738-816-4 276 Appendix 1 User Manual Telekurs iD / Version 8.3 / 15 April 2010 10. Appendix 2: Definitions of terms relating to analytical data from theScreener The following definitions of terms, in alphabetical order, supplement the information in section 6.17 "Analysis"). 10.1 Bad News Factor To determine the Bad News Factor we analyze a stock's declines in rising markets. In this purely objective analysis, the actual reasons for a stock's behavior are not important. If a stock price falls while its relative index goes up, it can be assumed that the stock's performance has been affected by bad news – hence the name, "Bad News Factor". How to interpret the Bad News Factor: Simply take the percentage difference (in basis points) between the rise of the index and the decline of the stock. For example, if a stock drops 2%, while during the same time period its reference index goes up 1%, the percentage difference is 3, or 300 basis points. Therefore, our Bad News Factor will be 300. In bi-weekly intervals that correspond to our updates, we track a stock's movement over the course of a standard sliding 52-week period. Each time the stock goes down while its reference index goes up, the percentage difference is calculated, absorbed into the yearly average and expressed in basis points as the Bad News Factor. As stocks rarely react in the same way the number used to calculate the average may differ from one stock to the next. For example, the number 114 would mean that during the last 12 months, each time UBS went down when the SMI went up, the average of the differences measured between the respective performances was 1.14%. Things to remember: The higher the Bad News Factor, the more a stock is sensitive to bad news. The smaller the Bad News Factor, the less the stock is sensitive to bad news, or said differently, the less investors seem to be concerned by the impact of bad news on the stock. See also illustration in section 10.2 "Bear Market Factor". 10.2 Bear Market Factor To determine the Bear Market Factor we analyze the relationship between a stock's price movements and declining markets, hence the name, "Bear Market Factor". Ultimately then, the question that concerns us is: on the average, when the market declines, how does a stock tend to react? How to interpret the Bear Market Factor: Simply take the percentage difference (in basis points) between the decline of the reference index and the performance of the stock. For example, if a stock drops 3%, while during the same time period its reference index goes down 1%, the percentage difference is 2, or 200 basis points. Therefore, our Bear Market Factor will be 200. If the decline of the stock is less than that of the index, or if the stock goes up, our indicator will be expressed in a negative number. A negative number indicates that the stock tends to show solid resistance to drops in the market. User Manual Telekurs iD / Version 8.3 / 15 April 2010 Appendix 2 277 Understanding Correlation: The closer a stock's Bear Market Factor is to zero (on either the positive or negative side), the more it will be inclined to mirror its relative index's behavior when the index goes down. In bi-weekly intervals that correspond to our updates, we track an index's movement over the course of a standard sliding 52-week period. Each time the index goes down we calculate the percentage difference between it and each one of its individual stocks. This difference is then absorbed into the yearly average and expressed in basis points as the Bear Market Factor. Things to remember: The higher the Bear Market Factor, the more a stock is likely to drop when its relative index drops. A Bear Market Factor that is strongly negative means the stock is more likely to resist losses in a declining market. 10.3 Beta 1 year in basis pts Beta measures the sensitivity of a stock relative to market movements. By definition, the market has a Beta of 1.0. To be consistent with our other indicators, the number we use to express Beta is 100, which is equivalent to the number 1.0. Stocks with a Beta greater than 100 tend to amplify the overall movements of the market. Stocks with a Beta between 0 and 100 tend to move in the same direction as the market, but not as far. The market can be considered as the portfolio of all stocks, so the "average stock" has a Beta of 100. 278 Appendix 2 User Manual Telekurs iD / Version 8.3 / 15 April 2010 10.4 Correlation Correlation is a measure of the extent to which two random variables track one another. The correlation of two random variables can range from -1 to 1. Our system measures the correlation of a stock relative to its national index. When a stock is positively correlated to its national index, it tends to appreciate or depreciate at the same time as its index. When a stock is negatively correlated to its national index, it tends to fall when its national index rises, and vice versa. Example: on October 16, 2002, UBS has a correlation of 0.92. This means that UBS is highly correlated to the SMI and tends to follow 92% of its up and down movements. 10.5 Dividend The Dividend value is colored either in black, green, blue or red, depending on the payout ratio. black colored when payout = 0 green colored when payout between 0 and 40 (0 < payout <= 40) blue colored when payout between 40 and 70 (40 < payout <= 70) red colored when payout > 70 10.6 Earnings Revision Trend The symbol ( ) implies that compared with their earnings revisions of seven weeks ago, the analysts have now raised their estimates (7wk EPS Rev > 1%); the symbol ( ) indicates that compared with their earnings revisions of seven weeks ago, the analysts have now lowered their estimates (7wk EPS Rev < -1%). When the earnings revisions (7wk EPS Rev) fall between +1% and -1%, the trend is considered to be neutral ( ). The symbol ( ) indicates that the revisions previous to the neutral situation were positive. The symbol ( ) indicates that the revisions previous to the neutral situation were negative. User Manual Telekurs iD / Version 8.3 / 15 April 2010 Appendix 2 279 10.7 Group The 4,500 stocks in theScreener.com's database are divided into 18 internationally recognized standard industry groups: 10.8 AUT Automobiles BAN Banks BAM Basic Materials CHE Chemicals CON Construction CYC Cyclical Consumer ENE Energy FSV Financial Diversified FOB Food & Beverage HEA Health Care IND Industrial INS Insurance MED Media NCY Non Cyclical Consumer RET Retail TEC Technology TEL Telecom UTI Utilities Growth to PE Ratio It is the basis of our Valuation Rating. This is the estimated growth of future earnings (Long Term Growth) plus dividend in %, divided by the estimated future PE ratio (Long Term P/E). Our G/PE Ratio measure is an index figure that compares firms on whether their stock is relatively "expensive" or "inexpensive" according to their potential earnings growth. We focus our attention on G/PE Ratio measures generally between 0.9 and 1.6, as this range of the index is most likely to include firms that will outperform their peers. A G/PE Ratio measure below 0.9 indicates that investors must pay a premium for the estimated growth potential; thus, the stock is relatively risky. 10.9 Long Term Growth This is the estimated annual growth rate of future earnings, normally projected over the next two to three years, and expressed as a percentage. Our Long Term Growth measure is averaged over at least three different estimates obtained from banks, brokers, or analysts. A figure of 18 means that for the next two to three years, the growth in company earnings is evaluated at an average of 18% per year. Caution: Be skeptical of high long-term growth projections that differ greatly from growth rates of associated national market indexes or industry groups. These can often result from very low earnings for the most recent few years, thereby making a firm's projected earnings growth appear very strong by comparison with the lean years. To verify this information the aggregate analysis and world indexes functions can be very helpful. 280 Appendix 2 User Manual Telekurs iD / Version 8.3 / 15 April 2010 10.10 Long Term P/E It is the PE ratio calculated on the basis of estimates of long-term earnings. 10.11 Market Capitalization in $bn This number is calculated by multiplying a firm's share price by the number of outstanding shares. 10.12 Medium Term Technical Trend In order to offer a little more security in the selection of stocks, we have added a technical rating that we call a "Trend Follower". This is by no means a tool for detecting reversals in tendencies, but is simply a measure of the persistence of a given tendency. The column MT Tech Trend indicates the current tendency, positive ( ) or negative ( ), and the column Technical Reverse indicates to which price this tendency is valid. When a price falls between 1.75% above or below the Tech Reverse, the MT Tech Trend is considered neutral ( ). Once the price breaks out of the +1.75% neutral zone, the MT Tech Trend will change to positive or negative depending on the movement. The symbol ( ) indicates that the MT Tech Trend previous to the neutral situation was positive. The symbol ( ) indicates that the MT Tech Trend previous to the neutral situation was negative. The MT Tech Trend can be thought of this way: if it is positive it indicates that the market currently "likes" (or, is buying) the stock. If it is negative it indicates that the market currently "does not like" (or, is selling) the stock. 10.13 Risk Zone Risk zones are determined by measuring the Bear Market Factor and the Bad News Factor against the world reference. A stock will appear on the risk map as a single point created by plotting its Bear Market Factor on the Y axis and its Bad News Factor on the X axis. There are three types of risk zones: A low-risk zone is the area where the points are plotted on coordinates lower than the average point of the world reference. User Manual Telekurs iD / Version 8.3 / 15 April 2010 Appendix 2 281 A medium-risk zone is the area where the points are plotted on coordinates higher than the average point of the world reference, but lower than the point whose coordinates are calculated by adding one standard deviation in both directions. A high-risk zone is the area where the points are plotted on coordinates higher than the point whose coordinates are calculated by adding one standard deviation in both directions to the average point of the world reference. 10.14 Stars In this easy-to-use rating system, stars are earned for each element specified below: Earnings Revision Trend = Valuation Rating , Medium Term Technical Trend = 4wk Rel Perf , = > 1% = Therefore, a stock can earn a maximum of four stars. The lowest rating a stock can have is no stars. Note For each category, once a stock has earned its star it will keep it until: 10.15 Earnings Revision Trend The arrow turns red ( ) Valuation Rating The arrow turns red ( Medium Term Technical Trend The arrow turns red ( ) 4wk Rel Perf Drops below -1% (< -1%). or ) Technical Reverse This is the price at which we project the momentum to reverse. When a stock's price crosses over its technical reversal point, it can be an early signal for a potential buy or sell. 282 Appendix 2 User Manual Telekurs iD / Version 8.3 / 15 April 2010 10.16 Timing / Trading Opportunities For an individual stock to qualify as a trading opportunity, it must meet the criteria of theScreener's Trend Oscillator. Timing and risk Using timing can certainly lead to very profitable trades, however the "risk / reward" rule holds especially true here. Since trading opportunities often last for only a very short time, and by definition involve stocks that are "on the move", you should be particularly vigilant when trading these stocks. 10.17 Valuation Rating Our Valuation Rating indicates if a stock is selling at a relative premium or bargain price, based on its growth potential. To estimate a stock's value relative to its current price our Valuation Rating combines: stock price; projected earnings; projected earnings growth; dividends. By combining these elements we can establish a rating for the analyzed company. There are five ratings, ranging from strongly undervalued ( ) to strongly overvalued ( ). = strongly undervalued (more than 15 %) = undervalued (more than 5 %) = correctly valued (less than 5 % difference between projected value and current price) = overvalued (more than 5 %) = strongly overvalued (more than 15 %) When we analyze a company's projected earnings growth, we place a certain emphasis on the G/PE Ratio. While the first two elements in our analysis are important, and fairly simple to understand (stock price and earnings), the G/PE Ratio merits further explanation. Some analysts watch the PE (Price Earnings ratio) – the ratio of stock price divided by earnings per share. In general, this ratio is fairly linear: a low PE suggests an inexpensive/low-risk stock, while a high PE suggests an expensive/high-risk stock. In our model, the concepts of expensive/inexpensive do not depend on the PE, but on the relation between the PE and growth. Multifactor analysis has showed that the estimated growth of earnings provides the best base for the evaluation of a stock. There is approximately a 60% correlation of estimated earnings growth to stock value. Our Growth to PE Ratio quickly evaluates a company and detects firms that offer the greatest relative potential for the future and are therefore, the most undervalued. Correspondingly, our Growth to PE Ratio also detects firms that offer the least relative potential for the future and are thus, the most overvalued. Our Growth to PE Ratio measure conveniently compares two stocks at a glance. Our growth projections are always based on an average of at least three estimates. The moment an investor buys a stock, the stock's present situation becomes the past, and the success of the investment depends fully on the future. The Corporate focuses on the future in order to establish a true Valuation Rating. User Manual Telekurs iD / Version 8.3 / 15 April 2010 Appendix 2 283 10.18 Volatility The volatility of a stock is its degree of random variability. A stock, which fluctuates widely over time, has high volatility. One, which is stable, has low volatility. Both short-term (1 month) and long-term (12 months) stock volatility figures are indicated. 10.19 4wk Rel Perf This figure measures the performance of a stock relative to its national index (compared to four weeks ago). For example, a grade of 2 for a given stock would mean that this stock performed 2% better than its national index. On the contrary, a grade of -3 would indicate a performance of 3% under the index. We have chosen not to show the absolute performance, since the index remains the valid benchmark. For a given stock, figures that show an absolute gain of 2% in a market that also gained 2% do not represent any remarkable information. However, a stock that consistently beats its national index is clearly one sought after by investors. A chronic under-performance, of course, would indicate serious problems. In fact, we use 4 week Relative Performance compared to Earnings Revision Trend. A positive Earnings Revision Trend for a stock that does not show a positive 4 week Relative Performance rating should force the investor to question the pertinence of this revision. In the other direction, a stock with a negative Earnings Rev Trend that stills beats its index (4wk Rel Perf > 0) means that something special is happening with this stock, since investors are still buying it. 10.20 7wk EPS Rev This is an abbreviation for 7 week Earnings Per Share Revision. This column concerns the value of these revised earnings. A figure of 2.8 implies that the analysts, compared with seven weeks ago, have now revised and raised their estimates by 2.8%. On the contrary, a negative number means that the earnings were revised at a lower estimate. 284 Appendix 2 User Manual Telekurs iD / Version 8.3 / 15 April 2010 11. Index Accumulation/Distribution Indicator....................255 Adjust jumps in share prices ..............................122 All Sources ...........................................................94 Limiting and/or grouping the display.................95 Save settings ....................................................97 Settings.............................................................96 Analysis ..............................................................152 Company Profiles ...........................................162 Eco Fact..........................................................164 FactSet ...........................................................153 GPRV......................................................148, 165 Hoppenstedt ...................................................163 Infinancials......................................................148 News...............................................................163 theScreener ............................................148, 157 Zacks ......................................................148, 166 Analysis News ....................................................163 Analytical charts .................................................238 Analytical data 4 week Relative Performance.........................284 7 week Earnings Per Share Revision.............284 Bad News Factor ............................................277 Bear Market Factor.........................................277 Beta ................................................................278 Correlation ......................................................279 Dividend..........................................................279 Earnings Revision Trend ................................279 Group..............................................................280 Growth to PE Ratio.........................................280 Long Term Growth..........................................280 Long Term P/E................................................281 Market Capitalization ......................................281 Medium Term Technical Trend.......................281 Risk Zone........................................................281 Stars ...............................................................282 Technical Reverse..........................................282 Timing / Trading Opportunities .......................283 Valuation Rating .............................................283 Volatility ..........................................................284 Analytical data from theScreener .......................158 Analytical report from theScreener.....................160 Ask prices.............................................................88 Assumed knowledge ..............................................8 Auxiliary functions ..............................................211 Average True Range..........................................263 Bad News Factor................................................277 Bar diagram........................................................105 Basic configuration for all packages.....................11 Basic Data & Events ..........................................147 User Manual Telekurs iD / Version 8.3 / 15 April 2010 Analysis .......................................................... 152 Companies ..................................................... 150 Company Details ............................................ 150 Corporate Actions........................................... 147 Custom Page.................................................. 152 Dividends Overview ....................................... 147 Documents ..................................................... 147 Financial instruments ..................................... 149 Identification Directory.................................... 147 Instrument Details .......................................... 147 Instrument Summary...................................... 149 Markets........................................................... 147 Navigation ...................................................... 149 Trading centres .............................................. 151 Basics .................................................................. 18 Bear Market Factor ............................................ 277 Benefits of using Telekurs iD ............................... 13 Bibliography ....................................................... 276 Bid prices ............................................................. 88 Bollinger Bands.................................................. 246 Bond Calculator ................................................. 223 Bond Liquidity and Spreads ........................... 230 Bond Simulator............................................... 234 Total Price Calculator..................................... 228 Total Return Calculator .................................. 227 Yield and Price Calculator.............................. 226 Box for information and alert messages .............. 18 Calculating the fair option price ......................... 216 Calculating the implied volatility......................... 216 Calendar function................................................. 57 Calling up financial data....................................... 43 Calling up viewer.................................................. 45 Calls ..................................................................... 98 Candlestick diagram .......................................... 105 Chaikin Oscillator ............................................... 255 Chaikin's Volatility .............................................. 258 Chaining............................................................... 98 Limit display.................................................... 100 Select type of derivative instruments ............... 99 Change data field combination ............................ 64 Chart .................................................................. 103 Absolute view ................................................. 117 Conflation ....................................................... 121 Copy charts into other applications ................ 131 Currency conversion ...................................... 123 Defining basic chart settings .......................... 131 Direct selection buttons.................................. 118 Display events ................................................ 123 Display or adjust jumps in share prices ......... 122 Index 285 Drawing features ............................................270 Enhance chart view with drawing features .....128 Intraday...........................................................117 Intraday update status ....................................119 Normalised view .............................................117 Saving and reapplying chart settings .............130 Selecting the data intervals ............................120 Selecting the day for the Intraday chart..........120 Set and display price indicators......................124 Set and display technical indicators ...............125 Set and show comparisons ............................116 Set axis properties..........................................111 Set cursor properties ......................................114 Set diagram type ............................................104 Set display colors ...........................................109 Set gridline properties.....................................107 Set period .......................................................117 Setting the curve resolution ............................121 Setting the logarithmic price scale..................115 Styles ..............................................................130 Turn display areas on and off .........................113 Using interactive drawing features .................127 Zoom...............................................................119 Closing Telekurs iD ..............................................17 Colors ...................................................................19 Column Add ...................................................................65 Change width....................................................71 Inserting advanced quotes field........................69 Inserting bar charts...........................................70 Move .................................................................64 Remove ............................................................64 Command line ................................................18, 26 Comment list items...............................................71 Commodity Channel Index.................................260 Commodity Option Calculator ............................221 Company analysis ..............................................166 Company Details ................................................150 Company Profiles ...............................................162 Compile a new list ................................................61 Conditions of use....................................................8 Context .................................................................21 Contributors........................................................143 Contributors pages from SIX Telekurs France...144 Copyright ................................................................2 Corporate Actions...............................................147 Country List ....................................................................20 Screen ..............................................................23 Style..................................................................63 Viewer...............................................................22 Create a new portfolio ..........................................80 286 Index Currency conversion .......................................... 123 Currency Option Calculator ............................... 219 Custom Page ..................................................... 152 Customer List.................................................................... 20 Screen .............................................................. 23 Style ................................................................. 63 Viewer .............................................................. 22 Data Export ............................................................... 52 Import ............................................................... 55 Data exchange via DDE ...................................... 50 Data exchange via FinXL..................................... 51 Date input with calendar function......................... 57 DDE (Dynamic Data Exchange) .......................... 50 Definitions of terms relating to analytical data from theScreener.................................................... 277 Deleting objects ............................................. 47, 49 Details of sales..................................................... 88 Detrended Price Oscillator................................. 257 Direct access ....................................................... 26 Display current prices in the ticker....................... 84 Display document .............................................. 208 Display events.................................................... 123 Display news headlines in the ticker.................... 85 Display news story ............................................. 206 Display or adjust jumps in share prices ............. 122 Displaying news items about particular companies ........................................................................ 207 Dividend Adjustment.......................................... 122 Dividend yield..................................................... 159 Dividends Overview ........................................... 147 Documents relating to instruments .................... 147 Domicile-dependent data and functions .............. 13 Double-clicking..................................................... 42 Drag & Drop ......................................................... 41 Drawing features................................................ 270 Fibonacci Arcs................................................ 271 Fibonacci Fan................................................. 271 Fibonacci Retracements ................................ 272 Fibonacci Time Zones.................................... 272 Gann Fan ....................................................... 270 Mean Tirone Levels........................................ 274 Midpoint Tirone Levels ................................... 273 Quadrant Lines............................................... 275 Speed Resistance Lines ................................ 275 Trend Lines .................................................... 276 Dynamic Data Exchange ............................... 50, 51 Earnings revisions trends .................................. 158 Ease of Movement ............................................. 260 Eco Fact............................................................. 164 Entitlements ....................................................... 212 User Manual Telekurs iD / Version 8.3 / 15 April 2010 Envelopes...........................................................247 Error messages ..................................................213 Even out jumps in share prices ..................135, 136 Events ................................................................147 Exchange rates ..................................................145 Exponential Moving Average .............................244 Exporting Data ..................................................................52 References .......................................................53 FactSet ...............................................................153 Estimates ........................................................153 Fundamental...................................................155 Fair option price..................................................216 Fair Value Pricing Service..................................168 Favorites...............................................................24 Delete ...............................................................25 Import................................................................25 Rename ............................................................25 Fibonacci Arcs.................................................................271 Fan..................................................................271 Retracements .................................................272 Time Zones.....................................................272 Filled diagram.....................................................105 FinXL ....................................................................51 Font and font size setting .....................................39 Forex ..................................................................145 Free text fieldsin lists and portfolios .....................71 Futures .................................................................98 Gann Fan ...........................................................270 General functions .................................................30 General shortcuts .................................................27 Global List ....................................................................20 Screen ..............................................................23 Style..................................................................63 Viewer...............................................................21 GPRV .........................................................148, 165 Heatmap...............................................................83 Help Desk SIX Telekurs .........................................2 Hoppenstedt .......................................................163 ICB sector code..................................................182 Implied volatility ..................................................216 Importing data ......................................................55 Index Option Calculator......................................217 Industry Classification Benchmark (ICB) ...........182 Infinancials .........................................................148 Quick Tour ......................................................148 Info/Alert box ........................................................29 Information about this user manual........................2 Information on the Telekurs iD application.........212 Installation ..............................................................8 User Manual Telekurs iD / Version 8.3 / 15 April 2010 Instrument Details .............................................. 147 Instrument Summary.......................................... 149 Instrument-related key figures ............................. 89 Intraday Chart .................................................... 117 Kagi chart...................................................106, 241 Key figures ........................................................... 89 Keyboard commands ........................................... 19 Keywords (search criteria) ................................. 203 Lanes Stochastics %D %K Oscillator ............... 257 Limit the search results ...................................... 199 Limits.................................................................. 137 Notifications.................................................... 140 Set new limits ................................................. 138 Working with limits.......................................... 139 Line diagram ...................................................... 105 Link objects .......................................................... 49 List........................................................................ 58 Add column ...................................................... 65 Adding lists to Favorites or to Top Favorites.... 73 Allocating a style .............................................. 63 Change an existing list ..................................... 62 Change column width....................................... 71 Change data field combination......................... 64 Change list structure ........................................ 63 Comment list items........................................... 71 Compile a new list ............................................ 61 Displaying lists in the original language ........... 74 Free text fields.................................................. 71 Inserting column with advanced quotes field ... 69 Inserting columns with bar charts..................... 70 Loading several lists in a viewer ...................... 73 Move column .................................................... 64 Open................................................................. 61 Remove column ............................................... 64 Revert style ...................................................... 70 Select list items ................................................ 72 Sort................................................................... 71 List type Country List ...................................................... 20 Customer List ................................................... 20 Global List ........................................................ 20 User List ........................................................... 20 Lists...................................................................... 20 Loading several lists in a viewer .......................... 73 Login .................................................................... 14 Main functions...................................................... 58 Main window ........................................................ 18 Market capitalisation .......................................... 158 Market Search.................................................... 198 Markets .............................................................. 147 Mass Index......................................................... 265 Maximise and restore tabbed pages.................... 46 Index 287 Mean Tirone Levels............................................274 Median Price ......................................................247 Medium-term technical trend..............................159 Menu bar ..............................................................18 Midpoint Tirone Levels .......................................273 Momentum .........................................................269 Money Flow Index ..............................................251 Moving Average Convergence/Divergence .......261 Multiple Column List.............................................75 Multiple Tabbed Lists ...........................................73 My Index List ........................................................76 National currencies ............................................201 Navigation in Basic Data & Events viewer .........149 Negative Volume Index ......................................252 New features in Telekurs iD Version 8.3................8 News ..................................................................203 Company news ...............................................207 Display document ...........................................208 Display latest news.........................................207 Limit news items .............................................209 Save settings ..................................................210 Settings...........................................................209 News filter...........................................................204 News Search ......................................................203 Search criteria.................................................203 News symbol ................................... 58, 79, 94, 157 NSIN.............................................................89, 147 Object linking........................................................49 On Balance Volume ...........................................254 Online help .......................................................8, 57 Open Screen ..............................................................45 Viewer.........................................................22, 45 Open an existing screen ......................................45 Open-High-Low-Close diagram..........................105 Option Calculator................................................214 Options .................................................................98 Packages..............................................................10 Package-specific data and functions....................12 Password change.................................................16 Performance.......................................................266 Permissions........................................................212 Personal shortcuts................................................28 Point & Figure chart ...................................106, 239 Portfolio ................................................................79 Change an existing portfolio .............................82 Create a new portfolio ......................................80 Edit a portfolio entry..........................................81 Positive Volume Index........................................253 Price and Volume Trend ....................................252 Price indicators...................................................243 Bollinger Bands...............................................246 288 Index Envelopes....................................................... 247 Exponential Moving Average ......................... 244 Median Price .................................................. 247 Simple Moving Average ................................. 243 Triangular Moving Average ............................ 245 Typical Price................................................... 248 Weighted Close .............................................. 249 Weighted Moving Average ............................. 245 Price Rate of Change ........................................ 267 Print contents of window...................................... 40 Program version................................................. 212 Purpose of this user manual .................................. 8 Puts ...................................................................... 98 Quadrant Lines .................................................. 275 Quick Search ..................................................... 170 Companies ..................................................... 174 Financial instruments ..................................... 173 Information about trading places.................... 175 News .............................................................. 176 Quote information........................................... 172 Quick Tour Infinancials ...................................... 148 Quote Overview ................................................... 93 Quotes ................................................................. 86 Rate of Change Percentual ............................... 268 Red news items ................................................. 205 Relative Strength Index ..................................... 262 Renko chart................................................106, 240 Reputational Risk Index (RRI) ........................... 164 Requesting Help .................................................. 17 Risk zones ......................................................... 159 RRI..................................................................... 164 Save Chart settings ................................................. 130 Settings for limiting and grouping..................... 97 Settings made for news search...................... 210 Style ................................................................. 70 User-specific objects ........................................ 47 Saving and deleting objects................................. 47 Screen handling ................................................... 44 Screens................................................................ 23 Search Extended ............................................... 178 Bonds ............................................................. 183 Companies ..................................................... 194 Corporate actions ........................................... 195 Currency......................................................... 181 Derivative instruments.................................... 186 Domicile.......................................................... 181 Equities........................................................... 180 Funds ............................................................. 190 Issue calendar ................................................ 197 Markets...................................................180, 196 National currencies ........................................ 201 User Manual Telekurs iD / Version 8.3 / 15 April 2010 New instruments/listings.................................193 News...............................................................196 Other instruments ...........................................192 Sector code.....................................................182 Sort Results ....................................................178 Status......................................................178, 179 Structured products ........................................187 Search functions.................................................170 Select list items ....................................................72 Select type of derivative instruments ...................99 Selecting the data intervals ................................120 Selecting the day for the Intraday chart .............120 Selection area ......................................................18 Context .............................................................21 Favorites ...........................................................24 Lists ..................................................................20 Screens.............................................................23 Set and display price indicators .........................124 Set and display technical indicators ...................125 Set and show comparisons ................................116 Set axis properties .............................................111 Set cursor properties..........................................114 Set diagram type ................................................104 Set display colors ...............................................109 Set gridline properties ........................................107 Set new limits .....................................................138 Set period ...........................................................117 Set time zone .......................................................31 Setting the curve resolution................................121 Setting the logarithmic price scale .....................115 Share analysis....................................................152 Shortcuts ..............................................................26 Significance of the colors .....................................19 Simple Moving Average .....................................243 Single Quote.........................................................86 Defining settings ...............................................92 Select the display option...................................87 Sort list .................................................................71 Speed Resistance Lines ....................................275 Standard Deviation.............................................263 Stars ...........................................................158, 282 Starting .................................................................14 Startup screen definition ......................................45 Stock exchange delay ..........................................58 Style Allocation ..........................................................63 Revert ...............................................................70 Save..................................................................70 Summary of shortcuts ..........................................26 Summary Telekurs iD...........................................10 Switching title bars of viewers on and off.............45 Symbols................................................................89 User Manual Telekurs iD / Version 8.3 / 15 April 2010 System events ................................................... 212 System Messages.............................................. 213 Table of contents ................................................... 3 Tables ................................................................ 211 Technical indicators ........................................... 250 Accumulation/Distribution Indicator................ 255 Average True Range...................................... 263 Chaikin Oscillator ........................................... 255 Chaikin's Volatility .......................................... 258 Commodity Channel Index............................. 260 Detrended Price Oscillator ............................. 257 Ease of Movement ......................................... 260 Lanes Stochastics %D %K Oscillator............ 257 Mass Index ..................................................... 265 Momentum ..................................................... 269 Money Flow Index .......................................... 251 Moving Average Convergence/Divergence ... 261 Negative Volume Index .................................. 252 On Balance Volume ....................................... 254 Performance................................................... 266 Positive Volume Index.................................... 253 Price and Volume Trend ................................ 252 Price Rate of Change..................................... 267 Rate of Change Percentual............................ 268 Relative Strength Index.................................. 262 Standard Deviation......................................... 263 TRIX ............................................................... 264 Vertical Horizontal Filter ................................. 266 Volume ........................................................... 251 Volume Oscillator ........................................... 256 Williams %R ................................................... 259 Technical trend .................................................. 159 theScreener ...............................................148, 157 Three-Line Break chart ..............................106, 242 Ticker ................................................................... 84 Change background color ................................ 85 Display current prices....................................... 84 Display news headlines.................................... 85 Running speed ................................................. 84 Time Series........................................................ 132 5min Snapshot ............................................... 134 History ............................................................ 135 Intraday .......................................................... 132 Summary ........................................................ 136 Time zone setting................................................. 31 Title bar ................................................................ 18 TK sector code................................................... 182 Tools .................................................................. 214 Tooltips ................................................................ 42 Top favorites toolbar ...................................... 18, 29 Trademarks............................................................ 2 Trading Place Details......................................... 151 Index 289 Trading volume.....................................................88 Trend Lines ........................................................276 Triangular Moving Average ................................245 TRIX ...................................................................264 Turn display areas on and off.............................113 Type of screen Country Screen.................................................23 Customer Screen..............................................23 Global Screen ...................................................23 User Screen......................................................23 Type of style Country Style ....................................................63 Customer Style .................................................63 Global Style ......................................................63 User Style .........................................................63 Type of viewer Country Viewer .................................................22 Customer Viewer ..............................................22 Global Viewer ...................................................21 User Viewer ......................................................22 Typical Price.......................................................248 Update status Intraday .......................................119 User List ....................................................................20 Screen ..............................................................23 Style..................................................................63 Viewer...............................................................22 User preferences..................................................30 Display Preferences .........................................32 Export/import path ............................................37 Extended Search Preferences..........................35 General .............................................................31 Other Configurations ........................................36 Printer Page Settings........................................37 Time zone .........................................................31 Using interactive drawing features .....................127 Valuation rating ..................................................158 Vertical Horizontal Filter .....................................266 290 Index Viewer About .............................................................. 212 All Sources ....................................................... 94 Analyse........................................................... 152 Basic Data & Events ...................................... 147 Chaining ........................................................... 98 Chart............................................................... 103 Contributors.................................................... 143 Forex .............................................................. 145 Heatmap........................................................... 83 Limits .............................................................. 137 List.................................................................... 58 Market Search ................................................ 198 Multiple Column List......................................... 75 Multiple Tabbed Lists ....................................... 73 My Index List .................................................... 76 News Search .................................................. 203 News Story ..................................................... 206 Portfolio ............................................................ 79 Quote Overview................................................ 93 Quotes.............................................................. 86 Search Extended............................................ 178 Single Quote..................................................... 86 System Messages .......................................... 213 Tables............................................................. 211 Ticker................................................................ 84 Time Series .................................................... 132 Watchdog ....................................................... 141 Volume............................................................... 251 Volume Oscillator............................................... 256 Warrants .............................................................. 98 Watchdog........................................................... 141 Weighted Close.................................................. 249 Weighted Moving Average................................. 245 Williams %R....................................................... 259 Working with screens........................................... 44 Yield Curves....................................................... 167 Zacks .........................................................148, 166 User Manual Telekurs iD / Version 8.3 / 15 April 2010