1
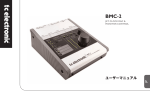
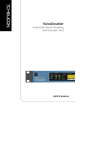
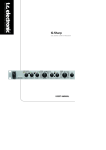
BMC-2
JET CLOCK DAC &
MONITOR CONTROL
USER’S MANUAL
INTRODUCTION
APPENDIX
Table of Contents . . . . . . . . . . . . . . . . . . . . . . . . . . . .3
Introduction . . . . . . . . . . . . . . . . . . . . . . . . . . . . . . . .4
BMC-2 and Jitter Rejection . . . . . . . . . . . . . . . . . . .14
BMC-2 Design Philosophy . . . . . . . . . . . . . . . . . . . .15
Wiring Diagrams . . . . . . . . . . . . . . . . . . . . . . . . . . . .16
Calibrated Listening . . . . . . . . . . . . . . . . . . . . . . . . .18
Technical Specifications . . . . . . . . . . . . . . . . . . . . . .19
SETUP EXAMPLES
Setup Example . . . . . . . . . . . . . . . . . . . . . . . . . . . . . .5
EN
TABLE OF CONTENTS
OPERATION
Overview – Rear Panel . . . . . . . . . . . . . . . . . . . . . . .6
Overview – Top . . . . . . . . . . . . . . . . . . . . . . . . . . . . .7
Operation . . . . . . . . . . . . . . . . . . . . . . . . . . . . . . . . . .8
TC Electronic, Sindalsvej 34, DK-8240 Risskov – [email protected]
English Version
Manual revision 1.0 – SW – V 1.0
Prod No: E60516011
3
INTRODUCTION
BMC-2 is a dedicated Digital-to-Analog Converter and high
quality “hands-on” Monitor Control that’s an ideal solution
for you, whatever your audio production or monitoring
setup – be it digital or analog.
We at TC Electronic realize that predictable speaker and
headphone control is an important part of your production
process, and with BMC-2 such luxury is always available
to you – regardless of the state of the computer at the
heart of your system.
This handy self-contained desktop unit can be operated
without a Mac or PC, offering you instant and practical
control of sound levels. As well as controlling the listening
level, BMC-2 allows you to switch between three digital
input sources – S/PDIF/AES3, TOS and ADAT –, and
confirm if those inputs are synchronous or not. BMC-2
drives one set of analog speakers, one set of digital
speakers and a set of headphones. Calibrated listening is
available with both sets of speakers and the headphone
output.
But it’s not all about DAC and Level Control – BMC-2 also
puts user-definable reference levels at your fingertips. You
simply hit the front panel-mounted REF button, and BMC-2
4
will attenuate the output to a user-defined sound pressure
level, so reference level monitoring is always just a single
button-press away.
BMC-2 precision re-clocks all inputs, and features high
performance jitter rejection based on patented JET
technology that was originally developed for our flagship
System 6000. You get all the benefits of optical interfacing
without the problems – asymmetries are corrected and
jitter is completely removed from the equation.
The analog outputs offer wide dynamic range on XLR
connectors. Peak level metering and Integrity Check – or
“iCheck” – is also available on the selected input. iCheck
reveals if the signal is spatially compromised, e.g. because
of data reduction, such as MP3 or AAC encoded at too low
a bit rate.
BMC-2 is a self-contained desktop unit that works right out
of the box with no need for a computer for setup. It
interfaces directly with all new Macs and most PCs used
for audio production – just attach the supplied 12V DC
power adapter.
EN
SETUP EXAMPLE
5
OVERVIEW – REAR PANEL
6
Power In
Analog Outputs
SPDIF I/O
Use the supplied 12V DC
power supply.
Balanced analog outputs for
active monitors, amplifier or mixer.
24 Bit SPDIF/AES3-id input and output on
RCA connectors.
Phones
TOS & ADAT
1/4" jack connection for headphones.
Lightpipe inputs and outputs on standard TOSLINK connectors
(TOS: Channels 1-2 – ADAT: Channels 1-4).
EN
OVERVIEW – TOP
7
OPERATION
1 – Rotary Control
The Rotary Knob is always active, unless Ref Level or
Cut is enabled. The “Valid” LED and the dot in the
knob itself are lit when it is active.
The markings on the panel around the knob follow half
hour readings on a clock. According to these markings
the control has the following defined gain distribution:
Min:
Off
1st step:
-72 dB
9 o’clock:
-42 dB
(from here, each half hour
division equals 4 dB)
12 o’clock:
-18 dB
(from here, each half hour
division equals 3 dB)
3 o’clock:
0 dB
Max:
+12 dB
Every pot has a slightly different transfer function, so
the above numbers are guidelines only. A more precise
way of knowing the gain is to check the LED dot on the
8
knob, which briefly blinks at each 6 dB increment. This
blinking occurs when the gain is within +- 0.2 dB of a 6
dB increment.
To ensure a bit-transparent 0 dB setting (at 3
o’clock), the control “snaps” to 0.0 dB in a
slightly larger area around the 0 dB point.
Unless the ALT button is enabled, the Rotary Knob
controls the analog L/R monitor outputs. With ALT
selected, the analog outputs are muted, and the Rotary
Knob sets the output level of the digital output
assigned to ALT (see also section “7 – ALT”).
Per default, ALT uses the SPDIF/AES3 output.
2 – INPUT SELECT Buttons
The INPUT selectors determine which input source is
fed to the speakers, phones, coax S/PDIF, TOS and
ADAT outputs of the BMC-2.
When switching between synchronous input sources,
BMC-2 performs the operation as a cross-fade without
OPERATION
Note that input sample rates may well be identical
without being synchronous. BMC-2 constantly monitors
and indicates if inputs are synchronous to the one
currently selected. When the LOCK LEDs are lit
steadily, this indicates that the input signals are
synchronous. When the LOCK LEDs blink, this means
inputs are not synchronous.
Any selected input format is passed bit-transparently to
all digital outputs with the exception of the output that
is assigned to ALT.
3 – INPUT STATUS LEDs
The LEDs in the left column indicate that a signal is
recognized. The LEDs in the right column indicate that
an audio signal is present on that particular input.
Signal recognized
Signal present
4 – ADAT SEL Button
This button has two functions.
Selecting ADAT Channel Pairs:
Press the ADAT button briefly to switch between ADAT
channel pairs 1-2 and 3-4 (Channel pairs 5-6 and 7-8
are not available).
9
EN
muting. In case the input sources are not synchronous,
or even at different sample rates, a small period of
muting can be expected during switching.
OPERATION
Selecting ADAT Sample Rate:
As ADAT double sample rate format is not detected
automatically, you must select this manually if required.
Press and hold the ADAT button for approximately 3
seconds to select double sample rate (88.2 or 96 kHz).
When double sample rate is selected, the yellow “x2”
LED is lit.
5 – CLOCK STATUS LEDs
The CLOCK STATUS LEDs indicate the sample rate of
the currently selected input. When the yellow “x2” LED
(double sample rate) is lit, the “44.1” LED represents
88.2 kHz and the 48 LED represents 96 kHz.
6 – REF Button
Calibrated level listening makes it easy to move from
studio to studio, avoiding accidental “squashing” of the
mix in a misguided search for extra loudness.
Furthermore, Calibration makes the spectral balance of
10
a mix more predictable (because we aim at different
spectral targets when reproduction level changes).
Calibration is typically performed using pink noise at a
defined level, e.g. -20 dBFS RMS. With an SPL meter
reading slow C weighted, set the level at your listening
position to a certain SPL per speaker. Typical values
would be between 70 and 85 dB SPL, depending on
the application.
The REF button removes the Rotary Control <1> from
the speaker signal-path, and assigns a preset gain
(SPL calibrated speakers) to the analog speakers and
the speakers assigned to ALT.
When you press REF, the meters momentarily show
the preset gain assigned to speakers (L) and
headphones (R) before resuming normal operation.
To calibrate analog speakers and headphones:
– With REF disengaged (LED unlit), set the desired
level using the Rotary knob and the headphone
level control.
–
Press and hold the REF button for five seconds
until the meters blink. Do not release the REF
button until the meters are lit steadily again.
If you prefer, you can also program the DIM function to
be activated once the REF button is pressed.
Assigning ALT to a digital output of your choice:
– First disengage ALT. ALT is disengaged when the
ALT button’s LED is not lit.
– Now select the digital output format you would like
to assign ALT to by pressing the SPDIF, ADAT or
TOS button in the “Input Select” section.
The factory default setting for REF preset gain is -18 dB.
You can calibrate both sets of speakers
independently, but headphones calibration
occurs every time a new REF level is set.
7 – ALT Button
ALT stands for “Alternative Monitors”. The ALT function
allows you to cross-fade analog speaker outputs and
ALT outputs (the default ALT output is SPDIF/AES3).
Per default, the ALT function is assigned to the
SPDIF/AES3 out. However, you can choose to assign
it to ADAT or TOS instead, using the method described
below.
–
After selecting the desired input, press and hold
ALT.
At first, the format previously assigned to ALT is lit.
After approximately five seconds, the newly
assigned format will blink. Do not release the ALT
button until the LED is lit steadily again.
The new output set is now assigned to the ALT
function.
11
EN
OPERATION
OPERATION
To calibrate levels for the ALT speakers:
– Press the ALT button.
- With REF disengaged (LED unlit), set the desired
level using the Rotary knob and the headphone
level control.
– Press and hold the REF button for approximately
five seconds until the meters flash. Once the meters
are lit steady again, the new level has been set.
10 – PHONES Knob
Please refer to section “6 – REF” for additional
information on calibration.
Pressing this button toggles between Stereo, Mono
and Side monitoring. From a signal-flow point of view,
both operations happen after the speaker gain control.
8 – DIM Button
The DIM button toggles an 18 dB attenuation in the
analog and digital speaker signal paths. This function
extends the dynamic range and lowers distortion for
the analog outputs.
9 – CUT / POWER OFF Button
Pressing this button mutes the speaker outputs (but
not the phones). Hold CUT for more than three
seconds to power off the unit.
12
The PHONES knob controls the headphone output,
unless BMC-2 is in Ref mode. When Ref mode is
pressed, speaker and headphone outputs operate at
calibrated level rather than the level set by the Speaker
and Phones pot.
11 – STEREO/MONO/SIDE Toggle Button
The unit always powers up in Stereo mode,
regardless of the mode selected when it was
shut off.
Monitoring the side component only is
especially interesting when comparing a data
reduced format – such as MP3 or AAC – to a
linear signal, or to a data reduced signal at a
different bit rate.
12 – VALID LED
When the VALID LED is lit, the big volume Rotary
Control is in the signal path. When it is not lit, you are
listening at REF level (see “6 – REF Button” for more
information).
13 – METERS
The Level Meters show the precise sample peak level
of the input selected without any gain changes.
If Mono or Side monitoring is selected, the left LED bar
shows the Mono component, while the right LED bar
shows the Side component.
(Both speakers, however, reproduce either Mono or
Side, depending on the setting).
As BMC-2 handles digital input signals only and subsequently cannot be above 0 dBFS, the O/L indicators
cannot be triggered by the input signal. If they do light
up, it is due to an internal overload.
Internal overload can occur when a high input level is
present and the Rotary Control Knob or the
Headphones control is set above 0 dB (“3 o’clock”
position) at the same time.
If the O/L indicators are lit, reduce the Rotary volume
control or the Headphones control accordingly.
External Metering:
When using an external loudness or level meter
in connection with BMC-2, it is essential that the
big ROTARY CONTROL knob is not present in
the signal chain.
Therefore, external metering should be done
using a digital output which is not assigned to
ALT (see “7 – ALT button”).
The outputs not used for ALT bit-transparently
pass the signal from the selected input - as it is
required for an external meter.
13
EN
OPERATION
APPENDIX
BMC-2 Clock & Jitter Rejection
A digital audio signal relies on only two components:
level and time. We all know about levels (bits) – but
timing is equally important to avoid noise and
distortion.
Jitter is unwanted variation of a digital audio signal’s
timing. It is typically recognized by compromised
dynamic range of AD, DA and sample rate converters;
or by clicks and dropouts due to interface breakdown.
A steady digital clock is crucial to the sound quality,
especially when one of the above conversions is
performed.
The clock stability and jitter rejection of BMC-2 is
based on technology from TC System 6000, providing
a performance strikingly better than equipment many
times the price of BMC-2.
The excellent jitter-rejection of BMC-2 is also capable
of cleaning up a less-than-perfect digital signal from an
external source, thereby tidying up your entire studio
timing and optimizing performance.
14
BMC-2 Design Philosophy
In the design of BMC-2, it has been important to
provide constant control of your speakers, regardless
of the state of your computer or other signal sources.
Another criterion was not to touch the signal unless
necessary.
Consequently, BMC-2 features a synchronous design
with bit transparent handling, impressive jitter rejection
and a sample rate generator with a memory lock
function that is invoked should the clocking input fail.
The XLR outputs have been optimized for both
balanced and unbalanced operation. When buying or
soldering XLR-to-TRS adapters, please follow the
wiring diagram on the following page to take advantage
of hum and noise suppression even in unbalanced
mode.
BMC-2 continues to run at the last measured clock
rate, when your Airport Express or other feeding device
may think it’s time to sleep.
We try to treat your speakers as gentle as possible, so
if you remove power from BMC-2 ungracefully by
pulling the power instead of switching it off, all you hear
is a minor anomaly.
There is one thing beyond our control, however: If you
attach digital speakers and switch between sources at
different sample rates, it depends on these speakers
whether noise occurs during switching or not. It is down
to how the speaker handles a change of sample rate
while it is active.
One important feature of the BMC-2 is that it can avoid
noise when switching between different sample rates.
But thanks to the sample rate memory lock, BMC-2 can
even handle an input clock that is coming and going.
15
EN
APPENDIX
APPENDIX – WIRING DIAGRAMS
In setups where the BMC-2 balanced outputs are connected to unbalanced equipment, it is possible to suppress noise
by using a cable wired as illustrated below.
Wiring for connecting the BMC-2’s balanced XLR outputs to unbalanced equipment with 1/4" input jacks.
16
APPENDIX – WIRING DIAGRAMS
EN
When you are feeding an AES3 signal to the SPDIF/AES3 input of the BMC-2, or when you are feeding another
device’s AES3 input from the SPDIF/AES3 output of the BMC-2, we recommend placing a small circuit between the
units to ensure optimal cable length and signal integrity. These circuits are not supplied by TC Electronic – please
contact a qualified technician for assistance.
BMC-2 Output to AES3 Input
Note: Place this circuit close to the AES3 input on the target device!
AES3 Output to BMC-2 Input
Note: Place this circuit close to the BMC-2 input!
17
APPENDIX – CALIBRATED LISTENING
Correctly calibrated REF level is essential for mixing.
Audio for different audiences requires different ranges in dynamics (please refer to the left-hand illustration below).
Without calibrated listening in the studio, you won’t be able to judge the dynamic range of a program/track reliably.
Dynamic Range Tolenrance
+24
0
of a typical audio consumer
+18
Headroom (peak)
-6
Preferred Average
Noise Floor
-18
-42
Car
iPod
Bedroom
Kitchen
Living Room
-42
Home Theatre
-36
Cinema
-30
-48
-54
-60
-66
In Flight Entertainment
-36
Car
-12
Bedroom
-30
iPod
-6
Kitchen
-24
Living Room
0 dB
Home Theatre
-18
In Flight Entertainment
+6
-24
18
-12
Cinema
+12
Headroom (peak)
Preferred Average
Noise Floor
Peak Level Normalization
Narrow Dynamic Range= Loud
APPENDIX – CALIBRATED LISTENING
EN
Some engineers apply “squeeze-box tactics” because
of the popular wisdom that this will produce the loudest
result. The red line in the right-hand illustration shows
how material with a low dynamic range ends up loud
when level control is based on peak level measuring
(as it used to be). Now with loudness detection
principles moving into consumer electronics (iTunes,
Dolby etc.) and broadcast, the loudness advantage of
“squeezed” is disappearing – leaving only distortion
and a wimpy sound.
Calibrated monitoring with BMC-2, on the other hand,
ensures consistent listening conditions enabling you to
always deliver reliable results in the studio - no matter
what the target format and audience.
19
TECHNICAL SPECIFICATIONS
Digital Inputs and Outputs
Connector (S/PDIF, AES3-id compatible):
Formats (S/PDIF and TOSLINK):
Connector (ADAT® or TOSLINK):
Format (ADAT®):
Digital IO Engine:
RCA Phono, BNC adapter included,
75 Ohm, 1 Vpp (terminated)
S/PDIF (24-bit), IEC 958, Pro-status bits
Optical Pipe
Ch. 1 to 4 @ 48 kHz, Ch. 1 to 4 SMUX @ 96 kHz
TCAT DICE JR, handling all IO formats
Clock and Jitter
Internal Sample Rate (fallback):
External Sample Rates:
Jitter Rejection Engine:
Jitter Rejection Filter (4th order):
DIO Interface Jitter:
DA Conversion Jitter:
Output Phase (all digital outputs):
48 kHz
43 to 97 kHz, jitter rejection at all rates
JET™ technology in TCAT DICE JR
> 3 dB @ 10 Hz, > 100 dB @ 600 Hz
< 1 ns peak, BW: 700 Hz to 100 kHz
< 42 ps RMS, BW: 100 Hz to 40 kHz
< 0.5% of Sample Period
Processing Delay DIO @ 96/48 kHz:
Frequency Response DIO:
0.15/0.3 ms
DC to 23.9 kHz ± 0.01 dB @ 48 kHz
Line Output Channel 1/2
Connectors:
Impedance:
Max. Output Level:
Digital Gain:
THD:
Dynamic Range incl. DIM:
Freq. Response:
Crosstalk:
XLR balanced with ground sensing
< 100 Ohm
+13 dBu, -5 dBu DIM activated
Off to +12 dB
< -93 dB (0.002 %) @ 1 kHz, -1 dBFS, 0 dB gain
> 118 dB (121 dB a-weighted), 20 Hz to 20 kHz
+0/-0.2 dB, 20 Hz to 20 kHz
< -98 dB, 20 Hz to 20 kHz
20
TECHNICAL SPECIFICATIONS
DAC
D to A Conversion:
D to A Delay:
Headphones Output
Connectors
Impedance
Max. Output Level:
Digital gain:
THD:
Dynamic Range:
Freq. Response:
Power @ 40 Ohm Load:
Power @ 600 Ohm Load:
EMC
Complies with:
Safety
Certified to:
Environment
Operating Temperature:
Storage Temperature:
Humidity:
24 bit, 128 x Oversampling Bitstream
0.40 ms / 0.20 ms @ 48 kHz / 96 kHz
1/4" Phone Jack (Stereo)
80 Ohm
+20 dBu (no load)
Off to +12 dB
< -85 dB (0.006 %) @ 1 kHz,
-1 dBFS, 0 dB gain, 300 Ohm
> 102 dB, 20 Hz to 20 kHz
+0/-0.2 dB, 20 Hz to 20 kHz
200 mW
93 mW
General
Dimensions (W x H x D):
Weight:
Finish:
Signal in Meter
(all digital inputs):
Stereo PPM Bridge
(Stereo, MONO, SIDE):
Mains Power Supply:
Power Consumption:
Warranty Parts and labor:
5.5" x 2.5" x 6.9" (140 x 64 x 176 mm)
1.8 lb. (0.82 kg)
Acrylic and anodized aluminum front panel.
Plated and coated chassis. Rubber coated
side plates.
1 LED per stereo channel
(activated at -60 dBFs)
12 LEDs per channel
12 VDC
< 8.4 W
1 Year
EN 55103-1 and EN 55103-2,
FCC part 15 Class B, CISPR 22 Class B
IEC 60065, EN 60065, UL60065 and
CSA E60065 CSA FILE #LR108093
32° F to 122° F (0° C to 50° C)
-22° F to 167° F (-30° C to 70° C)
Max. 90 % non-condensing
Due to continuous development,
these specifications are subject to change
without notice.
21