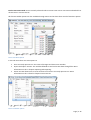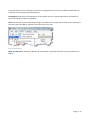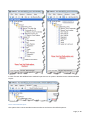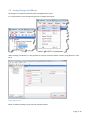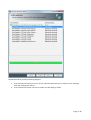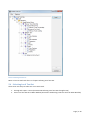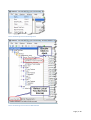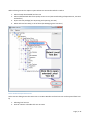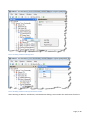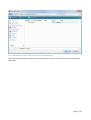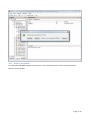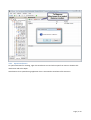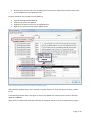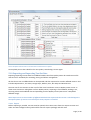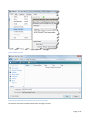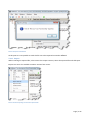
1
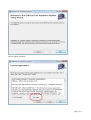
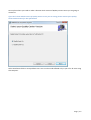
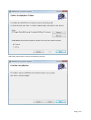
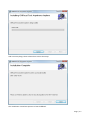
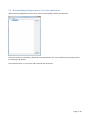
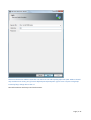
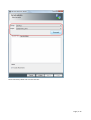
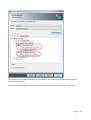
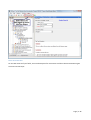
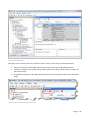
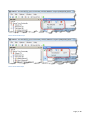
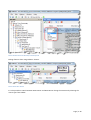
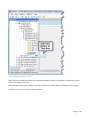
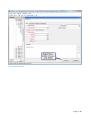
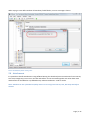
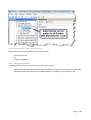
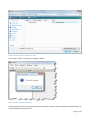
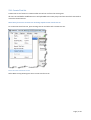
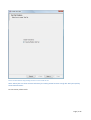
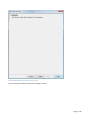
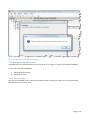
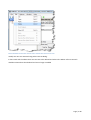
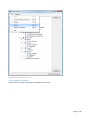
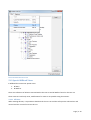
 Juvander Consulting Oy OffRoad ‐ User Guide OffRoad Test Anywhere Anytime®
5/31/2008 Version Information OffRoad Test Anywhere Anytime® for Quality Center User’s Guide. OffRoad Version 1.9 Copyright Information Copyright © 2005 – 2008 by Juvander Consulting Oy. All Rights Reserved. Trademark Information OffRoad Test Anywhere Anytime and Juvander Consulting are registered trademarks of Juvander Consulting Oy. Contents 1 What is OffRoad Test Anywhere Anytime®? .......................................................................................... 1‐1 2 OffRoad Installation ................................................................................................................................ 2‐3 2.1 Before You begin Installation ......................................................................................................... 2‐3 2.2 Installing OffRoad ........................................................................................................................... 2‐3 2.3 Upgrading OffRoad ......................................................................................................................... 2‐8 3 Uninstalling OffRoad ............................................................................................................................... 3‐9 4 OffRoad Licensing ................................................................................................................................. 4‐10 4.1 5 Trial License .................................................................................................................................. 4‐10 Using OffRoad ....................................................................................................................................... 5‐12 5.1 OffRoad Main Window ................................................................................................................. 5‐12 5.2 Saving Changes in OffRoad ........................................................................................................... 5‐19 5.3 Downloading of Requirements, Test Sets and Defects ................................................................ 5‐20 5.4 Selecting Local Test Set ................................................................................................................ 5‐29 5.5 Requirements ............................................................................................................................... 5‐32 5.6 Test Execution .............................................................................................................................. 5‐33 5.6.1 Manual Runner ..................................................................................................................... 5‐33 5.6.2 Mini Runner .......................................................................................................................... 5‐40 5.6.3 Maxi Runner ......................................................................................................................... 5‐41 5.6.4 Fast Run ................................................................................................................................ 5‐41 5.6.5 Run Status Rules ................................................................................................................... 5‐42 5.6.6 Continuing Manual Run ........................................................................................................ 5‐43 5.6.7 Editing Run ............................................................................................................................ 5‐43 5.7 Defects .......................................................................................................................................... 5‐43 5.8 Attachments ................................................................................................................................. 5‐47 5.8.1 Adding Attachments ............................................................................................................. 5‐48 5.8.2 Remove Attachment ............................................................................................................. 5‐52 5.8.3 Open Attachment ................................................................................................................. 5‐53 5.9 Uploading Results to Quality Center Server ................................................................................. 5‐54 5.9.1 How to know if something is to be uploaded? ..................................................................... 5‐57 5.9.2 What is uploaded? ................................................................................................................ 5‐58 5.9.3 Upload Results Viewer .......................................................................................................... 5‐58 5.10 Exporting and Importing Test Set Data ........................................................................................ 5‐60 5.10.1 Export ................................................................................................................................... 5‐60 5.10.2 Import ................................................................................................................................... 5‐62 5.11 Create Test Set .............................................................................................................................. 5‐64 5.12 Managing Local Test Sets ............................................................................................................. 5‐67 5.12.1 Delete Test Set ...................................................................................................................... 5‐67 5.12.2 Delete All Test Sets ............................................................................................................... 5‐69 5.13 Special OffRoad Views .................................................................................................................. 5‐70 5.13.1 All Runs ................................................................................................................................. 5‐70 5.13.2 All Defects ............................................................................................................................. 5‐71 5.14 Customizing OffRoad User Interface ............................................................................................ 5‐71 5.14.1 Selecting Grid Columns ......................................................................................................... 5‐71 5.14.2 Sorting and Filtering in Grids ................................................................................................ 5‐72 1 What is OffRoad Test Anywhere Anytime®? OffRoad is a tool to enable test execution and defect management while not connected to the Quality Center server. All test runs executed in OffRoad, new defects and modified defects from Quality Center project can be sent back to the originating project. Testing is a complicated set of processes making the management of the testing, test results and whole process very demanding. With the advantages of what OffRoad provides, it is possible to execute tests without being tied up in a particular place or network connection. Picture 1 Simplified OffRoad Usage Create Test Set and Add Test Cases into it is a phase where user is planning what to test, when and by whom. Select Existing Test Set from Quality Center is where using OffRoad already existing Test Set is selected for offline execution. All data needed from test case, test set, test case in test set and defect (including project customizations) are downloaded to OffRoad. Create Defects is when user is creating new defects using OffRoad which are first stored on the local computer. Modify Existing Defects is when together with other data user selected set of defects from Quality Center to be downloaded as well and these defects are then modified using OffRoad. Execute Runs for Test Cases is *basic* functionality in OffRoad, creating new runs using Manual Runner or Fast Run functionalities. This includes viewing of steps and marking them passed/failed/NA/Not Completed. Upload Results to Quality Center is a phase when all modifications done locally while not connected to the Quality Center server are uploaded to the server. New defects are created, runs added and modified defects are saved to Quality Center server. Page | 1‐1 Analyze Testing Results is then again normal Quality Center functionality when all testing results are being reviewed, analyzed and decisions being made on how to continue testing. Page | 1‐2 2 OffRoad Installation Installation of OffRoad is simply matter of executing OffRoadSetup.msi and following instructions on the screen. You will need administrative permissions on target computer when installing OffRoad. Latest version of OffRoad is available in here: http://onroad.juvander.fi/Community/files/. 2.1 Before You begin Installation OffRoad System Requirements are very basic, but verify these before starting the installation. Quality Center Server: OffRoad does not put any specific requirements towards Quality Center server. Following versions are supported: ‐
‐
‐
‐
Quality Center 9.2 Quality Center 9.0 Quality Center 8.2 TestDirector 8.0 OffRoad Client Computer: ‐
‐
‐
‐
‐
Windows 2000/XP/Vista Microsoft .NET 2.0 Framework Internet Explorer (OffRoad uses mshtml component from Internet Explorer) OffRoad instance that is used to connect to Quality Center correct version of Quality Center client components are needed. OffRoad which is used only via import/export functionality, Quality Center components are not needed. OffRoad setup does not include .NET 2.0 Framework, this can be downloaded from here: http://www.microsoft.com/downloads/details.aspx?FamilyID=0856eacb‐4362‐4b0d‐8edd‐
aab15c5e04f5&DisplayLang=en 2.2 Installing OffRoad Please note that by default OffRoad cannot be executed from network drive, only from local drive. This is default security setting in .NET runtime. To install OffRoad, execute a file called OffRoadSetup.msi. This will launch setup wizard which will then guide through the installation. Select Next from here: Page | 2‐3 Select ‘I Agree’ and Next: Page | 2‐4 Here a place where you need to make a decision which version of Quality Center server you are going to connect to. If you don’t know which version of Quality Center server you are using, please contact your Quality Center administrator for this information. Select installation folder or accept default one. You can also install OffRoad only to you or for all users using this computer. Page | 2‐5 And finally select Next to start the installation process: Page | 2‐6 And once everything is done select Close to close the setup: This installation created two options to launch OffRoad: Page | 2‐7 1. From Desktop using desktop shortcut: 2. Through menu Start ‐> All Programs ‐> Juvander Consulting Oy ‐> OffRoad 2.3 Upgrading OffRoad When installing newer version of OffRoad it will remove previous installation automatically before installing new one. Upgrade phases are the same as installing a fresh copy of OffRoad. Please note that before upgrading OffRoad, all run results, new and modified defects should be uploaded to the Quality Center project. Upgrade does not upgrade this data; it is left unmodified and can be used with the current version if that is installed again. Page | 2‐8 3 Uninstalling OffRoad OffRoad is uninstalled from Control Panel ‐> Add Remove Programs (in XP) or Control Panel ‐> Programs and Features (in Vista): Picture 2 Uninstall Offroad in Windows Vista Page | 3‐9 4 OffRoad Licensing Juvander Consulting Oy offers different types of licenses for OffRoad: 1. Automatic Trial license, fully functional OffRoad for 14 days. 2. Manual Trial license. If above does not work, you can request trial license from here: http://www.juvander.fi/LicenseRequestForm.aspx. 3. Seat Based Permanent license. License is installed and used by specified computer. 4. Floating License. License is shared among users, one user reserves license for X days at a time. For licensing related question, contact us: http://www.juvander.fi/ContactUs.aspx. 4.1 Trial License When starting OffRoad with a trial license, this dialog is shown first: After you select Continue, click Try to continue from here: Page | 4‐10 After these steps you have a fully functional OffRoad for 14 days. Page | 4‐11 5 Using OffRoad 5.1 OffRoad Main Window OffRoad’s main window has few elements: Picture 3 OffRoad Main Window Opening of local already downloaded test set is done from Local Test Sets tab by selecting it from the tree and double clicking it. Page | 5‐12 To download new data from Quality Center server, see chapter Downloading of Requirements, Test Sets and Defects. Once Local Test Set has been opened, view changed into this: Page | 5‐13 From this view it is possible to find all defects, runs, test cases and requirements that are linked into this local downloaded test set. There are two special collection nodes in here: All Runs (See chapter All Runs) and All Defects (See chapter All Defects). These contain all runs and defects that are found in this test set. All new runs and defects are added into these. Different toolbar options are these: Page | 5‐14 Note: Some of these buttons are enabled only if action is possible in currently selected view. Load new Test Set is used to download new data from Quality Center server. More information in chapter Downloading of Requirements, Test Sets and Defects. Save is used in all places where data can be modified to save all data to local data storage. Add Entity is used to add new defect or attachment. Remove Entity is used to remove currently selected test set, defect, run or attachment. Upload Results to Server sends all added and modified data to Quality Center project. More information on this is found in chapter Upload Results. Select grid columns opens an editor to select columns for currently open grid. More information on this is found in chapter Selecting Grid Columns. Print selected grid opens a print preview window from current grid and from this window it is possible to print currently selected grid. Create new run for selected test case opens Manual Runner to execute new run for selected test case. More information on this in chapter Test Execution. Page | 5‐15 Back to Test Cases Node moves currently selected node in Test Set Tree view to Test Cases node which lists all test cases in current test set. All of these toolbar options are also available through menus and in those there are also few other options. Picture 4 File Menu Options In the File menu there are extra options to •
•
•
Close currently open test set. This saves all changes and clears main window. Import and Export Test Set. This enables OffRoad to send and receive data through files. More information on this in chapter Importing and Exporting. Create Test Set allows user to create new test set from the currently open test set. More information on this is found in chapter Create Test Set. Picture 5 Edit Menu options Page | 5‐16 In the Edit menu there are common actions for cut/copy/paste which are used in different edit fields and can be used also through associated shortcuts. Find Replace brings up an special dialog to do find replace actions in selected grid. More information on this can be found in chapter Find Replace. Grid menu has extra option to Reset Row Height. This affects current grid so that while column width stays the same, grid row height is adjusted so that all text fits into cells. Picture 6 Options Menu Show Test Set Path is checked by default and if unchecked it will show a flat view of test sets without the folders: Page | 5‐17 In case of issues with OffRoad main window layout there is an option in Window menu to Reset Window Layout: Picture 7 Reset Window Layout This option clears current window locations and sizes and returns the default options. Page | 5‐18 5.2 Saving Changes in OffRoad All changes are saved automatically when moving between views. It is also possible to save changes using menu or toolbar commands: When creating new Defect, it is also possible to save (or cancel the defect creation) using buttons on the form: Picture 8 Defect Form More on Defect handling can be found on chapter Defects. Page | 5‐19 5.3 Downloading of Requirements, Test Sets and Defects When launching OffRoad for the first time, Select Test Set dialog is shown automatically: From this window it is possible to download new requirements, test sets and defects from Quality Center by selecting Load –button. Fill in Quality Center url, user name and password and press Next: Page | 5‐20 Please not that Server address looks like one above. Do not add anything after the qcbin. Address should only include server name, port (if not the default port 80) and qcbin. If your server requires using https instead of http, change that to the url. Now select Domain and Project and click Connect: Page | 5‐21 Once connected, select one or more test sets: Page | 5‐22 You can also take attachments (default) or leave them on the server by checking/un‐checking Include Attachments –checkbox. It is also possible to download test sets using a private test set filter defined in Quality Center client: Page | 5‐23 This dialog shows all your private test set filter. After you have selected your test sets, click Next. Here is three optiosn: 1. Include Filtered Defects 2. Include All Defects 3. No Defects Page | 5‐24 Filtered defects gets all your defects based on selected private favorite created on Quality Center client. Include All Defects takes all defects out from Quality Center into OffRoad. No Defects leaves all defects to Quality Center, only defect customizations are taken to OffRoad. After select Next from above Page | 5‐25 Requirement selection is similar to selecting test sets, it is possible to select all or only some of the requirements to be downloaded into OffRoad. If child requirement is selected, also all parent requirements are selected. Note, icons seen in this tree are the ones defined in the Quality Center project. Then select Next to verify your selections: Page | 5‐26 Download begins when you select Finish. During the download operation you can follow the progress: Page | 5‐27 Once download has finished, following happens: 1. If you had selected only one test set, that is opened already and you are ready to start executing tests and working with defects 2. If you selected more than one test set, Select Test Set dialog is shown: Page | 5‐28 Picture 9 Selecting local test set More on how to work with this is in chapter Selecting Local Test Set. 5.4 Selecting Local Test Set There exists two ways to select test set to work with: 1. Through File‐>Open –menu (See Picture 8 Selecting Local Test Set through menu) 2. From Local Test Set tab in Main Window (See Picture 9 Selecting Local Test Set from Main Window) Page | 5‐29 Picture 10 Selecting Local Test Set through menu Picture 11 Selecting Local Test Set from Main Window Page | 5‐30 When selecting menu File‐>Open it opens Select Test Set window which is used to 1. Select already downloaded local test set 2. Select and download data from Quality Center server (See Downloading of Requirements, Test Sets and Defects) 3. Import Test Set package (See Importing and Exporting Test Set) 4. Delete selected Test Set(s) or all of them (See Managing Local Test Sets) Picture 12 Select and Open Local Test Set Select Test Set dialog shows the same view as on Main Window and local test set can be opened from here by 1. Selecting local test set 2. Click Ok –button or double click test set name Page | 5‐31 5.5 Requirements To view requirements, select first the Requirements tab to switch view. Picture 13 Switching to Requirements If there are linked test cases for these requirements and they were also downloaded these are listed in this view and by double clicking test case name, it goes to the selected test case. Page | 5‐32 Picture 14 Viewing Test Cases linked to Requirement 5.6 Test Execution Test Execution is all about creating new runs and defects. This includes selecting correct test case for execution, reading test case and step descriptions and selecting values for run and defect fields. There can be mandatory fields for run and defect, these are marked in red. Test Case can also have mandatory fields which need to be filled before run is executed. Test Execution is done either using one of Manual Runners (Manual Runner/ Mini Runner / Maxi Runner) or Fast Run. Manual Runners guide testing through steps, Fast Run is just selecting correct Run Status in the Execution Grid and saving it. 5.6.1 Manual Runner To open Manual Runner, select Execute Run –button from toolbar or from menu Edit‐>Execute Run. Page | 5‐33 Picture 15 Open Manual Runner Picture 16 Open Manual Runner though menu Opening of Manual Runner is enabled only if you have selected proper node from local test set tree: ‐
‐
Test Cases node. In this case it starts to execute currently selected test case from Execution Grid (See Picture 15 Execute new Run for selected test case in Executin Grid) Any node under test case (See Picture 16 Execute new Run for selected test case from local test set tree) Page | 5‐34 Picture 17 Execute new Run for selected test case in Execution Grid Picture 18 Execute new Run for selected test case from local test set tree After selecting Execute Run Test Run view is shown: Page | 5‐35 Picture 19 Test Run View On Test Run view verify run fields, test case description for instructions and then select Execute Run again to move into Run Steps: Page | 5‐36 Picture 20 Run Steps View Run Steps view is used to record run results for each run step. For this there are few alternatives: 1. Select Pass/Fail step from toolbar (See Picture 19 Pass or Fail step using toolbar buttons). 2. Select Pass All Steps / Fail All Steps using toolbar (See Picture 20 Pass All Run Steps or Picture 21 Fail All Run Steps). 3. Change Run Step Status in Run Steps Grid (See Picture 22 Select Status for Run Step in Run Steps Grid). Picture 21 Pass or Fail step using toolbar buttons Page | 5‐37 Picture 22 Pass All Run Steps Picture 23 Fail All Run Steps Page | 5‐38 Picture 24 Select Status for Run Step in Run Steps Grid Ending of Run is done using End Run –button: Picture 25 End Run –button It is also possible to switch between Mini Runner and Maxi Runner during the execution by selecting the runner type from toolbar: Page | 5‐39 Picture 26 Switching to other Runner type 5.6.2 Mini Runner Mini Runner has similar functionality as Manual Runner, but it has no Run Step grid. You can Pass or Fail one step at a time by selecting the toolbar button or by changing Step Status. Picture 27 Mini Runner & Always on top –button It is also possible to keep Mini Runner on top of all other windows on the system by selecting the Always on top –button. To release window select either End Run –button or again Always on top. Page | 5‐40 5.6.3 Maxi Runner Maxi Runner is same as Mini Runner, but with larger buttons and text. Picture 28 Maxi Runner 5.6.4 Fast Run Fast Run is a method of recording run result without executing run steps. Fast Run will create actual run, but without marking Run Steps with a Run status. Fast Run is done in Execution Grid by changing the value of Last Run Status column and saving the grid either by selecting Save –button or moving focus to Test Set Tree. Page | 5‐41 Picture 29 Fast Run You can see a Status Bar message after Fast Run has been executed: Picture 30 Fast Run Status Bar message 5.6.5 Run Status Rules Depending on the status of the Run Steps following Run Status Rules apply. Whole Run Status is calculated based on these rules. 1.
2.
3.
4.
5.
6.
7.
If all or one of the Run Step status is set to No Run, whole run is set to Not Completed. If all or one of the Run Step status is set to Not Completed, whole run is set to Not Completed. If all Run Steps are set to Passed, whole run status is set to Passed. If all Run Steps are set to N/A, whole run status is set to N/A. If one of the Run Step is set to N/A, whole run status is set to Not Completed. If one of the Run Step is set to Failed, whole run status is set to Failed. If all or one of the Run Step is set to No Result, whole run status is set to No Result Note: No Result run status is a custom run status value which can be added to the list of possible Run Status values through Quality Center project customizations. Page | 5‐42 5.6.6 Continuing Manual Run OffRoad has no different functionality for continuing already executed manual run. In OffRoad this is seen same as editing existing run. For more on this, see Editing Run. 5.6.7 Editing Run To change already existing run you just need to find it first. For this there are few alternatives: 1. Find run from All Runs grid, double click the correct run row and run is selected from the Local Test Set tree. 2. Select Test Case from Execution Grid with existing run, double click the test case row to select Run Parameters node. Expand Run Parameters node and select Test Runs. From opened Test Runs grid you can select the correct run by double clicking the row. This will move focus to the run. 3. Expand Local Test Set Tree to find correct run node and select this. If run is not yet uploaded to the Quality Center server, it is still editable and all changes to it are saved. After selecting Test Run, you can also move to the Run Steps node and default Manual Runner is visible again. From here you can also select Mini Runner or Maxi Runner to your view. 5.7 Defects It is possible to edit all defects in OffRoad regardless of upload status. Defects are not locked against editing and all changes to these are uploaded during the next connection to Quality Center project. New Defects can be added to 1. Test Set 2. Test Case, defect is added and linked to specified Test Case 3. Test Run, defect is added and linked to specified Run Note: When adding new Defect to Test Set, it is not linked to any entity on Quality Center project. Functionality is the same as when adding new defect directly in Defects side of the project. Picture 31 Adding new Defect to Test Set Page | 5‐43 Picture 32 Adding new Defect to Test Case Page | 5‐44 Picture 33 Adding new Defect to Test Run After selecting the Add new defect form is opened. Mandatory fields are marked in red and these are the same as on Quality Center side. After all defect information is added, select Save –button to save new defect to OffRoad’s local storage. If defect is not to be saved, select Cancel –button. Page | 5‐45 Picture 34 New Defect form Page | 5‐46 When trying to save defect without all mandatory fields filled in, an error message is shown: Picture 35 Mandatory fields missing value 5.8 Attachments It is possible to handle attachments using OffRoad. During the download process attachment from Test Set, Test Case, Design Step, Test Case in Test Set and Defects can be retrieved together with other data. New attachments can be added to any OffRoad entity where Attachments –node is visible. Note: Attachments are uploaded to Quality Center server only from Test Set, Run, Run Step and Defect entities. Page | 5‐47 Picture 36 Attachment can be added in Attachments ‐node Attachment type that can be added to these entities can be ‐
‐
‐
Any file attachment Url Image from Clipboard 5.8.1 Adding Attachments To add attachment move first to Attachments node and then either ‐
‐
Right click the Attachments node to bring menu visible and select attachment type you want to add Select Add –button from Attachments toolbar and select attachment type you want to add Page | 5‐48 Picture 37 Adding attachment through menu Picture 38 Adding attachment through Attachments toolbar After selecting to add File –attachment, Add Attachment dialog is show. Select the attachment from here: Page | 5‐49 Picture 39 Add Attachment dialog. Note that this dialog is from Windows Vista After selecting attachment and Open, attachment details are shown. It is possible also to add attachment description. Page | 5‐50 Picture 40 Attachment Details To add Url as an attachment dialog is shown to write the added url. After writing the url, select Add Url to add this as an attachment. It is also possible to switch to add file in here by selecting the Add File –button. Page | 5‐51 5.8.2 Remove Attachment To remove already added attachment select first correct attachment from the list and then Remove –
button from the toolbar. Page | 5‐52 5.8.3 Open Attachment To open attachment for viewing, right click attachment row and select Open from menu or double click attachment and select Open. Attachment is then opened using application that is associated to attachment file extension. Page | 5‐53 Picture 41 Open or Save Attachment though menu Picture 42 Open or Save Attachment by double clicking attachment row 5.9 Uploading Results to Quality Center Server Uploading of testing results means that testing results are being send to Quality Center Server for further analysis. Page | 5‐54 From OffRoad it is possible to upload following data: ‐
‐
‐
Defects Runs Run Steps If Defect was originally downloaded from Quality Center or it was already uploaded once, only changed fields are uploaded. If defect field was changed on the Quality Center side and OffRoad, user can decide if field is uploaded to the server or not. More information on this feature in chapter Upload Results Viewer. To initiate upload process, select Send Results from toolbar or from File –menu. Picture 43 Toolbar button to start upload of results –process Picture 44 Menu to start upload of results –process After starting the upload process, fill in username and password to connect to Quality Center project: Page | 5‐55 On this dialog it is also possible to leave attachment out from this upload. To do this, uncheck the Include Attachments checkbox. When upload process is on, you can follow the upload progress on the status bar: After upload has ended, Upload Results Viewer is shown which shows all added and updated entities. More on this on chapter Upload Results Viewer‐ Page | 5‐56 Picture 45 Upload Results Viewer 5.9.1 How to know if something is to be uploaded? To decide if OffRoad has data that is not yet uploaded to Quality Center server, there these places to look: 1. Toolbar and menu for Send Results –are enabled. 2. Test Set Icon has been changed from into . Picture 46 Not Uploaded data in OffRoad Page | 5‐57 Picture 47Not Uploaded data in OffRoad 5.9.2
What is uploaded? 5.9.3 Upload Results Viewer Upload Result Viewer has two functions: 1. It can be used to verify what was updated and created 2. Force Update for items that were not updated Reasons for items not being updated can be that 1. Field was changed on Quality Center Server and OffRoad. By default OffRoad does not update fields that were updated on both places 2. Entity was locked on Quality Center Server. Defect can be edited by somebody else while trying to update results for it from OffRoad Page | 5‐58 3. Attachment with same name was already present at the entity. Attachment with the same name can be added only once to Quality Center On these situations it is possible to force update by 1.
2.
3.
4.
Expand ‘ExistingEntityNotUpdated’ Select entity to be force updated Expand on the Action column for not updated items Right click to show menu and select Update Server Picture 48 Select Update Server to force field or attachment update After selecting ‘Update Server’ row is marked on Update column as ‘True’ and Upload –button is made active. In the Message column there is also given a reason why update was not done on the server if field was updated in OffRoad. When all force update fields have been selected, click Upload –button to start the upload process again. Page | 5‐59 Picture 49 Update Column shows True when field is marked for force update Once upload process has ended for this new update, same dialog is shown again. 5.10 Exporting and Importing Test Set Data Exporting Importing Test Set data from OffRoad enables data from Quality Center be saved into one file and send it for somebody for reviewing, testing and defect management. All data that is seen on OffRoad side can be Exported and then Imported on another OffRoad instance. This includes Requirements, Test Cases, Design Steps, Defects, Runs, Run Steps and Attachments. Common use for this scenario is that not all of the users have direct access to Quality Center server. In these cases someone is taking data out from Quality Center, exporting it from OffRoad, sending it out, receiving it back with modified data and uploading result to Quality Center (See Picture 1 Simplified OffRoad Usage). Note! Export saves version number of OffRoad which did the export and this version is checked again in the import phase. If version is not exactly the same, import is cancelled. 5.10.1 Export Before exporting is possible, Test Set must be opened. Then select menu from File‐>Export Test Set and select Test Set Package location (path and file name for export package) and click Save. Page | 5‐60 Picture 50 Export Test Set Picture 51 Select File path and name where Test Set is to be exported Once Export has been finished confirmation message is shown: Page | 5‐61 Picture 52 Export Confirmation At this point it is now possible to send this file out to be imported on another OffRoad. 5.10.2 Import When receiving an exported file, select menu File‐>Import Test Set, select the exported file and click Open. Import Test Set is also available on Select Test Set form menu. Picture 53 Start Importing Test Set from exported file Page | 5‐62 Picture 54 Select Exported Test Set file for import Once import is done, confirmation message is shown: Picture 55 Import Confirmation Message From this point forward, this imported data can be used for testing or if it contained not uploaded data, this can be uploaded to Quality Center. Page | 5‐63 5.11 Create Test Set Create Test set is a feature to create another virtual test set from the existing one. All new runs and defect modifications are still uploaded to the same project and test set which was used to create this virtual test set. Note! Runs from source Test Set are not being copied to new virtual test set. To create new virtual test set, open existing test set and select File‐>Create Test Set. Picture 56 Create new Virtual Test Set Select Next to Copy Existing Test Set as a new virtual test set: Page | 5‐64 Picture 57 Select Next to Copy Existing Test Set as a new virtual test set Note: Above form can show custom selections for creating Virtual Test Set. Verify this with your Quality Center Administrator. To start create, select Finish: Page | 5‐65 Picture 58 Select Finish to create new virtual test set Once creating is finished confirmation message is shown: Page | 5‐66 Picture 59 Create New Test Set Confirmation Message 5.12 Managing Local Test Sets As good practice it is recommended that test sets that are no longer in use are removed from OffRoad. For this there are two possibilities: 1. Delete Selected Test Set 2. Delete All Test Set 5.12.1 Delete Test Set Test Set can be deleted when it has been opened from Edit‐>Delete menu when test set node has been selected from Local Test Set Tree. Page | 5‐67 Picture 60 Delete Test Set when Test Set node is selected from Local Test Set Tree Usually test sets are removed using Select Test Set dialog. In here mark with checkbox which test sets are to be deleted and select File‐>Delete. All test sets with checkbox selected are then deleted and are no longer available Page | 5‐68 Picture 61 Delete selected local test sets 5.12.2 Delete All Test Sets Delete all test set takes a step further and deletes all test sets. Page | 5‐69 Picture 62 Delete All local test sets 5.13 Special OffRoad Views In OffRoad there exist two special views: 1. All Runs 2. All Defects There are collections of All Runs executed within this test set and All Defects found on this test set. These views are read‐only views, modifications for items is not possible using these views. 5.13.1 All Runs When viewing All Runs, it is possible to double click the run row and this will open the selected run and moves local test set tree focus into this run. Page | 5‐70 5.13.2 All Defects All Defects is similar to All Runs, when double clicking defect row this will move focus to the selected defect and moves local test set tree focus into this defect. 5.14 Customizing OffRoad User Interface 5.14.1 Selecting Grid Columns In All grid views it is possible to select which fields to show. This is done using the Select Columns functionality which is opened either from Edit‐>Grid‐>Select Columns menu or from toolbar. Picture 63 Open Select Columns This opens an editor which shows on the left fields which are hidden and on the right fields which are visible. Fields can then be moved using the buttons in the middle and column order set using the buttons on the right. Page | 5‐71 Picture 64 Select Columns for grid After selecting Ok grid view is changed to the selected one and next time this same grid is viewed, visible columns and the order of columns is the one set in here. 5.14.2 Sorting and Filtering in Grids Grids can be sorted by clicking the column header. Picture 65 Sorting in grids is done by clicking column header Page | 5‐72 Filtering for row values is done by selecting the filter value in the row below row header. There are options None, Custom and list of values found in columns. None will clear the filter. Selecting value is filtering only rows where this value exists. Custom opens an Custom Row Filter which has and/or options and operator selections. Picture 66 Custom Row Filter Page | 5‐73