1
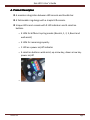
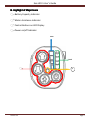
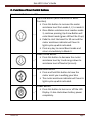
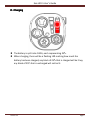
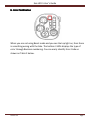
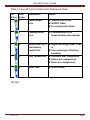
Easi-LED-S User’s Guide
®
Easi -LED-S User’s Guide
for
Babboe Curve-E/ Babboe City-E
Version 1A
Page 1
Easi-LED-S User’s Guide
Table of Contents
A. Product Description .............................................................................................................................................. 3
B. Highlight of Major Icons........................................................................................................................................ 4
C. Functions of Four Control Buttons........................................................................................................................ 5
D. Charging ................................................................................................................................................................ 6
E. Error Notification .................................................................................................................................................. 7
Version 1A
Page 2
Easi-LED-S User’s Guide
A. Product Description
A seamless integration between LED console and handle bar.
A fashionable ring design with a simple LED console.
Unique LED smart console with 9 LED indicators and 4 selection
buttons.
o 4 LEDs for different cycling modes (Neutral, 1, 2, 3, Boost and
walk assist)
o 4 LEDs for remaining capacity
o 1 LED as a power on/off indicator
o 4 selection buttons: walk assist, up arrow key, down arrow key.
power on/off
o
Version 1A
Page 3
Easi-LED-S User’s Guide
B. Highlight of Major Icons
Icons
○,a Battery Capacity Indicator
○,b Motor Assistance Indicator
○,c Control Buttons on LED Display
○,d Power on/off Indicator
Fout!
Fout!
○,c
Version 1A
d
Page 4
Easi-LED-S User’s Guide
C. Functions of Four Control Buttons
Four Control Buttons on LED
○,
1
○,
2
○,
○,
Version 1A
3
4
Up Arrow Button (with a selection of Boost
Function)
• Press this button to increase the motor
assistance level from mode 1, 2, to mode 3.
• Once Motor assistance level reaches mode
3, continue pressing Up Arrow Button will
enter Boost mode (green LED will be lit up).
• Pedal to start the boost for 30 sec and the
motor assistance indicator will have its
lights cycle up while activated.
• Press any key to cancel Boost mode and
return immediately to Mode 3.
Down Arrow Button
• Press this button to decrease the motor
assistance level by 1 and can go down to
assistance level of Neutral (or zero).
Walk Assist Button
• Press and hold this button to have the
motor assist you in walking your bike
• The motor assistance indicator will have its
lights cycle up while activated.
Power Button
• Press this button to turn on or off the LED
Display. It also shuts down battery power
completely.
Page 5
Easi-LED-S User’s Guide
D. Charging
The battery is split into 4 LEDs, each representing 25%.
When charging, there will be a flashing LED marking how much the
battery has been charged; any block of 25% that is charged will be lit up,
any block of 25% that is uncharged will not be lit.
Version 1A
Page 6
Easi-LED-S User’s Guide
E. Error Notification
When you are not using Boost mode and you see the top light on, then there
is something wrong with the bike. The bottom 3 LEDs displays the type of
error through Boolean numbering. You can easily identify Error Code as
shown on Table 1 below.
Version 1A
Page 7
Easi-LED-S User’s Guide
Table 1: Easi-LED-S Error Code Cross-Reference Chart
LED
Status
Error
Codes
1
Descriptions
Causes
Power Output
Error
Internal short circuit
MOSFET failed
Current detection failed
2
Communication
Error
Communication Error
between battery & controller
3
Battery Bad Cell or Single cell voltage under 2.56V
Poor Battery
or
Contact Pins
Poor contact pins of battery
connector
Over Temperature Controller over temperature
Battery over temperature
Motor over temperature
4
5
Legends:
Motor Stall
Motor stalled
■: LED On ■: LED On □: LED Off
THE END
Version 1A
Page 8