1
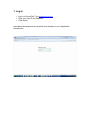
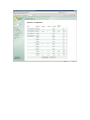
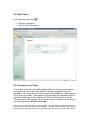
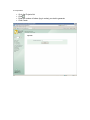
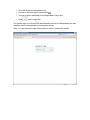
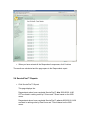
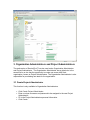
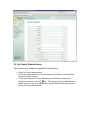
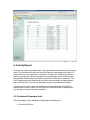
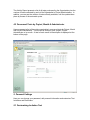
ServiceFirst™
Program Manual, version 2.0
© 2010 Assessio International AB. All rights reserved
1. Log-in
•
•
•
Log-in to ServiceFirst™ via: www.servicef.com.
Enter your User ID and Password
Click Submit
Usernames and passwords are acquired from Assessio or your Organization
Administrator.
2. Testing with Service First™
2.1 Create Project
Creating a project is the first step in administrating Service First™.
•
•
•
•
Click Create Project
Enter a Project Name (mandatory).
Enter a Project Description (optional).
Click Create
The system creates the project and returns you to the List Projects page.
2.2 List Projects
•
Click List Projects
The List Projects page lists all of your projects. By clicking the icons to the right of
the Project Name you can:
Send a test invitation to respondents
List all respondents
Edit the Project profile
Generate Log-in codes
View the project’s Service First™ Ranking Report
Export the Project’s Service First™ Ranking Report to Excel
The Progress column provides a quick overview of the percentage of completed
tests.
2.2.1 Send a Test Invitation to Respondents
•
•
•
•
•
•
Go to the Projects List
Click
Enter or paste in the respondents email addresses
The system provides a default subject, which can be edited if required.
The system provides a default body text, which can be edited if required.
Click Send
NB: The default text allows you to specify by when the test should be completed,
either add the date or remove this sentence.
If you wish to add your own default invitation text, you can do so in your Personal
Settings profile. See 5.1 Customizing Invitation Text.
The test invitation is followed with a link to the test, together with a log-in code. The
log-in code represents user credentials and is unique to each respondent. The log-in
code is no longer valid after the respondent has completed the test. No one can take
the test more than once per log-in code.
The link directs the respondent to the Respondent Login site where he or she can
choose the test language - Danish, English, Estonian, Finnish, Latvian, Lithuanian,
Norwegian, Polish, Russian or Swedish. The Respondent is then required to fill in
their personal information before starting the ServiceFirst™ assessment. The
following data is recorded: First name, last name, gender, age, daytime phone,
evening phone, cell phone, address, zip code and the country. Further a field: Notes
may be appropriated for additional information. For example, the respondent is
requested by you to write a short letter about himself or herself or to indicate relevant
experience to your organization.
A maximum of 500 respondents can be invited in a single mailing. If you happened to
invite the same person more than once, an error is generated.
TIPS: All Repondents log-in codes are available in the Project’s Respondents List. If
one of your Respondents does not receive the test invitation due the message being
blocked by the receiving email system’s Spam filters, you can find the Respondent in
the Respondent List and communicate the Log-on code to the Respondent either
verbally, sending a sms or manually via email.
2.2.2 List Respondents
The List Respondents page lists a project’s Respondents. By clicking the icons to
the right you can:
Edit the Respondent’s Personal Details
View the Respondent’s report (HTML)
View the Respondent’s report (PDF)
Start the Respondent’s Test Locally
Select a Respondent or multiple Respondents (Send Test
Reminder(s) or deletion.
•
Go to the Projects List
•
•
Click
The Respondents List can be sorted by Email Address, First Name, Last
Name or Test Status. The Test status indicates if the test has been completed
is ongoing or pending.
NB: The Start Test functionality is only available to Login Codes generated via the
system. Therefore, this functionality is not available for respondents whom have
been sent via the Send Test Invitation functionality.
2.2.3 Edit Project
From the Projects List click
•
•
to:
Edit the Project Name
Edit the Project Description
2.2.4 Generate Log-in Codes
To overcome issues with test invitations being blocked by receiving email system’s
Spam filters, we offer an alternative solution to provide respondents with log-in
credentials. The Generate Log-in Codes functionality facilitates you creating batches
of up to 200 log-in codes. These codes are not associated to a respondent until the
respondent has logged in and completed the Personal Details section of the test.
The codes can be sent manually via your email account or utilised when conducting
on-site testing (See 2.2.6 Take Test Locally).
Please note. the system does not send Test Invitations or Test Reminders to respondents where the
log-in codes have been generated via this functionality. You are required to manually send invitations
or reminders separate to the system, i.e. via your own email system or by communicating the code to
the respondent.
•
•
•
•
Go to the Projects List
Click
Enter the number of tokens (log-in codes) you wish to generate
Click Create
The system creates the log-in codes and takes you to the Project’s Respondents List.
•
Manually send the log-in code together with test instructions and link to the
Respondent’s Log-in site: https://www.servicef.com/servicefirst.asp
2.2.5 Send Reminder Test Invitations to Respondents
•
Go to the Project List and click
•
•
Select one or multiple Respondents
Click Send Reminder
•
•
Accept the reminder text provided by the system or make changes.
Click Send Reminder
to display the Respondents List
2.2.6 Take Test Locally
Test Administration on a local PC
For a variety of reasons it may be necessary to administrate a test on-site on a local
PC. To facilitate this, we provide Take Test Locally functionality. This functionality
allows you to initiate a test from your PC or a dedicated Test PC. You start the test
and the candidate then completes the test.
•
•
•
Go to the Project’s Respondent’s List
Choose an unused Login Code and click
The log-in code is populated to the Respondent’s Log-in site.
•
Click
on the Login Site
The system locks your ServiceFirst Administration account, the Respondent can then
complete their Personal details and commence the test.
Note. You are required to login to the system in order to retrieve the results.
2.2.7 Service First™ Ranking Report
•
From Projects List click
See 2.4 below
2.2.8 Export Service First Ranking Report to Excel
•
Go to the Projects List
•
•
•
•
•
Click
When prompted to Open or Save the Excel file, choose Save
Assign an appropriate name for the file and click Save
When the file has been saved, click Open
Excel opens to the exported report
2.3 Score Test Locally
If the paper and pencil version of the questionnaire has been administered, the
respondent’s responses can be entered into the system manually.
•
•
•
Click Score Test Locally
Enter the Respondent’s personal information (Project, First Name, Last Name,
Language and Country fields are mandatory).
Click Create. You are then directed to a page where you can enter the
respondent’s responses by clicking the appropriate result with the mouse.
•
When you have entered all the Respondent’s responses, click Continue
The results are calculated and the page opens to the Respondents report.
2.4 ServiceFirst™ Reports
•
Click ServiceFirst™ Reports
This page displays the:
Respondents whom have completed ServiceFirst™ after 2009-02-09 14:00
CET are listed in ranking order by C-Score and T-Score based on the 2009
norms.
Respondents whom have completed ServiceFirst™ prior to 2009-02-09 14:00
are listed in ranking order by Raw Score and T-Score based on the 2001
norms.
•
•
To view the respondents individual report, click .
Click the respondent’s email address to generate an email.
2.4.1 ServiceFirst™ Respondent Report
•
•
•
Click ServiceFirst™ Reports and then click
.
ServiceFirst™ Report is an individual results report with graphs that depict the
respondent’s C-Score, T-Score, Raw Score and percentile for the total score
as well as the Raw score for the four subscales
ServiceFirst™ Reports can also be generated in PDF file format. The PDFs
can be downloaded to your computer for later attaching to an email. Click
to open the report as a PDF.
3. Organization Administrators and Project Administrators
The web version of ServiceFirst™ has two user levels: Organization Administrator
and Project Administrator. The Organization Administrator has a global role in the
sense that he or she has the opportunity to create new users within their
organization, known as Project Administrators. The Organization Administrator is also
responsible for purchasing new tests for the organization
3.1 Create Project Administrator
This function is only available to Organization Administrators.
•
•
•
•
Click Create Project Administrator
Enter a unique username and password to be assigned to the new Project
Administrator.
Fill in the Project Administrators personal information
Click Create
3.2 List Project Administrators
This function is only available to Organization Administrators.
•
•
•
Click List Project Administrators
The Project Administrators list can be sorted by First Name, Last Name and
Email or by Date Created.
To edit each respective Project Administrator’s Username, password or
personal information, click the
icon. This opens the Project Administrator’s
profile where you can even designate the Project Administrator as Inactive or
delete the Project Administrator.
4. Activity Report
There are two ways to purchase tests - both by manual quota and partly by automatic
quota. The manual rate is the initial quantity of tests an organization purchases. To
prevent the risk of an organization running out of tests in the middle of a selection
process, an automatic quota is assigned to the organization, which facilitates tests
being loaded automatically at the same moment as the final test is consumed. The
size of these quotas are determined at the time the organization is registered as a
user of ServiceFirst™ and can be changed at any time by contacting Assessio.
A test is consumed only when the respondent has completed the ServiceFirst™
questionnaire. In other words, you can invite an unlimited number of respondents you only pay for the test upon its completion.
4.1 Purchased/Consumed tests
This functionality is only available to Organization Administrators
•
Click Activity Report
The Activity Report presents a list of all tests purchased by the Organization plus the
number of tests conducted by each of the Organization’s Project Administrators. In
addition, you can see the number of tests currently available, until the update takes
place by means of the automatic quota.
4.2 Consumed Tests by Project, Month & Administrator
Here we present a list of the entire organisation’s consumed tests by Project, Month
and Project Administrator. The list can be sorted by year, project, Project
Administrator or by month. A total of each month’s consumption is displayed at the
bottom of the page.
5. Personal Settings
Here you can change your password, edit personal information and customize Test
Invitations and Reminders.
5.1 Customizing Invitation Text
•
•
Click Personal Settings
Complete the following fields:
o Your Invite Text in Subject
o Your Invite Text in Body
o Your Reminder Text in Subject
o Your Reminder Text in Body
•
•
Select
Enable Your Email Invite & Reminder Content
Click Update
NB: If you have enabled Your Email Invite & Reminder Content, this over-rides the
default text for all Test Invitations sent. It is currently not possible to only enable the
Test Invitation and default to the default Reminder text.
If you wish to temporarily disable your customized text, you can do so by de-selecting
Enable Your Email Invite & Reminder Content.
6. Respondent Search Functionality
•
•
•
•
Click Respondent Search
Choose the search criteria: Project, First Name, Last Name and/or email
address
Click Search Results to initialize the search
From the results page, you can access or edit the respondent’s personal
information by clicking
.
•
Click
•
•
Click
to open the PDF report.
To delete a Respondent, select the Respondent in the Search Results list and
click the Delete button
to view the Respondent’s individual report.
6.1 Restore a deleted Respondent
•
•
•
•
•
Click Respondent Search
Choose the search criteria: Project, First Name, Last Name and/or email
address (Optional)
Select Locate Deleted Respondents
Click Search Results to initialize the search
The Search Results return a list of deleted Respondents based on the search
criteria entered.
•
Select the Respondent you wish to restore and click the Restore Respondent
button.
The restored respondent data is retrieved to the original project.
7. Documentation
•
•
•
•
•
•
•
•
Click Documentation
Presentation of the development behind Service First™
Development of Service First™ in USA
Development of Service First™ in Sweden
Guidelines for administration and interpretation
Statistical Terminology
Questionnaire form
Response form
Research and Development is continuously conducted on Service First™, and
therefore this documentation is periodically updated.
8. Logout
• Click Logout to close your session and prevent unauthorised usage.