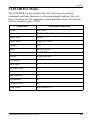
1
GRAPHISOFT BIM
Explorer User Guide
GRAPHISOFT®
Visit the GRAPHISOFT website at http://graphisoft.com for local
distributor and product availability information.
GRAPHISOFT BIM Explorer User Guide
Copyright © 2011 by GRAPHISOFT, all rights reserved. Reproduction,
paraphrasing or translation without express prior written permission is
strictly prohibited.
Trademarks
ArchiCAD®
is a registered trademark and GRAPHISOFT BIM
ExplorerTM is a trademark of GRAPHISOFT.
Other product and company names are trademarks of the respective
holders.
Contents
Contents
Introduction . . . . . . . . . . . . . . . . . . . . . . . . . . . . . . . . . . . . . . . . . . . . . . 5
Product Details . . . . . . . . . . . . . . . . . . . . . . . . . . . . . . . . . . . . . . . . . . . . 5
Workflow . . . . . . . . . . . . . . . . . . . . . . . . . . . . . . . . . . . . . . . . . . . . . . . .
Exporting ArchiCAD Models for GRAPHISOFT BIM Explorer . . . . .
Saving BIMx Projects . . . . . . . . . . . . . . . . . . . . . . . . . . . . . . . . . . . . . . .
Opening a BIMx Project for Editing . . . . . . . . . . . . . . . . . . . . . . . . . . . .
Exploring a BIMx Executable File . . . . . . . . . . . . . . . . . . . . . . . . . . . . .
6
6
7
7
7
Interface . . . . . . . . . . . . . . . . . . . . . . . . . . . . . . . . . . . . . . . . . . . . . . . . . 8
Menus . . . . . . . . . . . . . . . . . . . . . . . . . . . . . . . . . . . . . . . . . . . . . . . . . . . 8
FILE Menu . . . . . . . . . . . . . . . . . . . . . . . . . . . . . . . . . . . . . . . . . . . . 8
SETTINGS Menu . . . . . . . . . . . . . . . . . . . . . . . . . . . . . . . . . . . . . . . 9
GLOBAL ILLUMINATION Menu . . . . . . . . . . . . . . . . . . . . . . . . 11
CONTROLS Menu . . . . . . . . . . . . . . . . . . . . . . . . . . . . . . . . . . . . . 13
INFO Menu . . . . . . . . . . . . . . . . . . . . . . . . . . . . . . . . . . . . . . . . . . . 15
LAYERS Menu . . . . . . . . . . . . . . . . . . . . . . . . . . . . . . . . . . . . . . . . 15
GALLERY Menu . . . . . . . . . . . . . . . . . . . . . . . . . . . . . . . . . . . . . . 16
Technical Notes . . . . . . . . . . . . . . . . . . . . . . . . . . . . . . . . . . . . . . . . . .
Texture Formats. . . . . . . . . . . . . . . . . . . . . . . . . . . . . . . . . . . . . . . . . . .
Alpha Channel Texture Effects . . . . . . . . . . . . . . . . . . . . . . . . . . . .
Shadows . . . . . . . . . . . . . . . . . . . . . . . . . . . . . . . . . . . . . . . . . . . . . . . .
Sun Shadow Artifacts . . . . . . . . . . . . . . . . . . . . . . . . . . . . . . . . . . .
Special Keyboard Shortcuts . . . . . . . . . . . . . . . . . . . . . . . . . . . . . . . . .
System Requirements . . . . . . . . . . . . . . . . . . . . . . . . . . . . . . . . . . . . . .
Operating System . . . . . . . . . . . . . . . . . . . . . . . . . . . . . . . . . . . . . .
17
17
17
17
18
18
18
18
Installing the BIM Explorer Package . . . . . . . . . . . . . . . . . . . . . . . . 20
Uninstalling the BIM Explorer Package . . . . . . . . . . . . . . . . . . . . . . 21
License Management. . . . . . . . . . . . . . . . . . . . . . . . . . . . . . . . . . . . . . 22
GRAPHISOFT BIM Explorer User Guide
3
Contents
4
GRAPHISOFT BIM Explorer User Guide
Introduction
Introduction
GRAPHISOFT BIM Explorer (BIMx) allows architects to create
photorealistic walk-through models from their ArchiCAD projects. With
this innovative presentation tool, navigable 3D models can be saved as
self-running executable files containing also predefined fly-through
animations and images of the building.
Product Details
The GRAPHISOFT BIM Explorer package contains two components:
1) The BIMx Export Add-on for ArchiCAD 15 allows the seamless
export of ArchiCAD models directly into BIM Explorer.
2) GRAPHISOFT BIM Explorer is a standalone application to make
live presentation environments of the imported ArchiCAD models
and to save them as self-running executable files.
GRAPHISOFT BIM Explorer User Guide
5
Workflow
Workflow
The standard workflow between ArchiCAD and
GRAPHISOFT BIM Explorer is the following:
•
The BIM model is created in ArchiCAD with the appropriate surface
textures and materials applied on the building elements.
•
Using the BIM export add-on for ArchiCAD, the 3D model is sent to
the GRAPHISOFT BIM Explorer for further processing.
•
The walk-through model is opened in GRAPHISOFT BIM
Explorer and visualized with shaded OpenGL or global illumination
engines. Preferred fly-through paths can also be defined and saved
with the model.
•
The GRAPHISOFT BIM Explorer model is saved into a selfrunning application file, which can be sent to the owners, builders
and others parties for easy exploration of the project.
Exporting ArchiCAD Models for
GRAPHISOFT BIM Explorer
Once the BIM model is created in ArchiCAD 15 and the proper surface
textures are applied, the model is ready for export into BIM Explorer:
1) Open the project in AC15 and check the consistency of the model
and the surface textures before starting the export process.
Note that you can’t modify the 3D model and the surface materials
in BIM Explorer.
2) Open the 3D window (perspective or axonometric views).
3)
4)
5)
6)
6
Launch the File/ Export for BIM Explorer command.
The Export for BIM Explorer status window opens.
Once the export process is finished, click on the Launch button.
The BIM Explorer application starts automatically and the exported
model is loaded into the program’s memory.
GRAPHISOFT BIM Explorer User Guide
Workflow
Saving BIMx Projects
Once the AC model is exported into BIMx, you can save the project in
the native BIMx self-running application file format:
1) Press the ESCAPE key on your keyboard to access the BIMx
menus.
2) Click on the File menu.
3) Choose the operating system (Windows/Mac OS X) on which you
want to open the self-running project file.
4) Select the preferred project file location and enter the name of the
BIMx file.
5) The BIMx project is saved as a self-running application file.
Opening a BIMx Project for Editing
1) Start your BIMx application. You need a full BIM Explorer license
to edit a project.
2) Open the File menu and click on the Load command.
3) Select the preferred BIMx project file to open it.
4) Now you can start to edit the BIMx project.
Note that double-clicking on a BIMx application file opens the
project in non-editable, navigation mode.
Exploring a BIMx Executable File
Click on the executable/application file to explore the BIMx model. This
will install the BIMx viewer application automatically. You don’t need a
commercial license of BIMx to open these projects.
GRAPHISOFT BIM Explorer User Guide
7
Interface
Interface
The BIMx interface consists of the navigation window and the BIMx
menu. You can toggle between them with the ESCAPE key.
Menus
The following menus are available in BIM Explorer:
•
FILE
•
SETTINGS
•
GLOBAL ILLUMINATION
•
LAYERS
•
GALLERY
•
CONTROLS
•
INFO
•
QUIT
FILE Menu
The file menu includes the standard I/O functions of the program. The
LOAD command opens a BIMx project for editing. The Save for
Windows and Save for Mac OS X commands will store your project in
the standard BIMx self-running executable/application file formats.
Note that self-running BIMx project files can only be played and
edited in their native platform.
8
GRAPHISOFT BIM Explorer User Guide
Interface
SETTINGS Menu
The Settings dialog stores all the parameters that are related to the BIMx
model display and navigation control.
View Style
The BIMx model can be displayed in the following view styles:
•
Unlit
•
Gouraud
•
Headlight
•
Metal
•
Hidden Line
•
Global Illumination
The Global Illumination method give you the most realistic view of the
model.
Note that you have to render the model with the Global Illumination
engine before you can activate this view style.
Note that Global Illumination and Headlight view styles are using
more resources of the OpenGL Video Cards than the other methods.
In case you work with a very large model or if your computer has a
slow video card we recommend to use the Gouraud, Metal or Hidden
Line render modes.
Background
BIMx offers the following background options:
•
SKY (default BIMx Sky image)
•
WHITE
•
GREY
•
BLACK
•
GRADIENT
In case you’d like to use custom skybox images, you have to replace the
six .bmp files included in the BIMExplorer/Skybox folder.
GRAPHISOFT BIM Explorer User Guide
9
Interface
Stereo View
BIMx can display the model in stereo view modes. The following
methods are available:
•
Left/Right
•
RED/ CYAN
•
OFF
Note that you need special stereo view glasses to enjoy this BIMx
feature.
Transparency
Value range: 20-80
The transparency of all translucent surfaces in the model is controlled by
this parameter. Higher values result in less transparent surfaces.
View Cone
Value range: 10-120
Speed
Value range: 10-1000
This parameter defines the default speed of navigation. Higher numbers
result in faster movement.
Note that you can temporary increase the navigation speed by
holding down the ‘SHIFT’ button.
Mouse Sensitivity
Value range: 10-50
Mouse Invert
This option inverts the mouse navigation directions.
10
GRAPHISOFT BIM Explorer User Guide
Interface
Additional Settings Menu commands
The following parameters are self-explanatory. The parameter value
limits are shown in brackets.
Sun Altitude (10-80)
Sun Azimuth (0-360)
Sun Brightness (-100 - +100)
Sun Overbright (-100 - +100)
Camera Height (600-2000)
Camera Radius (150-400)
Units
The measured distances can be displayed in Metric or Imperial units
Sunflare
This option displays the sun flare if the camera looks towards the sun.
Help Popups
If this option is activated, a help popup window will appear over some of
the Settings menu’s commands.
It also controls if the introduction help-popup is displayed at the center of
the screen when opening a BIMx model.
GLOBAL ILLUMINATION Menu
In order to be able to view the model in Global Illumination mode, you
have to render the model first. Choose INITIALIZE to prepare the
model for Global Illumination view.
Note that this can be a lengthy process depending on the size of the
model (number of triangles), the computer hardware (RAM, Video
RAM, processor, Video Card type) and the Global Illumination
options you choose. Initialization may fail if the model is too big
since any single point on the model needs to be handled separately in
the computer memory. The more graphics memory you have the
larger model you can initialize.
GRAPHISOFT BIM Explorer User Guide
11
Interface
Cancel the process by pressing ESCAPE. You can resume the process
later. Completely lit surfaces are saved into project files and .exe files.
When resuming the process, the starting point may roll back a few percent
from where you cancelled.
Computing Light
This option affects the length of the Global Illumination calculation
process.
•
LIGHT VIEW: Lights surfaces visible from the current camera
viewpoint only.
•
LIGHT ALL: Lights all surfaces.
Sample Falloff
This option affects the length of the rendering process and the quality of
the resulting images.
If your sample rate is lower than 1000-2000, try setting this to option to
LOW. This will make shadow gradients less smooth and more pixelized,
but will result in faster rendering.
Note: Changing sample falloff will invalidate any previously
computed light.
Lightmap quality
This parameter has three values:
•
Ultra
•
Default
•
Low
"Ultra" will provide more realistic lights and shadows in the final
rendered model, however the rendering process can be significantly
slower in case of large models.
12
GRAPHISOFT BIM Explorer User Guide
Interface
CONTROLS Menu
The CONTROLS menu displays the list of the basic navigation
commands and their shortcuts for the international keyboard. Most of
these functions are self-explanatory and commonly used in first-person
shooter computer games (FPS).
Functions
Keyboard Shortcut
Menu
ESCAPE
Movement
W, S, A, D and the Arrow keys
Move Fast
SHIFT
Move Slow
CMD or CTRL
Crouch
ALT
Jump
SPACE BAR
Lift
PAGE UP
Lower
PAGE DOWN
Fly Mode
F
Info Tool
I
Measure Tool
M
Outlines
O
Sun Shadows
F3
Screenshot
F5
Parallel View
F8
Map Mode
BACKSPACE
GRAPHISOFT BIM Explorer User Guide
13
Interface
Info Tool
Pressing “I” during navigation activates the Info Tool. In this mode the
cursor’s shape changes to a cross and the bounding box of the currently
selected model element is highlighted. One click with the mouse opens
the Info palette, which shows basic information about the selected model
element. The following information is displayed in the Info Tool:
•
Type – Element Type (wall, slab etc.)
•
Layer – Element Layer
•
Size – Size of the element’s bounding box
•
Volume – Volume of the element
•
Floor Ind – Index of the story in which the element is placed
Fly Mode vs. Walk Mode
The 'F' key toggles between Fly Mode and Walk Mode. The Walk Mode
provides you with a more realistic viewing experience including the
following features:
•
Opening recognition to distinguish the solid building structures
such as walls, columns and roofs from doors and windows during
navigation.
•
Gravity to keep the camera height stable over slabs, ramps or stairs.
Map Mode
This useful feature helps you to find your current position in the building
during navigation. Press “BACKSPACE” during navigation to project
the corresponding section of the floor plan over the current 3D view.
Your current position and viewing direction is marked with a red arrow.
Use the mouse wheel to zoom the map.
Measure Tool
Press 'M' to enable the measure tool. The three-dimensional distance
from the camera to the world point at the center is computed and
displayed as 'View Distance'. To measure the distance between two
three-dimensional points, click the left mouse button and pick two points.
The resulting distance is computed and displayed as 'Measured Distance'.
14
GRAPHISOFT BIM Explorer User Guide
Interface
Screenshot
Press 'F5' to print the current view to a 24-bit .bmp file. The image will
have the same resolution as your current viewport (your desktop
resolution). The .bmp file will be saved with a unique name into the
'VirtualBuildingExplorer\Screenshot\' folder. When screenshots are
printed from a stand-alone .exe file, the images will be saved into the
same directory as the .exe file.
Parallel View
Press 'F8' to enable the orthographic view. Use the mouse to rotate the
model and the mouse wheel to zoom in/out. Hold down the right mouse
button and move the mouse to pan over the model.
Note that Stereoscopic rendering is currently not supported in
orthographic view.
INFO Menu
The Info Menu shows basic information about the active project and your
BIMx license:
•
Version: The version and build number of your BIMx application.
•
License Type: Type of your BIMx license (full, trial, educational). It
also displays whether you are using the global illumination version
of BIMx.
•
Triangle Count: The models in BIMx are made of 3D triangles. The
speed of the 3D navigation and the memory usage by the BIMx
application are strongly affected by the number of triangles in the 3D
model.
•
Video RAM Usage: Displays the size of the Video RAM used by the
project
•
RAM Usage: Displays the size of the RAM used by the project
LAYERS Menu
The BIMx project preserves the layers of the original ArchiCAD model.
You can control the visibility of the model layers in the Layers dialog.
Note that layers are not available in global illumination mode.
GRAPHISOFT BIM Explorer User Guide
15
Interface
GALLERY Menu
The Gallery menu accommodates the commands with which you can add
pre-recorded walk-through clips and camera positions to your project.
Adding Camera Angles (positions) to your Project
To add camera angles press 'F4'
Recording Walk-through Clips
•
To enter clip record mode: Press 'SHIFT+R'.
•
To start/stop recording: Click left mouse button.
•
To exit clip record mode: Press 'SHIFT+R'.
You must be in pause mode when exiting clip mode or you will lose that
clip.
Both perspective mode and orthographic mode (F8) can be recorded.
Editing the Gallery
To change the order of the clips in the Gallery, press “MOVE LEFT /
MOVE RIGHT'”.
Using the gallery
•
Clips will playback in sequence if 'SEQUENCER' is enabled,
otherwise only the current clip will be played.
•
Click the image to jump into that position or to play that clip.
•
Press 'P' to playback the current clip.
•
Press 'Shift+P' to playback the sequence of clips from the top.
•
'PLAY ON START' will playback the sequence of clips as the .exe
starts.
•
'PLAY ON IDLE' will make playback start or continue screensaverstyle.
16
GRAPHISOFT BIM Explorer User Guide
Technical Notes
Technical Notes
Texture Formats
BIMx supports the following surface texture formats: jpg, bmp, tif, tga,
png, gif.
If a texture would fail to load for any reason, the object that uses it will
be drawn with the material color instead.
Alpha Channel Texture Effects
BIMx supports alpha channel texture effects with 32-bit tif, tga and bmp
images. For the alpha channel effects to be detected inside BIMx, you
must enable transparency in the ArchiCAD material/texture properties.
Shadows
Shadows in BIMx are rendered using the OpenGL ARB_shadow
extension. It works by rendering the scene, from the sun's point of view,
into a texture map. This texture map is then projected onto the scene and
OpenGL will determine whether a pixel is in shadow or not. Larger
texture maps will produce higher quality shadows. The maximum size is
determined by your graphics card (the graphics memory available and
the maximum texture size allowed). Some graphics cards may have 256
MB on-board memory, but only allow a maximum texture size of 4096 x
4096. A shadow texture is typically 24-bit.
8192x8192 shadow texture will consume 200 MB of video memory.
4096x4096 shadow texture will consume 50 MB of video memory.
2048x2048 shadow texture will consume 12.5 MB of video memory.
BIMx will automatically try to generate the largest possible shadow
texture, starting with 8192x8192. Next, if this fails, it will try half that
size, and so on.
The shadow’s altitude, azimuth (heading) and brightness are controlled
via the settings interface.
To turn off the sun shadows, set sun shadow brightness to a value near
zero.
GRAPHISOFT BIM Explorer User Guide
17
Technical Notes
Sun Shadow Artifacts
Depending on the amount of available video card memory and the
(physical) size of your model, the sun shadows may display artifacts.
This is due to the fact that BIMx cannot fit the whole model into the
shadow map with good quality. Smaller models and more video graphics
memory will improve the result.
Special Keyboard Shortcuts
•
Holding down Z then pressing ESCAPE will quit.
•
Holding down SHIFT and CONTROL at the same time will
activate the light speed navigation, which is ten times faster than
running.
•
Holding down the right mouse button while flying will make you
stay on a fixed altitude. This is useful when recording a fly-over
above a building, for example.
•
Holding down the right mouse button while walking will lock the
view horizontally for a perfectly straight perspective.
System Requirements
Operating System
The Operating System requirements correspond to those of the
ArchiCAD 15 version. For more details, see "Getting Started with
ArchiCAD 15" available from the ArchiCAD Help menu.
Software
ArchiCAD 15 version is needed to run the BIMx Export Add-On.
Java 1.6.0 or later is required to run the installer.
18
GRAPHISOFT BIM Explorer User Guide
Technical Notes
CPU
Windows: Intel Pentium 4 or higher required.
Multicore processor is recommended to exploit ArchiCAD 15
performance capabilities.
MacOS (MacIntel): 64-bit processor required.
Mactel with Intel processor (Core2Duo and later).
Multicore processor is recommended to exploit ArchiCAD 15
performance capabilities.
Only case-insensitive file-system volumes are supported.
RAM
2 GB of RAM is required.
4 GB or more is recommended for complex models.
Hard Drive
Minimum of 1 GB free hard disk space is required for a full installation
of ArchiCAD 15 and BIMx.
Additional 2-3 GB is required for work with complex projects and 3D
visualization.
Display
Resolution of 1280*1024 or higher to work with ArchiCAD. BIMx
supports 1024*768 or higher resolutions.
True Color display adapter is needed.
Video card
Open GL 1.4 and DirectX 9 compatible graphics card with 256 MB or
more on-board video memory is recommended to fully exploit hardware
acceleration capabilities.
To find compatibility data for video cards, please visit the following
website: http://archicadwiki.com/Video_Cards
GRAPHISOFT BIM Explorer User Guide
19
Installing the BIM Explorer Package
Installing the BIM Explorer
Package
Important: When installing BIMx, you must be logged on as a
member of the Administrator Group.
Installing from CD:
Windows: After inserting the BIMx Installation CD into your CD-ROM
drive, the “BIM Explorer for ArchiCAD 15 Installation” screen will
appear. Choose “Install BIM Explorer” to start the installation Wizard. If
the installer does not start automatically, double-click on the “Setup”
application in the CD root directory.
Mac OSX: Insert the BIMx CD into your CD-ROM drive and doubleclick on the “BIM Explorer Installer” application in the CD root
directory.
Installing from web download package:
Windows: Double-click the downloaded executable file, which will
open the unpacker application. Specify a temporary location for the
installer files, then click “Extract”. After files are extracted, the installer
wizard will automatically start.
Note: Java 6 is required to run the BIMx Installer. If you do not have
Java 6 installed on your system, it can be installed manually from the
Java folder of the ArchiCAD DVD.
Mac OSX: Double-click on the downloaded image file to be
automatically mounted by the system. Then double-click on the “BIM
Explorer Installer” application in the mounted volume’s root directory.
20
GRAPHISOFT BIM Explorer User Guide
Uninstalling the BIM Explorer Package
Uninstalling the BIM Explorer
Package
Windows: To uninstall the entire BIM Explorer package, go to the
Windows “Control Panel” and select “Programs and Features” (Vista and
Windows 7) or “Add or Remove Programs” (XP).
Important: Do not remove the Java Runtime Environment before
uninstalling BIMx.
Mac OSX: Run “uninstaller” in the Uninstall.BIMx subfolder of your
ArchiCAD application folder. This will start the uninstaller, which will
remove all BIMx components from your computer.
GRAPHISOFT BIM Explorer User Guide
21
License Management
License Management
BIM Explorer for ArchiCAD 15 is protected with the WIBU protection
technology. To run BIMx with your commercially licensed copy of
ArchiCAD 15, you need a separate license for BIMx in the ArchiCAD 15
WIBU or CodeMeter keyplug. If you do not have such a license please
consult your ArchiCAD distributor.
Important: After installing BIMx do not forget to restart your
computer; otherwise the hardware protection key will not work
properly. Plug in the protection key only after you have rebooted
your system. (No restart is required if you already had a WIBU
protection key driver installed on your computer, and no driver was
installed by the BIMx installer.)
22
GRAPHISOFT BIM Explorer User Guide