1
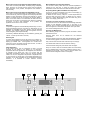
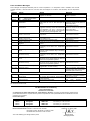
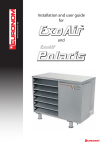
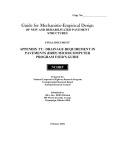
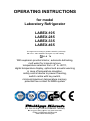
OPERATING INSTRUCTIONS for model Laboratory Refrigerator LABEX-105 LABEX-285 LABEX-335 LABEX-465 TÜV approved according to guideline 94/9 EG, (ATEX 95) EN 1127-1:1997 and BGR 120, figure 3.8, with marking II 3 G T6 With explosion proofed interior, automatic defrosting, melt water for manual remove, temperature selection from +2° to +20°C, digital temperature display, optical and acoustic warning in case of temperature deviation, safety control device to prevent freezing, switch centre with key switch, minimum/maximum temperature memory, potential free contact for BMS-system P.O. Box 18 40 77608 OFFENBURG, Germany +49 (0)781 9227-0 Fax: +49 (0)781 9227-200 E-Mail: [email protected] www.kirsch-offenburg.de General Instructions: In position P, the appliance works as in position 1, but it is possible to set or adjust the nominal value and warning threshold. Proper use: This pharmaceuticals refrigerator has been designed for the commercial storage of medications, which have to be kept refrigerated. NOTE: Only run the appliance in position 1. We recommend removing the key to avoid the appliance being switched off by mistake. Please read through these operating instructions carefully before putting the appliance into operation. They contain important notes for the installation, use and maintenance of the appliance. The manufacturer shall not be held liable if the following instructions are not observed: Do not operate any appliance that has been damaged during transport. If in doubt, contact the supplier. Electrical connections must match the specifications on the type plate. The electrical safety of the appliance is only guaranteed if the earth system in the building wiring is installed correctly. In the event of interruption to operation, for maintenance, and for cleaning, always disconnect the appliance from the mains: remove the mains plug (do not pull it by the cable) or switch off/unscrew the fuse. Repairs are to be carried out by suitably qualified persons only. Incorrect repairs may result in serious risk to users. Do not damage any components in the refrigerant circuit. If the evaporator pipes are pierced by a sharp object, other pipes are bent, or the surface finish is scratched off, refrigerant spraying out can lead to eye injuries. Do not cover or close ventilation or aeration openings. Keep the key out of reach of children. Worn out appliances must be immediately rendered useless. Remove the mains plug and cut off the supply cable. Remove or destroy locks, to prevent children from locking themselves in whilst playing, as this could be fatal. Please contact your municipal waste disposal office for details of how to dispose of the appliance correctly. Please ensure that the refrigerator pipes are not damaged in any way before the appliance is transported away to disposed of in a correct and environmentally friendly manner. Transporting the Appliance: For transportation in a motor vehicle, the appliance must be kept vertical. If it has to be transported to its set-up location in a horizontal position for reasons of space, do not switch the appliance on for at least 1 hour after it installation. Setting up the appliance: Set up the appliance in a dry and well-ventilated position, away from heat sources. The appliance must stand firm and on an even surface. Use the adjustable feet to compensate for any unevenness of the floor surface (except Labex-105). Getting Started: Before putting the refrigerator into operation for the first time, clean the inside (see under cleaning). Electrical Connection: Connect the appliance to 220-240 Volt, 50/60 Hz AC supply (see type plate inside the appliance) via a properly installed socket. Fuse = 10 Amperes. Key Switch (1) The key switch has 3 settings. In position 0, the appliance is switched off. As long as the appliance remains connected to the mains supply, the word “OFF” will appear on display 3. In position 1, the appliance is switched on. Switching On: Turn the key switch (1) to position 1. NOTE: If the unit is equipped with an incorporated data logger, the display shows “rtc”. Please set the clock according to the accompanying sheet. The time can be set in the parameter level or with the software. The interior temperature is shown in the display (4). Press the Set 12 button to view the set nominal temperature. In the same way, the upper temperature warning threshold can be viewed by pressing the T = button and the lower temperature warning threshold can be viewed by pressing the T = 13 button. Advice: After switching on the temperature alarm will be activated after reaching the warning limit, but latest after 2 hours. Setting the Temperature: Turn key switch 1 to position P for the duration of the adjustment procedure. Press the Set 12 button to show the interior temperature in the display (4). Temperature is adjusted ex works to +5°C. To change the temperature setting, keep the Set 12 button depressed and use the Max or Min buttons to set the required refrigeration temperature. Once temperature is set, return the key switch (1) to position 1. The current interior temperature is displayed again. The set nominal refrigeration temperature is automatically saved. It is retained even following a power failure or if the appliance is switched off. The temperature regulator keeps the interior temperature to the set temperature, providing the environment temperature is approx. 3°C above the set interior temperature. Warning Device: The warning device works independently of temperature control. Setting the Temperature Warning Thresholds (fixed ex works to +10° and +2°C): NOTE: To change the warning threshold, the upper temperature warning threshold should be set at least 3°C higher and the lower temperature warning threshold at least 3°C lower than the selected refrigerator temperature. Turn key switch 1 to position P for the duration of the adjustment procedure. Upper temperature warning threshold: keep the T = button depressed and use the Max and Min buttons to set the required temperature. Lower temperature warning threshold: keep the T = 13 button depressed and use the Max and Min buttons to set the required temperature. Then return the key switch (1) to position 1. Temperature Alarm: If the temperature falls below or rises above the set temperature warning thresholds, an audible signal is sounded, the remote warning contact is triggered and display (4) flashes alternately between the current temperature and the fault message (see fault and status messages). The alarm sound can be switched off using the Reset button. If the alarm status is still not eliminated after this, the alarm will sound again every 30 minutes. If, in the case of an alarm state, the alarm sound is not switched off and the alarm state is automatically eliminated, then the alarm sound will stop but the display continues to flash to show that an alarm state has been triggered. To stop the flashing, press the Reset button. Monitoring Unit Display Fault: In the case of a fault which means the display and operating unit will not function, the alarm sound can only be switched off by disconnecting from the mains. Mains Power Failure (Only Appliances Without Battery Pack) In the case of a mains power failure, the display will go completely blank. However, the remote warning contact will be triggered. After elimination of the problem, the appliance will continue to work normally. Minimum/Maximum Temperature Memory: The min./max. memory starts when the nominal temperature is reached for the first time. It stores the highest and lowest temperature values since either the initial start or the last reset. Requesting/Deleting Minimum/Maximum Temperature: For the min. or max. temperature to be shown on the display (4), press the respective or button and. To delete the max. memory, keep the button depressed and reset the value using the button. To delete the min. memory, keep the button depressed and reset the value using the button. The display (4) will show “----”. Mains Power Failure (Only Appliances With Battery Pack): In the case of a mains power failure, the audible alarm is sounded, the remote warning contact is triggered and the display alternates between current temperature and the fault message PF (power failure). The alarm sound can be switched off using the Reset button. If the alarm status is not eliminated, the alarm will sound again every 30 minutes. The monitoring unit remains in operation for approx. 72 hours. After elimination of the problem, the appliance will continue to work normally. Connection to Central Conductor Technology: The terminals for the RS 485 interface and the voltage-free alarm contact (3 pole alternating contact) are on the back of the appliance. This is contact completed during an alarm status and when the appliance is switched off. Exception: door open alarm. The contact is designed for max. 42V 1A. Defrosting: If required, the appliance will automatically defrost every 12 hours. During the defrosting process, the yellow diode lights up. The meltwater is channelled into a dish, where it must be removed manually. The meltwater collector inside the appliance must be checked regularly and emptied manually. Cleaning and Maintenance: Before cleaning, always remove the plug from the mains or switch off/unscrew the fuse. If necessary, additional defrosting can be initiated by pressing the “defrost” button (for at least 4 seconds). Cleaning water must not be allowed into the electrical components. Switching Off: To switch off the appliance, turn the key switch (1) to position “0”. As long as the appliance is still connected to the mains supply, the display (4) indicates “OFF”. If the appliance is to remain off for some time, remove the mains plug and open the door, in order to prevent formation of odours and mould. Clean the drawers using warm water and mild detergent. Abrasive or acidic cleaning agents or chemical solvents are not suitable. Only rinse the door seal with clean water and dry it thoroughly. The drawers and shelves can be removed for cleaning. Treat the outside casing with paint cleaner and care agent. Safety Regulation: If the control sensor (not at compressor) is faulty, the fault message E1 will appear in the display (4), an emergency programme takes over regulation of the refrigerator, and the alarm is sounded at the same time. This is to ensure that the refrigeration temperature remains within the warning threshold values. For this, the refrigeration temperature is dependant both on when the door is opened and on the ambient temperature, as regulation is only time-controlled and not temperature-controlled. Therefore, it is essential to contact customer services immediately. 1 2 3 7 8 Every 3-6 months, clean the condenser (black wire construction), which is situated either on the back or inside the machine room – depending on the model – using a brush or vacuum cleaner. This ensures that the refrigerator works to full capacity. 4 9 10 11 5 6 12 13 Fault and Status Messages Fault messages are displayed alternately with the current temperature. If no temperature value is available, then the fault message will flash. If several faults have occurred, these are displayed in succession and alternately with the temperature value. Display Cause Effect OFF Key switch in position 0 Appliance connected regulator on stand-by Diode 9 Flashing: thawing necessary On: thawing process active On: collective alarm Temperature above warning threshold A1 Diode 11 Hi Lo Temperature threshold A2 E1 Cold store sensor fault, break or short-circuit E2 Evaporator sensor fault, break or short-circuit monitoring sensor 1fault, break or short-circuit Fault during self-test in cooling regulator Loss of data in parameter memory E3 EP0 EP1 below warning EP2 Fault during self-test by operating panel EP3 Loss of data in operating panel parameter memory EP4 Fault during self-test in monitoring circuit EP5 Loss of data in monitoring circuit parameter memory EP6 Loss of data in data memory F90 – F93 Hardware conflict Optional Equipment: Acc Battery pack fault PF Power failure rtc Time not correct Measure to mains supply, Switch appliance on, turn key switch to position 1 High temperature alarm (poss. too many warm items at once or door left open too long) Observe whether status soon returns to normal. If not, there is a technical problem. Call customer services Observe whether status soon returns to normal. If not, there is a technical problem. Call customer services Low temperature alarm, safety device is triggered, monitoring circuit has switched off the refrigerator (can occur if the door has been open for a long period, if the appliance is under-cooled by the refrigeration unit). Cold regulator works in emergency programme Cold regulator works normally, thawing is only limited by time Cold regulator continues to work, monitoring circuit has no temperature control Monitoring circuit takes over temperature control Cooling regulator switches off, monitoring circuit takes over temperature control Cooling regulator and monitoring circuit working, buzzer and alarm relay in monitoring circuit are on Cooling regulator switches off, monitoring circuit takes over temperature control Cooling regulator is active Monitoring circuit triggers alarm but does not intervene in temperature regulation Cooling regulator is active Monitoring circuit triggers alarm but does not intervene in temperature regulation Cooling regulator is active, monitoring circuit triggers alarm, no data recording Check sensor Call customer services Check sensor Call customer services Check sensor Call customer services Call customer services Check parameters Call customer services Call customer services Check parameters Call customer services Call customer services Check parameters Call customer services Call customer services Check connecting cable between operating panel and control board, otherwise replace control unit No cooling, alarm triggered, remote warning contact triggered Wrong time for data output Replace battery pack or check connection, call customer services Check power supply Set clock according accompanying sheet If a fault status cannot be eliminated immediately, store the contents in another refrigerator and do not use the appliance until the service technician arrives. EC Declaration of Conformity Konformitätserklärung Déclaration de Conformité We, Philipp Kirsch GmbH, Okenstraße 103, 77652 Offenburg, Germany, accepting sole responsibility, declare that the product described below is compliant with the protective requirements of the specified directives and standards at the time of entering into circulation. Product description: Make Kirsch Kirsch Kirsch Kirsch Appliance Category Refrigerator Refrigerator Refrigerator Refrigerator Type LABEX-105 LABEX-285 LABEX-335 LABEX-465 from factory no. from factory no. from factory no. from factory no. 100 061 0100 280 110 1001 330 090 1001 460 040 1001 Directives: EC Low Voltage Directive 73/23 EEC and 93/68 EEC, Electromagnetic Compatibility 89/336 EEC Harmonised standards: EN 55014-1:2000+A1:2001+A2:2002 EN 61000-3-2:2000, EN 61000-3-3:1995+A1:2001 EN 50366:2003, EN 55014-2:1997+A1:2001 Year of EC labelling (low voltage directive): 2006 Offenburg, 6th March 2006 Georg Kirsch Managing Director to For refrigerators and freezers with optional settings Setting the date and time: Turn key switch to position "P". Press key 3 and key 8 at the same time until PA0 is shown in the display, and then release the keys. Press the Set key 12 briefly. The display will show the first parameter d1 in the menu level. When you are in this level, you can page through the parameter list with the key 3 or key 8 . Press the SET key to show the value of the set parameter. If you then press the key 3 or key 8 you can change this value. When you release the SET key, the new value is saved immediately. The display will automatically switch back to the basic display if no key has been pressed for 45 seconds or when the keys 3 and 8 are pressed simultaneously for about 4 seconds, or by turning the key switch to position 1. Parameter Description of function Setting range Standard value d1 Defrosting interval 8 hrs. d3 H1 Stop at defrosting temperature Actual value of refrigeration compartment sensor F1 Actual value of evaporator sensor F2 if applicable Actual value of monitoring sensor F3, no delay 0 = no automatic defrosting 1 = …..99 hrs. 0 ……. 30.0°C - - - - - - -99 ……99.0 K -99 ……99.0 K - 0.0 K 0.0 K - 0:00 …..23:59 1.01. … 31.12. 2000 ….2099 0 = Monday ……..6 = Sunday 0 …4 -99 …….999 0 0 0 H2 H3 H4 H5 H6 H15 r2 r3 r4 r5 H0 PA0 Actual value of monitoring sensor F4 no delay, if applicable Correction analogue input 1/2 Correction analogue input 3/4 Actual value of battery voltage (for battery option) Current time Current date Year Weekday Service display Password menu level PA0 5.0°C - The parameters r2 to r5 are for the time and date. The other parameters have been set ex-works and should not be changed. If rtc is shown in the display, the time and date are not set correctly. The parameter H0 allows you to bring a certain sensor into the display for 5 minutes. After this time the display automatically switches back to the normal display. A 1 needs to be entered for sensor F1, a 2 for sensor F2 etc. Connection of the RS 485 interface with the gateway: The 10 m long screened line in the PC Kit can be shortened to the required length. Depending on the model, the interface is on the reverse or above in the machine compartment. The enclosed metal strain-relief also serves to bond the line screening. To do this, the screening and the line sheath need to be clamped under the strain-relief. Of the four wires in the line, only the brown and white wires are required. Connect contact 1 and 2 to terminal x11 on the reverse of the refrigerator. There is a load resistor connected to the terminal X12; this is only removed if several refrigerators are connected into a network. The other end of the line is connected to the gateway on terminals 1 and 2. Caution: Ensure that contact 1 is connected with 1 and contact 2 with 2. Connect the gateway with the enclosed USB cable to the USB interface on the computer. Switch the gateway on using the on/off switch. Install the software. 4147/07.07