1
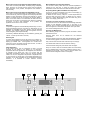
General Instructions: In position P, the appliance works as in position 1, but it is possible to set or adjust the nominal value and warning threshold. Proper use: This pharmaceuticals refrigerator has been designed for the commercial storage of medications, which have to be kept refrigerated. NOTE: Only run the appliance in position 1. We recommend removing the key to avoid the appliance being switched off by mistake. Please read through these operating instructions carefully before putting the appliance into operation. They contain important notes for the installation, use and maintenance of the appliance. The manufacturer shall not be held liable if the following instructions are not observed: Do not operate any appliance that has been damaged during transport. If in doubt, contact the supplier. Electrical connections must match the specifications on the type plate. The electrical safety of the appliance is only guaranteed if the earth system in the building wiring is installed correctly. In the event of interruption to operation, for maintenance, and for cleaning, always disconnect the appliance from the mains: remove the mains plug (do not pull it by the cable) or switch off/unscrew the fuse. Repairs are to be carried out by suitably qualified persons only. Incorrect repairs may result in serious risk to users. Do not damage any components in the refrigerant circuit. If the evaporator pipes are pierced by a sharp object, other pipes are bent, or the surface finish is scratched off, refrigerant spraying out can lead to eye injuries. Do not cover or close ventilation or aeration openings. Keep the key out of reach of children. Worn out appliances must be immediately rendered useless. Remove the mains plug and cut off the supply cable. Remove or destroy locks, to prevent children from locking themselves in whilst playing, as this could be fatal. Please contact your municipal waste disposal office for details of how to dispose of the appliance correctly. Please ensure that the refrigerator pipes are not damaged in any way before the appliance is transported away to disposed of in a correct and environmentally friendly manner. Transporting the Appliance: For transportation in a motor vehicle, the appliance must be kept vertical. If it has to be transported to its set-up location in a horizontal position for reasons of space, do not switch the appliance on for at least 1 hour after it installation. Setting up the appliance: Set up the appliance in a dry and well-ventilated position, away from heat sources. The appliance must stand firm and on an even surface. Use the adjustable feet to compensate for any unevenness of the floor surface (except Labex-105). Getting Started: Before putting the refrigerator into operation for the first time, clean the inside (see under cleaning). Electrical Connection: Connect the appliance to 220-240 Volt, 50/60 Hz AC supply (see type plate inside the appliance) via a properly installed socket. Fuse = 10 Amperes. Key Switch (1) The key switch has 3 settings. In position 0, the appliance is switched off. As long as the appliance remains connected to the mains supply, the word “OFF” will appear on display 3. In position 1, the appliance is switched on. Switching On: Turn the key switch (1) to position 1. NOTE: If the unit is equipped with an incorporated data logger, the display shows “rtc”. Please set the clock according to the accompanying sheet. The time can be set in the parameter level or with the software. The interior temperature is shown in the display (4). Press the Set 12 button to view the set nominal temperature. In the same way, the upper temperature warning threshold can be viewed by pressing the T = button and the lower temperature warning threshold can be viewed by pressing the T = 13 button. Advice: After switching on the temperature alarm will be activated after reaching the warning limit, but latest after 2 hours. Setting the Temperature: Turn key switch 1 to position P for the duration of the adjustment procedure. Press the Set 12 button to show the interior temperature in the display (4). Temperature is adjusted ex works to +5°C. To change the temperature setting, keep the Set 12 button depressed and use the Max or Min buttons to set the required refrigeration temperature. Once temperature is set, return the key switch (1) to position 1. The current interior temperature is displayed again. The set nominal refrigeration temperature is automatically saved. It is retained even following a power failure or if the appliance is switched off. The temperature regulator keeps the interior temperature to the set temperature, providing the environment temperature is approx. 3°C above the set interior temperature. Warning Device: The warning device works independently of temperature control. Setting the Temperature Warning Thresholds (fixed ex works to +10° and +2°C): NOTE: To change the warning threshold, the upper temperature warning threshold should be set at least 3°C higher and the lower temperature warning threshold at least 3°C lower than the selected refrigerator temperature. Turn key switch 1 to position P for the duration of the adjustment procedure. Upper temperature warning threshold: keep the T = button depressed and use the Max and Min buttons to set the required temperature. Lower temperature warning threshold: keep the T = 13 button depressed and use the Max and Min buttons to set the required temperature. Then return the key switch (1) to position 1. Temperature Alarm: If the temperature falls below or rises above the set temperature warning thresholds, an audible signal is sounded, the remote warning contact is triggered and display (4) flashes alternately between the current temperature and the fault message (see fault and status messages). The alarm sound can be switched off using the Reset button. If the alarm status is still not eliminated after this, the alarm will sound again every 30 minutes. If, in the case of an alarm state, the alarm sound is not switched off and the alarm state is automatically eliminated, then the alarm sound will stop but the display continues to flash to show that an alarm state has been triggered. To stop the flashing, press the Reset button. Monitoring Unit Display Fault: In the case of a fault which means the display and operating unit will not function, the alarm sound can only be switched off by disconnecting from the mains.