1
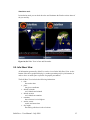
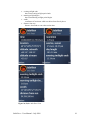
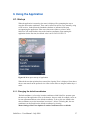
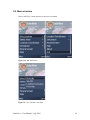
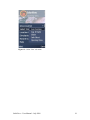
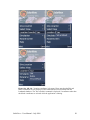
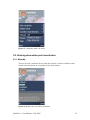
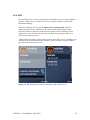
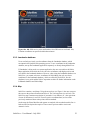
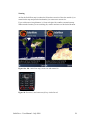
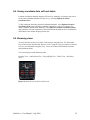
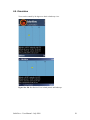
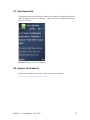
SolarView
User Manual
©AR Software
Contents
1. Introduction......................................................................................................................3
2. Application in General.....................................................................................................4
2.1 Hardware and software requirements .......................................................................4
3. Key Concepts...................................................................................................................5
3.1. Location coordinates.................................................................................................5
3.2. Sunrise and sunset time.............................................................................................6
3.2.1. Refraction...........................................................................................................6
3.3. Sun’s position in the sky...........................................................................................6
3.3.1. Sun’s altitude.....................................................................................................6
3.3.2. Sun’s direction, or azimuth................................................................................6
3.3. Noontime...................................................................................................................7
3.4. Morning and evening twilight...................................................................................7
3.5. Clock time.................................................................................................................7
4. Application Modes...........................................................................................................9
4.1. Real-time mode.........................................................................................................9
4.5. Simulation mode.......................................................................................................9
5. Application Views.........................................................................................................11
5.1. Opening view..........................................................................................................11
5.2. Sun Position View...................................................................................................11
5.3. Day and Night View...............................................................................................13
5.4. Globe View.............................................................................................................14
5.5. Info Sheet View......................................................................................................15
6. Using the Application....................................................................................................17
6.1. Start-up....................................................................................................................17
6.1.1. Changing the default coordinates.....................................................................17
6.2. Menu structure........................................................................................................18
6.3. Entering observation point coordinates..................................................................21
6.3.1. Manually..........................................................................................................21
6.3.2. GPS..................................................................................................................22
6.3.3. Landmarks database.........................................................................................23
6.3.4. Map..................................................................................................................23
6.4. Saving coordinate data, edit and delete...................................................................25
6.5. Browsing views.......................................................................................................25
6.6. Orientation..............................................................................................................26
6.7. View-based help......................................................................................................27
6.8. Support and feedback..............................................................................................27
SolarView – User Manual – July 2009
2
1. Introduction
The length of day varies around the globe, depending on the time of year and observation
point. Variations due to the time of year are particularly great at northern and southern
latitudes. In Finland, the University Almanac gives the sunrise and sunset times for a few
locations, but precise local data is hard to come by. Indeed, the variation in sunrise and
sunset times in practice between Finland’s westernmost and easternmost points amounts
to dozens of minutes, while it can be even greater between the northern and southern
reaches of the country.
Using the SolarView application, users can obtain precise sunset and sunrise times for
any date or location, whether in their own backyards or at far-flung foreign holiday
destinations. SolarView also provides other, fascinating information related to the sun’s
position during the day, such as its altitude from the horizon at its highest point, and how
long it remains above the horizon on the day in question.
SolarView – User Manual – July 2009
3
2. Application in General
SolarView is for anyone interested in sunrise or sunset times, or the sun’s journey
through the heavens during the day, and how this varies throughout the year.
Based on the entered coordinates and clock time, the application calculates data related to
the sun’s movements and presents it in either graphical or text format. Using graphics,
SolarView displays the sun’s position in the sky and the phases of the day (day, twilight
and night), both locally and around the world. The sun’s position in the sky is given in
text format, as well as its altitude at noon, the time it rises and sets, the precise mid-day
time, the length of day, the distance between the Earth and the sun, and the time that
morning twilight begins and evening twilight ends, for a given location and day of the
year. In addition, the application displays the coordinates at which the sun is at its zenith,
meaning that it shines from directly above.
Using SolarView, users can follow the sun’s position or the related changes during
daylight hours, for different times of the year and day. In so-called simulation mode, the
user can move the time backwards and forwards using the phone’s arrow keys. He or she
can thereby check the sun’s position say, in an hour’s, day’s, month’s or half a year’s
time. The day length at different times about a year from now can also be followed.
SolarView will calculate all of the required data on the basis of the given coordinates and
clock time. The user can enter coordinates in many ways: via a GPS receiver, manual
entry, using the solution’s world map to indicate a location or fetching previously stored
location data from the Landmarks database. Location coordinates entered in SolarView
can also be saved in the Landmarks database.
2.1 Hardware and software requirements
To run, SolarView requires the Symbian S60 3rd Edition operating system. In addition, a
device including a built-in or separate GPS receiver is recommended, in order to enable
the flexible entry of coordinates. SolarView also uses the Landmarks database, which in
turn is compatible with the Nokia Maps application. The user will therefore benefit most
from SolarView if he or she has these applications. However, you can still use SolarView
without the Landmarks database and Nokia Maps.
SolarView does not use any payable software resources. All calculation is performed
within the phone itself and the application even works well without a SIM card.
SolarView – User Manual – July 2009
4
3. Key Concepts
3.1. Location coordinates
In SolarView, the observation point is given in latitude and longitude coordinate pairs.
Latitude
A value can be given between -90 and +90 degrees. Thus, while the equator has a latitude
of 0 degrees, the northern hemisphere has positive latitudes of 0°...+90° and the southern
hemisphere negative ones within the same range (0...-90°). So, the North Pole is located
at 90 degrees North (+90°) and the South Pole at 90 degrees South (-90°). At the time of
writing, the author’s latitude is 60°21′50″N or 60 degrees, 21 minutes and 50 seconds
North (+60.3639°). In measurements of latitude, ‘N’ stands for North and ‘S’ for South,
in relation to the equator.
Longitude
A value can be given between -180 and +180 degrees for a longitude or meridian. The
international zero longitude reference, the Prime Meridian, passes through Greenwich in
London. Locations to the east of the Prime Meridian have a positive longitude of 0...+180
and those to the west have a negative one of 0...-180. At the time of writing, the author’s
longitude was 25°05′51″E or 25 degrees, 5 minutes and 51 seconds East (+25.0975°). In
measurements of longitude, ‘E’ stands for East and ‘W’ for West in relation to the Prime
Meridian.
Location coordinates
A precise location on the globe can be obtained by combining latitude and longitude
coordinates. At the time of writing, the author’s precise position on the globe was
60°21′50″N 25°05′51″E (+60.3639°, +25.0975°).
Coordinate notation
SolarView displays coordinates in traditional style, in degrees, minutes and seconds (e.g.
25°05′51″E). Coordinates entered manually must be given in decimal form, to a
maximum accuracy of four decimal places. Conversion of the traditional style into
decimal notation is easy, by bearing in mind the simple rule that one degree equals 60
minutes and one minute 60 seconds.
Example: Convert 25°05′51″E into decimal notation.
Begin by converting the seconds into minutes: 51 seconds equals 51/60 minutes or 0.85
minutes, so the intermediate coordinate data can be expressed as 25°05.85.
To convert minutes into degrees: 5.85 minutes equals 5.85/60 degrees or 0.0975 degrees,
giving coordinate information in decimal format of +25.0975° (the plus sign indicates
that the location is east of the Prime Meridian).
SolarView – User Manual – July 2009
5
Accuracy
The above coordinates are given to the nearest second. In practice, this represents
accuracy to within 30 metres. For SolarView’s purposes, such accuracy is sufficient.
3.2. Sunrise and sunset time
The sunrise and sunset times given by the application refer to the moment when the upper
edge of the sun touches the horizon. This is based on a theoretical situation in which the
observer is in a flat location level with the horizon, for example at sea. In practice,
forests, hills, mountains and buildings usually obscure the horizon. In addition, account
must be taken of the refraction or bending of the sun’s rays by the atmosphere.
3.2.1. Refraction
The refraction or bending of light by the atmosphere makes objects, such as the sun,
appear higher than they really are. Air temperature, air pressure and the curvature of the
atmosphere all affect the strength of the refractive effect. For this reason, refraction can
be difficult to define precisely, since data is required on atmospheric conditions along the
route followed by the refracted light at the observation time.
In calculating the sunrise and sunset time, SolarView uses a generally agreed refraction
value, which is 34 arc minutes (34'). This so-called horizon refraction slightly exceeds the
diameter of the sun’s disc (32'), making the sun’s lower edge appear to be just touching
the horizon when the sun has, in fact, already set.
3.3. Sun’s position in the sky
3.3.1. Sun’s altitude
SolarView gives the sun’s altitude above the horizon to an accuracy of one hundredth of
a degree. Altitude is measured from the horizon to the centre point of the sun’s disc. If
the sun’s altitude is given as a negative figure, this means that centre-point of the sun’s
disc is below the horizon. On such occasions, the sun’s topmost rim may well still be
above the horizon, i.e. the sun will not yet have fully set.
3.3.2. Sun’s direction, or azimuth
SolarView gives the direction of the sun from due north, in a clockwise direction,
accurate to the nearest hundredth of a degree. In astronomy, this is known as the azimuth.
The azimuth can be given between 0 and 360 degrees. For example, when the sun is due
south, its azimuth is 180°.
SolarView – User Manual – July 2009
6
3.3. Noontime
In everyday language, noontime is the time of day at which the clock shows 12.00. In
SolarView, noontime is the point at which the sun’s altitude above the horizon is at its
greatest. In many cases, these two times of day diverge.
For example, Finland’s time zone is UTC+2 and in Finland the sun is at its highest at
12.00 noon only on the 30th meridian east, which bisects East Finland through the town of
Lieksa. In Helsinki, for example, noontime is 20 minutes later and in Eckerö in Åland
over 40 minutes later.
Because SolarView uses precise coordination data, it is capable of displaying the exact
noontime and the sun’s altitude above the horizon at noon.
3.4. Morning and evening twilight
In SolarView, twilight is defined as so-called civil twilight, during which the sun is at
most six degrees below the horizon.
In astronomy, there are usually several degrees of twilight between civil twilight and
complete darkness.
Civil twilight The sun is 0–6 degrees below the horizon. Both the brightest stars and
planets such as Venus become visible. The term, civil twilight, is derived from the fact
that, during the middle ages, craftsmen of burghers were still able to work at this time of
day without artificial light.
Nautical twilight During nautical twilight, the sun is 6–12 degrees below the horizon.
The term derives from the ability, in the past, of seafarers to use their sextants to gauge
the vessel’s position during the time when the horizon was still clearly visible and the
stars began to become discernible.
Astronomical twilight During astronomical twilight, the sun is 12–18 degrees below the
horizon. Astronomical observations can already be made when a glimmer of light
remains on the horizon.
Darkness: During the hours of darkness, the sun is over 18 degrees below the horizon.
3.5. Clock time
When performing calculations, SolarView uses the phone’s time settings and displays the
results based on these.
The phone’s time settings include the clock time and the time zone. For the calculation to
give the right time, both of these must be right. Users should bear this in mind, especially
when entering coordinates for other time zones. For example, times for sunrise and
SolarView – User Manual – July 2009
7
sunset, and twilight start and end times, will be given in Finnish time (UTC+2) for
coordinates entered for England (UTC+0), if the phone settings are in Finnish time.
SolarView – User Manual – July 2009
8
4. Application Modes
4.1. Real-time mode
SolarView has two modes: real-time and simulation mode. In real-time mode, the
application uses the last-given coordinates and the phone’s time setting (clock time),
recalculating all data and updating the display at intervals of 30 seconds.
Figure 1. Sun Position View in real time.
Should the user wish to view calculations for some time in the future or past, he or she
must switch to simulation mode. An alternative, but more awkward method would
involve changing the phone’s clock time and restarting SolarView.
4.5. Simulation mode
In simulation mode, the user can move forwards and backwards to any time, using the
phone’s arrow keys. The arrow keys can be used in this way in all views apart from the
Info Sheet view, in which the arrow keys are used for list browsing.
There are two simulation modes: Minutes & Hours, and Days & Months. Enter
simulation mode by selecting menu Options>Simulation>Minutes & Hours or
Options>Simulation>Days & Months.
In Minutes & Hours simulation mode, you can move backwards and forwards in minute
and hour-long intervals. Correspondingly, Days & Months simulation mode allows you
to move backwards and forwards a day or month at a time. Using these different
methods, the user can change the observation time quickly, to the preferred year, day and
SolarView – User Manual – July 2009
9
time of day. Use the Left and Right arrow keys to move in short steps (minutes and days)
and the Up and Down arrow keys to move in big steps (hours and months).
Figure 2. On this phone model, the navigation key (circled in red) doubles as the arrow
keys.
Simulation mode is in effect when the clock time field text displays in red and the time is
followed by the letter ‘s’ in brackets.
Figure 3. Sun Position View in simulation mode.
SolarView – User Manual – July 2009
10
5. Application Views
5.1. Opening view
The Opening view consists of a background image and textbox only. The textbox at the
bottom of the screen gives the last-entered coordinates, sunrise and sunset times and the
clock time.
Figure 4. Opening View
5.2. Sun Position View
In the Sun Position View, the sun’s position in the sky is presented graphically. The sky
is represented in blue and the sun as a yellow circle. Vertical, black dashed lines
represent the main compass directions.
At the bottom of the screen there is a textbox that shows the altitude and azimuth of the
sun, the altitude of the sun at noon (noontime is shown in parenthesis), the sunrise- and
sunset time, and the observation time.
Since the sun moves through 360 degrees in a single day, the screen’s width represents
360 degrees. Its height represents 90 degrees. In SolarView, the azimuth is given in
degrees from due north in a clockwise direction, corresponding to the following degrees
and compass directions:
North: 0°
North-east: 45°
SolarView – User Manual – July 2009
11
East: 90°
South-east: 135°
South: 180°
South-west: 225°
West: 270°
North-west: 315°
In SolarView, the sun’s altitude is given in degrees from the horizon, between -90 and
+90 degrees. A negative figure indicates that the sun is below the horizon.
Black, dashed lines indicate the main directions of East, South and West in the northern
hemisphere. If the observer is in the southern hemisphere, the dashed lines indicate the
directions of West, North and East. In precise terms, reference to the northern and
southern hemispheres does not, in this case, mean the areas to the north and south of the
equator. The dividing line is in fact the latitude at which the sun is at its zenith i.e. is
shining directly above. This latitude varies throughout the year, between the tropics of
Cancer and Capricorn.
The compass direction is given by a letter at the top of each broken line: East (E), South
(S) and West (W), or West (W), North (N) and East (E).
Figure 5a, 5b. Sun Position View at the same observation time in the northern
hemisphere from Finland (60°21′50″N 25°05′51″E) and in the southern hemisphere from
Namibia (17°58′44″S 12°02′34″E). The times are set at Finnish time (UTC+2).
At the time of writing this paragraph, at 14:29:53 on the 6th of October 2008, SolarView
showed that from the author’s backyard (60°21′50″N 25°05′51″E) the sun was +22.32°
above the horizon and its azimuth 202.21°, i.e. a little to the west of due south.
SolarView – User Manual – July 2009
12
Size of sun
To make it easier to see, the sun is depicted as disproportionately large on screen. In
SolarView it has a diameter of 12 pixels, which on a display 240 pixels wide would
correspond to a size of 18′, when its true diameter in the sky is 32′. This means that the
sun shown on a 240-pixel display is over 33 times larger than in nature.
Simulation mode
In simulation mode you can move backwards and forwards through time and view the
sun’s position in the sky during various times of the day or year.
Figure 6a, 6b, 6c. Three sun position views on the same day at 60°21′50″N 25°05′51″E.
5.3. Day and Night View
The different phases of the day are presented in graphic format in the Day and Night
View: day (yellow), twilight (dark grey) and night (black). Day refers to the period
between the sunrise and sunset time. Twilight refers to the period after the sun has set and
is, at most, 6 degrees below the horizon. Night refers to the period when the sun is more
than 6 degrees below the horizon.
The textbox at the bottom of the display shows the sunrise and sunset times, the day
length, noontime and the observation time.
SolarView – User Manual – July 2009
13
Simulation mode
In simulation mode, the user can view how the day length changes at different times of
the year.
Figure 7a, 7b. Day and Night View in June and December at 60°21′50″N 25°05′51″E.
5.4. Globe View
In the Globe View, those parts of the world in which the sun is visible above the horizon
(daytime) are displayed graphically, alongside those in which the sun is 0–6 degrees
below the horizon (twilight) and those in which it is over 6 degrees below the horizon
(night). Night areas are depicted in black, while twilight areas are shaded. Daytime areas
are displayed in bright colours. The sun is depicted in that part of the world in which it is
directly overhead i.e. at the zenith. A red circle indicates the last-given observation point.
In the textbox at the bottom of the screen, the coordinates are displayed at which the sun
is at its zenith, alongside the observation time.
SolarView – User Manual – July 2009
14
Simulation mode
In simulation mode you can check how the sun illuminates the Earth at various times of
the year and day.
Figure 8a, 8b. Globe View in June and December.
5.5. Info Sheet View
All information generated by SolarView can be viewed in the Info Sheet View. At the
bottom of the above graphical display is a textbox presenting only key information, in
order to leave as much space as possible for graphic presentation.
The Info Sheet View includes the following information:
• time
observation time
• place
last-given coordinates
• altitude, azimuth
sun’s altitude and azimuth
• altitude at noon
sun’s altitude at noontime
• noontime
time when sun is at its highest
• sunrise, sunset
sunrise and sunset time
• day length
time during which sun is above horizon
SolarView – User Manual – July 2009
15
•
•
•
•
evening twilight ends
time when evening twilight period ends
morning twilight begins
time when morning twilight period begins
zenith
coordinates of location at which sun shines from directly above
distance from sun
distance from Earth to sun at observation time.
Figure 9a, 9b, 9c. Info Sheet View
SolarView – User Manual – July 2009
16
6. Using the Application
6.1. Start-up
When the application is started up, the menu is displayed first, prompting the user to
enter the observation coordinates. These can be entered in various ways: manually, using
a GPS receiver, fetched from the Landmarks database or indicated on the map
accompanying the application. If the user selects none of these or selects Cancel,
SolarView will set the default value as the location coordinates. Upon starting the
application for the first time, the default value is 60°21′50″N 25°05′51″E.
Figure 10. Menu upon start-up of application
When the observation point has been entered, the Opening View is displayed, from where
the user can transfer to the preferred view either via the menu or using the number keys 4
and 6.
6.1.1. Changing the default coordinates
’Default coordinates’ refers to the location coordinates which SolarView presents upon
the start-up of the application. If he or she chooses, the user could, for example, set his or
her own permanent address as the default coordinates. To do so, the user should select
these coordinates as per the instructions in section 6.3. below. Following this, the new
coordinates can be turned into the default coordinates by selecting
Menu>Settings>SolarView>Options>Location Coordinates>Save as default.
SolarView – User Manual – July 2009
17
6.2. Menu structure
Below, SolarView’s menu structure is shown in screenshots.
Figure 11a, 11b. Main menu
Figure 12. ‘Give Location’ sub-menu
SolarView – User Manual – July 2009
18
Figure 13. ‘Select View’ sub-menu
SolarView – User Manual – July 2009
19
Figure 14a, 14b, 14c. ’Location coordinates’ sub-menu. Please note that the Edit and
Delete commands are only displayed if the coordinates have been fetched from the
Landmarks database. The ‘Set as default’ command is displayed if coordinates other than
the default coordinates are selected while the application is running.
SolarView – User Manual – July 2009
20
Figure 15. ‘Simulation mode’ sub-menu
6.3. Entering observation point coordinates
6.3.1. Manually
The user can enter coordinates directly from the keyboard. Location coordinates can be
entered in decimal format, to a maximum of four decimal places.
Figure 16. Manual entry of location coordinates
SolarView – User Manual – July 2009
21
6.3.2. GPS
Using a GPS receiver, the user can obtain precise information on his or her geographical
location. A GPS receiver can either be built in or comprise a separate module using
Bluetooth technology.
When, from the menu, the user selects Options>Give Location>GPS, SolarView
contacts the GPS receiver, which begins to search for GPS satellite signals. When
sufficient satellites to define the location have been detected, the coordinates will be
displayed on screen. The user can accept the coordinates by pressing the OK key, or
reject them by pressing Cancel.
A three-minute time-limit is set for satellite location. If no GPS receiver is available or no
coordinates can be defined within three minutes, an error message is displayed and the
user must return to the previous view.
Figure 17a, 17b. Searching for location coordinates using a GPS receiver.
SolarView – User Manual – July 2009
22
Figure 18a, 18b. GPS receiver error notifications: 18a) GPS receiver not found. 18b)
Location coordinates not specified within three minutes.
6.3.3. Landmarks database
Users can fetch previously saved coordinates from the Landmarks database, which
accompanies the Symbian S60 operating system. To save coordinates in the Landmarks
database, start up the Landmarks application separately or directly through SolarView.
If Landmarks is being used as a separate application, the user can switch to the Nokia
Maps application from which he or she can select coordinates with high precision and
save them in the Landmarks database. However, when using the Landmarks database via
SolarView, you cannot select new coordinates in Nokia Maps, but only save those
coordinates in the Landmarks database, which are offered by SolarView. See the
telephone’s user guide and the Nokia Corporation website for further information on the
Landmarks database and Nokia Maps.
6.3.4. Map
SolarView contains a world map. Using the arrow keys (see Figure 1) the user can move
the cursor to the preferred location and select it. The cursor appears as a red circle. The
SolarView map’s maximum resolution is just under 11 arc minutes (11′), the equivalent
of some 20 kilometres in real life. For more precise coordinate data, use one of the
previously mentioned observation point selection methods.
On the map, the Prime Meridian and equator are marked with an unbroken white line. A
broken white line depicts the tropics of Cancer and Capricorn and the Arctic and
Antarctic circles.
SolarView – User Manual – July 2009
23
Zooming
At first, the SolarView map is reduced to fit into the screen size. Press the asterisk (*) to
zoom into the map and press the hash mark (#) to zoom out to screen size.
If you wish to move long distances, it is best to begin with a smaller, zoomed out map.
When near the location you are searching for, zoom in and move to the desired location.
Figure 19a, 19b. SolarView map, screen size and zoomed in.
Figure 20. Zoom in (*) and zoom out (#) keys circled in red.
SolarView – User Manual – July 2009
24
6.4. Saving coordinate data, edit and delete
Location coordinates obtained using the GPS receiver, manually or using the map can be
saved in the Landmarks database for later use, by selecting Options>Location
coordinates>Save.
To edit coordinate data taken from the Landmarks database, select Options>Location
coordinates>Edit, upon which the Landmarks application’s edit view will open. To
delete coordinate data from the database, select Options>Location coordinates>Delete,
upon which the selected coordinates will be deleted from the database and a confirmation
notification of the deletion displayed to the user.
6.5. Browsing views
You can select the desired view either via the menu or using the keys. Use the number
keys to browse back and forwards between views. Using the 6 key you can move forward
to a view, and backwards using the 4 key. Views can be browsed in both the real-time
and simulation modes.
Views are displayed in the following order:
Opening View – Sun Position View – Day & Night View – Globe View – Info Sheet
View.
Figure 21. Browser keys 4 and 6 circled in red.
SolarView – User Manual – July 2009
25
6.6. Orientation
Views can be rotated by 90 degrees to obtain a landscape view.
Figure 22a, 22b. Sun Position View in both portrait and landscape.
SolarView – User Manual – July 2009
26
6.7. View-based help
The application has a built-in Help file, which you can open by selecting Help from the
menu. The Help function is view-based, i.e. when in each view, the Help text related to
that view will open.
Figure 23. Help text for Day & Night view.
6.8. Support and feedback
Questions and feedback can be sent by email to the following address:
[email protected]
SolarView – User Manual – July 2009
27