1
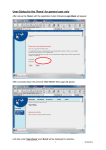
Underground Instruction Manual t4 Underground Instruction Manual Version 0.8 1.0 1.1 1.2 t4 Spatial Effective Date 01 February 2013 21 February 2013 4 June 2013 17 June 2013 Document Control Author John Manijak Brendan Marsh Brendan Marsh Maurice Mayclair Page 1 of 40 Status Draft Released Update for ver 1.6 Update for ver 1.7 t4 Underground v1.7 t4 Underground Instruction Manual Contents 1 Getting Started ................................................................................................................................................4 2 The Tools Tab ...................................................................................................................................................6 2.1 T4 Spatial Tools...........................................................................................................................................6 2.2 T4 Underground Tools ................................................................................................................................7 2.3 T4 Map Layers .............................................................................................................................................7 3 The Contract List ........................................................................................................................................... 10 4 Contract Page................................................................................................................................................ 13 4.1 Overview Tab ........................................................................................................................................... 13 4.2 Organizations Tab.................................................................................................................................... 14 4.3 Roles Tab .................................................................................................................................................. 14 4.4 Location Tab ............................................................................................................................................ 15 4.5 Attachments Tab ..................................................................................................................................... 16 4.6 Show Inspections ..................................................................................................................................... 17 5 The Inspections List ...................................................................................................................................... 18 5.1 Filtering Records ...................................................................................................................................... 19 5.2 Reports ..................................................................................................................................................... 19 5.3 Reviewing Data ........................................................................................................................................ 20 5.4 Video Review............................................................................................................................................ 21 6 t4 Underground Inspection Interface ........................................................................................................... 22 6.1 Overview Tab ........................................................................................................................................... 23 6.1.1 The Video Player ...................................................................................................................................... 24 6.1.2 The Action Center .................................................................................................................................... 25 6.1.3 Observations and Video Reports ............................................................................................................. 26 6.1.4 Inspection Related History....................................................................................................................... 27 6.2 Attachment Tab ....................................................................................................................................... 28 6.3 Notes Tab ................................................................................................................................................. 29 7 Interactive Map ............................................................................................................................................. 31 8 The Layers Tab .............................................................................................................................................. 33 8.1 Engineer’s Overall Grading: ..................................................................................................................... 34 8.2 Pipe Inspections Layer ............................................................................................................................. 35 8.3 External Layers (WMS) ............................................................................................................................ 37 t4 Spatial Page 2 of 40 t4 Underground v1.7 t4 Underground Instruction Manual Introduction Welcome to a new way of storing, reviewing, and analyzing your sewer inspection project. t4 Underground’s cloud based software and storage allows for instant access to your data online available anytime, anywhere! No more searching through piles of paperwork or hours of video. Now you have been empowered to make better decisions by being able to view all of your videos, inspection data, and status reports on one viewable source. t4 Spatial Page 3 of 40 t4 Underground v1.7 t4 Underground Instruction Manual 1 Getting Started Copy and paste the following to the address bar of your internet browser: http://underground.t4spatial.com This will bring you to the t4 Underground log in page. If you do not already have a username and password, please contact t4 Spatial at (805) 921 3000 or email us at [email protected]. Please enter your Username/Login in box #1, and your Password in box #2. Once you have correctly entered them, click on the LOGIN button (#3) . t4 Spatial Page 4 of 40 t4 Underground v1.7 t4 Underground Instruction Manual Immediately after logging in, you will see the t4 logo at the center of the screen. This will indicate that you have logged in properly and your session is beginning to load. Once fully loaded, you will be presented with an interactive map and three collapsible tabs: Tools, Layers and Time. You will also notice your name in the upper right hand corner of the software. Alongside your name you will find an orange circle with an “x”. This is the Logout button. Clicking on this will log you out and return you to the login screen. t4 Spatial Page 5 of 40 t4 Underground v1.7 t4 Underground Instruction Manual 2 The Tools Tab Located to the immediate left hand side of the screen you will find the Tools tab. Clicking on the circled arrow will hide the tab from sight. Clicking again on the arrow will fully extend the tab. You will find that the tab has 2 titles with five symbols. The top title is “t4 Spatial”. 2.1 T4 Spatial Tools Clicking on this symbol immediately closes the Tools tab and brings up a search location which will allow you to enter any address, cross streets, or town. t4 Spatial Page 6 of 40 t4 Underground v1.7 t4 Underground Instruction Manual After entering the location, click on the search button and the map will relocate to the entry. Clicking on the Red circle with the white “x” will close this tab. 2.2 T4 Underground Tools Next on the Tools tab you will find four buttons in a single line. The first button is the Contract List. When clicked will close the tools tab and open up the list of contracts that are available under your login. The second button a contract manager. is the Contract Wizard and is used when setting up contracts as The third button is the Inspection List. When clicked will close the tools tab and open up the list of inspections that are available under your login. The last button is the Report List. When clicked will open up the list of any previously saved Contract and Inspection List reports that are available to you. 2.3 T4 Map Layers The records in t4 Underground can be displayed as layers on the map and individually configured. By default t4 Spatial have set up the following layers. t4 Spatial Page 7 of 40 t4 Underground v1.7 t4 Underground Instruction Manual Engineers Overall Grading Is the editable value assigned to a pipe segment based on the inspection data and defaulted from the PACP recommendation. t4 Underground treats each Index Grading value as a discrete layer which allows users to view this data separately (or together). The default colors for these layers are taken from the NASSCO specifications but are editable by users. Pipe Inspections This layer highlights the location of video inspections within the system with notation about which filters are currently applied within the Inspection List. Filters can be removed from here (click on the white X) but not edited. GIS Pipe Network Records These three layers will (where provided) show the GIS records provided by asset owners to provide context to the inspection data. Contracts This layer shows the security jurisdiction of various inspection contracts and allows users to open those records. Where no GIS data has been provided inspections will be loaded to the center of these polygons. t4 Spatial Page 8 of 40 t4 Underground v1.7 t4 Underground Instruction Manual By clicking on the colored circle to the left of each Layer Name is possible to change the color and size of each layer item. These changes are individal to each users and will remain the next time you log in. t4 Spatial Page 9 of 40 t4 Underground v1.7 t4 Underground Instruction Manual 3 The Contract List Upon clicking on the Contract List shortcut button list of contracts available under your login. , t4 Underground brings up the Contract identifiers include Owner Number Contractor Number Status, Client Contractor Start Date End Date. The list of contracts can be sorted in the order of identifiers that you choose. t4 Spatial Page 10 of 40 t4 Underground v1.7 t4 Underground Instruction Manual For example, if you want to view the list of contracts by Start Date, click on the column header “Start Date”. This will sort the list of contracts by Start Date. t4 Underground also allows for the user to set filters on the line items displayed. By clicking on the button, a list of indexes drops down. By clicking on any of the items, the user is then directed to add any of a number of filters. These filter “conditions” are then listed just above the “add” button. t4 Spatial Page 11 of 40 t4 Underground v1.7 t4 Underground Instruction Manual After each condition has been entered the filtered list is updated. To undo or change any of the filter items, locate the two buttons alongside each condition. The “wrench” button allows the user to change the item while the “minus” button will eliminate the filter item altogether. While viewing any list of contracts you can save the filter as a report by clicking on the Context Menu and “Save as New Report”. Once you have found the contract of choice, click on the inspections associated with that contract. list button to display Click on the “wrench” button or double click elsewhere on the row to open the Contract page. t4 Spatial Page 12 of 40 t4 Underground v1.7 t4 Underground Instruction Manual 4 Contract Page The contract page offers a full description of the contract. There are five tabs available at the top of the page: Overview Organizations Roles Location Attachments 4.1 Overview Tab The Overview tab offers the Status of the contract, the Client, the Contractor, as well as the Starting and Ending dates. t4 Spatial Page 13 of 40 t4 Underground v1.7 t4 Underground Instruction Manual 4.2 Organizations Tab The contract Organization tab offers information on the active organizations associated with this contract. All users who are members of these organizations will automatically be granted Read Only access to the inspections within it. Elevated edits rights are only granted to those users explicitly named on the following tab <Roles>. 4.3 Roles Tab t4 Spatial Page 14 of 40 t4 Underground v1.7 t4 Underground Instruction Manual The contract Roles tab offers information on the active users and their roles (or level of activity) within this particular contract. Those with Engineer role can add basic data to the inspection record such recommended follow up actions. Those with Contract Manager role can perform all Engineer actions as well as administering users and editing financial information. 4.4 Location Tab Each contract can have an area or location defined for it. This helps us import records in the t4 Underground software when GIS files are unavailable. The Drawing tool is operating by adding a single click to add a new point to the polygon and a double click to ‘close’ the polygon when complete. t4 Spatial Page 15 of 40 t4 Underground v1.7 t4 Underground Instruction Manual Once the contract has been fully drawn you can select the Finish option return to the contract screen. 4.5 Attachments Tab The contract Attachments tab allows for users to add such items as contract books, change orders, specifications, maps, work orders, and invoices. All items are available for viewing or download. To add an item, simply click located near the bottom right side. To view an item, simply click located in the Action column on the right side. To download an item, simply click also located in the Action column. When you want to exit the contract tab click on t4 Spatial Page 16 of 40 found at the top right of the menu. t4 Underground v1.7 t4 Underground Instruction Manual 4.6 Show Inspections While viewing any contract you can switch to a view of all inspections for that contract by clicking on the Context Menu and “Show Inspections”. t4 Spatial Page 17 of 40 t4 Underground v1.7 t4 Underground Instruction Manual 5 The Inspections List Located on the Tools tab is the Inspections list button. all available inspections under the current login. Clicking on this will bring up This is a current list of all inspections available for review. There are several columns with information available for immediate review. To the right of all the columns is a “cog”, clicking this allows you to configure columns to display. As mentioned earlier when describing the ability to sort the columns of the contracts, the inspections list can also be sorted by clicking on the column of choice. For example, inspections can be sorted according to gradings by clicking on the Grading header. It is important to note that there may be more than one page of information available for review. By looking at the bottom right of the page you will notice the total number of inspections available as well as the total number of pages. . If you want to download the filtered or non-filtered inspection list, click the options button located at the top right hand side of the list and then “Export to CSV”. This will save the current filter results to your hard drive in a .csv file, which can be opened by using Excel. Note: Some of the above features may be disabled for non-commercial users t4 Spatial Page 18 of 40 t4 Underground v1.7 t4 Underground Instruction Manual 5.1 Filtering Records Filters may be desired to review only certain inspections on contracts, purchase orders, status, etc. Filtering as described earlier can be applied by clicking the button located near the top left of the inspection list. As each filter is added it will apply and display only those inspections that meet the criteria. To undo or change any of the filter items, locate the two buttons alongside each condition. The “wrench” button allows the user to change the item while the “minus” button will eliminate the filter altogether. Of particular note is the ability to filter “Condition” or “NASSCO Observation Code”. Users can select individual codes or families of codes to filter for only pipe segments containing, for example, roots or continuous cracking to focus their evaluations much more efficiently. 5.2 Reports Filters can also be exported as a CSV or saved as reports from the options menu The user is given the option to choose a name for the report and it is then saved ot the Reports menu on the left hand tab of the application window as highlighted below. From the Reports Menu the user can Run the Report, Share it (copies the report URL directly to the clipboard so it can be pasted into an email or similar; or Delete it. t4 Spatial Page 19 of 40 t4 Underground v1.7 t4 Underground Instruction Manual Run the Report Share the Report 5.3 Reviewing Data Locating at the right hand side of every inspection are two symbols. The first button (location pointer) allows the user to locate the inspection on the overall map, while the second button (video review) allows the user to review the video and data reports. When clicking on the location pointer, t4 Underground will close the inspection list and zoom to the position on the map as to where the inspection took place. The Inspection Details tab will be located on the left hand side of the screen. Contained on the tab are various descriptive items such as PSR number, Pipe Size, Grading, etc. t4 Spatial Page 20 of 40 t4 Underground v1.7 t4 Underground Instruction Manual We will cover map adjustments later. By clicking you will be returned to the Inspection List. on the Inspection Details tab, 5.4 Video Review The Video Review button appears in two different areas of the t4 Underground software. Located after every line item in the Inspection Details Tab, and as you will later see, on the map at every section of pipe inspected. Clicking on this button opens the t4 Underground Inspection Interface. t4 Spatial Page 21 of 40 t4 Underground v1.7 t4 Underground Instruction Manual 6 t4 Underground Inspection Interface This one of a kind inspection interface is unique to the t4 Underground software. There are three tabs available: Overview, Attachments and Notes. In the upper right hand corner of the t4 Underground Inspection Interface are 4 buttons. By selecting the options button, users will be presented with choices depending on security privileges ; Delete Inspection PDF Report Download Video Move Inspection Copy URL Selecting will minimize the t4 Underground Inspection Interface. Selecting will increase the size of the t4 Underground Inspection Interface. Selecting the close button will close the t4 Underground Inspection Interface. t4 Spatial Page 22 of 40 t4 Underground v1.7 t4 Underground Instruction Manual 6.1 Overview Tab Located at the top left side of the inspection interface are the Pipe Details that were supplied with the shape files at the beginning of the project. Included are such items as Pipe Length, Diameter and Installation Date. To the immediate right of the Pipe Details is the Inspection Main Pipe Details. This information was provided by the PACP certified operator while the inspection was performed in the field. Such items as the Diameter, Length Surveyed, and Material were verified by the operator and included on the inspection report. t4 Spatial Page 23 of 40 t4 Underground v1.7 t4 Underground Instruction Manual 6.1.1 The Video Player Located just below the Inspection Main Pipe Detail is the t4 Underground Video Player. Incorporating several features from other players, this unique system places them all in one place just below the video review. The play/pause button allows the user to stop and to resume video playback. The slider and time display shows the current location, time, and total video time. Clicking at various points on the slider allows the user to jump anywhere they choose on the video. The volume control allows the user to adjust the playback volume independent of the computer master volume. Clicking on the full screen button t4 Spatial opens the video inspection to full screen. Page 24 of 40 t4 Underground v1.7 t4 Underground Instruction Manual The play/pause, time slider, time display, volume control and full screen controls are still available in full screen mode. To return to the main screen, simply hit “esc” on your keyboard or click on the full screen button located at the bottom of the page. Video playback speed can be adjusted by choosing one of the following buttons located just below the time slider. Video by default will play at 1x speed. After adjusting the speed the video will resume playback at the time location at which the adjustment was made. Taking a snapshot of the video has never been easier. Click on the snapshot button located to the right of the video playback speed buttons. Once selected, the .jpeg will be saved to a location of your choice on your hard drive. The location pointer snap shot button. button has been added to the player and is located next to the 6.1.2 The Action Center The t4 Underground software’s interactive Action Center allows for planning and feedback for authorized users. The first field here is the Cost Field, which allows Contractors to input the charge for this particular inspection under the terms of the contract. t4 Spatial Page 25 of 40 t4 Underground v1.7 t4 Underground Instruction Manual Just below the Cost Field is the Follow Up Field. Clicking on the dropdown arrows allows for users to choose from several options for follow up. Choices made will be reflected on the Inspections List as well as the t4 Underground Video Player. Located below the Follow Up Center is the Status Bar. Authorized users will have several choices based on their project role. Role Contract Managers: Engineers: Status Completed or Submit Accept or Reject Inspection status must be submitted before the engineer is presented with the choice to accept or reject. Choices made will be reflected on the Inspections List as well as the t4 Underground Video Player. 6.1.3 Observations and Video Reports PACP 6.0 certified inspection reports have been incorporated into the t4 Underground Inspection Interface for easy review. Full downloadable reports are available in the attachments tab. A full list of the recorded observations is located to the right of the t4 Underground Video Player. A slide down bar is located on the right side of the observations list, allowing the user to quickly and easily review all recorded observations. t4 Spatial Page 26 of 40 t4 Underground v1.7 t4 Underground Instruction Manual PACP certified inspections allow for inspection software to issue gradings on the section of pipe inspected based on the observations reported. These are reported as one of three types: Structural, O&M and Overall. Located to the immediate left of the t4 Underground Video Player is the PACP Data. Just below the PACP Data is the Engineer’s Overall Grading. This editable value is defaulted from the PACP Overall Index but is editable by Engineers if they feel the rating needs to be adjusted.. The Pipe Grading is reflected in three areas: the Inspections List, the overall map, and on the t4 Underground Video Player. Authorized users can change the Grading based on personal choice or grading system by clicking on the value of their choosing. These changes will also be immediately reflected in all three areas. 6.1.4 Inspection Related History The Inspection Layer map icon will indicate that an inspection has history when a count appears to the top right of the camera icon. It will indicate the number of records (over and above the most recent inspection) that are linked due to common upstream and downstream manhole data. These historic records can be accessed via the main Inspection window as per the examples below. The date of the current inspection appears in the title bar t4 Spatial Page 27 of 40 t4 Underground v1.7 t4 Underground Instruction Manual Each of the items in the dropdown can be displayed as per below. 6.2 Attachment Tab Located near the top of the t4 Underground Inspection Interface is the Attachments tab. t4 Spatial Page 28 of 40 t4 Underground v1.7 t4 Underground Instruction Manual The inspection Attachments tab allows users to add, view, and download items such as the video inspection, pictures or the observation report for this individual inspection. These items are unique to this inspection and will not be available unless the user is reviewing this inspection. 6.3 Notes Tab The Notes tab allows for individual users to add personal notes to the individual inspection. t4 Spatial Page 29 of 40 t4 Underground v1.7 t4 Underground Instruction Manual Comments/Notes will be Time Stamped along with the Author’s name and listed under the Notes tab. These notes can also be exported to .csv file to be shared with others by clicking on the Context Menu and selecting the Export Notes to CSV option. By clicking on the comment section, the user can begin typing his comment. After completing the note, press the button. t4 Spatial Page 30 of 40 t4 Underground v1.7 t4 Underground Instruction Manual 7 Interactive Map t4 Underground includes a fully functional, interactive online map. Map controls are located at the top left corner of the map. These items may be slightly translucent. Simply sliding the mouse pointer over the area will highlight the controls. To choose what type of map to view, click on the map dropdown . Users will be presented with several choices including the popular Aerial Maps and Hybrid Maps both presented by Bing. To select an individual map, simply click on your choice. Also located in the left corner are map navigation tools. If the user chooses to do so, they can move left, right, up or down by clicking on the individual directions. To zoom in or out click on the + or -. Map navigation can also be obtained by clicking on an area on the map, holding down the left mouse button, and sliding the mouse in the desired direction. Zooming in and out also responds to the roller wheel available on some mice. t4 Spatial Page 31 of 40 t4 Underground v1.7 t4 Underground Instruction Manual Click the center dot to relocate the map to your default location. You can change your map default location by using the navigation tools to position the map zoom and location. Then click the “User Settings” cog and “Save”. Then no matter where the map is shifted to clicking the center dot the map to your personal default. t4 Spatial Page 32 of 40 will relocate t4 Underground v1.7 t4 Underground Instruction Manual 8 The Layers Tab Located on the right side of the screen is the Layers tab. Layer refers to the individual layers of information that can be viewed when looking at the map. When first logging in, some items on this tab will have orange boxes while others have grey boxes. Zooming in on the map will allow for all layers to become available. As they become available, their boxes will change to orange. The available layers are: Engineer’s Overall Grading Pipe Inspections Mainline Pipes Manholes Lateral Pipes Contracts. t4 Spatial Page 33 of 40 t4 Underground v1.7 t4 Underground Instruction Manual 8.1 Engineer’s Overall Grading: Clicking the in front of the Engineer’s Overall Grading turns on the PACP grading layer. T4 will place a checkmark in the orange box to indicate that this layer is turned on. Clicking again will remove the checkmark and turn off the grading layer. These gradings are the same as seen in both the Inspections List as well as the T4 Inspection Interface. If any adjustments have been made to the gradings, they will also be reflected in the grading layer. To the left of the box is a drop down arrow that when clicked allows the user to view the specified colors for the individual gradings. These are based on the PACP assigned Overall Index Grading. Each grading is an individual layer and allows for the user to turn on and off the layers of their choosing by clicking on the box. The colors of the individual grading layers can be changed by clicking on the colored circle in front of the chosen grading. t4 Spatial Page 34 of 40 t4 Underground v1.7 t4 Underground Instruction Manual Doing so will bring up the Layer Style tab, allowing the user to choose the preferred colors, and adjust the line width by sliding the circle to the right. The changes will be reflected at the top of the box under Current Style. Click to temporarily change the line colors for current viewing. Selecting the close button will close the T4 Inspection Interface. 8.2 Pipe Inspections Layer The Pipe Inspections layer can be turned on by clicking on the inspections. in front of the pipe Users can review videos using the T4 Inspection Interface by clicking on the Video Review button on the map. t4 Spatial Page 35 of 40 t4 Underground v1.7 t4 Underground Instruction Manual By clicking on the manhole layer box, the map will be populated with all manholes that were included with the individual shape file provided to T4 during the set up of the contract. Adjustment to the colors of the manhole symbols can be adjusted by clicking on the colored symbol to the right of the checked box. Checking the Mainline Pipes box will populate the map with the individual pipes. Adjustment to the colors of the mainline pipes can be adjusted by clicking on the colored symbol to the right of the checked box. t4 Spatial Page 36 of 40 t4 Underground v1.7 t4 Underground Instruction Manual 8.3 External Layers (WMS) WMS services can also be added as new layers as per the sequence below. It is now possible to import dynamic external layers from your own or other publicly available GIS systems using Open Geospatial Consortium (OGC http://www.opengeospatial.org/) compliant Web Mapping Services (WMS). “The OpenGIS® Web Map Service Interface Standard (WMS) provides a simple HTTP interface for requesting geo-registered map images from one or more distributed geospatial databases. A WMS request defines the geographic layer(s) and area of interest to be processed. The response to the request is one or more geo-registered map images (returned as JPEG, PNG, etc) that can be displayed in a browser application.” These services allow you to query and load contextual information, such as the worked example of publicly notifiable Sanitary Sewer Overflows (SSO), from directly within t4 Underground. t4 Spatial Page 37 of 40 t4 Underground v1.7 t4 Underground Instruction Manual This information is publically accessible from here: http://www.waterboards.ca.gov/water_issues/programs/sso/sso_map/sso_pub.shtml but is made available for further analysis in different formats here http://www.waterboards.ca.gov/water_issues/programs/sso/docs/index.php and here http://gispublic.waterboards.ca.gov/ArcGIS/rest/services/Water_Quality/Sewer_Overflo ws/MapServer. It is this last source that allows us to import the data into t4 Underground. All WMS services require several pieces of metadata in order to allow results to be correctly represented in a mapping system, they are: FIELD Name URL DESCRIPTION The name you wish to gives this map layer with t4 Underground The link to the data source Layers The value of the Layers parameter is a commaseparated list. Use “0” to select all layers. Top The northernmost edge of the Coordinate results bounding box t4 Spatial Page 38 of 40 WORKED EXAMPLE California State Water Board SSO Layer http://gispublic.waterboards.ca.gov/ArcG IS/rest/services/Water_Quality/Sewer_O verflows/MapServer 0 90 t4 Underground v1.7 t4 Underground Instruction Manual FIELD Bottom Coordinate Left Coordinate Right Coordinate Version Projection DESCRIPTION The southernmost edge of the results bounding box. The westernmost edge of the results bounding box. The easternmost edge of the results bounding box. The WMS Specification version named by the source The Co-ordinate Reference System named by the source WORKED EXAMPLE 0 -178 0 1.1.1 EPSG: 4236 The above information is almost always listed on public webpages describing the WMS datasets available within them. The functionality itself is accessed from top of the Layer Menu and defined in the window that appears. END OF DOCUMENT t4 Spatial Page 39 of 40 t4 Underground v1.7