1
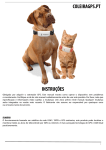
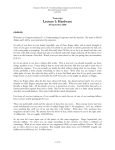
TIMERGPS+ USER MANUAL, ENGLISH EDITION
SEPTEMBER, 2014
Table of Content
1
1.1
2
2.1
2.2
2.3
2.4
2.5
3
4
4.1
4.1.1
4.1.2
4.1.3
4.2
4.2.1
4.2.2
4.2.3
4.3
4.3.1
4.3.2
4.3.3
4.3.4
TimerGPS+ (Product) User Instructions.................................................................................... 7
Content of the package .............................................................................................................. 7
Buttons and operation principles of the user interface ............................................................... 8
Power button (ON/OFF) ............................................................................................................ 8
START/STOP button ................................................................................................................ 8
INT/BACK button ..................................................................................................................... 8
UP button .................................................................................................................................. 8
DOWN button ........................................................................................................................... 9
Startup and initialisation of the TimerGPS+ .............................................................................. 9
Exercise functions ................................................................................................................... 10
Basic exercise .......................................................................................................................... 10
Basic exercise standby mode ............................................................................................. 10
Starting and ending in basic exercise mode ....................................................................... 11
Summary of basic exercise ................................................................................................ 11
Track exercise ......................................................................................................................... 11
Track exercise standby mode............................................................................................. 11
Starting and ending in track exercise mode ....................................................................... 12
Summary of track exercise ................................................................................................ 12
Competition function............................................................................................................... 12
Setting a countdown optimum time for the competition function ...................................... 13
Setting a minute alarm time for the competition function .................................................. 13
Competitive function standby mode .................................................................................. 13
Starting and ending the competition function .................................................................... 13
4.3.5
4.3.6
4.4
4.4.1
4.4.2
4.4.3
4.4.4
4.4.5
4.4.6
4.5
4.5.1
4.5.2
4.5.3
5
5.1
6
7
7.1
7.2
7.3
7.4
7.5
Summary of competition function ..................................................................................... 14
Pausing and continuing the competition function (Pause mode)........................................ 14
Countdown .............................................................................................................................. 14
Setting an optimum time for the countdown function ........................................................ 14
Setting a minute alarm time for countdown function ......................................................... 15
Standby mode of the countdown function ......................................................................... 15
Starting and ending the countdown function ..................................................................... 15
Summary of count function ............................................................................................... 16
Pausing and continuing the countdown function (Pause mode) ......................................... 16
Race exercise........................................................................................................................... 16
Standby mode of race exercise .......................................................................................... 17
Starting and ending race exercise ...................................................................................... 17
Summary of race exercise.................................................................................................. 18
Connecting to the HR-Check................................................................................................... 19
Using the HR-Check without he TimerGPS+ .......................................................................... 19
Stopwatch ................................................................................................................................ 19
Exercise log ............................................................................................................................. 20
Browse the log ........................................................................................................................ 20
Select a horse .......................................................................................................................... 21
Add a horse ............................................................................................................................. 21
Change a horse's name ............................................................................................................ 21
Remove horse .......................................................................................................................... 21
3
7.6
7.7
7.8
7.9
8
8.1
8.2
8.3
8.4
8.4.1
8.4.2
8.4.3
8.5
8.5.1
8.5.2
8.5.3
8.5.4
8.5.5
9
10
10.1
11
Log management ..................................................................................................................... 22
Space left ................................................................................................................................. 22
Remove an exercise ................................................................................................................. 22
Empty the log .......................................................................................................................... 23
Settings.................................................................................................................................... 23
Backlight ................................................................................................................................. 23
Display contrast....................................................................................................................... 24
Sound ...................................................................................................................................... 24
Localization............................................................................................................................. 24
Language ........................................................................................................................... 24
Units of measurement ........................................................................................................ 24
Time zone .......................................................................................................................... 25
Exercise options ...................................................................................................................... 25
Units .................................................................................................................................. 25
Interval length ................................................................................................................... 25
Exercise saving.................................................................................................................. 26
Alarm limits ...................................................................................................................... 26
Exercise Autostart -function .............................................................................................. 27
Charging the battery ................................................................................................................ 27
Maintenance ............................................................................................................................ 27
Resetting the product in case of problems ............................................................................... 28
About the GPS system ............................................................................................................. 28
4
12
13
13.1
13.2
13.3
13.4
13.5
14
14.1
14.1.1
14.1.2
14.2
14.3
14.4
14.5
14.6
14.7
14.8
14.9
14.10
14.11
Technical description of main components ............................................................................. 29
Terms and limitations for the use of the product ..................................................................... 29
Terms for end use agreement .................................................................................................. 29
Warnings and important safety instructions ............................................................................ 30
Declaration of conformity ....................................................................................................... 32
FCC Compliance ..................................................................................................................... 32
International limited warranty ................................................................................................. 33
Terms for end user license agreement ..................................................................................... 35
Grant of license ....................................................................................................................... 35
License .............................................................................................................................. 35
Single product ................................................................................................................... 36
Restrictions ............................................................................................................................. 36
Copyright and other rights ....................................................................................................... 36
Limitation of warranty............................................................................................................. 36
Your remedies ......................................................................................................................... 37
No other warranties ................................................................................................................. 37
Disclaimer of liability.............................................................................................................. 38
Confidentiality ........................................................................................................................ 38
Termination ............................................................................................................................. 38
Beneficiary .............................................................................................................................. 38
Export...................................................................................................................................... 39
5
Buttons of the device.
2. START/STOP -button
1. INT/BACK -button
3. UP -button
4. DOWN -button
5. ON/OFF power button
6
6. USB-charging and data-transfer port
Disclaimer
The information in this document is subject to change without notice and covers the product defined in the cover sheet
(hereinafter referred to as simply the 'product'). This document is compiled and kept up-to-date as conscientiously as possible.
TIMERGPS Europe Ltd. cannot however guarantee that the data is free of all errors, meticulous or complete and therefore
assumes no liability for loss or damage of any kind incurred directly or indirectly through the use of this document. Products are
not authorised for use in life-support or safety critical conditions. Use in such conditions or applications is done so at the sole
discretion of the customer. TIMERGPS Europe Ltd. will not warrant the use of its products in such conditions or applications.
1
TimerGPS+ (Product) User Instructions
1.1 Content of the package
•
•
•
•
•
•
TimerGPS+ with built-in battery
Regional charger adapter with USB cable
Neck band
Hands-free wrist mount
Protective silicone cover
TimerGPS+ User manual
7
2
Buttons and operation principles of the user interface
2.1 Power button (ON/OFF)
Press and hold the power (ON/OFF) button to turn the product on. To turn the product off, press and hold the power button for
two (2) seconds.
2.2 START/STOP button
Press the START/STOP button to start and stop an exercise. The START/STOP button will also function as the confirmation
button; press it to select the highlighted menu item. In the countdown function, using the START/STOP button will exit pause
mode.
2.3 INT/BACK button
Press the INT/BACK button to return to the previous menu. In the basic exercise mode, pressing the INT/BACK button once
will start an interval training session, and pressing it a second time will end the training session. Pressing it a third time will save
the interval, after which the product will resume basic exercises. The start and end of an interval exercise are signalled by two
short sounds accompanied with vibration. During the countdown exercise, pressing the INT/BACK button will enter pause
mode, and pressing it again will exit pause mode.
2.4 UP button
Press the up button from the basic mode to enter the menu, where the training functions are listed, along with the product
settings. Use the UP button to scroll upwards in the menu, or when naming a horse use the UP button to scroll backwards one
8
character when giving a name to horse. During basic and race exercises, pressing the up button will display the overall time,
time or average pace at the top of the screen. During a track exercise, pressing the UP button will show the overall time, lap time
or average pace at the top of the display. During a countdown exercise, pressing the UP button will display the countdown time,
time or average pace.
2.5 DOWN button
Press the down button to get from the basic mode to the menu, where all the training functions are listed. Pressing the down
button will select the next item on the menu list or brows a character forwards when naming a horse. During a basic exercise,
track exercise or race exercise pressing the down button will show the distance, average pace of time at the bottom the display.
3
Startup and initialisation of the TimerGPS+
Press and hold the power button switch the product on. The first time the product is switched on, one must select a language with
the UP and DOWN buttons and press the START/STOP button to confirm language (language can be changed later from the
settings menu). After the language has been selected, choose the unit of distance the device will use to display data. Select the
desired unit with the UP and DOWN buttons and press the START/STOP button to confirm. The product will now switch itself
off, and need to be switched on again. A prompt to add a horse will be shown on display. The default name for the horse will be
shown as 'UNNAMED'. Delete characters one-by-one with the INT/BACK button, then use the UP and DOWN buttons to select
each individual character for the horse's name. Press the START/STOP button to confirm a selected character, then when the
horse's full name has been typed select the (⏎) character from the list and press the START/STOP button finally to confirm the
horse's name. The product will now be in start mode and you can see the version of the program the product is using. Press the
UP or DOWN button to go to the menu. From here, it is possible to browse the exercise log, select different exercises, or change
9
the settings of the product. To begin searching for a satellite, press the START/STOP button in the start mode. 'Searching GPSsatellites' will appear on the display and the percentage level will increase until the process is complete. After the search is
complete, the basic exercise standby mode will be resumed.
Note: The best way to receive satellite signals is to take the device outside and remain out of the way of any tall obstructions
such as tall buildings or trees. When the product is powered up for the first time, it may take a few minutes to establish
connections with a satellite. It will be easier to find satellites if the product remains stationary.
4
Exercise functions
4.1 Basic exercise
Highlight basic exercise from the menu and press the START/STOP button to confirm. The product will now begin searching
for a satellite connection. 'Searching GPS-satellites' will appear on the display and the percentage level will increase until the
process is complete. When the products has completed establishing connection with a satellite, it will enter the standby mode of
the basic exercise. Alternatively, press the START/STOP button when in the start mode, and the product will start the basic
exercise directly.
4.1.1 Basic exercise standby mode
In the standby mode of the basic exercise, it is possible to review the previous time and pace results (to set the unit of
measurement for pace, refer to section 8.4.2). Measuring is not yet enabled however, and exercise data will not be saved in the
exercise log.
10
4.1.2 Starting and ending in basic exercise mode
Press the START/STOP button once in the basic exercise standby mode to begin the exercise. The product will now start
measuring the pace, distance and time. During a basic exercise, press the UP button to select either time, average pace or overall
time on the top part of the display. Press the DOWN to toggle between the distance or average pace on the bottom part of the
display.
Press the INT/BACK button once to start the interval function, and press it again to stop the interval. When the interval has been
stopped, the display will now show the interval summary data. Scroll through the data using the UP and DOWN buttons. Press
the INT/BACK button once again to return to the basic exercise. It is possible to make up to 23 intervals during one basic
exercise session. The interval length can be preset in the exercise section (Refer to section 2.7.4.2).
4.1.3 Summary of basic exercise
When the basic exercise has been stopped, the exercise summary will be shown on display. Use the UP and DOWN buttons to
browse through the exercise data. The exercise data of each interval will be shown on separate screens. Press the INT/BACK
button to return to exercise standby mode.
4.2 Track exercise
Select the track exercise from the main menu and press START/STOP to confirm. The product will then begin searching for a
satellite connection, and once the connection has been established track exercise standby mode will begin.
4.2.1 Track exercise standby mode
In the standby mode of the track exercise, it is possible to review the previous time and pace results (to set the unit of
11
measurement for pace, refer to section 8.4.2). Measuring is not yet enabled however, and exercise data will not be saved in the
exercise log. If one is moving with the product when in standby mode, the pace when the first lap was started will be shown on
display.
4.2.2 Starting and ending in track exercise mode
Press the START/STOP button in the track exercise standby mode to start the exercise. The point where one is stood at the time
of pressing the START/STOP button is the start of the track exercise. The width of the track is 30m from the leftmost to the
rightmost of the marked start point. Every time the start point is passed, the product will automatically display the lap data (time,
distance, average and maximum pace) for four (4) seconds. Press the UP button to show either lap time, average pace or overall
time on the top part of the display. Press the DOWN to toggle between the distance or average pace on the bottom part of the
display. Press the START/STOP button to stop the track exercise. 'Exercise saved' text will appear and the product automatically
proceeds to the exercise summary data.
4.2.3 Summary of track exercise
On the first track exercise summary screen, the summary data of the whole track exercise is shown. Pressing the UP and DOWN
buttons will check each individual lap data. Press the INT/BACK button to return to the track exercise standby mode.
4.3 Competition function
Select competition exercise from the main menu and press START/STOP to begin. Then the countdown optimum time will need
to be set along with the minute alarm time. The product will then begin searching for a satellite connection, and once the
connection has been established competition exercise standby mode will begin.
12
4.3.1 Setting a countdown optimum time for the competition function
Set the optimum time in minutes using the UP and DOWN buttons. Once you have set the desired minutes, press the
START/STOP button to proceed to the setting the time in seconds. When both times have been set, press the START/STOP
button again to proceed to the minute alarm menu, where the minute alarm time can be set. Press the INT/BACK button to
cancel all and return to the previous menu.
4.3.2 Setting a minute alarm time for the competition function
After setting the optimum time, the minute alarm time can be set. Set the minute alarm time (0-10 minutes) using the UP and
DOWN buttons. If zero (0) is set as the minute alarm time, the alarm will not be used during the exercise. Pressing the
INT/BACK button will cancel all choices and return to the previous menu.
Once the alarm time has been set, press the START/STOP button to begin establishing satellite connection. 'Searching GPSsatellites' will be shown on the display. After a connection has been established, the product will go to the standby mode of the
competition exercise.
4.3.3 Competitive function standby mode
In the competitive function standby mode, the time and optimum time are displayed.
4.3.4 Starting and ending the competition function
Press the START/STOP button in the competitive function standby mode to start the competitive function. The countdown clock
will start counting downwards from the set time. As the clock approaches zero (0), the product will begin to make a 'beep' sound,
after which it will begin to count upwards. If the minute alarm time is set, the product will alarm in intervals of the selected
13
minutes by beeping and vibrating.
End the competition function by pressing the START/STOP button. 'Exercise saved' will be shown on the display, and the
product will price to competition exercise summary data.
4.3.5 Summary of competition function
On the first competition exercise summary screen, the summary data of the total exercise is shown. Press the DOWN and UP
buttons to check each competition data. Press the INT/BACK button to return to the competition exercise standby mode.
4.3.6 Pausing and continuing the competition function (Pause mode)
During the competition function, press the INT/BACK once to pause the timer. The PAUSE text will appear in the center of the
display, and on the top part of the display will be a negative (-) countdown timer, or a positive (+) countdown timer if the end
countdown time has been surpassed. Exit the pause mode by pressing the INT/BACK or by pressing the START/STOP button,
after which the product will resume the countdown time.
4.4 Countdown
Select countdown from the main menu and press START/STOP to confirm. An optimum time and minute alarm time will need
to be set.
4.4.1 Setting an optimum time for the countdown function
Set the optimum time in minutes using the UP and DOWN buttons. Once you have set the desired minutes, press the
START/STOP button to proceed to the setting the time in seconds. When both times have been set, press the START/STOP
14
button again to proceed to the minute alarm menu, where the minute alarm time can be set. Press the INT/BACK button to
cancel all and return to the previous menu.
4.4.2 Setting a minute alarm time for countdown function
After setting the optimum time, the minute alarm time can be set. Set the minute alarm time (0-59 minutes) using the UP and
DOWN buttons. If zero (0) is set as the minute alarm time, the alarm will not be used during the exercise. Pressing the
INT/BACK button will cancel all choices and return to the previous menu.
Once the alarm time has been set, press the START/STOP button to begin establishing satellite connection. 'Searching GPSsatellites' will be shown on the display. After a connection has been established, the product will return to the standby mode of
the countdown exercise.
4.4.3 Standby mode of the countdown function
In the standby mode of the countdown function, the time and pace information is displayed (to set the unit of measurement for
pace, see section 8.4.2). If the product is moving in standby mode, the pace will be displayed but the exercise data will not be
saved in the exercise log.
4.4.4 Starting and ending the countdown function
While in the standby mode of the countdown function, press the START/STOP button to start the countdown and begin
measuring pace. On the top of the display, the countdown clock will begin to count downwards (-) from the set time. As the
clock approaches the optimum time, the product will make a 'beep' sound, after which it will begin to count upwards. If the
minute alarm time is set, the product will alarm in intervals of the selected minutes by beeping. Press the UP button to change
15
the field on the top part of the display to show either the countdown time, time or average pace. Press the DOWN button, to
display the distance, overall time and average page at the bottom part of the display. Press the START/STOP button to stop the
countdown exercise. 'Exercise saved' will appear on the display and the product will automatically shift to the countdown
exercise summary data.
4.4.5 Summary of count function
On the first countdown exercise summary screen, the summary data for the whole exercise is shown. Press the UP and DOWN
buttons to browse through the data. Press the INT/BACK button to return to the countdown exercise standby mode.
4.4.6 Pausing and continuing the countdown function (Pause mode)
You can pause the countdown function by pressing the INT/BACK button once. The PAUSE text will appear in the centre of the
display, and on the top part of the display the current countdown time will be shown, or if the time limit has been surpassed, a
positive (+) countdown time will be displayed. Exit the pause mode by pressing either the INT/BACK button again or by
pressing the START/STOP button once, after which the product will resume the countdown timer.
4.5 Race exercise
On the main menu, select race exercise and press START/STOP to confirm. Select a distance from the list (e.g. 1600m, 2100m,
2600, 3100m). The product will then begin searching and establishing a satellite connection and will then enter the race exercise
standby mode.
16
4.5.1 Standby mode of race exercise
In the standby mode the time and pace information is shown on display (to set the unit of measurement for pace, see section
8.4.2). Measuring is not active yet and the exercise data will not be saved in the exercise log.
4.5.2 Starting and ending race exercise
Press the START/STOP button in the race exercise standby mode to start the exercise. Use the DOWN button during the
exercise to change between the distance and average pace information, shown at the bottom of the display. Use the UP button
during the race exercise to change the field on the top of the display to show either overall time, time or average pace. When the
whole distance of the race exercise has elapsed the exercise will stop automatically. Time, distance, average and max pace
information from the last 500m will appear on the display. Use the UP and DOWN buttons to check the exercise summary of the
whole race exercise. Press the START/STOP button during the race exercise to manually stop the race exercise before the
selected distance is completed. The average pace information of each completed interval will show on the display.
17
Race distance
Interval 1
Interval 2
Interval 3
Interval 4
1600m
1. 500m
1. 1000m
Last
500m
2100m
1. 500m
1. 1000m
3. 500m
Last
500m
2600m
1. 500m
1. 1000m
2. 1000m
Last
500m
3100m
1. 500m
1. 1000m
2. 1000m
5. 500m
Interval 5
Last
500m
4.5.3 Summary of race exercise
The first exercise summary screen shows the summary data of the whole exercise. Pressing UP and DOWN buttons to check
each race data. Press the INT/BACK button to return to the race exercise standby mode.
18
5
Connecting to the HR-Check
The TimerGPS+ can connect to the TimerGPS accessory HR-Check wirelessly to check the rest and recovery heart rate of the
horse.
To establish a connection with the HR-Check, bring the product close to the HR-Check. The devices will be paired automatically
if the HR-Check is receiving a heart rate signal from the HR-Check transmitter.
5.1 Using the HR-Check without he TimerGPS+
After a connection has been established, the TimerGPS+ will enter the heart rate check standby mode. In the standby mode, the
TimerGPS+ will be ready to receive heart rate data from the HR-Check. To save the data, press the START/STOP button,
otherwise press the INT/BACK button to return to the heart rate check standby mode. For full instructions on how to use the HRCheck, consult the HR-Check user manual.
6
Stopwatch
The stopwatch function can be used to measure lap times. Select stopwatch from the main menu and press START/STOP to
confirm. TIME 0.00.0 will be shown in the center of the display, and the lap time 0.00.0 will be at the bottom. Press the
START/STOP button to start and stop the stopwatch. It is possible to measure lap times during simply by pressing the
INT/BACK button during the stopwatch and the lap time will be shown at the bottom of the display. Restart the stopwatch by
19
pressing the INT/BACK button when timing is paused.
7
Exercise log
In the exercise log it is possible to:
- browse the data saved in the exercise log
- switch a horse for the next exercise that will be saved
- add or delete a horse
- change the name of a horse
- check the memory capacity of the product, view and delete saved exercise data, or delete all the data in the log
- browse heart rate data (if paired with a HR-Check)
The exercise log is found in the main menu.
7.1 Browse the log
Saved exercise data can be browsed by selecting browse log and confirming by pressing the START/STOP button. Select a
horse with the UP and DOWN buttons and confirm the choice by pressing START/STOP. The exercise data for the chosen horse
will now be shown, and can be browsed through with the UP and DOWN buttons. The number following each horses name
indicates the number of saved exercises for that horse. The exercise data is listed in reverse chronological order. Return to the
previous menu by pressing the INT/BACK button.
20
7.2 Select a horse
Use the select a horse function to select the horse whose exercises will be saved. In the exercise log, highlight select a horse and
press the START/STOP button to confirm. The selected horse will be marked with a triangle (▸) next to its name. Select a horse
with the UP and DOWN buttons and press START/STOP to view a selected horse's exercise data. After this, the exercise data of
the selected horse will be saved in the log. Press the INT/BACK button to return to the menu.
7.3 Add a horse
Use the add a horse function to add a new horse into the product's memory. Select add horse from the exercise log menu. 'Add
name' will appear on the display with the letter 'a' . Press the UP and Down buttons to scroll through characters and press
START/STOP to confirm a selection. To delete a character, press the INT/BACK button. When naming the horse is complete,
select the ⏎ symbol from the list and press the START/STOP button.
7.4 Change a horse's name
Use the rename horse function to edit or rename a horse. In the exercise log menu, select rename horse from the exercise log
menu and press the START/STOP button. All the saved horse's names will appear on the display. For instructions on how to
name the horse, refer to section 7.3
7.5 Remove horse
Use the remove horse function to remove a horse from the product's memory. Select remove horse from the exercise log menu
and press the START/STOP button to show a list of all horse names on the display. After selecting a horse, a message reading
'Are you sure you want to remove horse?' will appear on the display. Press the START/STOP button to permanently remove the
21
horse. The product will then return to the remove horse menu. If all the horse's names are deleted, the product will prompt to
name new horse. To return to the previous menu, press the INT/BACK button. NOTE: Once a horse has been removed, all the
exercise data saved for that horse will also be deleted permanently.
7.6 Log management
Select log management from the exercise log and press START/STOP to check the memory status of the product and delete
saved exercises or empty the log entirely.
7.7 Space left
Check how much memory is remaining on the product (maximum 100%) by selecting log space left in the log management
menu.
7.8 Remove an exercise
To remove one or several exercises from the product memory, select remove exercise from the exercise log menu. A list of
horses with saved exercises will appear on the display. Select a horse and confirm by pressing the START/STOP button to show
the list of exercises saved for that horse. Select one or more exercises to be removed for a horse. Exercises selected for removal
will be marked with an (x). Once the exercises for removal have been chosen, press the INT/BACK button to remove the
exercises. The product will show a message reading 'Are you sure you want to remove selected exercises?', to confirm removal
press the START/STOP button. To cancel removal, press the INT/BACK button to return to the previous screen.
22
7.9 Empty the log
To remove all the exercise data for a horse, select clear log from the log management menu. A list of horse names with saved
exercise data will appear on the display. Select horses individually by name or select ALL HORSES to remove the exercise data
for every horse at once. The number following each horses name indicates the number of saved exercises for that horse. After
you have selected, press the START/STOP button to be prompted with a message reading 'Are you sure you want to remove
selected exercises?' . Press the START/STOP button again to confirm and remove all the exercises for a horse / all horses. To
cancel removal, press the INT/BACK button to return to the previous menu. After the removal is completed, the product will
automatically return to the clear log menu.
8
Settings
In the settings menu, the settings can be customized.
The settings menu includes:
-Backlight
-Display Contrast
-Sound
-Language
-Exercise settings
8.1 Backlight
Select Backlight from the settings menu to adjust the brightness of the display. Choose from three (3) options; bright, dim and
off.
23
8.2 Display contrast
From the “Display contrast”-menu you can adjust the contrast of the display. If the graphics of the display seems to be too light
or dark, adjust the counter by using UP and DOWN keys.
8.3 Sound
In the sound menu, sounds can be enabled and disabled.
8.4 Localization
The localization menu includes:
-Language
-Units of measurement
-Time zone
8.4.1 Language
Select the language in which the products display will read. There are six (6) languages to choose from; English, French, Italian,
Finnish, Swedish and German. Select a language and press the START/STOP button to confirm.
8.4.2 Units of measurement
Select the desired unit of measurement for pace from the units menu. There are seven (7) units of measurement to choose from;
min/km, m/min, km/h, min/mi., min/fur, yd./min and mph.
24
8.4.3 Time zone
By default, the product uses the time zone given by the GPS satellites, but the time zone can be set manually to correspond with
things such as an official race watch etc. Use the UP and DOWN buttons to set the hour and press the START/STOP button to
confirm the selection. Next select the minutes and press the START/STOP button to confirm. After both times have been
selected, 'Settings saved' will appear on screen and the product will automatically return to the settings menu.
8.5 Exercise options
The exercise menu includes:
-Units of measurement
-Alarm limits
-Interval length
-Exercise saving
-Exercise autostart
8.5.1 Units
Select the desired unit of measurement for pace from the units menu. There are seven (7) units of measurement to choose from;
min/km, m/min, km/h, min/mi., min/fur, yg./min and mph.
8.5.2 Interval length
In the interval length menu the interval length can be set, and can be at different lengths depending on the unit of measurement.
If the interval distance is set greater than 0, the interval exercise will be automatically saved according to this setting after the
25
distance has been surpassed. If the interval length is set at zero (0), it is removed from the interval exercise and the interval
exercise will function normally.
8.5.3 Exercise saving
In the exercise saving menu, exercise saving can be enabled or disabled, according to whether or not the product saves exercise
data in its own memory or in the exercise log. If saving is disabled, the exercise data will only be shown immediately after the
exercise and will not be saved in the exercise log and cannot be accessed later. If saving is enabled, the exercise data will be
saved in the exercise log for post-analysis. By default, exercise saving is enabled. The selected option will be marked with a
triangle (▸) beside it.
8.5.4 Alarm limits
In the alarm limits menu alarm limits can be enabled or disabled. When alarm limit is enabled, the product will make a 'beep'
sound when it detects the user is driving slower or faster than the given minimum and maximum pace limits respectively. There
are four (4) options; not enabled, only max pace, only min pace or both maximum and minimum pace limits enabled.
Set alarm limits in the alarm minutes menu. Select the minimum pace or maximum pace and which will be defined according to
which units of measurement have been set. Select minimum pace and press the START/STOP button. Use the UP and DOWN
buttons to select the minutes, then press the START/STOP button again to set the seconds. Press START/STOP once to more to
confirm the minimum pace. After the 'settings saved' prompt appears on the screen, the product will return to the menu. Set the
maximum pace in the same way the minimum pace was set.
26
8.5.5 Exercise Autostart -function
When the Autostart-function is enabled the driver can set a time of how long TimerGPS+ waits until the exercise will start
automatically. If the Autostart-feature is enable the timer will ask minutes and seconds for the Autostart-function every time
before the exercise is started. Use UP- and DOWN keys to select Minutes or Seconds and use START/STOP key to select it.
Using UP- and DOWN keys you can adjust minutes and seconds to whatever you desire and once finished use START/STOP
key again to confirm your selection. When ready, select “Ready” and press START/STOP key to start exercise. You can toggle
Autostart function on and off from the Exercise options. Go to Settings > Exercise options > Exercise autostart. Autostart
function is enabled when you can see ►-symbol in front of the Autostart -word. Select the Autostart -word and press
START/STOP button to toggle feature on and off.
9
Charging the battery
To recharge the product use the charger adapter and USB-cable included in the product package. Remove the adapter from the
plastic packaging and cast the packaging aside. Take the USB cable and plug the USB head into the corresponding slot on the
adapter. Carefully open the protection cap on the bottom of the product and turn out. Next plug the other end of the USB cable
into the now revealed slot on the product. Plug the plug into a power outlet. The product should now show an escalating bar next
to the BAT icon on the bottom left of the display showing its charging status. When the battery is fully charged, the bars in the
BAT icon will remain solid.
*PLEASE NOTE! Do not charge the product below +10℃ (50℉) or over +30℃ (86℉).
10
Maintenance
When not using the product, store it in a dry place at room temperature. Do not store within wet, moist or any kind of non27
breathable material such as plastic bags or sports bags or any material that conducts electricity (e.g. a wet towel). Do not expose
it to direct sunlight for extended periods. Clean the product with a cloth moistened with a mild soap and water solution. Dry the
product carefully with a soft towel. Never use alcohol, cleansing chemicals or abrasive materials such as steel wool. Do not use
running water or submerge the product in water or other liquids. The product is not waterproof, only water resistant. NOTE:
Every time before use, make sure that the plastic cap for the USB-port is well in place.
Should the product require service, contact a TimerGPS Europe Ltd Product Service Centre. Check where the nearest service
center is by visiting www.timergps.com. Product warranty does not cover direct or indirect damages incurred by service that has
not been authorized by TimerGPS Europe Ltd.
10.1 Resetting the product in case of problems
If, for some reason, the product does not respond to any button push and will not cease despite pushing and holding the power
button down, it is possible to reset the product by pressing the INT/BACK button and the UP button simultaneously.
11
About the GPS system
The global positioning system (GPS) is operated by the government of the United States of America who are solely responsible
for its accuracy and maintenance. The system is subject to changes which could affect the accuracy and performance of all GPS
equipment.
When using the product in a place where the GPS signal cannot reach the product (such as a dense forest, under and around
power lines or directly beside a mobile phone) the product may temporarily show incorrect readings. They will be automatically
corrected when the product is moved to an area where the signal can reach the product. Strong electromagnetic signals can also
cause the product to display erratic readings. Electromagnetic disturbances may occur near high-voltage power lines, traffic
lights, overhead lines of electric railways, car motors or cellular phones.
28
12
Technical description of main components
Product dimensions:
(Heigh / Weight / Thickness)
mm
Product weight:
98mm / 64 mm / 18
70 Grams
Charger:
package
AC Input
mA, 50-60 Hz
DC Output
Battery:
DC Output
Operating time:
Display:
display
Transflective
Included in the
GPS:
u-Blox
Buzzer:
Build in buzzer
100 - 240 V~100
5.0V, 550 mA
Measurement accuracy:
13
3.7 V, Li-ion(Li-Po)
3.1-4.2 V, 900 mAh
10-20 hours
+/-
2%
Terms and limitations for the use of the product
13.1 Terms for end use agreement
By using the product defined in this user manual, you are binding yourself (hereinafter 'you') to the terms and conditions of the
end user agreement including the warranty disclaimers and limitations of liability provisions stated in this user manual. If you do
not agree to there terms and conditions of this agreement, do not use the product. YOU AGREE THAT YOU HAVE READ
29
THIS AGREEMENT, UNDERSTAND AND AGREE TO BE BOUND BY THE TERMS AND CONDITIONS OF THIS
AGREEMENT.
13.2 Warnings and important safety instructions
Read before using the product.
Failure to avoid potential hazardous situations could result in an accident or collision resulting in death or serious injury.
•
•
•
•
•
•
•
•
•
•
•
Use the product only as specified in this use manual
This product has no user-replaceable components. If these guidelines are not followed, the product/battery may experience a
shortened life or may present a risk of damage to the product, fire, chemical burn, electrolyte leak and/or injury.
Do not charge product/battery below +10℃(50℉) or over +30℃(86℉0
For charger adapter and USB-cable, the socket outlet shall be installed near the product and shall be easily accessible.
Do not use product under -20℃(-4℉) or over 45℃(113℉)
Do not leave the product exposed to a heat source or in a high temperature location, such as in direct sunlight in and
unattended vehicle. To prevent damage, remove the product from the heat source and store it out of direct sunlight.
Do not leave the product exposed a water source or in a high moisture condition, such as near to a tap or basin. Product is not
waterproof.
Do not disassemble any part from the product.
Do not puncture or incinerate the product/battery.
Do not use any sharp object to clean any part of the product.
If the product/battery is damaged, keep it away from children.
30
•
•
•
•
•
•
•
Do not use the neck band or hands free if there is any possibility that you would put yourself, your horse or any person or
animal in any danger or an unsafe situation.
Contact your local waste disposal department to dispose of the product/battery in accordance with any applicable local laws
and regulations.
The product is inter to be used only as a training aid for horse trainers and must not be used for any other purpose requiring
precise measuring of pace, speed, tempo, time or distance. Always use your best judgment and exercise common
sense when using the product. Always carefully compare information displayed on the product to all available
measurement sources. Do not follow the information displayed on the product if it suggest an uncertain value or
would put you or your horse or any other person or animal in an unsafe situation. If you see or feel the the product is
broken and not working properly, do not use the product. Follow the instructions on how to repair or ask further
instruction from TimerGPS Europe Ltd. Product Service.
Do not use the product for horse training purpose if the outside temperature is too high or too low or there is any possibility
that you would put yourself or your horse in an unsafe situation. Make sure you know your own and your horse's
health condition well before you start using the product as a training aid. If you feel any bad symptoms, consult your
medical doctor or in your horse's case consult a veterinarian before starting to exercise.
Always use your best judgment and operate the horse in a safe manner. Do not become distracted by the product while
driving and always be fully aware of all driving conditions. Minimize the amount of time spent viewing the product's
display while driving.
Do not change exercise, settings or access any functions while driving. Pull over in a safe and legal manner before attempting
such operations.
IT IS THE USER'S RESPONSIBILITY TO USE THE PRODUCT IN COMPLIANCE WITH ALL APPLICABLE LAWS
AND ORDINANCES.
31
•
•
•
DO NOT USE OR HANDLE THE PRODUCT WHITE OPERATING MOTOR VEHICLES.
ALWAYS MOUNT YOUR PRODUCT IN A LOCATION THAT DOES NOT OBSTRUCT THE HORSE DRIVER'S
VIEW OF THE ROAD.
TIMERGPS EUROPE LTD. DOES NOT ASSUME ANY RESPONSIBILITY FOR ANY FINES, PENALTIES,
DAMAGES OR INJURIES THAT MAY BE INCURRED AS A RESULT OF ANY STATE OR LOCAL LAW OR
ORDINANCE RELATING TO THE USE OF YOUR PRODUCT.
13.3 Declaration of conformity
Hereby, TimerGPS Europe Ltd. declares that the product is in compliance with the essential requirements and other relevant
provisions of Directive 1999/5/EC.
13.4 FCC Compliance
The product complies with part 15 of the FCC Rules. Operation is subject to the following two conditions: (1) the product may
not cause harmful interference, and (2) the product must accept any interference received, including interference that may cause
undesired operation.
The product has been tested and found to comply with the limits for a Class B digital product, pursuant to part 15 of the FCC
rules. These limits are designed to provide responsible protection against harmful interference in a residential installation. The
product generates, uses and can radiate frequency energy and may cause harmful interference to radio communications if not
installed and used in according with the instructions, however there is no guarantee that interference will not occur in a particular
installation If the product does cause harmful interference to radio or television reception, which can be determined by turning
the product off and on, the use is encouraged to try to correct the interference by one of the following measures:
32
•
•
•
•
Reorient or relocate the receiving antenna
Increase the separation between the product and the receiver
Connect the product into and outlet that s on a difference circuit from the receiver
Consult the dealer or an experience radio/television technician for help
The product does not contain any user-serviceable parts. Repairs should only be made by an authorized TIMERGPS Ltd.
Product Service Centre. Unauthorized repairs on modifications could result in permanent damage to the product and void your
warranty and your authority to operate the product under part 15 regulations. TimerGPS Europe Ltd. does NOT give any
authorization for the end-customer or retailer to replace the battery or open the device. If the end-customer or retailer along with
anyone else outside TimerGPS Europe’s official service points opens the device the warranty is automatically void!
13.5 International limited warranty
The product is warranted to be free from defects in materials or workmanship for one (1) years from the date of purchase. Within
this period TIMERGPS Europe Ltd. will, at its sole option, repair or replace any components that fail in normal use. Such repairs
or replacement will be made at no charge to the customer for parts of labour, provided that the customer shall be responsible for
any transportation cost. This warranty does not apply to: (1) cosmetic damage such as scratches, nicks or dents; (2) consumable
parts such as chargers unless product damage has occurred due to a defect in the materials or workmanship; (3) damage caused
by accident, abuse, misuse, water, flood, fire or other act of nature or external causes; (4) damage caused by service performed
by anyone who is not an authorized service provider of TIMERGPS Europe Ltd. or (5) damage to a product that has been
modified or altered without the written permission of TIMERGPS Europe Ltd. In addition, TIMERGPS Europe Ltd. reserves the
33
right to refuse warranty claims against products or services that are obtained and/or used in contravention of the laws of any
country.
The product is intended to be used only as a training aid for horse trainers and must not be used for any purpose requiring precise
measuring of pace, speed, time or distance. TIMERGPS Europe Ltd. makes no warranty as to the accuracy or completeness of
measurement data of the product.
THE WARRANTIES AND REMEDIES CONTAINED HEREIN ARE EXCLUSIVE AND IN LIEU OF ALL OTHER
WARRANTIES EXPRESS, IMPIES OR STATUTORY INCLUDING LIABILITY ARISING UNDER ANY WARRANTY,
MERCHANT, ABILITY OR FITNESS FOR A PARTICULAR PURPOSE, STATUTORY OR OTHERWISE. THIS
WARRANTY GIVES YOU SPECIFIC LEGAL RIGHTS WHICH MAY VARY FROM STATE TO STATE. IN NO EVENT
SHALL TIMERGPS Europe Ltd BE LIABLE FOR ANY INCIDENTAL, SPECIAL, INDIRECT OR CONSEQUENTIAL
DAMAGE INCLUDING, WITHOUT LIMITATION, DAMAGES FOR ANY PART OR CITATIONS, WHETHER
RESULTING FROM THE USE, MISUSE OR INABILITY TO USE THE PRODUCT OR FROM DEFECTS IN THE
PRODUCT. SOME STATES DO NOT ALLOW THE EXCLUSION OF INCIDENTAL OR CONSEQUENTIAL DAMAGE,
SO THE ABOVE LIMITATION MAY NOT APPLY TO YOU.
TIMERGPS Europe Ltd. retains the exclusive right to repair or replace (with a new or newly overhauled replacement product)
the product or software/firmware or offer a full refund of the purchase price at its sole discretion. SUCH REMEDY SHALL BE
YOUR SOLE AND EXCLUSIVE REMEDY FOR ANY BREACH OF WARRANTY.
To obtain warranty service, contact your local TIMERGPS Europe Ltd. authorized dealer or call TIMERGPS Europe Ltd.
34
Product Service Centre for shipping instructions. Securely pack the product and a copy of the original sales receipt, which is
required as the proof for warranty repairs. Write the tracking number clearly on the outside of the package. Send the product,
freight charges prepaid, to any TIMERGPS Europe Ltd. warranty service station.
Contacting TIMERGPS Europe Ltd. main Product Service:
TIMERGPS Europe Ltd.
Product Service
Temmeksentie 3, Ovi 961
90400 Oulu
Finland
14
Terms for end user license agreement
14.1 Grant of license
14.1.1 License
By using the product defined in this user manual, you are binding yourself (hereinafter 'you') to the terms and conditions of this
end user license (hereinafter 'EULA') including the warranty disclaimers and limitations of liability provisions below. If you do
not agree to the terms and conditions of this EULA, do not use this product. YOU AGREE THAT YOU HAVE READ THIS
AGREEMENT, UNDERSTAND AND AGREE TO BE BOUND BY ITS TERMS AND CONDITIONS OF THIS EULA.
35
14.1.2 Single product
The firmware embedded, integrated and/or pre-installed in the product and its hardware (hereinafter 'firmware') is licensed, not
sold, to a single product by the seller or reseller who sold the product to you (hereinafter 'reseller'). The firmware may only be
used with that single product.
14.2 Restrictions
You shall not (i) copy, modify, amend, adapt, translate, reverse engineer, decompile, disassemble (except to the extent that this
restriction is expressly prohibited or limited by the applicable law) the firmware nor create or attempt to create derivative works
based on the firmware; (ii) rent, lease, loan or otherwise transfer rights to the firmware; (iii) publicly distribute the firmware (e.g.
by distributing the firmware on a web server for public access). You shall keep the contents of the firmware confidential from
unauthorized disclosure or use.
14.3 Copyright and other rights
All title and copyrights as well as trade secret, patent and other intellectual property and proprietary rights in and to the firmware
(including but not limited to any images, photographs, animations, video, audio, music, test and 'applets' incorporated into the
firmware), the accompanying printed materials and any copies of the firmware are owned by the TimerGPS Europe Ltd. or its
licensors. The firmware is protected by copyright laws and international treaty provisions. You shall not copy the printed
materials accompanying the firmware.
14.4 Limitation of warranty
The reseller does not warrant that the operation of the firmware or the media on which it is contained will be uninterrupted or
36
error-free. The reseller furthermore states that not all errors in the firmware or its media can be corrected or need correction, nor
does the reseller warrant that all defects in the firmware or its media will be corrected. The reseller has no control over the
conditions under which you use the firmware or media and do not and cannot warrant the results obtained by such use. Similarly
the reseller does not warrant that the functions contained in the firmware will meet your personal requirements or that the
firmware or its media will operate in combination with other software or hardware selected by you for use by you.
TO THE EXTENT PERMITTED BY APPLICABLE LAW YOU ACKNOWLEDGE THAT THE FIRMWARE IS PROVIDED
'AS IS' WITHOUT WARRANTIES OF ANY KIND, EXPRESS OR IMPLIED.
The reseller is not responsible for problems which occur as a result of the use of firmware in conjunction with any software
supped by you or with a computer which is incompatible with the operation system for which the firmware is being procured by
you.
14.5 Your remedies
The reseller's entire liability and your exclusive remedy for breach of the foregoing warranty shall be, at the resellers option,
either (i) refund of the price paid for the product (ii) replacement of the product that does not meet this warranty and which is
returned to the reseller. This warranty is void if failure had occurred from accident, abuse, negligence or misapplication.
14.6 No other warranties
ALL WARRANTIES NOT EXPRESSLY STATED HEREIN ARE DISCLAIMED TO THE MAXIMUM EXTENT
PERMITTED BY APPLICABLE LAW, AND THE RESELLER DISCLAIMS ALL OTHER WARRANTIES, EITHER
EXPRESS OR IMPLIED, INCLUDING BUT NOT LIMITED TO IMPLIED WARRANTIES OF MERCHANTABILITY AND
FITNESS FOR A PARTICULAR PURPOSE, WITH REGARD TOE THE FIRMWARE AND THE ACCOMPANYING
WRITTEN MATERIALS.
37
14.7 Disclaimer of liability
The reseller will not be liable for injuries or damages to erosions or property resulting from any cause whatsoever, with the
exception of injuries or damages caused by the gross negligence of the reseller. This limitation applies to all firmware. In no
event will the reseller be liable for any damages resulting from loss of data, loss of use, loss of revenue or any other pecuniary
loss. Furthermore, the reseller disclaims any and all liability for indirect, incidental, special, consequential or other similar
damages even if the reseller has been advised of the possibility of such damages. In any case, the resellers entire liability under
any provision of the terms and conditions shall be limited to the amount actually paid by you for the product, less applicable
depreciation.
14.8 Confidentiality
You shall maintain the confidentiality of the firmware and respective documentation.
14.9 Termination
Without prejudice to any other rights, the reseller may terminate these terms with no prior notice if you fail to comply with the
terms and conditions as stated heron. In such an event, you MUST return the product to the reseller. These terms and conditions
take precedence over any terms and conditions of any other agreement between the reseller and you regarding the firmware. The
provisions contained in the agreement that protect the interests of the reseller or TimerGPS Europe Ltd. in the firmware shall
survive the termination of this agreement.
14.10
Beneficiary
The reseller's licensors and suppliers are intended third party beneficiaries of the agreement and shall have the right to enforce
38
the terms of the agreement directly against you.
14.11
Export
You agree to comply with all applicable export and re-export restrictions.
Copyrights:
©2010-2014 TIMERGPS Europe Ltd.
Contact your local waste disposal department to dispose of the product/battery in accordance with applicable local laws and
regulations.
The product complies with EU directives.
This document is made of recyclable materials.
Contact your local waste disposal department to dispose of the product/battery in accordance
with applicable local laws and regulations.
The product is CE compliant.
The product complies with part 15 of the FCC Rules.
This document is made of recyclable materials.
39