1
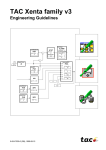
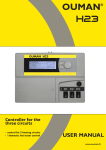
6.4 Routing schedule
Alarms > Routing schedule > Group 1 (2 ... 10) Alarm routing now
Routing schedule
Group 1 Alarm routing now
Group 1 Weekly schedule
Group 2 Alarm routing now
Group 2 Weekly schedule
Team 1 >
>
No routing >
>
You can make each alarm for your weekly program. ”Alarm routing now” shows to whom alarms are routed at the moment.
Typically, alarms are routed according to the time program (automatic).
If you know the service code of the device, you can change from automatic control to manual control and determine for yourself who will be
the recipient team of alarms. If the routing is the manual mode will the
hand image appear in is the beginning of the ”Alarm routing now” row.
Alarms > Routing schedule > Group 1 (2 ... 10) Weekly schedule
You can create a weekly program for each alarm group. Weekly
programs have a general graphic view and an editing view, where you can see to which alarm team each alarm is directed at different points of time. In the graph, alarm teams are distinguished
from each other by the thickness of the black bar.
Graph
Ryhmä 33 weekly
Group
viikko-ohjelma
program
Maanantai >>
Monday
Tiistai>>
Tuesday
Keskiviikko>
Wednesda>
Torstai
Thursday
>>
Perjantai>>
Friday
Lauantai >>
Saturday
Sunnuntai >>
Sunday
03691215182124
This example illustrates an alarm routing weekly
program. Alarm routing is on 7 days a week from 8
am to 9 pm. There are two alarm teams that function as recipients. One receives alarms during office hours. The other group is on call at other times.
Editing view
Time
M T WT F S S
08:00Maintenance
16:00 Team on call
21:00 No routing
08:00 Team on call
OK
1. Set switch time
2. Set alarm team
Time
M T WT F S S
08:00
Team on call
00:00
Add new
21:00
3.Select day(s)
No routing
OK
Turn the control knob to browse a weekly program. If you wish to
see the exact switch times and names of alarm teams, or if you
wish to edit, remove or add switch times, press OK at any weekday.
Browsing a weekly program:
An editing view opens, and it shows all the switch times and also
to which alarm teams alarms are routed at these times on the
chosen days.
The figure shows how alarms are routed to Maintenance during
office hours and to Team on call from 4 pm to 9 pm 7 days a week.
Adding a new switch time:
Press OK at the “Add new” row.
Press OK. Set the switch time for alarm routing (set hours and minutes separately) and press OK.
Press OK and then turn the control knob to set the alarm team (or
the ”No routing” option), and press OK. Press OK at each weekday you wish to choose. Press OK at the end of the row to accept
the new time program. Press Esc to exit.
Editing a weekly program:
Turn the control knob to move to the value you wish to change
and press OK. Turn the control knob to make the time and alarm
team changes. Press OK to accept. Press the OK button to change
the day of the week. Press Esc to exit.
Time Alarm team
08:00Team on call
21:00 Delete switch time
00:00Add new
M T K T P L S
OK
Deleting a switch time:
Turn the control knob to move to the switch time you wish to delete and press OK. Press OK at the selected alarm team and select
”Delete switch time” and press OK at the end of the row.
7