1
Manual
Date
Page
2013-02-01
1 (82)
Coverage
Identifier
Version
Service Provider’s Software Developers
TS1209282607
1.0
Approved on
Valid from
2013-01-29
2013-02-01
Expiry
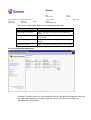
Service Development Guide
Description
TS1209133422 1.0
This document describes how to install and configure Content
Gateway software.
Company information
TeliaSonera Finland Oyj
Teollisuuskatu 15, 00510 HELSINKI, FI
Registered office: Helsinki
Business ID 1475607-9, VAT No. FI14756079
Relation
Content Gateway
Approved
Manual
Date
Page
2013-02-01
2 (82)
Coverage
Identifier
Version
Service Provider’s Software Developers
TS1209282607
1.0
Approved on
Valid from
2013-01-29
2013-02-01
Expiry
Approved
Relation
Content Gateway
Version history
Versions
Status
Date
Modified by
Comments
1.0
Approved
1.2.2013
TeliaSonera Finland Oyj
Renewed version
Table of contents
1 Introduction .................................................................................................................................... 4
1.1 Release Notes for Version 4.0.............................................................................................. 4
1.1
Operator Server .............................................................................................................. 5
1.1.1 Main Functionalities......................................................................................................... 6
1.2
Provider Server ............................................................................................................... 6
1.3
Provider Admin................................................................................................................ 7
2 Short installation Guide .................................................................................................................. 8
2.1 Download the latest version of the software from Sonera’s web page .................................. 8
2.2 Install the software ............................................................................................................... 8
2.2.1 Windows installation .................................................................................................. 8
2.2.2 HP-UX/Linux/SunOS installation ............................................................................. 12
2.3 Use WWW browser to connect to CGW4 ........................................................................... 13
2.4 Install licence ..................................................................................................................... 14
2.5 Configure the users, user groups and passwords of the maintenance user interface ......... 15
2.6 Test the operation of the system and connections.............................................................. 16
2.6.1 Test sending a message to a mobile phone ............................................................. 16
2.6.2 Test receiving a message on a phone...................................................................... 17
2.6.3 Test phone ............................................................................................................... 17
2.6.4 Current Messages report ......................................................................................... 18
2.6.5 Test the firewalls and connection configurations ...................................................... 19
3 Service Development Process ..................................................................................................... 20
4 Service Configuration and Provider Server Administration ........................................................... 21
4.1 Service Types .................................................................................................................... 21
4.1.1 Send Only ................................................................................................................ 21
4.1.2 Receive Only ........................................................................................................... 22
4.1.3 Query/Reply ............................................................................................................. 22
4.1.4 Push ........................................................................................................................ 23
4.2 Configuring Services with Provider Admin.......................................................................... 28
4.2.1 List All Configured Services ..................................................................................... 29
4.2.2 Creating a New Send Only Service .......................................................................... 30
4.2.3 Creating a New Receive Only Service ..................................................................... 31
4.2.4 Creating a New Query/Reply Service ....................................................................... 34
4.2.5 Creating a New Push Service .................................................................................. 36
4.2.6 Message Receiving.................................................................................................. 36
4.3 Setting Access Rights for a Service – Whitelist .................................................................. 37
4.4 Configuring Provider Server ............................................................................................... 39
4.4.1 General Configuration .............................................................................................. 39
4.4.2 Incoming Connections Configuration ....................................................................... 41
4.4.3 Outgoing Connections Configuration ....................................................................... 45
4.4.4 Security Configuration.............................................................................................. 48
Manual
Date
Page
2013-02-01
3 (82)
Coverage
Identifier
Version
Service Provider’s Software Developers
TS1209282607
1.0
Approved on
Valid from
2013-01-29
2013-02-01
Expiry
Approved
Relation
Content Gateway
4.5 Testing services with Test Phone ....................................................................................... 49
4.6 Administrating Provider Server ........................................................................................... 51
4.6.1 Connections ............................................................................................................. 52
4.6.2 Logs ......................................................................................................................... 53
4.6.3 Configuration ........................................................................................................... 54
4.6.4 Users ....................................................................................................................... 55
4.6.5 Log Normal .............................................................................................................. 56
4.6.6 Log All...................................................................................................................... 57
4.6.7 Authentication Admin ............................................................................................... 58
4.6.8 Change Password.................................................................................................... 59
5 Content Gateway Applications ..................................................................................................... 59
5.1 Send to File ........................................................................................................................ 60
5.1.1 Configuration ........................................................................................................... 60
5.1.2 Examples ................................................................................................................. 61
5.2 Query from File .................................................................................................................. 62
5.2.1 Configuration ........................................................................................................... 62
5.2.2 Examples ................................................................................................................. 63
5.3 Send SMS .......................................................................................................................... 64
5.3.1 Configuration ........................................................................................................... 64
5.3.2 Phonebook............................................................................................................... 65
5.3.3 Sending SMS Messages .......................................................................................... 67
5.4 Send .................................................................................................................................. 69
5.4.1 Sending SMS Messages .......................................................................................... 69
5.5 Numbergame ..................................................................................................................... 72
5.5.1 Configuration ........................................................................................................... 72
5.6 SMTP Gateway Functionality ............................................................................................. 73
5.6.1 Configuration ........................................................................................................... 74
5.7 ODBC Gateway ................................................................................................................. 77
5.7.1 Configuration ........................................................................................................... 77
6 Positioning support ...................................................................................................................... 82
Manual
Date
Page
2013-02-01
4 (82)
Coverage
Identifier
Version
Service Provider’s Software Developers
TS1209282607
1.0
Approved on
Valid from
2013-01-29
2013-02-01
Expiry
Approved
Relation
Content Gateway
1 Introduction
Content Gateway is a service platform that enables content providers, service providers and
companies to send and receive SMS and MMS messages between IT systems and mobile
terminals. In order to use Content Gateway, you need to install the Content Gateway provider
software package.
1.1 Release Notes for Version 4.0
−
−
−
−
New web-based Provider Admin tool which replaces the Remote Control.
Simplified session types that also manage all the functions of the old session types. The
supported session types are a) Send Only, b) Receive Only, c) Query/reply and d) Push.
Updated versions of the APIs, documentation and applications.
In the new version service providers are able to set a price for their services.
Manual
Date
Page
2013-02-01
5 (82)
Coverage
Identifier
Version
Service Provider’s Software Developers
TS1209282607
1.0
Approved on
Valid from
2013-01-29
2013-02-01
Expiry
Approved
Relation
Content Gateway
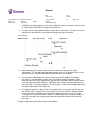
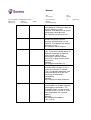
Platform Components
The Content Gateway platform consists of the following components:
−
−
−
−
Operator Server located on the operator’s infrastructure.
Provider Server on your company’s network.
Provider Admin for configuring your applications and Provider Server.
Applications that provide content and services to end-users.
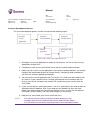
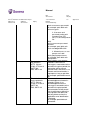
The following figure illustrates the Content Gateway platform.
Figure 1. The Content Gateway Platform
1.1
Operator Server
Operator Server is run on your operator’s infrastructure. It routes messages sent from your
applications to the Messaging System (MMSC, SMSC). It also routes messages sent to your
Short Number to your Provider Server and applications. You can find Operator Server’s
address by contacting your local Content Gateway operator.
Operator Server encrypts all traffic between Provider Server and Operator Server. In addition,
each provider is authenticated by the system. The messages are transmitted via the Internet
using the TCP/IP protocol.
Operator Server hides the protocol that the mobile network uses as well as possible changes
in the protocol (except tunneling protocols). When the operator introduces a new or updates an
existing Messaging System, you do not need to reconfigure your services and applications. In
Manual
Date
Page
2013-02-01
6 (82)
Coverage
Identifier
Version
Service Provider’s Software Developers
TS1209282607
1.0
Approved on
Valid from
2013-01-29
2013-02-01
Expiry
Approved
Relation
Content Gateway
addition, you do not need to know which physical message center is being used or the
technical details and complexities of the mobile network.
1.1.1
Main Functionalities
Operator Server manages the following functions:
1.2
•
Identifies Provider Server when Provider Server opens a connection to Operator Server.
Then Operator Server encrypts all connections to Provider Server.
•
Routes messages between Provider Server and the mobile network.
•
Sends delivery notifications and error messages to Provider Server. Provider Server then
routes the messages and notifications to the application sending the original message.
•
Identifies the requested recipient (Provider Server) and the service (the application) in
incoming messages. It then routes the message to Provider Server, which routes the
message to the application.
•
Checks that the sender of an incoming message has access rights to the requested
service. Operator Server enables restrictions based on MSISDN and service
identification.
•
Checks that the recipient of an outgoing message has access rights to the service.
•
Controls and manages the company and content/service provider information that is
needed for Content Gateway connections.
•
Controls and manages sessions.
•
Collects data from the logs and creates event statistics.
•
Collects data for billing the user and the provider, and for revenue sharing. Creates billing
data for the operator’s billing system.
Provider Server
Provider Server is run on your company’s network. Your applications interface with Provider
Server when they send or receive messages. Provider Server routes outgoing messages to
Operator Server, and incoming messages to your applications. When Provider Server opens a
connection to the operator, it identifies Operator Server. After that Provider Server encrypts all
connections to Operator Server.
If you have one Short Number for your services, you can have only one connection from
Provider Server to Operator Server. If you have more than one Short Numbers, you can route
Manual
Date
Page
2013-02-01
7 (82)
Coverage
Identifier
Version
Service Provider’s Software Developers
TS1209282607
1.0
Approved on
Valid from
2013-01-29
2013-02-01
Expiry
Approved
Relation
Content Gateway
all incoming messages to separate Provider Servers or to one particular Provider Server. With
one license, you can use only one Provider Server but several Short Numbers. If you wish to
use more than one Provider Server, you need separate licenses for all Provider Servers that
connect to Operator Server. However, it is always best to create the service structure in such a
way that you need only one Provider Server.
1.2.1
Main Functionalities
Provider Server manages the following functions:
•
Routes outgoing messages from the applications to Operator Server.
•
Routes incoming messages from Operator Server to the applications.
•
Identifies Operator Server when opening the connection to the operator.
•
Encrypts all connections to Operator Server.
Service applications may access Provider Server through one of the following communication
interfaces:
1.3
•
EMI (tunneling)
•
SMPP (tunneling)
•
HTTP (tunneling) and MMS tunneling (on top of HTTP)
•
SMTP
•
OTP
•
CGW, CGW3
•
Java API (on top of OTP)
•
C++ API (on top of CGW, CGW3)
•
ActiveX
Provider Admin
Provider Admin is a web-based interface used for managing service settings in Content
Gateway. Provider Admin supports all standard HTTP 1.1 compliant web browsers and can be
used from any machine having access to the Provider Server machine.
Manual
Date
Page
2013-02-01
8 (82)
Coverage
Identifier
Version
Service Provider’s Software Developers
TS1209282607
1.0
Approved on
Valid from
2013-01-29
2013-02-01
1.3.1
Expiry
Approved
Relation
Content Gateway
Main functionalities
You can use Provider Admin for the following tasks:
•
Configuring Provider Server.
•
Configuring the service settings.
•
Configuring the service identification settings.
•
Defining access rights (whitelist).
•
Checking connections (Inbound/outbound queues).
•
Defining user aliases and user groups.
2 Short installation Guide
2.1 Download the latest version of the software from Sonera’s web page
The latest version of the software and the programming interface are available on Sonera’s Internet
page at the address: http://www.sonera.fi/contentgateway .
You can download versions for the following 32 bit operating systems from the page:
- Windows
- Linux
- HP-UX
- Solaris
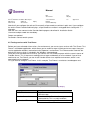
2.2 Install the software
2.2.1 Windows installation
For a server installation, a supported workstation or server is needed, with 10 MB of free disc space.
The Windows installation program is cgwsetup.exe.
1. If you chose installation method 1), delete the old CGW version prior to installing the new version.
Make a backup copy of the configuration files and licence file (*.cnf, *.lic) before updating.
2. Start the installation program cgwsetup.exe.
Manual
Date
Page
2013-02-01
9 (82)
Coverage
Identifier
Version
Service Provider’s Software Developers
TS1209282607
1.0
Approved on
Valid from
2013-01-29
2013-02-01
Expiry
Relation
Content Gateway
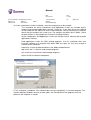
2. Accept the license terms.
3. Choose the directory where the software is to be installed.
Approved
Manual
Date
Page
2013-02-01
10 (82)
Coverage
Identifier
Version
Service Provider’s Software Developers
TS1209282607
1.0
Approved on
Valid from
2013-01-29
2013-02-01
Expiry
Approved
Relation
Content Gateway
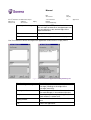
4. Select the installation type.
- The Typical installation will install all the pieces of software. Use this if there is no
particular reason to use the other installation options.
-
The Compact installation will only install the Provider Server software.
-
The Custom installation allows you to choose which pieces of software are to be
installed.
Manual
Date
Page
2013-02-01
11 (82)
Coverage
Identifier
Version
Service Provider’s Software Developers
TS1209282607
1.0
Approved on
Valid from
2013-01-29
2013-02-01
Expiry
Approved
Relation
Content Gateway
4a. If you selected the Custom installation, select the components to be installed.
- Test Installation for Server Components and Applications installs the Provider Server
software and example applications normally. Select this, if you want to test the CGW4.0
version along with the old version on the same computer. Please note that the installation
affects the port numbers the system uses. For example, the Admin port is 50081. Check
the port numbers in the provider.cnf file of the installation directory.
-
Server Components and Applications installs the Provider Server software and example
applications normally.
Send applications installs the SMS sending programs. Use this installation when you
install the software on a computer from which SMS messages are sent, only, through a
Provider Server computer.
-
Documents installs the documentation in the Adobe Acrobat format.
-
cpp installs the C++ libraries and example programs.
-
java installs the Java libraries and example programs.
-
activex installs the ActiveX component.
5. The installation is complete. If the software does not start immediately, re-start the computer. The
Content Gateway Windows Service (in other words, the ProviderServer.exe program) starts by
default as the computer is started.
Manual
Date
Page
2013-02-01
12 (82)
Coverage
Identifier
Version
Service Provider’s Software Developers
TS1209282607
1.0
Approved on
Valid from
2013-01-29
2013-02-01
Expiry
Approved
Relation
Content Gateway
If Content Gateway does not install as Windows Service (in other words, it cannot be found with the
Services management tool in Control Panel), this is what to do:
-
Open the command line interpreter
-
Go to the CGW4.0 installation directory
-
Enter the commands:
o
providerserver install
o
net start providerserver
2.2.2 HP-UX/Linux/SunOS installation
For a server installation, a Linux, HP-UX, or SunOS computer is needed with approximately 10 MB
of free disc space.
There is no installation program for the HP-UX/Linux/Sun version. The programs are in gzip
compressed tar files (cgw40_hpux1020.tar.gz, cgw40_hpux1100.tar.gz, cgw40_sunos.tar.gz,
cgw40_linux.tar.gz). This instruction describes the Linux installation, but the other installations
take place in the similar manner:
1. Make an installation directory and possibly a user ID of your own for cgw. For example:
mkdir /home/cgw40
cd /home/cgw40
Manual
Date
Page
2013-02-01
13 (82)
Coverage
Identifier
Version
Service Provider’s Software Developers
TS1209282607
1.0
Approved on
Valid from
2013-01-29
2013-02-01
Expiry
Approved
Relation
Content Gateway
2. Unzip the files from the tar archive. Please note that if you are updating the software, it is
worthwhile to copy all the configuration files (*.lic, *.cnf) in a safe place before the update and
restore them to the original directory after the update.
gunzip cgw40_linux.tar.gz
tar xvf cgw40_linux.tar
3. If you install CGW 4.0 beside the old CGW version, remember to change the port numbers
in the provider.cnf file to ones that are not used by the old CGW. After the test, remember to
delete the activation of the old CGW and set the crypted-port of the new version into the
same value as that used by the old CGW.
4. Start Provider Server
ProviderServer provider.cnf &
5. Add the activation of the Provider Server program to the computer start scripts. This phase
is not obligatory, but without it Provider Server will not start automatically as the computer
starts.
The correct script depends on the operating system. Check the manual page, for example,
“man rc”, “man rc.config”. In Linux, for example, you can perform automatic start like this:
- In the /home/cgw directory, make the script ”start”, with the following contents:
nohup ProviderServer provider.cnf &
-
In the /etc/rc.d/rc.local file, add the line (the assumption here is that ProviderServer
is run with the cgw user ID):
su cgw -c /home/cgw/start
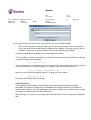
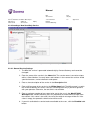
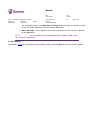
2.3 Use WWW browser to connect to CGW4
When the new Provider Server program is running, set up a connection to the maintenance user
interface. By default, the maintenance user interface is at port number 8081.
For example, if the Provider Server computer has the address sms.company.com, the URL to the
admin user interface with the default settings is http://sms.company.com:8081. If you are at the
same computer as Provider Server, the URL http://localhost:8081 will also work.
NOTE: If you selected the test installation in the software Windows installation, the port
number is 50081. So, the URL in that case is, for example, http://localhost:50081.
If you entered the URL correctly, the browser will ask for the user ID and password of the CGW
Provider Server:
Manual
Date
Page
2013-02-01
14 (82)
Coverage
Identifier
Version
Service Provider’s Software Developers
TS1209282607
1.0
Approved on
Valid from
2013-01-29
2013-02-01
Expiry
Approved
Relation
Content Gateway
At the time you log in for the first time, you can enter any user ID and password.
NOTE: The password that you give when you first log in will be stored in the user register of
the system only for the period that the Provider Server software is running. Later on, you will
need to use the exact same password as in the first log-in before you change it.
If the correct page does not appear, test the operation of the CGW
TIP: If port 8081 is reserved, change the port number of the admin port in the provider.cnf file and
restart the Provider Server program.
http-admin-port 8081
TIP: If you forget the user ID/password, close Provider Server and edit the auth.cnf file so that you
enter the password in it in plain language. For example, if the line in the auth.cnf file is:
peter =nXffxgffgHi5PyFXXuBXrx== admin
and you wish to set the password to “abc123”, change the line as follows:
peter abc123 admin
Restart Provider Server after the change.
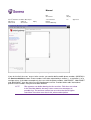
2.4 Install licence
The licence file is delivered by e-mail after the service agreement with Sonera has been
concluded. The licence file needs to be installed before messages can be sent to a phone or
received from a phone. If you are updating an old version of CGW into the CGW4 version, you do
not need a new licence but can use the old licence.
When the log-in is successful, the system will ask for the licence if it has not yet been configured
for it:
Manual
Date
Page
2013-02-01
15 (82)
Coverage
Identifier
Version
Service Provider’s Software Developers
TS1209282607
1.0
Approved on
Valid from
2013-01-29
2013-02-01
Expiry
Approved
Relation
Content Gateway
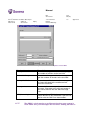
Open the licence file in any text editor and copy the entire text of the licence into the clipboard. Then,
paste the copied text into a blank field and save the licence.
Then click on the Connect button. If the connection is not established after the pressing of Connect,
check the connection.
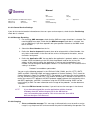
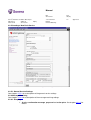
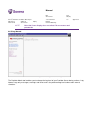
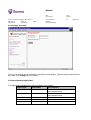
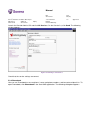
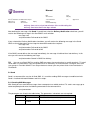
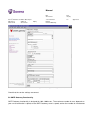
2.5 Configure the users, user groups and passwords of the maintenance user interface
The user configuration page can be displayed through the “User Authentication” link on the admin
pages. You can do this before the services are transferred, too.
Manual
Date
Page
2013-02-01
16 (82)
Coverage
Identifier
Version
Service Provider’s Software Developers
TS1209282607
1.0
Approved on
Valid from
2013-01-29
2013-02-01
Expiry
Approved
Relation
Content Gateway
It is most recommended that each user in CGW 4.0 have their own personal user ID and password.
The users belong to two groups:
1) a user belonging to the admin group has full rights to modify the settings and
service information of Provider Server.
2) those belonging to the user group can modify the configuration of services and
end-user prices.
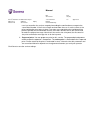
2.6 Test the operation of the system and connections
To make sure that the connection configurations are definitely correct, it is worthwhile to carry out
the test described in this chapter. The most typical reason for system failures is connection
problems. It is worthwhile to carry out these tests only with the final production system.
2.6.1 Test sending a message to a mobile phone
Send a message to your subscription with the Wsend or send program.
As follows with the Send program:
enter> send –s12345 –r0401234567 –hlocalhost –m Text message
SENT: 0401234567 Delivered to the SMSC or with the Wsend program:
Before sending, remember to set the sender’s number and the address of the Provider Server
computer on the Setup screen of the Wsend program.
Manual
Date
Page
2013-02-01
17 (82)
Coverage
Identifier
Version
Service Provider’s Software Developers
TS1209282607
1.0
Approved on
Valid from
2013-01-29
2013-02-01
Expiry
Approved
Relation
Content Gateway
Sending works correctly if the message is received on your phone. The Send program can be found
in the installation directory of the CGW software. If you test sending with another computer than the
one that has the Provider Server software, replace “localhost” with the address of the Provider
Server computer.
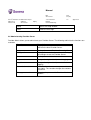
2.6.2 Test receiving a message on a phone
Log in the ProviderServer computer with a Web browser. Alternatively, you can check the test result
directly in the log files. Also start the application with which you wish to test the operation.
Please note that before the tests, you need to define a service to receive the messages on the
Admin website. The simplest way is to set up a Receive Only service, which saves the received
messages in a text file. The following settings, for example, are enough for receiving messages:
Name
Test
Short
<short number to be tested>
number
Service
<leave blank>
keyword
Application
file://received.txt
URI
Use the Web Admin user interface to view the logs. Note that the log page is not automatically
updated, but you need to click on the Log link again until the event is shown on the log page.
After this, send a message that has a search word configured for the service to the short number of
the service, and wait for the service to reply.
If the phone show the error message “Service is temporarily out of use. Try again later.” and the Log
screen of the Web Admin program shows nothing, the connection has problems. In all likelihood,
your company’s firewall prevents the connection. See chapter 5 (Firewall and connection settings).
If, on the other hand, the Log screen displays communications, the connection to the operator is in
order, but either the service or the routing configuration of the message has problems.
If the phone receives the error message “Service was not identified. Check that the short number
and search word are correct”, the configuration of the services is not correct or you sent a wrong
search word. Check both cases.
2.6.3 Test phone
To test the services, you can use the Test phone application. Contrary to the previous version, Test
phone works through the Admin web pages. Test phone is meant to facilitate sending test SMS
messages. The reply messages are sent to a real phone. An SMS message sent from Test phone
cannot be distinguished in any way from a message sent from a real phone. That is why before you
can use the Test phone application, the subscription number used on it is secured by a PIN code
sent to the real phone.
Manual
Date
Page
2013-02-01
18 (82)
Coverage
Identifier
Version
Service Provider’s Software Developers
TS1209282607
1.0
Approved on
Valid from
2013-01-29
2013-02-01
Expiry
Approved
Relation
Content Gateway
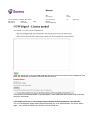
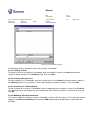
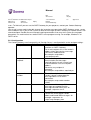
2.6.4 Current Messages report
The Current Messages report show the messages processed during the previous fifteen minutes,
their status and end-customer charging. The description of the fields is shown on the report page.
NOTE: The page shows no more than 200 latest events.
NOTE: The Current messages report only provides indicative information on the success of
invoicing which can factually only be checked with Sonera’s invoicing system or on the enduser's invoice.
Manual
Date
Page
2013-02-01
19 (82)
Coverage
Identifier
Version
Service Provider’s Software Developers
TS1209282607
1.0
Approved on
Valid from
2013-01-29
2013-02-01
Expiry
Approved
Relation
Content Gateway
2.6.5 Test the firewalls and connection configurations
If a firewall prevents a connection to the Provider Server of your company from Sonera, the services
will probably not work correctly after connection interruptions, nor will it be possible to deliver
messages sent from a phone.
First of all: close the Provider Server program and restart it (in the Windows environment, for
example, by the commands net stop providerserver and net start providerserver, in Unix
environments kill the program by the kill command and restart it).
Then repeat the test, but do not contact Provider Server before you send a test message.
If an error is displayed on the Web Admin page, test that at least the connection to Sonera is
working:
Make sure that the name service of the Provider Server computer is working correctly.
enter> nslookup cgw.mobile.sonera.net
Name:
cgw.mobile.sonera.net
Address: 195.156.25.22
If the name service is not in order, there are three options to fix it:
Repair the name service.
In the hosts file of the computer, add line
195.156.25.22 cgw.mobile.sonera.net
Or edit the licence file provider.lic so that you replace the line:
operator-server cgw.mobile.sonera.net
with the line:
operator-server 195.156.25.22
Restart Provider Server after this.
Make sure the connection to Sonera is working properly. Typically, the company’s firewall is open so
that the connection is working properly. In some cases, the connections outward have been blocked.
Test the connection with, for example, the telnet program as follows:
enter> telnet cgw.mobile.sonera.net 31779
If everything is working correctly, the connection will be established, but it immediately breaks as you
enter something in the telnet window. If the connection is not established by telnet, the problem is
fixed by opening the company's firewall. If Datanet is in use, check that the interconnection traffic
opening has been done correctly. Sonera’s firewall at the address cgw.mobile.sonera.net, port
31779 is open.
Manual
Date
Page
2013-02-01
20 (82)
Coverage
Identifier
Version
Service Provider’s Software Developers
TS1209282607
1.0
Approved on
Valid from
2013-01-29
2013-02-01
Expiry
Approved
Relation
Content Gateway
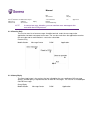
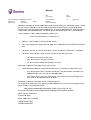
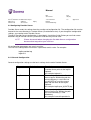
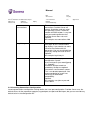
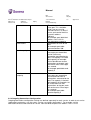
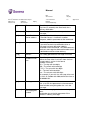
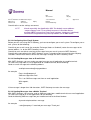
3 Service Development Process
The service development process can be summarized with following figure:
Develop a
Configure
Configure
service
Service with PA
Provider Server
Contact
Offer to the end
operator if
users
application
needed
Figure 2. The Service Development Process
1. Develop a new service application or modify an existing one. You can use the existing
applications through APIs.
2. Configure the new service into Provider Server with the Provider Admin web tool.
3. Before you can use the service application in the Content Gateway platform, you need to
configure the required parameters to Provider Server. Configuring needs to be done if
you have, for example, applied new protocols.
4. You can test the service application with Test Phone. Test Phone can be used only with
test license. If your Provider Server is already connected to the live network (with live
license), you can for example install another PS in order to test your services with the
Test Phone.
5. If your service requires special parameters, such as a special price, you need to make an
agreement with the operator. Also, if you need to use a protocol you have not used
before, you need to check that you have the ability to use it (i.e. you have the required
connections to the network). You may need to acquire a new licence.
6. Now you can start to offer your service to the end users.
NOTE
You need to have a license to the live network before you can
configure both services and Provider Server with Provider Admin.
You can find out more about acquiring license from Installation Guide.
Manual
Date
Page
2013-02-01
21 (82)
Coverage
Identifier
Version
Service Provider’s Software Developers
TS1209282607
1.0
Approved on
Valid from
2013-01-29
2013-02-01
Expiry
Approved
Relation
Content Gateway
4 Service Configuration and Provider Server Administration
4.1 Service Types
A service type specifies how sessions are controlled in the service. The service type is
significant for billing: using a wrong service type can cause either a mobile user not to be billed
at all or unnecessary billing. A session is a set of messages that forms a logical service
transaction. For instance, a ringing tone typically consists of 1 MO (Mobile Originated) and 3
MT (Mobile Terminated) messages, totaling 4 messages for a service transaction. The session
begins when the first message arrives to Content Gateway. The session ends automatically
when the preset timeout is reached or when the application ends the session.
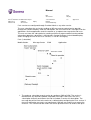
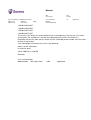
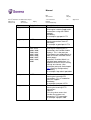
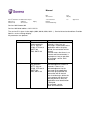
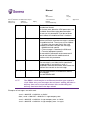
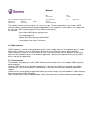
4.1.1 Send Only
An application sends the message to a mobile terminal, but does not expect an answer. The
session ends automatically when the SMSC receives the message or when the message has
been received in the mobile terminal (if delivery notification is used). You can limit the use of
the Send Only service by giving access rights only to certain users.
Send Only
Mobile Station Message Center
CGW
Application
Send message
Direct to Message
Center
Ack.
Direct to user
(Delivery Receipt)
Manual
Date
Page
2013-02-01
22 (82)
Coverage
Identifier
Version
Service Provider’s Software Developers
TS1209282607
1.0
Approved on
Valid from
2013-01-29
2013-02-01
NOTE
Expiry
Approved
Relation
Content Gateway
In case of an error situation, you can send an error message to the
user with the HTTP protocol.
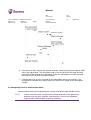
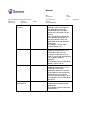
4.1.2 Receive Only
The session consists of one message. A mobile terminal sends the message to the
application, but does not expect an answer. The session ends when the application receives
the message and no confirmation is sent to the subscriber.
Receive Only
Mobile Station
Message Center
CGW
Application
4.1.3 Query/Reply
The Query/reply type is for services that are initiated by the user sending an MO message
(query), and the query is replied with one or more MT messages. The session is created upon
each MO message.
Query/Reply
Mobile Station
Message Center
CGW
Application
Manual
Date
Page
2013-02-01
23 (82)
Coverage
Identifier
Version
Service Provider’s Software Developers
TS1209282607
1.0
Approved on
Valid from
2013-01-29
2013-02-01
Expiry
Approved
Relation
Content Gateway
4.1.4 Push
Push is a part of Content Gateway that is used to provide push services. In Push services, the
service messages are sent from the application to users. The Push service type differs from
the other CGW service types as follows:
•
Push requires that the end user subscribe the service from the Service Provider. This is
done in order to get permission for charging the end user.
•
The service provider delivers content to active push subscribers when needed.
•
The end user ends the subscription if he/she does not want to receive the content
anymore.
Manual
Date
Page
2013-02-01
24 (82)
Coverage
Identifier
Version
Service Provider’s Software Developers
TS1209282607
1.0
Approved on
Valid from
2013-01-29
2013-02-01
Expiry
Approved
Relation
Content Gateway
Push services are configured through Provider Admin as any other service.
The user subscribes the service by sending an MO message to content/service provider
through the Content Gateway. After the subscription, the user receives MT messages from the
application. Service application sends the content as a separate message to the end users.
The user can close the subscription by sending an MO message to content/service provider.
Information about the subscribers is maintained in Content Gateway. Internal bookkeeping
allows charging the user for the Push services, i.e. for MT messaging.
Push ("subscribe")
Mobile Station
Message Center
CGW
Application
1. The end user subscribes a push service by sending a SMS to CGW. The service is
identified like any other MO (Mobile Originated) message. CGW saves the user’s
subscription internally and informs the end user about a successful subscription. The
message that will be sent to the end user is defined when configuring the Push service. If
the push notification message is not configured, CGW will not send any message to the
end user. This scenario can be used if the service provider wishes to send its own push
Manual
Date
Page
2013-02-01
25 (82)
Coverage
Identifier
Version
Service Provider’s Software Developers
TS1209282607
1.0
Approved on
Valid from
2013-01-29
2013-02-01
Expiry
Approved
Relation
Content Gateway
notification message. Note that in this case a different service (send only) must be used
to send the push notification message to the end user.
2. The push service subscription becomes active after 5–10 minutes. This gives the user a
chance to unsubscribe the service without having to pay for the content.
Push (send)
Mobile Station
Message Center
CGW
Application
3. Before delivering the content, CGW checks the end users that have an active
subscription. This can done with http request and it returns a list of active end users for
defined service. (Using the http request is defined later in the chapter)
4. Push content is delivered to the end user like any other MT (Mobile Terminated)
message. It is not possible to send a Push message for multiple recipients. At the
moment, there must be a separate message for each subscriber. When trying to send a
Push message to multiple recipients, CGW does not send the message and returns an
error message: "Too many recipients". The message is send to each recipient defined in
the above-mentioned HTTP request list.
5. The operator specifies a daily limit for the number of Push messages that the end user
can receive. When sending a Push message to an end user who has already reached
his/her daily limit, CGW does not send the message and returns an error message
“Passive user. Daily limit reached”. Otherwise, CGW handles the message similarly as
other MT messages (for example, barring check and whitelist check) and sends the
message.
Using the http request to find out the push subscriptions
Manual
Date
Page
2013-02-01
26 (82)
Coverage
Identifier
Version
Service Provider’s Software Developers
TS1209282607
1.0
Approved on
Valid from
2013-01-29
2013-02-01
Expiry
Approved
Relation
Content Gateway
Sometimes provider or service application needs to know who have subscribed a push service.
A list of service subscribers can be requested through Provider Server using http protocol.
Provider can issue the request from web browser, or service application can send the request
using its own http implementation. The format of the subscriber query URL is the following:
http://<address>:<port>/cgw-pa/cgw/push_orders.jsp?
service_id=<id>&status=<s>&format=<f>
•
Address is the IP address of the Provider Server.
•
Port is the http port of Provider Server. Note: this is different than Provider Server admin
port.
•
Parameter service_id is the id of the push service to request. Parameter is mandatory.
•
Parameter status defines states of users to return. Possible values are:
o
act, which returns only active users
o
pas, which returns only passive users
o
all, which returns both active and passive users
Parameter is optional. If omitted, returns active users.
•
Parameter format defines in which format the result is returned. Possible values are:
o
text, which returns the list in plain text format. This format does not contain any
additional tags, and is easy to use by applications.
o
html, which returns the list in html format. This format contains html tags in the
text, and can be viewed better in browser.
Parameter is optional. If omitted, returns using html format.
For example, to request all users who have subscribed push service 123, returning the result
in html format, use the following URL:
http://localhost:8080/cgw-pa/cgw/push_orders.jsp?service_id=123
The result of the above query might look the following on the browser window:
# push service subscribers
# service id: 0123
# time: 2003-10-14 14:03:50
+358401234567 ACT
+358401234568 ACT
Manual
Date
Page
2013-02-01
27 (82)
Coverage
Identifier
Version
Service Provider’s Software Developers
TS1209282607
1.0
Approved on
Valid from
2013-01-29
2013-02-01
Expiry
Approved
Relation
Content Gateway
+358401234569 ACT
+358401234570 ACT
+358401234571 ACT
+358401234572 ACT
The result list has always the three comment lines in the beginning. The first line is the name
of the report. The second line is the id of the requested push service. The third line is
timestamp. All the lines from that on, contain first the subscriber phone number, then the status
of the user (act or pas).
If no subscriptions were found, the result is the following:
# push service subscribers
# service id: 0124
# time: 2003-10-14 14:07:50
No orders
Push ("unsubscribe")
Mobile Station
Message Center
CGW
Application
Manual
Date
Page
2013-02-01
28 (82)
Coverage
Identifier
Version
Service Provider’s Software Developers
TS1209282607
1.0
Approved on
Valid from
2013-01-29
2013-02-01
Expiry
Approved
Relation
Content Gateway
6. If the end user does not want the content anymore, sending a closing message to CGW
closes the subscription. The closing message is like any other MO message and after
receiving it CGW removes the subscription. Once the subscription has been removed,
the end user will not receive content anymore.
7. Charging the push services is based on the subscription and the sent content. The
charge for an individual message (content) has to be less or equal to the subscription
charge.
4.2 Configuring Services with Provider Admin
Provider Admin allows you to configure your services and administrate Provider Server.
NOTE
Please note that some configuration settings depend on the agreement
between you and your operator, and therefore, some of the attributes
might not be visible/usable in the user interface.
Manual
Date
Page
2013-02-01
29 (82)
Coverage
Identifier
Version
Service Provider’s Software Developers
TS1209282607
1.0
Approved on
Valid from
2013-01-29
2013-02-01
Expiry
Approved
Relation
Content Gateway
The service configuration section has the following functionalities:
Function
All services
New Send Only service
New Receive Only service
New Query/reply service
New Push service
Description
Lists all configured services of the provider.
Opens a display for creating a new Send Only
service.
Opens a display for creating a new Receive
Only service.
Opens a display for creating a new Query/reply
service.
Opens a display for creating a new Push service.
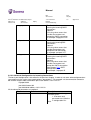
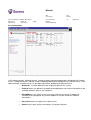
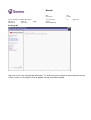
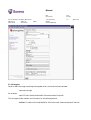
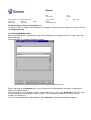
4.2.1 List All Configured Services
Figure 3. List of All Services
By default, Provider Server has some predefined services with default configuration values for
the ready-made application of Content Gateway. Please verify that these settings are
appropriate for your purposes.
Manual
Date
Page
2013-02-01
30 (82)
Coverage
Identifier
Version
Service Provider’s Software Developers
TS1209282607
1.0
Approved on
Valid from
2013-01-29
2013-02-01
Expiry
Approved
Relation
Content Gateway
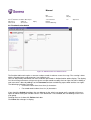
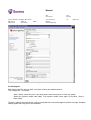
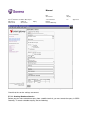
4.2.2 Creating a New Send Only Service
Figure 4. Defining a Send Only Service
4.2.2.1 General Service Settings
1. The ID of the service is generated automatically by Content Gateway and cannot be
changed.
2. Enter the name of the service in the Name field. The service names have to be unique
within a Short Number. Use only letters and numbers in the name of the service. Avoid
special characters, umlaut characters and spaces.
3. Enter a short description of the service in the Description field.
4. Enter a billing name of the service in the Billing Name field. The billing name is used in
the invoice to identify the service. You can use billing name only if you have agreed it
with your operator. Otherwise, the text field is not available.
5. Enter a maximum number of messages to be sent to the user in the Max MT SMS
Messages field. Content Gateway uses this parameter to create SMS messages from
the content. If this value is too small, the rest of the original message will be cut. If the
value is empty, the operator’s default value will be used.
6. If you wish to disable the service/make unavailable to the users, click the Disabled radio
button.
Manual
Date
Page
2013-02-01
31 (82)
Coverage
Identifier
Version
Service Provider’s Software Developers
TS1209282607
1.0
Approved on
Valid from
2013-01-29
2013-02-01
Expiry
Approved
Relation
Content Gateway
7. If you wish to use the service in a live environment for testing purposes without billing,
click the In test use radio button.
8. If you wish to use the service in a live environment with billing, click the In Production
radio button. Please note that this option and the associated behavior may vary and
depends on the agreement between you and your operator.
9. Proposed price. You can propose a price for this service. The proposed price becomes
effective upon the operator’s acceptance. The active price is shown above the Proposed
price. Please note that the price is nominated in cents. Note also that this parameter and
the associated behavior depends on the agreement between you and your operator.
10. Click Save to save the service configuration.
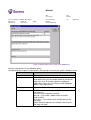
4.2.3 Creating a New Receive Only Service
Figure 5. Defining a Receive Only Service
Manual
Date
Page
2013-02-01
32 (82)
Coverage
Identifier
Version
Service Provider’s Software Developers
TS1209282607
1.0
Approved on
Valid from
2013-01-29
2013-02-01
Expiry
Approved
Relation
Content Gateway
4.2.3.1 General Service Settings
If you wish to receive location information on the users upon service requests, check that the Positioning
check box is selected.
4.2.3.2 Message Receiving
1. For receiving SMS messages, check that the SMS messages check box is selected. For
receiving MMS messages, check that the MMS messages check box is selected. You
can use MMS only if you have agreed it with your operator. Otherwise, the MMS check
box is invisible.
2. Select the Short Number from the list.
3. Define the Service keyword. Keywords have to be unique within a Short Number. Use
only letters and numbers in the name of the service. Avoid special characters, umlaut
characters and spaces.
4. Define the Application URI. You can define the application’s protocol, address, and port
number. Enter the following in the URI field: the protocol used for the service, the
address of the machine where the application is running and the application’s port
number. Do not change the default port number if it is not necessary. The structure of the
setting is as follows:
Protocol://serveraddress:portnumber
You can use the following protocols in the URI field: CGW, CGW3, text, file, HTTP, SMTP,
SMPP and EMI. CGW and CGW3 are legacy protocols of Content Gateway. “Text” stands for
Content Gateway’s Open Text Protocol (OTP). File protocol is used when the service needs a
file (e.g. Send to File, Query from File). The used file and file path is defined in URI field. HTTP
means the normal HTTP protocol, the SMTP protocol support replaces the functionality of the
old SMTP application, and EMI is used when using the UCP/EMI tunneling. SMPP can be
used similarly to EMI. For more information on the usage of the protocols, see the document
Protocols.
5. Select the EMI hex format check box, if you wish to transfer messages in hex format.
NOTE
If you have developed the service application with the Content
Gateway Java API, define the protocol in the URI field as
text://serveraddress:portnumber. This is because the Java API is
built on the Open Text Protocol.
4.2.3.3 Charging
1. Price confirmation message. This message is delivered to the user to confirm service
usage if, e.g. the price of the service exceeds the price limit defined by the operator. The
Manual
Date
Page
2013-02-01
33 (82)
Coverage
Identifier
Version
Service Provider’s Software Developers
TS1209282607
1.0
Approved on
Valid from
2013-01-29
2013-02-01
Expiry
Approved
Relation
Content Gateway
user has to confirm the service usage by forwarding the confirmation message to the
same Short Number. If the first message received from the user is not the same as the
price confirmation message, or there is no return message during the configured time
period, Operator Server concludes that the user does not want to use the service and
discards the original message. Note that if the service has a keyword, the first word of
the price confirmation message has to be the keyword.
2. Proposed price. You can propose a price for this service. The proposed price becomes
effective upon the operator’s acceptance. The active price is shown above the Proposed
price. Please note that the price is nominated in cents. Note also that this parameter and
the associated behavior depends on the agreement between you and your operator.
Click Save to save the service settings.
Manual
Date
Page
2013-02-01
34 (82)
Coverage
Identifier
Version
Service Provider’s Software Developers
TS1209282607
1.0
Approved on
Valid from
2013-01-29
2013-02-01
Expiry
Approved
Relation
Content Gateway
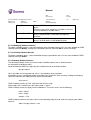
4.2.4 Creating a New Query/Reply Service
Figure 6. Defining a Query/reply Service
4.2.4.1 General Service Settings
See chapter 4.2.2.1 for a description of the general service settings.
4.2.4.2 Message Receiving
See chapter 4.2.3.2 for a description of the message receiving settings.
4.2.4.3 HTML to SMS
1. With the HTTP protocol support, you can transmit the content of a web page to a mobile
terminal. To define which section of the web page to send to the mobile terminal, enter
Manual
Date
Page
2013-02-01
35 (82)
Coverage
Identifier
Version
Service Provider’s Software Developers
TS1209282607
1.0
Approved on
Valid from
2013-01-29
2013-02-01
Expiry
Approved
Relation
Content Gateway
the start and end tags in the Start tag and End tag fields. The tags can contain any kind
of text. For more information, see the Protocols document.
2. Abort message is a message that will be sent to the end user if the session is aborted
by the application.
NOTE
You can find out more information about “HTML to SMS” from
the Protocols document.
4.2.4.4 Charging
See chapter 4.2.3.3 for a description of the charging settings and click Save to save the service settings.
Manual
Date
Page
2013-02-01
36 (82)
Coverage
Identifier
Version
Service Provider’s Software Developers
TS1209282607
1.0
Approved on
Valid from
2013-01-29
2013-02-01
Expiry
Approved
Relation
Content Gateway
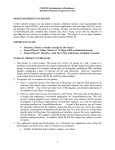
4.2.5 Creating a New Push Service
Figure 7. Defining a Push Service
4.2.5.1 General Service Settings
See chapter 4.2.2.1 for a description of the general service settings.
4.2.6 Message Receiving
See chapter 4.2.3.2 for a description of the message receiving settings.
4.2.6.1 Charging
1. A price confirmation message, proposed and active price. See chapter 4.2.3.3 for
details.
Manual
Date
Page
2013-02-01
37 (82)
Coverage
Identifier
Version
Service Provider’s Software Developers
TS1209282607
1.0
Approved on
Valid from
2013-01-29
2013-02-01
Expiry
Approved
Relation
Content Gateway
2. Push order notification is a message sent to the user to inform that his/her push
subscription has been successfully completed. Typically, the notification contains a
welcome message, the price and service-specific instructions. The push service
subscription becomes active after 5–10 minutes. This gives the user a chance to
unsubscribe the service without having to pay for the content. Once the service becomes
active, the user will receive push messages and will be charged accordingly. Note that
closing the push service subscription may vary between operators. If you wish to include
instructions for closing the service in this notification message, contact your operator to
check the correct “close subscription” message.
See chapter 4.2.3.3 for a description of the charging settings and click Save.
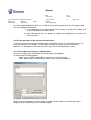
4.3 Setting Access Rights for a Service – Whitelist
Figure 8. A List of All Defined Services
You can define access rights for a service by clicking the All services link that will lead you to the service
list display. The Whitelist column displays the number of users that have the right to use the service. “0
items” means that all users are allowed to access the service. Whitelist can be defined for services that are
“In Production” mode (See chapter 4.2.2.1).
For example, to define access rights to the Numbergame service click the Whitelist link of the service. The
following display appears:
Manual
Date
Page
2013-02-01
38 (82)
Coverage
Identifier
Version
Service Provider’s Software Developers
TS1209282607
1.0
Approved on
Valid from
2013-01-29
2013-02-01
Expiry
Approved
Relation
Content Gateway
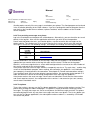
Figure 9. Defining the Whitelist for a Service
If you wish to limit the users’ access to the service, you need to define mobile phone numbers (MSISDN) in
the Service whitelist text box. Phone numbers have to be separated by a comma (,), a semicolon (;) or a
carriage return. In the above example only the users with the phone numbers “0101234567”, “0201234567”
and “0301234567” have the right to use the Numbergame service. Provider Admin adds international
prefixes to the numbers if they have not been defined.
NOTE
The operator can define barring for the services. This does not show
in the Provider Admin, but may cause some error messages to
provider log. The end user cannot use a service that has a higher
restriction class than user has in his phone subscription.
Manual
Date
Page
2013-02-01
39 (82)
Coverage
Identifier
Version
Service Provider’s Software Developers
TS1209282607
1.0
Approved on
Valid from
2013-01-29
2013-02-01
Expiry
Approved
Relation
Content Gateway
4.4 Configuring Provider Server
Provider Server reads the settings from the provider.cnf configuration file. The configuration file must be
located in the same directory as Provider Server (ProviderServer.exe). If you change the configuration
settings, you need to restart Provider Server.
The basic Provider Server configuration is described in Installation Guide. Below you can find a more
detailed listing of Provider Server’s parameters and how they can be used.
NOTE
Please be careful when changing the Provider Server configuration
because that may affect your services.
All configuration parameters are case insensitive.
One line in the configuration file contains a parameter and its value. For example:
logfile provider.log
loglevel 3
4.4.1 General Configuration
General configuration settings are the basic settings for the entire Provider Server.
Parameter
loglevel
Default value
3
Description
The level of the information that
Provider Server prints to the log file.
Optional.
An example: loglevel 3
logfile
The name (and path) of the Provider
Server log file. Without the path the
current directory is used. You can
use $(DATE) to insert the current
date into the name of the log file.
Optional.
An example: logfile prov_$(DATE).log
licencefile
The name (and path) of the Provider
Server license file. Without the path
the current directory is used.
Mandatory.
An example: licencefile provider.lic
Manual
Date
Page
2013-02-01
40 (82)
Coverage
Identifier
Version
Service Provider’s Software Developers
TS1209282607
1.0
Approved on
Valid from
2013-01-29
2013-02-01
Expiry
Relation
Content Gateway
usersfile
The name (and path) of the user
alias/group file. Without the path the
current directory is used.
Optional. If not defined, user aliases
and groups cannot be used.
An example: usersfile users.cnf
authfile
The name (and path) of the auth file.
Without the path the current
directory and default file is used.
Optional. If not defined, the default
filename is used.
An example: authfile auth.cnf
keep-open
password
bind-address
no
Set the value of the parameter to
“yes” if you want Provider Server to
keep the connection to Operator
Server always open. If the
connection is closed, Provider
Server will re-open it within about
one minute.
Optional.
An example: keep-open yes
The default password for the
Provider Admin displays. If this is
used, the username is “remote”.
This is an obsolete parameter. Not
recommended to be used if not
necessary for backwards
compatibility.
Optional.
An example: password newerkess
The address used to bind the
source addresses of both incoming
and outgoing connections. This
should be used if you are running
Provider Server in a multi IP server
and need to bind it to a specific
address.
Optional.
An example: bind-address
192.11.22.33
Approved
Manual
Date
Page
2013-02-01
41 (82)
Coverage
Identifier
Version
Service Provider’s Software Developers
TS1209282607
1.0
Approved on
Valid from
2013-01-29
2013-02-01
Expiry
Approved
Relation
Content Gateway
maxconnections
The maximum number of
connections Provider Server will
accept. Should be used only when
the operating system’s maximum
number of file descriptors is very low
and you need to guarantee that
Provider Server does not crash.
Optional.
An example: max-connections 200
log-history
By default you can see the last 200
messages on the Provider Admin
log display. If you need to see more,
increase the number with this
parameter. You can also disable log
history by setting the value to zero.
Optional.
An example: log-history 0
user
User password and group
configuration. Syntax:
User<username><password>[group
1]…[groupN]
Username and password are
mandatory. Groups are optional.
Parameters cannot contain spaces.
This is an obsolete parameter. Not
recommended to be used if not
necessary for backwards
compatibility.
Optional.
An example: user johnsm passwd
users admin
4.4.2 Incoming Connections Configuration
Incoming connections configuration settings define the listen port configuration. Provider Server uses the
default values for the parameters app-port, crypted-port, text-port and admin-port, but you can override any
default value in the configuration file.
Manual
Date
Page
2013-02-01
42 (82)
Coverage
Identifier
Version
Service Provider’s Software Developers
TS1209282607
1.0
Approved on
Valid from
2013-01-29
2013-02-01
Expiry
Relation
Content Gateway
Parameter
app-port
Default value
31771
Description
The Provider Server port
listening for incoming application
connections using the CGW3
protocol.
Mandatory.
An example: app-port 31771
crypted-port
31779
The Provider Server port
listening connections from OT.
Mandatory.
An example: crypted-port 31779
http-admin-port First unused
from series
8080, 9080,
7080, 8081,
8082, 8083,
8084, 8085,
8086, 8087,
8088, 8089,
8090
The Provider Server port
listening for incoming HTTP
connections for Provider Admin
displays. This is the port you
should point your web browser in
order to see the Provider Server
admin pages.
Important: Provider Admin is a
standard www application. It is
important that the server security
settings are correct. (See
parameter port-auth and chapter
4.4.4 Security Configuration).
Mandatory.
An example: http-admin-port 8081
text-port
The Provider Server port
listening for incoming OTP
connections. This is needed for
Java API support.
Mandatory.
An example: text-port 21772
http-port
21772
The Provider Server port
listening for incoming HTTP
connections.
Optional.
A missing value means that
Provider Server does not
accept the HTTP connection.
An example: http-port 7080
Approved
Manual
Date
Page
2013-02-01
43 (82)
Coverage
Identifier
Version
Service Provider’s Software Developers
TS1209282607
1.0
Approved on
Valid from
2013-01-29
2013-02-01
Expiry
Relation
Content Gateway
smpp-port
The Provider Server port
listening for incoming SMPP
connections.
Optional.
A missing value means that
Provider Server does not
accept the SMPP connection.
An example: smpp-port 3176
emi-port
The Provider Server port
listening for incoming EMI
connections.
Optional.
A missing value means that
Provider Server does not
accept the EMI connection.
An example: emi-port 3177
The Provider Server port
listening for incoming SMTP
connections.
Optional.
A missing value means that
Provider Server does not
accept the SMTP connection.
(See chapter 5.6.1 SMTP
Configuration).
An example: smtp-port 25
smtp-port
Approved
4.4.2.1 Advanced Configuration for Incoming Connections
The basic port configuration is described in the previous chapter. In order to set more advanced parameters
you need to use the syntax “port <portnumber> <parameter>”. For example: set the connection timeout to
60 seconds for port 9999 and bind the port to the address 192.11.22.33.
http-port 9999
port 9999 timeout 60
port 9999 bind-address 192.11.22.33
All the advanced parameters are optional.
Parameter
Default value
auth
Description
The port authentication type.
Possible syntax:
1. Username and
password are visible the
in configuration file:
Auth
Manual
Date
Page
2013-02-01
44 (82)
Coverage
Identifier
Version
Service Provider’s Software Developers
TS1209282607
1.0
Approved on
Valid from
2013-01-29
2013-02-01
Expiry
Relation
Content Gateway
plain<username><password>
An example: port 9999 auth
johnsm mypass
2. Username and
password are base64
encoded (See RFC
2617) in the configuration
file:
Auth
basic<username+password
base64>
An example: port 9999 auth
Basic am9objpteXBhc3M=
timeout
ack-timeout
3. Allowed users or user
groups are listed:
Auth group<group-names>
An example: port 9999 auth
group admin
(Seeconnection
chapter 4.4.4
Security
The default values for The
timeout
in
the protocols:
seconds. If there are no
HTTP 120 sec
messages in connection to the
port within the given period, the
CGW, OTP/text 0
SMTP 60
connection will be closed.
EMI, SMPP 30
Value 0 means that there is no
timeout and the connection is
kept open as long as possible.
An example: port 9999 timeout
60
The connection
The default values
for the protocols:
acknowledgement timeout in
seconds. If there is no
HTTP 120 sec
acknowledgement for the
CGW, OTP/text 0
SMTP 60
message in connection to the
port within the given period,
EMI, SMPP 30
the connection will be closed.
You should always define the
value greater than 0 but not
too long, because then the
application error identification
is delayed.
An example: port 9999 acktimeout 60
Approved
Manual
Date
Page
2013-02-01
45 (82)
Coverage
Identifier
Version
Service Provider’s Software Developers
TS1209282607
1.0
Approved on
Valid from
2013-01-29
2013-02-01
bind-address
maxconnections
Expiry
Approved
Relation
Content Gateway
The address to bind the
listen port. This should be
used if you are running
Provider Server in a multi IP
server and need to bind it to
a specific address.
Optional.
An example: port 9999 bindaddress 192.11.22.33
The maximum number of
connections to listen to the
port.
An example: port 9999
max-connections 200
send-capacity
The maximum number of
messages per second that
can be sent to any
connection connected to the
port. The capacity is the total
port capacity, for example:
set to 10 and there are two
connections to the port, each
will receive max 5 messages
in a second.
An example: port 9999 sendcapacity 5
receivecapacity
The maximum number of
messages per second that
can be received from all
connections connected to the
port. The capacity is the total
port capacity, for example: set
to 10 and there are two
connections to the port, each
will receive max 5 messages
in a second.
An example: port 9999
receive-capacity 5
4.4.3 Outgoing Connections Configuration
Outgoing connections configuration settings are defined separately for each service. In order to set service
(application) parameters, use the syntax “service <serviceid> <parameter>”. For example: set the
connection timeout to 60 seconds for service 1022 and bind the port to the address 192.11.22.33:
Manual
Date
Page
2013-02-01
46 (82)
Coverage
Identifier
Version
Service Provider’s Software Developers
TS1209282607
1.0
Approved on
Valid from
2013-01-29
2013-02-01
Expiry
Approved
Relation
Content Gateway
Service 1022 timeout 60
Service 1022 bind-address 192.11.22.33
The service ID is given in four digits (0001, 0010, 0100, 1022…). Service id can be found from Provider
Admin’s service settings display.
All parameters are optional.
Parameter
timeout
Default value
The default values
for the protocols:
HTTP 120 sec
CGW, OTP/text 0
SMTP 60
EMI, SMPP 30
Description
The connection timeout in
seconds. If there are no
messages in connection to the
application within the given
period, the connection will be
closed.
Value 0 means that there is no
timeout and the connection is
kept open as long as possible.
An example: service 1022
timeout 60
ack-timeout
The default values for
the protocols:
HTTP 120 sec
CGW, OTP/text 0
SMTP 60
EMI, SMPP 30
The connection
acknowledgement timeout in
seconds. If there is no
acknowledgement for the
message to the application
within the given period, the
connection will be closed.
You should always define the
value greater than 0 but not
too long, because then the
application error identification
is delayed.
An example: service
1022 ack-timeout 60
Manual
Date
Page
2013-02-01
47 (82)
Coverage
Identifier
Version
Service Provider’s Software Developers
TS1209282607
1.0
Approved on
Valid from
2013-01-29
2013-02-01
connecttimeout
bind-address
bind-port
maxconnections
Expiry
Relation
Content Gateway
10 sec
The connect timeout in
seconds. If the connection to
the application cannot be
established within the given
period, the connection will be
closed.
You should always define the
value greater than 0 but not
too long, because then the
application error identification
is delayed.
An example: service 1022
connect-timeout 15
The address to bind the
outbound connection to. This
should be used if you are
running Provider Server in a
multi IP server and need to bind
it to a specific address.
Optional.
An example: service 1022 bindaddress 192.11.22.33
The port number to bind the
outbound connection to. This
should be used if your
application requires a specific
source port for the connection.
Note that you must set the
services max-connections to 1.
An example: service 1022 bindport 3333
The maximum number of
outbound connections to the
application.
An example: service 1022 maxconnections 5
Approved
Manual
Date
Page
2013-02-01
48 (82)
Coverage
Identifier
Version
Service Provider’s Software Developers
TS1209282607
1.0
Approved on
Valid from
2013-01-29
2013-02-01
Expiry
Approved
Relation
Content Gateway
send-capacity
The maximum number of
messages per second that can
be sent to the application. The
capacity is the total service
capacity, for example: set to 10
and there are two connections
to the application, each
application will receive max 5
messages in a second.
An example: service 1022
send-capacity 5
receive- capacity
The maximum number of
messages per second that can
be received from all
connections connected to the
application. The capacity is the
total service capacity, for
example: set to 10 and there
are two connections to the
application, each will receive
max 5 messages in a second.
An example: service 1022
receive-capacity 5
4.4.4 Security Configuration
Because Provider Admin has a web-based user interface, it is important that the Provider Server security
settings are correct in order to prevent any unwanted access to the Provider Server configuration, service
configurations or service prices.
Usernames and passwords are defined in the auth.cnf file.
Security configuring:
Define possible users and their user groups. There are two predefined user groups in Provider Server:
• Admin – full access rights (administer Provider Server settings)
•
User – limited access (administer service settings)
The syntax for defining users and their groups is:
<username> <password> [group1] … [groupN]
For example: There are three users: John, Susan and Ann. John belongs to both the “admin” and “users”
user group and Susan and Ann are ordinary users and belong only to the “users” user group. The user
group configuration could look like:
John jpasswd admin users
Susan spasswd users
Ann apasswd users
Manual
Date
Page
2013-02-01
49 (82)
Coverage
Identifier
Version
Service Provider’s Software Developers
TS1209282607
1.0
Approved on
Valid from
2013-01-29
2013-02-01
Expiry
Approved
Relation
Content Gateway
Note that if you configure the auth.cnf file manually all passwords are written in plain text. If you configure
the auth.cnf from Provider Admin displays, all passwords are written in encrypted form starting with “=” –
character.
Now the users can connect to the Provider Admin page as described in Installation Guide.
Username and password are mandatory.
Groups are optional.
Parameters cannot contain spaces.
4.5 Testing services with Test Phone
Before you have activated a license for a live environment, you can test your services with Test Phone. Test
Phone is a Windows application, which allows you to send messages to and receive messages from your
service application without a connection to the Operator’s environment. Test Phone can be used with the
default test license, which is included in the Windows setup package.
Once you have activated the live license, you cannot use Test Phone anymore with the same instance of
Provider Server. This is to prevent sending test messages accidentally to a live network. If you wish to
continue to use Test Phone, you can install Provider Server to a separate environment, which is not
connected to a live network.
First you have to configure Test Phone. In this example, Test Phone is used to test numbergame.exe.
Figure 10. The Test Phone Setup Display
Display element
Phone Number
Provider Server Address
Application URI
Description
The phone number that is shown as the sender
in the message
The address of the Provider Server your service
is connected to. This is usually localhost.
The address of your application or web site.
Manual
Date
Page
2013-02-01
50 (82)
Coverage
Identifier
Version
Service Provider’s Software Developers
TS1209282607
1.0
Approved on
Valid from
2013-01-29
2013-02-01
Expiry
Relation
Content Gateway
Start tag and end tag
When testing the HTTP protocol to fetch content
from the web site defined in the application URI,
you can define the start and end tags of the
requested content.
OK
Accepts the set up.
Cancel
Cancels the set up and closes the display.
Use Test Phone to send a message to the application and to receive a reply from it.
Figure 11. The Test Phone Application Testing Numbergame
Display element
Description
New Message/Message from: Shows that you are about to write a new
message (sending) or the origin of the
message (receiving).
Message text box
The message to be sent is written to text box.
The received reply is also written to the text
box.
Recipient:
The recipient (for example, your application’s
short number) is written here.
Debug window
The send information and status are written
here.
Exit
Closes the application.
Approved
Manual
Date
Page
2013-02-01
51 (82)
Coverage
Identifier
Version
Service Provider’s Software Developers
TS1209282607
1.0
Approved on
Valid from
2013-01-29
2013-02-01
Expiry
Approved
Relation
Content Gateway
Setup
Opens the setup window.
Send
Sends the message.
4.6 Administrating Provider Server
Provider Admin allows you to administrate your Provider Server. The following administrative functions are
available:
Function
Description
Connections
Displays the connections and their statuses to
and from the local Provider Server.
Logs
Displays the current Provider Server log file.
Configuration
Users
Displays the contents of provider.cnf. Saving
the changes resets the Provider Server.
Displays the contents of users.cnf.
Log normal
Changes the log level to 3 (normal logging).
Log all
Changes the log level to 4 (more detailed
logging).
Administration of user names, passwords and
user rights. This function changes the contents
of auth.cnf
Authentication admin
Change password
Changing the password for Provider Admin user
account.
Manual
Date
Page
2013-02-01
52 (82)
Coverage
Identifier
Version
Service Provider’s Software Developers
TS1209282607
1.0
Approved on
Valid from
2013-01-29
2013-02-01
Expiry
Approved
Relation
Content Gateway
4.6.1 Connections
Figure 12. A List of Provider Server Connections
In the above example, “Inbound Queues” indicate all open incoming protocol ports configured into Provider
Server. “Outbound Queues” indicate all open outgoing protocol ports configured into Provider Server. In the
above example, Provider Server has one open connection (outbound) to Operator Server.
• Queue Id is a unique identifier of the respective queue in the system.
•
Protocol means the protocols available to the applications (for further information on the
available protocols, please see Protocols).
•
Bind Address “any” means that in case your machine has several IP addresses
(network cards) configured, any of these addresses can be utilized for “Inbound”
connections.
•
Server Port means the port of the socket server.
•
Conns means open (active) connections in that particular port.
Manual
Date
Page
2013-02-01
53 (82)
Coverage
Identifier
Version
Service Provider’s Software Developers
TS1209282607
1.0
Approved on
Valid from
2013-01-29
2013-02-01
Expiry
Approved
Relation
Content Gateway
•
Conn Timeout means the time how long the connection is kept open.
•
Ack Timeout means the time how long acknowledgement is to be waited before
determining error status.
•
Sent means the number of messages sent through this connection.
•
Received means the number of messages received through this connection.
•
Errors means the number of errors associated with the connection.
4.6.2 Logs
Figure 13. The Provider Server Log File
The Provider Admin tool enables you to view the current log file. You can change the number of visible log
rows with the log-history parameter as described in chapter 4.4.1.
Manual
Date
Page
2013-02-01
54 (82)
Coverage
Identifier
Version
Service Provider’s Software Developers
TS1209282607
1.0
Approved on
Valid from
2013-01-29
2013-02-01
Expiry
Approved
Relation
Content Gateway
4.6.3 Configuration
Figure 14. Defining Configuration File
The Provider Admin tool also enables you to change the configuration of your Provider Server by editing the
text box and clicking Save. This resets the Provider Server. For more information about the configuration
settings of Provider Server, please see chapter 4.4 of this document.
Manual
Date
Page
2013-02-01
55 (82)
Coverage
Identifier
Version
Service Provider’s Software Developers
TS1209282607
1.0
Approved on
Valid from
2013-01-29
2013-02-01
Expiry
Approved
Relation
Content Gateway
4.6.4 Users
Figure 15. Defining Users and User Groups
The Provider Admin tool also enables you to define users and user groups to be utilized by your applications
and services via APIs. For more information on the available APIs, please see the respective documents
C++ Guide, Java Guide and ActiveX Guide.
New users and user groups are defined in the following format:
<MSISDN (phone number)> <user_alias>, <group name>, <group name>, ...
In the above example, the number
“0101111” has an alias name “TestUser1” and is a member of the user group “UserGroup1”.
“0201111” has an alias name “TestUser2” and is a member of the user group “UserGroup2”.
“0301111” has an alias name “TestUser3” and does not belong to any user group.
“0401111” has an alias name “TestUser4” and is also a member of the user group “UserGroup1”.
You can define several user groups for one user in single row.
Manual
Date
Page
2013-02-01
56 (82)
Coverage
Identifier
Version
Service Provider’s Software Developers
TS1209282607
1.0
Approved on
Valid from
2013-01-29
2013-02-01
NOTE
Expiry
Approved
Relation
Content Gateway
Note that Users display does not affect PA user names and
passwords.
4.6.5 Log Normal
Figure 16. Defining the “Normal” Log Level
The Provider Admin tool enables you to change the log level of your Provider Server during runtime. “Log
Normal” logs only messages, warnings and errors and is the preferred log level to be used in normal
situations.
Manual
Date
Page
2013-02-01
57 (82)
Coverage
Identifier
Version
Service Provider’s Software Developers
TS1209282607
1.0
Approved on
Valid from
2013-01-29
2013-02-01
Expiry
Approved
Relation
Content Gateway
4.6.6 Log All
Figure 17. Defining the “All” Log Level
Log Level 4 (“All”) logs very detailed information. This level may have an impact on the performance of your
system. Please use this log level only for problem solving and troubleshooting.
Manual
Date
Page
2013-02-01
58 (82)
Coverage
Identifier
Version
Service Provider’s Software Developers
TS1209282607
1.0
Approved on
Valid from
2013-01-29
2013-02-01
Expiry
Approved
Relation
Content Gateway
4.6.7 Authentication Admin
Figure 18. Administration User Authentication
The Provider Admin tool requires usernames and passwords in order to secure the usage. The securing is done
with the Provider Server auth-parameter (see chapter 4.4.4).
You can add, modify and delete new users and their passwords in Authentication admin display. The display
lists the existing usernames and you can give a new password or modify the user rights for those. Adding a
new username is done by adding it to the Username text box and defining a password and the user rights.
The following restrictions are valid:
• Username needs the at least four (4) characters
•
Password needs to be at least six (6) characters
If you check the Admin check box, the user belongs to the admin user group and is granted a full access
rights to administrating the Provider Server. If the check box is not selected, the user belongs to the users
user group.
Deleting the user is done with Delete check box.
Click Save after changes in display.
Manual
Date
Page
2013-02-01
59 (82)
Coverage
Identifier
Version
Service Provider’s Software Developers
TS1209282607
1.0
Approved on
Valid from
2013-01-29
2013-02-01
Expiry
Approved
Relation
Content Gateway
4.6.8 Change Password
Figure 19. Change Password
The user can change his password with Change Password display. Type the old password and new
password. Click Change to save changes.
5 Content Gateway Applications
The applications provided with Content Gateway are as follows:
Application
Executable
User interface
Send to File
-
Query from File
-
Send SMS
Send
Numbergame
wsend.exe
send.exe
numbergame.exe
The functionality is integrated
into Provider Server.
The functionality is integrated
into Provider Server.
Windows GUI
Windows Console
Windows Console
into
into
Manual
Date
Page
2013-02-01
60 (82)
Coverage
Identifier
Version
Service Provider’s Software Developers
TS1209282607
1.0
Approved on
Valid from
2013-01-29
2013-02-01
Expiry
Approved
Relation
Content Gateway
SMTP Gateway
-
ODBC Gateway
Test Phone
odbcgw.exe
wphone.exe
The functionality is
integrated into
Provider Server.
Windows GUI
Windows GUI
integrated into
Ready-made applications are configured with the default values. After you have installed and configured the
applications, you need to check the settings in the Provider Admin tool.
NOTE
In order to use the C++ CGWAPI on UNIX system, you have to use
version 3.3.1 of gnu c++ compiler.
5.1 Send to File
The Send to File application is used for saving messages to the text file.
Send to File saves each sent message as one row in the text file. This can be used for receiving information
(e.g. voting and competitions) or other data that can be easily read and processed further from the file. No
parameters are used in Send to File.
The messages sent from the mobile terminal are stored in the following format:
<timestamp>:<Short Number>:<sender number>#<message>
For example:
20020612110817:12345:0401234567#Hello, this is a message from a phone to a file.
5.1.1 Configuration
The Send to File application is configured as a Receive Only service in Provider Server. The file where the
messages will be saved is defined in the URI in the format: “file://filepath”, e.g.
file://vote.txt
The content of the file can be edited when needed. Note that when the file path is not defined to the file URI,
it defaults to the directory where the Provider Server executable is located.
The following is an example of a Send to File service configuration:
Manual
Date
Page
2013-02-01
61 (82)
Coverage
Identifier
Version
Service Provider’s Software Developers
TS1209282607
1.0
Approved on
Valid from
2013-01-29
2013-02-01
Expiry
Approved
Relation
Content Gateway
Figure 20. Defining a Send to File Service
5.1.2 Examples
Send an SMS message containing the keyword of the service to the Short Number.
keyword message
An example
vote YES John Smith 0101234567 Caloniuksenkatu 5 Helsinki
The message will be stored in the file vote.txt in the following format:
20030827111023:12121:0101234567:# YES John Smith Caloniuksenkatu 5 Helsinki
Manual
Date
Page
2013-02-01
62 (82)
Coverage
Identifier
Version
Service Provider’s Software Developers
TS1209282607
1.0
Approved on
Valid from
2013-01-29
2013-02-01
NOTE
Expiry
Approved
Relation
Content Gateway
If you wish to forward the message to a file, use your mobile terminal’s
forward function. In the Edit window, you can add the keyword to the
beginning of the message. Then send the message to the Short
Number.
5.2 Query from File
The Query from File application is used for reading messages from the text file. Query from File reads a row
from the defined file. If no parameters are used, it returns a random row. A word can be used as a
parameter, so that the row including a certain word will be returned. To configure Query from File with
parameters, create a text file from which Query from File reads the data. The text in the file can be in the
following format:
keyword message
keyword message etc.
One row contains one returnable message. Query from File can be used e.g., for joke services, when a joke
is returned by random. Defining a keyword as the first word of the row enables parameter usage.
NOTE
The same file can be used for Send to File and Query from File. The
administrator can make the updates by sending new information,
such as new jokes to the file with Send to File. The subscriber can
get the data, such as jokes from the file using Query from File.
5.2.1 Configuration
The Query from File application is configured as a Query/reply service in Provider Server. The file, from
which the messages will be read is defined in the URI in the format: “file://filepath”, e.g.
file://joke.txt
The content of the file can be edited when needed. Note that when the file path is not defined to the file URI,
it defaults to the directory where the Provider Server executable is located.
The following is an example of a Query from File service configuration:
Manual
Date
Page
2013-02-01
63 (82)
Coverage
Identifier
Version
Service Provider’s Software Developers
TS1209282607
1.0
Approved on
Valid from
2013-01-29
2013-02-01
Expiry
Approved
Relation
Content Gateway
Figure 21. Defining a Query from File Service
5.2.2 Examples
With Query from File you can fetch a row from a file to your mobile terminal.
The example file is as follows:
Joke1: Really successful man is one who makes more money than his wife can spend.
Joke2: Bus station is where a bus stops. Train station is where a train stops. On my desk, I have a
work station.
To fetch a specific row from the file, enter the keyword of the row at the beginning of the message. Send the
following SMS message to the Short Number:
Manual
Date
Page
2013-02-01
64 (82)
Coverage
Identifier
Version
Service Provider’s Software Developers
TS1209282607
1.0
Approved on
Valid from
2013-01-29
2013-02-01
Expiry
Approved
Relation
Content Gateway
joke Joke1
Query from File returns the text from the row that begins with the keyword.
Joke1: Really successful man is one who makes more money than his wife can spend.
To fetch a random row from the file, send only the keyword to the Short Number:
Joke
Query from File returns a random row from the specified file.
5.3 Send SMS
The Send SMS application is used for sending SMS messages to mobile terminals. In addition to sending a
message to one recipient, you can create recipient lists and send group messages. You can create the
recipient lists in Send SMS’s Phonebook.
5.3.1 Configuration
The Windows setup program installs Send SMS along with Provider Server. To install Send SMS in another
computer, copy the wsend.exe file into its directory. To configure Send SMS, do the following:
Start Send SMS in Start –> Programs –> Content Gateway –> Send SMS. You can also start Send SMS
by double clicking the wsend.exe file in the installation directory.
In the Send SMS main window, click Setup. The following dialog box appears:
Figure 22. Send SMS Setup
Enter Provider Server’s address in the Server Address field. Enter also the sender’s number (your phone
number) in the Sender Number field. Then click OK.
NOTE
If you wish to enter text as the sender number, enter the $ sign and
the text, for example, ‘$COMPANY’.
Manual
Date
Page
2013-02-01
65 (82)
Coverage
Identifier
Version
Service Provider’s Software Developers
TS1209282607
1.0
Approved on
Valid from
2013-01-29
2013-02-01
Expiry
Approved
Relation
Content Gateway
Launch the Provider Admin URI and click All Services. On the Service list, click Send. The following
window appears:
Figure 23. Defining a Send Service
Check that the service settings are correct.
5.3.2 Phonebook
You can use Phonebook to save recipients’ names and phone numbers, and to create recipient lists. To
open Phonebook, click Phonebook in the Send SMS application. The following dialog box appears:
Manual
Date
Page
2013-02-01
66 (82)
Coverage
Identifier
Version
Service Provider’s Software Developers
TS1209282607
1.0
Approved on
Valid from
2013-01-29
2013-02-01
Expiry
Approved
Relation
Content Gateway
Figure 24. Send SMS Phonebook
The following sections describe the tasks you can do in Phonebook.
5.3.2.1 Creating an Alias
To create an alias for a recipient in Phonebook, enter the recipient’s name in the Name field and the
recipient’s phone number in the Number(s) field. Then click Add.
5.3.2.2 Creating a Recipient List
To add a recipient list in Phonebook, enter the name of the list in the Name field and the phone numbers in
the Number(s) field. Insert a comma (,) and a space between the phone numbers. Then click Add.
5.3.2.3 Searching for a Phone Number
To find a number on a long list in Phonebook, enter the beginning of the recipient ‘s name in the Find field.
The matching names are displayed on the list below the field. Select the recipient’s name from the list and
click OK.
5.3.2.4 Modifying Recipient Information
To change a recipient’s number or name in Phonebook, select an alias from the list. The name and number
appear in the Name and Number(s) fields and the Add button changes to Set. Edit the information and
click Set.
Manual
Date
Page
2013-02-01
67 (82)
Coverage
Identifier
Version
Service Provider’s Software Developers
TS1209282607
1.0
Approved on
Valid from
2013-01-29
2013-02-01
Expiry
Approved
Relation
Content Gateway
5.3.2.5 Deleting an Alias or a Recipient List
To delete an alias or recipient list information in Phonebook, select the alias or recipient list from the list and
click Delete Selected.
5.3.3 Sending SMS Messages
With Send SMS you can send SMS messages from a computer to a mobile terminal. To send a message,
do the following:
Start Send SMS. The following dialog box appears:
Figure 25. The Send SMS Application
Enter a message in the Message field. You can write up to 5,120 characters, but keep in mind that one
SMS is only 160 characters.
Enter the recipient’s alias or phone number, or the recipient list’s name in the Recipients field. If you send
the message to several recipients, enter a comma (,) or a semicolon (;) between the aliases, phone
numbers or recipient lists.
If you wish to see advanced sending options, click Advanced. The following dialog box appears:
Manual
Date
Page
2013-02-01
68 (82)
Coverage
Identifier
Version
Service Provider’s Software Developers
TS1209282607
1.0
Approved on
Valid from
2013-01-29
2013-02-01
Expiry
Approved
Relation
Content Gateway
Figure 26. The Advanced Options of Send SMS
Display element
Validity Period
Deferred delivery
Description
To set the validity period for the message, type
the number of minutes to the text field.
To set the delivery period for the message,
type the number of minutes to the text field.
Delivery Notification
To receive a notification when the message
has been delivered to the mobile terminal,
select the check box.
Message class
You can define a message class for the
message. Please do not use this parameter if
you are not familiar with the SMS message
class.
UDH (hex string)
You can define a UDH for the message.
Please do not use this parameter if you are not
familiar with the SMS user data headers.
NOTE
The SMSC’s clock may be on a different time than your system’s
clock. Make sure your messages do not have a validity period or a
Manual
Date
Page
2013-02-01
69 (82)
Coverage
Identifier
Version
Service Provider’s Software Developers
TS1209282607
1.0
Approved on
Valid from
2013-01-29
2013-02-01
Expiry
Approved
Relation
Content Gateway
delivery time set to only a few minutes. Also avoid setting the
delivery time later than a few days ahead.
After defining the message, click Send. If you did not select the Delivery Notification check box, you will
receive the following message in the Send SMS’s main window:
message sent
recipientnumber: Delivered to the SMSC
If you selected the Delivery Notification check box, you will receive the following message in the Send
SMS’s main window when the message has been delivered to the recipient:
message sent
recipientnumber: Delivered to the SMSC
recipientnumber: Delivered to MS
If the SMSC cannot deliver the message immediately, the message is buffered for a later delivery. In this
case you will receive the following message:
recipientnumber: Stored in SMSC for delivery
TIP
You can use Send SMS for sending SMS messages from workstations to mobile terminals. To install
Send SMS in a workstation, copy the wsend.exe file to a directory in the workstation. Configure users and
user groups in Provider Admin’s User Setup window or create your own phone book in the workstation’s
Phonebook.
5.4 Send
Send is a command line version of Send SMS. It is used for sending SMS messages to mobile terminals.
Send is installed with both Windows and Unix setups.
5.4.1 Sending SMS Messages
With Send you can send SMS messages from a computer to a mobile terminal. To send a message, go to
command prompt and enter the following command on the command line:
send parameters
The parameters are listed in the table below. The parameters in brackets are not required.
Parameter Value
Definition
-s
-r
Your Short Number or other phone number
The recipient’s mobile terminal number
Sender number
Recipient
number
Manual
Date
Page
2013-02-01
70 (82)
Coverage
Identifier
Version
Service Provider’s Software Developers
TS1209282607
1.0
Approved on
Valid from
2013-01-29
2013-02-01
[-t]
Expiry
Timeout
[-bin | text] Bin | text
[-h]
Host - Provider
Server address
[-nrq]
Approved
Relation
Content Gateway
The delivery notification timeout
The time (in seconds) that Send waits for a
delivery notification.
The message content is a binary or text
message.
Provider Server’s address
If Provider Server is installed in another
computer, add this parameter to the command.
The delivery notification request
If you wish to receive a notification when a
message has been delivered, add this
parameter to the command. The notification tells
you that a message has been delivered or that it
is buffered to wait for a later delivery.
[-vp]
Minutes
The validity period of the message in minutes
[-ddt]
Minutes
/
DDMMYYYYhh
mm
The delivery time of the message
Define the time either in minutes from the time
the message is sent or in the format
DDMMYYYYhhmm.
DD = The day with two digits
MM = The month with two digits
YYYY = The year with four digits
hh = The hour with two digits
mm = The minutes with two digits
For example, if you wish the message to be sent
at 12:33 on October 6th 2000, define the time as
061020001233.
[-m]
Message
[-smart]
Smart
messaging port
number
The message
Use -m as the last parameter in the command.
Send includes everything after the –m in the
message.
The smart messaging destination and originator
ports.
Remember to use the bin parameter if the
content is a binary message.
Manual
Date
Page
2013-02-01
71 (82)
Coverage
Identifier
Version
Service Provider’s Software Developers
TS1209282607
1.0
Approved on
Valid from
2013-01-29
2013-02-01
Expiry
Approved
Relation
Content Gateway
[-udh]
UDH in hex
The User Data Header information in
hexadecimal format
To find out more about the UDH parameter, see
the Nokia Smart Messaging documentation.
Do not use this parameter if you do not know
how it affects the mobile terminal’s functions.
[-c]
Class number
The message class
Defines where the received message is stored in
the mobile terminal. The classes are as follows:
0 = Displays the message (flash) like a cell
broadcast, but does not store the message
1 = Mobile terminal specific
2 = The message is stored on the SIM card.
3 = Terminal equipment specific
Do not add this parameter to the command if
you do not know how the mobile terminal
functions with this parameter.
[-f]
Filename
The name of the file that contains the message
The message is sent from the file specified in
the parameter. If you omit the –m or –f
parameters from the command, Send sends the
text from the console as the message.
[-hex]
Message in hex
The message content in hexadesimal format.
For example:
-hex 98FAE4E412BC
NOTE
The SMSC’s clock may be on a different time than your system’s
clock. Make sure your messages do not have a validity period or a
delivery time set to only a few minutes. Also avoid setting the
delivery time later than a few days ahead.
Examples of messages sent with send:
send –s 0401235 –r 0401234 –m Hello!
date | send –s 0401235 –r 0401234 –h cgw.company.com
send –s 0401235 –r 0401234 –h cgw.company.com –m Hello!
send –s 0401235 –r 0401234 –h cgw.company.com –f msg.txt
Manual
Date
Page
2013-02-01
72 (82)
Coverage
Identifier
Version
Service Provider’s Software Developers
TS1209282607
1.0
Approved on
Valid from
2013-01-29
2013-02-01
Expiry
Approved
Relation
Content Gateway
5.5 Numbergame
The Numbergame application is used for testing the live connection between Provider Server, Operator
Server and the operator’s messaging center. Its source code is provided with the API library.
To compile the Numbergame application on UNIX platform type the following to the UNIX terminal in the
directory where the API and the numbergame.cpp is.
g++ numbergame.cpp -o numbergame cgwapi.a -lsocket -lnsl -I.
The g++ compiler should be at least version 3.3.1.
Numbergame draws a number between 0 and 10. You have to guess the number by sending your guess to
Numbergame. Numbergame then sends you a reply telling you whether your guess was correct or not.
Numbergame uses the default port 3333, but the port can be changed by giving it as a parameter from the
command line.
An example: c:\>Program Files\cgw\numbergame.exe 4545
5.5.1 Configuration
The Windows setup program installs Numbergame with Provider Server. To configure Numbergame, do the
following:
Open Provider Admin and click All Services. Select numbergame from the list. The following window
appears:
Manual
Date
Page
2013-02-01
73 (82)
Coverage
Identifier
Version
Service Provider’s Software Developers
TS1209282607
1.0
Approved on
Valid from
2013-01-29
2013-02-01
Expiry
Approved
Relation
Content Gateway
Figure 27. Defining a Numbergame Service
Check that the service settings are correct.
5.6 SMTP Gateway Functionality
SMTP Gateway functionality is designed for 100−1,000 users. The maximum number of users depends on
your e-mail connection’s speed, on the SMTP Gateway server’s speed, and on the number of simultaneous
Manual
Date
Page
2013-02-01
74 (82)
Coverage
Identifier
Version
Service Provider’s Software Developers
TS1209282607
1.0
Approved on
Valid from
2013-01-29
2013-02-01
Expiry
Approved
Relation
Content Gateway
users. To find out if you can use the SMTP Gateway for your purposes, contact your Content Gateway
operator.
Your e-mail system needs to be able to route the incoming messages to the SMTP Gateway server, so you
have to define rules in your e-mail system to route the messages to SMTP Gateway at Provider Server. You
cannot configure Provider Server to accept incoming connections from an e-mail system (the smtp-port
parameter) in a machine that has another SMTP server program running. For example, Sendmail is an
SMTP server.
5.6.1 Configuration
The Content Gateway e-mail connectivity via Provider Server is configured with service and port settings.
Parameter
Default value
Description
smtp-address
The Provider Server address when it
functions as SMTP Gateway.
For e-mail recipients this is the sender’s
address when they receive a message
sent from a mobile terminal.
An example: smtp-addess
sms.company.com
smtp-addressrequired
With the value “yes”, Provider
Server checks that messages
received from the e-mail system have
a correct domain set as the recipient
address.
Otherwise, any recipient is
accepted.
An example: smtp-address-required yes
smtp-sendernumber
The mobile recipient sees this as the
sender’s phone number when the
message comes via an SMTP
connection.
An example: smtp-sender-number
12345
A maximum of how many SMS
messages are created from the
message received from e-mail. An
example: smtp-max-sms 5
smtp-max-sms
smtp-errors-to
1
The SMTP server address where to
send e-mail to the original sender
about undelivered SMS messages. An
example: smtp-errors-to
smtp://smtp.company.com
Manual
Date
Page
2013-02-01
75 (82)
Coverage
Identifier
Version
Service Provider’s Software Developers
TS1209282607
1.0
Approved on
Valid from
2013-01-29
2013-02-01
smtp-subject
NOTE
Expiry
Approved
Relation
Content Gateway
The subject of the e-mail received from a
mobile terminal. You can use the same
replacement variables as in the service
URI definition.
An example: smtp-subject Message
from phone number $(M)
Remember to restart Provider Server.
5.6.1.1 Configuring SMTP Gateway for Messages Received from a Mobile Phone
To configure SMTP Gateway to route messages from a phone to e-mail, open Provider Admin and click All
Services. In the Service Setup window, select smtp from the list. The following window appears:
Figure 28. Defining an SMTP Gateway Service
Manual
Date
Page
2013-02-01
76 (82)
Coverage
Identifier
Version
Service Provider’s Software Developers
TS1209282607
1.0
Approved on
Valid from
2013-01-29
2013-02-01
Expiry
Approved
Relation
Content Gateway
Check that the service settings are correct.
NOTE
Check especially the Application URI. The default server address
“smtp.company.com” is very likely incorrect. If Provider Server
accepts SMTP connections from e-mail systems (smtp-port is defined),
the invalid configuration may cause problems for all SMS traffic.
5.6.1.2 Configuring Your E-mail System
Before you can start using SMTP Gateway, you have to configure your e-mail system. To configure your email system, do the following:
Check that your e-mail server (for example, Exchange, Notes or Sendmail) routes the messages to the
correct address, i.e. to the SMTP Gateway server.
Check that users are able to send e-mail messages from your e-mail system to SMTP Gateway.
Check that the connection to the SMTP Gateway server is closed to users from outside your company.
Outsiders should not be able to send e-mail messages through the SMTP Gateway server.
5.6.1.3 Sending Messages from an E-mail Client
With SMTP Gateway, you can send a message from your e-mail application to a mobile terminal.
To send a message from an e-mail application to a mobile terminal, do the following:
Send an e-mail message to the following address:
mobilephonenumber@smtpgwaddress
An example
From: [email protected]
SMS message from email
This is an SMS message sent from an email application.
With regards,
Alex
If the message is longer than 160 characters, SMTP Gateway truncates the message.
5.6.1.4 Sending Messages from a Mobile Terminal
With SMTP Gateway, you can also send an SMS message from a mobile terminal to an e-mail application.
To send a message to an e-mail application, do the following:
Send the following SMS message from your mobile terminal to the Short Number:
keyword recipientaddress message
An example
s [email protected] I received your message. Thank you!
Manual
Date
Page
2013-02-01
77 (82)
Coverage
Identifier
Version
Service Provider’s Software Developers
TS1209282607
1.0
Approved on
Valid from
2013-01-29
2013-02-01
Expiry
Approved
Relation
Content Gateway
The recipient receives the message as an e-mail message. The message contains the sender’s SMTP
Gateway address (mobilestationnumber@smtpgwaddress), the recipient’s e-mail address, the subject and
the message. SMTP Gateway generates the subject automatically.
An example
From: [email protected]
To: [email protected]
Subject: SMS Message from 0101234567
I received your message. Thank you!
5.7 ODBC Gateway
ODBC Gateway is used for making database queries from a mobile terminal. The database query is made
with an SQL statement. You can add various parameters to the SMS message to define the query.
ODBC Gateway is meant for a small number of users. The exact number of users depends on the time it
takes to make a database query. The database application’s performance depends mostly on the ODBC
driver used with the application.
5.7.1 Configuration
The Windows setup program installs ODBC Gateway with Provider Server. To configure ODBC Gateway,
do the following:
Install an ODBC driver for the database application. To find out more about the installation of available
ODBC drivers, see the manufacturer’s and Microsoft’s web sites or contact your database application’s
supplier.
Create the links to the database application before you create a query using that database. ODBC Gateway
does not create the ODBC DSN data.
Open Provider Admin and click All Services. Select odbc from the list and the following window appears:
Manual
Date
Page
2013-02-01
78 (82)
Coverage
Identifier
Version
Service Provider’s Software Developers
TS1209282607
1.0
Approved on
Valid from
2013-01-29
2013-02-01
Expiry
Approved
Relation
Content Gateway
Figure 29. Defining a ODBC Gateway Service
Check that the service settings are correct.
5.7.1.1 Creating Database Queries
Before you can make a database query from a mobile terminal, you must create the query in ODBC
Gateway. To create a database query, do the following:
Manual
Date
Page
2013-02-01
79 (82)
Coverage
Identifier
Version
Service Provider’s Software Developers
TS1209282607
1.0
Approved on
Valid from
2013-01-29
2013-02-01
Expiry
Approved
Relation
Content Gateway
Start ODBC Gateway by selecting Start –> Programs –> Content Gateway –> ODBC Gateway. You can
also start ODBC Gateway by double clicking the odbcgw.exe file in the installation directory. The following
dialog box appears:
Figure 30. The ODBC Gateway Application
If you have not defined a keyword for ODBC Gateway in Provider Admin, select the Keyword is first word
check box. ODBC Gateway then identifies the database query from the SMS message’s first word. If you
have defined a keyword for ODBC Gateway in Provider Admin, do not select the box. ODBC Gateway then
identifies the database query from the SMS message’s second word. In this example odbc service has a
keyword defined, and therefore, the Keyword is first word check box is not selected.
To copy the data from an existing database query to a new query, select the keyword of an existing query
from the list, and click Clone. ODBC Gateway copies all data except the keyword.
To add a new database query, click Add. The following dialog box appears:
Manual
Date
Page
2013-02-01
80 (82)
Coverage
Identifier
Version
Service Provider’s Software Developers
TS1209282607
1.0
Approved on
Valid from
2013-01-29
2013-02-01
Expiry
Approved
Relation
Content Gateway
Figure 31. Defining Data Source Setup for an ODBC Query
Define the parameters for the database query.
The following table explains the parameters that you can use when you create a database query.
Parameter
Definition
Keyword
DSN
The identifier of a database query
ODBC DSN
Also define the user ID and password. If you do not
define the user ID and password, the database
application shows the user ID/password dialog box
when a message arrives.
Max Rows
The maximum number of rows sent from the database.
SQL Statement
The SQL statement with which ODBC Gateway reads
the database.
You can use the following variables:
$(msid) = The sender’s mobile terminal number
(0101234567)
$(number) = The number of the variable word in the
message.
ODBC Gateway replaces the variables with the text in
the reply message.
Manual
Date
Page
2013-02-01
81 (82)
Coverage
Identifier
Version
Service Provider’s Software Developers
TS1209282607
1.0
Approved on
Valid from
2013-01-29
2013-02-01
Reply Text
Nothing Found Text
Error Text
Expiry
Approved
Relation
Content Gateway
The text ODBC Gateway sends as an answer to a
query.
You can use the SQL statement’s variables in the text.
Use only lowercase variable names.
The message ODBC Gateway sends as an answer to a
query if the parameters in the SMS message are
incorrect.
The message ODBC Gateway sends as an answer to a
query if an error occurs in the database query.
5.7.1.2 Modifying Database Queries
To modify a database query, select the database query keyword from the list in the main window of ODBC
Gateway and click Modify. Change the information you wish and click OK to save the changes.
5.7.1.3 Deleting Database Queries
To delete a database query, select the database query keyword from the list in the main window of ODBC
Gateway and click Delete.
5.7.1.4 Making Database Queries
The following example shows you how to make a database query from a mobile terminal.
An example of a database query
Send the following SMS message from your mobile terminal to the Short Number:
db store abc12
‘db’ is the odbc service keyword and ‘store’ is the database query keyword.
If the odbc service is configured without a keyword, you will get the same result by sending the following
SMS message from the mobile terminal to the Short Number:
store abc12
ODBC Gateway creates an SQL statement from the message.
Select code, item, amount from store where code = ‘abc12’
ODBC Gateway makes the query from the database. The return values are the following:
code = abc12
item = thingie
amount = 128
ODBC Gateway converts the return values to the following reply text and sends the reply to your mobile
terminal:
Abc12: thingie amount is 128
Manual
Date
Page
2013-02-01
82 (82)
Coverage
Identifier
Version
Service Provider’s Software Developers
TS1209282607
1.0
Approved on
Valid from
2013-01-29
2013-02-01
Expiry
Approved
Relation
Content Gateway
If the answer to a query consists of more than one row, ODBC Gateway creates a separate reply text from
each row. ODBC Gateway then creates an SMS message from all the rows and sends the message to the
sender of the query. If the length of the SMS message is over 160 characters, ODBC Gateway automatically
truncates the message.
6 Positioning support
Mobile location services are value-added services that use the user's position. The system requests the
position of the mobile terminal and adds the latitude and longitude information to the message that is
delivered to Provider Server and further to the application.
NOTE
The content/service provider must make an agreement with the
operator in order to receive position information.
The positioning support is service-based. In the same short number you can have services that use location
information and services that do not. When the mobile user is positioned, the MSISDN is replaced with a
position ID. Note that the position ID is about 40 characters long, much longer than the MSISDN. The
content/service provider must make sure that your data structures are capable of handling these long
sender numbers.
The positioning utilizes the cell-id technology where the position of the mobile user is located on the cell
level. The accuracy depends on the cell size and on the network operator's coverage. It can be
approximately 200-2,000 meters in cities and more in the countryside.
The message from a positioned user contains the following information:
1) The latitude
2) The longitude
3) An estimate of the positioning error in meters
4) The MSISDN is removed and replaced with the position ID
5) The name of the city
6) The city code
7) The zip code at the position
The position information is supported only with the HTTP and OTP protocols and with the Java and C++
APIs. See the documents Protocols, JavaGuide and C++Guide for more information.
You should implement your service as Query/Reply. The reason is that you must use the position ID in your
reply, which is recognized only within the same session. You cannot use positioning in the Receive Only
service and reply with the Send Only service.
NOTE
The message is not delivered to Provider Server at all if positioning
fails. In this case the mobile user receives an error message.