1
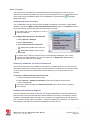
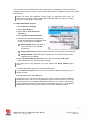
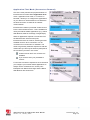
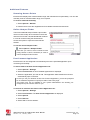
iPassConnect for Nokia S60 User Guide Version 1.9, January 2009 Corporate Headquarters iPass Inc. 3800 Bridge Parkway Redwood Shores, CA 94065 USA www.ipass.com +1 650-232-4100 +1 650-232-4111 fx T AB LE O F CO NT E NT S iPassConnect for Nokia S60 4 Introduction .............................................................................................................................................4 System Requirements .........................................................................................................................4 Supported Languages .........................................................................................................................4 Installing iPassConnect .......................................................................................................................4 Configuring iPassConnect .....................................................................................................................5 Launching iPassConnect .....................................................................................................................5 Setting Configuration Code .................................................................................................................5 Setting iPass Credentials ....................................................................................................................5 Configuring Unknown Networks ..........................................................................................................6 Network Information ............................................................................................................................7 Exiting from iPassConnect ..................................................................................................................7 Connecting and Disconnecting .............................................................................................................8 Connecting to a Wi-Fi Network ............................................................................................................8 Manually Connecting to 3G Networks .................................................................................................8 Auto-Connect ..........................................................................................................................................9 Configuring Auto-Connect ...................................................................................................................9 Choosing networks for Auto-Connection .............................................................................................9 Enabling 3G Network Support .............................................................................................................9 Application First Mode (Connect on Demand) ..................................................................................11 Additional Features ..............................................................................................................................12 Scanning Access Points ....................................................................................................................12 Online Hotspot Finder .......................................................................................................................12 Post Connect Application ..................................................................................................................12 Directory Updates ..............................................................................................................................13 Re-configuring Known Networks .......................................................................................................13 Usage Tracking .................................................................................................................................14 Usage Tips ........................................................................................................................................14 Troubleshooting Connection Issues ..................................................................................................15 iPassConnect for Nokia S60 User Guide Version 1.9, January 2009 2009 iPass Inc. Page 2 2 T AB LE O F CO NT E NT S Cop yr igh t © 2 00 9. Al l r ight s r e se rv e d. T rad em a rk s iPass, Patch Manager and the iPass logo are trademarks of iPass Inc. All other brand or product names are trademarks or registered trademarks of their respective companies. W ar r ant y No part of this document may be reproduced, disclosed, electronically distributed, or used without the prior consent of the copyright holder. Use of the software and documentation is governed by the terms and conditions of the iPass Corporate Remote Access Agreement, or Channel Partner Reseller Agreement. Information in this guide is subject to change without notice. Every effort has been made to use fictional companies and locations in this manual. Any actual company names or locations are strictly coincidental and do not constitute endorsement iPassConnect for Nokia S60 User Guide Version 1.9, January 2009 2009 iPass Inc. Page 3 3 iPassConnect for Nokia S60 USER GUIDE Introduction iPassConnect for Nokia S60, version 2.0, is an easy-to-use network Connectivity Manager for the Nokia S60 series mobile device. It allows remote users with Nokia S60 devices to connect to the Internet and Enterprise resources through iPass' global network of providers. iPassConnect provides Wi-Fi connectivity to the user. It also provides an option to connect via 3G networks in case Wi-Fi network is not available. iPassConnect can be executed in two different modes: the traditional Connection First mode where iPassConnect is first launched to establish a network connection before launching a network-aware productivity application, like the web browser or email client. The second mode is Application First where the application upon launching automatically activates the network connection using iPassConnect. Refer section iPass reminds users to check their data usage plans for their respective 3G/Mobile Broadband carrier. iPass is not responsible for any fees incurred by the user for use of iPassConnect over a 3G/Mobile Broadband connection. No credit or refund will be made available for usage fees that exceed a subscriber‟s data plan. It is the Mobile Broadband subscriber‟s sole responsibility to track his/her mobile data usage. iPassConnect for Nokia S60 User Guide Version 1.9, January 2009 2009 iPass Inc. Page 4 4 Application First Mode (Connect on Demand) for more details. This guide will serve as an introduction to iPassConnect, providing you with information on configuration and basic usage. System Requirements Nokia S60 3.0 or 3.1 device with Wi-Fi capability Supported Languages English Installing iPassConnect Installing iPassConnect on your device is a simple procedure. Transfer the installer file to the device using removable storage cards, as mail attachments or some suitable method. To install iPassConnect on your device: 1. Copy the iPassConnect installation SISX file to your device. 2. Open File Manager, locate and select the SISX file to begin installation. Note that existing versions, if any, will be replaced. 3. The installation wizard takes you through the various steps to complete the installation. Please read and accept the EULA in order to install the software. Once the installation process is complete, you will see an iPassConnect icon in the Installations folder. Your device is now ready to connect. You can also use Nokia PC Suite, if available, to install iPassConnect directly from your laptop. iPassConnect for Nokia S60 User Guide Version 1.9, January 2009 2009 iPass Inc. Page 5 5 Configuring iPassConnect You need to configure the client with your basic settings, which includes your iPass account information, before using iPassConnect for the first time. iPassConnect will prompt you if you forget to do so. Launching i PassConnect Once installed iPassConnect appears in the Installations folder. To launch iPassConnect: 1. Navigate to the Installations folder. 2. Select iPassConnect to launch it. Navigating the Menus Use the left and right soft keys for selecting the appropriate option or command. You can also use the joystick to scroll and select options – if your device has this capability. Setting Configuration Code Certain variants of iPassConnect for S60 software require a configuration code to be entered upon first launch of the software. If you had received a configuration code along with the software, please enter this code when prompted, before proceeding further. Note that the code is case sensitive. Once a valid code is entered, the client will download the latest configuration and directory information. An Internet connection (Wi-Fi or cellular) needs to be enabled in order to receive this update. To configure iPassConnect using configuration code: 1. iPassConnect prompts for the Configuration code when you launch the client for the first time. 2. Key-in valid configuration code and select OK. An Invalid code message will be displayed in case of incorrect code. 3. iPassConnect connects to iPass Directory server and downloads the latest configuration and directory information. Note that the device needs to be connected to the Internet using a non-iPass Wi-Fi connection or cellular connection for this process to complete. 4. Please restart your device when prompted. Setting iPass Credentials iPassConnect can store your iPass login credentials, making it easier and faster for you to log in. If an iPass account has not been assigned to you by your company, you can obtain an individual account by registering at http://www.ipassconnect.com/S60, either using your PC or from this device after connecting using a personal Wi-Fi connection. iPassConnect for Nokia S60 User Guide Version 1.9, January 2009 2009 iPass Inc. Page 6 6 To set your iPass user credentials: 1. Select Options > Settings > User Login. 2. Key-in your Username, Password and Domain name in the boxes provided. 3. Select OK to save your changes. Furthermore, you can register for iPass connectivity from this screen, if required: 4. Select the option 'Not yet registered?' to view the link www.ipassconnect.com. You may need to scroll down in order to view this option. 5. Select the link to visit the site and register for iPass connectivity. 6. Select OK to save your changes. Configuring Unknow n Netw orks In addition to iPass networks, iPassConnect allows you to easily connect to network access points that are not part of the iPass network and which iPassConnect refers to as 'Unknown Networks'. Once you configure and connect to an unknown network, it is classified as a „Known Network‟. All iPass networks are automatically classified as known networks. When iPassConnect detects an iPass enabled network, the corresponding wireless network settings are configured automatically. However, if you are using a privacy enabled Wi-Fi network, please ensure that the connection settings are configured properly. To configure the Wi-Fi settings for unknown networks: 1. Select the unknown network in the list. 2. Select Connect. 3. Input authentication and encryption data as required. 4. Select OK. The iPassConnect client by default displays all known and unknown networks. Display of unknown networks can be turned off, if required. To turn off display of unknown networks: 1. Select Options > Settings > Other. 2. Select Show Unknown Networks. 3. Select this option to toggle No. 4. Select OK. Hidden WLANs Hidden WLANs or non-broadcasting networks are normally listed at the bottom of the networks list. You can connect to these networks provided you have the network name in addition to encryption and authentication information. Connecting to hidden or non-broadcasting networks is iPassConnect for Nokia S60 User Guide Version 1.9, January 2009 2009 iPass Inc. Page 7 7 supported but is strongly discouraged. Auto-Connect cannot be used with Hidden WLANs (both in Connection First and Application First modes). To configure the Wi-Fi settings for Hidden WLANs: 1. Select Hidden WLAN in the list. 2. Select Connect. 3. Key-in the network name in the Enter SSID box. 4. Select OK. 5. Input other authentication and encryption data as required. 6. Select OK. Netw ork Information The iPassConnect client scans for Wi-Fi networks – both iPass enabled networks and non-iPass networks – and lists them in most-preferred to least preferred order. iPassConnect uses various icons to represent and identify different networks and various aspects. Icons used to represent information about the available networks: Icon Description Location on screen iPass enabled known network Left Unknown network Left Non-iPass known network Left Auto-Connect enabled network Left Signal Strength Right The network requires security information to connect Right Connected network, using security credentials Left Connected network, without using security credentials Left Exiting from iPassConnect You can exit iPassConnect, if required, by following the procedure described below. To Exit from iPassConnect: Select Options > Exit. iPassConnect for Nokia S60 User Guide Version 1.9, January 2009 2009 iPass Inc. Page 8 8 Connecting and Disconnecting Upon launch, the iPassConnect client scans for Wi-Fi networks within range and lists them. This list displays both iPass enabled networks and non-iPass networks arranged in most-preferred to least preferred order. It is refreshed periodically thereafter. Connecting to a Wi -Fi Netw ork Though the basic procedure for connecting to Wi-Fi networks is the same for both known and unknown networks, you might be prompted for credentials in case of unknown networks. To connect using iPassConnect: 1. Choose the desired network from list and select Connect. 2. iPassConnect displays various status messages and finally shows the message Connected upon successful connection. Moreover, the option Connect changes to Disconnect. To disconnect from iPassConnect: Scroll to the connected network and select Disconnect. Manuall y Connecting to 3G Netw orks You can manually connect to 3G networks also, if required. To manually connect to 3G network: 1. Select Options > Connect to 3G Packet Data. Note that this option will be displayed only if you had enabled Fallback to 3G Packet Data. See section Enabling 3G Network Support for more information. 2. You will be connected. Moreover the option changes to Disconnect from 3G Packet Data using which you can disconnect from the network. iPassConnect for Nokia S60 User Guide Version 1.9, January 2009 2009 iPass Inc. Page 9 9 Auto-Connect Auto-Connect can be enabled to instruct iPassConnect to automatically connect to known networks. Auto-Connect operates only when you launch iPassConnect or in the Application First mode. Auto-Connect enabled networks can be identified by a special symbol ( ) displayed against their name. Configuring Auto-Connect Your configuration may have Auto-Connect enabled by default for all networks, except Hidden WLANs. If you see the Mark as Favourite/Unmark as Favourite option in the Options menu for any iPass network, it means that Auto-Connect has been enabled. This option will not be displayed in case of unknown networks. To configure Auto-Connect for all networks: 1. Select Options > Settings. 2. Select Auto-Connect. 3. Select Auto-Connect to Favourites. Select Yes to enable Auto-Connect Select No to disable Auto-Connect. 4. Select OK. In certain cases, network connection will be automatically established even if AutoConnect has been disabled. This can be noticed in an Application First scenario where known networks are available. Choosing netw orks for Auto -Connection Once Auto-Connect has been enabled for all networks, as explained above, you can choose to use specific networks for Auto-Connection. Note that unknown networks are not chosen for AutoConnect; once they become classified as a known network, you can chose them for AutoConnect. To remove a network from the Auto-Connect list: 1. Choose the desired network from the list. 2. Select Options > Unmark as Favourite to remove this network from the AutoConnect enabled list. This option would now appear as Mark as Favourite which can be used for enabling Auto-Connect. Enabling 3G Netw ork Support One of the benefits of this client is that you can configure applications to use the iPassConnect Virtual Access Point and let iPassConnect decide whether to use Wi-Fi or 3G based on what is available. The alternate options are that you can configure your application to prompt you each time, or select a specific type of connection – cellular or a specific Wi-Fi network – for regular use. This fallback to 3G option in iPassConnect simplifies your work for you. iPassConnect for Nokia S60 User Guide Version 1.9, January 2009 2009 iPass Inc. Page 10 1 You can opt to use 3G networks when Wi-Fi networks are not available, provided your device supports 3G connectivity. However, note that 3G support option is available only when you enable Auto-Connect. Please be aware that additional charges might be applicable while using 3G connections, especially roaming charges while travelling. Please contact your cellular vendor for further details in this regard. To enable 3G Network support: 1. Select Options > Settings. 2. Select Auto-Connect. 3. Select Yes for Auto-Connect to Favourites. 4. Select Fallback to 3G Packet Data. 5. Choose one of the following options to specify how iPassConnect responds when no Wi-Fi connections are available: Never fallback: Select this option if you do not wish to use 3G/GSM connections. Home network only: Select this option to use 3G, but only within home networks. Always fallback: Select this option to always use 3G connections when Wi-Fi networks are not available. 6. Select 3G Packet Data Access Point. This is used to specify the 3G options, which depends on your cellular provider and plan. This option will not be displayed if you had selected the Never fallback option above. 7. Choose appropriate option from the list and select OK. It shows No access points if you have not inserted the SIM card provided by your cellular provider. 8. Select OK and then select OK again. iPass reminds users to check their data usage plans for their respective 3G/Mobile Broadband carrier. iPass is not responsible for any fees incurred by the user for use of iPassConnect over a 3G/Mobile Broadband connection. No credit or refund will be made available for usage fees that exceed a subscriber’s data plan. It is the Mobile Broadband subscriber’s sole responsibility to track his/her mobile data usage. iPassConnect for Nokia S60 User Guide Version 1.9, January 2009 2009 iPass Inc. Page 11 1 Application First Mode (Connect on Demand) One of the most powerful and popular features of iPassConnect for Nokia S60 is Application First mode. Application First mode, or “Connect on Demand,” allows you to configure the applications on your device to use iPassConnect to determine the best connection to utilize for its network communication. iPassConnect creates a protected "Virtual Access Point" named "iPassConnect". This is available for use by all network-aware applications (e.g., Nokia Web Browser, Mail for Exchange, Google Maps). When an application requests a connection from the iPassConnect virtual access point, iPassConnect acts as a broker, selecting the best available "known" Wi-Fi connection or a 3G connection if no known Wi-Fi is available. The result is a generally seamless experience with this method and you will only be asked to participate in the connection process in two cases: If neither known Wi-Fi nor 3G service is available. If you need to enter your password to connect For the best connection experience we recommend you configure your network-aware applications to always use the "iPassConnect" access point. Examples from Mail for Exchange and the Nokia Web Browser are shown here. iPassConnect for Nokia S60 User Guide Version 1.9, January 2009 2009 iPass Inc. Page 12 1 Additional Features Scanning Access Points iPassConnect displays the networks within range and refreshes the list periodically. You can also manually scan for networks within range, if so required. To scan for networks manually: 1. Select Options > Refresh. 2. iPassConnect scans the neighborhood for available networks and lists them. Online Hotspot Finder The iPass Handheld Hotspot Finder helps mobile users to locate nearby Wi-Fi networks in the iPass network of more than 100,000 broadband locations in over 80 countries using the Web browser. Choose this option to open the network finder website. To use the online Hotspot Finder: Select Options > Hotspot Finder. Note that you need to have Internet access (using cellular or Wi-Fi connection) in order to use the Hotspot Finder function. Post Connect Application iPassConnect can be configured to automatically launch the specified application upon connecting successfully. To add an item to the Post Connect Application list: 1. Select Options > Settings. 2. Select Post-Connect. A list of available applications is displayed. 3. Select the application you wish to add. This application will thereafter be executed automatically upon connection. In case you set your browser as the Post Connect Application, you will be prompted for an additional argument to specify the URL of the home page. This option may not be available if your system administrator has already preconfigured a post-connect action for you. To remove an item from the Post Connect Application list: 1. Select Options > Settings. 2. Select Post Connect. The Post Connect Application is displayed. 3. Select Options. 4. Select Remove. 5. Select Yes to confirm deletion. iPassConnect for Nokia S60 User Guide Version 1.9, January 2009 2009 iPass Inc. Page 13 1 Director y Updates The iPassConnect client is in-operable without the presence of an iPass-provisioned directory, which maintains a list of iPass enabled networks. The client can be configured to periodically update the directory – automatically and transparently – without exhausting network bandwidth or consuming disproportionate processor cycles or memory. You can also update the directory manually, if required. To configure Automatic Directory update: 1. Select Options > Settings. 2. Select Other. 3. Select Allow update to toggle Yes. 4. Select OK. To update Directory details manually: Select Options > Check for Updates To verify Directory status: 1. Select Options > About. 2. The About window displays the following information: iPassConnect version details Profile and Directory IDs Date on which the Directory was last updated. Re-configuring Know n Netw orks iPassConnect prompts you for credentials when you initially attempt to connect to an unknown network. Once valid credentials are provided, it connects successfully while also adding the network to the known networks list. You can delete the network from the list, for instance, when you need to re-configure or re-assign updated credentials. The network will be recreated again once you connect using updated credentials. To delete a network from the list: 1. Select the required non-iPass enabled known network. 2. Select Options > Delete access point. 3. Select Yes to confirm. iPassConnect for Nokia S60 User Guide Version 1.9, January 2009 2009 iPass Inc. Page 14 1 Usage Tracking iPassConnect keeps track of usage during the current session and also the cumulative usage data. The Usage Report screen shows the name of the network, data sent and received in kilo bytes (KB) during the last connection. It also shows the total connection duration, total data sent and received since the counters were last reset. To view the Usage Report: Select Options > Usage Reports. To reset the Usage Report Counters: 1. Select Options > Usage Reports. 2. Select Options. 3. Select Reset Counters. 4. Select Yes to confirm. Usage Tips Performance and Battery Life For best performance and battery life it is recommended that you set Show WLAN availability to Never under Menu > Tools > Settings > Connection > Wireless LAN settings. Similarly, if you have a WLAN scanning option on your „home standby screen‟, then it is recommended that you leave it set to WLAN scanning off for best performance. iPassConnect for Nokia S60 User Guide Version 1.9, January 2009 2009 iPass Inc. Page 15 1 Troubleshooting Connection Issues If you are unable to login using iPassConnect, it could be due to the following reasons: Interference: Make sure you are working away from any obstructions, such as walls, pillars, columns, or other possible sources of interference. Signal Strength: Check the signal strength, displayed in the networks list. Try connecting to a local access point that gives the strongest signal. Password: If you utilize your corporate username/password, make sure you update your password in the client if the password was recently changed. iPassConnect records the details of all failed connection attempts which can be used for troubleshooting connection issues. The document being displayed is read-only file and cannot be deleted. To view the Troubleshooting Log: 1. Select Options > Troubleshooting. The Troubleshooting log is displayed which shows the list of failed connection attempts, the time and date at which each attempt was made. 2. Select any log entry to view its details. 3. Select OK to return to Troubleshooting logs. 4. If working with your System Administrator or iPass, you may be asked for a copy of your log file for analysis. Select Options > Send log in order to send the log via email. Log File Notes: [AFS] indicates “Application First Scenario”; these are connections initiated by applications on your device configured to use the “iPassConnect” Virtual Access Point. [CFS] indicates “Connection First Scenario”; these are connections initiated inside the iPassConnect client. Connectivity to iPass networks requires to steps: 1) Physical connection (association) to the access point and 2) Login to the hotspot provider. The login to the hotspot provider function is labeled a “GIS” login. Viewing the log files to determine whether there was an association failure or a GIS failure will help aid in the troubleshooting process. Connections to personal networks do not require the 2nd step. Association failures are most often caused by interference, or weak signal strength. In addition to interference and signal strength issues, GIS failures can be caused by a bad username/password, a problem with the venue‟s authentication system, or a problem with your company‟s authentication interface (if using a corporate account). Also, there are occasions when you may be in range of a network that uses the same network name as one that is part of the iPass network. This can cause the software to think it is in range of an iPass network, but will result in a GIS login failure since the venue‟s authentication is not integrated with iPass. iPassConnect for Nokia S60 User Guide Version 1.9, January 2009 2009 iPass Inc. Page 16 1