1
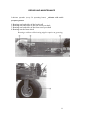
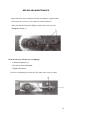
Operating and Parts
manual
RINK
Model 1015
Serial number:
Redexim
Operating Instructions
Topdresser 1015
SELFPROPELLED
Note:
IN ORDER TO ENSURE THE SAFE USE AND TO ACHIEVE THE BEST PERFORMANCE, IT IS
ESSENTIAL THAT THIS OPERATORS MANUAL IS CARREFULLY READ BEFORE THE
TOPDRESSER IS USED.
TABLE OF CONTENTS
Contents Page
Safety reg ulations................................................................................ ...
3
Short description ... ..................................................................................
5
Technical data ...................................................................................... ...
5
Initial Operation..........................................................................................
6
Operation.....................................................................................................
6
* Before
every ride .............................................................................6
........................................................................................... 7
* Loading
* Starting the engine .................................................................. 7
* Operating................................................................................. 8
* Spreading.........................................................................................9
Repair and maintenance..........................................10
* Oil cahnge for the hydraulic tank..........................................................10
* Lubricate machine................................................................................11
* Oil change for conveyor belt gears.......................................................13
* Adjust distance bwetween the brush rolls............................................14
(according to requirements)
* Stretch conveyor belt (in case of slipping)............................................14
* Installing and removing the conveyor belt.............................................15
* Stretching conveyor belt after assembly................................................16
Spare parts list
Technical alterations reserved
Parts marked with # are only available as additional equipment
2
SAFETY REGULATIONS
(1) The Topdresser GS 10 is built solely for spreading small-grained. loose
material such as sand, small granular material or similar products.
Any other usage is not in accordance with the indicated use. The manufacturer
does not answer for any damage resulting fram incorrect usage. The user alone
has to incur the risk.
Usage in accordance with the intended use also includes compliance with the
manufacturer's conditions of operation. maintenance .and repair.
(2) The machine is built according to prior art and operationally reliable;
however. the spreader could put life and limb of the operator or, of third persons
at risk if it is not used, maintained and repaired by persons who are familiar with
it and have been informed of the dangers.
(3) Any person who. in the plant of the user, is responsible for the
operation, maintenance and repair of the machine, must have read and
understood the operating instructions and. in particular, this chapter,
Safety Regulations.
Read the engine manual carefully before operating the machine.
Only use original spare parts from the manufacturer for repairs.
Alongside the references in these operating instructions. the general regulations
for safety and for prevention of accidents must be observed.
Accompanying persons are not allowed ! It is also not allowed to sit or ride on
the moving machine.
(4) The operator is obliged to check the machine for any external damage or
failure before putting it into operation. Any changes (including operating
performance) which might affect safety must immediately be remedied.
Changes to and rebuilding of the machine (other than changes allowed by the
manufacturer) are. tor reasons ot safety, not allowed.
(5) Before starting work, the operator must make himselt familiar with all fittings
and contrals as weil as their tunctioning.
Before moving away. check the immediate vicinity and care for a good field of
vision.
3
-
...'--
SAFETY REGULATIONS
(6) Whilst spreader is in operation, no one is allowed to enter the loading
ramp. A label with th is notice is stuck on both sides of the spreader. This notice
must always be well legible and has to be replaced if damaged! .
(7) Whilst the spreader is in operation, do not enter the zone of danger of the
spreader since rotating parts and foreign flying particles might cause any injuries.
(8) Adjusting and repair work on axle (wheel bearings, tyres) must only be
undertaken by properly trained and authorised personnel.
(9) Stop the engine whenever you leave the operating position. Never
leave the machine running, when you leave it, for any reason.
(10) Fill gas tank outdoors, but never while engine is running or hot. Never filt
tank while smoking. Use an approved container to handle and store an
inflammable liquid. If you spill gasoline, wipe it up. Keep the machine free from
accumulation of sand built up. Replace gas tank cap securely.
(11) Before starting work on the hydraulic system, it is important that it is
without pressure.
The hydraulic hose pipes must be regularly checked and replaced if damaged
or wom out. The replacement hose pipes must conform with the manufacturer's
technical requirements.
(12)A sound level of 80dB (a) is emitted in the immediate vicinity ofthe engine
on the Topdresser GS 10.
Used oil damages the environment; please disose of carefully
4
SHORT DESCRIPTION
The Topdresser GS 10 is used for spreading small-grained, loose material,
such as sand, smalt granular material or similar products. The Topdresser and
the complete hydraulic system is driven by a 13 hp engine. The machine has a
closed hydraulic system. The spreading equipment of the Topdresser is driven
by a gear box with hydraulic motor for conveyor belt and a separate hydraulic
motor for the brush roll. The number of revolutions of the hydraulic system for
the conveyor belt can be continuously adjusted by means of a flow divider. A
separate flow divider is also available to adjust the forward and reverse speed
of the chassis. Spreading density or spreading amount can be determined by
the chassis speed and conveyor belt speed.
Technical Data
Dimens
ions
Length ......................................................................... 2.00 m
Width ........................................................................... 1.80 m
Width ........................................................................... 1.30 m
Box Size ... ..................................................................
0.50 x 1.46 m
Loading capacity .......................................................... . 0.5 m3
Weights
Authorized total weight ................................................. 1500 kg
Empty weight
approx.350 kg
Spreading width ........................................................... 1.50 m
Tyre equipment ................................................ . ......... 5 Swing tyres Trelleborg
Garden Slick 18x9.50-8
Tyre pressure....................................................... .......
0.65 bar
Speed ..........................................................................
0-8 km/h
Engine....................................................................... 13 PS
Spreading amount ........................................................ continuously adjustable
The typeplate is fastened onto the front right-hand side of the spreader
5
INITIAL OPERATING
• To start the engine
a) Fill fuel tank with clear, fresh "Regular" grade gasoline.
b) Place throttle control in FAST position.
c) Push the ignition switch to the "ON" position and push out choke lever.
d) Pull starter rope rapidly. Repeat if necessary with choke opened slightly.
e) When engine starts, push choke lever back to run position and place
throttle control lever in desired running speed.
Please note: Proper engine operating and maintenance instructions have
been provided with this unit by the engine manufacturer. It is important to read
and maintain this manual. Warranty on this engine and engine accessories are
provided by the engine manufacturer.
* After
the first ride with a full load
- Retighten wheel nuts.
- Check wheel hub clearance and have it adjusted, if necessary. Test tyre pressure.
- Check hydraulic tank for eventual oilloss.
- Retighten hydraulic fittings.
OPERATION.
Before every ride
- Check oil volume in hydraulic tank and search for any leakings.
- Check for any externally recognizable failures or damage and repair them.
- Check tyre pressure.
- Check conveyor belt tread, reset if necessary.
6
OPERATION
Loading
- Pay attention to the desired maximum ground pressure.
- When loading, pay attention for the authorized total weight.
- Do not drop off too much material in front of spreader. Please keep the
engine free of any accumulation.
Starting the engine
- Push the ignition switch to the "ON" position.
-
Open the gas flow moving the gas throttle to the right (1)
- Move the choke lever to the left (2).
- Bring the throttle control in middle position (3).
- Pull starter rope rapidly (4). Repeat if necessary.
- When the engine is running, bring back the choke lever into neutral
position and place throttle controllever in desired running speed.
(2) (1)
(4)
(3 )
7
OPERATING
Controls:
The forward and reverse drive can be activated by the shift lever at the handle (1).
The machine stops immediately, as soon as shift lever wil! be released. Up means
forward, down means reverse drive. The speed of the drive can be regulated with
the flow regulator (2). Scale distribution 0 to 10.
The Topdresser can be activted by the shift lever (3). The spreading density can be
adjusted at the flow regulator of the Topdresser. Please read at page 9 for further
details on the Topdresser adjustment.
8
SPREADING
Controls:
The brush roller speed can only be controlled by the
tractor revs.
1 Regulator tor setting the speed ot the conveyor belt:
Scale distribution 0 to 10
(1)
Adjusting spreading thickness:
The spreading thickness (mm) is dependent on
- the speed of the vehicle
- the speed of the conveyor belt (regulator(1 )
Set the required spreading thickness on a firm surface before starting work.
Set the controler for teh conveyor belt speed to the required value
9
REPAIR AND MAINTENANCE
Oil change for the hydraulic tank (according to requirements)
- Unscrew the filling nozzle (1).
- Release the suction hose (2) and drain off the oil. - Screw the suction hose
back into place.
- Top up with Bio-Hydraulic oil CG 46 until the level reaches the centre of the
viewing window (3).
- Screw the filling nozzle back on.
Please note:
This is a closed hydraulic circuit. In order to prevent the ingress of
contaminants, the runback filter (4) must be replaced every 100
operating hours.
(4)
(1)
(2)
(3)
10
REPAIR AND MAINTENANCE
Lubricate spreader (every 50 operating hours) _ubricate with multipurpose grease:
1 Bearings on both sides of the brush roll
2 Bearings on bath sides of the rear conveyor shaft
3 Bearings on both sides of the front conveyor shaft
4 Bearings on the front wheel
Bearings without a lubricating nipple require na greasing.
11
REPAIR AND MAINTENANCE
Lubricate machine (every 50 operating hours)
Lubricate with multi-purpose grease:
1 Bearings on both shift levers at the front handle.
2 Bearing on the front of the steering wheel.
Bearings without a lubricating nipple require no greasing.
(1)
(2)
12
REPAIR AND MAINTENANCE
Oil change for conveyor belt gears (every 100 operating hours) - Unscrewfiller screw
(1).
-
Loosen drain plug (2) from the below inside area and drain oft oil.
-
Screw on drain plug with new gasket.
-
Add 0.61 Oil SAE 120 to 140.
-
Screw on filler screw with the new gasket.
13
REPAIR AND MAINTENANCE
Adjust distance between the brush rolls (according to requirements)
- Loosen the two screws (1) on each side of the brush roll
- Move the brush roll until it slightly contacts the conveyor belt.
- Retighten screws (1).
(1)
Stretch conveyor belt (in case of slipping)
- Loosen counternut (1).
- Turn nut (2) once clockwise.
- Tighten counternut.
Excessive stretching can reduce the life span of the conveyor belt.
(1)
14
REPAIR AND MAINTENANCE
Installing and removing the conveyor belt
- Loosen screws on both sides (1) and remove the chassis.
- Remove the brush roller by loosening the screws (2).
- Release the tension on the conveyor belt on both sides (3).
- Remove the bearing on the right seen in the direction of travel (4).
- Pull away the side element (5) with tension bearing (6).
- Remove the conveyor belt.
The reassembly takes place in reverse order.
15
REPAIR AND MAINTENANCE
Stretching conveyor belt after assembly
- Tension the conveyor belt on both sides evenly using the two tension screws
until the marked length is stretched to 487 mm (distance between centres).
- Allow the conveyor belt to run in tor approx. 30 minutes until it runs centrally.
The conveyor belt should not graze the sides. If readjustment is necessary
increase tension on the side which is doing the grazing.
Too much tension will reduce the life Sf)an of the conveyor belt.
Ordering spare parts
To ensure that your spare parts order can be processed quickly, always
specify the following data when ordering.
- Chassis number / Ident. number
- Model (year of construction if available)
- Part number from respective spare parts list
- Designation
- Order number
16
Spare Parts List - Wheel Drive
Part No.
Designation
Order No.
1
Hydraulic Motor
10580
2
3
4
5
6
7
8
9
10
Axle Hub
Motor assembly
Hydraulic fitting
Hydraulic fitting
Hydraulic fitting
Srew M 12x35 mm
Nut M 12
Was her
Hydraulic tube 12x1.5
16120
16204
10661
10662
10043
10158
10179
10136
10444
Remark
17
Spare Parts List - Engine - Pump
Part No.
Designation
1
Honda engine GX 390
2
3
4
Hydraulic Pump
Clutch
Pump adapter
Order No.
Remark
10684
43421-01
43421-02
43421-03
18
Spare Parts List - Hydraulics
Part No.
Designation
Order No.
1
Hydraulic tank
16077
2
Hydraulic Filter
43421-16
3
Valve tor Topdresser
43421-08
4
Valve tor drive
43421-010
5
Flow valve
6
Flow regulator valve
7
Hydraulic hose 1 0x280
10673
8
Hydraulic hose 10x1200
10666
9
Hydraulic hose 10x750
10671
10
Hydraulic hose 1 Ox1500
10674
11
Hydraulic hose 10x1200
10675
Remark
10336
43421-09
19
Spare Parts List - Hydraulics
20
Spare parts list Topdresser
Part No.
Designation
Order No.
1
Clamping device
16112
2
Transport roller tront
16129
3
Transport roller rear
16127
4
Shaft tor brush rolller
16159
5
Torque support tor
16161
Remark
rubberized
.-
conveyor belt drive system
6
Torque support tor
16157
brush roller "drive system
7
Connecting sleeve
16160
8
Holder tor brush roller
16115
9
Clamp rail tront
10015
30 x 4 x 1440 mm
10
Clamp rail aside
10021
30 x 4 x 540 mm
11
Rubber stripper tront
10573
12
Rubber stripper aside
10407
13
Conveyor belt
10524
14
Spreading roller unit
10162
15
Hopper
10529
Aluminium
16
Flange bearing dia. 30 mm
11001
Lubrication instructions !
17
Regulator 12 I
10335
21
Spare Parts List - Front steering
Part No.
Designation
Order No.
1
Shift lever tor Topdresser
43421-11
2
Shift lever tor drive
43421-12
3
Contact wire
43421-14
4
Brake wire
10686
5
Brakelever
10114
Remark
22
Spare parts list Topdresser
Part No.
Designation
Order No.
Remark
Oil change instructions !
18
Conveyor belt gear
10492
19
Hydraulic motor tor
10572
transport roller
20
Hydraulic motor tor
10473
brush roller
21
Hydraulic hose NW 10x280
10673
22
Hydraulic hose NW 10x400
10672
23
Hydraulic hose NW 10x750
10671
24
Hydraulic hose NW 10x2800
10667
25
Hydraulic tube
26
Holder tor hydraulic hose
10348
27
Feather key 8x7x20
10100
28
Feather key 6x6x25
10483
29
Clamping Sleeve 8x30
10605
30
Set screw M 8x6
10430
31
Screw M 1 Ox1 00
10600
32
CircJip 30x1.5
11002
Tube 12x1
.
23
24