1
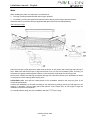
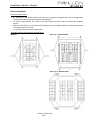
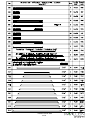
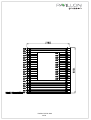
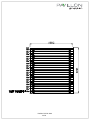
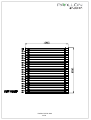
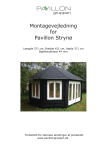
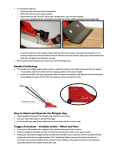
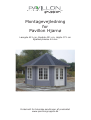
Installation manual
Montageanleitung Notice de montage Istruzioni per il montaggio
Montagevejledning
Pavilion PAY44-4242
for
Pavillon Hjarnø
Pavillon Pavillon Padiglione
Width 421 x Depth 421 x Height 371 cm
Breite/Tiefe/Höhe largeur/profondeur/hauteur lunghezza/profondita/altezza
Længde 421 cm, Bredde 421 cm, Højde 371 cm
Bjælketykkelse 44 mm
Log thickness 44 mm
Bohlenstärke Épaisseur des murs Spessore delle pareti
Forbehold October
for tekniske
ændringer
af produktet
Oktober Octobre
Ottobre 2007
Technische Änderungen vorbehalten
The
producer
shall
have
the
right
to make technical changes to the
www.pavillongruppen.dk
product Le producteur réserve le droit d’effectuer des modifications techniques au produit Il produttore
mantiene il diritto di apportare modifiche tecniche al prodotto
Installation manual - English
1 General information
Dear client,
We are glad that you have decided in favour of our garden pavilion!
Please read the assembly manual carefully before proceeding with the pavilion installation! You will
thus avoid problems and will not waste your time.
Recommendations:
¾
Keep the pavilion package until its complete assembly in a dry place. Package should be protected from
weather conditions (moisture, the sun, etc.) and it shouldn’t have direct contact with the ground during
stocking period. Do not keep the pavilion package in a heated room!
¾
When selecting the garden pavilion location, make sure that the pavilion will not be subjected to
extreme weather conditions (areas of strong snowfall or winds); otherwise you should attach the
pavilion (for instance, with anchors) to the subsoil.
Warranty
Your pavilion is made from high quality spruce and delivered in the natural (unprocessed) form (except
foundation joists). If, despite our thorough inspection, you should have complaints, please submit the filled
out control sheet and purchase invoice to the product seller.
ATTENTION: Please be sure to keep the documentation accompanying the pavilion package! The
control sheet includes the control number of the pavilion. We can only review complaints if you
submit the control number of the pavilion to the seller!
The warranty does not cover:
¾
Peculiarities of wood as a natural material
¾
Wooden details already painted (processed with a wood preservative)
¾
Wooden details containing whole branches that do not endanger the stability of the pavilion
¾
Colour tone variations caused by wood structure differences that do not influence wood lifetime
¾
Wooden details containing (caused by drying) small cracks/gaps that do not pass through and do not
influence the structure of the pavilion
¾
Twisted wooden details if they can nevertheless be installed
¾
Roof and floor boards that may have on their concealed surfaces some non-planed areas, colour
differences and waning
¾
Complaints resulting from an incompetent manner of the installation of the pavilion or the pavilion
subsiding due to an incompetently made foundation
¾
Complaints caused by introducing self-initiative changes to the pavilion, such as the deformation of
wooden details and doors/windows due to an incompetent manner of wood processing; the attachment
of storm braces too rigidly, doorframes being screwed onto wall logs, etc.
The complaints covered by the warranty are satisfied to the extent of replacing the deficient/faulty
material. All other demands will be excluded!
Pavilion PAY44-4242
2/44
Installation manual - English
Garden pavilion painting and maintenance
Wood is a natural material, growing and adapting depending on weather conditions. Large and small cracks,
colour tone differences and changes, as well as a changing structure of wood are not errors, but a result of
wood growing and a peculiarity of wood as a natural material.
Unprocessed wood (except for foundation joists) becomes greyish after having been left untouched for a
while, and can be turn blue and become mouldy. To protect the wooden details of your garden pavilion, you
must immediately process them with a wood preservative.
We recommend that you cover the floor boards in advance with a colourless wood impregnation agent,
especially the bottom sides of the boards, to which you will no longer have access when the pavilion is
assembled. Only this will prevent moisture penetration.
We definitely recommend that you also process the doors and windows with a wood impregnation agent,
and do that namely both inside and outside! Otherwise the doors and windows can become twisted.
After the pavilion assembly is completed, we recommend for the conclusive finishing a weather protection
paint that will protect wood from moisture and UV radiation.
When painting, use high quality tools and paints, follow the paint application manual and manufacturer’s
safety and usage instructions. Never paint a surface in strong sunlight or rainy weather. Consult a specialist
regarding paints suitable for unprocessed softwood and follow the paint manufacturer’s instructions.
Having been properly painted, your garden pavilion’s lifetime will increase substantially. We recommend
that you inspect the pavilion thoroughly once every six months.
2 Preparation for assembly
Tools and preparation of components
To assemble the garden pavilion, you will need the following tools:
assembly aid
water-level
knife
ladder
hammer
screwdriver
saw
measuring tape
pliers
drill
ADVICE: To avoid splinters, we recommend that you wear the corresponding protective gloves during the
assembly process.
Pavilion PAY44-4242
3/44
Installation manual - English
Foundation
A good foundation is the most important aspect guaranteeing the duration and safety of your pavilion. Only
a completely level and bearing foundation will ensure problem-free installation of the pavilion, its stability
and especially the matching of the doors. With a good foundation, your pavilion will stand for many years
more.
Prepare the foundation so that its upper edge extends from the ground to a height of at least 5 cm. At the
same time make sure that there are sufficient air apertures under the pavilion floor for ventilation.
We recommend the following foundation options:
x Strip or spot foundation
x Foundation from concrete or pavement slabs
x Cast concrete bed
Prepare the foundation so that foundation joists and every nodal point are propped up on every side with
intervals not exceeding 50-60 cm.
Consult an expert in this field or have the foundation prepared by specialists.
Controlling of parts
Prior to assembly, please check the content of the package. With the help of parts list (included to this
installation manual) make sure that all the parts listed in the parts list are included to the package.
ATTENTION:
¾
You will find included in the pavilion package one spare log (longest wall log).
¾
You will find included in the pavilion package one spare board (longest floor board).
¾
The pavilion package also includes 2-3 marked hitting blocks (wall profile approximately 20-30 cm long).
All of the details listed above ARE NOT mentioned in the specification list.
3 Garden pavilion assembly
Preparation of components:
Sort the components based on position number to simplify the finding of the right part while installing the
pavilion.
ATTENTION: Never place the components directly on grass or a muddy surface because it will be very
difficult or even impossible to clean them up later!
Base frame
The base frame of the pavilion must be completely flat and level to ensure that the installation proceeds
without problems. Place the impregnated foundation joists on the prepared foundation in accordance with
the drawing (see Technical specifications) and screw them together with 6x120 mm screws. Make sure that
the base frame has the same measures as on the drawing. (NB! The base frame can differ +/- 5 mm
because of the swelling/ waning of the wood during the transportation. It does not affect the installation of
the pavilion.)
ADVICE: It is recommended to place between the foundation joists and foundation a damp-proof course
that will protect the pavilion from moisture and decay.
ADVICE: To ensure protection from wind and storm, it is recommended to attach the foundation joists to the
foundation (for this, you can use for instance metal angles, anchors, etc.). The corresponding materials are
not included in the supplied kit!
Pavilion PAY44-4242
4/44
Installation manual - English
Walls
When installing the walls, it is important to remember that:
¾
The logs are always assembled with their tongue upwards!
¾
If necessary, use the hitting block and hammer! Never directly hit the tongue with the hammer!
Install the walls in accordance with the appended wall plans (see Technical specifications).
The first layer of logs:
Place the first layer of wall logs on the base frame as shown on the picture that is wall logs and half logs in
turns. Make sure that the first layer of logs would reach ca 5 mm over the foundation joists. This way you
will protect the garden pavilion against moisture, so the rainwater could easily flow into the ground.
Now remove carefully the wall logs and attach half logs with 4,5x70mm screws to the foundation as shown
on the picture. Put the wall logs back to their place.
ATTENTION: Make sure that the measurements of the foundation would be the same as given in the
Technical specifications.
Continue the installation of the walls according to the wall plans by strongly forcing the wall logs into one
another. If necessary, use the hitting block and hammer. At the same time, do not forget to begin the
installation of the door and windows.
You should definitely begin the door installation after the 5th-6th layer of logs.
Pavilion PAY44-4242
5/44
Installation manual - English
Door and window
Door and window frame:
¾
By double door and double window, the frames are supplied in separate parts due to transportation
requirements and you will have to begin by assembling it.
¾
To do this, place together the 4 parts of the frame and screw them onto one another with 5x90mm
screws.
¾
Make sure that the part of the frame with the deeper notch is installed upwards. The lateral jamb parts
have hinges and are mirrored.
¾
It is recommended to install the leaves later.
Assembly of the double window and double door:
Window:
Door ver. 1 (PAY44-4242).:
Door ver. 2. (PAY44-5742):
Pavilion PAY44-4242
6/44
Installation manual - English
Door installation:
When the pavilion is installed, place the door leaves on the hinges. To open and close the door, fit the
separately packaged lock and handle. If necessary, regulate the door from the hinges. Clean the door glass
and fix the door bars with the screws packaged with the bars.
Window installation:
Install the window similarly to the door. Additionally you need to install the window stops.
ADVICE: Definitely make sure that the windows and doors open in the proper direction. The doors open
from the inside to the outside. The windows of the pavilions also open to the outside (the window handles
are on the inside).
ATTENTION: It is not necessary to fix the doors and windows to the wall logs! If you wish to do this, it will
be sufficient to fix them with a couple of screws in the lower part of the frame because as they dry, the wall
logs will begin subsiding.
You can conduct the final adjustments of the doors and windows only some 2-3 weeks after the pavilion
installation, when the pavilion will have become adapted to weather conditions and its logs settled.
Roof
Please notice that after assembling wall logs, all walls must be with equal height. After insuring the equal
height of the walls, part pos. 151 must be screwed (5x90 mm screw) to walls as shown on the drawing.
In case of pavilion PAY44-5742 you must screw part pos. 151 and part pos. 152 (5x90 mm screw) to walls
as shown on the drawing.
At first attach both (triangle) halves of the roof (left and right side), using the 5x90 mm screws. This way, 8
triangle roof components are formed for pavilion PAY44-4242. In case of pavilion PAY44-5742 you will get 6
triangle and 4 trapeze roof components.
ATTENTION: Attach the roof shingles (not
included in house kit) to the roof elements before
installing the roof to the garden pavilion.
Have ready some boards with the length ca. 3.60
m for installing pavilion to support the roof
elements during installation. The installation of
roof elements is possible with 2 persons.
Place one roof element onto the rafter and support
the top of the element at the centre of the garden
pavilion with the help of the board. In case of
pavilion PAY44-5742 start with the middle triangle
roof component.
Attach the roof element to the rafter with 5x90
screws as it is shown on the illustration beside.
The next element is assembled exactly the same
way. When installing the second element, see that
the edge and the top of the roof would remain on
the same height as those of the first element.
NB. Se speciel vejledning for
montering af tagshingels
Pavilion PAY44-4242
7/44
Installation manual - English
When the second element has been attached to the rafter, screw both elements together with 5x90 mm
screws. It is recommended to drill the holes first so that the connection of the elements would be stronger.
The rest of the roof elements are assembled the same way.
Usually the installation of the last roof component is the most complicated. If there will remain a gap
between the elements unscrew the elements from the walls and push them upwards. On the right place fix
the elements again with at least 4 screws of 5x90 mm.
On the contrary, if there will remain too little space for the last element, all the elements should be pushed
downwards.
In pavilion PAY44-5742 install the part pos. 160. Fix it with 6x120 mm screws (10 pieces).
Finally, the metal roof cap needs to be installed (NB! Not included in some house kits!).
Assembly of eave edgings
Attach the eave edgings pos. 100 (in pavilion PAY44-5742 pos. 100 and pos. 101) to the roof elements
with screws. Use 4.5x50 mm screws. Ideally the top side of the eave edging should be on the same line
with the top side of the roof board.
Floor
Start assembling the floor from centre
with longest, 90˚ floor boards (pos. 061).
Leave gaps of 0,5-0,7 mm between the
boards. That is needed to allow floor
boards to expand according to weather
conditions.
Place the floor boards in the centre of
the floor so that groove meets groove.
Groove needs to be filled with fitting
slats (pos. 150).
After middle section of floor being
assembled, move on to the sides of the
floor with 45˚ floor boards. Don’t forget
to leave small gaps of 0,5-0,7 mm
between boards. The last and shortest
floor board must be cut to the right size.
Floor boards should be fixed to every
foundation bearer with 2,5x50 mm nails.
Assembly of floor beadings
The floor beadings need to be cut to the
right size. Fix the floor beadings with
1,4x40 mm nails.
Pavilion PAY44-4242
8/44
Installation manual - English
Storm braces
The storm braces (pos. 140) must
be attached in the corners of the
pavilions on the both sides of the
wall. Fix the storm braces with
6x110 bolts, shims and nuts.
The top of the storm brace (with the
round hole) has to be on the same
level with the top log of the wall. It is
important to drill the Ø 6 mm holes
through in advance. Place the storm
braces on the both sides of the wall.
Drill holes through also from the
middle of the oval gaps of the storm
braces. Fix the slats with bolts.
ADVICE: Do not turn the bolts tightly so wood can further swell or diminish.
With the pavilion having settled, you should adjust the attachments so the wall logs can settle.
General advice:
Problem:
Cause:
Solutions:
Problem:
Cause:
Solution:
Cause:
Solution:
Gaps appear between the wall logs
Additional details are attached to the pavilion that do not allow wood to
swell/diminish.
If the door/window is attached to the wall logs with screws/nails, remove these screws/nails;
If the storm brace is screwed on too tightly, loosen its attachment;
If (rain water) pipes are installed on the wall, loosen their attachments;
The doors and windows become stuck.
The pavilion/foundation has settled.
Check whether the pavilion is level. Level the foundation joists and walls.
The doors and windows have swelled due to moisture.
Adjust the door and window hinges; if necessary, plane the door or window narrower.
We wish you total success with the pavilion installation and much joy
with this pavilion for many years to come!
Pavilion PAY44-4242
9/44
Pavilion PAY44-4242
34/44
Pavilion PAY44-4242
35/44
Pavilion PAY44-4242
36/44
Schraube
Schraube
Nagel
Nagel
Schraubenmutter
Schloss-schraube
Dichtscheibe
Screw
Screw
Nail
Nail
Nut
Polt
Washer
Clou
Écrou
Boulon a tige carrée
Joint
Clou
Vis
Vis
Vis
Vis
Schraube
Schraube
Screw
Screw
Chiodo
Dado
Vite a testa quadra
Rondella
Chiodo
Vite
Vite
Vite
Vite
Materiale di
Moyens de fixation
fissaggio
Vis
Vite
Fixing
Befestigungsmaterials
material
Screw
Schraube
PAVILION Y44-4242
Pavilion PAY44-4242
37/44
2,5x50 mm
6 mm
6x110 mm
6x22 mm
1,4x40 mm
5x90 mm
6x120 mm
4,5x50 mm
4,5x70 mm
3x20 mm
30
8
4
300
24
24
48
30
160
20
Pcs
For
Roof cap- Dachkappe
Eave edging-Dachrandbrett-Madrier en bordure du toit-Tavola
bordo tetto
Half board-Halbe Bohle-Demi madrier-Mezz'asse
32: Cornice boards on the wall-Dachstützleisten auf die Wand;
48 Roof halves together-Dachhälften miteinander;
48: Triangle roof elements together- enstehende Dachelemente
miteinander;
32: Roof elements to the cornice boards-Dachdreiecke auf die
Dachstützleisten
Foundation-Fundament-Fondation-Fondazione
Floor beading-Fussbodenleiste-Baguette du plancher-Listello
pavimento
Floor board-Fussbodenbrett-Madrier du plancher-Tavola
pavimento
Storm brace-Sturmleiste-Protection contre le vent-Antivento
Storm brace-Sturmleiste-Protection contre le vent-Antivento
Storm brace-Sturmleiste-Protection contre le vent-Antivento
Pavilion PAY44-4242
38/44
Pavilion PAY44-4242
39/44
Pavilion PAY44-4242
40/44
Pavilion PAY44-4242
41/44
Pavilion PAY44-4242
42/44
Pavilion PAY44-4242
43/44
Pavilion PAY44-4242
44/44