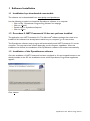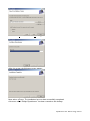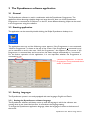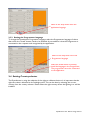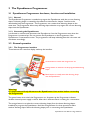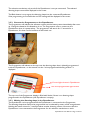
1
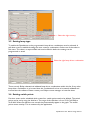
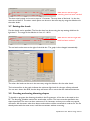
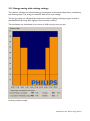
Dynadimmer User Manual - Software Installation - Preparing Dim Schedule - Dynadimmer Programmer 1 Software Installation 1.1 Installation by a downloaded executeable The software can be downloaded from www.philips.com/dynadimmer Use the following procedure to install the Dynadimmer software on a computer: Click on line “Dynadimmer Programming Software”on webpage Click on <Open> Double click on DynadimmerSetup.msi Click on <Run> 1.2 Procedure if .NET Framework 2.0 has not yet been installed The application uses .NET Framework 2.0. This Microsoft® software package also needs to be installed. If this software has already been installed on your computer, go to next section. The Dynadimmer software setup program will automatically install .NET Framework 2.0 on the computer. This may take a few minutes depending on the computer capabilities. When the installation has finished, the installation of the Dynadimmer software will continue automatically. 1.3 Installation of the Dynadimmer software Once the installation of .NET Framework has been completed or if it was stopped because it was already installed on the PC, the installation screen of the Dynadimmer Programmer application appears. Click <Next>. Dynadimmer User Manual - Page 2 of 12 Now select <Next>. Then select <Next> again. After this screen the following screen appears. Now select <Close>. The installation has now been successfully completed. A shortcut called “Philips Dynadimmer” has been created on the desktop. Dynadimmer User Manual - Page 3 of 12 2 The Dynadimmer software application 2.1 General The Dynadimmer software is used in combination with the Dynadimmer Programmer. The application allows dimming schedule design and saves them for later use. If the Dynadimmer Programmer is connected to COM port I on the PC, three different dimming shapes can be saved in the Programmer using this software. 2.2 Starting application The application can be started by double-clicking the Philips Dynadimmer desktop icon. The application starts up and the following screen appears. If the Programmer is not connected, “Wait for Programmer” is shown at the top of the screen. If the Programmer is connected it may not be switched on and in that case “Wait for Programmer” also appears on the screen. If the Programmer is connected later and is turned on, the status changes automatically to “connected”. For the further operation of this application, it is not important whether the Programmer is connected or not. “Wait for Programmer” in case the Programmer is not connected else it states “Connected”. 2.3 Setting languages The Dynadimmer system is currently equipped with two languages, English and Dutch. 2.3.1 Setting the Dynadimmer software language The Dynadimmer software will always come up with the language in which the software was running when it was closed the last time. It remembers the language setting. To change the Dynadimmer application language; select the language of choice at the bottom of the screen. Dynadimmer User Manual - Page 4 of 12 Select in the drop-down menu the application language 2.3.2 Setting the Programmer language To change the Dynadimmer Programmer language, select the Programmers language of choice after which the “Install” button needs to be selected. A precondition is that the Programmer is connected to the computer and recognized by the application. Select in the drop-down menu the Programmer language Select the install button to actively install the language in the Programmer. The programmer has to be connected to the application. 2.4 Setting Country selector The Dynadimmer is using the midpoint of the night to calibrate the time. It is important that the right time value is allocated to the midnight point. This can be done by selecting the correct country from the country selector. Please select the right country where the lighting is or will be installed. Dynadimmer User Manual - Page 5 of 12 Select the right country 2.5 Setting lamp type To enable the Dynadimmer to be programmed a lamp-driver combination must be selected. A pull-down menu is available showing the most common combinations. Select one of the values in this menu. This value is a required field and must be filled in before the settings can be programmed or saved. Select the right lamp-driver combination There are only Philips released and validated lamp-driver combinations within this list. If any other lamp-driver combination is to be used then this combination first has to be tested, validated and inserted into the software. Please contact your Philips account manager to have that done. 2.6 Setting switch points Five time zones can be scheduled which means four switch points need to be defined. The switch points can be set by using the slide bars. The range of the slide bars is from 15.00 (3.00 PM) to 10:00 AM. When the slide bars are moved, they automatically appear in the graph. The switch points cannot overlap. This is monitored by the application. Dynadimmer User Manual - Page 6 of 12 Slide the bar until the right switching time has been reached The time switch points can be set in steps of 15 minutes. The stop time of dim level 1 is also the start time of level 2. The other switch points can be set in the same way by using the slide bars for the other levels. 2.7 Setting dim levels Five dim levels can be specified. The first dim level can be set using the top settings slide bar for light level 1. The range of the slide bar is from 10 –100 %. Slide the bar until the right dim level has been reached The set level can be seen to the right of the slide bar. The graph is also changed automatically. The other dim levels can be set in the same way using the slide bars for the other levels. The horizontal line in the graph indicates the minimum light level for the type of lamp selected. You can set a lower dim level, but the lamp will never dim to more than the indicated minimum. 2.8 Creating and saving dimming shapes To be able to program the dimming schedule in the Programmer, it first has to be saved on the PC. The dimming schedule needs to be saved under a name. The name must be specified in the shape input field. The name can be a maximum of 16 characters and may not contain any special characters. All characters other than letters and numbers will be converted to underscore. If a file already exists with the same name, it will be overwritten without a warning. Dynadimmer User Manual - Page 7 of 12 Within the C-drive of the computer a DynadimmerDimmingShapes directory is created in which the created dimming shapes are stored. 2.9 Retrieving a dimming shape stored on the PC A previously saved dimming schedule can be retrieved through the <Browse> button. Select the required file and select open. Please note that only one shape at a time can be retrieved and changed. The dimming schedule that is open at the time of retrieving an existing schedule will be lost if not saved properly. 2.10 Retrieving a dimming shape stored within the Programmer This function works only if the Programmer is connected and connected is stated in the title bar. By selecting Fetch shape A, Fetch shape B or Fetch shape C the existing schedules in the programmer can be shown on the screen. Please note that only one shape at a time can be retrieved and changed. The dimming schedule that is open at the time of retrieving an existing one will be lost if not saved properly. 2.11 Programming the Dynadimmer Programmer Connect the serial connection in the back of the PC and connect the Programmer. Switch ON the programmer with the green button. The programmer now indicates that it is connected to the PC. The software will also indicate that it is connected. When the dimming schedules have been created or adjusted, the dimming schedule can be programmed at three locations in the Programmer by using the three programming buttons Program shape A, Program shape B or Program shape C. As soon as the Programmer is programmed, the details are also saved in the PC under this name. The file will be overwritten if this name already exists. Dynadimmer User Manual - Page 8 of 12 2.12 Energy-saving with existing settings The software calculates an estimated energy consumption of the selected lamp-driver combination and dimming shape. The savings are stated in kWh and as a percentage. The energy savings are calculated based upon the outdoor lighting switching program as used in the Netherlands and may differ slightly if used in another location. The calculations are made based on the norm of 4200 burning hours per year. Dimming schedule example Dynadimmer User Manual - Page 9 of 12 3 The Dynadimmer Programmer 3.1 Dynadimmer Programmer hardware, functions and installation 3.1.1 General The Dynadimmer Programmer is needed to program the Dynadimmer with the correct dimming shape. A dimming shape is created by the software as described in chapter 2 and has to be downloaded into the Programmer. The Programmer can contain three dimming shapes at the same time. The Programmer allows easy dimming shape selection to program the correct dimming shape into the Dynadimmer. 3.1.2 Connecting the Dynadimmer It is allowed to connect and disconnect the Dynadimmer from the Programmer even when the Programmer is powered up. Do not connect the Dynadimmer to the Programmer if the Dynadimmer is connected to mains. The programmer will beep indicating that this is the case and shut down accordingly. 3.2 General operation 3.2.1 The Programmer interface Three buttons and a two-line display make up the interface. Green button to switch the Programmer ON Orange button to select the to-be-programmed dimming shape Black button to actually write the dimming shape into the Dynadimmer Warning! It is important to firstly disconnect the Dynadimmer from mains before connecting the Programmer The green button is to switch the Programmer ON. At power-up the Programmer indicates whether internal power supply is still ok. After this it indicates that it is waiting for a connection. The orange button is to select the correct dimming shape (from the three dimming shapes installed) to program the Dynadimmer. Hold the orange button for three seconds to select another dimming shape. Select the dimming shape prior to connecting the Dynadimmer. Dynadimmer User Manual - Page 10 of 12 The selection mechanism only works if the Dynadimmer is not yet connected. The selected dimming shape name will be displayed in the screen. The Black button is to program the dimming shape into the connected Dynadimmer. If the programming is successful then an OK message will be displayed in the screen. 3.2.2 Connect the Programmer to the Dynadimmer The Programmer will indicate the software version and the battery status immediately after startup. Change the batteries if indicated to do so. The Programmer tries to connect to the Dynadimmer when it is powered-up. The programmer will search for 15 seconds for a Dynadimmer; if it does not find one then it will switch OFF. The Programmer will indicate on the top row the dimming shape that is (already) programmed inside the Dynadimmer, on the second row the “to-be-programmed dimming scheme‟‟ is displayed. Current light scheme in Dynadimmer The „to-be-programmed‟ light scheme The top row of the Programmer display is filled with blocks if there is no dimming shape programmed in the Dynadimmer (the Dynadimmer is empty). 3.2.3 Writing the dimming shape in the Dynadimmer The Dynadimmer can be programmed if the Dynadimmer is connected to the Programmer. The dimming shape that needs to be programmed can be selected by means of the orange button. Holding this button down for 3 seconds selects another dimming scheme. Yet ensure that the Dynadimmer is not connected to the Programmer for this selection mechanism to work. Dynadimmer User Manual - Page 11 of 12 Select the black button to actually write the dimming shape into the Dynadimmer. The Programmer will state OK if the programming was successful. 3.2.4 Copying the dimming shape from the Dynadimmer into the Programmer The Dynadimmer dimming shape can be copied from the Dynadimmer back into the Programmer if the Dynadimmer is connected to the Programmer. The dimming shape that can be overwritten can be selected by means of the orange button. Holding the orange button down for 3 seconds selects another to be programmed dim scheme. Ensure that the Dynadimmer is not connected for the selection mechanism to work. The Programmer copying function can be enabled by selecting the black and orange button simultaneously for 5 seconds. The screen will then state Copy to Programmer. Select the black and orange button to actually write the dimming shape into the Programmer. The Programmer will state OK if the copying was successful. Now the Programmer can be connected to the software and the software can read the Programmer and load the dimming shape as described in chapter 2. 3.3 Gang programming The Programmer can be set in a mode in which it is quicker to program multiple Dynadimmer sequentially. Entering the Gang-mode: Press the orange and black button simultaneously Press the green button Let go of the green button Wait for the beep Let go of the orange button Wait for the beep Press the orange button Let go of the black button Done Gang programming has the advantage that you would not have to press any button to program a Dynadimmer, connecting it would be enough. The Programmer then automatically programs the Dynadimmer. Now just connect the Dynadimmer, the Programmer quickly programs the Dynadimmer and shows OK if it was successful, remove the Dynadimmer and connect the next one. Dynadimmer User Manual - Page 12 of 12