1
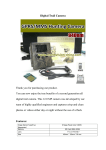
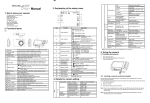
User’s Manual
Digital Trail Camera
MF-D120
HT-002
Thank you for purchasing our product.
You can now enjoy the true benefits of a second generation all
digital trail camera. This 12.0 MP camera was developed by our
team of highly qualified engineers and captures crisp and clean
photos or videos either day or night without the use of a flash.
Features:
• Still photos: 12.0 MP
• Video resolution: 640 x 480
• Photo file format: JPG
• Video file AVI
• Internal memory 32 MB
• External memory SD card up to 32 GB
• Exposure Auto
• Viewing mode 2.5” viewing screen/Computer/TV
• Video output PAL / NTSC
• PIR distance Adjustable from 1 to 30M
• Motion detection angle 95°
• Power source: external 12V DC power jack or lithium battery pack
• Operating temperature (-20 °C to +70 °C)
• Storage temperature (-30 °C to +85 °C)
• Computer operating system WIN 2000 / XP / VISTA /Mac OS X
KIT INCLUDES:
Camera HT-002
MF-D80×1
×1
12V Power charge×1
Battery pack×1
USB cable×1
Video cable×1
Bandage×1
User’s manual×1
Main Features:
●
●
●
●
●
●
●
●
TFT 2.5” viewing screen
Adjustable PIR sensitivity (infrared motion detection)
Color photos by day, black and white at night
Multi-Shots of 1, 2, 3 or 4 photos per detection
Adjustable video length, from 10 to 90 sec.
Adjustable time delay between detections - from 10s to 30 min.
Night-time photos and videos taken with 54 LED
Auxiliary jack for external 12V DC power or lithium battery pack
Power:
Lithium battery pack
This camera request use the lithium battery pack, install the battery according to the
instructions inside camera case, and keep the battery fully charged (can work a week)
12V Power
Camera model HT-002
HT-0020
canbe
beused
used with an external 12V DC input.
MF-D80can
can
be
used
Memory Card
The SD slot in the camera model HT-002
MF-D80 can accept SD memory cards up to 32GB.
Before inserting or removing the memory card, the camera must be turned off.
Failing to do so may cause loss of photos or damage to the memory card.
When the memory is full, screen will show “Disk full”.
Depending upon the memory card capacity, the following data shows an approximate
quantity of photos that can be recorded by the camera.
When inserting SD Card into the camera, screen will show “SD” tag on top right
corner. And first the photos and videos will save the internal memory, wait the
internal memory full, and then save the photos and videos to SD card memory.
Test:
When selects photo, press “SHUTTER”, can photo a picture.
When selects video, press “SHUTTER”, can record 10s video
Photo:
When selecting photo mode, the test light on the front of the
camera will blink 60s, allowing the operator to walk away from
camera.
The camera enter photo status, screen will closure.
If you want to view the photo file, must first turn off, and restart the
camera.
Video:
When selecting video mode, the test light on the front of the
camera will blink 60s, allowing the operator to walk away from
camera.
The camera enter video status, screen will closure.
If you want to view the video file, must first turn off, and restart the
camera.
View:
To view recorded photos or videos on camera screen.
Can use
key select view front or back photo or video.
When viewing, select
“Menu”, press
enter delete function
, and press
“OK” key, can
“left or right” key,
can enter unlock or lock function
Delete: a. delete the current photo or video on screen
b. delete all photos or videos on screen
c. cancel delete photo or video on screen
Lock: protect the photo or video on screen
Unlock: not protect photo or video on screen
Press
return back to main menu.
(main menu)Menu:
including Work、Delay、Multi-shot、Video length、
Language、Date time & Stamp、Picture Quality、ISO、Save etc.
Work: Day: Photos or videos daytime only
Night: Photos or videos night-time only
24H: Photos or videos anytime
Delay:
Selects the time the camera will wait before recording another photo or
video. This option prevents taking too many photos or videos of the same
object should it remain in front of the camera for a lengthy period of time.
When selects single shooting, the delay will not work.
When selects doubleton shooting, the delay can work, if select delay 10s,
when have external trigger, and then take the first photo, take the second
photo after 10s. So please first select multi-shot before select the delay time.
Multi-shot: Allows for a 20 second interval between 4 consecutive photos.
This option shows a different view of all 4 photos.
Video-length: Selects the video length when the camera is set in video mode
Language: Selects language, English or Deutsch.
Date: Sets date: Year/ Month/ Day
Time: Sets time: Hour/ Minute/ Sec.
Stamp: Selects or cancels imprinting of date and time on photos.
Quality: Increases or decreases photo quality.
Higher photo resolution will lower memory capacity in memory card.
12MP 4032x3024
8MP 3264x2448
5MP 2560x1920
ISO: The photosensibility of the camera, including auto、100、200、400
When strong light, please select ISO Auto
When poor light, please select ISO100, or ISO200, or ISO 400, according to
external light select the photosensibility.
Save: Selects ok save all and exit, or exit, return to main screen.
Distance: The distance dial sets the motion detector sensitivity. Use this feature to set
the detection range required. Turn dial to the right to increase distance. Range of
detector is between 1 and 25M.
TV slot: To transfer photos and videos on a TV screen, use the video cable (supplied)
and plug in TV out port of camera to video in of TV set. Viewing screen
menu will also appear on TV screen.
USB slot: To transfer or view photos and videos on a PC, you must first turn the
camera on and use the USB cable (supplied) to connect the camera to your
computer. The computer will then recognize the camera as a removable
disk drive. Camera operator must wait until the termination of computer
software installation (few seconds) before clicking on Desktop. Then, click
on removable disk and look to find folder with DCIM. Click on the DCIM
folder and all the photos and videos will be found in 100DSCIM folder.
Photos and videos can be viewed, edited or deleted with your computer’s
software.
SD Card slot: Taking the SD card out of the camera and inserting it in the computer
port will achieve same results. If no SD slot is built into the computer,
use a multi-card reader.
Trouble Shooting:
No person / animal on photos
1. Rising sun can trigger sensor. Camera must be reoriented.
2. At night, motion detector may detect beyond range of the IR Illumination. Reduce
distance setting.
3. Small animal may be triggering unit. Reduce distance setting and/or raise height of
camera.
4. Motion detector may sense animals through foliage.
5. If person/animal moves quickly, it may move out of camera field of view before
photo is taken. Move camera further back or redirect camera.
6. Camera must be set on a stable and immovable object.
i.e. large tree.
Red light blinking
1. Main mode switch is in test mode.
2. Main mode switch is in Photo or Video mode. Red light blinks during 60 sec.
allowing the operator to walk away from camera.
Firmware Update
With Camera and SD card:
1. Download the update file from our website:
2. Open the downloaded .zip file by double-clicking on it.
3. Extract the file ASHERJRM.bin from the .zip file.
4. Copy these files into the SD card.
5. Make sure the camera is turned OFF.
6. Insert the SD card into the camera.
7. Hold down the «OK» button and turn ON the camera.
8. The screen will light up and display "F/W updating…"
9. Upgrade success when display “F/W update OK…”
10. Turn off the camera and restart the camera.
(Note: when updating, can not cut off the power)