1
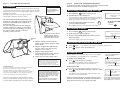
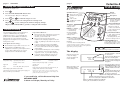
page 8
SETTINGS
page 1
Celestia 400
Turning the ringer on and off
USER GUIDE
By default, the ringer is on.
Model 3401
1
Press
2
Press the PLAY/PAUSE/STOP button twice
The Celestia says: ‘Ring on’ or ‘Ring off’.
CALLER ID buttons*
3
Press memo or
4
Press
OR press
go back to the previous
record
clear records
to switch the ringer on or off
to leave Settings mode without saving any changes
Troubleshooting
Always make sure your Celestia 400 is fully
plugged into the telephone line socket and the
mains power socket.
If the phone does not ring …
n
n
Check that the ringer volume is not set to -0.
Check that the total REN value of all
equipment connected to your telephone line is
no more than 4. Disconnect one or more
telephones and see whether that helps.
If you cannot dial out …
n
n
n
n
Technical details
Temperature range
Disconnect all other instruments connected to
the same line as the Celestia 400 and see
whether you can make a call.
Disconnect the Celestia 400 from the
telephone line and plug a telephone into the
socket. Try making a call. If this works, the line
is OK.
If you are using a two-way socket adapter,
remove it and plug a telephone directly into
the socket. If the call now works, the adapter
may be faulty.
If you think the fault may be on the exchange
line, contact the service provider (the BT
engineers on 151, or your cable company).
If you still cannot identify the cause of the
problem, contact the Binatone Help Line.
Default settings
Operating 0ºC to 40ºC
Storage -20ºC to 60ºC
Time and date
12:00 am on 01-01
Max. incoming message length
3 minutes
Approvals
CTR 21
Security code
123
Input
230 V AC, 50Hz, AC9 V, 200 mA
Ring count
2
If the unit is disconnected from the telephone line, all
settings will be returned to these defaults.
Mains adapter part number XX002104D
The AC port (connected to the mains power supply) is a
SELV port with respect to EN41003
ANSWER ON light
This also flashes when
the unit is ringing for an
incoming call
DELETE/ANSWER ON button
— switch the answering
machine on and off
— delete recorded messages
— leave Settings mode without
changing settings
SET button
— enter or leave
Settings mode
OR press PLAY/PAUSE/STOP to go back to setting the time and date
n
Microphone
call back the number
displayed
to save the new setting and leave Settings mode
The Celestia 400 must be serviced by trained
engineers. NEVER attempt any repairs or
adjustments yourself — you could make the
problem worse and invalidate the Guarantee.
Display
see below
skip to the next record
Binatone Telecom plc operates a policy of continuous product
improvement, and so reserves the right to make changes to the
product and functions without notice.
If you need help, call the Binatone Help Line
020 8344 8870
9.00 am to 5.00 pm, Monday to Friday
MEMO/<</– button
— record a memo
— rewind during
message playback
— decrease value in
Settings mode
PLAY/PAUSE/STOP button
— start, pause and stop
message playback
— in Settings mode, move
from one setting to the next
OGM/>>/+ button
— record an outgoing message
— fast-forward during message
playback
— increase value in Settings mode
* Please note that, to use these features, you need to
subscribe to the BT Caller ID option, or the equivalent
option from your service provider.
SPEAKERPHONE button
— press while the unit is recording
an incoming message, to stop
recording and speak to the caller
The
and
buttons can also be used to adjust
the speaker and ringer volumes (see page 7)
The display
The time and date — 9.35 am
on 13 October
While the Celestia 400
is idle, the display
shows information as
in this example:
Other information and
symbols that appear
on the display include:
09:35 AM13-10 MSG02/15
04-12
CALL #
There are 4 new incoming messages
or memos and 15 messages/memos
altogether
03 02:45 PM 13-10 MSG 02/05
00-16
There are 2 new caller ID records
and 12 records altogether
-5
This appears when you press the
SPEAKERPHONE button to listen
and/or speak to a caller; or when you
call back a number from the Caller ID
memory
The bell appears when the unit is
ringing for an incoming call (even if
the ringer is turned off)
This shows the loudspeaker volume currently set
After the Celestia 400 has been connected to the
line for 16 seconds, the call duration is shown here
When you call back a number from Caller ID
memory, the record number is shown here
page 2
GETTING READY FOR USE
page 3
Installation
You need to have a telephone connected to your line as well as
your Celestia 400. If you wish to connect both units to the same
telephone line socket, use a two-way adapter (‘splitter’) widely
available from retailers.
Alternatively, you can connect the phone and the
Celestia 400 to different extension sockets.
The Celestia 400 should be installed where the
mains power cable will reach a 230V AC, 50 Hz
switched socket. NEVER try to lengthen the
mains power cable.
You can either wall mount the unit, using the
template supplied, or stand it on a flat surface.
If you leave the unit free-standing, you can fit
the support stand as shown, for the best
position, or in the front slot.
MAINS
SAFETY WARNING
Do not install the
Celestia 400 where it
might get wet
USING THE ANSWERING MACHINE
To set the time and date, and the number of rings before the Celestia 400
will answer a call, refer to SETTINGS on pages 6 to 8..
Recording your outgoing message
1
Press and hold
2
Speak clearly into the microphone
Your outgoing message (OGM) can be between 3 and 60
seconds long. The display shows the recording time as you
speak. Do not pause for more than 10 seconds.
3
Press the PLAY/PAUSE/STOP button when
stop
you have finished speaking
The machine will ‘beep’ then play back your OGM.
SLIDE INTO PLACE
until you hear a ‘beep’
OGM
REC
09:35 AM13-10 MSG02/05
00-32
pause
-5
To check your OGM at
any time
• Press
Recording a memo
TELEPHONE
LINE
(If you prefer to have the unit
standing upright, slide the
support stand into the lower
slot, rather than as shown.)
1
Plug the mains power lead and the
telephone line cord into the back of the
unit as shown
2
Plug the telephone line cable directly
into the socket or into the two-way
adapter (see note above)
3
Plug the mains adapter into a
230 V AC, 50 Hz mains socket, with the
switch on the socket set to OFF
4
Switch on power at the mains socket
1
Press and hold memo until you hear a ‘beep’
2
Speak clearly into the microphone
3
Press the PLAY/PAUSE/STOP button when you have
finished speaking
Your memo will be stored as a new message.
You can connect the Celestia 400 to a public exchange line in
the UK. It is not suitable for connection to a PBX.
NOTE: if you disconnect the Celestia 400 from mains
power, your time and date settings will be lost. However,
stored messages and Caller ID records will be retained.
00-32
Do not clean any part of your Celestia
400 with solvent chemicals, abrasives or
spray cleaners which might get inside the
case and cause damage not covered by
the guarantee. When necessary, clean it
with a damp cloth.
Keep your Celestia 400 away from hot,
humid conditions or strong sunlight.
-5
This shows the duration of recording
w
w
Press
once
— the machine says: ‘Answer on’ and the light comes on
Press
again to switch the machine off
Incoming calls
When a call comes in, the caller’s ID is shown on the display
(if you subscribe to the Caller ID service or equivalent).
w
Press
while the phone is ringing
You can converse with the caller in hands-free mode.
Remember to speak clearly into the microphone
When the OGM is playing to the
caller, this appears
OGM PLY
CALL #
w
Press
while the OGM is playing or while the caller
is speaking
The machine stops recording the caller’s message, and
you can converse with the caller.
NOTE: if you lift the handset of any phone connected to the
same line as the Celestia 400, the machine will stop what it’s
doing and free the line for you to speak to the caller.
16 11:05
13-10 MSG02/05
AM
02083448870
The caller’s ID (phone number)
To intercept a call
You can intercept a call which the machine has answered.
Conditions for use
The ringer equivalence numbers (RENs) of all instruments
connected to an exchange line must not add up to more than 4.
The Celestia 400 has a REN of 1; most other phones and fax
machines have a REN of 1 unless marked otherwise.
09:35 AM13-10 MSG02/05
Switching the machine on and off
To answer an incoming call
The Celestia 400 must be used with mains
adapter, part no. XX002104D, supplied with
the unit. Using any other adapter will result in
non-compliance with EN41003, and will
invalidate any approval given to this apparatus.
MSG REC
OGM PLY
CALL #
UNAVAILABLE
16 11:05
13-10 MSG02/05
AM
01-03
If the caller’s ID is unavailable (e.g. on
an international call) 'UNAVAILABLE' is
shown; if the caller has withheld their
ID by dialling 1470, ‘WITHHELD’ is shown.
page 4
USING THE ANSWERING MACHINE
page 5
Checking Caller ID records
Message playback
w
Press the PLAY/PAUSE/STOP button once to start message playback
If you have new messages and memos, the machine plays them. If you
have no new messages, the machine plays all messages and memos.
Up to 50 Caller ID records are stored in the Celestia 400’s memory. When the Caller ID
memories are full, new records will overwrite the oldest ones. Caller ID records are
shown on the display as described on page 1. As you check each new record, it is
added to the ‘old record’ count.
pause
stop
To pause during playback
w
Press the PLAY/PAUSE/STOP button once
PLY
06 09:45 AM13-10
00-56
Press the PLAY/PAUSE/STOP button again
To skip forward to the next message
w
MSG
TAM #
To continue playback
w
CALLER ID FUNCTIONS
MSG
01/11
-5
This shows the duration of playback
w
w
Press
or
to display the first record
Press
or
to scroll through the list of records
If you come to a record where the caller’s ID was unavailable or withheld, you
hear a ‘beep’ and the display shows 'UNAVAILABLE’ or ‘WITHHELD’.
Press
Returning a call
To skip back to the previous message
w
1
Press memo
To stop playback
w
Press and hold the PLAY/PAUSE/STOP button
2
Press
or
on the display
Press
until the number you want is shown
CALL #
to dial the number
16 11:05
0208344
13-10 MSG02/05
AM
Deleting Caller ID records
Deleting messages
Remember to delete messages after you have listened to them — otherwise,
the machine’s memory may become full and it will not record any more
messages. The machine will not delete new messages.
To delete records one by one
1
Press
or
until the number you want is shown on the display
2
Press
once to delete the record
To delete a message during playback
w
Press
once while the message is playing
To delete all messages
w
To delete all records
w
Press and hold
The machine will delete all old records and give a confirmation ‘beep’.
If there are no records to delete, the machine will give an error tone.
Press and hold
The machine will delete all old messages and give a confirmation ‘beep’.
If there are new messages, or no messages to delete, the machine will
give an error tone.
Remote operation
To set your security code for remote operation, refer to page 7.
Refer to the Remote Operation card for details of how to phone in from elsewhere
and check whether you have messages.
Note that, if the answering machine is turned off, the Celestia 400 will answer calls
after 16 rings, but it will not record messages unless you turn it on using your
remote security code.
During remote operation, the Celestia 400 will pause playback and ‘beep’
after 3 minutes. Press any key within 10 seconds to continue message
playback; otherwise, your call will be cut off.
Guarantee and service
The Binatone Celestia 400 is guaranteed for 12 months from the date of purchase shown on your
sales receipt. The Guarantee does not cover damage by misuse or negligence, or by excessive
voltages —for example, faults on the telephone line, or lightning.
While the unit is under Guarantee
Disconnect the plugs from the mains and the telephone line, then pack up your Celestia 400, using
the original packaging. Return the unit to the shop where you bought it, making sure you take
your sales receipt as proof of purchase.
In the unlikely event that you need to return your Celestia 400 to our Repair Centre while it is under
guarantee, there will be a £5 handling charge.
Repair after the Guarantee has expired
Disconnect and pack up your Celestia 400 as above. Call our Service Department on 01325 304473
and ask for details of the repair charge and the address to send the unit.
Return your Celestia 400 to the address given, remembering to include your name and address,
plus a cheque or postal order for the value of the repair charge.
page 6
SETTINGS
page 7
To go into Settings mode, press the SET button. Then pressing the PLAY/PAUSE/STOP button
takes you through a number of options, as shown:
SETTINGS
Setting the security code
IN SETTINGS MODE, PRESS
to change the value of the
current setting, step by step.
Wait for a prompt between
each key press.
memo
pause
DAY AND
TIME
NUMBER
OF RINGS
stop
pause
stop
RINGER
ON/OFF
pause
stop
SECURITY
CODE
pause
stop
to leave Settings mode, saving any
changes you have made
pause
stop
VOLUME
del
Setting the time and date
— the Celestia says: ‘Set day and time’
1
Press
2
Press memo or
The default security code is 123. You can change it to
any other three-digit code you will easily remember.
OGM
1
Press
2
Press the PLAY/PAUSE/STOP button twice
The Celestia says: ‘Set security code’.
3
Press memo or
to set the first digit. Press PLAY/PAUSE/STOP
4
Press memo or
to set the second digit. Press PLAY/PAUSE/STOP
5
Press memo or
to set the third digit. Press PLAY/PAUSE/STOP
to leave Settings mode without
saving any changes
This is OPTIONAL — if you do not set
the time and date, the Celestia 400 will
automatically take its settings from the
network when it answers a call.
You need a three-digit security code in order to
operate the answering machine remotely.
6
to change the hour setting (01 to 12)
Press
to leave Settings mode without saving any changes
OR press PLAY/PAUSE/STOP to move on to setting the security code
Press the PLAY/PAUSE/STOP button
4
Press memo or
to change the minute setting (00 to 59). Press PLAY/PAUSE/STOP
5
Press memo or
to switch between am and pm. Press PLAY/PAUSE/STOP
6
Press memo or
to change the date setting (01 to 31). Press PLAY/PAUSE/STOP
7
Press memo or
to change the month setting (01 to 12). Press PLAY/PAUSE/STOP
You can adjust the volume of the ringer by pressing
or
while the Celestia 400 is ringing.
8
Press memo or
to change the day setting (Monday to Sunday)
The new setting will apply the next time a call comes in.
to save the new setting and leave Settings mode
OR press
to leave Settings mode without saving any changes
OR press PLAY/PAUSE/STOP to move on to setting the number of rings
Setting the number of rings
This is the number of rings before the Celestia
400 will answer a call when the answering
machine is switched on.
You can also adjust the volume of the loudspeaker, the ringer
and the beeper in Settings mode, as follows.
As you change the beeper and ringer volumes, the Celestia 400
plays a demonstration.
1
Press
2
Press the PLAY/PAUSE/STOP button three times
-6
09:35 AM13-10 MSG02/05
Loudspeaker
volume
-3
Beeper
volume
The Celestia says: ‘Monitor on’. The ‘speaker’ symbol appears on the display.
to set the speaker volume. Press PLAY/PAUSE/STOP
OGM TS*)
to change the number of rings (2 to 9 and
4
Press memo or
to set the beeper volume. Press PLAY/PAUSE/STOP
Press memo or
CALL #
to save the new setting and leave Settings mode
03 09:35 AM13-10 MSG02/05
The ‘ringer’ symbol appears on the display.
00-16
to leave Settings mode without saving any changes
OR press PLAY/PAUSE/STOP to move on to setting the security code
* TS is Toll Saver, which saves you paying for an unnecessary call if you dial in to check your
messages remotely. If there are new messages, the Celestia will answer your call after two
rings; if there are no new messages, it will answer after four rings.
5
Press memo or
6
Press
OR press
-5
Ringer
volume
All volumes have a range from 1 to 9,
with a default setting of 5.
Press memo or
2
OR press
You can adjust the volume of the loudspeaker during a
call or during message playback by pressing
or
3
Press
Press
Volume settings
then PLAY/PAUSE/STOP — the Celestia says: ‘Set number of rings’.
1
3
00-16
to save the new setting and leave Settings mode
OR press
3
Press
03 09:35 AM13-10 MSG02/05
The Celestia tells you the security code you have set.
Each time you press the button, you change the value by one hour; the Celestia
speaks the number. When you reach the correct setting, move to the next step …
9
CALL #
to set the ringer volume. Press PLAY/PAUSE/STOP
to save the new settings and leave Settings mode
to leave Settings mode without saving any changes
OR press PLAY/PAUSE/STOP to move on to setting the security code