1
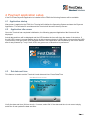
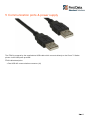
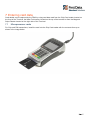
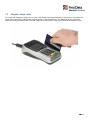
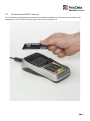
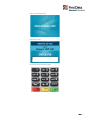
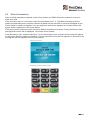
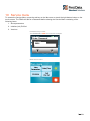
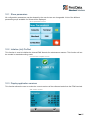
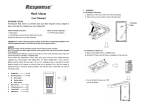
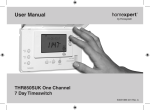
FD40 User Guide
Version 16.0
First Data Merchant Solutions is a trading name of First Data Europe Limited, a private limited company incorporated in England (company number 02012925)
with a registered address at Janus House, Endeavour Drive, Basildon, Essex, SS14 3WF. First Data Europe Limited is authorised and regulated by the UK
Financial Conduct Authority (FCA register No. 582703).
© 2015 First Data Corporation. All Rights Reserved. All trademarks, service marks, and trade names referenced in this material are the property of their
respective owners. All rights reserved. No part of this document may be published, copied or shared with express prior content from First Data Corporation.
85320/0615
June 2015
Table of Contents
1
Document purpose .............................................................................................................................3
2
Terminal hardware features ................................................................................................................3
3
Box contents.......................................................................................................................................3
4
Payment application setup..................................................................................................................4
4.1
Application startup .......................................................................................................................4
4.2
Application idle screen.................................................................................................................4
4.3
Set date and time ........................................................................................................................4
5
Communication ports & power supply.................................................................................................5
6
Keypad ...............................................................................................................................................6
7
Entering card data ..............................................................................................................................7
8
9
7.1
Microprocessor cards ..................................................................................................................7
7.2
Magnetic stripe cards ..................................................................................................................8
7.3
Contactless and NFC devices .....................................................................................................9
Transaction processing ....................................................................................................................10
8.1
Sale transaction.........................................................................................................................10
8.2
Refund transaction ....................................................................................................................13
Optional transaction features ............................................................................................................15
9.3
TIP processing ..........................................................................................................................15
10 Service menu ...................................................................................................................................16
10.1
Show parameters ......................................................................................................................17
10.2
Initialise (Init) PinPad .................................................................................................................17
10.3
Display application versions ......................................................................................................17
11 System idle menu .............................................................................................................................18
1 Document purpose
This Manual describes the features and functions of the FD40 Clover™ Terminal (FD40) and
Payment Application together with the installation and setup instructions.
2 Terminal hardware features
The FD40 Terminal includes the following features:
• WinCE 6.0 Operating system
• 320x240 Colour graphics display
• Touch Screen
• 3-Track MSR
• Smart Card Reader
• Internal contactless reader
• Internal PIN Pad
• 4 SAM/SIM slots
• 15 Button Keypad 3 x 5 matrix
• Dual USB communication Ports
3 Box contents
• FD40 Terminal
• Dual USB Power supply
4 Payment application setup
If the First Data Payment Application is installed on the FD40 the following features will be available.
4.1 Application startup
After power is applied to the FD40, the Terminal will initialise the Operating System and start the Payment
Application. This will take 30 seconds and the Terminal will show the boot up screen.
4.2
Application idle screen
Once the Terminal has completed initialisation, the following payment Application Idle Screen will be
displayed.
Actual date and time will be displayed and the LED besides the time will show the status of the device. If
the left LED is green it means that the device is able to communicate via USB (does not mean that the USB
is connected). The right green LED indicates that the FD40 Application was initialised by the Clover Station
after it was powered up – only if both LED’s are green can a transaction be performed.
4.3
Set date and time
This feature is used to set the Terminal’s local date and time. Press Date/Time
Set Date/Time screen
Verify the date and time (24 hour clock) - If correct, select OK. If the date and time is not correct simply
select the X and update the date and time.
5 Communication ports & power supply
The FD40 is powered by the supplied dual USB cable which connects directly to the Clover™ Station
printer via the USB ports provided.
FD40 cable description:
• Dual USB AC communication connector (x2)
6 Keypad
The FD40 has a 3x5 keypad layout that supports alphanumeric key input.
Example Enter ‘A’: Press Alpha and then the 2 key.
Example Enter ‘F’: Press Alpha, Alpha, Alpha and then the 3 key.
Lower case alpha character may be entered by pressing the green ENTER
the shift lock. Press the green ENTER
+ ALPHA again to enable shift
+ ALPHA key to disable
lock.
While entering data in an edit box, the left and right arrow keys may be used to move back and forth and
edit the selected characters without having to backspace over the entire string. The green ENTER
+ 9 works as the TAB key and will let the user move between edit fields on the display.
FD40 keyboard layout:
7 Entering card data
Card details can be captured by the FD40 by using card data read from the Chip Card reader located on
the front of the Terminal, the Near Field sensor located on the top of the terminal or from the Magnetic
Stripe Reader located on the right side of the Terminal.
7.1
Microprocessor cards
For Chip and PIN transactions, install the card into the Chip Card reader with the contacts face up as
shown in the image below.
7.2
Magnetic stripe cards
For cards with Magnetic Stripe only or if the Chip Reader fails and a fall back is allowed, the card data will
need to be captured by swiping the card as shown in the image below. The Magnetic Stripe should be
down and facing inwards to the Terminal. Swipe the card from the rear of the Terminal towards the front.
7.3
Contactless and NFC devices
For Contactless card transactions present the contactless enabled card to the terminal as shown in the
image below, the LED lights will turn green when the card has been re
8 Transaction processing
The FD40 Clover solution supports the following payment transaction types:
• Sale, Refund
The Payment Application also supports Tips. Transactions are always started via the connected Clover
Station and the FD40 handles the Transaction flow.
8.1
Sale transaction
When a sale transaction is started via the Clover Station the FD40 will ask the customer to insert, swipe or
present their card.
If the card has a chip on it, insert the card in the reader (see 7.1), the EMV processing screen is shown and
depending on the card the customer may be asked to enter their PIN or a prompt will appear on the Clover
Station to capture a signature on the Clover screen. You are required to verify that the signature on the
back of the card agrees with the signature on the Clover Station. Should the signature differ, cancel the
transaction on the Clover Station and seek another form of payment from your customer
If the card must be authorised online the Clover Station will perform this action automatically. Assuming the
transaction is successful a remove card screen is displayed followed by the Approval screen on the FD40.
The receipt can then be printed by selecting the appropriate option on the Clover Station.
If the card has no chip, swipe the card (see 7.2); the processing screen is shown and a prompt will appear
on the Clover Station to capture a signature. You are required to verify that the signature on the back of the
card agrees with the signature on the Clover Station. Should the signature differ, cancel the transaction on
the Clover Station and seek another form of payment from your customer
If a contactless card is used, the FD40 will signal with the contactless LEDs and an acoustic sound that the
card was read properly. If a chip card is used the customer will be prompted to remove their card and the
Clover station will authorise the transaction.
If the card must be authorised online the Clover Station will perform this action automatically. Assuming the
transaction is successful a remove card screen is displayed followed by the Approval screen on the FD40.
The receipt can then be printed by selecting the appropriate option on the Clover Station
Card entry screen:
EMV processing screen
PIN entry screen
Enter PIN via the FD40 keypad
Processing screen
Card removal screen
Approval screen
8.2
Refund transaction
When a refund transaction is started via the Clover Station, the FD40 will ask the customer to insert or
swipe their card.
If the card has a chip on it, insert the card in the chip reader (see 7.1). The EMV processing screen is
shown and depending on the card the customer is asked to enter their PIN or a prompt will appear on the
Clover Station to capture a signature. You are required to confirm the signature on the back of the card
agrees with the signature on the Clover Station.
If the card must be authorised online the Clover Station will perform this action. Finally, the Remove Card
and Approval screens will be displayed. The receipt is then printed.
If the card has no chip, swipe the card (see 7.2), the processing screen is shown and a prompt will appear
on the Clover Station to capture a signature. You are required to verify that the signature on the back of the
card agrees with the signature on the Clover Station.
Card entry screen:
Enter PIN via the FD40 keypad
EMV processing screen
Processing screen
Card removal screen
Approval screen
9 Optional transaction features
9.3
TIP processing
If TIP processing is available the Customer will be asked to enter and confirm the TIP amount in the
following way: First the Customer is asked if they want to add a TIP amount. If confirmed OK, the Customer
must enter the TIP amount and finally confirm the total amount.
TIP screen
Enter TIP amount screen
Confirm total amount screen
10 Service menu
To access the Service Menu, press the red key on the idle screen or touch the right bottom button on the
touch screen. The FD40 will ask for a Password before showing the Service Menu consisting of the
following items:
1. Show parameters
2. Initialise (Init) PinPad
3. Versions
Password entry screen:
The Password is 5656 and cannot be changed.
5656
Main service menu
10.1 Show parameters
All configuration parameters may be showed by the user but are not changeable. A list of the different
parameter groups available for review will be displayed.
Show parameter screen
10.2 Initialise (Init) PinPad
This function is used to initialise the internal EMV Kernels for maintenance reasons. This function will not
be needed in standard working mode
Init PIN Pad complete screen
10.3 Display application versions
This function allows the user to review the current versions of the software loaded into the FD40 terminal.
SW version screen
11 System idle menu
If a payment application is not loaded into the FD40, it will by default boot up into System Mode. Below is
the IDLE Menu that will be displayed. Selections may be made by touching the button on the screen or
entering the corresponding number on the keypad. If this menu appears, contact the Clover Support Team
to request a Payment Application download.
The Terminal’s date and time, the OS Version Number, and the version of the Idle Mode Application are
displayed in the centre of the menu.