1
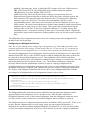
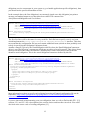
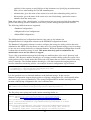
Standalone Server User Guide Author Version Date Comments George Inman 1 19/10/09 First Version George Inman 1.1 07/12/09 Updated Version George Inman 1.2 08/12/09 Added endorsed directory Instructions Stijn Lievens 1.3 04/11/2010 Added installation inTomcat; how to enable BTG functionality; how to configure obligations Stijn Lievens 1.3.1 23/11/2010 Minor update to obligations Stijn Lievens 1.4 05/04/2011 First version including the AipepConfiguration element Stijn Lievens 1.5 20/05/2011 Fixing the namespace problems on the stickypad example. Introduced the „supportMultiResources‟ attribute. Some further clarifications. Stijn Lievens 1.6 01/06/2011 Added section about trusted proxies. Added the first version of the policy management interface. Table of Contents Standalone Server User Guide................................................................................................................ 1 Introduction............................................................................................................................................................. 2 Overview of the Service ....................................................................................................................................... 2 Installing the Service ............................................................................................................................................ 2 Setting up Logging ................................................................................................................................................. 6 Server Configuration ............................................................................................................................................ 7 The TCPConfiguration element ...................................................................................................................................... 7 PDP and CVS Configuration ................................................................................................................................ 9 Configuring a PERMIS PDP and CVS ............................................................................................................................ 9 Configuring a Sun PDP .................................................................................................................................................... 13 Configuring a Trust PDP ................................................................................................................................................ 13 Testing the Server............................................................................................................................................................. 14 Configuring an Application Independent PEP (AI-PEP) ......................................................................... 14 Protocol Information .......................................................................................................................................... 17 Specifying a CVS policy when making a WS-Trust Request ............................................................................ 18 Specifying an Authorisation Policy to use when making an XACMLAuthzRequest .............................. 18 Submitting Sticky Policies to Use for a Particular RID ...................................................................................... 20 Returning Sticky Policies from the AIPEP .............................................................................................................. 22 References .............................................................................................................................................................. 24 Appendix 1. Server WSDL ................................................................................................................................. 25 1 Introduction The standalone server is a network accessible application independent Authorisation server that can be used as an application independent PEP or Credential Validation Service to respond to any application's request for an authorisation decision. The following instructions will teach you how to install and tailor the standalone server to allow you to make authorisation requests across a network using standardised authorisation protocols and receive authorisation responses for use in your application. Overview of the Service The standalone server is a Java[1] based application with an embedded Apache Axis2 [2] service that accepts requests for authorisation using three standardised protocols messages sent using SOAP[3]. As of version 0.2.0 the service can also be installed in a servlet container (like Tomcat) using the Axis2 servlet. The first of the supported protocol languages is XACML [4] which is implemented as a test message handler and should not be used in production environments. The second handler is an XACML over SAML 2.0 [5] message handler, this handler has been produced in accordance with the constrained authorisation profile outlined in [6]. The final handler operates as a Ws-Trust [7] CVS handler which provides the requestor with a SAML assertion containing valid Attributes as specified in [8]. Currently the handlers that supports the use of multiple policies is the XACML over SAML 2.0 message handler and the WS-Trust message handler. Request messages should be sent to the server's endpoint which will determine the type of the messages based on the XML namespace of the request message. Please note that only messages that conform to the relevant message schemas will be accepted by the service. Installing the Service Prior to installation the standalone server has the following requirements: A Sun Java Runtime Environment – this should be a 1.6 release of the JRE. Older versions are not supported. (Optional) If you wish to make the server available over a network then a single port number should be reserved for the service and this port should then be opened in your firewall. (Optional) If you wish to run the server using SSL then you may wish to install OpenSSL or similar for use when creating server certificates. (Optional) If you wish to deploy the service inside a servlet container, you will need a servlet container as well as the Axis2 servlet. Version 5.5.31 of Tomcat together with Axis2 version 1.5.1 has been tested. Installation as a standalone service In order to install the service you should download the latest release of the service from the PERMIS website (http://sec.cs.kent.ac.uk/permis) and unzip the release package to a folder of your choice. Once this folder has been unzipped you should open a new terminal window and navigate into the newly unzipped directory. Before the server can be run you must endorse the XML parsers contained in the endorsed directory of the release. This can be accomplished by copying the endorsed directory in the release to the “lib/” directory of your Java runtime environment 2 installation. For Windows users: C:\...\standalone>: copy endorsed %JAVA_HOME%\lib\ For Linux users: ...:~/standalone$ cp –R ./endorsed $JAVA_HOME/lib/ Note: if you have not correctly endorsed the XML libraries, you will be confronted by a message similar to the following when trying to start the software: OpenSAML requires an xml parser that supports JAXP 1.3 and DOM3. The JVM is currently configured to use the Sun XML parser, which is known to be buggy and can not be used with OpenSAML. Please endorse a functional JAXP library(ies) such as Xerces and Xalan. For instructions on how to endorse a new parser see http://java.sun.com/j2se/1.5.0/docs/guide/standards/index.html You can find more information about the Java endorsing mechanism at the following URL: http://download.oracle.com/javase/1.5.0/docs/guide/standards/index.html You should now be ready to test the service by running one of the two following commands: For Windows users: C:\...\standalone>: standalone.bat For Linux users: ...:~/standalone$ ./standalone.sh At this point you should be able to verify that the service has been installed properly by navigating to https://localhost:1104/ which should show a page similar to the one displayed below: 3 Please ensure that a service named AuthzService has been deployed and that it has three separate operations SAML2XACMLAuthzRequest, XACMLAuthzRequest and WsTrustAuthzRequest. Please note: Occasionally when started additional operations are made available. If this occurs please restart the server as there is a bug within the Axis WSDL parsing code meaning that the schema is incorrectly loaded occasionally and we are currently working to fix this bug. At this stage you should have a fully operational standalone PERMIS Authorisation server deployed with two default policies, one of which can be queried using the example SOAP request messages included in the “./Example Request Messages” folder of the release package using some form of Soap client such as SoapUI[9]. Installation inside a servlet container. We assume that you have a servlet container like Tomcat installed in a directory called $TOMCAT. First, you need to install the Axis2 servlet in the servlet container. Download the Axis2 WAR (Web Archive) from the Axis2 site: http://ws.apache.org/axis2/index.html. Simply copy the WAR file into the $TOMCAT/webapps directory. When you restart Tomcat you should have the Axis2 servlet available. You can check this by visiting http://localhost:8080/axis2/. [This assumes that Tomcat is listening on port 8080.] Check that Axis2 has found all the required libraries by visiting the „Validate‟ link on this page. In order to install the service you should download the latest release of the service from the PERMIS website (http://sec.cs.kent.ac.uk/permis) and unzip the release package to a folder of your choice. Prior to installing the authorisation service, you will need to endorse the XML parsing libraries in Tomcat. In Tomcat version 5.5.x this is done by creating copying all the JAR files inside the distribution‟s „endorsed‟ directory to the directory $TOMCAT/common/endorsed. See http://tomcat.apache.org/tomcat-5.5-doc/class-loader-howto.html for additional information. Note: if you haven‟t done the endorsing correctly, you will be greeted by the same message from OpenSAML as in the case of „Installation as a standalone service‟. Next you can install the authorisation service by simply copying the AuthzService4 webapp_x_y_z.aar file that is included in the distribution to $TOMCAT/webapps/axis2/WEBINF/services. You will need to edit the META-INF/services.xml file in that AAR (Axis2 Archive) file to reflect the location of the main configuration file of the service as well as the location of the log4j properties file. The properties that need to be set are: „configFile‟ and „log4JConfigFile‟ respectively. For example: <parameter name="configFile">permis.xml</parameter> <parameter name="log4JConfigFile">log4j.properties</parameter> Remark: if your service is listed by Axis2 as a faulty service, then please check the Tomcat log files and make sure that the main configuration file (permis.xml) is found. Note that the current directory is the one from which Tomcat was started. Remark: if you ever get an error message saying that a certain method in the org.apache.commons.codec.Base64 class cannot be found then you need to replace the commonscodec-1.3.jar in $TOMCAT/webapps/axis2/WEB-INF/lib with the commons-codec-1.4.jar supplied with the software. Setting up an SSL connection. When you want the authz server to be available using an SSL connection, i.e. using HTTPS rather than plain HTTP, you will need to do the following: - Configure the SSL connector for your servlet container. This guide does not explain how to do this. When using the AipepConfiguration element or when using the service as a CVS, it is probably a good idea to require client authentication as well. - Update the axis2.xml file to tell Axis2 to use HTTPS transport as well. In the Transports In section, change the following: <transportReceiver name="http” class="org.apache.axis2.transport.http.AxisServletListener"/> To: <transportReceiver name="http" class="org.apache.axis2.transport.http.AxisServletListener"> <parameter name="port">8080</parameter> </transportReceiver> <transportReceiver name="https" class="org.apache.axis2.transport.http.AxisServletListener"> <parameter name="port">8443</parameter> </transportReceiver> This amounts to adding a „HTTPS‟ transport receiver, and specifying the port to use for both the HTTP and HTTPS receiver. Be sure to use the same ports as the ones that your servlet container is listening on. Allowing only selected hosts to use the authorisation service In some cases it may be useful to limit the possible clients of the authz service to a set of known clients. A secure way of doing client authentication is via client SSL certificates. This can be set up entirely using container managed security. You will need to edit a couple of files. Add the following to the webapps/axis2/WEB-INF/conf/axis2.xml file (inside the webapp element): <!-- This is the role we are using --> <security-role> <role-name>authz-trusted-proxy</role-name> 5 </security-role> <security-constraint> <!-- The URL pattern for the authz service --> <web-resource-collection> <web-resource-name>authz service</web-resource-name> <url-pattern>/services/AuthzService</url-pattern> </web-resource-collection> <!-- Anyone accessing this URL must have the authz-trusted-proxy role --> <auth-constraint> <role-name>authz-trusted-proxy</role-name> </auth-constraint> <!-- A connection to the authz service must be done over SSL --> <user-data-constraint> <transport-guarantee>CONFIDENTIAL</transport-guarantee> </user-data-constraint> </security-constraint> <!-- client authentication is done using client certificates --> <login-config> <auth-method>CLIENT-CERT</auth-method> </login-config> This basically says the clients must connect to the service using SSL, that they must authenticate using a client certificate and that they must possess the authz-trusted-proxy role in order to get access to the service. At this point in time nobody can call the service as nobody has the authztrusted-proxy role. Adding clients to this role in done in the conf/tomcat-users.xml file: <!-- define the authz-trusted-proxy role --> <role rolename="authz-trusted-proxy"/> <!-- Add the client to the authz-trusted-proxy role --> <user username="DN of client" password="null" roles="authz-trusted-proxy"/> <!--Optionally add more clients to the authz-trusted-proxy role --> Note: it is possible to retrieve the DN of the client as perceived by Tomcat by turning SSL debugging on. This is done by setting JAVA_OPTS=-Djavax.net.debug=ssl in bin/catalina.sh. This will cause debugging output w.r.t the SSL connections to be logged in the Tomcat log file. Setting up Logging The software uses Log4J as its logging framework. The configuration is read in from a Log4J properties file. A default properties file (log4j.properties) comes with the software. In general the authorisation service provides two types of logging: - The first type is mainly aimed at programmers/developers who want to understand in (too) great detail what the software is doing. The software uses the convention that each class outputs its logging information to a logger named after the fully qualified name of the class. This is common practice and allows one to select only the logging output from a single class for instance. - The second type is meant to provide a trail of the requests received and responses sent by 6 the service. The name of the logger used for this is „access.log‟. By configuring the appenders and log level for this particular logger you will get a clear picture of the requests and responses sent to and by the service. The following log levels are used: WARN: logs only requests (and responses) that reveal a serious programming error; INFO: as above and also log the requests (and responses) that fail to locate an appropriate policy (either because no default policy is configured or because the request mentions a policy identifier that couldn‟t be identified); DEBUG: as above but also logs all requests and corresponding responses for which there was no problem. Server Configuration All server and policy configurations are defined in a single file in the root directory of the release package called “permis.xml”. This file is consists of a single <PERMISStandaloneConfiguration> element containing a single <TCPConfiguration> element that is used to configure the axis server itself and multiple elements used to configure each indivual message handler type: <PERMISConfiguration> elements that are used to configure individual instances of PERMIS. <SunPDPConfiguration> elements that are used to configure individual instances of the XACML PDP. <TrustPDPConfiguration> elements that are used to configure individual instances of the TrustPDP and <TestService> elements that are used to configure GRANT all or DENY all handlers. The TCPConfiguration element Note: this element is ignored when installing inside a servlet container. At its most basic the TCPConfiguration element defines the port number upon which the server listens, the number of threads to use for requests and the protocol to use. Where required additional configuration parameters are included in order to configure the protocol listener e.g. for SSL. We specify below the possible parameters for this service and their expected contents. General Parameters These parameters are required by all server configurations. <ServerPort> - This element is used to specify the port number on which the server should accept incoming requests. It takes a single numeric value. If a port has been opened in your firewall to support this service then this value should match the value of that port. <ThreadCount> - The ThreadCount element is used to specify how may requests can be handled in parallel by the server. The value placed here should be numeric and should vary according to the resources allocated to the system. <Protocol> - The Protocol element specifies the underlying protocol upon which SOAP requests will be received by the server. This may currently contain a value of either “http” or “https”. If the system cannot determine the type of the protocol then it will default to “http”. Table 1. Example HTTP Configuration <TCPConfiguration> <ServerPort>1104</ServerPort> <ThreadCount>10</ThreadCount> <Protocol>http</Protocol> </TCPConfiguration> Using the above configuration you should be able to navigate to http://localhost:1104 and view the service as before. 7 SSL Specific Parameters1 These parameters are only required when operating using the HTTPS server. <PrivateKey>- This element should contain a relative or absolute path that can be used to determine a file containing a private key certificate. This certificate will be used to secure the SSL server and may or may not be encrypted. If the file is encrypted, however, the PrivateKeyPassword element must be present. <PublicKey> - This element should contain a relative or absolute path that can be used to determine a file containing a public key certificate(PKC). The contents of this file must contain a PKC certificate that matches the details contained in the private key file defined above. <PrivateKeyPassword> - This element should contain a string representation of the password required to access the Private Key file. This element is only required when the private key is protected by a password. <KeyStore> - This element should contain a relative or absolute path that can be used to create a Java KeyStore file containing the private and public key certificates loaded from their respective files. Please note that this file should not exist prior to service initialisation. If the file is found to exist it will be overwritten. <TrustStore> - This element should contain a relative or absolute path that can be used to locate a Java TrustStore file containing the certificates of server entities that the service trusts. For more information please see Section 4. <KeyStorePassword> - This optional element should contain a string representation of the password that will be used to access the KeyStore file. If this element is not present the KeyStore password will be assumed to be “password”. <TrustStorePassword> - This optional element should contain a string representation of the password required to access the TrustStore file. If this element is not present the KeyStore password will be assumed to be “password”. <RequireClientAuthentication> - This element specifies whether or not the server should only accept requests from servers with whom it has a pre-existing trust relationship i.e. their SSL certificate is in the TrustStore. A value of “true” specifies that only trusted servers can access the service a value of “false” specifies that any server may make authorisation requests. Table 2. Example HTTPS Configuration <TCPConfiguration> <ServerPort>1104</ServerPort> <ThreadCount>10</ThreadCount> <Protocol>https</Protocol> <!-- SSL only Configurations --> 1 If you want to use SSL, it is better to install the service inside a servlet container like Tomcat. The SSL support provided by the standalone application is flaky at best. 8 <PublicKey>./server.crt</PublicKey> <PrivateKey>./server.key</PrivateKey> <PrivateKeyPassword>password</PrivateKeyPassword> <KeyStore>./keystore.jks</KeyStore> <KeyStorePassword>password</KeyStorePassword> <RequireClientAuthentication>true</RequireClientAuthentication> <TrustStore>./truststore.jks</TrustStore> <TrustStorePassword>password</TrustStorePassword> </TCPConfiguration> If you now navigate to https://localhost:1104/ you should be asked by your browser to provide a certificate for authentication. The example trust store included in the release should contain a single PKC that corresponds to a PKCS#12 file in the release named trusted.p12, which has a password of “password”. You should now be able to see the service as before. Please Note : The SSL certificates provided with the release should not be used to provide SSL support in deployed systems. PDP and CVS Configuration The authorisation server offers support for several PDP implementations including the PERMIS PdP/CVS [9], Sun‟s XACML PDP [10] and Eindhoven‟s Trust PDP. Each of these configuration types utilise a different type of configuration element in the main configuration file: <PERMISConfiguration> elements configure an instance of the PERMIS PDP/CVS. <SunPDPConfiguration> elements configure an instance of the Sun XACML PDP. <TrustPDPConfiguration> elements configure an instance of the Trust PDP. If a error occurs whilst configuring these elements the element will be skipped and appropriate error information will be outputted to the log file. Please Note: At construction the server will attempt to determine a default PDP/CVS for incoming requests. This default policy will be defined using the isDefault attribute present on all the PDP configuration elements. Only one default policy may be specified in any configuration file instance. Configuring a PERMIS PDP and CVS Each <PERMISConfiguration> element defined in the configuration file describes a seperate instance of a PERMIS RBAC server that is accessible through the server's authorisation endpoint. Whilst multiple policies can be configured via this configuration file only one can be used to access the XACML only endpoint or be used as for SAML2XACML and WS-TRUST requests that do not contain a policy identifier. We call this policy the default policy and specify it as a boolean attribute of the PERMISConfiguration element itself called “isDefault”. The possible configuration elements defined for this configuration type are: <PolicyLocation> - The PolicyLocation element specifies the location of the policy to be used with this service. This may take the form of the URL of an LDAP server, a WebDAV server URL, the path to an Attribute Certificate or the Path to an XML file. <PolicyIssuer> - the Policy Issuer specifies the Policy writer. When accessing policies which are stored in remote repositories this value is also used to determine the user entry in which the policy 9 is stored. <PolicyIdentifier> - The Policy Identifier specifies a Unique identifier that can be used to identify the correct policy to be used. This value must match the OID attribute contained in the policy file itself. This value is then used to determine which policy to load from repositories and later this identifier can be used when making both Ws-Trust and SAML-XACML requests to determine which policy to use for credential validation or authorisation. <LDAPACAttribute> - This element specifies the LDAP attribute name that is used to hold Attribute Certificates for authorisation. <LDAPPKCAttribute> - This element specifies the LDAP attribute name that is used to hold user PKCs for signature verification. <CredentialLocation> - The Credential Location element is used in pull mode to define the repositories from which user credentials should be pulled. This element should take the value of an LDAP or WebDAV attribute repository's URL. <RootPKC> - This element specifies the paths to certificate authoritys that can be used when verifying user certificates and signed credentials. <ObligationsServiceConfiguration> - Specifies an obligations service that will be attached to the PDP. This element is discussed in more detail below. <EngineIdentitiy> - Determines the value used as the Issuer of the assertion embedded in the RequestSecurityTokenResponse. This value is thus only used for the CVS functionality. Table 3. PERMIS Policy Configuration Example <!-- example Policy Configuration using XML and no Signature Verification. This policy is the default policy as specified by the isDefault attribute--> <PERMISConfiguration isDefault="true"> <!-- The location of the policy --> <PolicyLocation>./policy.xml</PolicyLocation> <!-- The issuer of the policy --> <PolicyIssuer>cn=A Permis Test User,o=Permisv5, c=gb</PolicyIssuer> <!-- For XML policies the Policy Identifier may have any unique value but MUST still be set --> <PolicyIdentifier>TestPolicy</PolicyIdentifier> <!-- The LDAP attribute where the users policy/attributes are stored --> <LDAPACAttribute>attributeCertificateAttribute</LDAPACAttribute> <!-- The LDAP attribute where the user's PK certificate is stored --> <LDAPPKCAttribute>userCertificateAttribute</LDAPPKCAttribute> <!-- The location of user credentials --> <CredentialLocation>ldap://sec.cs.kent.ac.uk/c=gb</CredentialLocation> </PERMISConfiguration> The PERMISConfiguration element supports the following attributes: - isDefault: indicates whether or not this is the default policy for this server. Default: false - isBtgEnabled: when set to „true‟ then a BTG-wrapper will be used around the stateless PDP. This enables the PDP to return the BTG-answer. This wrapper will hold all the relevant state information for the BTG-protocol. Default: false 10 - - - btgMode: determines the „mode‟ in which the BTG-wrapper will work. Valid values are: PRE_FETCH and FETCH_ON_DEMAND. Only considered when the attribute isBtgEnabled is set to true. Default: PRE_FETCH authenticateCaller: when true then the Issuer of the top level Assertion used in a RequestSecurityToken message has to match the DN of the client certificate used for the SSL connection. This parameter thus only influences the CVS functionality. When this attribute is set to true, then the CVS can only be (meaningfully) called over SSL. supportMultiResources: when this is set to true then one can send multiple resources in a single request. The xacml-context:Response will then contain multiple xacml-context:Result elements, one for each resource in the request. This is particularly useful when using the SAML profile of XACML. In this case credential validation (i.e. fetching, parsing and validating the user‟s credentials) will only be done once. This should result in a significant performance improvement compared to making multiple calls, one for each request. Default: false. For additional policy configurations please refer to the example permis.xml configuration file included in the release package. Configuring an Obligations Service Note: due to class loading issues configuring an obligations service does not work with servlet container deployment when using a version smaller then 0.2.3. From version 0.2.3 onwards you should be able to use an obligations service no matter how you deploy the authorisation server. The optional ObligationsServiceConfiguration element specifies an obligations service that will be attached to the PDP. This is, if the XACML response contains Obligations then some of them may be enforced by the specified obligations service. The mechanism used is flexible and allows administrators to specify their own obligations without having to change or recompile the code. The underlying framework used is Spring version 3 [11]. The software distribution contains the necessary libraries but the administrator will have to specify a Spring configuration file. An ObligationsServiceConfiguration element consists of zero or more Obligation elements. Each Obligation element has a required „path‟ attribute that gives the location of a Spring configuration file. Further, each Obligation element needs to have one or more ObligationIdentifier elements. An example of an ObligationsServiceConfiguration element is given below: <ObligationsServiceConfiguration processAll="false"> <Obligation path="./obligations/AlwaysSucceedObligation.xml"> <ObligationIdentifier>AlwaysSucceedObligation</ObligationIdentifier> </Obligation> <Obligation path="./obligations/EmailObligation.xml"> <ObligationIdentifier>EmailObligation</ObligationIdentifier> </Obligation> </ObligationsServiceConfiguration> The ObligationIdentifier elements specify the identifiers that this particular obligation will be registered under in the obligations service. In other words, if this identifier matches the ObligationId attribute on one of the returned obligations, then this ObligationConstructor object (see later) will be used to construct the executable obligation which will then be enforced. The ObligationsServiceConfiguration element also has an attribute called „processAll‟. If this is set to false, then the ObligationsService will simply return any unrecognised obligations (i.e. obligations for which no matching ObligationIdentifier was found.) If it is set to true then if there are such unrecognised obligations, then access will be denied. If you have configured additional 11 obligations service components in your system (e.g. to handle application specific obligations), then you should set the processAll attribute to false. In the example above the first obligation is an extremely simple one: this obligation just prints a message on standard output to say that it has been called. The content of the AlwaysSucceedObligation.xml is as follows: <?xml version="1.0" encoding="UTF-8"?> <beans xmlns=http://www.springframework.org/schema/beans xmlns:xsi=http://www.w3.org/2001/XMLSchema-instance xsi:schemaLocation="http://www.springframework.org/schema/beans http://www.springframework.org/schema/beans/spring-beans-2.5.xsd"> <bean id="always-succeed" class="issrg.aipep.obligations.AlwaysSucceedObligationConstructor"/> </beans> The first five lines will be the same for every such file. Each file has to specify exactly one bean which implements the issrg.aipep.obligations.ObligationConstructor interface. This does not mean that the configuration file may not contain additional beans (which are then probably used to help in specifying the ObligationConstructor bean). Another example is given by the EmailObligation.xml file where the EmailObligationConstructor object is specified by using a constructor which uses an object of type Properties. This object (bean) has been created as the bean with identifier „mailProperties‟ and is referenced in the bean with identifier email-obligation. This is the actual ObligationConstructor defined by this file. <?xml version="1.0" encoding="UTF-8"?> <beans xmlns=http://www.springframework.org/schema/beans xmlns:xsi=http://www.w3.org/2001/XMLSchema-instance xsi:schemaLocation="http://www.springframework.org/schema/beans http://www.springframework.org/schema/beans/spring-beans-2.5.xsd"> <bean id="mailProperties" class="org.springframework.beans.factory.config.PropertiesFactoryBean"> <property name="properties"> <props> <prop key="mail.smtp.host">mx.cs.kent.ac.uk</prop> <prop key="mail.transport.protocol">smtp</prop> </props> </property> </bean> <bean id="email-obligation" class="issrg.aipep.obligations.EmailObligationConstructor"> <constructor-arg ref="mailProperties"/> </bean> </beans> More information on how to specify such a Spring Inversion of Control configuration file can be found here: http://static.springsource.org/spring/docs/3.0.3.RELEASE/spring-frameworkreference/html/beans.html If you are interested in implementing your own obligations, then we refer to Deliverable D7.1 [12] sections 2.5.1 and 2.5.2 for a description of the various classes and interfaces involved. You could also look at the source code of existing obligations [13]. 12 Configuring a Sun PDP Each <SunPDPConfiguration> element defined in the configuration file describes a separate instance of a Sun XACML PDP, accessible through the server's authorisation endpoint. We do not currently support Ws-Trust requests for this PDP type. Please Note: In order to provide access to a Sun XACML PDP instance it MUST be configured as the default policy. The possible configuration elements defined for this configuration type are: <PolicyLocation> - The PolicyLocation element specifies the absolute or relative path location of the policy to be used with this service. This may only take the form of a Path to an XML file containing an XACML 2.0 Policy construct. This element must be present at least once, and may be used multiple times to specify multiple policies. <PolicyIdentifier> - Gives a name to the PDP which must be used in the SAML/XACML request when the PDP is not the default one. <ObligationsServiceConfiguration> - This element is configured in the same way as the corresponding element on the PERMISConfiguration element. Table 4. XACML Policy Configuration Example <!-- an example XACML Policy Configuration --> <SunPDPConfiguration isDefault="false"> <!-- The location of the XACML Policy files --> <PolicyLocation>xacmlpolicy.xml</PolicyLocation> <PolicyLocation>xacmlpolicy-second.xml</PolicyLocation> <PolicyIdentifier>My-PDP</PolicyIdentifier> </SunPDPConfiguration> The SunPDPConfiguration element supports the following attributes, each with the same meaning as in the PERMISConfiguration element. - isDefault - isBtgEnabled - btgMode - supportMultiResources If you want this configuration to respond to WsTrust queries as well, then you need to set the „isCVS‟ attribute to true. If you do not mention the attribute it defaults to „false‟ and this element will not respond to WsTrust queries, hence you will not be able to use it as a Credential Validation Service. Configuring a Trust PDP Each <TrustPDPConfiguration> element defined in the configuration file describes a separate instance of a Trust PDP, accessible through the server's authorisation endpoint. We do not currently support SAML XACML or Ws-Trust requests for this PDP type and whilst multiple policies can be configured via this configuration file only one can be used to access the XACML only endpoint. We call this policy the default policy and specify it as a boolean attribute of the TrustPDPConfiguration element itself called “isDefault”. 13 Please Note: In order to provide access to a Trust PDP instance it MUST be configured as the default policy. The possible configuration elements defined for this configuration type are: <PolicyConfigFile> - The PolicyConfigFile element is used to provide a relative or absolute path to a TrustPDP policy configuration file that defines the policies required to initalise the PDP instance. The element may only be defined once per TrustPDPConfiguration instance. <TrustServiceConfigFile> - The TrustServiceConfigFile is used to provide a relative or absolute path to a Trust Service confiuration file which specifies the class names of the required trust services. Table 5. Trust PDP Configuration example <TrustPDPConfiguration isDefault="true"> <!-- The location of the Policy Configuration file --> <PolicyConfigFile>./config.xml</PolicyConfigFile> <!-- The location of the Trust Service Configuration file --> <TrustServiceConfigFile>./config-trustservice.xml</TrustServiceConfigFile> </TrustPDPConfiguration> For more information on configuring a Trust PDP and the contents of the referenced configuration files please refer to the trust PDP‟s installation documents. Testing the Server The standalone server also provides a testing mechanism that provides both XACML and SAML XACML grant and deny handlers. This service means that as long as the server receives correctly formatted requests then either grant or deny replies will always be received from the default policy endpoints no matter the contents of the request. The test handlers can be initialised by adding a <TestService> element to the permis.xml configuration file. This element should have a single attribute “handler” which is used to specify whether the service returns GRANT or DENY responses. For GRANT responses the attribute should have the value “permit” and for deny responses “deny”. Table 6. Test Service Configuration Example <!-- An example GRANT test handler --> <TestService handler=”grant”/> Please note: This handler overrides any other default policies configured in the permis.xml configuration file and should be omitted in production services. Configuring an Application Independent PEP (AI-PEP) The authorisation server can also contain one (or more) AI-PEP instance(s). This is done by using the AipepConfiguration element. The AipepConfiguration element supports the following attributes: - isDefault: indicates whether or not this is the default PDP of the server; defaults to false when absent - ID: gives an identifier for this PDP. Will be used to locate this PDP when specifying a PDP 14 explicitly in the request as specified later in the document (see Specifying an Authorisation Policy to use when making an XACMLAuthzRequest) - submitAction: gives the name of the action to be used when submitting sticky policies. - deleteAction: gives the name of the action to be used for deleting a particular resource identifier from the sticky store. Note: when either of the „submitAction‟ or „deleteAction‟ has not been specified, then submitting policies and deleting resource identifiers will not be possible through this particular interface. The following child elements are supported: - <DatabaseConfiguration> - <ObligationsServiceConfiguration> - <MasterPDPConfiguration> The ObligationsServiceConfiguration element is the same as for instance the ObligationsServiceConfiguration element on the PERMISConfiguration element. The DatabaseConfiguration element is used to configure the storage for sticky policies that were submitted to the AIPEP. You can choose to either use a file system backed storage (easy for testing) or one can use a storage backed by a relational database. When the DatabaseConfiguration element is absent then in-memory storage is used. This means that sticky policies submitted to the authorisation server are lost when it is stopped. To use a file system backed storage the following two attributes have to be used: „directory‟ and „filePath‟. The directory attribute should give an existing (writable) folder on the file system. New sticky policies will be stored inside this folder with a file name that is a (SHA-1) hash of the sticky policy‟s identifier. The filePath attribute should give a file that contains the mapping between resource identifiers and sticky policies. An example of such a configuration is given below: <DatabaseConfiguration filePath=”./policystore/stickystore.txt” directory=”./policystore”/> It is also possible to use a relational database as the backend storage. In this case the DatabaseConfiguration element simply points to a Spring configuration file, which should define one bean of type javax.sql.DataSource. The springConfigurationFile attribute should give the location of the Spring configuration file. One could thus have: <DatabaseConfiguration springConfigurationPath="webapps/axis2/WEBINF/services/authz/conf/policy-store-spring.xml"/> The file policy-store-spring.xml could contain something similar to: <?xml version="1.0" encoding="UTF-8"?> <beans xmlns=http://www.springframework.org/schema/beans xmlns:xsi=http://www.w3.org/2001/XMLSchema-instance xsi:schemaLocation="http://www.springframework.org/schema/beans http://www.springframework.org/schema/beans/spring-beans-2.5.xsd"> <bean id="dataSource" class="org.springframework.jdbc.datasource.DriverManagerDataSource"> <property name="driverClassName" value="com.mysql.jdbc.Driver"/> <property name="url" value="jdbc:mysql://localhost/store"/> 15 <property name="username" value="xxx"/> <property name="password" value="yyy"/> </bean> </beans> Note that in this case we used a MySQL database, but in principle this should not matter. Remark: it may be necessary to put the library (jar file) providing access to the database in the directory $TOMCAT/webapps/axis2/WEB-INF/lib folder so that it can be located. The DatabaseConfiguration element also supports the „ridAttributeIdentifier‟ attribute which gives the identifier of the XACML attribute in the request context that specifies the resource identifier of the request. The default value for this attribute (when not specified) is: urn:oasis:names:tc:xacml:1.0:resource:resource-id Preparing the database. The implementation expects that certain tables are present in the database. The easiest way to set up these tables is to use the DatabaseConfigurationParser main program. This expects a Spring configuration file as above as input on the command line, and will create the necessary tables for you. For instance, you could run the following command from inside $TOMCAT/webapps/axis2/WEB-INF/services/authz/lib: java -cp *:../../../lib/* issrg.standalone.configuration.parser.DatabaseConfigurationParser ../conf/policy-store-spring.xml Note that the actual database (store in this instance) is not created for you and needs to exist prior to executing this statement. You may also need to use a different username/password for table creation. The MasterPDPConfiguration element allows configuring the actual PDP that will be used by the AIPEP. It has the following child elements: - LawConflictResolutionPDP: specifies the conflict resolution PDP to used by the law.. LawPDP: specifies the law policies that will be used by the Master PDP. - ControllerConflictResolutionPDP: the conflict resolution PDP that will be used by the controller. - ControllerPDP: specifies the policy that the controller/keeper of the data would like to enforce. - TrustPDP: specifies a system wide trust policy All elements take a PERMISConfiguration, SunPDPConfiguration or TrustPDPConfiguration element as its child to configure the actual PDP. When the LawPDP or ControllerPDP element is missing, this is interpreted as having a PDP that always returns NotApplicable. The following conflict resolution strategies are currently supported - permit-overrides - deny-overrides - first-applicable The conflict resolution PDP indicates the conflict resolution strategy by having an obligation on its response with an attribute identifier of http://sec.cs.kent.ac.uk/masterpdp/conflictresolution/permitoverrides or http://sec.cs.kent.ac.uk/masterpdp/conflictresolution/deny-overrides or 16 http://sec.cs.kent.ac.uk/masterpdp/conflictresolution/first-applicable. When either the law or the controller are not interested in specifying a conflict resolution strategy for a particular request, they should return NotAppplicable. When no PDP is specified for a conflict resolution element then this is interpreted as returning NotApplicable for every request. Subjects (and issuers) can submit their own conflict resolution policy to use in the same way as they can submit authorization policies. The policy type, however, must be set to „ConflictResolution‟, rather than „Authorization‟. An example of a complete AipepConfiguration element can be found below. <AipepConfiguration isDefault="true" submitAction=”SUBMIT” deleteAction=”DELETE” > <DatabaseConfiguration ridAttributeIdentifier="rid" filePath=”./policystore/stickystore.txt” directory=”./policystore”/> <ObligationsServiceConfiguration processAll="false"> <Obligation path="./obligations/EmailObligation.xml"> <ObligationIdentifier> http://sec.cs.kent.ac.uk/obligations/EmailObligation </ObligationIdentifier> </Obligation> </ObligationsServiceConfiguration> <MasterPDPConfiguration> <LawConflictResolutionPDP> <SunPDPConfiguration> <PolicyLocation>always-permit-overrides.xacml</PolicyLocation> <PolicyIdentifier>always-permit-overrides</PolicyIdentifier> </SunPDPConfiguration> </LawConflictResolutionPDP> <LawPDP> <PERMISConfiguration isDefault="true"> <PolicyLocation>./lawPolicy.xml</PolicyLocation> <PolicyIssuer>cn=law,o=Permisv5, c=gb</PolicyIssuer> <PolicyIdentifier>lawPolicyIdentifier</PolicyIdentifier> </PERMISConfiguration> </LawPDP> <!—Note that ControllerConflictResolutionPDP and ControllerPDP elements are missing. This is allowed. --> </MasterPDPConfiguration> </AipepConfiguration> Protocol Information Due the the proliferation of different standards and versions of standards we wish to make clear that contrary to previous releases of this software we now only support three distinct message types: 1. xacml-context:Request messages as defined in [4]. 2. xacml-samlp:XACMLAuthzDecisionQuery messages as defined in [5]. 3. wst:RequestSecurityToken messages as defined in [7] and constrained by [8]. In addition to the standard message types defined in these file we have also implemented standards compliant but otherwise un-profiled means of specifying the CVS or authorisation policies to use when making RequestSecurityToken and XACMLAuthzDecisionQuery messages, we are currently 17 in the process of profiling these requests and standardising them and will make the full profiles available in the near future. Specifying a CVS policy when making a WS-Trust Request In order to specify the CVS policy to use when making the WS-Trust Request a request should be specified according to the profile described in [8]. Once this request has been constructed a <wsp:PolicyReference> element should be added to the body of the request. The URI attribute of this element should contain a policy OID that matches a policy OID configured into the main configuration file of the server (permis.xml). For example the request defined below would mean that a policy with the OID of mysite-policy would be used to provide the credentials for this request. Table 7. An Example WS-Trust Request, with referenced Policy Identifier <wst:RequestSecurityToken xmlns="http://www.w3.org/2001/XMLSchema" xmlns:wst="http://docs.oasis-open.org/ws-sx/ws-trust/200512/" xmlns:wsp="http://schemas.xmlsoap.org/ws/2004/09/policy" > <wst:TokenType> urn:oasis:names:tc:SAML:2.0:profiles:attribute:XACML </wst:TokenType> <wst:RequestType> http://schemas.xmlsoap.org/ws/2005/02/trust/validate </wst:RequestType> <wsp:PolicyReference uri=”mysite-policy” /> <wst:Claims Dialect="http://www.ogf.org/authz/2008/06/CVS/pull"> <saml:Assertion ID="Permis-Credential-Validation-Service-V1.0" IssueInstant="Wed Oct 14 16:10:15 BST 2009" Version="2.0" xmlns:saml="urn:oasis:names:tc:SAML:2.0:assertion"> <saml:Issuer> cn=A Permis Test User,o=PERMISv5,c=gb </saml:Issuer> <saml:Subject> <saml:NameID Format="urn:oasis:names:tc:SAML:2.0:nameidformat:X509SubjectName"> CN=User0,o=PERMISv5,c=gb </saml:NameID> </saml:Subject> </saml:Assertion> </wst:Claims> </wst:RequestSecurityToken> Specifying an Authorisation Policy to use when making an XACMLAuthzRequest In order to specify the policy to use when making an XACMLAuthzRequest a request should be specified according to the profile described in [5]. Once this request has been constructed a <Policy> element of type “urn:oasis:names:tc:xacml:2.0:policy:schema:os” should be added to the body of the request. The PolicyId attribute of this element should contain a policy OID that matches a policy OID configured into the main configuration file of the server (permis.xml). The RuleCombiningAlgId attribute of this message should be set to “urn:oasis:names:tc:xacml:1.0:rulecombining-algorithm:permit-overrides" and an empty target element should be included e.g. 18 Table 8. An example SAML-XACML Policy reference. <Policy xmlns="urn:oasis:names:tc:xacml:2.0:policy:schema:os" PolicyId="mysite-policy" RuleCombiningAlgId="urn:oasis:names:tc:xacml:1.0:rule-combining-algorithm:permitoverrides"> <Target/> </Policy> For example the request defined below would mean that a policy with the OID of mysite-policy would be used to provide the authorisation decision for this request. Table 9. An Example SAML-XACML Request, with referenced Policy Identifier <XACMLAuthzDecisionQuery xmlns="urn:oasis:names:tc:xacml:2.0:profile:saml2.0:v2:schema:protocol:cd-01" xmlns:xsi="http://www.w3.org/2001/XMLSchema-instance" xsi:schemaLocation="urn:oasis:names:tc:xacml:2.0:profile:saml2.0:v2:schema:protocol:cd-01 file:/home/sfl/work/issrg/oasis-documents/xacml3/XACML-3.0-cd-1-updated-2009-May07/XSD/xacml-2.0-profile-saml2.0-v2-schema-protocol-cd-1.xsd" ID="A2009-10-13T12.57.07" Version="2.0" IssueInstant="2009-10-13T12:58:12.209Z"> <xacml-context:Request xmlns:xacmlcontext="urn:oasis:names:tc:xacml:2.0:context:schema:os"> <Subject xmlns="urn:oasis:names:tc:xacml:2.0:context:schema:os"> <Attribute AttributeId="urn:oid:1.2.826.0.1.3344810.1.1.14" DataType="http://www.w3.org/2001/XMLSchema#string"> <AttributeValue> member </AttributeValue> </Attribute> </Subject> <Resource xmlns="urn:oasis:names:tc:xacml:2.0:context:schema:os"> <Attribute AttributeId="urn:oasis:names:tc:xacml:1.0:resource:resource-id" DataType="http://www.w3.org/2001/XMLSchema#string"> <AttributeValue> http://www.mysite.com/members/ </AttributeValue> </Attribute> </Resource> <Action xmlns="urn:oasis:names:tc:xacml:2.0:context:schema:os"> <Attribute AttributeId="urn:oasis:names:tc:xacml:1.0:action:action-id" DataType="http://www.w3.org/2001/XMLSchema#string"> <AttributeValue>GET</AttributeValue> </Attribute> </Action> <Environment xmlns="urn:oasis:names:tc:xacml:2.0:context:schema:os"/> </xacml-context:Request> <Policy xmlns="urn:oasis:names:tc:xacml:2.0:policy:schema:os" 19 PolicyId="mysite-policy" RuleCombiningAlgId="urn:oasis:names:tc:xacml:1.0:rule-combining-algorithm:permitoverrides"> <Target/> </Policy> </XACMLAuthzDecisionQuery> Submitting Sticky Policies to Use for a Particular RID In the example below, we show how a „member‟ of a certain site/service provider (presumably ou=some,o=service,c=gb) requests to submit some (personal) information, known to the service provider with the RID rid-123. The member has a sticky policy which only allows transfer of this data other providers within the UK and when this happen he wants this policy to be attached to his data so that the other site can also honour this policy. Note that the user‟s policy says nothing about submitting the data, as in this case it is assumed that the organisation‟s policy determines who may submit data. <soapenv:Envelope xmlns:soapenv="http://schemas.xmlsoap.org/soap/envelope/"> <soapenv:Header/> <soapenv:Body> <XACMLAuthzDecisionQuery xmlns="urn:oasis:names:tc:xacml:2.0:profile:saml2.0:v2:schema:protocol:cd-01" ID="A2010-12-13T12.58.12" Version="2.0" IssueInstant="2010-12-13T12:58:12.209Z"> <xacml-context:Request xmlns:xacml-context="urn:oasis:names:tc:xacml:2.0:context:schema:os"> <Subject xmlns="urn:oasis:names:tc:xacml:2.0:context:schema:os"> <Attribute AttributeId="urn:oid:1.2.826.0.1.3344810.1.1.14" DataType="http://www.w3.org/2001/XMLSchema#string"> <AttributeValue>member</AttributeValue> </Attribute> </Subject> <Resource xmlns="urn:oasis:names:tc:xacml:2.0:context:schema:os"> <Attribute AttributeId="urn:oasis:names:tc:xacml:1.0:resource:resource-id" DataType="http://www.w3.org/2001/XMLSchema#string"> <AttributeValue>ou=some,o=service,c=gb</AttributeValue> </Attribute> <Attribute AttributeId="rid" DataType="http://www.w3.org/2001/XMLSchema#string"> <AttributeValue>rid-123</AttributeValue> </Attribute> </Resource> <Action xmlns="urn:oasis:names:tc:xacml:2.0:context:schema:os"> <Attribute AttributeId="urn:oasis:names:tc:xacml:1.0:action:action-id" DataType="http://www.w3.org/2001/XMLSchema#string"> <AttributeValue>SUBMIT</AttributeValue> </Attribute> </Action> <Environment xmlns="urn:oasis:names:tc:xacml:2.0:context:schema:os"/> </xacml-context:Request> <Extensions "> <sp:StickyPolicy xmlns:sp=”http://sec.cs.kent.ac.uk/stickypolicy” PolicyID="sticky-policy-1" PolicyLanguage="PERMIS" 20 PolicyType="Authorization" TimeOfCreation="2010-08-09T00:00:00Z"> <sp:PolicyAuthor> <sp:AuthorType>DataSubject</sp:AuthorType> </sp:PolicyAuthor> <sp:PolicyResourceTypes> <sp:ResourceType>personal:preferences</sp:ResourceType> </sp:PolicyResourceTypes> <sp:PolicyContents><X.509_PMI_RBAC_Policy OID="sticky-policy-1"> <SubjectPolicy> <SubjectDomainSpec ID="everywhere"> <Include LDAPDN=""/> </SubjectDomainSpec> </SubjectPolicy> <RoleHierarchyPolicy> <RoleSpec Type="permisRole" OID="1.2.826.0.1.3344810.1.1.14"> <SupRole Value="UNSPECIFIED"/> </RoleSpec> </RoleHierarchyPolicy> <SOAPolicy> <SOASpec ID="anyone" LDAPDN=""/> </SOAPolicy> <RoleAssignmentPolicy> <RoleAssignment> <SubjectDomain ID="everywhere"/> <RoleList> <Role Type="permisRole"/> </RoleList> <Delegate Depth="0"/> <SOA ID="anyone"/> <Validity/> </RoleAssignment> </RoleAssignmentPolicy> <TargetPolicy> <TargetDomainSpec ID="UK"> <Include LDAPDN="c=gb"/> </TargetDomainSpec> </TargetPolicy> <ActionPolicy> <Action Name="TRANSFER" ID="TRANSFER"/> </ActionPolicy> <TargetAccessPolicy> <TargetAccess> <RoleList/> <TargetList> <Target> <TargetDomain ID="UK"/> <AllowedAction ID="TRANSFER"/> </Target> </TargetList> <Obligations> <Obligation ObligationId=”http://sec.cs.kent.ac.uk/obligations/AttachStickyPolicy” FulfillOn="Permit"/> </Obligations> </TargetAccess> </TargetAccessPolicy> </X.509_PMI_RBAC_Policy> </sp:PolicyContents> </sp:StickyPolicy> <Extensions> </XACMLAuthzDecisionQuery> </soapenv:Body> 21 </soapenv:Envelope> Note: it is very important the the Extensions element used is in the same XML namespace as the XACMLAuthzDecisionQuery, otherwise your sticky policy will not be found and will hence not be stored. Returning Sticky Policies from the AIPEP Next, assume that a request comes in from another UK based site to transfer the data with RID rid123 to his site, then the response will come back as „Permit‟ and the user‟s policy will be included in it as shown below. Thus, the request may be the following: <soapenv:Envelope xmlns:soapenv="http://schemas.xmlsoap.org/soap/envelope/"> <soapenv:Header/> <soapenv:Body> <XACMLAuthzDecisionQuery xmlns="urn:oasis:names:tc:xacml:2.0:profile:saml2.0:v2:schema:protocol:cd-01" ID="A2011-01-01T12:58:12.209Z" Version="2.0" IssueInstant="2011-01-01T12:58:12.209Z"> <xacml-context:Request xmlns:xacml-context="urn:oasis:names:tc:xacml:2.0:context:schema:os"> <Subject xmlns="urn:oasis:names:tc:xacml:2.0:context:schema:os"> </Subject> <Resource xmlns="urn:oasis:names:tc:xacml:2.0:context:schema:os"> <Attribute AttributeId="urn:oasis:names:tc:xacml:1.0:resource:resource-id" DataType="http://www.w3.org/2001/XMLSchema#string"> <AttributeValue>o=other service,c=gb</AttributeValue> </Attribute> <Attribute AttributeId="rid" DataType="http://www.w3.org/2001/XMLSchema#string"> <AttributeValue>rid-123</AttributeValue> </Attribute> </Resource> <Action xmlns="urn:oasis:names:tc:xacml:2.0:context:schema:os"> <Attribute AttributeId="urn:oasis:names:tc:xacml:1.0:action:action-id" DataType="http://www.w3.org/2001/XMLSchema#string"> <AttributeValue>TRANSFER</AttributeValue> </Attribute> </Action> <Environment xmlns="urn:oasis:names:tc:xacml:2.0:context:schema:os"/> </xacml-context:Request> </XACMLAuthzDecisionQuery> </soapenv:Body> </soapenv:Envelope> The response may then be as follows. Note how there is an obligation with identifier http://sec.cs.kent.ac.uk/obligations/stickypolicyobligation returned. This one denotes that this the policies mentioned as http://sec.cs.kent.ac.uk/obligations/stickypolicyobligation/stickypolicy need to be attached when the data is transferred to the other party. <soapenv:Envelope xmlns:soapenv="http://schemas.xmlsoap.org/soap/envelope/"> <soapenv:Body> <urn:Response IssueInstant="2011-01-01T12:58:13.209Z" ID="_66149d3bc0c909eb607847edd65dc030" Version="2.0" InResponseTo=" A2011-01-01T12:58:12.209Z " xmlns:urn="urn:oasis:names:tc:SAML:2.0:protocol"> <urn:Status> <urn:StatusCode Value="urn:oasis:names:tc:SAML:2.0:status:Success"/> 22 </urn:Status> <urn1:Assertion IssueInstant="2011-01-01T12:58:13.209Z" ID="_24c15e6bb46b2bc3aea05f9fdc53a068" Version="2.0" xmlns:urn1="urn:oasis:names:tc:SAML:2.0:assertion"> <urn1:Statement xsi:type="urn:XACMLAuthzDecisionStatementType" xmlns:urn="urn:oasis:names:tc:xacml:2.0:profile:saml2.0:v2:schema:assertion:cd-01" xmlns:xsi="http://www.w3.org/2001/XMLSchema-instance"> <urn2:Response xmlns:urn2="urn:oasis:names:tc:xacml:2.0:context:schema:os"> <urn2:Result> <urn2:Decision>Permit</urn2:Decision> <urn2:Status> <urn2:StatusCode Value="urn:oasis:names:tc:xacml:1.0:status:ok"/> </urn2:Status> <urn3:Obligations xmlns:urn3="urn:oasis:names:tc:xacml:2.0:policy:schema:os"> <urn3:Obligation ObligationId="http://sec.cs.kent.ac.uk/obligations/stickypolicyobligation"> <urn3:AttributeAssignment AttributeId="http://sec.cs.kent.ac.uk/obligations/stickypolicyobligation/stickypolicy" DataType="http://www.w3.org/2001/XMLSchema#base64Binary"> PD94b remainder of base64 encoding cut</urn3:AttributeAssignment> </urn3:Obligation> </urn3:Obligations> </urn2:Result> </urn2:Response> </urn1:Statement> </urn1:Assertion> </urn:Response> </soapenv:Body> </soapenv:Envelope> Note that in this case the returned policies are base64 encoded. This behaviour can be changed by setting the „base64EncodeStickyPolicies‟ attribute on the AipepConfiguration element to false. The Policy Management Web Service It is possible to use a dedicated policy management interface for the authorization server. This allows submitting, viewing and deleting of sticky policies. Important Note: since manipulation of sticky policies is a sensitive subject it is very much recommended that you only allow trusted proxies to contact the policy management web service. Earlier in this document it is explained how to setup trusted proxies for an Axis2 based web service. The Axis2 services.xml file contains the necessary information to enable the policy management interface. Simply uncomment the PolicyManagement service. In order to use the Policy Management Web Service in conjunction with an AIPEP, you must use a relational database backend for the sticky policies. This is the (indirect) way in which the Policy Management Web Service and the AIPEP communicate. The Axis2 services.xml file contains a parameter called „configFile‟ whose value should point to the configuration file (typically called pm.xml) for the policy management web service: <parameter name="configFile">/path/to/pm.xml</parameter> The content of this configuration file is fairly restricted. It consists of a top level element called PolicyManagementConfiguration and a child element called DatabaseConfiguration. An example is given below: <PolicyManagementConfiguration> <DatabaseConfiguration ridAttributeIdentifier="rid" 23 springConfigurationPath="/path/to/policy-store-spring.xml"/> </PolicyManagementConfiguration> The DatabaseConfiguration element you use should be the same one as that used on your AipepConfiguration element, as they need to share the same database backend. Available Operations The policy management web service has the following operations: - storePolicy: takes a sticky policy and stores it in the database. After calling this operation the policy is present in the system but it does not yet apply to any resource. - storePolicyBase64: has the same functionality as above but is useful for clients that have problems to send complex elements to a web service. In this case the sticky policy construct should be a base64 encoded string. - removePolicy: takes a policy identifier. After calling this operation the policy is no longer present in the system, which means that any resource identifier to which this policy was applicable are no longer covered by this policy. - getPolicy: takes a policy identifier and returns the sticky policy with that identifier. - getPolicyBase64: as above but returns the sticky policy in a base64 encoded string. - associate: takes a policy identifier and a resource identifier. After calling this method the policy referenced by the policy identifier applies to the given resource identifier. Calling this method multiple times has no effect (it is idempotent). - disassociate: this is the reverse of the associate-method. - getPolicyIdentifiers: takes a resource identifier and returns the list (possibly empty) of the policy identifiers of the policies that are applicable to the resource identifier. - getResourceIdentifiers: takes a policy identifier and returns the list of resource identifiers (possibly empty) that this policy identifier applies to References [1] Gosling, J., Joy, B., Steele, G., and Bracha, G. 2005 Java(Tm) Language Specification, the (3rd Edition) (Java (Addison-Wesley)). Addison-Wesley Professional. [2] Apache Axis 2 project, see http://ws.apache.org/axis2/ [3] Gudgin, M., Hadley, M., Mendelsohn, M. et al. (2003), „SOAP Version 1.2 Part 1: Messaging Framework‟, W3C Recommendation, 24th June (URL: http:// www.w3.org/TR/2003/REC-soap12part1 – 20030624/). [4] OASIS, “OASIS eXtensible Access Control Markup Language (XACML) Version 2.0”, OASIS Standard, 1 February 2005. [5] OASIS, “SAML 2.0 Profile of XACML, Version 2”, Committee Draft 1, 16 April 2009 [6] David W Chadwick, Linying Su, Romain Laborde , “Use of XACML Request Context to Obtain an Authorisation Decision”, OGSA Standard, September 2006. [7] S. Anderson et al., “Web Services Trust Language (WS-Trust),” technical report, 2005. [8] David Chadwick, Linying Su, Use of WS-TRUST and SAML to access a Credential Validation Service, OGSA Draft, June 2009. [9] PERMIS PDP/CVS, see http://sec.cs.kent.ac.uk/permis or http://www.openpermis.org/ [10] Sun‟s XACML PDP, see http://sunxacml.sourceforge.net/ [11] Spring framework: http://www.springsource.org/ [12] Deliverable D7.1 of the TAS3 project: http://www.tas3.eu/project/publications/download/wp7identity-management-authentication-authorization/TAS3_D07p1_IDM-Authn24 Authz_V2p1.pdf/at_download/file [13] SVN repository of ISSRG source code: http://projects.cs.kent.ac.uk/projects/permis/svn/trunk Appendix 1. Server WSDL This appendix contains a copy of the wsdl used to generate the Permis Standalone server's message handling code. For additional schema information please refer the the “resources” folder in the release package which contains a copy of this wsdl as well as all the schema used to generate the service. <wsdl:definitions targetNamespace="http://sec.cs.kent.ac.uk/authzservice" xsi:schemaLocation="http://schemas.xmlsoap.org/wsdl/ http://schemas.xmlsoap.org/wsdl/wsdl.xsd http://www.w3.org/2001/XMLSchema http://www.w3.org/2001/XMLSchema.xsd" xmlns:xacmlpolicy="urn:oasis:names:tc:xacml:2.0:policy:schema:os" xmlns:wsdl="http://schemas.xmlsoap.org/wsdl/" xmlns:saml="urn:oasis:names:tc:SAML:2.0:assertion" xmlns:xacmlsaml="urn:oasis:names:tc:xacml:2.0:profile:saml2.0:v2:schema:assertion:cd-01" xmlns:xacmlcontext="urn:oasis:names:tc:xacml:2.0:context:schema:os" xmlns:ws="http://www.example.com/webservice" xmlns:wst="http://docs.oasis-open.org/wssx/ws-trust/200512/" xmlns:soapenc="http://schemas.xmlsoap.org/soap/encoding/" xmlns:http="http://schemas.xmlsoap.org/wsdl/http/" xmlns:tns="http://sec.cs.kent.ac.uk/authzservice" xmlns:wsoap="http://www.w3.org/2004/08/wsdl/soap12" xmlns:xsd="http://www.w3.org/2001/XMLSchema" xmlns:samlp="urn:oasis:names:tc:SAML:2.0:protocol" xmlns:mime="http://schemas.xmlsoap.org/wsdl/mime/" xmlns:soap="http://schemas.xmlsoap.org/wsdl/soap/" xmlns:xacmlsamlp="urn:oasis:names:tc:xacml:2.0:profile:saml2.0:v2:schema:protocol:cd-01" xmlns:ds="http://www.w3.org/2000/09/xmldsig#" xmlns:xsi="http://www.w3.org/2001/XMLSchema-instance"> <wsdl:types> <xsd:schema targetNamespace="urn:oasis:names:tc:xacml:2.0:policy:schema:os" xmlns:xsd="http://www.w3.org/2001/XMLSchema"> <xsd:import namespace="urn:oasis:names:tc:xacml:2.0:policy:schema:os" schemaLocation="access_control-xacml-2.0-policy-schema-os.xsd"/> </xsd:schema> <xsd:schema targetNamespace="urn:oasis:names:tc:xacml:2.0:context:schema:os" xmlns:xsd="http://www.w3.org/2001/XMLSchema"> <xsd:import namespace="urn:oasis:names:tc:xacml:2.0:context:schema:os" schemaLocation="access_control-xacml-2.0-context-schema-os.xsd"/> </xsd:schema> <xsd:schema targetNamespace="http://docs.oasis-open.org/ws-sx/ws-trust/200512/" xmlns:xsd="http://www.w3.org/2001/XMLSchema"> <xsd:import namespace="http://docs.oasis-open.org/ws-sx/ws-trust/200512/" schemaLocation="http://docs.oasis-open.org/ws-sx/ws-trust/200512/ws-trust-1.3.xsd"/> </xsd:schema> <xsd:schema targetNamespace="urn:oasis:names:tc:xacml:2.0:profile:saml2.0:v2:schema:assertion:cd-01" xmlns:xsd="http://www.w3.org/2001/XMLSchema"> <xsd:import namespace="urn:oasis:names:tc:xacml:2.0:profile:saml2.0:v2:schema:assertion:cd-01" 25 schemaLocation="xacml-2.0-profile-saml2.0-v2-schema-assertion-cd-1.xsd"/> </xsd:schema> <xsd:schema targetNamespace="urn:oasis:names:tc:xacml:2.0:profile:saml2.0:v2:schema:protocol:cd-01" xmlns:xsd="http://www.w3.org/2001/XMLSchema"> <xsd:import namespace="urn:oasis:names:tc:xacml:2.0:profile:saml2.0:v2:schema:protocol:cd-01" schemaLocation="xacml-2.0-profile-saml2.0-v2-schema-protocol-cd-1.xsd"/> </xsd:schema> <xsd:schema targetNamespace="urn:oasis:names:tc:SAML:2.0:protocol" xmlns:xsd="http://www.w3.org/2001/XMLSchema"> <xsd:import namespace="urn:oasis:names:tc:SAML:2.0:protocol" schemaLocation="samlschema-protocol-2.0.xsd"/> </xsd:schema> <xsd:schema targetNamespace="urn:oasis:names:tc:SAML:2.0:assertion" xmlns:xsd="http://www.w3.org/2001/XMLSchema"> <xsd:import namespace="urn:oasis:names:tc:SAML:2.0:assertion" schemaLocation="samlschema-assertion-2.0.xsd"/> </xsd:schema> </wsdl:types> <wsdl:message name="saml2XACMLAuthzRequestMessage"> <wsdl:part name="parameters" element="xacml-samlp:XACMLAuthzDecisionQuery"> </wsdl:part> </wsdl:message> <wsdl:message name="WsTrustAuthzResponseMessage"> <wsdl:part name="parameters" element="wst:RequestSecurityTokenResponse"> </wsdl:part> </wsdl:message> <wsdl:message name="WsTrustAuthzRequestMessage"> <wsdl:part name="parameters" element="wst:RequestSecurityToken"> </wsdl:part> </wsdl:message> <wsdl:message name="saml2XACMLAuthzResponseMessage"> <wsdl:part name="parameters" element="samlp:Response"> </wsdl:part> </wsdl:message> <wsdl:message name="xacmlAuthzRequestMessage"> <wsdl:part name="parameters" element="xacml-context:Request"> </wsdl:part> </wsdl:message> <wsdl:message name="xacmlAuthzResponseMessage"> <wsdl:part name="parameters" element="xacml-context:Response"> </wsdl:part> </wsdl:message> <wsdl:portType name="AuthzInterface"> <wsdl:operation name="XACMLAuthzRequest"> <wsdl:input message="tns:xacmlAuthzRequestMessage"> </wsdl:input> <wsdl:output message="tns:xacmlAuthzResponseMessage"> </wsdl:output> </wsdl:operation> 26 <wsdl:operation name="WsTrustAuthzRequest"> <wsdl:input message="tns:WsTrustAuthzRequestMessage"> </wsdl:input> <wsdl:output message="tns:WsTrustAuthzResponseMessage"> </wsdl:output> </wsdl:operation> <wsdl:operation name="SAML2XACMLAuthzRequest"> <wsdl:input message="tns:saml2XACMLAuthzRequestMessage"> </wsdl:input> <wsdl:output message="tns:saml2XACMLAuthzResponseMessage"> </wsdl:output> </wsdl:operation> </wsdl:portType> <wsdl:binding name="AuthzSoapHttpBinding" type="tns:AuthzInterface"> <soap:binding style="document" transport="http://schemas.xmlsoap.org/soap/http"/> <wsdl:operation name="XACMLAuthzRequest"> <soap:operation soapAction="urn:oasis:names:tc:xacml:2.0:policy:schema:os"/> <wsdl:input> <soap:body use="literal"/> </wsdl:input> <wsdl:output> <soap:body use="literal"/> </wsdl:output> </wsdl:operation> <wsdl:operation name="WsTrustAuthzRequest"> <soap:operation soapAction="http://schemas.xmlsoap.org/ws/2005/02/trust"/> <wsdl:input> <soap:body use="literal"/> </wsdl:input> <wsdl:output> <soap:body use="literal"/> </wsdl:output> </wsdl:operation> <wsdl:operation name="SAML2XACMLAuthzRequest"> <soap:operation soapAction="urn:oasis:names:tc:xacml:2.0:profile:saml2.0:v2:schema:protocol:cd-01"/> <wsdl:input> <soap:body use="literal"/> </wsdl:input> <wsdl:output> <soap:body use="literal"/> </wsdl:output> </wsdl:operation> </wsdl:binding> <wsdl:service name="AuthzService"> <wsdl:port name="AuthzEndpoint" binding="tns:AuthzSoapHttpBinding"> <soap:address location="https://localhost:1104/axis2/services/AuthzService.AuthzEndpoint/"/> </wsdl:port> </wsdl:service> </wsdl:definitions> 27 28