1
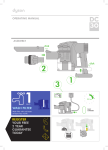
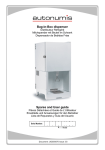
Bravanti machine
Operators Manual
This guide contains instructions on
how to use Autonumis Bravanti
machines
Document: PA000734 Issue: 2
Note:
Installation of this equipment should be undertaken by a trained and authorised
engineer and is detailed in a separate installation and servicing manual.
This operators manual is a guide to machine loading, setting and maintenance
only.
Contents
Specification
Overview of controls
Concentrate loading
Cleaning & maintenance
End of life disposal
2
3
9
11
14
Due to our policy of continual product improvement any diagrams and
illustrations of the product and/or its component parts contained within this
document may appear different from that/those supplied. However the
contents of this document and the functionality of the product and/or its
components that it describes remain unaffected.
1
Specification
Weight:
Electrical:
Water connection:
Water pressure:
Refrigeration:
Brix adjustment:
Pump:
Portion control:
Product capacity:
Dry = 55.5 kg Packed = 62.5kg
Installed = 64.5kg
UK/EU 230v 50hz
3/4” BSP hose connection
Minimum dynamic water pressure 2.5 Bar
Maximum dynamic water pressure 8 Bar
Pressure regulated in machine to suit site
conditions.
R134a Hermetic compressor
Concentrate storage compartment chilled to 4°C
Electronic control
Easy load peristaltic pump with 3 roller rotor 24v DC
Motor. Fits silicone tube 6.4mm I/D x 2,4mm wall
Programmable drink shot size or free flow
2 x 5 litre disposable bag in box
2
Overview of Controls
Flush Mode Switch
Light switch
Door switch
Set button
+/1 button
Fig 1.
-/2 button
The three buttons shown in Fig 1 can be used to amend and set the
following parameters:
1. Drink strength (Brix level)
2. Drink shot size (drink volume)
3. Concentrate low warning light
4. Machine lockout
See later in the manual for more details.
3
Setting of drink strength (Brix)
Drink strength depends on two factors - concentrate delivery and water
delivery.
Concentrate can be adjusted between ‘High’ and ‘Low’ pump speeds.
Water can be adjusted between 0 and 100 on the digital scale. 0 = less water
(stronger drink), 100 = more water (weaker drink).
These two elements can be adjusted by pressing the buttons on the control
panel as shown in Fig 1.
1. Ensure display reads ‘Machine ready’.
2. Press and hold the ‘+/1’ button or ‘-/2’ button for 3 seconds
depending on whether the left hand (1) or right hand (2) product is
being set. In this example we will set the left hand product (1).
3.Display will show ‘left’ until button is released. It will then show
pump speed and water setting eg. High 0030
4. Pressing the ‘+/1’ button will then toggle between ‘High’ and ‘Low’
pump speed settings.
5. Press the ‘Set’ button to confirm pump speed.
6. Display will now show the water setting. Press the ‘+/1’ or ‘-/2’
buttons to increase or decrease the setting.
7. Press the ‘Set’ button. Display will now show the pump speed
and water setting eg. High 0025.
8. Press ‘Set’ button again to confirm. Display will now read
‘Machine Ready’.
Note: Machine will not operate unless the display reads ‘Machine Ready’.
When adjusting the Brix level the first drink dispensed should be discarded.
The Brix level should always be checked using a good quality refractometer.
4
Drink shot size (drink volume)
Your machine will be fitted with one of the following dispense panels:-
Multiple drink dispense volumes
Single drink dispense volume
The machine can be set to give up to three different volumes of drink per
side or can be set to free flow.
Note: Dispense panels shown with water option.
5
Drink shot size (contd)
1. Ensure display reads ‘Machine ready’.
2. Press and hold the ‘Set’ button (see Fig 1) for 3 seconds until the
display reads New Bag?’.
3. Press either the ‘+/1’ or the ‘-/2’ buttons until the display reads
‘set water shots’.
4. Shut the door and place the required size glass under the
dispense nozzle on the drip tray.
5. Press and hold the dispense button on the front of the machine
until the glass is filled to the required volume.
6. Open the door. The display will be reading the length of time of
dispense eg. 0500 = 5 seconds. This time can be amended by
pressing the ‘+/1’ or ‘-/2’ buttons.
7. The free flow option can be set by amending the time setting to
0000.
8. Press ‘Set’ button and the display will return to ‘Set water shots’.
The procedure can now be repeated to set the dispense volumes
for other dispense buttons.
9. Press the ‘Set’ button to return the machine to ‘Machine ready’
status.
Note: Machine will not operate unless the display reads ‘Machine Ready’.
If water option is available dispense is free flow only.
6
Setting of low concentrate warning
An indication that the bag in box concentrate is nearly empty can be set in
the machine. A red warning light will be illuminated when approx 10% of the
concentrate remains. This feature is not available when using refillable
containers.
Low concentrate warning lights
To set the low concentrate warning lights:
1. Ensure display reads ‘Machine ready’.
2. Insert a new pack of concentrate into the machine.
3. Press and hold the ‘Set’ button for 3 seconds. Display will read
‘New Bag?’.
5. Press any left hand dispense button to re-set the left hand pack
or any right hand dispense button to re-set the right hand pack. The
display will briefly show which side has been set (left or right) and
then ‘Saved’ before returning to ‘Machine Ready’.
The low concentrate warning light will go out.
7
Setting the machine to Flush mode
Setting the machine to ‘Flush’ mode enables the dispense valves to be cleaned
without removal from the machine.
1. Ensure display reads ‘Machine ready’.
2. Set the ‘Flush Mode Switch’ (see Fig 1) to ‘Flush’. The display will
read ‘Flush’.
3. Place a jug beneath the dispense valve to be flushed. Press and
hold any of the left or right dispense buttons on the front of the
machine to flush water through either the left or right dispense
valves.
Machine operates in free flow mode when set to ‘Flush’, water will
be dispensed until the dispense button is released.
4. Set the ‘Flush mode Switch’ (see Fig 1) back to the ‘Run’ position
to return to ‘Machine Ready’.
Setting the machine to Lockout
The machine can be locked out when not in use. In this mode no product will be
dispensed.
1. Ensure display reads ‘Machine ready’.
2. Press and hold the ‘Set’ button for 3 seconds. The display will
read ‘New Bag?’.
3. Press either the ‘+/1’ or the ‘-/2’ buttons until ‘Lock Machine?’ Is
displayed.
4. Press and hold the ‘Set’ button for 3 seconds until ‘Out of Service’
is displayed. Machine is now in lockout mode.
5. To exit from Lockout mode, press and hold the ‘Set’ button for 6
seconds until ‘Machine Ready’ is displayed.
8
Concentrate loading
Note: The concentrate carton has been removed from the following
photographs for clarification purposes.
1. Remove the round perforated area from the bottom of the concentrate
carton and pull out the tube and connector.
2. Attach the clip provided in the sales pack approx 10mm from the bottom
of the tube. Leave the small plastic cap in the end of the tube.
3. Screw or push the connector on the end of the tube into the connector on
the bag (dependent on the type of connector).
4. Open the peristaltic pump. Position the carton into the machine and push the
groove in the connector into the claw on top of the dispense box as far as it will
go.
9
Concentrate loading (contd)
If the type of connector shown in the photograph below is fitted, the top
groove in the connector should be used to locate in the claw.
Claw to locate in top groove
5. Feed the silicone tube through the
peristaltic pump and snap the pump
door shut. A distinct ‘click’ will be
heard.
6. Remove the clamp and plastic cap
from the end of the tube and fit over
the stub pipe on the valve assembly.
The tube should reach the bottom of the
stub pipe and should not be kinked or
creased.
Tube in correct position
Valve assembly
10
Cleaning and maintenance
Daily cleaning routine:
l
The dispenser should be flushed through with water every
day or when the concentrate type is changed. A jug should
be placed beneath the relevant dispense valve prior to
flushing.
Set the dispenser to ‘Flush’ mode (see page 8 for details)
and dispense at least 1 litre of water from each valve.
l
Empty the drip tray and wash the tray and grill thoroughly
with a mild detergent. Rinse in clean, warm water.
l
Wipe down the drip tray area and the exterior cabinet with a
clean damp cloth.
Weekly cleaning routine:
l
Remove the concentrate boxes, shelf and dispense module.
Wipe all internal cabinet surfaces with a clean, damp cloth.
l
Wash the shelf thoroughly using a mild detergent and rinse
off in clean, hot water.
l
Remove both valve assemblies, disassemble and wash
thoroughly in mild detergent. Rinse off in clean, hot water
and thoroughly dry. Apply a small amount of silicone grease
provided to the ’O’ring seals and reassemble.
11
Removal of the dispense module
1
2
The dispense module sits on 4
pins, 2 each side of the inner
cabinet.
Lift the front of the dispense
module upwards. It will rotate on
the rear pins.
3
4
Pull the dispenser forward with
the front still elevated.
Lift the front and rear of the
module until clear of the pins.
Remove the water and electrical
connections by depressing clips.
12
Dispense module connections
The dispense module has one water and two electrical connections to the
rear of the machine.
Electrical connections
Water connection
When reconnecting the water a positive ‘click’ should be heard when fully
located.
When fully connected, the dispense module should be horizontal. If it is
angled upwards it is not sitting down fully on the location pins. (See previous
page)
Français
11
13
End of life disposal
This unit contains fluorinated greenhouse gas HFC-134-a regulated by the
Koyoto protocol, the warming potential of which is 1300, and therefore must
be disposed of responsibly.
14
Autonumis Ltd, Cirencester Rd,
Tetbury, Gloucestershire.
GL8 8SA United Kingdom
Tel +44 (0) 1666 502641
Fax +44 (0) 1666 504397
Appln
0001
684 89
15