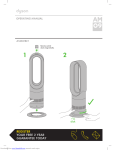
1
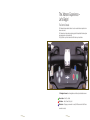
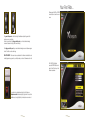
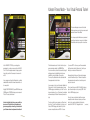
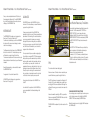
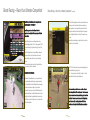
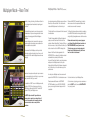
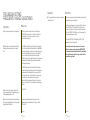
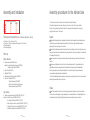
UserManual_Cover:UserManual_Cover 30/04/2010 08:42 Page 1
innovation
www.trixter.net
Trixter North America
P.O. Box 611
Brockton,
MA 02303 US
T: +1 888-497-7234
E: [email protected]
Trixter Europe Ltd.
Trixter House, Warren Business Park
Knockdown, Gloucestershire
GL8 8QY UK
T: +44 844 979 4567
E: [email protected]
|
immersion
|
Xdream
V3.1
interactivity
Virtual Personal Trainer - User Manual
This is the Xdream!
The age of the interactive and immersive fitness product is here.
We believe the Xdream is the first fitness product to successfully integrate accurate
real-life simulation, total body cardiovascular conditioning and a motivational
personalised training program.
Real feel gears, brakes, handlebars, pedals, cranks and seat sensors enable each
move the rider makes to be accurately portrayed within the experience.
The Xdream’s resistance accurately depicts the terrain gradients, track surfaces and
conditions.
The advanced software programming uses challenge and reward motivation within an
expert personal training system. Get ready to be challenged by the realistic virtual trail
rides, your artificial intelligence competitors, or by the real members beside you. You
will be rewarded with new trails, features and levels.
Motivation through justified Reward is what the Xdream is all about!
You will ride through Parkland trails, climb up Highland ascents, dodge rocks in
Semi-Arid or ride over sand dunes in the Desert. You will also be rewarded for doing
what comes naturally to a mountain biker - coming up out of the saddle and
pumping the handlebars to get up that ascent - the Xdream will boost your pedalling
power with a POWER SUPERBOOST making you go even faster as your reward!
The Xdream will have you burning more calories and working more muscles than you
can imagine, and will help you develop true total body fitness. The design of your
Xdream is based on a real mountain bike to give you smooth resistance, real-world
riding feel and a high degree of bike adjustment - making it ideal for everyone,
no matter what your size or current fitness level, giving you a total body workout.
Trixter is enabling indoor cycling and fitness to undergo a true revolution and you are
a part of this; welcome to the Xdream global tribe. With the Xdream and Xdream
program you will gain improved core and upper-body muscular conditioning, within a
powerful cardiovascular workout whilst, at the same time you are immersed in our
virtual world, whether it’s riding through the varied terrain of Parkland, or weaving in
and out of tight track turns in the Desert!
page 2
Safety Information
• ALWAYS ensure the bike is properly set up for your body type. The Xdream offers up/down
WARNING
TO AVOID DEATH OR SERIOUS PERSONAL INJURY
• BEFORE beginning any fitness or conditioning program, consult with your
physician or health official. This will establish the proper conditioning or fitness
program that is appropriate for your age and physical condition.
• BE SAFE. Prior to commencing each ride answer these questions:
• Have you have been ill recently?
• Have you have felt dizzy recently?
• Have you have felt breathless recently?
• Have you have had any chest pain recently?
• Do you have an injury?
• Are you pregnant?
• Is there any reason why you think they should not exercise?
• Are you over 35 years old and do not exercise regularly?
• Have you have been told by a health practitioner that they shouldn’t exercise?
IF YOU ANSWER “YES” TO ANY OF THE ABOVE QUESTIONS YOU MUST
SEEK FURTHER ADVICE AND CLEARANCE FROM A MEDICAL
PROFESSIONAL PRIOR TO UNDERTAKING AN XDREAM RIDE.
• ALWAYS read the user’s manual fully and follow all instructions, which were written to
ensure your safety and to protect the cycle.
Note for Club Owners: To ensure the proper use and safety of the Xdream, make sure that
all users have access to and refer to this manual. The manual should be made available to all
users.
• ALWAYS operate the Xdream only on a solid, level surface in a well lit and well ventilated
area. Make sure the seat and handlebars are securely fastened before use.
• NEVER allow children on the Xdream or allow children to play unsupervised near the bike.
Serious injury could occur due to a child’s curiosity or interest in the moving parts of the cycle. (continued)
and fore/aft adjustments that are clearly marked to ensure a quick and easy custom fit for
each workout. Ensure that the rider compartment is securely tightened before use.
• ALWAYS check the cycle before each use.
• NEVER use the cycle if it is not completely assembled or is damaged in any way.
• NEVER use an Xdream when ill or in a weakened condition.
• NEVER exceed the weight limit for this bike. The weight limit for this bike is 300 pounds. Do
not use the Xdream if your body weight exceeds 300 pounds.
• ALWAYS wear proper attire and footwear that fully covers your feet. Long hair should be
tied back. Ensure that your laces are tucked into your shoes.
• ALWAYS warm up before beginning to exercise or at the start of a workout.
• ALWAYS use care when getting on and off the Xdream. Always wait until the pedals are
completely stopped before removing your feet from the pedals or dismounting. Do not stand
or climb on the handlebars.
• ALWAYS ride or allow the Xdream to be ridden only under the supervision of a qualified
Instructor.
• ALWAYS keep hands away from moving parts and always ensure that hands are never
placed in a position where these is no rubber handlebar grip.
• NEVER overexert yourself or work to exhaustion. If you feel faint, dizzy, short of breath, or if
you have chest or other pains, STOP IMMEDIATELY! Consult your physician before you
continue.
• ALWAYS ensure that you have a water bottle with at least 300ml beverage and wear a
towel in the rear pocket of your riding top to absorb sweat from your body and the handlebars.
• NEVER ride the Xdream in a standing position at high revolutions per minute (RPM).
• ALWAYS maintain your pelvis over the centre line of the Xdream.
• NEVER adjust the resistance of the flywheel and the resistance of the X-Bars Handlebar
System when standing.
• NEVER use accessory attachments that are not recommended by the manufacturer – such
attachments might cause injury or damage to the bike and will affect the warranty of the Bike.
• Please also note as a gesture of courtesy to the next user and to maintain the high quality of
the Xdream, please ensure that it is wiped down after each use.
• If any issues arise affecting the performance of the Xdream, please inform the instructor
immediately and ensure that wear parts are checked regularly.
THE SAFETY LEVEL OF THE EQUIPMENT CAN ONLY BE MAINTAINED IF IT IS
REGULARLY CHECKED AND EXAMINED FOR WEAR AND DAMAGE.
THIS SAFETY INFORMATION AND USER’S MANUAL GENERALLY DO NOT REPLACE THE
NEED TO BE ALERT AND TO USE YOUR COMMON SENSE WHEN USING THE XDREAM!
(continued)
page 3
page 4
Safety Information continued
Contents
2 ....... Introduction
-
This is the Xdream!
5 ....... Safety Information
Free Space Required
8 ....... Xdream Essentials
The space required for the installation of one Xdream is 1630mm x 1000mm
This is the free space recommended for the safe and optimal operation of an Xdream.
-
X-Bars and freewheel
9 ....... Essential Fitness Elements of the Xdream
Interval training, ‘core’ stability and Total Body Workout – muscle usage
10 ....... The Benefits of Exercise
12 ....... Setting up the Xdream
Maximum Weight Limitation
The weight limit for the Xdream is 136kg or 300 pounds.
Do not use the Xdream if your body weight exceeds 136kg or 300 pounds.
- The seat, the rider/pedal interface and handlebar height
14 ....... Turning o n /o FF
16 ....... The Xdream Experience – Let’s begin!
The control console, the gear shifters and headphone socket.
18 ....... Your First Ride...
Speed
19 ....... Quick Start Mode
The Xdream is a piece of speed independent training equipment (described in EN 957-1).
The braking torque is adjusted by the Xdream software rather than the pedalling speed.
20 ....... Registering and Creating your Personal User Account
24 ....... Xdream Fitness Mode – Your Virtual Personal Trainer!
27 ....... Trail Selection and Race Set Up
Youth User Safety
28 ....... Assistance Setup – Getting Used to your Xdream!
This appliance is not intended for use by persons (including children) with reduced
physical, sensory or mental capabilities, or lack of experience and knowledge, unless they
have been given supervision or instruction concerning use of the appliance by a person
responsible for their safety.
29 ....... Removal of Assistance Settings
30 ....... Let’s get on with the Race!
31 ....... Finishing a Race
-
Session data screen and graphical output of your last race.
33 ....... The Reward/Ride Tips videos
Children should be supervised to ensure that they do not play with the appliance.
This appliance is not suitable for therapeutic purposes.
34 ....... Logging in as a Guest
35 ....... Adjusting Assistance Settings
36 ....... Training Mode
Certificate of Conformity EMC
This certificate of conformity is based on an evaluation of a sample of the
product as specified in the certificate. This is to certify that the tested
sample is in conformity with all provisions of Annex III of Council Directives
89/336/EEC, referred to as the EMC Directive. The holder of the certificate
is authorized to use this certificate in connection in with the EC declaration
of conformity according to Article 10.1 of the Directive.
37 ....... Ghost Racing – Race Your Ultimate Competitor!
39 ....... Multiplayer Mode – Race Time!
41 ....... Create Race - Being Race Host/Controller
43 ....... How to join a Multiplayer Race
44 ....... Race Handicap
45 ....... Troubleshooting - Frequently asked questions
47 ....... Assembly and Installation
51 ....... Xdream Recalibration
page 5
Xdream Essentials
The Xdream is unique – there really is no other interactive indoor bike like it.
That’s because it has been designed to feel just like an outdoor bike and deliver an
unrivalled workout.
The Xdream is a virtual reality cycling program that will bring you an awesome
workout guided by our specially created software and written music scores.
So what makes it so special?
X-Bars
A feature of the Xdream is the unique X-Bar handlebar system. This allows the
handlebars to arc from side to side against adjustable resistance, a movement that
allows you to simulate making turns and ‘pumping’ the bars from side to side.
Customer Support Contact Information
This brings several advantages to your workout. Firstly and most obviously, you will
now be using the muscles of your upper body to make the bars move from side to
side. Secondly, the fact that your arms are no longer rigid means that the muscles of
your abdomen and lower back – the ‘core-stabilisers’ are having to work harder to
maintain your body over the bike. This in effect means that you are now training
these muscles to become stronger.
Please contact us should you encounter any problems, or if you have any queries, via the contact points below:
Indoor exercise can be boring – but not anymore!
UK & Europe
USA & The Americas
Email Support: [email protected]
Telephone Support: +44 844 979 4567
9am - 5pm (GMT) Monday – Friday
Email Support: [email protected]
Telephone Support: +1 888-497-7234
9am - 5pm (EST) Monday – Friday
Trixter Europe
Trixter House, Warren Business Park
Knockdown, Tetbury
Gloucestershire, GL8 8QY, UK
Trixter North America
P.O. Box 611
Brockton,
MA 02303, USA
page 7
Freewheel
Just like a regular outdoor bike the Xdream allows you to stop pedalling and
‘freewheel’ or ‘coast’ without the flywheel momentum turning the pedals for you. In
other words, the only way the pedals can move is from your muscles doing the work.
The fact that you can stop pedalling at anytime is a useful safety feature, but more
importantly the freewheel system will teach you smooth pedalling technique and work
your leg muscles more effectively over the pedal revolution.
page 8
Essential Fitness Elements of the Xdream
Interval training
The trails available on the Xdream are based on the same method of interval training
used by elite endurance athletes. Each trail has been designed and professionally
structured to provide a total body interval based workout session. Artificial
Intelligence riders provide intelligent pace setting for each individual based on the
individual’s unique level of fitness and performance.
This form of fitness training has a powerful effect on cardiovascular or aerobic fitness
– so crucial to good health and the prevention of many illnesses and diseases such
as coronary artery disease. Interval training is also a very powerful means of reducing
body fat levels as it results in higher calorie consumption both during the exercise
and also after as your body generates additional heat and goes through an energy
demanding recovery process.
The Xdream is compatible with Polar heart rate monitors and your heart rate will be
shown on the race screen and will be recorded in the session data of each race.
‘Core’ Stability
Due to the fact that handlebars on an Xdream move and the pedal system utilises a
freewheel, your stability on the bike is maintained by the muscles of the lower back
and pelvic area rather than the arms, shoulders, and legs. Therefore while
undertaking an Xdream ride you will be training these muscles that are so crucial to
the health of the lower back and stability for most sports activities.
Total Body Workout – Muscle Usage
Total upper and lower body extremity muscle groups with focus on core muscle
engagement of the Abdominals and Obliques. Upper body Deltoids, Trapezius,
Latissimus Dorsi, Biceps, Triceps, Forearm Flexors, Extensors, and the lower
extremity Quadriceps, Hamstrings, Gastrocnemius, Soleus and Gluteal muscle
groups.
page 9
The Benefits of Exercise
Exercise helps reduce your risk of getting any of a handful of diseases and, more
importantly, of early death. You'll also feel better, perform better, sleep better and be
more at peace with yourself and the world. Just look at the numerous health benefits
that regular use of an Xdream may help you gain…
Exercise is good for your heart
The heart is a muscle. Like other muscles, its performance improves when it is
regularly challenged by exercise. The heart responds by becoming stronger and more
efficient. That's why athletes have slow heart rates, around 60 beats per minute.
Exercise is good for your arteries and veins
Exercise reduces the amount of harmful low-density lipoprotein (LDL) cholesterol and
fats in your blood. It increases the flexibility of the walls of blood vessels, thus
reversing hardening of the arteries (known as atherosclerosis). This helps to lower
blood pressure. There is even evidence that regular exercise helps evacuate LDL
cholesterol and other constituents of the plaque that accumulate on the inner
surfaces of blood vessels. This plaque is what clogs arteries, cuts off blood flow, and
is a major cause of heart attack and stroke.
Exercise is good for your lungs
Working harder increases the lungs' capacity to move air in and out. As a result,
more oxygen is drawn into the body and more carbon dioxide and other waste gases
are expelled. Regular exercise helps prevent the decline in oxygen uptake that occurs
naturally with aging and as a result of inactivity. But remember, when you stop
exercising, you lose all improvements in the functioning of your lungs in as few as
three months.
Exercise is good for diabetics
By helping muscles to take up glucose from the bloodstream and use it for energy,
exercise prevents sugar from accumulating in the blood. By burning calories, exercise
helps control weight, an important factor in the management of type 2 diabetes.
page 10
Exercise helps control your weight
Muscles need energy to work. Energy is measured in calories. By burning off
calories, exercise helps balance the calories taken in as food. When we are
sedentary, the balance is usually tipped toward an excess of calories, which
accumulate as fat and additional pounds. When you are physically active, there may
be a deficit of calories, which takes fat away and lowers weight. Lowered weight
reduces the heart's load and is beneficial in diabetes.
Exercise strengthens your bones
When you exercise, bones and muscles work together. Just as muscles grow
stronger when physically stressed, bones also respond by getting stronger. Exercise
also increases bone density, which helps prevent osteoporosis, the condition in which
bones lose density, weaken, and become porous and very fragile.
Exercise enhances your emotional well-being
Most people feel calm and have a sense of well-being after
they exercise. Any anxieties they had before exercising are
tempered or even gone. They feel better about themselves,
less tired, more productive at work and more interested in
sex. There seems to be a chemical reason behind these
emotional benefits. Exercise, according to one theory,
releases beta-endorphin, a natural substance in the body
that is hundreds of times more potent than morphine.
This begins to occur just 12 minutes into a workout.
Another theory points to serotonin as the cause of the
exercise high. Increased levels of serotonin in the central
nervous system are associated with feelings of well-being,
heightening of appetite, and lessening of mental depression.
Setting up the Xdream
Before your first Xdream experience, you need to get your riding position set-up right
and then learn the controls and movements. Let’s start with the seat height.
The Seat Height
Using the seat quick release lever, slide the saddle so it is lined up with the number 3.
Centralising the saddle in line with the seat post.
• Stand next to the Xdream and adjust the seat by turning the knurled adjuster
mechanism anti-clockwise. Adjust the saddle so the top is in line with the top of
your iliac crest – this is the bony tip of your pelvis at the side of your waist.
• Once position turn the adjuster clockwise to tighten to mechanism.
• Now sit on the bike and place the ball of your foot on the pedal. This is the correct foot position. This means you should not necessarily have your toes all the way
to the end of the toe-clip. Slowly pedal.
At correct height the riders’ leg should have a slight bend at the bottom of the pedal
stroke but your hips shouldn’t rock. You should be able to drop your heel to straighten your leg out completely. If your hips rock from side to side you will need to lower
your seat. If your leg is not fully straight at the bottom of the pedal stroke then raise
the seat.
If your seat is too high: Your hips will rock leading to the ligaments in the sacral iliac
joint area being permanently lengthened and the sacral iliac joint dysfunction can
occur causing sheering of the ligaments.
If your seat is too low: Your leg will not extend to the required length placing greater
stress on the patellar tendon; the psoas can get over developed and shortened
causing posterior pelvic tilt. This can lordotic posture, tonic hamstring and fasic lower
abdominals. This obviously leads to deviation in postural alignment causing muscle
imbalances that can lead to back problems.
Seat Lateral Positioning (Fore/Aft)
• Place your feet on the pedals and turn the pedals until they are at the 3 and 9
position.
• Now look down in line with the front of your knee cap of the foremost leg. You
should be able to see the pedal axle directly below the front of the knee cap.
• Use the seat quick release lever; slide the saddle rail forwards or backwards until
the front of your knee is in the correct position over the pedal axle. (continued)
page 11
page 12
1
Setting up the Xdream
Turning ON/OFF
The Rider/Pedal Interface
When pedalling, the ideal foot position is to have the ball of the foot directly over the
pedal axle. With the Xdream you can use normal cross-training shoes, or special
‘clip-less’ cycling shoes which have a stiffer mid-sole and Shimano® SPD - compatible
cleats to allow them to fix securely to the pedal.
Turning ON
1 Please turn on the COMPUTER SECTION of your Xdream FIRST
by tapping the button that can be found directly inside the circular
hole which is at the front of the bike. You will then notice the
computer booting up on the screen.
If you are using lace-up fitness shoes make sure that your laces are safely tucked out
of the way.
2 Next please turn on the BIKE SECTION of your Xdream
by flicking the switch near the back foot of the bike to 1, ensuring that
nobody/nothing is touching ANY part of the bike when turning the bike on.
Handlebar height
Finally you need to set your handlebar height. This should have the centre handlebar
clamp in line with or above the saddle height. Use the adjuster knob to raise or lower
the X-Bars. Ensure that you don’t extend the handlebar above the ‘max’ marking.
Once you have your saddle and handlebar positions set, make a note of the number
etched on the side of the seat post, the saddle rails and the handlebar stem. Now it
will be easy to set the right position in future.
2
Turning OFF
1 Please turn off the COMPUTER SECTION of your Xdream
by tapping the button inside the circular hole.
2 Next turn off the bike section of your Xdream
by flicking the switch near the back foot of the bike to 0.
page 13
page 14
The Xdream Experience –
Let’s Begin!
The Control Console
The Xdream has been created to ride as true to a mountain bike as is possible in an
indoor environment.
The Xdream has a brake system and gearing system that replicates the brake system
and gearing system of a mountain bike.
The right brake is your front brake and the left brake is your back brake.
The Navigation Arrows allow for navigation around the set up and selection screens
Green button – Start, Go, Select
Red button – Abort, Cancel, Stop, Quit
Blue button – Changes your view when in a race (Third Person view to First Person
view and vice versa)
page 15
page 16
Your First Ride...
Please press the RED or GREEN
console button to view the main
menu.
The gear shifter pods on the left and right handlebars replicate the gear shifter
system as on a normal bike.
As with a normal bike, the left gear shifter pod is your front derailleur allowing
movement between the High, Mid, Low chainring.
The right gear shifter pod is your rear derailleur allowing movement between gears
levels 1-9 within a certain chainrings.
DO NOT WORRY if this sounds too complicated as the Xdream is defaulted to automatically generate your gears for you initially unless you instruct it otherwise so fear not!
With GUEST highlighted,
press the GREEN button and
select Quick Start for your first
Xdream experience
If you wish to plug headphones directly into the Xdream, a
Headphone socket is located slightly higher than the top of the
handlebar post, as highlighted by the headphone icon above it.
page 17
page 18
Registering and Creating your Personal User Account
Quick Start Mode
On completion of your first Xdream race, this screen
will appear. To enable the Xdream to become your
Virtual Personal Trainer you should register and
create your own personal user account. This will
enable the Xdream to record all of your activity and
therefore allow you to progress your fitness levels,
just like a real personal trainer would!
Press the GREEN button to
CONTINUE and you will see how
quick and easy it is to create
your own personal user account!
Quick Start is, as you would imagine, the most basic
concept of the Xdream - It does what it says on the tin!
In Quick Start mode, the Xdream will randomly choose
one of four Green category trails to ride. The rider has a
choice of nine race lengths and 20 difficulty levels to
choose from. The higher the difficulty level, the faster
your five race competitors will cycle thus making the
race harder to win! The Xdream will automatically
generate your gears for you depending on the terrain
and gradient that you are riding on.
In Quick Start mode, the Xdream is defaulted to assist
you in your steering around the trail.
The fundamental concept of the interactive Xdream is
that YOU are in CONTROL of the STEERING.
Quick Start Mode assists you by not allowing you to ride
too far off the course, much like when you had
stabilisers on your first bike as a child!
This is mountain biking though so you can and will
crash, on the screen only, if you ride into rocks, bridges
or posts for example.
USERNAME - You will need to enter this username
every time you use the Xdream so choose a
username that is not too long and easy to remember!
There is no blood though so please do not be alarmed!
Using the navigation arrow buttons, highlight the first
letter of your user account name that you want and
press the GREEN button to select that letter.
Quick Start is ideal for getting used to the feel of
the Xdream and the feel of the Xdream screen
visuals. You cannot, however, progress your
fitness level or monitor your performance using
Quick Start.
Continue to navigate using the arrow buttons and
selecting with the GREEN button until you have
entered your username.
To begin your Quick Start race, select your chosen race
length and your chosen difficulty level. Highlight the
START button and press the GREEN button.
Once you have entered your username, navigate to
the ENTER key on the keyboard and click GREEN to
select.
(continued)
page 19
page 20
HEIGHT - Next enter your height using the arrow
keys to increase or decrease the value.
Press GREEN to move to the NEXT screen.
WEIGHT - Enter your weight and press GREEN to
move on.
SEX - Select your sex and press GREEN to move on
This screen will appear, when you are
happy with your chosen username,
press the GREEN button to move on
to the NEXT screen.
This screen allows you to review your entries,
and edit them if necessary, before you save
your profile.
DATE OF BIRTH - Again using the navigation arrows,
select your date of birth following the date convention
of DDMMYYYY as noted on the screen.
This is your basic profile complete so if you do
not wish to customise your profile any further,
press GREEN to CONFIIRM your profile and it
will be saved.
The slashes will appear automatically between the
fields. Once done, navigate to ENTER and press
GREEN.
Press GREEN a second time in order to move on to
the NEXT input screen.
Every detail in your user profile, except for your
username can be changed at any time by
selecting CHANGE USER SETTINGS option.
The user fields are mandatory therefore
your user profile will not be saved
unless the required fields are completed.
Should you wish to customise your user further,
highlight ADVANCED and press GREEN. (continued)
page 21
page 22
Xdream Fitness Mode – Your Virtual Personal Trainer!
This screen will appear as soon as the tutorial
finishes or whenever you log into your user account
and select Xdream Fitness Mode.
Your unique user profile will become a permanent
record of each and every race you ride in Xdream
Fitness Mode and how you perform in each race.
In the ADVANCED OPTIONS, you can change the
appearance of your rider on screen, and turn the MUSIC
On or Off. Use the navigation arrows to change your skin
tone, and/or your bike kit for example – have some fun
with it!
As you progress up through the fitness levels, you will be
rewarded with new ride kit and new bikes so watch out
for new options!
Highlight CONFIRM CHANGES, press GREEN and press
GREEN again to CONFIRM and save your user account.
That’s it! Your user profile is done!
A short tutorial will play after your user profile has
been saved. This tutorial is very informative and
gives some great tips on how to get the best out of
your Xdream workouts so please watch and learn!
page 23
The Matrix screen above is the first of four tiers of your
personal workout schedule, the BEGINNER tier.
You can view the map of each trail, as well as its length
and biggest ascent by highlighting the trail you are
interested in, using the arrows on the console.
The map of the particular trail and its other details will
then appear above the trail matrix.
As a new user, not only is your fitness level defaulted to
Fitness Level 1 but only the easiest category of races,
GREEN category, are available to you to ride. The other
layers are locked out to you. This is where the motivation
and reward aspect of Xdream Fitness really comes into
play!
The only way that you can progress your Fitness Level
from Level 1 to Level 2 and beyond, is by riding one of
the four GREEN category rides, beat all of your five
onscreen competitors and come FIRST in the race.
page 24
If you come FIRST in the race, you will have exceeded
the fitness level criteria for Fitness Level 1 and thus you
will start your next race at Fitness Level 2.
Be warned though that as your Fitness Level increases
so do the fitness levels of your ‘OnScreen Competitors’ these pacemaker riders are there to motivate you and
push you to improve!
The only way that you can UNLOCK the BLUE category
layer of races and beyond, is by coming FIRST in all of
the four GREEN category races.
So not only are you motivated to beat the onscreen
competitors and win the races to improve your fitness
levels, but you are also motivated by the desire to
access the LOCKED OUT categories of trails.
(continued)
Xdream Fitness Mode – Your Virtual Personal Trainer! (continued)
Once you have completed and won all 20 trails, and
thus progressed to fitness level 20 on the BEGINNER
tier, you will then be faced with a new tier, and a new
challenge - the INTERMEDIATE tier.
INTERMEDIATE
The INTERMEDIATE tier allows you to progress from
fitness level 21 through to fitness level 40.
You will need to do exactly as you did in the BEGINNER
tier and win all four races in each category in order to
unlock the next category.
The difference being that all races in the INTERMEDIATE
tier last for a minimum of 10 minutes before your race
will finish when you pass through the finish line.
The onscreen competitors will of course continue to get
faster and faster, and harder to beat, as your fitness level
increases!
ADVANCED
ADVANCED All races in the ADVANCED tier last a
minimum of 20 minutes before your race will finish when
you pass through the finish line.
You guessed it – You are then faced with the
ADVANCED tier which allows you to progress from
fitness level 41 through to 60.
I have just won the last race in the ADVANCED tier –
is that it?
I am afraid not! On completion of the ADVANCED tier,
you are presented with the ultimate challenge of the
PRO tier!
page 25
Best Position/Fastest Lap Time Button
You are able to toggle between two different views on the
track matrix. The two views are BEST POSITION or
FASTEST LAP TIME. You can change the view by
highlighting the BEST button which is found to the left of
CHANGE USER SETTINGS button and pressing GREEN.
Your BEST RACE POSITION per track is shown as the
default view.
It becomes very important in the ADVANCED tier
especially to begin to use your OnScreen competitors as
pacemakers. It is the winning of the race that counts so
you can pace yourself and conserve your energy by
staying with the pack and riding with your competitors.
As long as you ensure you cross the finish line first at the
end, then that is all that matters for you to be able to
progress to the next fitness level!
On every occasion that you complete a category (layer
of four trails), as a reward a RIDE TIPS video sequence
will play where you will be rewarded for your all efforts
and energy with new ride kit and new bikes, which you
can then select in your user profile. You will also be
presented with some very useful ride tips to help in your
challenge to become the best Xdream rider out there!
These tips vary from how to get the maximum benefit
from your brakes, to reminders to search for short cuts
on the trails, to when to update your user profile.
So what happens when you have won all the races in
the INTERMEDIATE tier?
Xdream Fitness Mode – Your Virtual Personal Trainer! (continued)
The FASTEST LAP TIME view will show your fastest lap
times in comparison to the fastest lap time done by a
fellow user in that current calendar month.
For example, 3.03 (-0.23) means your fastest lap time is
3.03 mins for that track and that your time is 23 seconds
FASTER than the current fastest lap time for that track, in
that calendar month.
PRO
This is where the hard work really begins!
Each race is now a 30 minute minimum race before your
race will finish when you pass through the finish line.
The PRO tier allows you to progress from fitness level 61
through to 80 if you can manage to keep up with those
annoyingly fast On Screen competitors at this stage! You
will need all the energy you can muster to win races in the
PRO tier!
As an extra reward for reaching the PRO tier, you will see
that a new mode called TRAINING MODE will unlock in the
main menu and be available to you.
CHANGING USER PROFILE SETTINGS
You can change your user profile at any time when you are
on the trail matrix screen just by highlighting CHANGE
USER SETTINGS and pressing the GREEN button.
TRAINING MODE is explained fully in a later section of the
manual.
Make the change(s) you wish to, highlight SAVE and press
the GREEN button.
page 26
Trail Selection and Race Set Up
Assistance Setup – Getting Used to your Xdream!
Select the trail you wish to ride from the Trail Matrix by highlighting it, then press the GREEN button.
We understand that it can take a couple of races for
riders to really get to grips with how the Xdream handles.
We therefore give new riders special Assistance
Settings to help them through this exciting time, in the
same way that you had stabilisers on your first bike as
a child!
The two fundamentals of the assistance settings are
Steering Assistance and Auto Gears.
Race Settings
Race Difficulty/Fitness Level
The race settings screen will always tell you your
current fitness level and the current default race
length for the tier you are in.
Difficulty is defaulted to Fitness Level 1 for a new
user but your challenge is to come first in all the 20
different trails on the BEGINNER tier so you can
progress onto the INTERMEDIATE tier and so on.
Race Length/Duration
As mentioned already, the default length of the races
will increase each time that you progress to a new tier.
BEGINNER tier
INTERMEDIATE tier
ADVANCED tier
PRO tier
=
=
=
=
1lap
10mins + 1lap
20mins + 1lap
30mins + 1lap
The longer length races will begin to challenge your fitness
level just as much as your pacemaker riders do!
page 27
BEGINNER tier
INTERMEDIATE tier
ADVANCED tier
PRO tier
=
=
=
=
Fitness
Fitness
Fitness
Fitness
Levels
Levels
Levels
Levels
New User – Default Assistance Settings
1-20
21-40
41-60
61-80
Once a fitness level has been reached, or the default
race length has increased, you are able to race at a
fitness level or race length less than your current
best BUT you will be unable to progress to the next
Fitness Level if you race in a fitness level lower than
your current best, or for a race duration less than
your current tier dictates.
As a new user, the steering assistance is defaulted to
Partial Steering Assistance. This means that you are in
control of the steering but you will be nudged back onto the
trail should you veer too far from the centre of the track at
any point.
Partial Steering Assistance also means that you will ride
with Full Braking Assistance, and Full Forgiveness.
The Forgiveness setting is a realism, or tolerance setting
that controls how easily you can crash or fall off.
page 28
The Partial Steering Assistance does mean that you are
protected from crashing to a certain degree BUT you can,
and you will crash and fall off if you ride straight into rocks,
bridges or posts and so on.
As mentioned earlier, as a new user your gears will be
automatically generated for you initially when you are riding
a trail.
The gears will be generated depending upon the gradient
and terrain of the trail, as well as the speed at which you
are pedalling.
Removal of Assistance Settings
Partial Steering
On completion of the BLUE category on the BEGINNER
tier, you will notice that the Partial Steering Assistance
is removed.You will no longer have any steering assistance
or braking assistance therefore it is now up to you
alone to keep your bike on the track, and to use
your brakes when needed.
Let’s Get On with the Race!
Once you have selected your trail and your race settings it’s time to race!
Highlight START on the RACE SETTINGS Screen and click the GREEN button to START THE RACE!
Tips when in a race
5
6
Autogears
CHANGING YOUR VIEW
You can change the view at any time during a race by
pressing and holding the BLUE button on the bike
console.
7
On completion of the RED category on the BEGINNER
tier, you will notice that Autogears are removed. You will
now have to adjust your own gears depending on the
gradient and terrain that you are riding on, just as you
would when riding your own mountain bike!
Just remember that the gear pod on the right is your main
gearbox - Use it for small incremental changes.
Use the gear pod on the left for major changes:
Select Low for steep climbs
Select Mid for flat sections
Select High for downhills
Access to REWARD/TIPS video
sequences
You are able to go back and replay any of the
REWARD/TIPS video sequences, or the initial tutorial
video, at any time by selecting the HELP button on the
ASSISTANCE SETTINGS screen.
Select MAIN to watch the tutorial again or use the
navigation arrows to select a REWARD/TIPS video
sequence to watch again.
page
page29
29
ABORTING
You can abort out of the race at any time if necessary by
pressing and holding the
RED button on the bike console.
4
2
3
1
You will notice that the race screen displays many pieces
of information about the race, which can be very useful!
1 - The navigation arrow in the middle of the bottom of
the screen will pre-warn you which way the trail is going
to go. The arrow will also change colour from GREEN to
RED to warn you if you begin to veer off the track so
keep an eye on it!
2 - Bottom left hand corner you will notice your Race
Position.
3 - Bottom right hand corner you will notice your Gear
display.
4 - The Xdream is compatible with Polar Heart Rate
Monitors. If you are wearing one, your heart rate will
appear to the left of your gear display.
5 - Top left hand corner you will notice your Timer/Lap
number
6 - Just below the timer is the race timeline. You are the
yellow circle and your race competitors are the red
triangles.
7 - Top right hand corner you will notice the map of the
track from above. You are the yellow circle and your race
competitors are the red triangles.
You will have little time to study these displays during a
race but some of them can be very handy to glance at
once in a while especially if you want to know how close
your competitors are to you!
page 30
Finishing a Race - Race Statistics
Finishing a race - Race statistics (continued)
The GRAPHS screen displays the graphical output of your
completed race.
When you complete a race, coming in first position of course,
you will be able to check on your
race performance by using the RESULTS screen,
as well as looking at the MORE DETAIL screen and/or the
GRAPHS screen.
Different coloured lines are displayed to show your
performance in the race you have just completed, as well
as your FIRST time you rode that same trail for the same
time period, and your BEST performance riding the same
trail for the same time period.
The graphs are a very good way to assist you in
monitoring your progress.
The RESULTS screen summarises your time, distance and
calorie data. It also shows your time, distance and calorie
data cumulatively. This will assist you in assessing your
progress on a daily basis, as well as on a monthly and yearly basis – very useful!
Highlight BACK and press the GREEN button to bring you
back to the session data screen.
Highlight CONTINUE and press the GREEN button and
you will return to your TRAIL MATRIX.
The position that you came in the race, FIRST of course,
will now appear in the matrix box of the race you have just
ridden.
Your Trail Matrix is the easiest and quickest way to check
your progress.
The MORE DETAILS screen displays your race data in
detail.
page 31
page 32
The Reward/Ride Tips Videos
Logging in as a Guest
As you can see from the MAIN MENU screen, it is
possible to ride as a GUEST in Quick Start mode,
or to ride one of the GREEN category races in
Xdream Fitness Mode as a GUEST.
However, as a GUEST you will only have access to
a limited number of trails and your progress will not,
and cannot, be monitored. This means that a
GUEST cannot progress and increase their Fitness
Level.
As mentioned already, when you complete a category (layer
of four trails), a video sequence will play to congratulate you
for your efforts and your energy in completing the category.
Only the four GREEN category tracks are available
to a GUEST and the fitness level of any GUEST is
defaulted to Fitness Level 1 permanently.
Assistance settings can be adjusted in GUEST
Mode.
On completion of certain categories you will be rewarded
with the choice of new ride kit or the choice of a new bike.
These rewards are highlighted to you in the REWARD VIDEOS.
The video sequences also present you with useful RIDE
TIPS to enable you to get the very best out of your Xdream
experience.
As mentioned already, these videos can be replayed at any
time from the ASSISTANCE SETTIINGS screen via the
HELP button.
page 33
page 34
Adjusting Assistance Settings
Once you get more used to how the Xdream handles,
how it steers for example, you may wish to adjust your
ASSISTANCE SETTINGS .
As already mentioned, certain ASSISTANCE SETTINGS
will be removed for you as you progress up through the
Fitness Levels anyway but you may wish to change your
SETTINGS before that time.
There are many combinations of assistance settings that
can be selected and an adjustment of settings may help
you to progress even faster.
All ASSISTANCE SETTINGS can be turned off and
stripped away entirely so that you are riding au natural the choice is yours!
The largest number of ASSISTANCE SETTINGS options are
available to you when Steering Assist NONE is selected.
As before, use the arrow buttons on the console to make
any change in the Assistance Settings.
When you choose not to have any steering assistance
(Steering Assist NONE),
naturally your braking assistance will be turned off too
so that you no longer have braking assistance also.
You are able to turn off AUTOGEARS so that you control
of the gears and you will
also be able to adjust your FORGIVENESS setting,
which is your ‘tolerance to
crashing’ setting, from FULL to REDUCED, or to
MINIMAL.
As mentioned earlier, TRAINING MODE will become
available to you when you have fought and pedalled
your way up to the PRO tier and are at Fitness Level 61.
Please note that when you have progressed to Fitness
Level 13 in the BEGINNER tier, the options to change
your Steering Assistance and Autogears settings are
removed and are therefore greyed out.
As you continue to get better and better on your
Xdream, adjust your FORGIVENESS setting to challenge
yourself even further.
Crashing Penalties
As you ride with less and less assistance, you have to
be more and more careful not to crash! As a further
incentive not to crash, please be aware that the time
taken for your rider to be reset to the track after a crash
increases depending upon which tier you are currently riding.
The reset delays become longer on each new tier to the
point where the reset delay
is 5 seconds on the final PRO tier. This reset delay could
be the difference between you coming in FIRST, or
coming in SECOND so don’t let it happen to you!
page 35
Training Mode
As you can see from the screen shot above, TRAINING
MODE allows the rider to ride any trail, for any length of
time, in any fitness level that they have available to them.
TRAINING MODE essentially allows you to “Fill In The
Gaps”.
You have a choice of nine race lengths:
1 Lap, 10mins, 15mins, 20mins, 30mins, 45mins,
60mins, 90mins or an incredible 120mins.
Use TRAINING MODE to warm up for the PRO tier races,
as well as for practising any particularly difficult sections of
a track that you are going to have to master in order to
progress up through the PRO tier. You can do this by
choosing easier and shorter races from the TRAINING
MODE matrix.
Your finishing positions for each race are recorded on the
TRAINING MODE matrix as they are in Xdream Fitness
Mode.
This means that when you have progressed to the highest
Fitness Level possible, Fitness Level 80, in Xdream Fitness
Mode, you will have the choice of riding any trial in any one
of the 80 Fitness Levels.
This choice of 20 tracks, nine race lengths and 80 Fitness
Levels gives the rider a choice of an astonishing 14,400
different race combinations! ... The choice is yours!
page 36
Your mission in TRAINING MODE is ultimately to ride all the
trials in all the race lengths, in Fitness Level 80, and come
FIRST in every single one of those races!
Easy!
Ghost Racing – Race Your Ultimate Competitor!
Ghost Racing – Race Your Ultimate Competitor!
Ghost Racing Mode allows you to race against your
ultimate competitor - YOURSELF!
2) In Ghost Racing Mode, select the track and the amount
of laps you wish to race. Begin the race and when you
have completed it, your time will be saved in the Ghost
Racing track matrix, and this field will then turn turquoise
blue to highlight that there is a Ghost Time ready for you
to race.
Essentially you are setting up a ghost time for you then to
go back to, and try and beat.
Ghost Racing is a fantastic additional Mode to
complement the structured fitness program of Xdream
Fitness Mode.
In Ghost Racing, there are no fitness levels and no
artificial intelligence riders. It is YOU riding against YOUR
previous best time (your ghost) and trying to beat that
time.
The Ghost Racing mode is only available to riders who
have user profiles, not to Guest users so be sure to
create yourself a user profile if you have not already
done so.
You must obviously set a time for the tracks initially so
that you have a time to try and beat.
SPLIT TIME - shows how you are performing against your
previous fastest time (your ghost).
E.G. - In the screen shot to the left, the rider is 1.43 sec
slower than that rider's current fastest time.
This can be done in two ways:
1) In Xdream Fitness Mode, when you complete races
your lap times will automatically be copied and placed
into the relevant field in Ghost Racing Mode, depending
upon track and number of laps you have ridden.
For example, should you win the first Parklands track in
Xdream Fitness Mode, the first Parklands track in Ghost
Racing Mode will also be populated with your race time
so that there is a time all ready for you to try and better
in Ghost Racing Mode.
page 37
(continued)
Please note that you select to race a number of laps in
Ghost Racing Mode NOT a time/duration. This is to ensure
that you can continue to keep on bettering your race times
indefinitely. You can choose to race up to 20 laps of any
track if you so wish, therefore you have 400 (20 lap
selections x 20 tracks) different Ghost Races available to
you.
page 38
Multiplayer Mode – Race Time!
Multiplayer Mode – Race Time!
(continued)
Now that you have got the hang of the Xdream it’s time for
you to ride against some friends and start pushing each
other further!
As mentioned previously, a Multiplayer race must have a
Race Host, or Race controller – this is the rider who
creates the Multiplayer race for other riders to join.
Riders can HANDICAP themselves though in order to
make races more fair if an experienced Xdream rider
wishes to race a new rider for example.
The Xdreams that are placed in your club are connected
and networked so that you can race against other human
beings as well as racing against Artificial Intelligence
competitors.
Be warned though as other humans tend to make more
noise when racing and are hugely more competitive than
the AI competitors so be prepared!
The Race Host then must choose which trail to race and
for what duration.
The Race Host chooses the race duration by navigating
to the LENGTH field and then choosing the race length
using the left/right navigation arrows on the bike console.
Also be warned that in Multiplayer, should you ride into
another rider or another rider rides into you, then you will
crash and fall off! This makes Multiplayer races even more
challenging!
A maximum of six people can take part in any one race so
you can race against just your best friend, or you can race
against your whole family if you so wish!
It is possible for a GUEST to race in a Multiplayer race but,
as before, a GUEST will only have access to the four
GREEN category trails should the GUEST be the HOST
(Chooser of Trail) of your Multiplayer race.
The trails that are available to the Race Host depend
purely upon what Fitness Level the Race Host has
reached in Xdream Fitness Mode. Therefore if the Race
Host is a new user, or Guest, the Race Host will only be
able to choose from the four GREEN category trails.
However if the Race Host has progressed to the
INTERMEDIATE tier, or above, all trails will be unlocked
and available to be picked by the Race Host.
As soon the Race Host “creates” a race, their username
will appear in the Multiplayer race list of any other
Xdream bike that the Race Host’s Xdream is networked
with. At this point, up to five other riders may join this
particular race.
As a rider joins a Multiplayer race, their username will
appear in the RIDERS LIST on the trail selection screen.
Please be aware that there are no ASSISTANCE
SETTINGS available to you in MULTIPLAYER MODE
given you are racing other human beings and not A.I.
competitors.
Let’s look at how to set up a Multiplayer Race...
At the main menu, login using your unique username, or
select the GUEST option, then select MULTIPLAYER
from your login menu.
The GUEST option is useful if you wish to race
someone who is a guest to your actual club, or if
time is of the essence and a competitor does not
have one minute to create a user profile for
themselves.
page 39
Please also be aware that you cannot progress
your Xdream Fitness Mode fitness levels when in
MULTIPLAYER MODE, even if you win a race.
This is because you are not racing against set
fitness levels in Multiplayer and so your fitness
level is not able to be assessed.
page 40
Create Race - Being Race Host/Controller
Create Race - Being Race Host/Controller
(continued)
When all other race competitors have joined your race
and you can see their names in the RIDERS IN RACE
list, navigate to the LENGTH field and choose the
Length of your Race.
To create a race, highlight CREATE RACE and press
the GREEN button.
Should you wish to give yourself a HANDICAP in this
race, now is the time that you would navigate to the
HANDICAP field and choose that HANDICAP value –
HANDICAP will be explained in detail later.
Next highlight the trail you wish to race then press the
GREEN button to START the race countdown.
You will see a trail matrix that will reflect your current
trail matrix when in Xdream Fitness Mode.
Choose the trail you wish to race by highlighting it.
You must now wait for other riders to join your race.
The 10 second countdown period gives other riders a
last chance to join your race, and it gives you, the
Race Host, the opportunity to cancel the race if you
have chosen the wrong trail or race length, for
example.
Note who has joined your race by observing the
Riders in the Race table to the left of the trail matrix.
After this 10 second “Last Chance” period, your race
will load and begin!
Note that if the RACE HOST aborts out of the
race, the race will also terminate for all other
riders in that race.
page 41
page 42
How to Join a Race
Race Handicap
All you need do to join a race is highlight the race that
you wish to join in the RACES AVAILABLE list that you
can see below.
You have the ability to set yourself a HANDICAP for a
race.
You may wish to do this if you are racing against an
inexperienced rider or a less fit person for example.
Or you may ask that another rider in a race gives
themselves a handicap if they are far more
experienced than everyone else in the race.
Once you have highlighted the race, press the GREEN
button. You will now see the Trail Matrix of the RACE
HOST and your username will now appear in the
RIDERS IN RACE list on the left of the trail matrix.
You can LEAVE any race BEFORE it starts by
highlighting the LEAVE RACE button underneath the
RIDERS IN RACE list and then pressing the GREEN
button.
Handicapping attempts to even out any big advantages
that a rider may have so that the race is a fair and
enjoyable one for everyone.
The handicap works by increasing the user’s
weight that they entered into their user profile, by
10% per increment of handicap.
You are able to make changes to User Settings, as
long as you have logged in with a username, when
you are joining a race in MULTIPLAYER MODE too.
A rider’s weight can be increased between 10-100% and
you are able to see which riders have, or have not, given
themselves a Handicap by looking in the Handicap
column in the Rider in Race List, to the left of the trail
matrix.
The race will NOT START unless the RACE HOST
starts the race so the RACE HOST is in control
of when the race will begin.
page 43
page 44
TROUBLESHOOTING:
FREQUENTLY ASKED QUESTIONS
Symptoms
What to do
1) Why are the console buttons not responding?
Check that the switch near the back foot of the Xdream is
TURNED ON (Button at position 1). This switch controls the
console buttons so if it has been turned off, none of the
console buttons will respond.
2) I have ridden one of the tracks before but that
data has not been recorded on my user profile,
why?
Firstly TURN OFF the switch near the back foot of the Xdream
bike. It is vital that the bike be left switched off for a MINIMUM of
10 seconds to allow power to drain from the bike section of your
Xdream. Next stand astride the centre frame of the bike (Not
sitting on or touching the seat) and then press and keep
HOLDING the up arrow of the gear shifter pod on left hand side
of handlebars (Front derailleur) ensuring that the handlebars
remain straight and centred.
Symptoms
What to do
5) The screen has frozen or locked up completely
– what should I do?
This is a rare occurrence but we all know that computers can be
temperamental every now and again!
Should the screen freeze or lock up for more than 90 seconds,
find the START/SHUT DOWN button (Within the hole on the
back panel of the base of the screen unit) and then press and
HOLD the START/SHUT DOWN button until the computer fully
shuts down and the screen is black.
Just tap the START/SHUT DOWN again to START UP the
computer and thus the Xdream bike.
Please note If there has been a power cut or a power
spike at your premises, you may need to SHUT DOWN
the computer as above but also switch off the wall power
switch as well and turn it back on again, in order for the
Xdream bike to right itself.
Next TURN ON the switch near the back foot of the Xdream
bike whilst continuing to press the up arrow of the left gear pod.
Then please move the handlebars all the way over to far left,
over to the far right, over to the far left then back to the centre.
At this point you can then release the up arrow button.
Please note that this procedure will not work if the bike is not
turned off for a minimum of 10 seconds before the procedure is
performed.
3) When I climb out of the seat, my rider on the
screen remains sat down? The saddle sensors are
behaving erratically, what do I do?
SAME AS NO 2
4) The rider on the screen will not steer correctly, or
the rider veers far right/left when I am trying to steer
straight ahead? What do I do?
If the steering is behaving erratically, the sensors in the
handlebars need to be recalibrated. This is easy to resolve!
SAME AS NO 2
(continued)
page 45
(continued)
page 46
Assembly and Installation
Assembly procedures for the Xdream bike
1. Firstly check the contents of the box so that it matches the contents list above.
2. Next take the leg which has a white “x-biking.com” transfer on it and fit it to the rear of the bike.
Place 2 of the long bolts through the bolt holes with 1 washer each side and tighten the nut securely
using 6mm Allen key and 17mm wrench.
Tools required for assembly
•
•
•
•
(Some of these are required for service):
Wrenches – 14mm, 15mm and 17mm
Allen Keys – Full Set of long metric allen keys( from 2.5mm to 8mm)
Philips screwdriver
Pliers including snips
Parts List
Xdream Bike Box
• 1 Xdream bike frame (PN XBD-Frame)
Includes: 2 x Height Adjust Knob Assembly (SD10M011)
1 x Seat Post with slider (SD10S002)
• 1 Set of X-Bars (SD10X001)
• 1 Saddle (SD10S001)
• 1 Rear bike leg with x-biking transfer (SD10M012)
• 1 Box with - 2 Pedals (SD10D011)
1 Water bottle bracket (SX10M001)
4 Sets of nuts and bolts for leg attachment
1 Black square plastic cap (SD10X016)
User Interface
• 1 Xdream complete User Interface Unit (PN XBD-1000-001A)
Includes: 1 x Monitor Column (PN XBD-1000-001B)
1 x U-Shaped Cable Cover (PN XBD-1000-001C)
1 x Bike Facing Cover with 4 corner bolts (PN XBD-1000-001D)
1 x Opposite Cover with 4 corner bolts (PN XBD-1000-001E)
2 x Front bike legs with leveller feet (PN XBD-1000-039A)
page 47
Saddle
3. Next slide the bike saddle onto the seat slider from the back of the bike forward. Ensure the saddle is level
and that the nose points directly forward along the direction of the frame. Tighten the saddle securely by
tightening both nuts evenly using a 14mm wrench.
4. Next thread the saddle sensor cable with connector (To be found sticking out of the side of the seat post) up
through the front two bars of the saddle and clip the sensor cable firmly into the clip connector on the underside
of the saddle (One way fit only).
5. Allow some slack on the sensors and clip the cable to the saddle rails using a cable tie. Cut off the excess
cable tie.
6. Next remove the threaded nut only from the top of the quick release lever (To be found attached to the
saddle slider part of the seat post) and insert the threaded bolt up through the slot in the saddle slider.
With the nut positioned on top of the slider, tighten the nut onto the bolt up until the quick release lever
can be pulled back tight underneath the saddle slider.
7. Next fit the saddle height adjust mechanism securely in place ensuring that the knob is on the right hand side
(when looking forward from the back of the bike).
Pedals
8. Next fit the pedals to the crank arms. It is advised to finger tighten the pedals on to the cranks initially to
minimise risk of cross threading. The right pedal tightens in a clockwise direction. The left pedal tightens in an
anti-clockwise direction. Finally tightened the pedals as much as possible using a 15mm wrench.
page 48
Assembly procedures for the Xdream bike
(continued)
Joining the Xdream bike to the User Interface
n ote: The User Interface will be delivered pre-built so the only assembly required here is
joining the Xdream bike to the User Interface.
X-Bars
9. Next fit the X-Bars by firstly gently pulling the coiled cable up and out of the handlebar head tube on the
frame of the bike (PN XBD-Frame).
10. Next unpack the X-Bars from their box and remove the black square plastic cap from the top of the
handlebar stem so that you can reach the cables inside. Pull the connector just up out of the hollow stem.
11. Next feed the long coiled cable inside the handlebar head tube up into the bottom of the X-Bars hollow
stem. It is advisable to keep hold of the shorter cable/connector that’s within the X-Bars when feeding the
other cable/connector up and through. Fully insert the handlebar stem slowly into the head tube of the bike
frame until the bottom of the stem touches the bottom of the head tube.
12. Gently pull the longer cable/connector from the bike frame up through the top of the stem and clip the
2 connectors together (One way only). Taking care not to damage any of the wires, then gently push the
cable assembly back down into the inside of the stem coiled cable first. Refit the black square plastic cap.
13. Next fit the handlebar height adjust mechanism securely in place ensuring that the knob is on the right
hand side (when looking forward from the back of the bike).
1. We advise that an Xdream should not be moved once the bike has been joined to the User Interface.
Therefore please ensure this final part of assembly is done in the correct final location.
2. Firstly remove the bike facing cover from the user interface, by using a 2.5mm allen key to remove the
four small bolts.
3. Next using a 6mm allen key and 17mm wrench, undo the two bolts that attach the now exposed leg to
the user interface, and remove the leg being careful to lower the user interface gently to the floor.
4. Take this now loose leg and fit it to the front of the Xdream bike making sure that the two sets of bolt
holes line up.
5. Next slowly manoeuvre the User Interface so that the base panel is positioned over the top of front leg
of the Xdream bike. Line up the bolt holes so that two bolts can be passed straight through the base panel
and the front leg of the bike.
6. Fit the long bolt and one washer through the lined up holes on both sides of the bike leg. Now fit one
washer and nut to the bolts and tighten securely using 6mm allen key and 17mm wrench.
7. Next take the three leads that emerge out of the hole near the bottom of the monitor column within the
Water bottle holder
14. Next fit the water bottle holder bracket by first removing the two screws on the left fork of the bike
using a 5mm Allen key. Once fitted, tighten the bolts slowly to minimise the risk of cross threading.
User Interface, and connect the three leads into the corresponding three connectors in the front of the
Xdream bike. The three leads comprise of one power lead, a USB lead and an audio lead therefore it is
impossible to connect the leads into the wrong connectors.
8. Next firmly place the U-shaped cable cover over the exposed cables between the bike and the column.
9. Next replace the bike facing cover and secure the panel with the four small bolts that were removed
earlier using a 2.5mm allen key.
10. Finally adjust the six leveller feet under the legs accordingly until the entire bike and user interface
assembly is stable.
11. Plug the Xdream in and the installation is now complete.
page 49
page 50
Xdream Recalibration
The power consumption (Watts) is calibrated by measuring the driving speed (min-1) of the axle and the
braking torque (Nm)
Your Xdream was calibrated to fulfil the requirements of its accuracy classification before shipment.
Should you have doubts about the accuracy of the calibration, please contact Trixter Customer Support
or send your Xdream to an accredited test laboratory.
Xdream Bike Wear Parts
The following parts list includes all wear parts that are protected under the warranty terms for a period of
six months past the date of the Xdream purchase:
•
•
•
•
•
•
Height Adjustment Knob Assembly (SD10M011)
X-Bar Springs (SX10X004)
Xbar Spring Pillars (SX10X005)
Handlebar Grips (SD10X015)
Pedal Strap (SX10M004)
Saddle (SD10S001)
All other part and components are protected under the warranty for twelve months after date of the
Xdream purchase. The Xdream Frame is protected under the warranty for five years after date of the
Xdream purchase.
Customer Support Contact Information
Please contact us should you encounter any problems, or if you have any queries, via the contact points below:
UK & Europe
USA & The Americas
Email Support: [email protected]
Telephone Support: +44 844 979 4567
9am - 5pm (GMT) Monday – Friday
Email Support: [email protected]
Telephone Support: +1 888-497-7234
9am - 5pm (EST) Monday – Friday
Trixter Europe
Trixter House, Warren Business Park
Knockdown, Tetbury
Gloucestershire, GL8 8QY, UK
Trixter North America
P.O. Box 611
Brockton,
MA 02303, USA
page 51