1
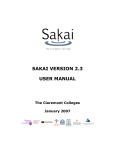
ResearchTools User Guide Information Systems and Services October 2012 1. Introduction ResearchTools is an adaptation of Sakai developed specifically to provide a Virtual Research Environment (VRE). It consists of an online framework for collaboration and communication tools and is accessible from anywhere in the world with a connection to the web. Sakai is an open source CLE (collaboration and learning environment), especially useful for creating an intimate, closed, online community for collaborative projects, whose members can be widely geographically dispersed. 1.1 Supported Browsers The following web browsers are supported: Windows XP, Vista: Internet Explorer 7, Firefox 2, Firefox 3 Mac OS X Firefox 2, Firefox 3 Using any other browser may cause some functionality to be lost, however as of the time writing, recent incarnations of Chrome, Firefox and Internet Explorer have been demonstrated as working. 1.2 Components and Navigation The main components of ResearchTools are sites and tools. The Sites menu allows you to navigate to different worksites. The Tools menu allows you to select a tool (or page) within a site. The Actions bar shows what actions you can perform with the selected tool. The Reset icon returns a tool (or page) to its initial state without saving any changes. It is preferable to use the Reset icon rather than the browser’s back button. The following diagram shows where you would find the Sites menu, Tools menu, Actions bar and Reset icon. Sites Menu Logout An action bar A reset icon Tools menu ResearchTools User Guide 1 1.3 Pasting into ResearchTools Throughout ResearchTools, there are a number of text-entry areas. Rather than retype something you have elsewhere, you might like to copy and paste into the text editor. There is a ‘Paste from Word’ icon on the toolbar which cleans up text copied from Microsoft Word. You should always use this method to paste text that has been copied from a Word document. 2. Getting Started 2.1 The Gateway The first thing you will see when you navigate to ResearchTools is the Gateway site. The login link is located at the top right of the Gateway pages. To login, you will be asked to select your identity provider and then enter your user ID and password. Once you have logged in, the logout link is located in the top right of every page. If a session is inactive for an hour, you will be logged out automatically. Note: To protect your privacy, you should close your browser when you have finished your session. 2.1.1 Welcome The Gateway Welcome page displays the administrator’s “Message of the day” and a welcome note. 2.1.2 Support The Support page gives details of how additional help and advice can be obtained (and is where you can find this document). 2.1.3 Features This page lists a number of the features available in ResearchTools. 3. My Workspace My Workspace is your own private area, separate from any shared sites. This is the site you see after logging in. The My Workspace site is made up of several different tools (or pages), detailed below. 3.1 Home The Home page shows the “Message of the day”, recent announcements made to any of the sites that you’re a member of and an overview of your Calendar. The way this information is displayed can be controlled by clicking on the options links in the Actions bars. ResearchTools User Guide 2 3.2 Profile The Profile tool allows you to control the information shown about you. If you’re not a member of Newcastle University, you should ensure that the email address in your profile is correct (otherwise you will not receive any notifications, messages, etc). 3.2.1 Adding a photo to your Profile To display a photo, you should upload a photo into your Resources tool and provide the URL for that. You must remember to allow public access (one of the options in Resources) otherwise no other users will be able to see the picture. Details of how to find the URL of a resource are covered in section 3.5.1. The University picture option is not currently available. 3.2.2 Searching for Profiles You can see what other people have put in their profile by searching for them from within your profile tool. If they have not edited their profile they will not show up. 3.3 Membership Shows a list of the sites that you’re a member of. You can navigate to a site by clicking on its name in the list. There is also a tab for joinable sites which lists other worksites that have been created that you may choose to join (likely to be none). 3.4 Calendar The Calendar tool in your My Workspace area combines the Calendars from all of the shared sites you’re a member of, providing a complete record of the events that affect you or would be of interest to you. If anything is added to this Calendar however, it will show up just for you. To share new events, they must be added to a Calendar in a shared worksite (see section 4.4 below). The Calendar can be viewed as a single day, a week, month or year or as a list of events over a specified time period. New events can be created by selecting the “Add” option from the Actions bar. 3.5 Resources Resources provides an area for you to store files. Files can be uploaded to (or downloaded from) any shared Resources area that you have permissions to. By default, any files stored in the Resources tool of your My Workspace are private and viewable only by you. When uploading a file, however, there is an option to “Add details for this item”. This allows you to make the file publicly viewable (which can be useful, for example for providing a photo to be shown in your profile). ResearchTools User Guide 3 3.5.1 The URL of a Resource Once a resource has been saved, you can see and modify the details about it by clicking on the “Actions” button and selecting “Edit Details” from the drop box. The details shown include the external URL for the resource which can be referenced as a link, for example to a profile picture (see section 3.2.1). 3.6 Announcements This tool lists all of the announcements made to all of your shared sites. 3.7 Preferences You can select your time zone and preferred language (limited non-English availability). You can also set the level of notifications you receive when events occur in a site you're a member of. ResearchTools User Guide 4 4. Shared Sites Shared sites are accessed from the Sites menu (see section 1.2). Any site you have access to, other than My Workspace, is a shared site. What you can do in a shared site depends on your role. You can see your role using the Site Info tool (section 4.3). This guide is written from the “maintain” role point of view. Users with the “access” role will have fewer permissions. Any questions about roles or permissions in ResearchTools should be directed to [email protected]. Within a shared site there will be a number of tools available from the Tools menu. These tools are detailed below. 4.1 Home The Home page displays information about what the site is for. Recent announcements and chat messages are shown here, so that you can see if there has been any recent activity. There is a summary of the site’s Calendar displayed here as well. 4.2 Announcements This tool has two main functions: to allow you to read all announcements made to the site and to allow you to add a new announcement. When adding an announcement, there is a facility to set the time that the announcement will be displayed and an option of sending an email to site members to inform them of the announcement. You may edit or delete any announcement that you have made (although you cannot cancel an email notification, once it has been sent). 4.3 Site Info This provides some information about the site, including a contact name and email address. You can see the names and user IDs of the other members of the site and their roles (if you can’t see this information then you have the “access” role). If you belong to any groups within the site, they will be shown here. For more information about groups, see section 5 of this guide. Through Site Info, the site’s “owner” can perform a number of additional administrative tasks, such as: add or remove site members; organise groups; change a user’s role within the site; edit the site information displayed on the Home page; change the order that the tools appear in the Tools menu; add content from external websites or RSS feeds. 4.4 Calendar The Calendar displays events that would be of interest to all members of the site. Any events added here will, by default, be viewable by all members of the site. The Calendar is group-aware so it is also possible to restrict certain events to specific groups of users. ResearchTools User Guide 5 4.5 Resources Resources provides an area to share files with the other members of the site. By default, files saved here are accessible by all members of the site and not by anyone who is not a member of the site. 4.5.1 Groups Within the Resources tool, folders can be made accessible only to certain groups of users, rather than the whole site. This can be used, among other things, to protect the privacy of sensitive information. For more information about groups, see section 5 of this guide. 4.6 Wiki The Wiki allows users to add and edit content collectively. Detailed documentation on using the wiki can be found at https://camtools.cam.ac.uk/access/content/public/wiki_overview%2008.pdf. 4.7 Forums The Forum (or message board) contains topics which, in turn, contain discussion threads on the subject. You can start new threads, reply to existing threads or create a new topic, if necessary. When creating a new topic, the settings and permissions probably won’t need to be changed. The site’s “owner” will have to set up a forum before other users can post any messages. 4.8 Messages The Messages tool can be used to send messages to individuals or to groups within a site. To send a message to multiple individuals (but not a specified group) hold down the ‘Ctrl’ key whilst clicking on each desired recipient. You can add attachments to messages, if required. Messages are internal to ResearchTools so are not sent by email, unless specified. 4.9 Blogging tool (A.K.A “Clog”) The Clog tool allows all members of a site to contribute to a group blog or journal. The following sub-sections, relating to the screen shot below, outline the process of creating a new blog entry. 4.9.1 Title The title will show up in the list of blog entries and also in the result of a search. 4.9.2 Content The main body of the post can be made up of text, images, links and attached files. There is a tab for each component type in the post editor. ResearchTools User Guide 6 4.9.3 Options There aren’t many options to choose after you’ve written your post, from the top of the page down you will see... “Allow Comments” which enables or disables the ability of other users to make comments on your post once you have published it. “Only site administrators and I can see this post” / “All members of this site can see this post”, make your selection as to whether you’d like your blog to be private to yourself and administrators, or to be viewable be everyone who is a member of the project site where the blog is being published. “Publish” / “Save as Draft” / “Cancel”, publish will immediately submit your blog post; save as draft will only store a copy of your post for later editing but NOT publish it; cancel will end your editing session and will lose any changes to your blog post, i.e. if this was a new post you will lose it entirely, if it is a post that you are editing any changes will be lost. ResearchTools User Guide 7 4.10 Chat Room This allows members of the site in different physical locations to communicate in “real time”. All messages are saved so that you can catch up on a conversation or look back at any old messages 5. Groups Within a site, groups of users can be set up. An individual user can be a member of more than one group. Groups can be used with the following tools: Announcements – announce to certain group(s) only. Calendar – events visible to certain group(s) only. Resources – files/folders only available to certain group(s). Messages – send to certain group(s). Forums – topics available to certain group(s) only. Only the site “owner” or an administrator can set up groups or add/remove users. For advice on setting up groups, please contact [email protected]. 6. Help and Support A link to the Help Tool is always located at the bottom of the Tools menu. Context-sensitive help, where available, can be accessed by clicking on the blue question mark icon. If the Help pages (and this document) don’t answer your question, additional help is available via [email protected]. In any requests for help, please remember to include your ResearchTools user ID and as much detail of the problem as possible. 7. Feedback If you could provide any feedback or suggestions for improvements, for either ResearchTools or this documentation, they would be gratefully received. Please contact [email protected] your feedback. ResearchTools User Guide 8