1
wallf lower
Wallflower 2 User’s Guide
S/W Version 2.1
Version 1.0
May 2004
TABLE OF CONTENTS
1 Introduction
What Can Wallflower Do?. . . . . . . . . . . . . . . . . . . . . . . . . . . . . . . . . . . . . . . . . . . . . . . . .
Features . . . . . . . . . . . . . . . . . . . . . . . . . . . . . . . . . . . . . . . . . . . . . . . . . . . . . . . . . . . . . .
Models . . . . . . . . . . . . . . . . . . . . . . . . . . . . . . . . . . . . . . . . . . . . . . . . . . . . . . . . . . . . . . .
What’s in this Document? . . . . . . . . . . . . . . . . . . . . . . . . . . . . . . . . . . . . . . . . . . . . . . . . .
For More Information . . . . . . . . . . . . . . . . . . . . . . . . . . . . . . . . . . . . . . . . . . . . . . . . . . . .
2
1-1
1-1
1-2
1-2
1-3
Basic Features
Getting to Know Your Wallflower . . . . . . . . . . . . . . . . . . . . . . . . . . . . . . . . . . . . . . . . . . .
On/Off, Advance and Enter Buttons . . . . . . . . . . . . . . . . . . . . . . . . . . . . . . . . . .
LCD Control Buttons . . . . . . . . . . . . . . . . . . . . . . . . . . . . . . . . . . . . . . . . . . . . . .
I/O Connectors . . . . . . . . . . . . . . . . . . . . . . . . . . . . . . . . . . . . . . . . . . . . . . . . . .
Powering On and Off . . . . . . . . . . . . . . . . . . . . . . . . . . . . . . . . . . . . . . . . . . . . . . . . . . . .
Installation . . . . . . . . . . . . . . . . . . . . . . . . . . . . . . . . . . . . . . . . . . . . . . . . . . . . . . . . . . . .
Proper Ventilation! . . . . . . . . . . . . . . . . . . . . . . . . . . . . . . . . . . . . . . . . . . . . . . . .
Installing the Stands . . . . . . . . . . . . . . . . . . . . . . . . . . . . . . . . . . . . . . . . . . . . . .
Hanging Your Wallflower . . . . . . . . . . . . . . . . . . . . . . . . . . . . . . . . . . . . . . . . . . .
VESA Mount . . . . . . . . . . . . . . . . . . . . . . . . . . . . . . . . . . . . . . . . . . . . . . . . . . . .
Cleaning Your Wallflower . . . . . . . . . . . . . . . . . . . . . . . . . . . . . . . . . . . . . . . . . .
CleanING Inside the Glass . . . . . . . . . . . . . . . . . . . . . . . . . . . . . . . . . . . . . . . . .
2-5
2-5
2-6
2-7
2-8
2-9
2-9
2-9
2-9
2-9
2-9
2-9
3 Network Setup
Network Setup Methods . . . . . . . . . . . . . . . . . . . . . . . . . . . . . . . . . . . . . . . . . . . . . . . . . . 3-12
Wired Ethernet Configuration . . . . . . . . . . . . . . . . . . . . . . . . . . . . . . . . . . . . . . . . . . . . . . 3-12
WiFi with Access Point Configuration . . . . . . . . . . . . . . . . . . . . . . . . . . . . . . . . . . . . . . . . 3-13
WiFi Configuration Without an Access Point (AdHoc/Peer-to-Peer) . . . . . . . . . . . . . . . . 3-14
Switching to Ad-hoc Mode . . . . . . . . . . . . . . . . . . . . . . . . . . . . . . . . . . . . . . . . . . 3-14
conecting with windows XP . . . . . . . . . . . . . . . . . . . . . . . . . . . . . . . . . . . . . . . . . 3-14
COnnecting with mac os x . . . . . . . . . . . . . . . . . . . . . . . . . . . . . . . . . . . . . . . . . . 3-15
Alternative Setup Method: Known SSID Mode . . . . . . . . . . . . . . . . . . . . . . . . . . . . . . . . . 3-15
Customizing Your Network Settings . . . . . . . . . . . . . . . . . . . . . . . . . . . . . . . . . . . . . . . . . 3-16
Quick Setup for Experienced Network Users . . . . . . . . . . . . . . . . . . . . . . . . . . . . . . . . . . 3-18
How the wallflower gets an IP address . . . . . . . . . . . . . . . . . . . . . . . . . . . . . . . . 3-18
Setting your network preferences . . . . . . . . . . . . . . . . . . . . . . . . . . . . . . . . . . . . 3-19
Network Settings in Detail. . . . . . . . . . . . . . . . . . . . . . . . . . . . . . . . . . . . . . . . . . . . . . . . . 3-19
Getting to the Network Settings Pages . . . . . . . . . . . . . . . . . . . . . . . . . . . . . . . . 3-19
ethernet and WiFi IP settings . . . . . . . . . . . . . . . . . . . . . . . . . . . . . . . . . . . . . . . 3-19
WiFi Network Settings . . . . . . . . . . . . . . . . . . . . . . . . . . . . . . . . . . . . . . . . . . . . . 3-20
Troubleshooting . . . . . . . . . . . . . . . . . . . . . . . . . . . . . . . . . . . . . . . . . . . . . . . . . . . . . . . . 3-20
4 Moving Content to Your Wallflower
Many Ways to Move Your Stuff . . . . . . . . . . . . . . . . . . . . . . . . . . . . . . . . . . . . . . . . . . . . . 4-23
Setting Up Drag-and-Drop Transfer . . . . . . . . . . . . . . . . . . . . . . . . . . . . . . . . . . . . . . . . . 4-24
Windows XP Setup . . . . . . . . . . . . . . . . . . . . . . . . . . . . . . . . . . . . . . . . . . . . . . . 4-24
Mac OS X Setup . . . . . . . . . . . . . . . . . . . . . . . . . . . . . . . . . . . . . . . . . . . . . . . . . 4-28
Changing the Workgroup Name . . . . . . . . . . . . . . . . . . . . . . . . . . . . . . . . . . . . . . . . . . . . 4-31
Changing File Server Security . . . . . . . . . . . . . . . . . . . . . . . . . . . . . . . . . . . . . . . . . . . . . 4-31
Using Secure Copy Protocol . . . . . . . . . . . . . . . . . . . . . . . . . . . . . . . . . . . . . . . . . . . . . . . 4-31
SCP and Windows XP . . . . . . . . . . . . . . . . . . . . . . . . . . . . . . . . . . . . . . . . . . . . . 4-32
SCP and Mac OS X . . . . . . . . . . . . . . . . . . . . . . . . . . . . . . . . . . . . . . . . . . . . . . . 4-32
Using USB Devices. . . . . . . . . . . . . . . . . . . . . . . . . . . . . . . . . . . . . . . . . . . . . . . . . . . . . . 4-32
5 Media Playback
Supported Formats . . . . . . . . . . . . . . . . . . . . . . . . . . . . . . . . . . . . . . . . . . . . . . . . . . . . . . 5-33
Independent Mode Playback. . . . . . . . . . . . . . . . . . . . . . . . . . . . . . . . . . . . . . . . . . . . . . . 5-34
INDEPENDENT Playlists . . . . . . . . . . . . . . . . . . . . . . . . . . . . . . . . . . . . . . . . . . . 5-34
Independent Mode Playback Algorithm . . . . . . . . . . . . . . . . . . . . . . . . . . . . . . . . 5-34
Scrited Mode Playback . . . . . . . . . . . . . . . . . . . . . . . . . . . . . . . . . . . . . . . . . . . . . . . . . . . 5-35
Script Syntax . . . . . . . . . . . . . . . . . . . . . . . . . . . . . . . . . . . . . . . . . . . . . . . . . . . . 5-35
Albums . . . . . . . . . . . . . . . . . . . . . . . . . . . . . . . . . . . . . . . . . . . . . . . . . . . . . . . . . . . . . . . 5-37
Creating Albums. . . . . . . . . . . . . . . . . . . . . . . . . . . . . . . . . . . . . . . . . . . . . . . . . . 5-37
Enabling/Disabling Albums . . . . . . . . . . . . . . . . . . . . . . . . . . . . . . . . . . . . . . . . . 5-37
Controlling Playback Time (“Flip Time”) . . . . . . . . . . . . . . . . . . . . . . . . . . . . . . . . . . . . . . 5-39
Setting On/Off Time. . . . . . . . . . . . . . . . . . . . . . . . . . . . . . . . . . . . . . . . . . . . . . . . . . . . . . 5-40
Screen Orientation and Resizing . . . . . . . . . . . . . . . . . . . . . . . . . . . . . . . . . . . . . . . . . . . 5-40
Automatic Resizing . . . . . . . . . . . . . . . . . . . . . . . . . . . . . . . . . . . . . . . . . . . . . . . 5-40
AutomAtic Centering . . . . . . . . . . . . . . . . . . . . . . . . . . . . . . . . . . . . . . . . . . . . . . 5-41
Portrait Mode . . . . . . . . . . . . . . . . . . . . . . . . . . . . . . . . . . . . . . . . . . . . . . . . . . . . 5-41
Titles . . . . . . . . . . . . . . . . . . . . . . . . . . . . . . . . . . . . . . . . . . . . . . . . . . . . . . . . . . . . . . . . . 5-41
MP3 Artist/Title. . . . . . . . . . . . . . . . . . . . . . . . . . . . . . . . . . . . . . . . . . . . . . . . . . . 5-42
Image Titles . . . . . . . . . . . . . . . . . . . . . . . . . . . . . . . . . . . . . . . . . . . . . . . . . . . . . 5-42
Notes on Video Performance . . . . . . . . . . . . . . . . . . . . . . . . . . . . . . . . . . . . . . . . . . . . . . 5-42
6 Internet Features
Web Download . . . . . . . . . . . . . . . . . . . . . . . . . . . . . . . . . . . . . . . . . . . . . . . . . . . . . . . . . 6-45
Entering URLs to Download. . . . . . . . . . . . . . . . . . . . . . . . . . . . . . . . . . . . . . . . . 6-45
Selecting Unique Filenames . . . . . . . . . . . . . . . . . . . . . . . . . . . . . . . . . . . . . . . . 6-46
Redirected Download. . . . . . . . . . . . . . . . . . . . . . . . . . . . . . . . . . . . . . . . . . . . . . 6-46
Selecting Download Period . . . . . . . . . . . . . . . . . . . . . . . . . . . . . . . . . . . . . . . . . 6-47
Sites Using Authentication . . . . . . . . . . . . . . . . . . . . . . . . . . . . . . . . . . . . . . . . . . 6-47
Error Reporting. . . . . . . . . . . . . . . . . . . . . . . . . . . . . . . . . . . . . . . . . . . . . . . . . . . 6-47
Email Overview . . . . . . . . . . . . . . . . . . . . . . . . . . . . . . . . . . . . . . . . . . . . . . . . . . . . . . . . . 6-47
Receiving Email . . . . . . . . . . . . . . . . . . . . . . . . . . . . . . . . . . . . . . . . . . . . . . . . . . . . . . . . 6-47
1-2
IMAP/POP3 Protocols . . . . . . . . . . . . . . . . . . . . . . . . . . . . . . . . . . . . . . . . . . . . . 6-47
Basic Information You’ll Need for Setup . . . . . . . . . . . . . . . . . . . . . . . . . . . . . . . 6-47
Deleting Email After Download . . . . . . . . . . . . . . . . . . . . . . . . . . . . . . . . . . . . . . 6-48
Security Phrase . . . . . . . . . . . . . . . . . . . . . . . . . . . . . . . . . . . . . . . . . . . . . . . . . . 6-48
Viruses. . . . . . . . . . . . . . . . . . . . . . . . . . . . . . . . . . . . . . . . . . . . . . . . . . . . . . . . . 6-48
Error Reporting . . . . . . . . . . . . . . . . . . . . . . . . . . . . . . . . . . . . . . . . . . . . . . . . . . 6-48
Sending Email . . . . . . . . . . . . . . . . . . . . . . . . . . . . . . . . . . . . . . . . . . . . . . . . . . . . . . . . . 6-48
Email Out Album . . . . . . . . . . . . . . . . . . . . . . . . . . . . . . . . . . . . . . . . . . . . . . . . . 6-48
Setting Up Outgoing Email . . . . . . . . . . . . . . . . . . . . . . . . . . . . . . . . . . . . . . . . . 6-48
Scrolling News Feeds (RSS) . . . . . . . . . . . . . . . . . . . . . . . . . . . . . . . . . . . . . . . . . . . . . . 6-49
7 Other Features and Settings
Advance/Enter Buttons . . . . . . . . . . . . . . . . . . . . . . . . . . . . . . . . . . . . . . . . . . . . . . . . . . . 7-51
Displaying System Status . . . . . . . . . . . . . . . . . . . . . . . . . . . . . . . . . . . . . . . . . . 7-51
Security Settings. . . . . . . . . . . . . . . . . . . . . . . . . . . . . . . . . . . . . . . . . . . . . . . . . . . . . . . . 7-52
Security Overview Page . . . . . . . . . . . . . . . . . . . . . . . . . . . . . . . . . . . . . . . . . . . 7-52
Web Interface Security . . . . . . . . . . . . . . . . . . . . . . . . . . . . . . . . . . . . . . . . . . . . 7-52
File Server Security . . . . . . . . . . . . . . . . . . . . . . . . . . . . . . . . . . . . . . . . . . . . . . . 7-53
Maintenance Pages . . . . . . . . . . . . . . . . . . . . . . . . . . . . . . . . . . . . . . . . . . . . . . . . . . . . . 7-54
Maintenance Tasks . . . . . . . . . . . . . . . . . . . . . . . . . . . . . . . . . . . . . . . . . . . . . . . 7-54
Software Upgrades . . . . . . . . . . . . . . . . . . . . . . . . . . . . . . . . . . . . . . . . . . . . . . . . . . . . . . 7-55
Log Files . . . . . . . . . . . . . . . . . . . . . . . . . . . . . . . . . . . . . . . . . . . . . . . . . . . . . . . . . . . . . . 7-55
Advanced Maintenance Functions . . . . . . . . . . . . . . . . . . . . . . . . . . . . . . . . . . . . . . . . . . 7-56
Remote Control and Advanced Scripting . . . . . . . . . . . . . . . . . . . . . . . . . . . . . . . . . . . . . 7-56
1-4
Wallflower 2 User’s Guide
1
Introduction
Features, Models and How to Use this
Document
Thank you for your purchase of a Wallflower 2 Multimedia Display System. This
document describes the setup and operation of your Wallflower. Additional information can also be found on-line at:
www.wallflower-systems.com/docs.
What Can Wallflower Do?
At its simplest, your Wallflower is a stand-alone multimedia display system that
can show movies, still images and play audio. Your movies, pictures and audio
(what we call “content” in this document) can be anything from family photos to
advertising messages.
Content can get to the Wallflower manually through the drag and drop interface
or it can be “fetched” from the Internet through email or web download. In the
following chapters, you’ll learn how to set up and use your Wallflower.
Features
• 14.1 inch TFT LCD screen
• 1024x768 resolution
• Supports 16.7 Million Colors
• 30 Gbyte media storage
• MP3 Jukebox functions
1-1
Models
• MPEG, AVI and QuickTime Video playback support
• Built in speaker
• USB jump drive support
• Support for 10/100 Ethernet in addition to WiFi
• Internet file sharing via our Pollinate™ technology.
• Configurable control buttons
• Top quality construction materials
• Frames and enclosures made from real wood, metal and glass
• LCD screen protected by tempered glass
• Keeps fingerprints, etc. off the LCD panel
• Clean with simple household glass cleaner
• All common Operating Systems supported
• Windows 98/ME/NT/2000/XP
• Apple OS X all versions (OS9 not supported)
• All Linux variants
• No software installation needed on any platform
Models
Wallflower 2 comes in three feature levels shown in the table below.
Model
Network Features
Value
Ethernet Only
[No Internal Wifi]
Standard
Ethernet
Built-In Wifi
What’s in this Document?
The Wallflower 2 User’s Guide contains information about the following aspects
of Wallflower 2 operation:
• Installation: Where to put your Wallflower, how to mount it, etc.
• Network Setup: How to get your Wallflower configured for your network.
Those with advanced networking knowledge may wish to skip the step-bystep directions and just go the the “Just the Facts” section in Network Setup.
• Basic Operation: How to perform all the basic tasks of a Wallflower.
• Advanced Operation: Using advanced features such as file sharing.
1-2
For More Information
For More Information
Always check our website for the most up-to-date information and software
downloads:
www.wallflower-systems.com
1-3
For More Information
1-4
Wallflower 2 User’s Guide
2
Basic Features
Buttons, Connectors, Stand Installation and
Wall Mounting
In this chapter we’ll cover the basic hardware features of your Wallflower including installation and button and connector usage.
Getting to Know Your Wallflower
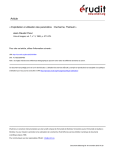
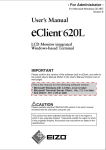
Your Wallflower has two sets of buttons on the top edge of the system as shown
in Figure 1. The three left buttons control power off/on and image/sound features. The right buttons control the LCD display. Each group are described
below.
ON/OFF, ADVANCE AND
ENTER BUTTONS
The three buttons on the left side of the Wallflower’s top edge are (in order):
Power On/Off, Advance Selection (“Advance”) and Enter Selection (“Enter”).
FIGURE 1.
On/Off, Advance and Enter Buttons
On/Off
Enter
Advance
2-5
Getting to Know Your Wallflower
• Power On/Off: This button controls power to your Wallflower. To turn on
your Wallflower simply depress the button for about one second. To turn off
your Wallflower, simply press and release this button for less than 2 seconds. If you hold the button down for 4 or more seconds you will force a
“hard” turn-off which will cause subsequent restarts to take up to 8
minutes (we force a hard drive check after a hard off event).
• Advance: This button is used to advance though choices in on-screen
menus. During normal operation it is used to control volume (or other userprogrammable functions).
• Enter: This button selects choices in on-screen menus. During normal operation it is used to control volume (or other user-programmable functions).
LCD CONTROL BUTTONS
The LCD Control Buttons are located on the right side of the top edge of the
Wallflower. A variety of settings can be changed including brightness/contrast,
color temperature and screen geometry.
FIGURE 2.
LCD Control Buttons
Select
FIGURE 3.
2-6
Up/Down/Left/Right
On-Screen LCD Control Menu
LCD On/Off
Getting to Know Your Wallflower
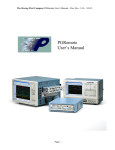
I/O CONNECTORS
Your Wallflower 2 includes several I/O connectors along the bottom of the frame
as shown in the figure, below.
FIGURE 4.
I/O Connectors
Power
(in shadow)
Serial Port
Audio Out
USB
Ethernet
Optional WiFi
Adapter
• Power: 2.1mm barrel power connector. Your Wallflower power supply delivers up to 5 A at 12V DC (60W) though the system uses considerably less.
Please be advised that if you attempt to use your own 12V power extension,
that voltage drop over long runs can cause your unit to malfunction.
• USB (2): The USB open port is used primarily to attach Mass Storage compatible Flash card readers and cameras. Other peripherals may be supported. The USB port can also be used to attach a USB keyboard for
diagnostic functions. If you ordered a Wallflower 2 with WiFi support, the
WiFi adapter is installed into one of these two ports.
• Audio Out: The green 3.5mm stereo jack. This connector is used to connect
external speakers or an external amplifier to your Wallflower. To connect to a
stereo, use a 3.5mm-to-dual-RCA cable set. Normally, the Wallflower’s internal amplifier and speaker are connected. If you wish to use external speakers, simply unplug the internal connector and replace with your own.
• Line In (behind wire in photo): The red 3.5mm stereo jack. This connector
is not currently used.
• Mic In (behind wire in photo: The blue 3.5mm stereo jack. This connector
is not currently used.
• Ethernet: RJ45 jack. This jack is used to connect 10/100Mbps Ethernet to
your system.
• Serial Port: Not currently used.
2-7
Powering On and Off
Powering On and Off
Your Wallflower is powered off and on via the On/Off button on the top of the
system. A single short press turns it on, a single short press turns it off. Holding
the on/off button down will force an immediate power off and THIS IS NOT
SOMETHING YOU SHOULD DO!
Your Wallflower has an internal hard drive and like all hard drives, it is sensitive
to having power unexpectedly removed. While we have taken great lengths to
prevent damage to the hard drive when this happens, it is also important that
you, as the user, not do anything that could damage your system.
Here are the things you should never do:
1.
2.
3.
4.
2-8
Never shut off your Wallflower by just unplugging it (or hooking it to a timer).
This will, over time corrupt your harddrive (see below).
Never (never, ever!) pull the power while the Wallflower is starting up and
the progress bar is hovering below the 50% point. At this point in start-up,
the Wallflower is repairing the disk due to some previous problem (probably
caused by a power failure). Yanking the power now will probably damage
the drive beyond what it can repair itself. Disk repair can take up to 30 minutes (but usually less than 5).
Never-ever-never-ever-ever repeatedly cycle power on/off/on/off while the
system is starting up. This is actually worse than #2, above.
Never run with scissors. This is just good advice and is not directly related
to your Wallflower.
Installation
Installation
Your Wallflower may be used with its included stand (“feet”) or hung on a wall.
PROPER VENTILATION!
NOTE: Your Wallflower requires proper air-flow/ventilation. NEVER block the
airflow perforations in the case and NEVER operate your Wallflower for an
extended period of time (more than 5 minutes) laying on its back.
INSTALLING THE STANDS
Your Wallflower 2 comes with two metal feet, and screws and double stick table
to attach them. Remove the protective tape on the double-stick tape then attach
with the provided screws. You can use the feet in either protrait or landscape
orientation.
HANGING YOUR
WALLFLOWER
Your Wallflower includes keyhole style hanging holes on the rear enclosure.
Use “molly” type screws to affix to the wall.
NOTE: DO NOT allow the screwheads to penetrate more than 1/8” into the
Wallflower’s rear enclosure to avoid damaging internal components.
VESA MOUNT
Your Wallflower can also be wall-mounted via an optional VESA mount adapter.
Please visit our website for more information.
CLEANING YOUR
WALLFLOWER
The casing of your Wallflower Plus can be cleaned and treated just like any
other wooden furniture, with a spray polish, to keep it in good condition and free
of fingerprints. The glass can be cleaned with window cleaner and a soft cloth.
CLEANING INSIDE THE
GLASS
If dirt accummulates inside the front bezel glass, simply remove the four screws
holding on the bezel, clean the inside glass then replace.
You can clean the LCD with a soft cloth or special purpose LCD cleaning cloth.
Do not use harsh cleansers on the LCD (doing so will void your warranty).
5.
2-9
Installation
2-10
Wallflower 2 User’s Guide
3
Network Setup
WiFi, Ethernet and IP Configuration
This chapter describes in detail how to configure the networking operation of
your Wallflower 2 for both the Ethernet and Wireless Ethernet (WiFi) ports.
Please refer the QuickStart Guide if you just want to get connected as quickly as
possible.
NOTE FOR NETWORKING BEGINNERS: If you are new to IP networks,
please read one of the many fine tutorials available on the Internet. Search from
Google for “networking tutorial”.
NOTE FOR ADVANCED USERS: If you are experienced in setting up IP and
WiFi networks, you may wish to skip most of this chapter and go to the “Quick
Setup” section at the end of this chapter.
3-11
Network Setup Methods
Network Setup Methods
There are several methods to set up networking on your Wallflower as shown in
the table below.
Method
Choose this Method If...
What You’ll Need
Wired Ethernet
• You are using a wired Ethernet network
• Ethernet crossover cable (usually orange) or,
• You are unable to temporarily disable
encryption on your WiFi network
• You are having trouble with the WiFi
setup methods
• Regular Ethernet cable and
Ethernet hub
• A PC or Mac
WiFi with Access
Point
• You are using an Access Point based
WiFi network where you can temporarily
disable encryption
• Access Point
WiFi without Access
Point (peer-to-peer/
Adoc)
• You want to make a direct connection
between a PC/Mac with a WiFi adapter
and your Wallflowe
• A PC or Mac with WiFi
• A PC or Mac with WiFi
Wired Ethernet Configuration
If you start your Wallflower connected to a wired Ethernet network, the WiFi
port will be automatically disabled. The Wallflower will attempt to use DHCP to
assign its IP address. If there is no DHCP on your Ethernet network, then the
Wallflower will self-assign the IP address 192.168.0.240.
1.
2.
3.
4.
5.
3-12
Either through a hub/switch or a crossover cable, connect your Wallflower’s
Ethernet port to the same network as your PC/Mac.
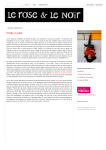
Power up your Wallflower and watch the screen to see what IP address is
displayed at the end of the boot sequence (see Fingure NNN, below).
If the Wallflower was able to get an IP address via DHCP, you can skip to
Section NNN, Customizing Your Network Settings.
If your Wallflower fails to get an address via DHCP, it will self assign
192.168.0.240. Configure your PC/Macs network to be 192.168.0.0 with a
netmask of 255.255.255.0. Your PC’s IP address will need to be between
192.168.0.2 and 192.168.0.239. You may need to reconfigure your router/
gateway to match this address range. Please see Appendix A: Configuring
Your PC or Macs Networking Settings if you need help with this step.
Now proceed to “Customizing Your Network Settings”, below.
WiFi with Access Point Configuration
FIGURE 1.
IP Address Display During Boot
Write down this
number!
WiFi with Access Point Configuration
To configure your Wallflower using your Access Point based WiFi network, follow these steps:
1. Temporarily disable WEP encryption on your WiFi network if it is enabled.
Please refer to your Access Point documentation if you need help with this
step.
2. Enable DHCP on your WiFi network if it is not already enabled. Please refer
to your Access Point and/or Router documentation if you need help with this
step.
3. Turn your Wallflower on and watch the screen as it boots. At the end of the
boot sequence, you should see a valid IP address as shown in Figure 1,
above. If your Wallflower is not able to connect to your network, or can not
get an IP address via DHCP it will self-assign the IP address 192.168.0.140
(netmask 255.255.255.0).
4. If your Wallflower was able to connect to your WiFi network and get an IP
address, you can skip to “Customizing Your Network Settings”, below.
5. If your Wallflower fails to get an address via DHCP, please check your
encryption and DHCP settings and try again. If this still fails, it could be due
to 2.4GHz interference or insufficient single strength. We then recommend
you use either Ethernet configuration (above) or Peer-to-Peer configuration
(below). If these methods do not work, or cannot be used, please see the
Troubleshooting section at the end of this chapter for other methods.
3-13
WiFi Configuration Without an Access Point (AdHoc/Peer-to-Peer)
WiFi Configuration Without an Access Point
(AdHoc/Peer-to-Peer)
Ad-hoc mode- also called peer-to-peer mode- can be used to connect to your
Wallflower directly from a PC/Mac with a WiFi card without going through an
Access Point. In general, setup is easier with an Access Point since the Wallflower can usually detect the network settings automatically (assuming you've
followed the QuickStart Guide for your operating system). If you do not have an
Access Point and wish to use Ad-hoc mode, read on.
SWITCHING TO AD-HOC
MODE
1.
2.
3.
Reboot your Wallflower by cycling power.
Your Wallflower will go through its normal boot sequence, possibly including
searching for an Access Point to connect to. After you see the "Files" icon, a
countdown sequence will begin that says "Normal Operation will Begin in 9
Seconds...", etc. As soon as you see this countdown, click once on the left
control button ("Advance" button).
A menu will now appear with 3 choices:
• Restore original network settings
• Force Wallflower into Access Point Mode on network "Wallflower"
• Force Wallflower into Ad-hoc Mode on network "Wallflower-Adhoc"
4.
Select the last choice: Ad-hoc Mode and click the right ("Select") button.
Then press the left button until you get to "Exit and Restart" then select by
clicking the right button. Your system will restart (be patient, this can take a
minute or so.)
Your Wallflower will now reboot. When it comes back up, your Wallflower
will be on peer-to-peer WiFi network “Wallflower-AdHoc” with IP address
192.168.0.140 (netmask 255.255.255.0).
You can now connect to your Wallflower from your Windows XP PC (see the
next step for directions).
CONECTING WITH
WINDOWS XP
In this section we assume you have some familiarity with configuring your WiFi
card. Directions:
1. Open your network connection settings for your WiFi card by clicking:
Start->Network Connections->Show All Connections
2.
3.
4.
3-14
Double click your WiFi connection icon, then choose Properties.
Click on the tab "Wireless Networks". You should see the Ad-Hoc network
"Wallflower-Adhoc" in the menu of available networks (if you do not see it,
click on Advanced and make sure that your system is configured to "see"
Ad-hoc networks). Select the "Wallflower-Adhoc" network and click Configure. Make sure that all encryption/WEP checkboxes are unchecked and
that the peer-to-peer checkbox is checked. Then click OK.
In the lower box ("Preferred Networks"), select "Wallflower-Adhoc" and
move it to the top position. This forces your PC to connect to this network
first. Do NOT click OK. Click on the General tab.
Alternative Setup Method: Known SSID Mode
5. On the General screen, select TCP/IP then select "Use the Following IP
Address". Select an IP address in the range 192.168.0.2-139
(192.168.0.10, for example) with a netmask of 255.255.255.0. Now click
OK. The DNS settings aren't important.
6. Close the properties box to get back to "Network Connections". Right click
on your WiFi connection and click "Repair". This forces your PC to reset it's
IP address.
7. Check your connection by pointing your web browser to 192.168.0.140. You
should get the Wallflower Configuration Menu. If not, recheck your steps
above.
8. If your PC was able to connect to your Wallflower network please proceed
to “Customizing Your Network Settings”, below.
CONNECTING WITH MAC
OS X
In this section we assume you have some familiarity with configuring your WiFi
card. Directions:
1. Click on the WiFi signal icon on the right hand side of the Finder title bar to
bring up a pulldown list of available networks. Select "Wallflower-Adhoc"
under "Computer-to-Computer" networks.
2. You may need to configure your network location to set a static IP address.
Choose and IP address in the range 192.168.0.2 to 192.168.0.139.
3. Check your connection by pointing your web browser to 192.168.0.140. You
should get the Wallflower Configuration Menu. If not, recheck your steps
above.
4. If your PC was able to connect to your Wallflower network please proceed
to “Customizing Your Network Settings”, below.
Alternative Setup Method: Known SSID Mode
Known SSID Mode can be used with when you are having difficulty connecting
to an Access Point based network and cannot use Ethernet configuration.
Directions:
1. Change your WiFi access point's ESSID (sometimes called SSID or WiFi
Network Name) to "Wallflower".
2. Turn off WEP encryption.
3. Set your local network IP addresses to be in the range 192.168.0.1 to
192.168.0.255. This usually means your access point's IP address will
change to 192.168.0.1 (if it is a combined AP/gateway). You must also turn
off DHCP.
4. Don't forget to change your PC/Mac's WiFi settings to match.
5. Reboot your Wallflower by cycling power.
6. Your Wallflower will go through its normal boot sequence, possibly including
searching for an Access Point to connect to. After you see the "Files" icon, a
countdown sequence will begin that says "Normal Operation will Begin in 9
Seconds...", etc. As soon as you see this countdown, click once on the left
control button.
3-15
Customizing Your Network Settings
A menu will now appear with 3 choices:
• Restore original network settings
• Force Wallflower into Access Point Mode on network "Wallflower"
• Force Wallflower into Ad-hoc Mode on network "Wallflower-Adhoc"
7.
8.
Select the second choice: Known SSID Mode and click the right ("Select")
button. Then press the left button until you get to "Exit and Restart" then
select by clicking the right button. Your system will restart (be patient, this
can take a minute or so.)
Your Wallflower will now reboot. When it comes back up, it will be at IP
address 192.168.0.140 on WiFi network "Wallflower". You may need to
cycle power again.
You can now connect to your Wallflower from your PC/Mac by pointing your
browser at 192.168.0.140. Now you can reconfigure the Wallflower for your
specific network as shown below.
Customizing Your Network Settings
You should now be able to "talk" to your Wallflower. Try the following:
1.
In Internet Explorer or Safari (Mac users), enter the IP address of your Wallflower. For example, if your Wallflower told you its IP address was
192.168.0.5, type the following in your browser:
http://192.168.0.5
3-16
Customizing Your Network Settings
You should see the main Wallflower configuration screen (it may look different than the example below). Poke around to see what you can change.
Just don't change any network or WiFi settings yet!
2. We recommend the following settings:
• Static IP Address (instead of Automatic/DHCP). This will make
it easier for Windows XP and Mac OS X to find your Wallflower
every time you want to use it. Use an IP address "out of the way"
of your DHCP server's range.For example, if your DHCP server is
assigning addresses between 192.168.0.20 and 192.168.0.30,
you should pick a static address of 192.168.0.31.
• Select a Specific SSID. On the WiFi setup pages, choose your
specific SSID in order to prevent your Wallflower from attaching to
other networks unexpectedly.
NOTE: Your SSID cannot contain spaces or other non-alphanumeric characters (for example “&”, “?”, “*” etc.).
• Turn On Encryption. This has nothing to do with the Wallflower,
it just makes good security sense. You don't want your neighbors
poking around in your computers, do you?
NOTE: Your Wallflower supports 40-bit and 128-bit hexadecimal
passwords only. If your network is using “passphrase”, you will
need to switch to hexadecimal.
3-17
Quick Setup for Experienced Network Users
• Make the Changes Stick: When you've got the network the way
you want it, restart your Wallflower from the "Other Options"
menu (bottom-most button). Don't forget to make sure your
access point and PC’s match the new setings. You will need to
restart your Wallflower for the new network/WiFi settings to take
effect.
Quick Setup for Experienced Network Users
In this section, we’ll tell you how to configure the standard WiFi and Ethernet
settings as quickly as possible. We’ll assume you have a bit of practice installing
and configuring networking devices such as routers, PCs, etc.
HOW THE WALLFLOWER
GETS AN IP ADDRESS
On both the Ethernet and WiFi, the first thing the Wallflower does out-of-the-box
is attempt to assign an IP address via DHCP.
Ethernet Operation. If the Ethernet is plugged in and there is a link on the
Ethernet port, the WiFi will be disabled. The Wallflower will attempt to use
DHCP to get an IP address. If DHCP fails, the Wallflower will self-assign
192.168.0.240 (netmask 255.255.255.0).
WiFi Operation. If the Ethernet is not plugged in (or has no link), and your
model has WiFi installed (Standard and Multimedia Editions, or Value Editions
with an approved WiFi adapter installed) then your Wallflower will attempt to get
an IP address through DHCP on the strongest unencrypted network1 it finds. If
DHCP is unsuccessful, the Wallflower will self-assign 192.168.0.140 (netmask
255.255.255.0).
3-18
Network Settings in Detail
SETTING YOUR NETWORK
PREFERENCES
Once your Wallflower has an assigned IP address, simply point your web
browser at the assigned IP address. See the previous section for further details.
Network Settings in Detail
GETTING TO THE
NETWORK SETTINGS
PAGES
The Network Settings pages can be reached by pointing your browser at the
main configuration page, then clicking on the side menu button labeled “Network Settings”
ETHERNET AND WIFI IP
SETTINGS
The Ethernet and WiFi IP settings control the IP address for your Wallflower’s
Ethernet or WiFi port.
NOTE: When the Ethernet port is active (has a link) the WiFi network is disabled.
The following settings are available on the IP configuration pages:
• DHCP/Automatic or Static IP: Select DHCP if your Ethernet network is set
up to provide IP address information automatically and you want to use this
capability. Select Static if you want to manually assign IP address information
(see below).
If you select Static IP Mode, you must fill in the following fields:
• IP Address: The IP Address for your Wallflower. This address must be on
the same IP network as your PC/Mac and router.
• Netmask: The network mask for your IP network. The netmask must be the
same as that used by other PCs and the router on your network. Typical values are 255.255.255.0 and 255.255.0.0.
• Gateway/Router: This is the IP address of your local router. It is typically
(but not always) the first IP address on your network. For example, if your
PCs IP address is 192.168.1.23 the router is very likely at IP address
192.168.1.1. You can find the router address by looking at your PC’s or
Mac’s IP settings.
• DNS Servers: This is the IP address of your Domain Name Servers (DNS
servers translate names like www.cnn.com into IP addresses). This address
is sometimes the same as your router (especially on small networks).
1. This can be a bit confusing. What this means is the Wallflower will connect to the
strongest WiFi signal it sees that gives it an IP address. In some cases, encrypted
networks will still give out an IP address to unencrypted clients. Of course, your Wallflower won’t be able to use this network even tough it has an address! In these situations, we recommend using the Ethernet port to get set up, then switch to WiFi.
3-19
Troubleshooting
WIFI NETWORK SETTINGS
The following settings are available on the WiFi Network Settings Page:
• Connect to Specific Network/Connect to Strongest Signal: When connect to strongest signal is selected, the Wallflower will ignore the SSID of
local Access Points and simply connect to the strongest signal.
NOTE: We DO NOT recommend Strongest Signal Mode since your Wallflower can jump between networks and get confused by other 2.4GHz
devices (cell phones, cordless phones, etc.)
NOTE ON SSID NAMES: Wallflower’s restrict the SSID names to only
upper and lower case letters, numbers and the symbols ‘-’, ‘_’, and ‘+’. SSID
names are case sensitive and may not contain spaces.
• Enable/Disable Encryption: This option enables or disables WEP encryption.
• Encryption Key: Wallflower supports only hexadeciamal keys and does not
support passphrases. Legal charaautomatically cters are 0-9 and A-F. The
length of the encryption key (40- or 128-bit) is determined by the length of
the hexadecimal key entered in the text box- more than 10 characters is considered 128-bit.
Troubleshooting
PROBLEM
Wallflower fails to connect to unencrypted WiFi network.
CAUSE:
When the Wallflower first attempts to connect to a WiFi network, it searches for
the strongest WiFi signal it can find. In some cases the Wallflower can get confused by other WiFi networks or other 2.4GHz devices (including cell phones,
cordless phones and microwave ovens).
SOULUTION:
There are 2 solutions:
• Use Ethernet configuration and chose a specific WiFi network name from the
WiFi settings menu.
• Use “Known SSID Mode” as described above.
PROBLEM
The Wallflower seems to have an IP address, but I cannot connect to it.
CAUSES/SOLUTIONS:
3-20
Troubleshooting
1. IP address/network mismatch between Wallflower and PC/Mac.
Solution: Check your IP address settings and make sure your PC/Mac is on the
same IP network. For example, if the Wallflower is on IP address
192.168.0.140, then your PC should also be on 192.168.0.x (e.g. 192.168.0.5)
2. WiFi network mismatch between Wallflower and PC/Mac.
Solution: Check your PC/Macs WiFi network SSID and make sure it matches
that of the Wallflower (shown at boot time).
3-21
Troubleshooting
3-22
Wallflower Plus User’s Guide
4
Moving Content to Your
Wallflower
This chapter describes how to transfer content to your Wallflower via the Ethernet or WiFi connection. Please refer the QuickStart Guide if you just want to get
going as quickly as possible.
Many Ways to Move Your Stuff
There are several methods of moving images, movies and sounds to your Wallflower:
• Drag-and-Drop File Sharing. This is the primary way to get content to a
Wallflower connected to your local LAN. It takes advantage of software built
into Windows, Mac OS X and Linux that makes a Wallflower appear as a
local file folder or hard drive.
• Email Download. Your Wallflower can receive (and send) email with media
attached. Please see “Using Email Features” for more information.
• Web Download. Your Wallflower can download content directly from websites. Please see “Using Internet Download” for more information.
• Secure Copy Protocol. This advanced method allows you to push content
to a Wallflower anywhere on your local network, or the internet.
• USB Device Upload. You Wallflower can automatically copy files found on
attached USB devices such as Flash card readers, jump drives and mass
storage compatible cameras.
This chapter will discuss Drag-and-Drop, USB devices and Secure Copy Protocol. Later chapters will discuss email and web download capability.
4-23
Setting Up Drag-and-Drop Transfer
Setting Up Drag-and-Drop Transfer
Once Drag-and-Drop is set up, your Wallflower will look and act like a hard drive
directly connected to your computer. You can cut-and-paste from websites, or
e-mails and paste the files directly into the Wallflower folder. You can even use
programs such as Photoshop to modify images on your Wallflower directly;
there is no need to copy them to your PC first.
The following sections show how to get drag-and-drop set up for PCs and Macs.
Instructions for Linux users can be found on our website.
WINDOWS XP SETUP
1.
Open "My Network Places" by clicking Start->My Network Places. Your
Wallflower should appear if your Microsoft network name is “MSHOME” (the
default in Windows XP). If not, proceed to step 2.
2.
Click on the Search icon. In the box that says "Computer Name:" enter the
IP address of your Wallflower. After a few seconds, your Wallflower will
appear on the right.
Type your Wallflower’s IP
address here.
3.
4-24
Double click your Wallflower's icon and a folder named "Images" will
appear. It is into this folder that you will drag and drop images, music and
videos for the Wallflower to display. (Ignore the “Printers and Faxes” icon,
this is something Windows puts in.).
Setting Up Drag-and-Drop Transfer
4. To make this folder permanently available in Windows, right click on it, then
select "Map Network Drive". You will be given a choice of drive letter. We
suggest something easy to remember like "W:".
4-25
Setting Up Drag-and-Drop Transfer
5.
4-26
Now your "W" drive is the Wallflower. Open up the folder (Start->My Computer then click on the Wallflower folder) and have a look. If you have
selected “Thumbnail View” for this folder, it will look like the screen shot
below.
Setting Up Drag-and-Drop Transfer
6. Now you can add your own pictures and delete our demo pictures. Just
drag-and-drop or cut-and-paste from any location (other folders, e-mails,
web pages, etc.). Your photos will appear shortly on your Wallflower.
4-27
Setting Up Drag-and-Drop Transfer
MAC OS X SETUP
4-28
1.
On the Finder menu, select “Go” then “Connect to Server”.
Setting Up Drag-and-Drop Transfer
2. Enter your Wallflower’s IP address in the “Address” box. You must preceed
the address with smb:// as shown below. depends on your network.)
Then click “Connect”..
3. After a few moments you will see a new popup menu asking which share
you want to mount (see below). Select “Images”. You may be presented
with a username/password screen. You can enter anything in this screen
(or nothing) then hit Enter. The Wallflower does not currently use passwords.
4-29
Setting Up Drag-and-Drop Transfer
4-30
4.
Your Wallflower should now appear as a drive named Images on the right
side of your screen.
5.
Now you can add your own pictures and delete our demo pictures. Just
drag-and-drop or cut-and-paste from any location (other folders, e-mails,
web pages, etc.). Your photos will appear shortly on your Wallflower.
Changing the Workgroup Name
Changing the Workgroup Name
By default, your Wallflower is assigned to the Windows Workgroup “MSHOME”
(which is the Windows XP default). You can change this setting from the System Naming page in the web configuration menus.
Changing File Server Security
You can limit access to your shared file area by enabling security on the File
Server. Directions:
1. From the web interface, select Setup then Security Settings
2. From the left hand menu, select File Server
3. You can enable/disable security by clicking on the checkbox as shown
below, then clicking “Submit”
4. You can add/delete users once you have enabled security.
Using Secure Copy Protocol
Advanced users may wish to make use of the Secure Copy Protocol (SCP) to
move content to their Wallflower. SCP is similar in many ways to FTP, but it is
more secure.
To use SCP you will need three things: the username/password combination to
transfer files, the IP address of the Wallflower and the target folder/directory for
the transferred files. This information is in the table below.
4-31
Using USB Devices
Parameter
Value
SCP Username
mywallflower
SCP Password
The numerical portion of your serial number
Target Directory
/home/wfclient/images
SCP AND WINDOWS XP
Windows XP does not include an SCP client so you will need to install one. We
recommend WinSCP (search on Google for “WinSCP”).
SCP AND MAC OS X
Mac OS X users can either install a graphical SCP client (once again, “Google”
for one that strikes your fancy), or use command line SCP from a Terminal Window:
1.
2.
3.
Start a Terminal Window session.
Change directories to where your content is located.
Type: ssh file.jpg [email protected]:/home/wfclient/
images
In the example above, replace “file.jpg” with the file you wish to transfer and
the “192.168.0.140” with your IP address.
If you are prompted to accept the “fingerprint” or key, type yes.
4.
You will be prompted for the username/password. Use the values above
(unless you have changed them).
Using USB Devices
Your Wallflower can automatically upload content from USB devices attached to
either of the USB ports found on the back of the system. Simply plug in the
device, and the Wallflower will copy all of the media to an album named “USB<date>” where date is today’s date 1.
The Wallflower recognizes any USB Mass Storage compatible device. This
includes Flash card readers, jump drives and most cameras (Sony cameras are
a notable exception).
1. If you do this more than once a day, the album will have an additional number at the
end of the name. For example: USB-4-4-2004-1.
4-32
Wallflower 2 User’s Guide
5
Media Playback
Formats, Play Order, Albums and Titling
The chapter describes what media are supported, how media playback works
and how it can be controlled.
Supported Formats
The following media formats are supported as of version 2.1.x of the Wallflower
Plus software:
• Images: JPEG, BMP, GIF, TIFF, PCX and PNG.
• Movies: MPEG-1, MPEG-2, DiVX, QuickTime, most AVI formats (depends
on the codec), some MPEG-4 (depends on the tool used to create the file).
Windows Media not supported.
• Audio: MP3. Windows Media files not supported.
Future upgrades may support additional formats.
5-33
Independent Mode Playback
Independent Mode Playback
Your Wallflower has two basic playback modes: Independent and Scripted. In
Independent mode, the Wallflower builds its own playlists based on the albums
you have created. In Scripted mode, you supply a playlist file and the Wallflower
plays only what is in the playlist.
INDEPENDENT PLAYLISTS
In Independent mode, your Wallflower builds its playlist from all enabled albums
on the system. An album is nothing more than a subdirectory one level below
the Images directory. Enabling/Disabling albums is covered below.
You can set the Wallflower to buld its Independent playlist alphabetically or
using random shuffle. In both cases, content is played in album order. In other
words, if you have chosen random shuffle and have two albums named “A” and
“B”, then the content in one album will be played randomly, then the content in
the other folder will be played randomly but the content of album “A” and album
“B” will not be intermixed.
The point above is very important to understand, especially if you have seperated MP3s and images. If you have a directory full of MP3s without any
images, there will be nothing on the screen while the MP3s play.
NOTE: Your Wallflower only looks for playable files in the main Image folder and
one level of folder (directory) below the main Image folder. If you have placed
content more than one folder below the main Images directory, this content will
be ignored.
For example, if you have created a folder called “1999” in the main images
directory and a folder in “1999” called “Thanksgiving” then all the content in
“1999” will be played, but the content in “Thanksgiving” will not be.
INDEPENDENT MODE
PLAYBACK ALGORITHM
The Wallflower uses the following algorithm each time though its media dispatch
loop:
1. The Wallflower attempts to play content at the head of the list (if alphabetical then the next file alphabetically).
2. If the content is an image file and another image file is showing, then the
next image is displayed. If a movie is playing, then the system waits until the
movie is complete before showing the image.
3. If the content is music and no other music is being played, then the new
music file is played. If another song is already playing, then the new song is
put on hold (until the previous song completes) and the Wallflower moves
on to the next item in the playlist.
While this may seem a bit complicated, in practice it really isn’t. Let’s assume
you have 4 photos, a 5 minute song and a 2 minute video in an album. Alphabetically, the song (“asong.mp3”) comes before the movie (“mymovie.mpeg”.)
Here’s what will happen:
5-34
Scrited Mode Playback
• The Wallflower will start playing “asong.mp3” and start displaying your 4 photos. The photos will continue to loop until asong.mp3 completes.
• Once asong.mp3 completes, your Wallflower will play “mymovie.mpeg”.
When that is over, the system will move to the next album.
Situations will arise where there are “holes” in the Wallflower’s ability to schedule content. For example, a song may end in the middle of an images flip time.
In such cases, the Wallflower may insert additional music (if it will fit) or it may
allow some “dead air”. In any case, if you want precise control over scheduling,
please see script mode, below.
Scrited Mode Playback
In scripted mode, your Wallflower will play only what you want it to play and
nothing more. This mode is very handy for putting together narrated slideshows, music and picture playlists, etc.
Script files must be stored in the Images/scripts album (subdirectory) and must
have a .scr extension. They can be created with any text editor (like Notepad),
or they can be created with the simple script editor built in to the web interface.
SCRIPT SYNTAX
The script file is just a text list of media to be played in the order that it will be
played. Images can have an optional time associated with them. All sound/video
media will play to completion.
Image Entries
Image entries use the following general syntax:
<album>/<filename> [for]/[wait] [1-999] [seconds]
That’s probably meaningless to most, so here’s some practical examples:
kids/johnny.jpg for 4 seconds
This plays the photo johnny.jpg in album “kids” for 4 seconds.
space/hubble1.jpg wait
This plays the photo hubble1.jpg in album “space” until the currently playing
audio file (specified earlier in the script) has completed.
space/hubble1.jpg
This plays the same image but for the duration of the flip time set through the
web browser.
5-35
Scrited Mode Playback
Audio and Video Entries
There is only one syntax for audio/video entries:
<album>/<filename>
For example, to play sousa.mp3 in album “marching”:
marching/sousa.mp3
To play the movie “springsale.avi” in album “videos”:
videos/springsale.avi
Combining Entries
Here’s an example of combined entries:
narration1.mp3
image1a.jpg for 5 seconds
image1b.jpg for 5 seconds
# The next image will play until narration1.mp3 completes.
# If it was a 20 second mp3, then image1c
# will play for 10 seconds
image1c.jpg wait
Script Comments
Any line that starts with a ‘#’ is ignored. Leading whitespace is also ignored.
Missing Files
If a script references a missing file then that file will be ignored even if it is subsequently added to the system. You will need to enter-exit-enter script mode to
get the new file recongized.
Script Checking
If you edit a script using the webbrowser you can get a syntax error and missing
file report.
5-36
Albums
Albums
Your Wallflower considers all folders (subdirectories) in the main Images directory to be Albums. Playback of of Albums can be independently enabled and
disabled through the web interface.
By using Albums, you can organize your multimedia content and selectively
play back only what you want at a given time. For example, you might create an
Album called “Thanksgiving” and then only enable the Album for Thanksgiving
dinner.
CREATING ALBUMS
1. Using either “My Computer” (Windows) or the Finder (OS X), open the
folder or drive volume for your Wallflower.
2. Windows: Right click your mouse and select New->Folder. Enter an appropriate name (i.e. “Thanksgiving” for the above example).
OS X: <ctrl>-click your mouse and select New Folder. Rename the folder
from “untitled folder” to something appropriate for your Album.
You can now copy content into this folder. It is enabled by default.
ENABLING/DISABLING
ALBUMS
Albums can be enabled/disabled through the web interface as follows:
1. Select Albums from the tab bar. You will see the image below.
5-37
Albums
2.
3.
5-38
On this menu you can select which Albums to play. New albums are
enabled by default. The Main Images folder cannot be disabled.
If you click on an Album name from the Album Chooser you will see thumbnails of the media in the folder.
Controlling Playback Time (“Flip Time”)
Controlling Playback Time (“Flip Time”)
Images are played for a specific amount of time called the “flip time”. The flip
time is set on the Album and Timing Settings page (see below). The minimum
flip time is currently 1 second and there is no upper limit.
NOTE: We do not recommend leaving images on the screen for more than 15
minutes at a time as this can cause burn-in to occur on your LCD panel. BURNIN IS NOT COVERED BY YOUR WARRANTY.
.
5-39
Setting On/Off Time
Setting On/Off Time
Also in the Playback Settings page you will find the option to have the Wallflower blank its screen during certain periods of the day. The times entered must
be in 24 hour time format.
NOTE: You can also turn off just the display by using the screen power button
on the far right of the monitor control buttons (next to the LED).
Screen Orientation and Resizing
On the Picture/Playback Options page you can control screen orientation, resizing and centering options.
AUTOMATIC RESIZING
When automatic resizing is selected your images will automatically be resized
to the best resolution for the screen.
If you do not select automatic resizing, then the image will be displayed in it’s
native resolution and will either be cropped (if it is larger than the 1024x768
screen resolution) or matted (if it is smaller than 1024x768).
In most cases, you should leave auto-resizing turned on.
NOTE: Regardless of whether you have enabled resizing, your Wallflower
always creates a resized copy of the image for it’s own use. This copy is created
the first time the Wallflower attempts to display the image and the process can
take up to 15 seconds depending on the size of the original. While the Wallflower is creating this copy, some functions may work very slowly including
5-40
Titles
titling bars and the wb interface. This is normal and will not happen after the
copy process is completed.
AUTOMATIC CENTERING
When automatic centering is turned on, images that do not fit the 4:3 aspect
ratio of the screen will be automatically letterboxed or sideboxed with a black
border to fit in the center of the screen.
For example, if one of your images is a panaroma with an aspact ration of 10:1
(say a 1000 pixel by 100 pixel image) then there will be black bands above and
below the image. Similarly, portraits shown in landscape mode will have black
bands on either side of the image.
With automatic centering turned off, your images will be “pinned” to the upper
left corner of the screen.
In most cases, you should leave auto-centering on.
PORTRAIT MODE
If most of the images you want to display are portrait orientation, you should
consider using portrait mode. In portrait mode, all images are rotated 90
degrees before being displayed.
Titles
Your Wallflower can display titles with information about MP3 and JPEG files
being played. Titling options can be found on the Titles page, shown below.
5-41
Notes on Video Performance
MP3 ARTIST/TITLE
With this option selected, your Wallflower will show the artist and title of the MP3
file it has just started to play. The information will be shown at the top of the
screen for about 10 seconds after the file starts playing.
If the artist/title information is missing or incorrect in the MP3 file, then the title
will indicate this.
IMAGE TITLES
There are two types of image titles: informational titles and filename titles. To
create and informational title, you need to create a file with the information you
want displayed in the same album as the photo. This file must be a text file with
the extension “.txt”.
For example, if you want a title for an image named "johns_birthday.jpg" then
put a text file named "johns_birthday.txt" with your title information in the same
album. You can create text files with most text editors including Word, Wordpad
and Notepad. Just be sure to save as text (sometimes called ASCII text).
Using the example above, if the file “johns_birthday.txt” had the line “Here’s
John’s First Birthday, Look at the Cake on His Face!” then this text would display as a title for the first few seconds of the image display.
You also have the option of just showing the filename if an information file is not
found.
Notes on Video Performance
Your Wallflower will perform best on video files when they are limited in certain
(reasonable) ways. Video files have several parameters which can affect
whether the Wallflower can display them without skips or jerkiness:
• Width/Height: Videos at or beyond 640x480 resolution may start to show
some frame dropping (jerkiness). To put this in perspective, standard definition broadcast TV’s resolution is 460x360. So even at 640x480 you’re
beyond standard definition TV.
• Framerate: This is how many frames per second are shown in the movie.
Typically it is 29.97 and sometimes 24. The human eye can start to see jerkiness of flicker below about 20 frames per second.
• Bitrate: This is a parameter used by the program that generated to video file
to control how much compression is used in the file.
• Compression/Quality: Similar to the parameter above, the creator of the file
can control how much video quality they are willing to give up in exchange
for performance and size.
There are so many variables involved (we didn’t even get into formats such as
MPEG-1 vs. MPEG-2 vs. DiVX vs. QuickTime) that it is almost impossible to
give hard-and-fast rules as to what settings to use. We can say that we have
test videos at 352x240 resolution (MPEG-1, bitrate 1.15Mbps, 29.97 framerate)
5-42
Notes on Video Performance
that look as good as DVD. We’ve also seen videos with the same exact settings,
that look horrible. It’s really up to you to experiment (and let us know if you hit a
combination that works every time!)
5-43
Notes on Video Performance
5-44
Wallflower 2 User’s Guide
6
Internet Features
Web Download, Email and RSS News Feeds
Your Wallflower is capable of sending and receiving content over the internet
several different ways. This chapter covers the setup of these services.
Web Download
The web download capability allows your Wallflower to periodically download
content from websites. Currently, download of image, MP3 and video files is
supported. Other content, including standard HTML pages, can be downloaded, however the contents of these pages is not displayed.
The web download configuration page can be reached by clicking on the Internet tab on the web interface and then selecting “Web Content Download”.
ENTERING URLS TO
DOWNLOAD
To enter URLs (“Uniform Resource Locators” better known as web addresses),
simply type the URL into the text box. URLs must be complete and include the
“http://” at the beginning.
Example:
http://www.mysite.com/photos/kids_swimming.jpeg
There is no limit to how many URLs you can enter.
Downloaded content is stored in the Album “webcontent”.
6-45
Web Download
SELECTING UNIQUE
FILENAMES
By default, when a photo is downloaded from a website, it is given the same
name as it originally had. For example, fetching the URL:
http://www.mysite.com/photos/kids_swimming.jpeg
Would result in a file named “kids_swimming.jpeg” in the “webcontent” album.
This is exactly the behavior you would expect, especially when downloading
changing content such as weather maps (after all, there’s no need to see the
weather from yesterday or the day before.)
Sometimes, however, you might want a unique filename assigned for every
download. A good example is using a webcam where you would want to store
every snapshot with a different name. To enable unique filenames, simply click
the unique filename checkbox. Each file will then get a unique filename, based
on the time of download.
REDIRECTED DOWNLOAD
You can supply a list of URLs to download in a file on a website that the Wallflower can access. For example, if you have the following URL in the Wallflower’s URL download list:
http://www.myserver.com/wallflower/morestuff.wdl
And the file “morestuff.wdl” has the following entries:
http://www.server1.com/pic1.jpg
http://www.server2.com/vid3.mov
6-46
Email Overview
Then the Wallflower will append the entries in the morestuff.wdl file automatically to its download list. (Note that the redirected entries in morestuff.wdl are
not themselves added permanently to the main URL download file.)
You can use redirected downloads to keep a central list of images you want
multiple Wallflowers to download. For example, if you have a personal website,
you could update your “.wdl” periodically and all your friends and family could
get the latest images.
Redirected download files must always end in “.wdl” (lower case).
SELECTING DOWNLOAD
PERIOD
The dropdown box for download period allows you to select how often web
downloads occur. The maximum rate is once every 15 minute. The minimum is
once per day.
SITES USING
AUTHENTICATION
Sites using basic authentication (username/password) are not currently supported.
ERROR REPORTING
The results of each web download are stored in text files which you can view
from the Maintenance pages on the web browser interface.
Email Overview
Your Wallflower can both send and receive content via email. Content received
via email is saved in the “email-in” album. Content you want automatically sent
via email must be stored in the “email-out” album.
Receiving Email
Your Wallflower can download email either from its own dedicated email
account (the easiest method) or from a shared account (slightly more complicated). In this section we’ll cover the setup of both.
IMAP/POP3 PROTOCOLS
Your Wallflower supports POP3 and IMAP email protocols. In order to use the
email download capability, your email service must support one of these two
protocols.
Note About Free Email Accounts: Popular free email accounts such as Hotmail and Yahoo, do not support the IMAP or POP3 protocols. Therefore, these
accounts cannot be used with your Wallflower. However, Fastmail (www.fastmail.fm) does provide free basic IMAP accounts as do several other vendors.
BASIC INFORMATION
YOU’LL NEED FOR SETUP
You’ll need the following information to set up email download for your Wallflower.
6-47
Sending Email
• Incoming Mail Server: This is typically the system name from which your
email will be fetched. Examples: fastmail.fm, smtp.sbcglobal.net.
• Username: This is the username you use to access your email account. It is
sometimes (but not always) your email address.
• Password: This is the password you use to access your email account.
• Email Protocol: POP3 or IMAP.
DELETING EMAIL AFTER
DOWNLOAD
If you select this option, received emails will be deleted from the mail server
after download. If the Wallflower is the only user of this account then select this
option.
If you are sharing the email account between a Wallflower and other users, you
should leave this unchecked so that the Wallflower does not automatically clean
up the email account.
SECURITY PHRASE
If you enter a security phrase, then only emails with this phrase in the subject
line will be accepted by the Wallflower. You can use this feature for spam prevention. The security phrase much match exactly.
VIRUSES
Your Wallflower is immune from viruses as it never executes anything received
via email.
ERROR REPORTING
The results of each email download are stored in text files which you can open
in Microsoft Word. In the main Images directory you will find a file called emaillog.txt and in the “email-in” album you will find a file called “log.txt”. If you are
experiencing problems with email download, have a look at these files for an
indication of the cause of the problem.
Sending Email
Your Wallflower can send photos or other content via email to a distribution list.
You can use this feature to update other Wallflowers or family and friends when
you add new images to your system.
EMAIL OUT ALBUM
Photos or other content that you wish to send must be put in the “email-out”
album. Each item will be sent only once, regardless of how long it is in the
email-out album.
SETTING UP OUTGOING
EMAIL
Unlike incoming email, outgoing email does not use an external email account.
All the Wallflower needs is an internet connection to send email.
The following settings are available for outgoing email:
6-48
Scrolling News Feeds (RSS)
• Outgoing Email Name: This is the name that will appear on the outgoing
email. Your recipients will see this as the “From:” entry in the email.
• Outgoing Subject: The contents of this field will be used as the subject for
emails sent by the Wallflower. It can be any text value such as “Pics from
Steve!”. If you are using the email out feature to synchronize with other Wallflowers, you might want to use this field as a common security phrase.
• Distribution List: This is the list of addresses to which outgoing emails will
be sent. One entry per line.
Scrolling News Feeds (RSS)
Your Wallflower can display scrolling news feeds (like CNN’s news crawler)
across the bottom of the screen while images are showing. Go to the RSS page
under “Internet” on your web browser for more information.
NOTE: News feeds do not show during videos.
6-49
Scrolling News Feeds (RSS)
6-50
Wallflower 2 User’s Guide
7
Other Features and
Settings
Buttons, Security and Maintenance Pages
This chapter covers a variety of topics not found in other chapters.
Advance/Enter Buttons
The Advance/Enter buttons are found on the op of the enclosure as shown in
the photo below.
On/Off
Enter
Advance
These buttons can be programmed for several features including volume up/
down, advance image, rewind, etc. Please go to “Setup” then click “Buttons”
through the web user interface.
DISPLAYING SYSTEM
STATUS
One handy feature that is enabled by default via the buttons is Status Overlay. If
you hold down the advance and enter button simultaneously, a small box will
7-51
Security Settings
pop on the screen with information about your system including IP address, network name and software revision. Clicking the buttons simultaneously again
makes the box go away.
Security Settings
You can enable username and password checking on both the web interface
and on the file server (windows file sharing). Through the web browser, go to
“Setup” then click on “security”.
SECURITY OVERVIEW
PAGE
The Security Overview page is shown below. This gives you a high level view of
your security settings.
WEB INTERFACE SECURITY
To enable web interface security, clcik on “Web Interface Security” then select
“Enable Web Server Security” and click submit. You will now be able to add/
delete users (up to a maximimum of 2 for the non-Business Edition version of
the Wallflower 2).
7-52
Security Settings
NOTE: As soon as you enable security, a user named “admin” is added with a
password “admin”. You should change these as soon as possible. DO NOT
LOSE YOUR PASSWORD.
FILE SERVER SECURITY
To enable file server security, clcik on “File Server Security” then select “Enable
File Server Security” and click submit. You will now be able to add/delete users
(up to a maximimum of 2 for the non-Business Edition version of the Wallflower
2).
7-53
Maintenance Pages
Maintenance Pages
By clicking on the Maintenance tab through the web browser you can get to the
Maintenance screen below.
MAINTENANCE TASKS
Restart: Clicking this link will reboot your Wallflower.
Shut Down: Clicking this link will power off your Wallflower.
Upgrade Software: Clicking this link upgrade your system software (see Software Upgrades, below).
Restore All Factory Defaults: Clicking this link will restore your system to outof-the box settings (your content will not be changed)
Clean Image Cache: Clicking this link will delete all resized and rotated temporary files your system has created. You should only do this if you are seeing
unusually resized or rotated images. It doesn’t hurt anything to click it, but all
your cached images will need to be recreated and your system will run slow for
a while.
Toggle Status Overlay: Clicking this will turn on/off the status overlay box
described above.
7-54
Software Upgrades
Software Upgrades
Your Wallflower’s software can be easily upgraded as follows:
1. Check which version of software you are running by going to the main
homepage of your web interface and looking for the entry.
2. Check the Wallflower on-line support pages for a software update that is
numerically greater than this version (in the case of the above image you
would be looking for an upgrade to version 2.1.2 or higher). MAKE SURE
YOU DOWNLOAD THE FILE FOR YOUR WALLFLOWER MODEL (i.e.
don’t try to install Wallflower Plus or Wallflower Classic upgrades on your
Wallflower 2).
3. Download the upgrade file. When the download is complete make sure the
size is close to that shown on the web site. If not, you may not have gotten
the whole package.
4. Copy the file to the main Images directory on your Wallflower.
5. Click on “Upgrade” on the Maintenance page.
6. Watch your Wallflower’s screen. It should show several informational messages as it goes through the upgrade. When it is done, it will reboot. Be
patient, this can take several minutes depending on the size of the upgrade.
Log Files
Several operations on your Wallflower product log files which can help you (or
us) debug problems. For example, both the email and web download operations
save messages that are viewable if there are problems.
To see the log files, click on the Maintenance tab, then click on System Logs.
7-55
Advanced Maintenance Functions
Advanced Maintenance Functions
There are several function under Advanced Maintenance. Do not fool around
with these unless directed to by Wallflower personnel or if directed to from our
website. We mean it!
Remote Control and Advanced Scripting
The Wallflower 2 for Business supports advanced remote control and scripting
capabilities. Please contact us if you need more information.
7-56