1
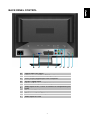
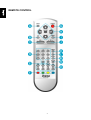
ENGLISH
USER MANUAL
DEUTSCH
FRANCAIS
NEDERLANDS
Thank you very much for choosing the iiyama
LCD monitor.
We recommend that you take a few minutes to
read carefully through this brief but
comprehensive manual before installing and
switching on the monitor. Please keep this
manual in a safe place for your future
reference.
PLC1900WTV-e.P65
2007/07/04, 17:28
English
Explanation of WARNING Symbols
Dangerous Voltage: The lightning flash with arrowhead symbol, within an
equilateral triangle, is intended to alert the user to the presence dangerous
voltage within the inside of the product that may be sufficient level to
constitute a risk of electric shock to persons.
Instruction: The exclamation point within an equilateral triangle is intended
to alert the user to the presence of important operating and servicing
instructions in the literature accompanying the appliance.
Safety instructions
1)
2)
3)
4)
5)
6)
7)
8)
9)
10)
11)
12)
13)
14)
15)
16)
Read these instructions.
Keep these instructions.
Heed all warnings.
Follow all instructions.
Do not use this LCD TV near water.
Clean only with dry cloth. Do not use liquid, alcohol, or aerosol cleaners.
Do not block any ventilation openings. Install your LCD TV in a well-ventilated
area.
Keep your LCD TV away from moisture, excessive dust and any heat sources,
such as radiators, heat registers, stoves, or any other apparatus (including
amplifiers) that produce heat.
Do not remove the back cover. There are no user-serviceable parts inside.
Do not defeat the safety purpose of the polarized or grounding-type plug. A
polarized plug has two blades with one wider than the other. A grounding type plug
has two blades and a third grounding prong. The third prong is provided for your
safety. If the provided plug does not fit into your outlet, consult an electrician for
replacement of the obsolete outlet.
Protect the power cord from being walked on or pinched particularly at plugs,
receptacles, and the point where they exit from the LCD TV.
Never rest objects on the power cord or place it in high traffic areas. It is better to
use the point where they exit from the apparatus.
Only use attachments/accessories specified by the
manufacturer.
Use only with the cart, stand, tripod, bracket, or table specified
by the manufacturer, or sold with the LCD TV. When a cart is
used, use caution to avoid injury from tip-over.
Unplug this LCD TV during lightening storms or when unused
for long periods of time.
Refer all servicing to qualified service personnel-- Servicing may be required if the
LCD TV has been damaged in any way, such as power-supply cord or plug is
damaged, liquid has been spilled or objects have fallen into the apparatus, the
apparatus has been exposed to rain or moisture, does not operate normally, or has
been dropped.
CAUTION: Any damage caused by incorrectly attempting to mount this
LCD TV is not covered under the terms of the manufacturers warranty.
WARNING: To reduce the risk of fire or electric shock, do not expose this
LCD TV to rain or moisture.
According to WEEE regulation , this monitor can't be handled as normal trash in
Europe when it is out of usage. Please refer to the recycle information from our
website to handle it.
English
17) Do not expose your LCD TV to dripping or splashing, and no objects filled with
liquids be placed on it.
18) The Shock Hazard Marking and Associated Graphical Symbol are provided on the
back panel of unit.
19) This product is only to perform the useful function of entertainment and visual
display tasks are excluded.
20) Wall or ceiling mounting: When mounting the product on a wall or ceiling, be sure
to install the product according to the method recommended by the manufacturer.
Use only their indicated mounting hardware for safety.
English
Content
Deutsch
Français
Nederlands
ACCESSORIES...................................................................................................................1
FRONT PANEL CONTROL..................................................................................................2
BACK PANEL CONTROL ....................................................................................................3
REMOTE CONTROL ...........................................................................................................4
INSTALLATION....................................................................................................................8
Connecting RF antenna or Cable TV Wire ...................................................................8
Connecting to DVD/ Set Top Box..................................................................................8
Connecting to a Computer..........................................................................................10
Connecting with the Power Cord ................................................................................10
BASIC OPERATION .......................................................................................................... 11
Turning the LCD TV .................................................................................................... 11
Power On/Off .............................................................................................................. 11
Selecting input source ................................................................................................ 11
Volume Adjust............................................................................................................. 11
Channel Select ........................................................................................................... 11
Sleep Time Setting...................................................................................................... 11
Sound ......................................................................................................................... 11
Using the OSD Menu.................................................................................................. 11
ADVANCED OPERATION—OSD MENU ..........................................................................12
In HDMI, TV, AV, SCART, YPbPr mode ......................................................................12
Picture Menu .......................................................................................................12
Sound Menu ........................................................................................................12
OSD Menu...........................................................................................................13
Channel Menu .....................................................................................................13
In PC Function (VGA and HDMI-DVI mode) ...............................................................15
PC Menu .............................................................................................................15
Sound Menu ........................................................................................................16
OSD Menu...........................................................................................................16
TECHNICAL INFORMATION.............................................................................................17
SAFETY PRECAUTIONS ..................................................................................................18
CARE AND MAINTENANCE .............................................................................................19
TROUBLESHOOTING.......................................................................................................19
English
ACCESSORIES
Thank you for purchasing this LCD-TV of high performance!
This LCD-TV package comes with:
Deutsch
LCD TV
User’s Guide Book
Remote Control
Battery AA x 2
Power Cord
VGA Cable
RCA A/V Cable
HDMI Cable
Audio Cable
Français
Nederlands
1
English
FRONT PANEL CONTROL
XYZ[ \ ] ^ _
X
Volume Down (Adjust Decreasing)
Y
Volume Up (Adjust Increasing)
Z
On Screen Display Menu Key (Back to Previous Menu)
[
Scroll Down (Channel Down)
\
Scroll Up (Channel Up)
]
Input Source Selection (Enter)
^
Power On/Off Switch
_
Power LED Indicator/ Remote Control Receiver
2
English
BACK PANEL CONTROL
Deutsch
Français
Nederlands
A
B
A
Power Input (AC Input)
B
HDMI (support HDCP or PC) Signal Input
C
VGA (15 pin) Signal Input from Computer
D
SCART Signal Input
E
YPbPr / HD Component Video Input
F
Audio Input for AV, YPbPr or HDMI-DVI components (left/
right)
G
Composite Video Input
H
RF Antenna / Cable TV Input
I
Audio Input for VGA
C
D
3
E
F
G
H
I
English
REMOTE CONTROL
4
B
TV
Switch to TV when in any source
C
VOL +/–
Adjust volume up or down
D
0~9 number
Change channel number
E
LAST
Return to previous channel
RED
In Teletex function: move cursor down
In Name function: edit channel name / select channel for
exchange
GREEN
In Teletext function: move cursor up
In Name function: add desired channels / select channel for
exchange
F
YELLOW
BLUE
In Teletext function: change from current page to selected page
In Name function: erase desired channels
In Teletext function: go out from CURSOR Mode
In Name function: confirm edited name
G
POWER
Power ON/OFF
H
UP/ DOWN/ LEFT/
RIGHT/ ENTER
UP/ DOWN/ LEFT/ RIGHT: Navigate and adjust OSD function
ENTER: Enter the function setting
I
MENU
On Screen Display (OSD) menu ON/OFF
J
CH ▲ and CH ▼
Adjust Channel UP/DOWN
K
MUTE
Volume mute ON/OFF
L
INFO
Display current information
M
SLEEP
Get into sleep timer setting
N
SOUND
Display the current sound mode
O
TELETEXT
FUNCTION
CONTROL button
Enter to teletext mode (refer to page 6~7)
5
Nederlands
Input source select
Français
INPUT
Deutsch
A
English
Function of remote control button
English
Teletext function control button
•
PICTURE button
In MIXED Mode: Press the button to return from MIXED mode to the normal TV
Screen (current program).
•
•
TEXT/ MIX button
In TV Mode: Press the TEXT/ MIX button to enter the Teletext mode.
In TELETEXT Mode: Press the button again to superimpose a Teletext broadcast onto
the screen of current TV program (Mixed mode).
•
•
•
•
•
•
•
•
•
•
•
•
Store button
Store current page in List mode.
Press the LIST button to change from FLOF system to LIST Mode.
Press a coloured button corresponding to the coloured brackets on the screen for page
number storage.
Enter the Teletext page number using the 0 ~ 9 digit buttons (enter three digits).
Press the STORE button to memorize the page numbers you require.
Hold button
Press this button to remove the information from the display and stop the automatic
page change which will occur if a teletext page consists of 2 or more sub pages.
To continue to press this button again. The number of sub pages and the sub page
displayed is, usually, shown on the screen below the time. When this button is pressed
the stop symbol is displayed at the left-top corner of the screen and the automatic
changing is inhibited.
Index button
Press the Index button to return to index page.
•
When you press this button in teletext mode, a CURSOR appears. This cursor
(rectangular box) contains a page number and you can select the desired page
simply by using the four colours.
RED button: Move cursor down.
GREEN button: Move cursor up.
YELLOW button: Change from current page to selected page.
BLUE button: Exit the CURSOR Mode.
6
•
7
Nederlands
•
Reveal button
Press this button to display concealed information, such as solutions of riddles or
puzzles.
Press this button again to remove the information from the display.
English
Size button
Select double height text under Teletext mode for full screen.
Press this button to enlarge the top half of the page.
Press this button again to enlarge the bottom half of the page.
Press this button again to return to the normal display.
Français
•
•
•
•
•
Deutsch
•
List button
Press this button you force the Teletext to LIST Mode. It means that row 24 (bottom row
of Teletext) will not have transmitting information, only the pages that you have
previously stored in the memory.
Press LIST button again to exit from LIST Mode to teletext.
INSTALLATION
English
Connecting RF antenna or Cable TV Wire
Make sure the power is OFF before installing your LCD TV. Connect the LCD TV to TV antenna
wire or cable/satellite box with 75-ohm coaxial cable.
Preset the TV channels into memory with AUTO SCAN function (See page 13) when using an
antenna or cable TV system without a cable connecter box.
RF Cable or Adapter
(not supplied)
Connecting to DVD/ Set Top Box
Connect Video/ Audio cables from compatible devices into the back panel of LCD TV.
1) With RCA A/V cable:
VCD or DVD Player
RCA A/V Cable
2) With SCART cable:
SCART Cable (not supplied)
VCD or DVD Player
8
3) With YPbPr cable:
English
YPbPr Cable (not supplied)
Français
VCD or DVD Player
Deutsch
Audio in Cable (not supplied)
4) With HDMI cable:
Nederlands
VCD or DVD Player
HDMI Cable (not supplied)
5) With HDMI to DVI cable:
Audio Cable (not supplied)
VCD or DVD Player
HDMI Cable (not supplied)
9
English
Connecting to a Computer
1) VGA (15pin D-Sub): Connect the VGA cable from VGA output of the computer to the VGA
terminal input of your LCD TV. Also, connect the Audio In cable (green) from the audio output
of your computer to the audio input terminal (green) of the LCD TV.
PC
PC Audio In Cable
(not supplied)
VGA 15Pin Cable
2) HDMI-DVI cable: Connect the HDMI-DVI cable from the DVI output of the computer to the
HDMI terminal input of the LCD TV. Also, connect the green end of the Audio In cable from the
audio output of your computer to the audio input terminal (red/white) of the LCD TV.
PC
Audio In Cable
(not supplied)
HDMI to DVI Cable (not supplied)
Connecting with the Power Cord
Connect the power cord to the power cord connector on the back of your LCD TV, and plug the
other end of the power cord into a correctly grounded electrical outlet.
AC power
socket
Power cable
10
English
BASIC OPERATION
To operate your LCD TV, you may use the TV remote control or top panel buttons to select input
source, change channels, or adjust volume.
Before using the LCD TV:
Connect external equipments properly.
Insert the power plug, and the power LED indicator will light orange.
Selecting input source
Press the INPUT button on the remote control, and use ▲▼ to select the required input source
between PC, HDMI, TV, AV, SCART, or YPBPR.
Volume Adjust
Press – VOL + to adjust volume.
To turn off the volume, press MUTE.
To restore volume, press MUTE again, or press – VOL + directly.
Channel Select
Press number buttons or ▼CH▲ buttons to select the desired channels.
Ex: the desired channel is 8--Press 0 → press 8, or press 8 only.
Return to previous channel, press LAST button.
Sleep Time Setting
Repeatedly press SLEEP button to set the off timer. The function is used to automatically shut off
the LCD TV after a preset period of time passed.
There are several times for choice -- 15min, 30min, 45min, and 60min.
To cancel Sleep Time function, choose 0 min.
Sound
Repeatedly press SOUND button on the remote control to select audio language. The available
selection include stereo, mono, SAP, etc.
Using the OSD Menu
You are able to use OSD menus to adjust various settings by using your remote control or menu
button on the top of the LCD TV.
The basic operation is as following:
• Press MENU to display OSD menu.
• Use ◄► to move the cursor left and right to select OSD menu page.
• Press ENTER or ▼ to enter the OSD menu page.
• Use ▲▼ to select the optional item you want to adjust.
• Press ◄► to adjust levels or select the items.
• Press MENU again to exit current OSD page.
11
Nederlands
To turn the LCD TV on/off:
Press POWER button on the bottom of LCD TV or press POWER button on your remote control to
turn on/off the TV. The power LED indicator lights blue when the LCD TV is on.
Note: when there is no signal in the PC mode, the power LED indicator lights orange after a few
seconds’ idleness.
Français
Power On/Off
Deutsch
Turning the LCD TV
English
ADVANCED OPERATION—OSD MENU
You can use the OSD menu to adjust various settings for your LCD TV.
Press the MENU button to display the OSD Menu, and use ◄ ► to select the desired OSD menu.
In HDMI, TV, AV, SCART, YPbPr mode
Picture Menu
When input source is TV,
When input source is HDMI, AV, SCART, or
YPbPr:
Contrast: To adjust contrast of video.
Brightness: To adjust luminance of video.
Colour: To adjust colour.
Tint: To adjust tint level.
Sharpness: To adjust picture sharpness.
Colour Temp.: To select colour Temperature by pressing ◄► — Normal, Warm, or Cool.
Aspect Ratio: To select image size between Full, Zoom1, Zoom2, Normal, Panaroma, WSS.
Note: Panaroma is not supported when video resolution is 720p or higher, and WSS is available only
under TV, SCART, or AV input source.
Sound Menu
When input source is TV,
When input source is HDMI , AV, SCART, or
YPbPr:
Bass: To adjust the bass.
Treble: To adjust the treble.
Balance: To adjust the left and right audio balance.
12
AVC: To select automatic volume control circuitry (AVC) ON or OFF. (only available in TV mode)
English
OSD Menu
When input source is TV,
When input source is HDMI , AV, SCART, or
YPbPr:
Deutsch
Français
Note: The Canal+ function is available only when the input source is SCART.
Reset: To recall factory setting condition. Press ENTER to recall all settings.
Channel Menu
It is only active in TV source.
Auto Scan: To automatically preset the channels into TV’s memory. Select the country of your
area with ◄► and then press ENTER to perform Auto Scan. If the country is not listed in the
13
Nederlands
Sleep: To set TV sleep timer between 15 min, 30 min, 45 min, 60 min, or OFF.
TTX Language: To select the language of Teletext content from WEST, EAST, RUSSIAN, ARABIC,
and FARSI with ◄►. (only available in TV, AV, or SCART mode)
OSD Language: To select the OSD language between English, French, German, Spanish, Italian,
Portuguese, Dutch, and Swedish with ◄►.
OSD H. Position: To adjust the horizontal position of OSD.
OSD V. Position: To adjust the vertical position of OSD.
Duration: To automatically shut off the OSD after a preset period of time passed.
Use ◄►to preset the time from 15 to 60 seconds. To keep the OSD on, select OFF.
Canal+: To enable SCART connector to support Canal+ Set Top Box (available in French). For
normal SCART function, please select OFF.
English
selection area, select “OTHERS.” Kindly suggest you auto scan all the channels before watching
your TV for the first time.
Note: After auto scanning all the channels, you need not to do it again when turning on your TV next
time.
Manual Store: To search the detectable channels and store them into memory manually.
1.
2.
3.
4.
5.
6.
Press ◄ or ► to get into “Manual Store.”
Move the cursor to “Prog. No, “ and select the desired channel position with ◄►.
Move the cursor to “System,“ and select the system according to your local area with◄►.
Move your cursor to “Search,” and search the detectable channels with ◄►.
Move your cursor to “Fine Tune,” and adjust the picture with ◄►.
Move to Store, then Store the instruction with ENTER.
Note: The channel will be stored instead of the former program.
Name: To enter a name for program with 0~9 and A~Z. Press ◄ or ► to get into “Name.”
1. To enter a name:
Press red key (on the remote control) to edit a name for the channel.
Use ▲▼ to select the desired letter and use◄► to move the cursor to enter next letter. After
the desired name is entered, press blue key (OK) to confirm.
2. To Erase/ Add channels:
Use ▲▼ to select the desired channel.
Press yellow key to erase the channel or press green key to add it.
When using ▲CH▼ key, the channels you erased will be passed over. You may press green
key to add the erased channels or use Auto Scan function to re-present them.
3. To exchange one channel with another:
Press blue key to enter the function of “Sort,” and the following screen will show.
If you want to exchange channel 1 with channel 2:
14
Move your cursor to channel 1 and press red key (Sel1) to select channel 1.
Move your cursor to channel 2 and press green key (Sel2) to select channel 2.
Confirm your selection by pressing blue key (OK).
Press MENU to exit.
English
1.
2.
3.
4.
In PC Function (VGA and HDMI-DVI mode)
When input source is PC:
When input source is HDMI (PC function):
Deutsch
PC Menu
Français
Nederlands
Auto Adjust: Auto adjust picture’s horizontal position, vertical position, fine tune, and H-Size with
◄►. (disabled in HDMI)
Contrast: To adjust foreground luminance of video.
Brightness: To adjust background luminance of video.
Colour Mode: To adjust colour temperature.
1. Press ◄ or ► to get into Colour Mode.
2. Use ◄►to select between Normal, Warm, Cool and User.
3. When “User” is selected, it allows you to adjust the colour of red, green, and blue separately.
H-Position: To adjust horizontal position of video. (disabled in HDMI)
V-Position: To adjust vertical position of video. (disabled in HDMI)
Clock: To adjust delay time of clock in order to reduce the noise of picture. (disabled in HDMI)
Phase: To adjust delay time of phase in order to reduce the noise of picture. (disabled in HDMI)
15
English
Sound Menu
Bass: To adjust the bass.
Treble: To adjust the treble.
Balance: To adjust the left and right audio balance.
AVC: Enable or disable Auto volume control. (disabled in PC source)
OSD Menu
Sleep: To set TV sleep timer between 15 min, 30 min, 45 min, 60 min, or OFF.
TTX Language: Disabled in PC & HD (YPbPr) source.
OSD Language: To select the OSD language between English, French, German, Spanish, Italian,
Portuguese, Dutch, and Swedish with ◄►.
OSD H - Position: To adjust the horizontal position of OSD.
OSD V - Position: To adjust the vertical position of OSD.
Duration: To automatically shut off the OSD after a preset period of time passed.
Use ◄►to preset the time from 5 to 60 seconds.
Canal+: Disabled in PC source.
Reset: Press ENTER to reset all the settings in PC page.
16
LCD
Type
English
TECHNICAL INFORMATION
19.05” TFT Active Matrix
0.285(H) x 0.285(V) mm pixel pitch
RGB vertical stripe
Glass surface
Anti-Glare
RGB
RGB analog (0.7/1.0 Vp-p, 75 ohms) Separate Sync,
fh: 30-80 kHz, fv:50-75 Hz
Video
1 composite RCA, 1 SCART, 1 YPbPr component,
1 HDMI
Audio
1 mini-stereo, 1 pair of RCA (L/R) stereo
Compatibility
PC
Up to 1440 x 900 Non-interlaced
Resolution
Recommended
1440 x 900 @ 60
and supported
1280 x 1024 @ 60 Hz, 75 Hz
1024 x 768 @ 60, 75 Hz
800 x 600 @ 60, 75 Hz
640 x 480 @ 60, 75 Hz
Speaker Output
2.5W x 2
Power
Voltage
100-240 VAC, 50/60 Hz (auto switch)
Display area
Full Scan
410.4 mm (H) x 256.5 mm (V)
16.2” (H) x 10.1” (V)
Operating
Temperature
32°F to + 104°F ( 0°C to + 40°C)
conditions
Humanity
20% to 70% (no condensation)
Altitude
To 10,000 feet (3,000m)
Temperature
-4°F to + 140°F (-15°C to + 60°C)
Humanity
20% to 90% (no condensation)
Altitude
To 40,000 feet (12,000m)
Physical
443.0mm (W) x 379.7mm (H) x 210mm (D)
Storage condition
Dimensions
17.4’’ (W) x 14.9’’ (H) x 8.3’’ (D)
Weight
Net
Regulations
Power saving modes
4.95 kg (10.9 Ib)
CE, CB
On
< 50 W (blue LED)
Active Off
< 2 W (orange LED)
Warning: Do not set the graphics card in your computer to exceed these refresh rates; doing so may
result in permanent damage to the LCD TV
17
Nederlands
TV system Antenna - PAL / SECAM
Français
RF
Deutsch
Input signal
Color Filter
English
SAFETY PRECAUTIONS
This LCD TV is manufactured and tested on a ground principle that a user’s safety comes first.
However, improper use or installation may result danger to the LCD TV as well as to the user.
Carefully go over the following WARNINGS before installation and keep this guide handy.
Warnings
This LCD TV should be operated only at the correct power sources indicated on the label on
the rear end of the LCD TV. If you are unsure of the power supply in your residence, consult
your local dealer or power company.
Do not try to repair the LCD TV by yourself as it contains no user-serviceable parts. The LCD
TV should be repaired by a qualified technician only.
Do not remove the LCD TV cabinet. There is high-voltage parts inside that may cause electric
shock to human bodies, even when the power cord is disconnected .
Stop using the LCD TV if the cabinet is damaged. Have it checked by a service technician.
Put your LCD TV only in a clean dry environment. Unplug the LCD TV immediately if it gets
wet, and consult your service technician.
Always unplug the LCD TV before cleaning it. Clean the cabinet with a clean dry cloth. Apply
non-ammonia based cleaner onto the cloth, not directly onto the glass screen.
Keep the LCD TV away from magnetic objects, motors, TV sets, and transformer.
Do not place heavy objects on the cable or power cord.
For PLUG CABLE EQUIPMENT, the Socket-outlet shall be installed near the equipment and
shall be easily accessible.
18
English
CARE AND MAINTENANCE
Care
TROUBLESHOOTING
No Power
Make sure A/C power cord is securely connected to the power supply is firmly connected to the
TV.
Plug another electrical device into the power outlet to verify the outlet is working.
Power on but no screen image
Make sure the video cables are tightly secured.
You have selected the correct video input.
Adjust brightness.
Make sure all cables are installed.
Wrong or abnormal colors
If any colors (red, green, blue) are missing, check the video cable to make sure it is securely
connected. Loose or broken pins in the cable connector could cause an improper connection.
Connect the TV unit to another video source or use another TVs to make sure the video source
is no problem.
19
Nederlands
If smoke, abnormal noise or odor appears to arise from your LCD TV. Remove the power cord
immediately and call your service center.
CAUTION-Never remove the rear cover of your LCD TV cabinet. The display unit inside
contains high-voltage and may cause electric shock to human bodies.
Never try to repair your LCD TV yourself. Always call your authorized service center or a
qualified technician to fix it.
Français
Safety Tips
Deutsch
Avoid exposing your LCD TV directly to sunlight or other heat source. Place your LCD TV
away from the sunlight to reduce glare.
Put your LCD TV in a well ventilated area.
Do not place anything heavy on top of your LCD TV.
Make certain your LCD TV is installed in a clean and moisture-free area.
Keep your LCD TV away from magnets, motors, transformers, speakers, and other TV sets.