1
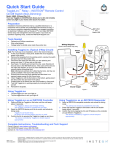
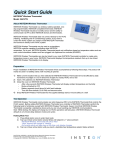
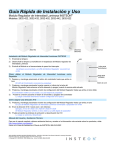
Quick Start Guide INSTEON® Thermostat (#2441TH) Remote Control, 2-Stage H/C, 7-Day Programmable Thermostat and Humidistat About INSTEON Thermostat - Confirm your existing system does not have a heat pump Confirm your system has 4 or 5 wires (if 4 wires, you’ll need an “add-awire” adapter) Installation should only be performed by a qualified HVAC technician or a homeowner who is familiar and comfortable with electrical circuitry. If you have questions, consult an HVAC Technician or call the INSTEON Support Line at 800-762-7845. Tools needed: flathead screwdriver and wire cutter/stripper Add zone control to the system by adding INSTEON Wireless Thermostats - - Installation 1) 2) 3) 4) 5) 6) 7) 8) 9) 10) 11) 12) 13) 14) 15) 16) 17) Do not remove wires from existing thermostat until instructed to do so. If you have A/C, turn off A/C breaker. a. Confirm A/C is off by turning on air and observing that compressor/fan does not come on. Turn off breaker/fuse to furnace. a. If thermostat has no power, proceed to step 4. b. Try to turn on heat. If it does not come on, proceed to step 4. c. Otherwise, turn off heat and wait until furnace fan stops. Turn off other breakers until heat no longer runs. Remove cover from thermostat to gain access to wires (may need to detach from wall). If necessary, take photo of wiring connections to help with reconnections. If possible, while still connected, attach “C” label to wire connected to “C” on thermostat. Disconnect your C wire from thermostat. Label wire if necessary. Repeat steps 6 and 7 for all remaining wires. Remove existing thermostat backplate from wall. Remove 3” of the outer jacket covering the bundle of wires (the jacket cannot remain inside INSTEON Thermostat or device may malfunction). If you cannot get the individual wires to extend 3” beyond outer jacket, you will need to splice on extension wires.) Slide wires (but not outer jacket) through the black draft shield grommet. Mount INSTEON Thermostat to wall. Insert C wire into terminal C and tighten. Repeat for other wires matching terminal designations. Close front of INSTEON Thermostat onto back mounting plate until you hear a click. Turn on breaker(s). After a few seconds INSTEON Thermostat will display the ambient temperature. If INSTEON Thermostat displays a two-digit error code, open the unit and tap the reset button. Close unit and wait a few seconds as it restarts. If problem persists, call the INSTEON Support Line at 800-762-7845. Getting Started Button Name Up arrow Down arrow Mode Set Program Time/Sensor Master Fan Hold Energy (Leaf) Button Function Adjust heat, cool or both setpoints up 1°. Adjust heat, cool or both setpoints down 1°. Cycle between modes (Heat, Cool, Auto, Time of Day and Off). Adding and removing INSTEON Thermostat to and from INSTEON scenes Adjust preprogrammed scenes (Wake, Leave, Return and Sleep). Adjust clock settings. Press and hold to set as the “active” thermostat (with one or more INSTEON Wireless Thermostats). Cycle between fan-always and fan-auto. Lock current settings (until tapped again or INSTEON release command). Save energy by dropping the heat and cool setpoints by 4° (adjustable). Set Clock 1) 2) 3) 4) 5) Tap Time/Sensor button. Hours will blink. Tap Up or Down arrow until current hour and AM/PM are shown. Tap Time/Sensor again. Minutes will blink. Tap Up or Down arrow until current minutes are shown. Tap Time/Sensor again. Day will blink. 2441TH Rev. 6/28/2012 4:02 PM / See Owner’s Manual for Warranty Information. Protected under U.S. and foreign patents (see www.insteon.com) © Copyright 2012 INSTEON, 16542 Millikan Ave., Irvine, CA 92606, 800-762-7845 6) 7) Tap Up or Down arrow button until current day is shown. Tap Mode to exit. Set Heat and Cool Temperatures Heating 1) Press Mode button once to enter Heat mode. 2) Tap the Up arrow several times until heat setpoint is 2° above ambient. INSTEON Thermostat will call for heat and “Heat” will change to “Heating” and flash briefly. 3) Confirm proper function by letting your furnace to operate long enough to begin blowing warm air. 4) Tap the Up/Down arrows until you reach a desirable heat setpoint. Cooling 1) Wait until at least six minutes have passed since furnace was heating. 2) Tap mode button a second time to enter Cool mode. 3) Tap the down arrow several times until cool setpoint is 2° below ambient. INSTEON Thermostat will call for cooling and “Cool” will change to “Cooling” and flash briefly. 4) Confirm proper function by letting A/C operate long enough to begin blowing cool air. 5) Tap the Up/Down arrows until you reach a desirable cool setpoint. Auto Mode 1) Tap Mode button until Auto appears. Heat and cool setpoints are as set in previous steps. 2) Tap Up once to increase both heat and cool setpoints by 1°. 3) Tap Down once to decrease both heat and cool setpoints by 1°. 4) As desired, tap Mode button a third time to cycle to Time of Day mode (see Owner’s Manual for instructions) and a fifth time to cycle back to Off mode. Make INSTEON Thermostat an INSTEON Controller INSTEON Thermostat can control other INSTEON devices or trigger software events when there is a change. The following INSTEON Thermostat changes can be set up as a controller: Group 1 - Cooling mode change (scene control) Group 2 - Heating mode change (scene control) Group 3 - Humidification, high humidity setpoint (scene control) Group 4 - Dehumidification, low humidity setpoint (scene control) 1) Press and hold INSTEON Thermostat set button until it beeps. LED will start blinking green. 2) Tap Up and Down button to add to a Scene to Group 1 through 4 (default setting = Cooling mode, Group 1). 3) Adjust scene responder to the state you want when scene is activated from INSTEON Thermostat (e.g. 50%, 25% or even off). 4) Press and hold responder Set button until unit double-beeps and/or LED flashes. INSTEON Thermostat will double-beep and its LED will stop blinking. 5) Test by tapping INSTEON Thermostat mode button to chosen scene (i.e. Heat or Cool mode). Each time mode selected in step 2 becomes active, responder will turn on (or off). Make INSTEON Thermostat an INSTEON Responder 1) Set INSTEON Thermostat to desired state (mode, setpoint, fan state and energy button state). 2) Press and hold controller set button until it beeps (or LED flashes). Controller LED will start blinking. 3) Press and hold INSTEON Thermostat set button until it beeps. INSTEON Thermostat will double-beep. If you want INSTEON Thermostat to also respond to an off command (e.g. control from a toggle button). 1) Set INSTEON Thermostat to desired state. 2) Press and hold controller Set button until it beeps (or LED flashes). Controller LED will start blinking. 3) Press and hold INSTEON Thermostat Set button and Down Arrow until it beeps. INSTEON Thermostat will double-beep. Owner’s Manual and Tech Support For the Owner’s Manual and the most current Quick Start Guide, visit http://www.insteon.com/support Call: INSTEON Support Line at 800-762-7845 2441TH Rev. 6/28/2012 4:02 PM / See Owner’s Manual for Warranty Information. Protected under U.S. and foreign patents (see www.insteon.com) © Copyright 2012 INSTEON, 16542 Millikan Ave., Irvine, CA 92606, 800-762-7845