1
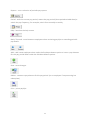
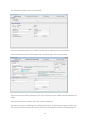
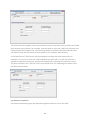
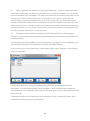
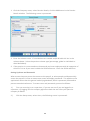
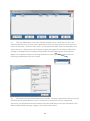
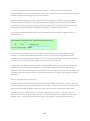
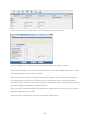
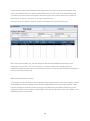
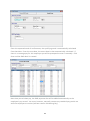
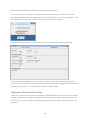
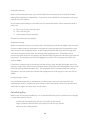
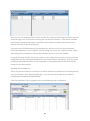
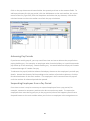
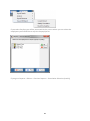
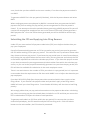
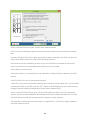
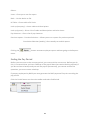
User Guide 1 Contents Introduction .............................................................................................. 4 Navigating Payroll ...................................................................................... 4 Drop Down Menus ................................................................................... 4 Main Toolbar ........................................................................................... 4 Employee Navigation Tree ........................................................................ 6 Sorting and Searching for Employees ......................................................... 7 Creating a New Company Payroll ................................................................. 8 Split Schemes ....................................................................................... 10 Setting up pay frequencies and selecting the first pay period ...................... 11 Configuring the Company Payroll ............................................................. 12 Pay Elements ..................................................................................... 12 Adding a New Pay Element .................................................................. 12 Pay Element Templates ....................................................................... 15 Setting up Pensions ............................................................................ 17 Setting Up Users and Passwords ........................................................... 18 Creating Employees.................................................................................. 20 Department ....................................................................................... 21 CIS Deductions .................................................................................. 24 Specifying Basic Pay and Regular Deductions............................................... 24 Working with Quantity, Unit and Amount .................................................. 24 Flat Rate Pension ................................................................................... 24 Attachment of Earnings .......................................................................... 25 RTI (Real Time Information) Setup ............................................................. 25 EAS (Employer Alignment Submission).................................................. 26 Multiple EASs (split payroll scheme) ...................................................... 27 Taking on a Payroll Mid Tax Year ............................................................. 27 Take on YTD figures for employees ....................................................... 28 Applying SSP, SMP, SAP or SPP ............................................................... 30 SSP (Statutory Sick Pay) ..................................................................... 30 SMP (Statutory Maternity Pay) ............................................................. 31 SPP (Statutory Paternity Pay) .............................................................. 33 ASPP (Additional Statutory Paternity Pay) .............................................. 34 SAP (Ordinary Statutory Adoption Pay) ................................................. 36 ASPP (Adoption) (Additional Statutory Paternity Pay (Adoption)) .............. 37 Employees Starting and Leaving ................................................................ 37 Employee Starting .............................................................................. 38 Employee Leaving .............................................................................. 38 2 Re-employing a Leaver........................................................................ 38 Calculating Pay ........................................................................................ 38 Payment Date ....................................................................................... 39 Capturing Variable Pay Data ................................................................... 39 Spreadsheet ...................................................................................... 39 Working with Periodic Pay.................................................................... 40 FPSs Filed Late – Applying Late Filing Reasons ........... Error! Bookmark not defined. Advancing Pay Periods ...................................................................................... 41 Suspending Employees from a Pay Period ............................................................ 41 Printing and Previewing Reports and Payslips ....................................................... 42 Making BACS Payments ..................................................................................... 46 Submitting the FPS and Applying Late Filing Reasons ............................................ 47 Final FPS of the Tax Year or Scheme has Ceased ..................................................... 48 Reports .............................................................................................................. 49 Previewing and Printing General Reports ............................................................. 49 Ending the Pay Period .......................................................................................... 52 Employer Payment Submission (EPS) .................................................................. 53 Submitting an EPS for a split scheme ............................................................................ 55 Switching Pay Frequencies ................................................................................. 55 Restarting a Pay Period ..................................................................................... 55 Receiving HMRC Notices via DPS ........................................................................ 56 Payroll Year End ............................................................................................... 56 Backing up Data ............................................................................................... 57 Restoring data ................................................................................................. 57 3 Introduction Navigating Payroll Drop Down Menus Click File, here you will find open company, close company, change password, back up, restore, repair company, delete company, register, printer setup, a list of previously opened companies and exit. Click Payroll, you will find options for processing date, import, reports, payslips, payments, export data, period and end of year. Click Setup, you will find banks, parameters, BACS/BITS, import specification, user and configure system. Click Company, you will find setup, pay elements, pension details, bank details, make BACS payment to Revenue, HMRC credentials, P45/46 online filing, P35 extra information, P35 checklist, change name in list, Transfer Company and notes. Click Reports, you will find employee, company, year end, others and custom. Click Help, you will find contents, internet, latest changes, calculator, licence agreement and about Keytime Payroll. Main Toolbar Buttons on the main toolbar will change when you click either the Employees or Calculate buttons. When working with Employees button (default on load) the toolbar looks like this: You will notice that as you click either button, the other is disabled (greyed out), so for example, if you click Employees, the Employees button is subsequently disabled meaning that you can only click the Calculate button. When working under the Employee button you can change static information like Tax Code’s etc… and also this is where you will add SMP and SSP. SSP / SMP/SPP / SAP/SPP - launches the screen where you enter the relevant information 4 Reports - runs a selection of periodic pay reports. Period - ends the current pay period, restart the pay period (clears period variable data) or switch the pay frequency, for example, switch from monthly to weekly. Help - launches the help screen. Back / Forward - move between employees when reviewing payslips or amending periodic pay details. Add – add a new employee when under the Employee button option or insert a pay element for this pay period when under the Calculate button options. Save - saves changes. Delete - removes a pay element for this pay period. (or an employee if no processing has taken place) Print - prints payslips. 5 Employee Navigation Tree Employees can be found in the employee navigation tree, which runs down the left of the main window: When working with the Employees button click an employee in the navigation tree and the employee's static details will open on screen. When working in payroll calculation (click Calculate on the main toolbar), click an employee in the navigation tree and the employee's periodic pay calculation will appear. You can add, edit or delete pay elements in this screen. 6 The top toolbar changes to look like this. Spreadsheet - Runs a Spreadsheet to capture variable data for this pay period, such as overtime hours. Re-Calculate - Click Re-Calculate to refresh the payslip after making changes to pay details. You must place a tick in the box next to the employee for the recalculate to work. Reports - Click to run a selection of periodic pay reports. Payments - Makes payments to employees using any combination of methods. Sorting and Searching for Employees You can sort employees in the navigation tree in a number of ways. Click the drop down in the sort field at the top of the navigation tree: You can sort employees by department, payment type, employment ID, status, clock no, period, or surname. Choose a sort order from the drop down menu and click the green arrow to the right of the field to refresh the tree. You can also order the list in ascending or descending order by clicking the AZ and ZA buttons. 7 To search for an employee, type the employee name, or part thereof into the search field, which can be found directly below the sort order drop down menu, click the search button to the right of the field. Creating a New Company Payroll Open the payroll and when presented with the company list screen, click New Company, enter the company name as it will appear on reports and payslips. If this is an existing scheme tick the existing payroll scheme box, this adds additional ‘take on’ functionality including previous employee IDs, click Create. 8 The Company Details screen is presented: Enter the company details; any fields marked with a red asterisk are mandatory. Click the References/Tax office details tab, the following screen is presented: Enter the accounts office reference, this can be found on your P30BC payment booklet or P30B. Enter the tax district number and PAYE scheme reference. You have the option of adding your company/tax payer UTR (unique tax payer reference); the UTR is used when filing tax returns and acts as an additional means of identifying the 9 employer when used in payroll submissions to HMRC. It isn’t mandatory; if you do not know the reference or you don’t want to use it, leave it blank. Split Schemes A split scheme means you have a single scheme reference, but not all employees are contained in a single payroll. For example, you may have one scheme reference but operate separate payrolls for monthly and weekly paid staff, or you may operate branches and have a separate payroll per branch. The first submission you will make under the RTI reporting system will contain the details of all employees that are on your payroll at that point in time, regardless of when they are paid. This is called an alignment submission and it sets up the employees under the scheme reference. If you have a single scheme reference and are operating a split scheme your alignment submission must be made in parts and you must state the part number and the number of parts you are going to submit overall. There is a further consideration for a split scheme, and that is employee IDs, or clock numbers. An overarching rule for RTI is that employee IDs must be unique, and that applies across the whole scheme. You must take great care, therefore, to ensure clock IDs across different payrolls do not overlap. One way to overcome the problem is to use a clock ID prefix; this is useful particularly if you have split the payroll into branches. The clock prefix is added to the individual’s clock number, thereby keeping the original ID and making it unique. The split scheme indicator can be found in the Company / Setup menu option, in the References/Tax office details tab. Tick the split scheme box and enter the alignment part number and total number of parts you will be submitting. If you want to prefix the clock number enter the prefix in the box. Click the Payroll Defaults tab, the following screen is presented: 10 If you plan to pay employees by BACS, click the spy glass by the Bank field and follow the instructions on screen to add your company bank details. Once you have finished with the wizard, click the drop down and select the bank sort code. Choose a payslip layout from the payslip dropdown box. Apply any cash options (only applicable if you pay by cash) Setting up pay frequencies and selecting the first pay period After creating your company, you must decide on how frequently employees will be paid and what will be the next pay processing period. Select pay frequencies – tick all of the pay frequencies required in this payroll. You can run any combination of weekly, monthly, fortnightly and four weekly (lunar). The selected frequencies are then made available for you to select at employee level. Select the first pay period – If you are setting up a payroll to run from the beginning of the tax year the next pay period on all selected pay frequencies will be 1. This means you will be running every pay period in the tax year i.e. from week 1 and/or month 1 etc. If you are starting the payroll part way through the tax year, either as a new company or as part of the process of switching payroll software you can set the next pay period to be processed; enter the next pay period in the box by the relevant pay frequency. If you are switching software mid-year, it is possible to take on appropriate year to date figures and have the payroll calculate pay from where the old system left off (see later 11 section on taking on opening balances). Of course, you may choose to start the payroll from period 1 and run it through to date in these circumstances. Configuring the Company Payroll Before you begin to create employees or process the payroll, there are some settings and configuration options you may wish to consider: Pay Elements Pay elements determine what the employee is to be paid each period, some elements are fixed and are used automatically by the system, for example, tax and NI calculations and others are definable, for example, standard hourly rates, overtime rates, and bonus and commission payments. Elements may be additions or subtractions, affect the build-up to gross or just the net pay and may be subject to tax and/or NI. Keytime Payroll installs with a set of pay elements, which can be used or further refined, or you can add your own. Proceed as follows: Click the Company menu, then select Pay Elements, then Elements, you are presented with the following screen: Adding a New Pay Element To add a new pay element, click Add on the main toolbar, the following screen is presented: 12 Click the drop down in the Type field, you have the following options: Adjustment Amount - an addition or subtraction that affects the net pay (does not affect build up to gross), not usually subject to tax or NI and entered as a straightforward amount, for example, lottery deduction. Adjustment Rate - an addition or subtraction that affects the net pay (does not affect build up to gross), not usually subject to tax or NI and entered as a rate with a multiplier (adjustment amount is more commonly used). Payment Amount - An addition or subtraction that affects gross and net pay (affects build up to gross), usually subject to tax and NI, for example, a monthly salary or bonus payment. Payment Rate - An addition or subtraction that affects gross and net pay (affects build up to gross), usually subject to tax and NI. For example, weekly wages or overtime paid as number of hours multiplied by a rate. System - Some built in elements are 'system' elements, for example pension contributions and advanced periods of holiday pay. Ordinarily, you will never create a system type pay element. Choose a type from the drop down list. Enter a description; this is the description that will appear on the employees pay slip. The Quantity field may be left blank, unless each employee that has this element applied to their pay is to be paid using the same multiplier, for example, if you are creating an overtime element, and you choose Payment Rate as the element type, entering a quantity would mean that each employee that you apply this element to would be working the same 13 number of overtime hours, as in this case, the quantity would represent the number of hours. If however, this element was a monthly salary, the element type would probably be a Payment Amount (most monthly paid staff are paid a fixed amount each month), the quantity could be 1, indicating one month. The Special field determines whether the element is to have any special attributes. For example, Advanced Holiday Pay must have Holiday Pay in the Special box for it to be treated as Advanced, so that the Tax and NI calculations take the advanced periods into consideration. Applying the loans or savings options ensures that any addition or deduction of this type is accumulated in the employee’s details and printed with a year to date figure on the payslip, it is also reported as a loan or saving in the payroll reports. Adding the Pension type to an element will add the element to the Pensions report TIP you can use this type to include a pension refund element to the report. Enter a Code for the new pay element; the system identifies the element by its code, not its description. The code can be alphanumeric and up to 4 characters long. The Unit Identifier field is used in conjunction with the quantity and rate/amount fields. For example, if you are creating an overtime element, you would select the element type as payment rate, the quantity field would be blank (or 0) as each employee could work a different number of overtime hours, and the unit identifier would be Hours, as you are multiplying a payment rate by a number of hours. The Rate/Amount field can be left blank if you have employees that are paid different rates/amounts. If you have a banding system or all/most of your employees are paid the same rate/amount, enter the rate of pay in this field. In the Pay Element Details frame, click the Tax and NI options if this element is subject to tax and NI, click Pension if this element is a payment amount or rate and it affects a pension contribution; you can apply a percentage to a pension scheme and the payroll will automatically calculate the percentage based on the elements you specify contribute to pension. For example, the element may be an overtime element and you contribute to the employees’ pension based on the number of standard hours worked, if you specify that the overtime element is pensionable, then the payroll will automatically calculate the percentage contribution as standard hours plus overtime; in this case, you would leave the Pension option unticked on the overtime element. If the element is an Addition, click Addition, if it is a Subtraction, click Subtraction (the default is addition). Tick Benefit via payroll if the element is a payrolled benefit in kind. Click Enter Details Cont... Tab, the following screen is presented: 14 The Overtime frame applies only to pay elements that are payment rates and they are based upon another pay element, for example, overtime paid as time and a half; the overtime rate is based upon the standard rate. Click the drop down in the Base Element field and select the element that the calculation is to be based on, for example, Basic Weekly. In the Base Factor % field, enter the percentage to multiply the base element by, for example 1.5 to arrive at time and a half (standard rate plus 50%). As this pay element is applied to individual employees, payroll will automatically calculate the overtime rate as you enter the basic rate. The user in this case would enter 1.5 indicating time and a half in the Base element field. Pay Element Templates Pay element templates group pay elements together and their use is two-fold: 15 1.) Apply a group of pay elements to a group of employees. When creating employees, rather than adding each pay element individually to the employee’s details, you can paste a group of elements from a template. This saves time and ensures that each employee has the required pay elements. Note that where a pay element is not used in a particular pay period, the pay element is masked from the pay slip. For example, you may have a large number of shop floor staff and fairly complex set of overtime and bonus elements; you can add these elements to a template and as you create each employee you paste the elements from the template. If in any period you do not use all of these elements, the employees will not see any reference to them on their pay slips. 2.) Templates are also used as the basis for batch data entry when calculating pay. Elements in the template are presented in spreadsheet form to enable the rapid capture of variable pay data. Payroll installs with four templates; these are: Monthly, Fortnightly, Lunar and Weekly, you can edit these descriptions or add other templates. Proceed as follows: Click the Setup menu, then Parameters, then System Codes, then Templates, the following screen is presented: Edit the descriptions by clicking in the Description field and overtyping the present description. To add a new template name, click Add, in the Code field enter a code; the system identifies the template by the code, not the description, enter a description and click Save and Close. To add pay elements to the template click the Company menu, then Pay Elements, then Template, the following screen is presented: 16 To add an element, click Add, the cursor moves to the Template column and a new line is created. Click the drop down in the Template field and select the template name you wish to add to, press the tab key and click the drop down in the Pay Element field, select the pay element to add, click Save to save changes. To add more elements, click Add again and continue as above. Setting up Pensions You can create three types of pension: Individual - Create and apply a flat rate contribution. This is achieved by applying two pay elements (one for the employee contribution and one for the employer contribution) to the employee pay details. A flat rate per pay period is deducted from the employee and, optionally, a contribution from the employer, note that the employers contribution does not appear on the pay slip. Global - Works in the same way as the individual scheme, except you apply the same flat rate contribution to all employees in the scheme. Percentage - Based on a percentage of the employees pay and, optionally, an employer percentage contribution. The percentage based scheme works in conjunction with pensionable pay elements (see Creating Pay Elements for more details). All pension contributions are reported in the period pay details and also the company pension report. Contributions are split between employee and employer. To set up a pension scheme, proceed as follows: 17 1. Click the Company menu, select Pension Details, click the Add button in the Pension Details window. The following screen is presented: 2. Enter the scheme name. If contributions are taxable and/or NI able tick Yes in the relevant boxes. Select the pension scheme type (percentage, global or individual as described above). 3. If the pension is a contracted out scheme and you have employees with NI categories of either D E L N or O you must include the SCON reference. Enter the SCON reference. Setting Up Users and Passwords Where more than one person has access to the payroll, or other people could potentially access the payroll it is wise to create user names and apply passwords. This applies to the application rather than the general underlying database, which is password protected to prevent unauthorised access. To create users and passwords, proceed as follows: 1.) First you must log in as a supervisor, if you are not sure if you are logged in as supervisor, try logging into the company again but check the user ID as you open the company as below: 2.) Click the Setup menu, select Users, the following screen is presented: 18 3.) Click the Add button in the User Details window, enter a code for this user; the system identifies users by their code rather than name, you may wish to use the person's initials as the code. Enter the user name. In the Supervisor field, click the drop down and select yes or no. Supervisors have full access rights, but rights can be further defined by clicking in the Rights field, clicking the drop down list and choosing one of the options. Rights can be applied further by clicking the button to the right of the Rights field and selecting combinations from this screen: 4.) Click close once you have made your selection. To apply a password, click the user ID and click the Password button, if this is a new user or there hasn't been a password previously, the Old Password will be blank; leave the field blank, enter the password in the New Password field and type it again in the Confirmation field. 19 Notice that when you first create a company payroll, you will log in as 'Supervisor' and there is no password. Supervisor user is created with every payroll, and the rights for this user cannot be edited or removed, you can, however, apply a password and we would recommend doing this, proceed as follows: Log into the payroll as Supervisor (see previous), click the File menu, select Change Password, proceed as above, click Save and Close. Next time you log in you will be prompted for a password. Creating Employees Important Note It is very important to ensure you have the correct details for each employee, enter names in full (don’t use initials or shortened names unless you have no other information). You must also enter a correct address including postcode (where appropriate) if you do not have an employee’s national insurance number (NINO). Incorrect employee information, in particular where there is no NINO means that HMRC may not be able to identify the employee, this in turn could affect any benefit claims they may make. You create employees by clicking the Add button on the main toolbar in the Employee Library. The following screen is presented: 1.) Enter the employee surname and forename(s), enter the date of birth, and select title and gender. Enter the employee address including postcode, if the address is foreign 20 tick the foreign box; this changes the postcode field to country. If the employee is seconded to the UK tick the Seconded box and click the button; select the statements that apply. 2.) Employee ID is used as a code for employee identification with the payroll only. You can sort employees by employee ID and the spreadsheet displays employees by the employee ID. Tip - it is recommended that the employee ID is as meaningful as possible, for example, use the employee surname, or part of the surname plus initials, making it as easy as possible to identify the employee from the ID. 3.) Clock No; Employees can be sorted by clock number, and some reports are sorted in clock number order. The system automatically allocates the clock number but you may overtype the number if necessary; it must be unique. Changing Clock Numbers – Important Information RTI submissions contain the clock number and will be used by HMRC to identify an employment on the employee record. For example, you may have an employee who appears twice on your payroll, they will have 2 clock numbers which will be submitted to HMRC. In turn, HMRC will use these numbers to indicate 2 employments for that employee. If you change the clock number at any time, the system will automatically flag the number as being amended and transmit this to HMRC as you make RTI submissions. This prevents HMRC from interpreting the change of clock number as a third employment. When taking on a new payroll it is very important to bear the clock number in mind. If employees have been submitted to HMRC previously in another payroll system, HMRC will already know those employees with different IDs. When starting a new payroll you will be prompted to confirm whether the scheme is an existing one, if it is you will see an additional field and set of options in the employee records to enable you to handle the switch in payroll ID. If you submit new IDs (clock number) without indicating the ID has changed, HMRC will create duplicate employments for each employee affected. 4.) Enter the employment start date. Department You can add departments and then sort and report on employees by department. If you plan to automatically transfer the payroll journal to Pastel Partner, you can apply general ledger sub account codes (departments or cost centres) to your payroll departments. To add a department, click the Zoom button (magnifying glass button) to the right of the Department field, the following screen is presented: 21 Click the Add button in the Department Codes window, enter a code and description. If you plan to automatically transfer the payroll journal to Pastel Partner and you also wish to update Pastel's general ledger sub account codes, enter the corresponding sub account code that the department relates to. If you do not use sub account codes leave the nominal sub code field blank. Click Save and Close. 5.) To apply the department, click the drop down in the Department field and select the department. 6.) If the employee is a director, click Yes and enter the date the employee became a director. Note that this option controls the way in which NI is applied (see section Payroll Configuration for further information on director's NI). 7.) In the Pay Period box, click the dropdown and select the pay frequency, select the payment method. Important, select BACS only if you actually use the BACS system to pay employees. If you select BACS as the payment method, Payroll will automatically add a hash code to your RTI payment submissions. Your BACS payment will need to contain the same 4 digit code; HMRC will marry the two transactions together, if they do not match, or the payment code is missing the transaction may attract the attention of their compliance team. 8.) You need to specify whether the employee will be paid every pay period or on an irregular basis. If an employee is not paid every pay period, if they are a casual for example, you need to tick the option ‘on an irregular basis’ in the ‘payment to this employee are made’ frame. If you tick the option ‘every pay period’ and you do not make regular payments to the employee, after a certain length of time HMRC will assume that the employee has left your employment. Set employees who are on long term sick leave or extended maternity or adoption leave to ‘on an irregular basis’. 22 9.) Click the Financial Details tab, in the Financial Definition sub tab, enter the employee’s NI number (NINO) and select the NI table. If you don’t have the NINO you may leave the field blank, but you must enter the employee’s full address and postcode. Enter the tax code and select the tax basis (cumulative or week 1/month 1). 10.) Select any pension scheme this employee is subscribing to (see earlier section on setting up pension schemes). If you have been notified of a student loan and are required to make deductions, tick the Student loan box; the system will automatically calculate and deduct the correct loan amount. 11.) You can make net to gross pay calculations, to do this enter the net pay in the Net Amount box. 12.) Click the Year to Date Totals sub tab. If the employee is a new starter, part way through the tax year in an existing payroll, enter P45 details in (P45) Taxable pay and (P45) Tax paid. If you are taking on a payroll part way through the tax year, you will need to enter year to date totals for all employees (see later section Take on a payroll mid-year). 13.) Click the Additional Details tab, then Banking/Working week sub tab. If you are paying your employees by BACS you will need their bank details in order to submit the payment file to your bank. Select the account type, enter the account name and number. Payroll identifies banks by a sort code and holds them in a central bank details file; this means that if you have several employees who bank with the same bank you only need to set up the bank once and then apply the sort code to the relevant employees. To set up banks, click the Zoom icon to the right of the Sort Code field, click Next, click Add Bank, and click Next. Enter the sort code, bank name and address and any other details, click Finish, you can now click the drop down in the sort code field and select the bank sort code. 14.) Capture the employee’s passport number as part of your checks on their entitlement to work in the UK. 15.) Tick (click) the days the employee normally works, 16. In number of normal hours worked, select the number of hours the employee is usually expected to work. If the employee is off sick, or on maternity leave select the number of hours they would normally work. 17. Click the Pay Elements tab. You can add pay elements to the employee record by pasting them from a pay elements template (see earlier section), click the Template button on the main toolbar and select the template. Alternatively, you can add 23 individual pay elements, to do this, click the Add button on the main toolbar, click the drop down in the Pay Type field and choose the pay element. CIS Deductions To manage CIS deductions for sub contractors, you can create a contractor as a normal employee but instead of entering NINO and tax code: Leave NINO field blank Select NI table X Use code SC20 for 20% deduction in the Tax Code field Or use SC30 for 30% deduction in the Tax Code field Sub contractors setup using the above are excluded from RTI submissions. Specifying Basic Pay and Regular Deductions You apply basic, regular pay details to the employee record, such as basic weekly hours and hourly rate of pay or basic monthly pay. Beyond that, you add pay elements and amend variable data (such as overtime hours) when calculating pay. Once you end a pay period all variable data captured in that period is cleared down ready for the next period. Working with Quantity, Unit and Amount To apply basic pay you need to work with the Quantity, Units and Amount fields, the Element Type field will determine which of these fields you use. If the element type is a payment or adjustment amount enter the amount to be paid in the Amount field. If the element type is a payment or adjustment rate enter the number of units normally paid in the Quantity field and the rate per unit in the Amount field. For example, if an employee normally works 40 hours per week for a basic hourly rate, enter 40 in the Quantity column and the hourly rate in the Amount column, as you calculate pay, the system will multiply the hourly rate by 40. Flat Rate Pension If you apply an individual flat rate pension to the employee record you must apply pay elements for the employee and employer (if applicable) contributions. Click Add on the main toolbar, click the drop down in the Pay Type field and select Employee Pension Flat Rate, do the same for the employer’s contribution. Enter the contribution in the amount field. 24 Attachment of Earnings You can apply attachment of earnings and set rules on how the deduction is to be applied. Click the employee in the navigation tree, the employee information screen will open, click the Attachments tab, the following screen is presented: Click the Add button on the main toolbar In the Description field enter a description In the Attachment field select the type of attachment from the drop down list Enter any reference and the date issued You can prioritise attachments, meaning that if any rules about the deduction are to apply you can specify which attachment takes priority. The Deduction field will behave differently according to the type of attachment you have selected; if the deduction is a percentage type based on earnings, such as a DEA then the system will automatically calculate the deduction for you, otherwise, enter the amount to be deducted each period. in the Protected Amount field, enter the amount of net pay which is protected, this means that if the employees net pay falls below this amount the attachment will not be taken (it will be carried over until there is sufficient pay). Enter the total amount to be taken (if known) in the Total field The Paid Amount and Paid flag are controlled by the payroll. Carried over displays any deferred deductions where there hasn’t been sufficient salary to allow the deduction (where there is a protected amount). RTI (Real Time Information) Setup 25 Before you can start reporting in real time, you must ensure your payroll contains the correct detail. RTI setup will take you through some basic data checks and ensure you have the minimum required to successfully file. Open the payroll company and click the Company menu, select RTI setup: The first option is an employee data quality check. This routine checks all mandatory fields are completed and that data is correctly formatted. You can run a separate report for employees without NINOs. Next is an option to confirm or add HMRC filing credentials. If you are already filing payroll year end on-line, the credentials will already be present. The next check ensures you have entered PAYE scheme reference and accounts office reference. EAS (Employer Alignment Submission) There is the option to run an EAS (employer alignment submission). An EAS is the first submission made under the RTI regime; it aligns HMRCs details on your employees with yours. An EAS is only required where you have 250 employees or more on your payroll, where there are less than 250 employees you can combine an alignment submission with your first FPS (full payment submission). To submit an EAS, click the EAS button in the RTI setup screen, a wizard will take you through a validation routine, which checks employees and company details for completeness. If errors are found these must be corrected prior to making the submission. Follow the instruction in the EAS wizard to complete the submission. 26 You can make only one EAS submission and it cannot be amended once submitted. The payroll will record the fact that an alignment submission has been made by populating the date field by the EAS submission button. Multiple EASs (split payroll scheme) You may have a split payroll scheme; that is one where not all employees are held in a single payroll company, e.g. where you operate branches and you keep a payroll for each branch, or you have monthly paid staff or directors in a separate payroll to other employees. In this case, you must make multiple alignment submissions and each submission must state the part number and the total number of parts being submitted, for example part 1 of 4, or part 3 of 5. You can specify part number and total parts by going to the Company menu / Setup; tick the split scheme option in the references/tax office details tab. You must ensure that all parts are submitted; it doesn’t matter which order they are submitted in, but each part must be submitted. You can submit only one EAS, and it cannot be amended once submitted. The payroll will record the fact that an alignment submission has been made by populating the date field by the EAS submission button. Taking on a Payroll Mid Tax Year If this is the first time you have used Keytime Payroll and you are taking on an existing PAYE scheme part way through a tax year, you will need to take on tax and NI and various other figures in order for the figures on the P60 and the EPS submission at the end of the year to be correct. You create a new payroll company by clicking New Company in the company list. Enter the company name and tick the Existing payroll scheme box. Ticking this box puts the payroll in ‘take on’ mode, meaning additional options are available to enable you to capture existing information and figures. 27 Set up the payroll as described in previous sections. Please note that an alignment submission (EAS) can be submitted only once; if this was done in the previous payroll system it doesn’t need to be done again in the new system. When creating employee records, you will be given the option of capturing the previous employee ID (clock number). You must capture the original ID where you have assigned new IDs; the system will then flag the new clock number as a change of employee ID, thus avoiding the undesirable effect of HMRC assuming an additional employment. In the main employee details screen, the following additional question appears when in take-on mode: If you have retained the same clock number as the original system (including any clock number, or branch prefix where applicable), click Yes. If you have assigned new clock numbers click No and enter the original ID. If you haven’t used payroll software previously and have never used any kind of employee ID, click did not have one. Terminology may differ between systems, but regardless of this, you must not mistake the clock ID for any other kind of reference. The clock ID in Keytime Payroll is submitted to HMRC as a means of identifying the employment; it is the identifying reference between the 2 systems that must either match or where there has been a change, the original reference captured. Take on YTD figures for employees Despite national insurance (NI) being calculated and paid on the amount earned in the pay period, you will also need to capture NI values to date. This ensures all relevant year to date figures are submitted to HMRC when you make your next and end of year submissions. To capture year to date NI values, first create the employee record. Click the Financial Details tab and Year to Date Totals sub tab. A Previous NI option will appear on the main toolbar; this is only present where there aren’t any figures in the year to date screen: 28 Click Previous NI on the main toolbar, the following screen is presented: Enter the figures from the P11 or last full payment submission (FPS), or similar. Select the NI category. Enter standard earnings for NI in the Total NIable amount box. Enter the remaining figures from a P11 or similar. Click Save and Close. Other YTD figures can now be entered. Enter the gross taxable pay in this employment in the Current (Taxable pay) box and the tax paid in this employment in the Current (Tax paid) box. Enter the gross pay in this employment in the Gross Pay box (the gross pay and gross taxable pay may be different). Only enter P45 Taxable Pay and Tax Paid where the employee is a new starter in the current tax year and has given you a P45. Enter any other relevant take on totals in the Other Totals frame. 29 Applying SSP, SMP, SAP or SPP Keytime Payroll can automatically calculate amounts and apply the payment. Proceed as follows: SSP (Statutory Sick Pay) First ensure you are working in the employees button (Employees on the main toolbar should be disabled), click the employee then click the SSP button on the main toolbar, click the Add button on the main toolbar, the following screen is presented: Enter the start and end dates for the period of absence and any notes you wish to make about the absence. Click the Save button on the main toolbar. Note that SSP is based on the employee's average pay or a number of weeks; if there is no average pay at this stage the following screen will be presented: Enter the weekly average pay and click OK. 30 If you have an employee already on sick leave when you start using Keytime Payroll, and they have already had three waiting days deducted from SSP they are already being paid you must cancel the three waiting days that the system will assume when you create the SSP record. To do this, click the 'no break in absence' box. Once you save the details, the SSP record is created, the screen looks like this: Next time you calculate pay, the SSP payment due will be added automatically to the employee's pay record. You must; however, manually adjust any standard pay the employee would normally have received had the hours in that pay period been worked (see later section Calculating Pay). SMP (Statutory Maternity Pay) First ensure you are working in the employee library (Employees on the main toolbar should be disabled), click the employee then click the SMP/SPP button on the main toolbar, Note that the employee must be female to qualify for SMP (check the Male/Female flag in the employee details if you unable to apply SMP). Click the Add button on the main toolbar, the following screen is presented: 31 Enter the expected week of confinement, the qualifying week is automatically calculated from that date. Enter the start date, the return date is then automatically calculated. If there is no average pay for this employee you will be prompted to enter it manually. Click Save and the SMP detail is created: Next time you calculate pay, the SMP payment due will be added automatically to the employee's pay record. You must, however, manually remove any standard pay you do not wish the employee to receive (see later section Calculating Pay). 32 SPP (Statutory Paternity Pay) Note that the employee must be male to qualify for SPP (check the Male/Female flag in the employee details if you’re unable to apply SPP). First ensure you are working in the employee library (Employees on the main toolbar should be disabled); select the employee on the tree then click the SMP/SPP button on the main toolbar: Select Standard Paternity Pay, click OK, the following screen is presented: Enter the expected week of confinement, the qualifying week is automatically calculated from this date. Enter the start date and choose the number of weeks the employee is to be on leave. Enter the date of birth and weekly average pay if necessary. Click save and the SPP record is created: 33 Next time you calculate pay, the SPP payment due will be added automatically to the employee's pay record. You must, however, manually remove any standard pay you do not wish the employee to receive (see later section Calculating Pay). ASPP (Additional Statutory Paternity Pay) Note that the employee must be male to qualify for APP (check the Male/Female flag in the employee details if you’re unable to apply APP). First ensure you are working in the employee library (Employees on the main toolbar should be disabled); select the employee on the tree then click the SMP/SPP button on the main toolbar: Select Additional Statutory Paternity Pay, click OK, the following screen is presented: 34 Enter the dates the ASPP is to start and end. Enter the remaining detail and if necessary enter the employee’s average pay (the payroll will calculate this where there is sufficient pay history). Click Save on the main toolbar and the APP record is created: When an employee claims additional statutory paternity pay, you should record their partner’s name and NINO on the employee record; open the employee record, click the Additional details tab click the Statutory Pay / Holidays sub tab; enter the surname, forename and NINO in the Partner’s details boxes. 35 SAP (Ordinary Statutory Adoption Pay) First ensure you are working in the employees button (Employees on the main toolbar should be disabled), click the employee then click the SAP button on the main toolbar, click the Add button on the main toolbar, the following screen is presented: Enter the matching data and click the Claim SAP button, enter the placement date and choose the number of weeks leave. Click the Save button on the main toolbar and the SAP record is created: Next time you calculate pay, the SAP payment due will be added automatically to the employee's pay record. You must, however, manually remove any standard pay you do not wish the employee to receive (see later section Calculating Pay). 36 ASPP (Adoption) (Additional Statutory Paternity Pay (Adoption)) First ensure you are working in the employees button (Employees on the main toolbar should be disabled), click the employee then click the SAP button on the main toolbar, click the Add button on the main toolbar, the following screen is presented: Click additional paternity pay (adoption), click OK, the following screen is presented: Enter the dates the adoption pay is to start and finish. Enter the remaining detail and if necessary, the employee’s average pay (the payroll will calculate average pay where there is sufficient pay history). Click Save and the adoption pay is added. Employees Starting and Leaving Under RTI, you no longer need to submit P45s / P46s to HMRC to notify them of employees starting and leaving. Instead, the payroll will send starter and leaver signals when you next send an FPS. You must still give an employee leaving a P45, or similar to take to their new employer. 37 Employee Starting When a new employee starts you need to add them to the payroll as already described, adding P45 information if applicable. If you don’t have a NINO for the employee, you must capture their full address. As you enter the employee’s start date you are presented with a starter statement with a choice of: A. This is my first job since 6th April B. This is my only job C. I have another job or pension Choose the statement that applies. Employee Leaving When an employee leaves you process their final payment and inform HMRC they have left. If you are aware that the employee is leaving prior to processing their final payment, open their record in the employee library, in the Employee Details tab enter their leaving date and select ‘one period left’ from the leaving code drop down box. This allows you to process one final payment; the payroll will automatically flag them as loft once you close the pay period. The employee will also be flagged as a leaver in the relevant period FPS you send to HMRC. If you were unaware that an employee has left and you have already processed their final payment, open their record in the employee library and enter their leaving date, select ‘left’ from the leaving code drop down box. The employee will be excluded from the next pay calculation, but the system will include the employee with a left signal in your next FPS to HMRC. Re-employing a Leaver If an employee leaves but is subsequently re-employed, you must not reuse their old employment record. Instead you must create a new record with a new clock number and take them on again as if they were a new starter. Calculating Pay Before you run the pay calculations, it is recommended that you first attend to any changes in static information, that is: Create any new employees that are to be paid in this period Flag any leavers that had their final payslip in the last pay period Attend to any coding notices 38 Create SSP/SMP/SAP/SPP records for any employees due a payment in this period Attend to any changes in basic pay, e.g. pay rises, rate rises Click the Calculate button on the main toolbar, select the pay frequency to calculate (e.g. weekly or monthly), click OK: Where there are multiple frequencies in the same payroll the system takes the employees assigned to that pay frequency, for example, all weekly paid employees and calculates their basic pay, based on the elements assigned to their records. Payment Date It is very important to ensure you set the correct payment date when processing pay. The payment date is included against every employee record in the FPS and HMRC will use this date to allocate pay to the corresponding tax month. NOTE a tax month runs from the 6th of a month to the 5th of the following month. For example, if you enter a payment date of 1st May for the May pay period HMRC will allocate the FPS to the APRIL tax month, as April tax month runs from the 6th April to the 5th May. Where the PC system date falls within the pay period, you will not be prompted to enter a processing date. Where the PC system date falls outside the pay period, you will be prompted for a processing date. For example, if you are processing week one pay and the PC date is 14 December, week one does not correspond with a December date and so you will be prompted for a processing date. Capturing Variable Pay Data There are two ways in which you can capture variable pay data, the spreadsheet or periodic pay details. Spreadsheet The Spreadsheet is based upon the pay element templates. Click the Spreadsheet button on the main toolbar and select the template, the following screen appears: 39 Here you see the employee ID and clock number for reference and using the tab key you can move through rows and columns entering the variable information. In the above example we have pay elements that require monetary values (basic monthly) and elements that require a number or hours (overtime). Once you have finished capturing variable data you need to re-run the pay calculation; select all employees in the navigation tree by ticking the box by the company name, rather than ticking every employee, click the Re-calculate button on the main toolbar. If you have a large payroll, use the sort order to sort employees by status, you can then see employees that are uncalculated separately from those that are calculated. Click the group heading Uncalculated to select all the employees in that group and click the Re-calculate button on the main toolbar. Working with Periodic Pay There may be times when it is necessary to add or amend a pay element for one pay period only, for example, when paying holiday pay. You can also use periodic pay to capture variable data instead of the spreadsheet. Click the employee in the navigation tree, the following screen is displayed: 40 Click on the pay element and amend either the quantity and rate or the amount fields. To add a pay element for this pay period, click the Add button on the main toolbar, the cursor moves to the Pay Type field, click the drop down and select the pay element, click the Recalculate button on the main toolbar to refresh the pay calculation. Advancing Pay Periods If you have a weekly payroll, you may need from time to time to advance the payroll when paying holiday pay. For example, an employee takes 2 weeks holiday, so is paid three weeks pay made up of one week pay, 2 weeks holiday pay. You would advance the payroll 2 weeks to take advantage of 2 weeks free pay. To advance the payroll, add the Advance Period pay element to the employee's periodic pay details. Amend the Quantity field according to the number of periods to advance, click the Re-calculate button on the main toolbar. The employee is then removed from the payroll until the number of advanced periods has passed. Suspending Employees from a Pay Period From time to time it may be necessary to suspend employees from a pay period, for example, seasonal or temporary workers who do not work every week. To suspend an employee there must be no gross pay in the pay period, where this happens you will see a Suspend button on the main toolbar when you click on an employee in the navigation tree: 41 Click the Suspend button, you have two options: Suspend this particular employee or suspend all employees with no gross pay. Printing and Previewing Reports and Payslips You can preview payslips in two ways: Click an employee in the navigation tree and click the Payslip tab Alternatively, click the employee in the navigation tree and click the Print button on the main toolbar; a payslip will preview on screen, click Print again to send the payslip to the printer. To print a range of payslips, select the employees in the navigation tree, either by clicking the box to the left of the employee name, or by clicking the box by the company name to select all employees, click the Print button. TIP To select an alternative range of employees, use the sort order to first arrange the employees, for example, by department, and then select the batch you want to print. To print a periodic pay report, click the Reports button on the main toolbar, a sub menu is displayed, select the report and it will first preview on screen, click the Print button on the main toolbar or the print icon in the top left of the report window to send to the printer. Note: it is possible to reprint periodic reports and payslips once a pay period is closed. To print a previous period report go to Reports > Others > Previous Reports > Period selection. 42 You will then be presented with the following screen. Select the period type and the period number and select reports or payslips. If you select Reports you will get a menu for which reports you would like to run. 43 44 If you select Payslips you will be presented with a screen where you can select the employees you would like to re-print the payslips for. If you go to Reports > Others > Previous Reports > Cumulative Selection (weekly) 45 You will be presented with the following screen: Use the drop down menu to select which period you want to run a report for this then produces an employer’s payment record. Making BACS Payments Keytime Payroll generates a BACS file in Standard 18 format; this is suitable for use with all RTI compliant BACS payment software. Before you can generate a BACS file, your employees must be flagged for payment by BACS, you can select BACS as payment method by opening the employee record and selecting BACS in the payment method box. You must also enter your BACS service user number – click the Company menu, select Setup, click the employee/defaults tab, enter the BACS service user number. The BACS payment file contains a hash code; HMRC will look to match this code as the BACS payments come through the BACS clearing system with hash code contained in your FPS submission. If the hash code is present in your FPS submissions, but you do not actually make payment by BACS, the mismatch will be picked up by HMRC and it may trigger a compliance event. It is strongly recommended, therefore, that you choose BACS as the payment method only when employees are actually paid using this method. If you aren’t 46 sure, check that you have a BACS service user number, if not then the payment method is not BACS. To generate a BACS file in the pay period (Calculate), click the Payments button and select BACS. When making payment to employees by BACS it is essential that you generate the BACS payment file prior to ending the pay period; you cannot generate it once the period is closed. If you attempt to close the period without generating a BACS payment file you will receive the message that employees are not in the status of FPS ready, please generate a BACS payment file. Once the file has been generated you will be allowed to end the pay period. Submitting the FPS and Applying Late Filing Reasons Under RTI you must make a full payment submission (FPS) on or before the date that you pay your employees. Payroll will automatically generate an FPS as you end a pay period, you can also generate the FPS whilst working in the open pay period. This caters for user’s preference about when they choose to close a pay period. If you leave the pay period open in case of amendments, only closing the pay period when the next one is due, you can generate and submit the FPS as and when required from within the calculate pay screen. If you close the payroll as soon as you have processed it you can generate and submit either from within the calculate pay screen, or you can let the payroll automatically generate it as you close the pay period; the FPS will then be available for submission in the main employee screen. There is no restriction on the number of FPSs you submit in a pay period, but it is important to remember that the requirement to file them with HMRC is on or before the date that you pay employees. From April 2014 FPSs filed after the payment date contained within them require a late filing reason. If you file after the payment date and you don’t apply a late filing reason HMRC will send you a late filing notice. From October 2014 they will also issue a late filing penalty. We strongly advise that you pay particular attention to the payment date when calculating pay, when correcting pay that has already been included in an FPS and that you ensure the FPS is submitted on or before this date to avoid penalties. To generate and submit an FPS from within the pay period, first ensure that you have entered all period pay; the FPS would usually be the last thing to do. Click the Submit button on the main toolbar, the FPS wizard is presented: 47 If this is the final FPS of the year, tick the final submission box. If this is the final submission because the scheme has ceased, tick the scheme has ceased box. If you are filing the FPS late (so after the payment date contained in the FPS), tick the late filing reason box and select a reason from the drop down list. Click Next to start the validation process, any errors found are presented in the form of report and must be corrected before the submission can be made. Click Submit to send the FPS. Submission history is retained and can be viewed by clicking the History button in the FPS wizard. Final FPS of the Tax Year or Scheme has Ceased Under RTI, you are not required to submit P14s; instead you send a final FPS. You can make as many final FPSs as you like up to the 19th of April in the following tax year, after that any changes must be made by submitting an Earlier Years Update (EYU). If this is the final FPS of the tax year, tick the final submission box in the FPS submission wizard. There are some additional declarations that must be submitted with the final FPS, click FPS Questions and tick the appropriate response to each question. The final FPS is submitted in the same way as a regular FPS – click next to begin validation, and click Submit to send. 48 If the FPS is final because the PAYE scheme has ceased, tick the ‘final FPS box and tick the ‘scheme ceased’ box too. You will need to answer the FPS questions as described above. Submit the FPS as described above. Reports Previewing and Printing General Reports In addition to the period pay reports, there are several other report options. Click Employees on the main toolbar, click the Reports menu, options are: Employee: Company: Details P45 P46 Payment History Pension Sickness Directors NI (where applicable) Banks Pensions Employee lists and labels Cost of payroll (can straddle tax years) Computer Audit Team report (GPRF) Others: Year End: Previous period/year reports and payslips P11 P60 YTD information (P35) To print a report go to Reports and below are screen shots of which reports you can run off in each section. Employee section: 49 Company section: Year End section: Other Section: Employee section Details – Generates an employee record detailing the employee’s details and YTD figures. P45 pre-printed – Shows the P45 ready to print onto HMRC stationary. 50 P45 part 1 – Shows the P45 on pre-printed copy of the P45. P45 part 3 – Show the P45 part 3 on pre printed copy. Payment history – Shows a report with details of payment history. Pension – Shows employee pension payments. Sickness – Shows a report detailing sickness history. Directors NI – This is only availably if the employee has been selected as a director. Company section: YTD- Shows YTD figures for employees. Cost of payroll – Allows you to select a date range, department range or employee, can straddle tax years and can be used to generate payroll figures for company accounts. Banks- Shows a report of the company bank accounts. Class 1A NI- not reported in payroll anymore. COMPS- Shows report of NI deductions and gross pay. Details- Shows company details. Employee List- Shows list of employees and their details. Employee labels - Prints employee labels. Employee reports (all employees) - Shows employee record. Pensions- Shows pension details. Sickness - Shows sickness report. Computer audit team (GPRF) - used for HMRC to do audit (password is required this can be given by phoning support on 0845 456 3103). Year end: P11s – Fills in P11 ready to print. P60s – Gives you a P60 ready to print onto HMRC stationary YTD information – Gives you information contained in the employee YTD screen. 51 Others: Users – Gives you a user list report. Bank – List the banks on file. NI Table – Give a table of NI limits. Look up (company) – shows codes and descriptions. Look up (system) – Gives a list of codes and descriptions and other items. Pay elements – Gives a list of pay elements. Previous reports – Previous Selection – Allows you to run reports for previous periods. Cumulative Selection (weekly) –Runs weekly tax and NI reports. Clicking the menu. button accesses employee reports without going to the Reports Ending the Pay Period Before you can move to the next pay period, you must end the current one. Before you do this, it is essential that you have a backup of the payroll data (see section Backing up Data) if you do not have a backup and you end the payroll prematurely, you cannot reverse the operation; you must restore a backup. If you pay employees by BACS you must generate the BACS payment file prior to ending the pay period. Click the Period button on the main toolbar and select End Period. 52 Employer Payment Submission (EPS) Under RTI employers are required to submit an FPS on or before the date employees are paid. The FPS contains information on employees’ pay and deductions and details of starters and leavers. Whilst the FPS gives HMRC details on pay and deductions, it doesn’t give any information on the payments the employer makes to HMRC on a monthly or quarterly basis. It may be that whatever you have deducted from employees pay is being paid over to HMRC, but there are times where the two figures will not agree. An EPS then becomes necessary to ‘reconcile’ the two. You would also send an EPS to inform HMRC that no payments have been made in a tax month; therefore, there is nothing to pay over. You generate and submit an EPS from the Submit button on the main toolbar in the employee library: Click Submit, select employer payment submission, the following screen is presented: You can filter out submitted EPSs but selecting not submitted in the dropdown box and clicking the refresh button. Click the EPS you wish to submit and click the Submit button: 53 If no employees or subcontractors were paid since the last EPS, tick the box. If this is the last EPS for the tax year, tick the ‘final submission’ box. If this is the last submission of the tax year, and the scheme has ceased, tick the ‘scheme ceased’ box too. Click Next. Recovery figures should already be included, but you can edit then if necessary by ticking the override box at the bottom of the screen. To claim the employment allowance tick the ‘claim employment allowance’ box. Nothing further is required; the system will restrict employer NICs each period until the £2000 allowance is used up. If you are notifying HMRC of periods of past or future inactivity, i.e. you aren’t/didn’t pay anyone for a complete tax month use the options on the right of the screen. To notify 54 HMRC that no employees were paid in this or the previous tax month, tick the box ‘no employees were paid’ and Payroll will populate the start and end dates for the last tax month. The start date of a tax month is the 6th and it ends on the 5th of the following month. It is important to note that if you haven’t paid anyone in a tax month you must tell HMRC before the 19th of the following month in order to avoid a late filing notice and a potential penalty. To inform HMRC of a future period of inactivity, select the period start date and end date. The future period of inactivity must be at least a full tax month; a tax month starts on the 6 th and ends on the 5th of the future month. For example, if you have a payroll containing a single director and they are paid once a year, you can use future period of inactivity dates in the EPS to inform HMRC not to expect any FPSs until after a certain date. Submitting an EPS for a split scheme If you are operating a split payroll scheme, where not all employees are contained in one payroll and you need to send an EPS, you cannot submit multiple EPSs covering different parts of the scheme. You must consolidate EPS data across all payrolls, consolidation must be done manually, as there may be other software products involved. Once you have consolidated figures, nominate one of the payrolls to make the submission and make adjustments to the EPS then submit as normal. Switching Pay Frequencies It is possible to run more than one pay frequency in the same payroll, for example, you may have monthly and weekly paid employees in the same payroll. You can open different frequencies at the same time and switch between them. Whilst working in calculate pay, click the Period button, select Change Period, and select the pay frequency to work with. TIP the pay frequency and period number you are working in is displayed in the bottom right of the screen. Restarting a Pay Period You can clear all variable pay data and start the calculation again for one employee or all employees. You may wish to do this if you have opened a pay period but have forgotten to make changes to static information first, or you have captured incorrect variable data and wish to remove it and start again. 55 To restart an individual, click on the employee in the navigation tree and click the Period button on the main toolbar, select Restart Period, you will also have the option to restart all employees. Follow the instructions on screen to restart. Receiving HMRC Notices via DPS HMRC will send you notices and other messages, such as coding notices and NINOs from the NINO verification service via their data provisioning service (DPS). Keytime Payroll communicates directly with DPS and stores messages that relate to the scheme within the scheme database. To access DPS you must first ensure you have your HMRC filing credentials stored in the payroll – click the Company menu, select HMRC credentials. To access DPS click the Company menu, select HMRC notices. You can view all previously retrieved messages by clicking the Company menu, select HMRC notices, select view previously retrieved notices. Payroll Year End Please refer to the Payroll Year End documentation for specific instructions on what to do at the end of the tax year. P60 Print Alignment All the boxes on the P60 are in fixed positions, which should be correct for all printers. Please note that the system uses Portrait Laser P60 single sheet forms only. It is not compatible with Landscape forms, Dot Matrix P60s or the P60 Certificate of Pay. Occasionally, you may need to adjust the prints to fit the forms. You can manoeuvre the entire print up and down, left and right to ensure that it prints within the boxes on the form. SETUP > CONFIGURE SYSTEM. Click the SETTINGS tab. You can then adjust the margins to align the P60s. If you do make a change, we recommend making a note of the original settings, in case your payslip alignment is affected. You only need to make this change in a single company - other companies will use the same settings. 56 Backing up Data To back up client data go to File > Back up company, you will then be prompted to confirm you want to back up the company you are in. You will then be asked where you would like to save your back up and rename the file (if you want to). Restoring data To restore data go into the company you wish to restore and go to File > Restore Company, this will then ask if you are sure you want to restore for the company you are in. If you select yes this will bring up a screen to select where your back up is stored. Further Help & Guidance For further help and guidance you can press F1 within the software to launch the help file, or speak to a support executive on 0845 456 3103. 57