1
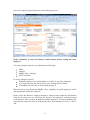
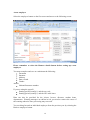
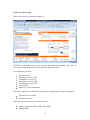
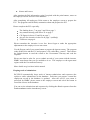
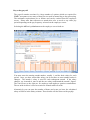
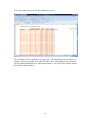
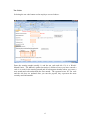
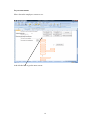
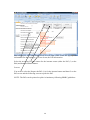
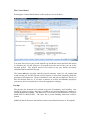
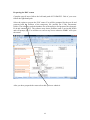
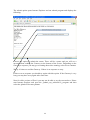
Payroll and End of Year Processing
PAYE2000
(2011-12)
User Manual and Customer Agreement
We accept the terms and conditions set out in this document:
Signed _______________________
Dated ____________________________
Capacity in which signed ____________________________________________
Crown copyright forms are reproduced with the permission of the Controller of Her
Majesty s Stationery Office
Table of Contents
Limited Licence _______________________________________________ 3
What is PAYE2000? ____________________________________________ 4
Before installing PAYE2000 _______________________________________ 5
Getting started________________________________________________ 6
Changing the master template _____________________________________ 7
Starting PAYE2000 ____________________________________________ 8
Working with PAYE2000 ________________________________________ 9
Opening the Payroll ___________________________________________ 10
End of year processing _________________________________________ 13
Day to day payroll ____________________________________________ 15
Payroll and the End of year ______________________________________ 23
Sundry notes and details ________________________________________ 27
2
Limited Licence
The Licence hereby granted to the Customer by Quality Management Software Ltd
( the Supplier ) shall take effect in respect of the Payroll / End of year Return
( PAYE2000 ) for the year of assessment 2011/2012.
The Supplier reserves the right to terminate the licence agreement granted forthwith
on giving notice to the Customer in writing.
Disclaimer
The Supplier shall have no liability in any way arising out of the use of PAYE2000
and the Customer by using the software acknowledges this. It is imperative that the
user of PAYE2000 understands that it is not a substitute for the knowledge and skill
of a payroll practitioner. PAYE2000 has been designated to assist the practitioner not
to replace him or her and accordingly users should always check the calculations and
end of year Return before it is submitted.
Software Support
Telephone support is available to help users solve any questions they have with the
functionality of PAYE2000 on the following numbers:
01483 429078
01453 761956
Andrew Bolton
Rebecca Benneyworth FCA
The Supplier undertakes to respond to messages left on voicemail within eight hours
of the call being lodged between the hours of 9.00 am to 4.00 pm Monday to Friday.
The Supplier will endeavour to respond quickly to any call. Any special
circumstances which prevent this response time being met at any time will be reported
on voicemail.
The Supplier will provide support for the installation for approximately one hour to
assist the customer in using PAYE2000 for no extra charge. Any additional training
time will be charged at £100 an hour by agreement in writing with the Customer.
The support will not provide technical tax or payroll advice. Enquiries about these
subjects should be directed to HMRC.
Copyright
This document represents a limited licence granted to the Customer by the Supplier.
PAYE2000 may not be reproduced in any way, lent or sub-let to any other third party
without the express permission of the Supplier.
3
What is PAYE2000?
PAYE2000 (© Quality Management Software Ltd) is an Excel spreadsheet that is
designed to assist employers and practitioners with payroll and completing end of
year Returns. It allows the user to quickly and simply complete information on screen
as they would on paper. It performs the calculation of tax and National Insurance
following HMRC s guidelines.
PAYE2000 includes a database which allows you to keep track of employer and
employee information from year to year and to store payroll data and each year s
return. The database also allows you to monitor the submission of returns to the
Revenue.
Please note the demonstration version includes a built-in database which allows one
employer and one employee, there is no separate database file.
4
Before installing PAYE2000
PAYE2000 has a database and you must ensure the appropriate Excel options are
installed in order to use it. The Setup program in earlier versions of Excel or
Microsoft Office includes these options. From Office 2000 onwards the options are
automatically included. You may need your original Office CD or disks.
Run Setup and choose the Add/Remove option. Confirm that you have installed the
options which allow Excel to use a database. These are referred to as:
Office 97
Data Access
Please select all the sub-options by selecting the all option or ticking the boxes with
the mouse.
If you have any doubt please contact QMS for advice.
5
Getting started
What do you need to run PAYE2000?
To run PAYE2000 on your PC you should have:
A Pentium with a minimum of 32 Mb of RAM, preferably 64 Mb
Windows or Vista
A copy of Microsoft Excel 97 or above
A knowledge and understanding of payrolls and the end of year Return
The Revenue has approved printouts from a HP LaserJet printer
Installing PAYE2000
The PAYE2000 spreadsheet should be copied into any suitable folder.
Insert the PAYE2012 Spreadsheet CD into your CD drive.
Select the My Computer icon on your desktop;
Select the CD drive;
Select the file PAYE2012.xls
Select Edit, Copy
Find and Select the suitable folder
Select Edit, Paste, this action should cause the PAYE2012 spreadsheet to be
copied from the installation CD to your PC.
Installing the database.
Warning: Do not install a fresh empty database if you are bringing forward
information from last year.
Insert the PAYE2000 disk into your a: drive.
Copy the file PAYEDATA from the CD to the C: drive in a similar manner to
that used for the PAYE2012 spreadsheet;
You can choose the C:\ directory, if you choose another directory:
Update your master Spreadsheet with the name of the directory (see below).
6
Changing the master spreadsheet
You only need to change the master spreadsheet if you are planning to use the
database and have copied the database to a directory other than the C:\ directory. You
should move to the right of the introductory screen and see a display similar to the
following:
Figure 1
Enter the following information:
the location of the database in cell H6
HMRC user id and password for submitting the end of year return by the
internet (you can change them when you prepare the end of year return).
Remember to save the spreadsheet with File and Save.
7
Starting PAYE2012
Open Microsoft Excel, select File, Open and choose PAYE2012 from the
spreadsheets available.
Using the database
The database contains two main sections: the employer and employee information.
Move to the employer screen and see the display. The buttons allow you to retrieve,
save and delete employers from the database. Similarly the employee screen has
buttons which allow you to retrieve, save and delete employees from the database.
Any information which is employee related (such as P60s) is saved with the employee
options. Information which is employer related (such as a P35) is saved with the
employer options.
8
Working with PAYE2000
Introduction
PAYE2012 is a computer system which helps employers and agent prepare payroll
and end of year returns. PAYE2012 is not a substitute for the knowledge and skill of
a payroll practitioner, it assists you with the routine tasks of data entry, transcribing
figures from one schedule to another and calculating tax and national insurance.
What can it do?
PAYE2012 allows you to enter all the necessary information for an employer s
payroll, it automatically calculates the tax and national insurance liability and allows
you to print payslips, reports, P11, P32, P60, P35 and P45s. It also prepares an
employer s end of year return for filing online.
PAYE2012 uses HMRC specifications for calculating tax and national insurance. As
part of the accreditation process the calculations are checked and agreed to the nearest
penny. If you enter all sources of income correctly then the tax and national insurance
will be correct.
9
Opening the Payroll
A new Employer
After opening Excel, select File then Open and choose the PAYE2012 spreadsheet.
This is the first screen you will see:
Figure 2
Screens
The buttons take you to the appropriate screens and buttons on these screens will
guide you through the other options.
10
Select the employer button and move to the following screen:
Please remember to select the Remove details button before setting up a new
employer.
You must complete and save at a minimum the following:
Name
Address
HMRC office (3 digits)
PAYE reference
If you are using the payroll:
Whether employees are paid monthly or weekly, or any other frequency
(if weekly) the first pay day of the tax year, usually the first Friday
(if monthly) the start day of each month (usually 1)
Data can also be provided for the HMRC office, eligibility for small employer s relief,
and departments within the employer.
Please select the Retrieve employer button to bring forward employer information
from the previous tax year, and select the Retrieve all employees to bring forward
each employee after you have brought forward the employer. This will automatically
increment the latest tax code (if an L code) by a fixed amount, for 2011-12 this is
100.
11
A new employee
Select the employee button on the first screen and move to the following screen:
Please remember to select the Remove details button before setting up a new
employee.
You must complete and save at a minimum the following:
Forename
Surname
Address
Date of birth
Gender
And/or
National Insurance number
If you are using the payroll:
Starting period (usually 1) and the tax code
Starting period (usually 1) and the NIC table letter
Data can also be provided for the joiners, leavers, directors, student loans,
departments. Warning messages are shown in red, you need to remove the cause of
the warning otherwise later processing may not work.
You can bring forward an individual employee from the previous year by selecting the
Retrieve employee button.
12
End of year processing
Move to the P60 screen and the display is:
PAYE2012 will transfer end of year payroll information automatically to the P60. If
you are not using the payroll you can enter the appropriate data.
At a minimum you need:
NIC table letter
Earnings at or up to LEL
Earnings at or up to ET
Earnings at or up to UAP
Earnings at or up to UEL
Total of NIC
Employee s NI contributions
The above repeated for each table letter (up to 4, usually only one letter is required)
The total of pay and tax
The latest tax code
Data can also be provided on the P60 screen for:
Statutory payments (SSP, SMP, SAP, SPP)
Student loans
13
Joiners and leavers
After entering the P60 information, print if required with the print buttons, return to
the employee screen and save to the database.
After completing all employees P60s return to the employer screen to prepare the
P35. The program reads all P60s, summarises them and prepares the P35.
Please complete the P35 especially:
The funding boxes, 7 on page 2 and 20 on page 3
Any amount already paid in box 25 on page 3
CIS figures in boxes 23 and 28 on page 3
Any tax free incentive in box 26 on page 3 (unlikely)
Tick boxes on page 4.
Please remember the incentive is tax free: don t forget to make the appropriate
adjustments to the employer s own tax return.
Use the Prepare end of year return button to prepare the internet return. The program
reads all the P60s and the P35 and prepares a file called eoy_return . Then choose
the Submit button to send the return to the Government Gateway and read the
response.
Please note that in order for you to submit an end of year return with the internet,
HMRC must know that you are entitled to do so. The employer or the agent must
register with the Government Gateway.
More details are given later in this manual.
Keeping track of submissions
PAYE2012 automatically keeps track of internet submissions and responses (the
replies to earlier submissions) in the database. Each time you prepare a return the
employer s record in the database is updated. After the end of year return is
processed by HMRC please return to the employer screen and select the button to
record the success in the database.
You can review submissions and responses by clicking the Read responses from the
Database button on the introductory screen.
14
Day to day payroll
The payroll contains sections for a large number of options which are required for
HMRC acceptance tests, many of them are not used in normal day to day processing.
The minimum requirements are as follows and can be reached from the employee
screen. Please note that references to month also refer to week or any other pay
period depending on the pay frequency selected on the employer screen.
Selecting the What is paid button on the employee screen leads to:
You must enter the starting month number, usually 1, and the basic salary for each
period. Once you have entered the salary you do not have to enter another unless it
changes. The month 1 salary is used for each subsequent month. If the salary
changes, say in month 6, enter 6 and the new salary underneath the month 1 figures.
The extra boxes to the right are for employee and employer pension contributions.
The on strike tick box is used to restrict tax refunds while on strike.
Alternatively you can enter the number of hours and a rate per hour, the calculated
salary will show in the Salary column. These details will also show on the payslip.
15
Lower down the screen you find the adjustments screen:
The description will be printed on the pay slip. The adjustment can be positive or
negative and can be taxable or not and NICable or not. Each adjustment by default is
for the starting month and every subsequent month, if it is only for the starting month
then tick the right hand box.
16
Tax Codes
Selecting the tax code button on the employee screen leads to:
Enter the starting month (usually 1) and the tax code and tick if it is a Week1/
Month1 basis. The What is paid convention is followed, once you have entered a
code it is used for the starting month and all subsequent months unless you enter a
new month and code underneath the first month. The separate boxes for Tax code
and the tick box are updated after you run the payroll, they represent the most
recently used information.
17
National Insurance codes and Directors and Starters
Selecting the NIC codes button on the employee screen leads to:
Enter the starting month (usually 1) and the NIC code. The What is paid
convention is followed, once you have entered a code it is used for the starting month
and all subsequent months unless you enter a new month and code underneath the
first month.
Directors
Information about directors is included here, this affects the calculation of NIC.
New members of staff.
Information about the previous employment of new members of staff is included
below, you can check the P45 data for tax already deducted in a previous
employment.
18
In year movements
Move down the employee screen to see:
And tick the box to get the next screen:
19
New employees will either bring a P45 or will sign a P46. Enter the appropriate
information for the employee or, lower down, the P46 information.
Select the necessary Prepare button for the internet return (either the P45 (3) or the
P46) and then the Submit button.
Leavers
You need to select the Prepare the P45 (1A) for the internet button and then Go to the
P45 screen and the following screens to print the P45.
NOTE: The P45s can be printed on plain A4 stationery following HMRC guidelines.
20
The Control Panel
Selecting the Control Panel button on the employee screen leads to:
You must first select a pay period with the up and down arrows and then the button
to calculate pay for this period or all periods from the start of the year up to the
selected period. The payroll process first removes any pay details previously
calculated and recalculates the pay.
The button Prepare payslips and the payroll summary report for all employees
works out the pay for the selected period, prepares a report and optionally prints the
payslips for all employees. Please remember to save the current employee first if you
have not already done so. If you have a mixture of weekly and monthly employees
you can use the new dropdown to select the appropriate category.
Payslips
The payslips are designed to be printed on special A4 stationery avail window. One
payslip is printer per page, the page is folded in two and the employee s address is
visible through the window. The stationery is referred to as Mastermailers, reference
MAILPAD or MAILPADF. The latter has a postal franking band and could be
posted.
QMS Ltd and its directors and staff do not have any financial interest in Econoprint.
21
A section of the payroll report is as follows:
The report shows department subtotals if appropriate.
22
Payroll and the End of year
Move to the employer screen:
Select the left hand arrowed sequence to prepare the following:
the P32 (note this can be done at any time during the year to produce
information about payments due to HMRC;
the P60s for all employees
the P35
Agents and employers must ensure that they submit accurate information in an
internet return. All the P60 details and the P35 summary must be valid.
If you are claiming the tax free incentive for internet filing remember to adjust the
employer s accounting profit appropriately when determining the profit for tax
purposes. The incentive is tax free!
The EOY service is available before 6 April; however it will be interrupted during the
change in tax year period, please check with HMRC.
23
Advice for P60s
This is particularly applicable if you are using the software to prepare and submit the
EOY return and using information from last year. If you are using the software for
day to day payroll you will already have done many of these tasks.
End of year users (ie users who have not used the day to day payroll) start by
retrieving each employer from last year and saving them, there is no need to retrieve
the employee information from last year as the standing information will be available
automatically. Open up each employee on the employee screen, make any changes to
the standing information and enter the financial information on the P60 screen. Please
do not include any CIS payments as employees earnings on the P60. You can exclude
employees from the return with a tick box at the bottom of the employee screen.
Please check especially the NINO and tax code; these are items which HMRC is fussy
about. NINOs must be AA111111B where the AA cannot be TN for temporary. The
B is a letter. There must be at least one NI table letter and earnings information on the
P60.
Advice for P35s
Please make sure the HMRC office and PAYE reference on the employer screen are
correct. The office is the first 3 digits and can change if a tax office is closed or
employers are transferred to another office. Please also select a payment frequency,
usually monthly or weekly.
Please prepare the P35 information using the appropriate option (see overleaf). You
will need to make some extra entries. At a minimum you will need to enter any NICs
and tax already paid in box 25 on page 3 of the P35. If you are entitled to claim the
any tax free incentive enter this in box 26. If you are not using the complete payroll
and are recovering SSP, please check the calculated entry in box 12. This is usually
calculated on a monthly basis in a complete payroll.
You will need to check the tick boxes on page 4 of the P35. After making any changes
please save the employer information, this will save any alterations to the P35 screens.
24
Preparing the EOY return
Complete payroll users follow the left hand path of P32/P60/P35. End of year users
follow the right hand path.
Select the option to prepare the EOY return. You will be prompted for the user id and
password and the location of the temporary file (usually the C:\My Documents
folder). The software reads the database for each employee and prepares the electronic
P14s and summary P35. The software may detect problems such as an invalid NINO
and will prompt you. You will have to correct any errors otherwise HMRC will reject
the return.
After you have prepared the return select this option to submit it.
25
The submit option opens Internet Explorer and our submit program and displays the
following:
Choose this option to submit the return. There will be a pause and you will see a
message about reading the Gateway at the bottom of the screen. Depending on the
Gateway s response you may get a warning about slow running, select No to continue.
We try 10 times to read the Gateway. If there is no response we stop.
If there was no response you should try again with this option. If the Gateway is very
busy you may have to try again after some time.
Note for older versions of Excel: you may not be able to see the screen above. Please
start Internet Explorer and open the submit_eoy_online2012 program and then
select the Send to Revenue button.
26
Sundry notes and details
You can access other sections of the payroll from the buttons on employee screen.
The following describes information on the various screens.
Different pay periods
If different employees have different pay periods e.g. weekly and monthly and work
for the same employer you will need to work out pay for each employee in turn, not
all together. This will prepare the P11, please remember to save the employee
information to the database. Return to the employer screen and choose the P32
option to prepare the P32 for the employer.
Director (previously employee) appointed during the year
HMRC recommends that a new P11 be started. The old P11 will have a leaving date;
the new P11 will have details of earnings in the previous job (i.e. prior to becoming a
director). You will need to distinguish the name of the employee (e.g. by adding
(Director) to the name). You will prepare two P60s at the end of the year. The first
will show the tax, earnings and NI prior to becoming a director. The second will
show the cumulative tax and earnings and also show the director s NI.
Director ceasing to be a director during the year but continuing as a paid
employee
HMRC recommends that a new P11 be started. The situation is the reverse of the
above.
Submitting returns by the Internet
HMRC recommends that both the electronic P35 and accompanying P14s be
submitted together, the Original Complete Submission method. We follow this
method. We also include all P14s in an uncompressed form; the compressed form is
primarily for employers who need to submit large numbers of P14s. There is an
overhead for the Revenue as the compressed information has to be uncompressed
before it is validated.
Holiday pay
We calculate holiday pay following HMRC s examples for weekly paid employees.
In particular we use Method B for calculating NICs, this uses the whole sum based on
the number of weeks it represents. We follow the suggested option number 1 (apply
the 3-weekly lower and upper earnings limits and earnings threshold to the total
payment and round the resulting NICs figures to the nearest penny, rounding down
exact amounts of ½p, in the normal way). Note that the revised earnings threshold
(for NIC) must be obtained from the annual value and is not just a simple multiple of
the weekly value. The lower and upper earnings limits are multiples of the weekly
values.
27
Statutory pay
SMP, SAP, SPP
The amount of statutory pay depends on average earnings prior to the period of
statutory payment. The payroll software calculates the average based on the payroll
history using the previous 8 weeks employment record. There may be situations
where the average cannot be calculated, for example where there is an incomplete
history or some of the payments were in an earlier year. Remember that average
earnings can affect the amount of SMP in the first 6 and subsequent weeks. You may
need to calculate average pay separately and enter the average figure on the
appropriate screen (SMP, SAP, SPP).
If you are backdating a pay rise which affects the calculation of average earnings
don t forget to re-calculate the average. This does not overwrite SMP which has
already been paid. However, SMP still to be paid (and recovered) will be increased to
take account of any past underpayment.
Employer s departments
You have the option to specify departments. Please add a department to the list on the
employer s screen. When you add an employee you can select a department. The
payroll will be summarised by department enabling you to prepare the appropriate
account entries for book-keeping purposes. If you don t use departments the payroll
report will show an overall total.
Pension contributions
The payroll allows you to make straightforward pension contributions either as a lump
sum or on a percentage basis. These can be ticked as tax deductible or not. More
complicated scenarios such as when an employee makes standard contributions to a
pension scheme and also makes Additional Voluntary Contributions are also possible.
In this case you should indicate the standard contribution next tot the salary entry box
and lower down the screen include the AVC as a negative adjustment to pay with an
appropriate description. Both contributions may or may not be deductible for tax and
both will appear on the payslip.
Paying Statutory Sick Pay (SSP) and cut off day for payments
SSP is included in the appropriate weekly payslip for weekly paid employment but
only up to a certain day of the week. For example, if someone is paid on Friday then
the days of sickness will be notified typically up to and including Thursday
immediately before the Friday. You must enter the day of the week, in this example
Thursday. The selected day can be the same as the pay day. Any sick days not
included in the first week s pay will be included in the following week s pay.
SSP is included in monthly payslips but only up to a certain number of days before
the end of the month. This can be zero or you can choose a number such as 5 days,
i.e. SSP for sickness in the last 5 days will not be included in the current month but in
the next month.
28
Sickness periods are entered lower down the SSP screen on the left hand side. The
payroll program will calculate PIWs, waiting days and entitlement to sickness. You
may need to enter the average weekly salary if there is insufficient payroll history to
calculate automatically.
You can select a different pattern of Qualifying days, the default is Monday to Friday.
29
Earnings orders
You must provide the following information. All orders require:
Start date
End date (if appropriate)
Date of issue (used to prioritise different orders)
Date of receipt (used to prioritise different orders)
Priority and non priority AEOs and DEOs need:
Initial amount
Amount in previous year (if appropriate)
The protected amount (may be 0)
The normal deduction
30