1
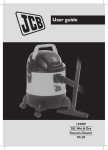
User guide 1400W 30L Wet & Dry Vacuum Cleaner 70341 1400W 30L Wet & Dry Vacuum Cleaner 70341 Thank you for purchasing this JCB product 2 JCB is a byword around the world for quality, innovation and success. With the application of stringent design parameters and utilising high performance, modern materials and manufacturing processes, your JCB product has been developed for optimum functionality and practical application. Used for the purposes for which it is intended, and with careful maintenance as outlined in this user guide, your JCB product will give years of trouble-free service. IMPORTANT Please read all of the product safety and operating instructions carefully before using this product. Please pay particular to all sections of this user guide that carry warning symbols and notices. WARNING! This is a Warning symbol. This symbol is used throughout the user guide whenever there is a risk of personal injury. Ensure that these warnings are read and understood at all times. CAUTION! This is a Caution symbol. This symbol is used throughout the user guide whenever there is a risk of damaging your JCB product. Ensure that these warnings are read and understood at all times. NOTE: Used throughout the user guide to provide additional information, hints and tips. Our products are continually monitored to comply with changing technical standards and requirements. The company reserves the right to alter design and specifications without prior notice. E. & O. E. errors and omissions exempted. Contents SAFETY INSTRUCTIONS . . . . . . . . . . . . . . . . . . . . . . . . . . . . . . . . . . . 4 Overview of the Appliance Components . . . . . . . . . . . . . 5 ASSEMBLY . . . . . . . . . . . . . . . . . . . . . . . . . . . . . . . . . . . . . . . . . . . . . . 6 DRY VACUUM CLEANING . . . . . . . . . . . . . . . . . . . . . . . . . . . . . . . . . 7 WET PICK-UP . . . . . . . . . . . . . . . . . . . . . . . . . . . . . . . . . . . . . . . . . . . 8 TOOLS AND ACCESSORIES . . . . . . . . . . . . . . . . . . . . . . . . . . . . . . 8-9 APPLIANCE OUTLET SOCKET . . . . . . . . . . . . . . . . . . . . . . . . . . . . . 9 STORAGE . . . . . . . . . . . . . . . . . . . . . . . . . . . . . . . . . . . . . . . . . . . . . . . 9 Maintenance . . . . . . . . . . . . . . . . . . . . . . . . . . . . . . . . . . . . . . . . . 10 TROUBLESHOOTING . . . . . . . . . . . . . . . . . . . . . . . . . . . . . . . . . . . . 10 ADDRESS AND HELPLINE NUMBER . . . . . . . . . . . . . . . . . . . . . . . 11 GUARANTEE . . . . . . . . . . . . . . . . . . . . . . . . . . . . . . . . . . . . . . . . . . . 12 3 SAFETY INSTRUCTIONS • Personal safety 4 • WARNING!: When using this vacuum cleaner, basic safety precautions, including the following, should be followed to reduce the risk of personal injury and material damage. Read all of this User Guide before using this vacuum cleaner. Children should be supervised to ensure that they do not play with the appliance, or stumble over the power cord. Product safety • CAUTION!: Never use the appliance without a filter being installed. • CAUTION!: Never use the appliance to vacuum hot ashes, large pieces of broken glass or sharp objects. • Never use in the presence of explosive liquid or vapours. • • Never pick up inflammable or poisonous liquids such as petrol, copier toner or other volatile substances. Use only JCB approved spare parts and accessories. • Never modify the cleaner in any way. • • Never pick up acids, asbestos or asbestos dust. • Never touch the plug or cable with wet hands. Do not plug a power tool or product into the appliance outlet socket Ó that has a wattage greater than the take-off wattage, ie. 1500W at 240VAC. • Unprofessional repairs can be dangerous for users. • The appliance must never be left running unsupervised. • This appliance is intended for domestic use only. • Misuse or use for commercial or any other purpose will render the guarantee invalid. • Always disconnect from the main supply after use or prior to emptying, cleaning or maintaining the appliance. • To protect against fire, electric shock and personal injury, do not immerse cord, plug or cleaner in water or other liquid. • This appliance is not intended for use by persons (including children) with reduced physical, sensory or mental capabilities, or lack of experience and knowledge, unless they have been given supervision or instruction concerning use of the appliance by a person responsible for their safety. Location • Do not use or keep this product outside. • Do not store the appliance near hot surfaces eg. ovens or heating appliances. Mains lead • Do not allow the mains lead to become strained or run this appliance over it. • If the electrical cable becomes damaged the cable assembly must be replaced. Do not attempt this task yourself, contact the Helpline number that is found on page 11. Electrical requirements • Check that the voltage on the rating plate of your appliance corresponds with your house electricity supply which must be A.C. (Alternating Current). • If the socket outlets in your home are not suitable for the plug supplied with this appliance the plug should be removed and the appropriate one fitted. • • Should the fuse in the 13 amp plug require changing, a 13 amp BS1362 fuse must be fitted. Children • Children do not understand the dangers associated with operating electrical appliances. Never allow children to use this appliance. WARNING!: The plug removed from the mains lead, if severed, must be destroyed, as a plug with a bared flexible cord is hazardous if engaged into a live socket outlet. Overview of the Appliance Components 6 5 10 4 7 1 8 9 2 21 5 16 17 11 14 15 22 18 23 2 13 19 3 20 12 1 Carry handle 13 ON/OFF switch 2 Motor housing 14 2 x castors 3 Float cage 15 Tank 4 Anti-crush hose 16 Clamps (x2) 5 Wet pick up / large particle floor nozzle 17 Connection for the anti-crush hose 6 2 x metal tubes with parking hook 18 2 position wheeled floor nozzle 7 Crevice tool 19 Hose handle with suction control valve 8 Upholstery nozzle 20 Power tool adaptor 9 Foam mesh filter 21 Appliance outlet socket with synchronised operation 10 Paper dust bag 22 Rear wheels 11 Pleated filter 23 Drain outlet 12 Float switch 22 ASSEMBLY 6 7. 1. Make sure that the appliance is not plugged in. 2. Hold the two clamps, which hold the motor housing in its position and fold them upwards A. 8. A 9. Firmly push the castors down until they lock into position, then turn the tank over. NOTE: Take care not to damage the tank by applying excess force. Fit the appropriate filter or bag. See later sections. Replace the motor housing on the tank E. E 3. Loosen the clamps and lift the motor housing up and out B. B 10. Hook the clamps into the motor housing and let them snap into place by pressing the clamps downwards F. F 4. Turn the tank over so that the motor housing is on the bottom. 5. Put the two rear wheels Ô in the side guides on the bottom of the tank C. C 6. 11. Screw the large end of the hose › on the front air intake stub Í on the tank G. G Put the two castors Á in the guides on the bottom of the tank D. 12. Place the hose handle Ï on the hose › by pushing it into place. D 13. Select a nozzle fi ‡ · Î or the two metal tubes fl and slide it over the suction tube › H. H DRY VACUUM CLEANING Pleated filter ‰ For dry vacuuming, when picking up large particles, the pleated filter may be used by itself, no dust bag is needed. After use, the filter may be gently brushed or tapped to remove dust. The pleated filter ‰ cannot be washed and should not be used for wet pick-up. Press it until it locates firmly into place all around the connector K. NOTE: Opening the bag out a little and bending the creases on the cardboard will ease the fitting. Take care not to damage the dust bag. K The product is supplied with the pleated filter ‰ fitted. To remove, eg. when using for wet pick-up, pull gently I. I Check the dust bag „ regularly and change it when it is 2/3 full. If fine dust has been picked up, the bag may need to be changed sooner as the pores of the bag may become blocked. The dust bag is not reuseable. Paper dust bag „ When picking up fine dust, we recommend the paper bag should be fitted in addition to the pleated filter. This stops the filter clogging and makes disposal of the dust easier. Do not use the paper bag for wet pick up. Fitting the paper dust bag NOTE: Don’t use the dust bag for vacuuming up objects with sharp edges or wet objects. Place the motor housing on the tank E and close the clamps F. Screw the large end of the hose on the front air intake stub Í on the tank G. Slide the paper dust bag „ over the hose inlet connection in the tank J. Make sure that the ON/OFF switch Ê on the appliance is in the “Off” position (position “0”) before you plug the power plug into the socket. J Plug the power plug into the socket. Switch the motor on (ON/OFF switch in position “I”). When you have finished vacuuming, switch the motor off by putting the ON/OFF switch Ê into the “OFF” position (position “O”). Unplug the power plug. 7 WET pick-up 8 NOTE: Never vacuum up hazardous materials. Foam mesh filter ‚ For wet pick-up, the foam mesh filter must be fitted. Make sure that the appliance is not plugged into the power mains. Check to make sure that the tank Ë is free of dust and dirt. Remove the paper dust bag „ and/or the pleated filter ‰. Slide the foam mesh filter ‚ L over the filter basket. L The contents of the tank can now drain out. Now, remove the motor housing from the tank B and pour the rest of the liquid into a suitable tank or drain. Then, you can continue vacuuming after you have replaced the motor housing E. After wet vacuuming, switch off the appliance and unplug it. Empty the container and clean/ dry it inside and outside. TOOLS AND ACCESSORIES Hose handle with suction control valve Ï Fit this between the hose and tubes. This gives additional length to the tube and allows control of the suction. Rotate the valve to open. With the valve open, the suction to the nozzle will be reduced making it easier to push. For maximum suction, have the valve fully closed. 2-position wheeled floor nozzle Î Use this nozzle for dry vacuum cleaning large areas of floor when the particles are small to medium sized. Place the motor housing on the tank once again E and close the clamps F. NOTE: If you want to vacuum up a large quantity of liquid from a sink or a tank, please don’t put the entire suction nozzle in the liquid; rather leave a little space so that some air can also be drawn in along with the liquid. The appliance is equipped with a float switch  that will stop the vacuuming when the tank is full. You will notice that suction has stopped by the motor now running faster. In this event, switch the appliance off and unplug it. Be aware that the full tank can be very heavy. In this event, place the appliance over a drain and carefully open the outlet screw M. M Use with the brushes down on hard floors and up on carpets. Press the foot pedal to lower or raise the brushes as required. Wet pick-up/large particle nozzle fi Use this nozzle, with the brushes and flexible strip attached, for wet vacuum cleaning floors. When picking up larger particles, the brush and flexible strip section of the nozzle may be removed by pressing the clips at either end of the nozzle. Upholstery nozzle · This may be used with either wet or dry vacuuming and is intended for smaller areas such as furniture. Crevice tool ‡ This may be used with either wet or dry vacuuming and is useful for small gaps and when high spot suction is required. Anti-crush hose › Avoid picking up very large particles, especially when using the hose without a nozzle, as these may become trapped in the hose. Two metal tubes with parking hook fl 4 7 8 The two metal tubes simply push together. The lower tube has a parking hook so that the hose/tube assembly can be parked during use. The parking hook slots into the U clip on the motor housing. The parking hook position on the tube is designed to suit the 2-position floor 6 nozzle, however the position of the parking hook may be adjusted to suit the other nozzles if required. Connect the vacuum hose to the machine’s suction supports (use the power tool adapter supplied Ì, other suitable adapters are available from your local dealer or DIY store). Loosen the two screws and slide to new position and then re-tighten the screws. Plug-in the vacuum cleaner. Power tool adaptor Ì Use the adaptor to connect the hose to the dust outlet tube of the power tool. 5 1 11 Ì 12 9 O Switching off: turn on/off switch to position “0”. 2 3 Switching on: turn on/off switch to position “A” O. The adaptor is suitable for three sizes of outlet: 27mm, 33mm and 35mm. 14 13 Connect the machine to the outlet of the 10 vacuum cleaner. appliance outlet SOCKET WITH SYNCHRONISED OPERATION 18 Power tools such as jigsaw or circular saws up to a maximum of 1500W can be connected directly to the appliance outlet socket Ó on the vacuum cleaner N. This will control the cleaner suction motor so that it switches on and off with the operation of the power tool. CAUTION!: If a power tool or appliance with a wattage greater than 1500W is connected and switched on, the vacuum cleaner plug fuse will blow. Switch on the electric tool and let it run for a16 short time at high speed. The vacuum cleaner will switch on automatically after a short time and will vacuum up the dust and shavings while 15 you work. 17 Delayed shut-off After switching off the electric equipment, the vacuum cleaner will run for a while and vacuum 19 and the vacuum hose free of dust the machine and shavings. Storage The tools and accessories may be stored on the storage section at the rear of the product P. P N To store the 2-position wheeled floor nozzle, attach to the lower tube and then place in the parking position. 9 19 Maintenance 10 Remove the mains plug before carrying out any maintenance. After using for wet pick-up, empty the container, wash the foam mesh filter ‚ (in clean cool water) and leave the container open to fully dry before re-assembling. With the filter removed, regularly check the operation of the float. This must be able to move freely to shut-off the suction when the maximum quantity of water is picked up Q. Q Troubleshooting Problem Possible causes Possible solutions Poor suction Pleated filter clogged Gently brush clean or replace Dust bag clogged (Note: fine dust may clog the pores of the bag even if it does not appear full) Replace bag Float shut-off valve has operated. This operates when the maximum quantity of water has been reached but it may also operate if the cleaner is knocked over Switch the product off and empty or if the product has been knocked over, return the product to upright Blockage in hose, tubes or nozzle Check for blockage and remove Water escapes from the exhaust When picking up a large volume of liquid do not fully immerse the nozzle in the liquid, allow some air intake to ensure correct operation of the float valve Float valve is jammed by obstruction Check operation of valve, ensure foam mesh filter is fitted correctly Dust escapes from exhaust Check condition of the bag and pleated filter Replace if necessary No power The plug fuse has blown because a power tool with a wattage greater than 1500W has been used in the socket Replace the 13 amp fuse in the plug. Only use tools with a wattage rating less than 1500W HELPLINE ADDRESS If you have any difficulty with your appliance, do not hesitate to call us. JCB. Mexborough, South Yorkshire, England, S64 8AJ We are more likely to be able to help than the store from where you bought it. Please have the following information ready to enable our staff to deal with your query quickly. • Name of the product • Model number as shown on the rear of the appliance • Serial number as shown on the rating label UK Helpline and Replacement Parts: 0844 871 0961 11 Guarantee Exclusions JCB shall not be liable to replace or repair the goods under the terms of the guarantee where: 12 It is important to retain the retailer’s receipt as proof of purchase. Staple your receipt to this back cover for future reference. Please quote the following information if the product develops a fault. These numbers can be found on the base of the product. 1. The fault has been caused or is attributable to accidental use, misuse, negligent use or used contrary to the manufacturer’s recommendations or where the fault has been caused by power surges or damage caused in transit. 2. The appliance has been used on a voltage supply other than that stamped on the products. 3. Repairs have been attempted by persons other than our service staff (or authorised dealer). 4. Where the appliance has been used for hire purposes or non domestic use. 5. JCB are not liable to carry out any type of servicing work, under the guarantee. 6. The guarantee excludes consumables such as bags and filters. • This guarantee does not confer any rights other than those expressly set out above and does not cover any claims for consequential loss or damage. This guarantee is offered as an additional benefit and does not affect your statutory rights as a consumer. Model no. Serial no. All JCB products are individually tested before leaving the factory. In the unlikely event of any appliance proving to be faulty within 28 days of purchase, it should be returned to the place of purchase for it to be replaced. If the fault develops after 28 days and within 3 years of original purchase, you should contact the Helpline number quoting Model number and Serial number on the product, or write to JCB at the address shown. You may be asked to return a copy of proof of purchase. Subject to the exclusions set out below, the faulty appliance will then be repaired or replaced and dispatched usually within 7 working days of receipt. If you suspect a fault, follow the simple checks detailed below before retrying the appliance or calling the helpline. • Replace bag. • Check the tools / tubes / hose for blockages. For electrical products sold within the European Community. At the end of the electrical product’s useful life, it should not be disposed of with household waste. • Check the plug is firmly in the socket. • Check the socket is working by trying another appliance. Please recycle where facilities exist. Check with your Local Authority or retailer for recycling advice in your country. • Check the fuse in the plug. This JCB product is intended for household use only. If for any reason this item is replaced during the 3 year guarantee period, the guarantee on the new item will be calculated from the original purchase date. JCB has a policy of continuous improvement in product quality and design. The company, therefore, reserves the right to change the specification of its models at any time. Therefore it is vital to retain your original till receipt or invoice to indicate the date of initial purchase. JCB is used under license. To qualify for the 3 year guarantee, the appliance must have been used according to the instructions supplied. VC70341 MUK Rev1 09/10