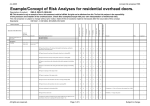
1
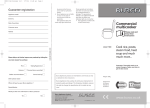
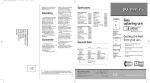
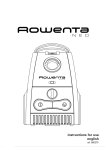
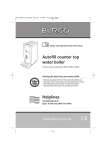
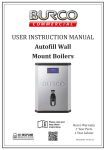
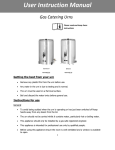
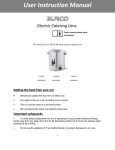
76100 Rev 2
8/12/05
8:49 AM
Page 1
Guarantee registration
Appliance model
Serial no.
Date of purchase
Customer name
Address
one main reason for purchase
Price
■
Styling/Appearance
■
Features
■
Previous Burco ownership
■
Dealer recommendation
■
Service back-up
■
Other (please state)
Where did you buy your Burco appliance ?
Dealer/Retailer
If you do not want Burco to keep you informed of future products
and offers, please tick here
■
CUT HERE & DETACH
Please help us to further improve our products by ticking the
76100 Rev 2
8/12/05
8:49 AM
Page 2
Burco Appliances products are intended for commercial use only
as detailed in these instructions.
Burco Appliances has a policy of continuous improvement in
product quality and design. The Company, therefore, reserves
the right to change the specification of its models at any
time.
Burco Appliances Limited
A MEMBER OF THE GLEN DIMPLEX GROUP
Talbot Road, Mexborough,
South Yorkshire, S64 8AJ
Tel 01709 577120 Fax 01709 579905
Email [email protected]
CP76100MUK Rev 2 11/05
76100 Rev 2
8/12/05
8:49 AM
Page 3
Portable hand wash unit
Please read and keep these
instructions
Model 76100
Dimensions
H1010mm, W400mm, D430mm
10 litre capacity
Approx 50 handwashes
Getting the best from your unit...
•
•
•
A residual current device (RCD) should be used with this unit.
It is important to descale as the performance of the unit will be
impaired.
Always put water in the unit before using.
0870 1676648
www.burco.co.uk
76100 Rev 2
8/12/05
8:49 AM
Page 4
Mains cord
Important safety
instructions
•
The use of any electrical appliance
requires following common sense
safety rules.
Primarily there is danger of
personal injury and secondly danger of
damage to the appliance and
property. These are indicated in the
instructions text by the following two
conventions:
•
Children
WARNING: Danger of
personal injury
•
IMPORTANT: Damage to the
appliance
In addition we offer the following
essential safety advice.
•
•
The unit should only be operated
on a flat, level surface.
The unit should only be operated
on a dry surface avoiding any
possibillity of water ingress into
the lower electrical compartment.
Personal safety
•
•
Children do not understand the
dangers associated with operating
electrical appliances. Never allow
children to use this appliance.
Other safety
considerations
Location
•
If the mains cord or plug of this
unit is damaged it must be
replaced by the manufacturer.
Contact our service helpline for
assistance.
Always switch off and disconnect
the unit from the mains when not
in use or when cleaning.
•
WARNING: The unit should
not be lifted or moved whilst
connected to the mains.
WARNING: To prevent any
risk of electrocution do not
immerse the unit in water or
any other liquid when
cleaning and do not allow
any water or liquid to come
into contact with any of the
electrical connections or
controls.
•
•
•
2
Do not operate with a damaged
lead or plug, or after an appliance
has malfunctioned, or has been
dropped or damaged in any way.
Contact Burco Appliances for
advice on examination, repair, or
electrical or mechanical
adjustment.
Do not dismantle any part of the
unit. Responsibillity cannot be
accepted if this instruction is
ignored.
This appliance must only be used
for hand washing, it is not
intended for dish washing.
Maintenance other than cleaning
should be performed by the
manufacturer while this product is
within guarantee (contact our
service helpline) or otherwise by a
qualified service engineer.
Unplug from the mains outlet
when not in use and before
cleaning.
76100 Rev 2
8/12/05
8:49 AM
Page 5
Guarantee
This electric portable handwash
unit is guaranteed for a period of 12
months from the date of purchase
against defective materials or faulty
workmanship.
This guarantee is given subject to
the unit being used in accordance with
the instructions of the supply voltage
marked on it and to the usual fair wear
and tear conditions.
The guarantee does not cover
consequential damage arising out of
any failure acceptable under
guarantee, nor does it cover damage
resulting from misuse, accident or
unauthorised alterations to the unit.
Proof of purchase will be required.
In any communication with the
manufacturer, it is essential to quote
the model and serial number marked
on the rating plate.
This guarantee, in no way
diminishes the buyer’s statutory rights.
Please fill in and return the tear
off section to register the guarantee
with Burco.
7
Marketing Department
Burco Appliances Ltd
Talbot Road
Mexborough
South Yorkshire
S64 8AJ
CUT HERE & DETACH
Page 6
8:49 AM
8/12/05
76100 Rev 2
Affix
postage
stamp
here
76100 Rev 2
8/12/05
8:49 AM
Page 7
Electrical
requirements
The RCD must be plugged directly
into the socket and the appliance
plugged directly into the RCD.
Check that the voltage on the
rating plate of your appliance
corresponds with your electricity
supply which must be A.C. (Alternating
Current).
If the socket outlets are not
suitable for the plug supplied with this
appliance, the plug should be removed
and the appropriate one fitted.
Features
WARNING: The plug removed
from the mains lead, if severed,
must be destroyed as a plug with
bared flexible cord is hazardous if
engaged into a live socket outlet.
WARNING: This appliance
must be earthed.
fi
fl
⁄
¤
‹
›
‡
·
‚
„
‰
Should the fuse in the 13A plug
require changing, a 13A BS 1362 fuse
must be fitted.
A residual current device (RCD)
should be used with this unit.
Waste bucket and lid (inside)
Water spout
Sink bowl
Latches holding top and
bottom sections together.
Handle(s)
Stainless steel tube(inside the
unit)
Wheels (on back left and
back right of unit)
Overflow
Infra red housing
Upper section
Lower section
A
¤
fi
‹
fl
„
⁄
›
‰
·
‡
‚
3
76100 Rev 2
8/12/05
8:49 AM
Page 8
Preparation
Filling
1 Remove any plastic film
before using the unit.
2 Check that the voltage
shown on the rating plate is
suitable for your supply.
3 Only use on a flat, level
surface.Only use on a dry
surface.
4 When moving unit, please
use side handles.
1 To fill, release the catches
situated either side of the
handwash that secure the
upper section to the lower.
Lift the upper section until it
is clear of the lower section
noting two cutouts in the
bottom edge.
These are to be
positioned on
the left hand
side of the
rolled edge of
the lower
container giving it a resting
position and allowing hands
Using
IMPORTANT: Always put
water in the unit before
switching on.
1 Lift out the bowl by the edges
raising it off the upper
section and sliding it up the
water spout. When it is high
enough, rotate the bowl and
tap to the right (anticlockwise) until it is clear of
the opening of the upper
section.
2 Lift out the waste container,
free access for filling.
2 Pour clean potable water into
the lower
section. Never fill beyond the
MAX fill mark (10L) otherwise
water will flow out of the
overflow.
3 When filled with the desired
amount of water lift the
upper section and replace it
on the lower section. (Both
container seams should be
lined up). Failure to correctly
align these sections will result
in difficulty latching the two
parts together and may
damage the latches
themselves.
4 Relatch the catches ensuring
the wire retainers are
situated above the cleat on
remove the lid and check to
see that it is empty. This
container must be empty
before use otherwise there is
a chance of over filling.
3 Replace the waste container
in the top section and
replace the bowl, reversing
the process used when lifting
it, ensure that it is fitted
snugly back in place.
4
76100 Rev 2
5
6
7
8
8/12/05
8:49 AM
Page 9
the upper section. Be careful
to avoid catching any part of
yourself when this catch
snaps into place.
Plug into the supply and the
NEON light will illuminate to
indicate power to the unit.
Put your foot into the black
plastic moulding located at
the bottom of the unit to
operate the handwash.
Run the hand wash two
cycles. This will prime the
pump. No water will be
disperssed until this is taken
place.
The unit takes approximately
15 mins to reach full
temperature.
The unit is then ready for
operating.
2 When the water stops
dispensing from the nozzle
when activated, the lower
tank may be empty and the
unit should be switched off.
(Remove the plug from the
socket). If there is water
remaining in the lower
section please check that the
hose is securely attached to
the upper section pipe. See
cleaning and descaling. If
neither of these actions
resolve the problem, please
call our helpline.
3 Remove the sink bowl and
empty the waste container
(as previously instructed).
IMPORTANT: It is essential
that this is carried out before
re-filling the lower container.
4 Replace the sink bowl and
refill the lower container as
previously instructed.
Hand
Washing
1 To operate place your foot
momentarily into the black
plastic moulding at the front
of the lower unit. This
activates an infra red beam,
which in turn pumps water
out of the water dispensing
nozzle for a period of
approximately 7 seconds.
The operation can be
repeated by momentarily
putting your foot back into
the plastic moulding once
the previous pouring has
stopped.
After use
Switch off (disconnect from
the mains) and empty waste
container as previously
instructed.
Protective
cut-out
The heating element is fitted
with a thermal cut-out which
protects the handwash unit from
damage, if it is allowed to boil
5
76100 Rev 2
8/12/05
8:49 AM
Page 10
dry or is switched on without
water. The cut-out re-sets
automatically as the boiler cools
off.
In order to ensure correct
operation of this cut-out it is
essential to keep the heating
element free from scale. Failure
to do this will result in the cut-out
operating before the water has
heated.
release the lock ad allow
pipes from upper and lower
sections to seperate.
• Release catches and separate
upper and lower
sections.Note: Never clean
the unit when it is still hot wait for it to cool completely
to avoid any chance of burns.
To fully remove the upper
section from the lower
section open them as for
filling.
IMPORTANT: To descale, we
recommend you use the
Cleaning and
descaling
•
•
•
Lift out the bowl by the
edges raising it off the upper
section and sliding it up the
water spout.
When it is high enough,
rotate the bowl and tap to
the right(anti-clockwise) until
it is clear of the opening of
the upper section.
Locate the quick release
fitting, this is the large white
plastic section joining two
steel pipes.
•
proprietary descaler which is
especially made for water
boilers. Follow the
manufacturers instructions,
and then operate the water
boiler with just water 3 times
before use.
Do not use the water boiler
descaler unless the
manufacturer specifically
states it is suitable for water
boilers.
IMPORTANT: Failure to descale
will invalidate your
guarantee.
Ensure that the bezel is
unscrewed to its fullest
extent.
• Grip the white fitting and pull
the plastic ring at the bottom
of the fitting towards the
body of the plastic joint
firmly.
• While these two parts are
pulled together this will
6