1
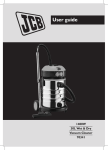
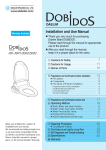
62640 BurcoGasBoiler-ib
26/5/06
10:37 am
Page 1
appliance, providing that the
cleaning instructions have
been carried out.
Descaling
Marketing Department
Burco Appliances Ltd
Talbot Road
Mexborough
South Yorkshire
S64 8AJ
In hard water areas scale
will form inside the urn. This
will adversely affect the
operation of the urn if
allowed to accumulate.
Descaling can be simply
achieved by using a
proprietary descaler. Choose
one recommended for
stainless steel kettles. It is
important to follow the
instructions given on the
descaling solution carton.
IMPORTANT Failure to
descale will invalidate your
guarantee.
Guarantee
This appliance is
guaranteed for a period of 12
months from the date of
purchase against defective
materials or faulty
workmanship.
This guarantee is given
subject to the urn being used
in accordance with the
instructions on the supply
voltage marked on it and to
the usual fair wear and tear
conditions.
The guarantee does not
cover consequential damage
arising out of any failure
acceptable under guarantee,
nor does it cover damage
resulting from misuse,
accident or unauthorised
alterations to the urn.
In any communication
with the supplier or
manufacturer, it is essential
to quote the serial number
marked on the urn.
Proof of purchase will be
required.
In any communication
with the service department,
it is essential to quote the
model and serial number
marked on the base of the
urn.
This guarantee, in no way
diminishes the buyer’s
statutory rights.
Please fill in and return
the tear off section to register
the guarantee with Burco.
Spare parts
Burco catering urn
Description
Part no.
Burner
Lid assembly
Injector Amal 120
Foot
Flame failure valve
Thermocouple
Catering tap
Upper tap assembly
58759
59062
56479
00868
58762
58765
53586
59728
Burco catering urn deluxe
Description
Part no.
Gas valve
Control knob
Lid assembly
Catering tap
Upper tap assembly
Burner
Electrode
Injector Amal
Thermocouple
36 litre urn
Description
Part no.
Burner
Lid assembly
Injector
Leg
Gas valve
Control knob
Thermocouple
Safety tap
Upper tap assembly
Electrode
56474
58906
50842
59890
62507
62508
58765
62582
62583
53801
62507
62508
59062
53586
59728
56474
53801
56479
58765
Gas
catering urn
Please read and
keep these
instructions
20 litre urn
H560mm
W340mm
D340mm excl tap
6.5kg
General data
Must be left with the user
Getting the best
from your urn...
• Boil and discard the water twice
before general use
Dimensions
Height
Width
Depth
Weight Empty
Full
Heat input
Injector
Pressure setting
I3+
I3P
• Any water in the urn is due to testing
and is normal
20 litre
36 litre
560mm
340mm
340mm excl tap
6.5Kg
26.5Kg
3.5Kw
AMAL 120 LP,
730mm
420mm
420mm excl tap
6.3Kg
42.3Kg
4.5Kw (320 g/h)
Bray Cat 960
36 litre urn
H730mm
W420mm
D420mm excl tap
6.3kg
• The urn must be used on a flat level
surface
• Remove any plastic film from the urn
before use
(28-30)/37mbar
37mbar
Affix
postage
stamp
here
Our policy is one of continuously seeking ways of improving
our products, therefore the Company reserves the right to change
the specification of items at any time.
5
Burco Appliances Limited
A MEMBER OF THE GLEN DIMPLEX GROUP
Talbot Road, Mexborough,
S64 8AJ
Tel 01709 577 120 Fax 01709 587 510
Email [email protected]
Part Number 62640
www.burco.co.uk
26/5/06
Instructions
for use
General
•
In the event of a
suspected gas leak
immediately turn off the
gas supply. Do not search
for a leak with a match
or naked flame. Consult a
Corgi registered gas
engineer.
• The boiler is not suitable
for boiling liquids other
than water. If the water is
being boiled for tea or
coffee, it is best to
prepare the drink in
another container.
• Parts that are protected
by the manufacturer or
their agent are not to be
adjusted by the installer.
• If the burner fails to
remain alight, wait 3
minutes before
attempting to re-light.
• A full capacity 20 litre
boiler filled to the max.
Page 5
line will take
approximately 45-50
minutes to boil from cold
on the high setting.
• A full capacity 36 litre
boiler filled to the max.
line will take
approximately 70-80
minutes to boil from cold
on the high setting.
• Do not fill above the
‘MAX’ capacity mark.
Warning If the urn is over
filled there is a risk that
boiling water may be ejected.
Before first use
1 Wipe all external surfaces
with a damp cloth.
2 Clean the urn twice before
use. Fill the urn to the
MAX line with a weak
detergent solution, boil,
drain, and thoroughly
rinse with clean water.
Lighting the boiler
Burco urn
1 Turn on the gas supply at
the bottle or service tap.
2 Apply lighted match or
taper to the flash tube
'light here'. Depress the
button on the flame
supervision device.
3 After the burner has lit
continue to depress the
flame supervision device
for 20 seconds until the
flame is established.
Burco urn deluxe
1 Depress the control knob
and turn slowly to the
ignition position. A click
will be heard and the
burner will light. Several
attempts may be
necessary after initial
installation.
2 Continue to depress the
2
control knob for 20
seconds after the burner
has lit.
3 Release the control knob.
The required setting can
now be selected between
the high and low settings.
minimum clearance of
300mm is required from a
shelf or ceiling.
burner/controls tray to the
boiler case. The burner and
controls assembly can now be
removed for servicing.
Gas connection
36 litre urns
1 Unscrew the urn from its
Burco Urn Deluxe and 36
litre
Installation
• Fixed ventilation and an
openable window must be
provided to the room in
which the boiler is to be
used.
• The installation should be
in accordance with the
current Gas Safety
Installation and Use
Regulations and Health
and Safety at Works Acts.
• Prior to installation ensure
that the local distribution
conditions (Nature of Gas
and Gas pressure) and the
adjustment of the
appliance are compatible
(the adjustment
conditions are stated on
the the data plate).
• The installations should
comply with the relevant
requirements of British
Standards BS6173,
BS6891, BS5472 parts 1,
2, 3; BS5482 parts 1, 2, 3
and BS3212.
The boiler should be
securely screwed down onto
a flat surface. The gas
connection is 8mm O.D. pipe
and suitable compression
fitting is required to complete
the installation. Turn on the
gas and check the
installation for soundness.
Burco catering urn
The gas connection is
made using flexible hose
(8mm I.D.) complying with
BS3212 1991 to either the
bottle governor or to a tap
fitted at the end of a rigid
pipework assembly. The gas
bottle, or isolation tap, must
be located close to the urn so
that it is possible to turn on
the gas and light the urn
safely. Turn on the gas and
check the installation for
soundness.
Burco urn Deluxe
The urn should be located
on a flat level surface. 20 litre
boilers should not be
positioned closer than
100mm from side walls, 36
litre unit requires 150mm. A
Unscrew the boiler from
its mounting, remove any
residual water and turn
upside down. Slacken the 3
screws securing the legs to
the base plate and remove
the 3 screws securing the
To remove base tray
1 Disconnect the
thermocouple from the
tap
2 Turn boiler upside down
3 Remove base tray
THERMOCOUPLE
1 Remove the thermocouple
from its mounting bracket
2 Fit new thermocouple to
Thermocouple
bracket
Before servicing turn off
and disconnect the gas
supply. After servicing check
appliance for soundness.
To remove the burner
controls tray
Burco catering urn
mounting bracket as
shown.
3 Thread the thermocouple
Servicing
Location
mounting if applicable.
Remove any residual
water and turn upside
down.
2 Pull off the control knob.
3 Remove the triangular
base from the urn legs.
4 Slacken the 3 screws
securing the legs to the
burner tray and remove
the 6 screws holding the
legs to the boiler case. The
burner and controls tray
can now be removed for
servicing.
Thermocouple
through the hole in the
base tray and replace the
tray.
4 Route the thermocouple
to the tap taking care to
avoid sharp bends. Ensure
there is a clearance from
the floor.
TAP ASSEMBLY
1 Remove the tap bracket –
3
keep screws, nuts and
washers for future use.
2 Unscrew tap assembly
from burner. The
individual components
can now be exchanged as
required.
Guarantee registration
BURNER ASSEMBLY
1 Remove the tap assembly
2 Slacken the internal
Serial no.
Appliance model
Date of purchase
locknut and remove the
external ferule on the
flash tube. The burner
assembly can now be
removed and component
parts replaced.
Customer name
Address
Servicing
To ensure the long life of
your boiler we recommend
servicing. If service is required
contact your local Corgi
approved agent.
Cleaning
Water may be left in the
boiler for a short period but
to maintain a supply of fresh
water it should be emptied
periodically and cleaned out.
Turn off the gas before
cleaning and allow the urn to
cool.
IMPORTANT Do not use
any abrasive cleaning fluids
or materials.
1 Wash out the urn. Use
clean water and a soft
cloth.
2 Brush any scale or
sediment from inside.
3 Rinse thoroughly.
4 The outer surface should
be cleaned with a warm
weak detergent solution
and soft cloth.
Note: If in the course of
time discolouration of the
boiler pan occurs, this is in no
way detrimental to the
4
CUT HERE & DETATCH
• To avoid being scalded
when the urn is operating
or has just been switched
off keep hands away from
any steam from the lid.
• The urn should not be
carried whilst it contains
water, particularly hot or
boiling water.
• This appliance should
only be installed by a
Corgi registered gas
engineer.
• This appliance is intended
for professional use only
by qualified people.
• Before using this
appliance ensure the
room is well ventilated
and an openable window
is available.
10:37 am
42mm
62640 BurcoGasBoiler-ib
Please help us to further improve our products by ticking the
one main reason for purchase
Price
Features
Dealer recommendation
n
n
n
Styling/Appearance
Previous Burco ownership
Service back-up
n
n
n
Other (please state)
Where did you buy your Burco appliance ?
Dealer/Retailer
Would you like more information on Burco products?
Yes
n
No
n